Switch Interface Statistics and Diagnostics on the 200/300 Series Managed Switches
Available Languages
Objectives
As the administrator of the network, it is good practice to check the behavior of the interfaces on a switch. Good maintenance is key in the performance of a network. With the 200/300 Series Manged Switches, you can check how many packets are being sent through an interface and in which form.Furthermore, if an interface has problems, you can perform a diagnostic test on the cable that is plugged on that interface to see its status. With this information in hand you can make better decisions when it comes to troubleshoot an interface. This article explains how to check the statistics of an interface and also how to perform a copper test on an interface on the 200/300 Series Managed Switches.
Applicable Devices
- SF/SG 200 and SF/SG 300 Series Managed Switches
Software Version
- 1.3.0.62
Interface Statistics
Step 1. Log in to the web configuration utility and choose Status and Statistics > Interface. The Interface page opens:
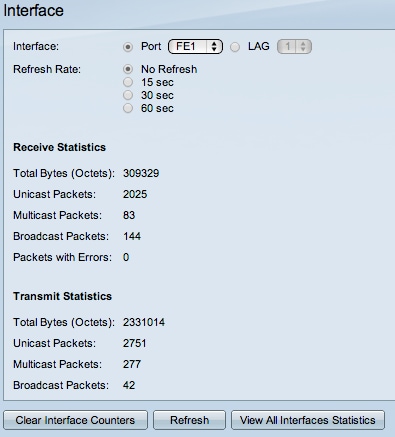
Step 2. In the interface field, click one of the following:
Step 3. In the Refresh Rate field, click one of the following:
Good packets are exactly the same as the user sends and no data is lost and there is no error in the data, but bad packets contain errors and the information sent and received is not accurate as always. The Receive Statistics section shows the following information:
The Transmit Statistics section shows the following information:
- Port — To analyze a port. Choose from the drop-down list the port that you wish to analyze.
- LAG — To analyze a Link Aggregation Group (LAG). Choose from the drop-down list the LAG that you wish to analyze. A LAG combines individual interfaces into a single logical link, which provides an aggregate bandwidth of up to eight physical links
- No refresh — The information about the interface that will not refresh with new information.
- 15 sec — The information about the interface refreshes every 15 seconds.
- 30 sec — The information about the interface refreshes every 30 seconds.
- 60 sec — The information about the interfaces refreshes every 60 seconds
- Total Bytes (Octets) — Displays the number of octets received, which includes the number of bad packets and the FCS (Frequent Check Sum) octets. The FCS checks if the validity of a frame.
- Unicast Packets — Displays the information about the number of good unicast packets received. A unicast is a one-to-one connection between two users.
- Multicast Packets — Displays the information about the number of good multicast packets received. A multicast is one-to-many connection between one and one or more users.
- Broadcast Packets — Displays the information about the number of good broadcast packets received. A broadcast is a connection between one to all the members that belong to a network segment.
- Packets with Errors — Displays the information about the number of packets with errors received. These packets can be unicast, multicast, or broadcast that during the transmission got corrupted or dropped.
- Total Bytes (Octets) — Displays the number of octets transmitted, which includes the number of bad packets and the FCS (Frequent Check Sum) octets.
- Unicast Packets —Displays the information about the number of good unicast packets transmitted.
- Multicast Packets — Displays the information about the number of good multicast packets transmitted.
- Broadcast Packets —Displays the information about the number of good broadcast packets transmitted.
Step 4. (Optional) To clear all the counters of the displayed, interface click Clear Interface Counters.
Step 5. (Optional) To clear all the counters of all the interfaces, click Clear All Interfaces Counters .
Copper Test
Step 1 Log in to the configuration utility and choose Administration > Diagnostics > Copper Test. The Copper Test page opens:
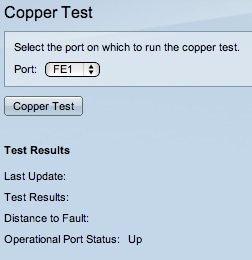
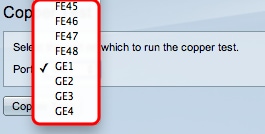
Step 2. From the Port drop-down list, choose the port you wish to perform the copper test on.
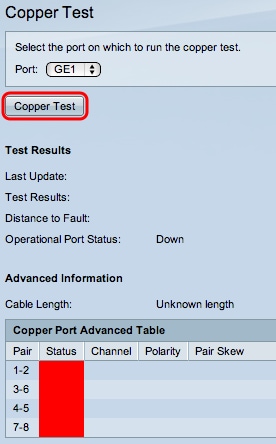
Step 3. Click Copper Test. A warning window appears.

Step 4. Click OK.
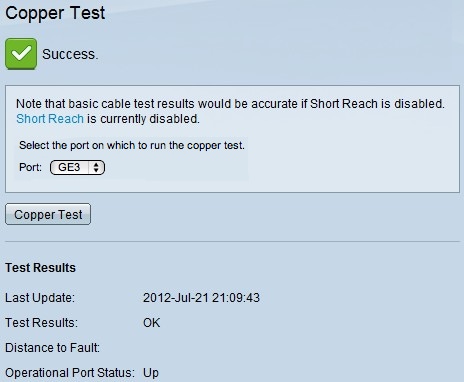
The Test Results section shows the following information about the test performed:
- Last Update — Displays the date and time the port was last tested.
- Test Results — Displays the results of the tested connection. The following are the possible results:
– OK — The cable passed the copper test.
– No Cable — No cable is connected to the port.
– Open Cable — The cable is only connected on one side of the connection.
– Short Cable — A short circuit occurred during the test.
– Unknown Test Result — A general error occurred.
- Distance to Fault — Displays where along the connection a fault was discovered.
- Operational Port Status — Displays whether the port is up or down.
Revision History
| Revision | Publish Date | Comments |
|---|---|---|
1.0 |
13-Dec-2018
|
Initial Release |
 Feedback