Creation and Management of Secure Sensitive Data (SSD) Rules on 200/300 Series Managed Switches
Available Languages
Objective
This article shows you how to setup and manage rules for Secure Sensitive Data (SSD) on the 200/300 series switches.
Applicable Devices
• SF/SG 200 and SF/SG 300 Series Managed Switches
Software Version
• v1.2.7.76
SSD Rules
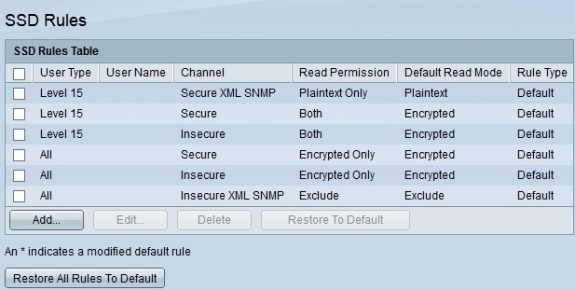
Step 1. Log in to the web configuration utility and choose Security > Secure Sensitive Data Managment > SSD Rules. The SSD Rules page appears.

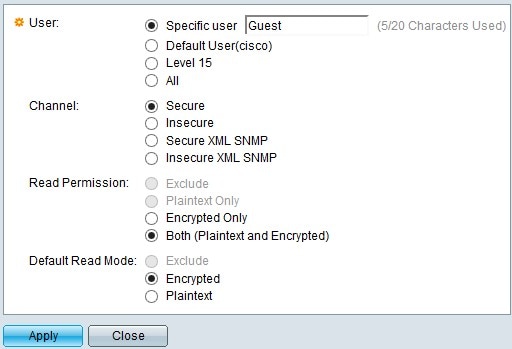
Step 2. To create a new rule, click Add. The Rule Definition page opens.

Step 3. In the User field, select a radio button to choose which user(s) to apply the rule to.
• Specific User — Enter the specific user name into the field if the rule applies to a single user.
• Default User —. This rule applies to the default user, which is set to cisco.
• Level 15 — This rule applies to all users with level 15 privilege.
• All — This rule applies to all users.
Step 4. In the Channel field, choose a radio button to determine which channel(s) to apply the rule to.
• Secure — Makes this rule only apply to secure channels. This includes console, SSH, and HTTPS, but not XML channels.
• Insecure — Makes this rule only apply to insecure channels. This includes Telnet, TFTP, and HTTP, but not XML channels.
• Secure XML SNMP — Makes this rule only apply to XML over HTTPS with privacy.
• Insecure XML SNMP — Makes this rule only apply to XML over HTTP or without privacy.
Step 5. In the Read Permission field, select a radio button depending on your previous selections.
• If, in Step 3, you chose Level 15 or All, click either Exclude or Plaintext Only.
• If, in Step 4, you chose Secure XML SNMP or Insecure XML SNMP, click either Exclude or Plaintext Only.
• If, in Step 4, you chose Secure or Insecure click either Encrypted Only or Both (Plaintext and Encrypted).
Step 6. In the Default Read Mode field, click Exclude, Encrypted, or Plaintext.
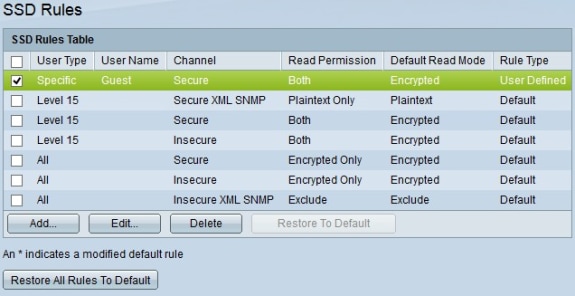
Step 7. To activate the rule, click Apply. To cancel the rule creation, click Close.

Revision History
| Revision | Publish Date | Comments |
|---|---|---|
1.0 |
11-Dec-2018
|
Initial Release |
 Feedback