Downloadable ACL in Catalyst 1300 Switches
Available Languages
Objective
The objective of this article is to demonstrate how the downloadable Access Control List (DACL) works on Cisco Catalyst 1300 switches with Cisco Identity Service Engine (ISE).
Applicable Devices | Software Version
- Catalyst 1300 series | 4.1.6.54
Introduction
Dynamic ACLs are ACLs assigned to a switch port based off a policy or criteria such as user account group membership, time of day, and more. They could be local ACLs that are specified by filter-ID or downloadable ACLs (DACL).
Downloadable ACL are dynamic ACLs that are created and downloaded from the Cisco ISE server. They dynamically apply access control rules based on user identity and device type. DACL has the benefit of allowing you to have one central repository for ACLs, so you don’t need to manually create them on each switch. When a user connects to a switch, they just need to authenticate, and the switch will download the applicable ACLs from the Cisco ISE server.
Use Cases of Downloadable ACL
- Different users will receive different ACLs when they connect to a switch (Local ISE Users).
- Users with limited network connectivity can sign into a central web portal for full network access (Central Web Authentication).
- Advanced - use of MAC Authentication Bypass (MAB) to allow communication to Windows Active Directory (AD) and some related services while connecting your ISE server to AD and monitoring user authentication. Prior to Windows AD login, the network will only allow access to very limited resources, but the AD authentication will download different ACLs based on Windows groups and allow full network access.
- Advanced - Users receive different ACLs based on the day of the week, time of day, or some other factor because of policies on the ISE server.
In this article, the first use case will be discussed in detail.
Table of Contents
- Configure RADIUS Client
- Configure 802.1x Authentication
- Cisco ISE Server Configuration for Downloadable ACL
- Client Configurations
- DACL Verification
Prerequisites
- Ensure your Catalyst 1300 switch is upgraded to the latest firmware (the switch firmware should be 4.1.6 or higher).
- Assign a static IP to the switch for management purposes.
Configure RADIUS Client
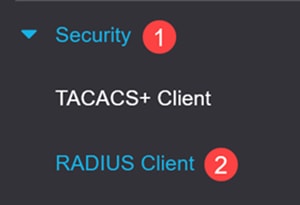
Step 1
Login to the Catalyst 1300 switch and navigate to Security > RADIUS Client menu.
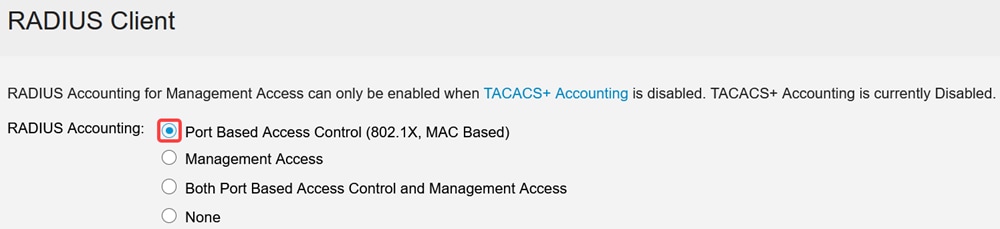
Step 2
For RADIUS Accounting, select Port Based Access Control option.
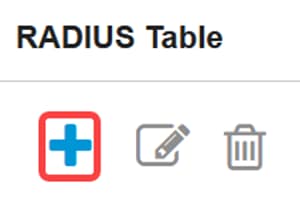
Step 3
Under RADIUS Table, click on the plus icon to add the Cisco ISE Server.
Step 4
Enter the Cisco ISE Server details and click Apply.
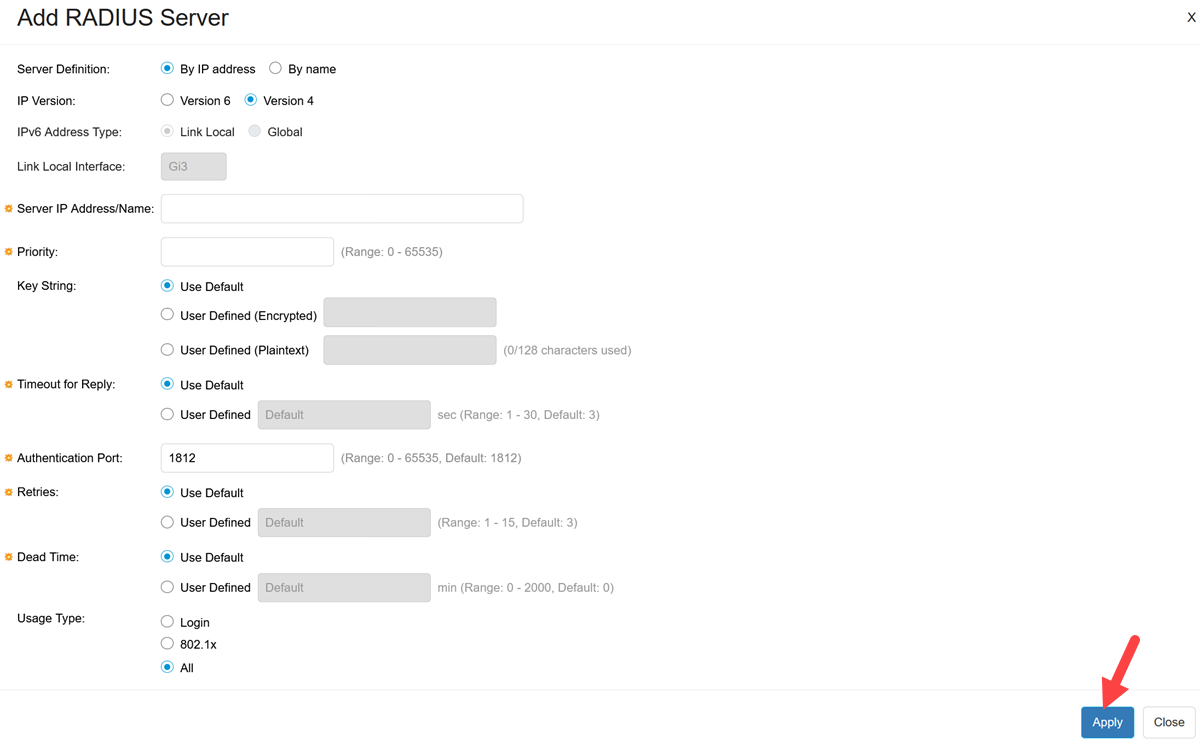
The Usage Type must be selected as 802.1x.
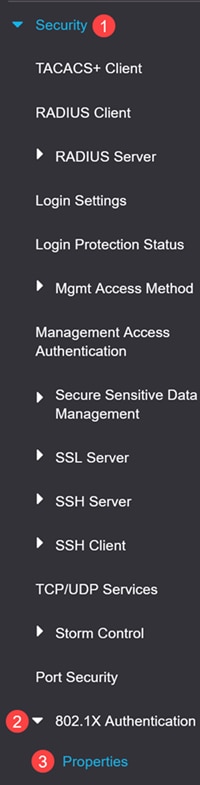
Configure 802.1x Authentication
Step 1
Navigate to Security > 802.1X Authentication > Properties menu.
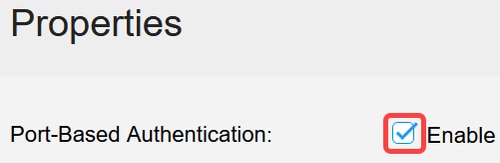
Step 2
Click the check box to enable Port-Based Authentication.
Step 3
Under Authentication Method, select RADIUS and click Apply.

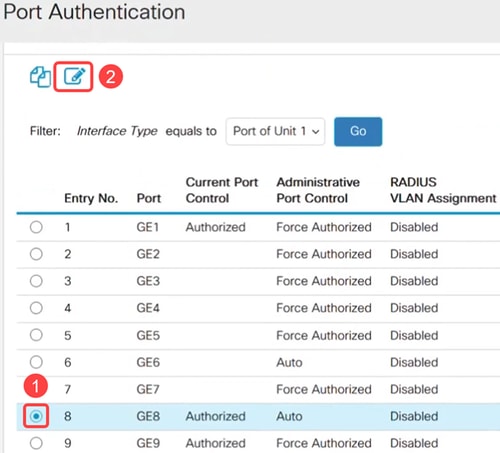
Step 4
Go to Security > 802.1X Authentication > Port Authentication menu. Select the port to which your laptop is connected and click on the edit icon. In this example, GE8 is selected.
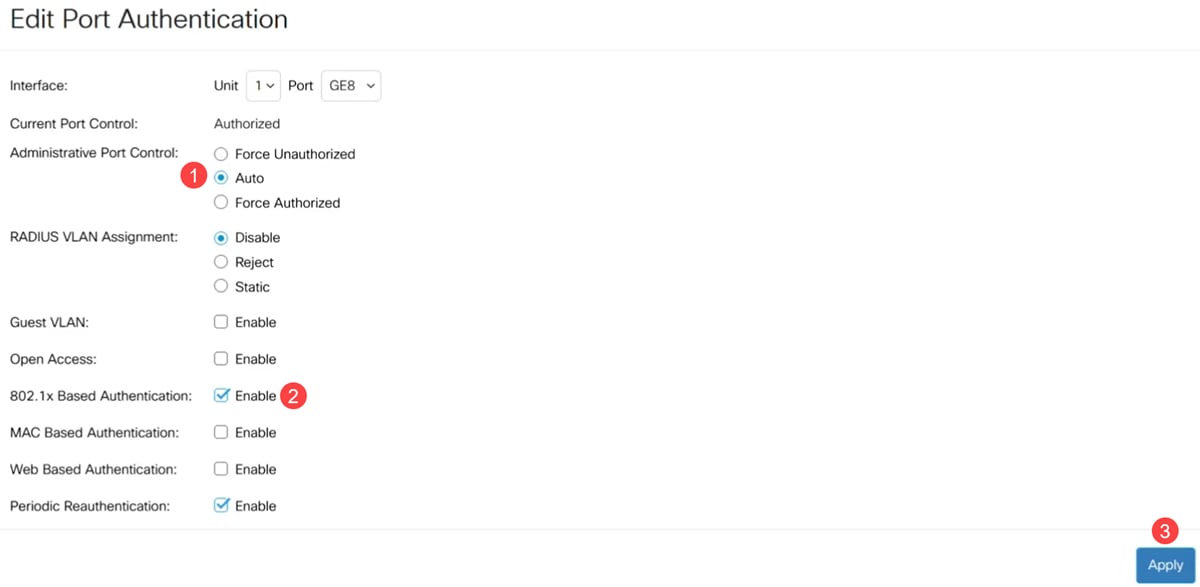
Step 5
Select the Administrative Port Control as Auto and enable 802.1x Based Authentication. Click Apply.
Cisco ISE Server Configuration for Downloadable ACL
ISE configuration is beyond the scope of Cisco Business support. Refer to the ISE Admin guide for more information.
The configurations shown in this article are an example for downloadable ACL to work with Cisco Catalyst 1300 series switch.
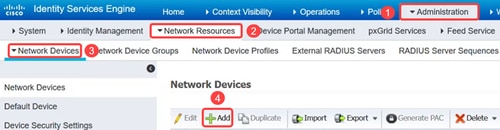
Step 1
Login to your Cisco ISE server and navigate to Administration > Network Resources > Network Devices and add the Catalyst switch device.
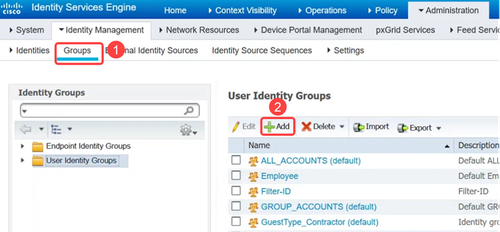
Step 2
To create User Identity Groups, navigate to the Groups tab and add the User Identity Groups.
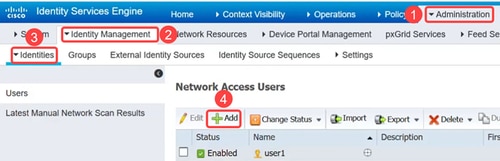
Step 3
Go to the Administration > Identity Management > Identities menu to define the users and to map the users to the groups.
Step 4
Navigate to Policy > Policy Elements > Results menu. Under Authorization, click on Downloadable ACLs.

Step 5
Click on the Add icon to create the downloadable ACL.

Step 6
Configure the Name, Description, select the IP version, and enter the access control entries (ACEs) that will make up the downloadable ACL in the DACL Content field. Click Save.
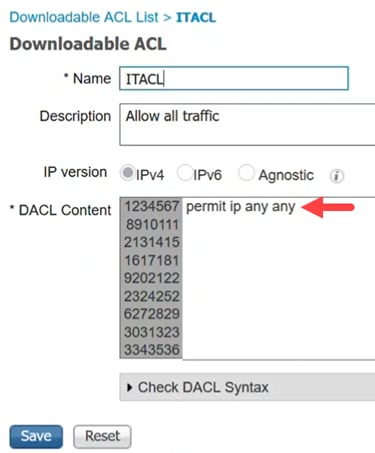
Only IP ACLs are supported, and the source must be ANY. For ACL on ISE, only IPv4 is supported now. If an ACL is entered with another source, while the syntax may be fine as far as ISE is concerned, it will fail when applied to the switch.
Step 7
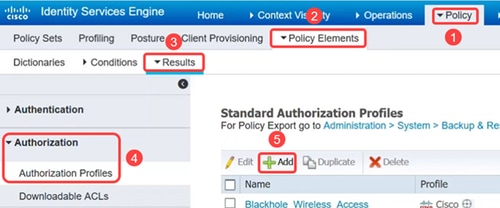
Create authorization profiles that will be used to logically associate your DACL and other policies together inside the ISE policy sets.
To do this, navigate to Policy > Policy Elements > Results > Authorization > Authorization Profiles and click on Add.
Step 8
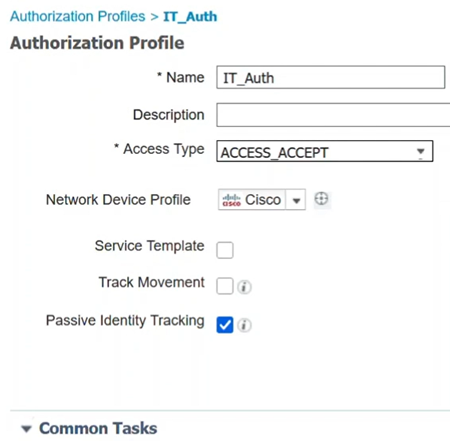
In the Authorization Profile page, configure the following:
- Name
- Description
- Access Type - this should be set to ACCESS_ACCEPT. If set to ACCESS_REJECT it will reject the authentication.
- Network Device Profile – this should be selected as Cisco.
- Passive Identity Tracking - may need to be enabled for some authentication scenarios. It is required for EasyConnect_PassiveID scenarios linked to AD.
- Common Tasks – This section has many options. For this example, DACL Name is configured.
Click Save.
Step 9
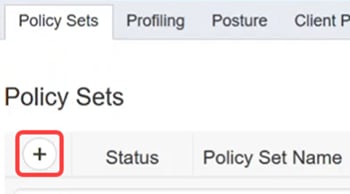
To configure policy sets that are logical groupings of authentication and authorization policies, click on Policy > Policy Sets menu.
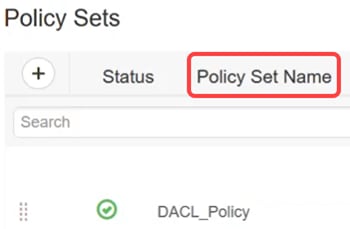
You can view the following when looking at a list of policy sets:
- Status - A green check indicates enabled, empty white circle indicates disabled, and an eye icon is for a monitor only configuration.
- Policy Set Name and Description - are self-explanatory
- Conditions - define where the policy set applies.
- Allowed Protocols/Server Sequence - sets more advanced controls.
- Hits - show the number of times the policy set has been used.
- Actions - allow you to change the order where policy sets could be applied, copy an existing policy set, or delete an existing policy set.
- View - allows you to edit the policy set details.

Step 10
To create a policy set, click on the add button.
Step 11
Define a Policy Set Name.
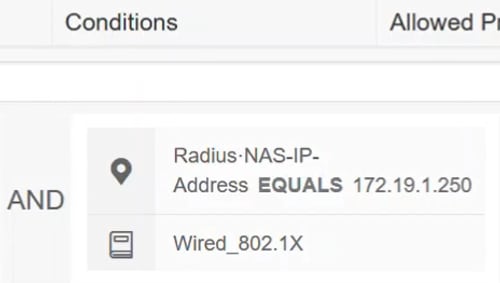
Step 12
Under Conditions, click the add button. This opens the Conditions Studio where you can define where this authentication profile will be used. In this example, it has been applied to the Radius-NAS-IP-Address (the switch) which is 172.19.1.250 and wired_802.1x traffic.
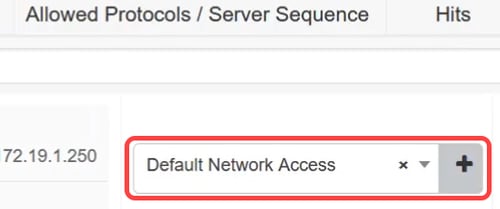
Step 13
Configure the Allowed Protocols to the Default Network Access and click Save.
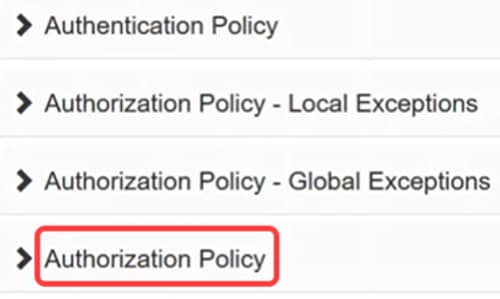
Step 14
Under View, click on the arrow icon to configure authentication and authorization policies based on your network set up and requirements or you can choose the default settings. In this example, click on Authorization policy.

Step 15
Click on the plus icon to add a policy.
Step 16
Enter the Rule Name.

Step 17
Under Conditions, click on the plus icon and select the identity group. Click Use.


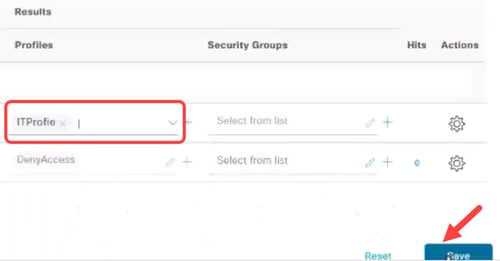
Step 18
Apply the required Profile and click Save.
Client Configurations
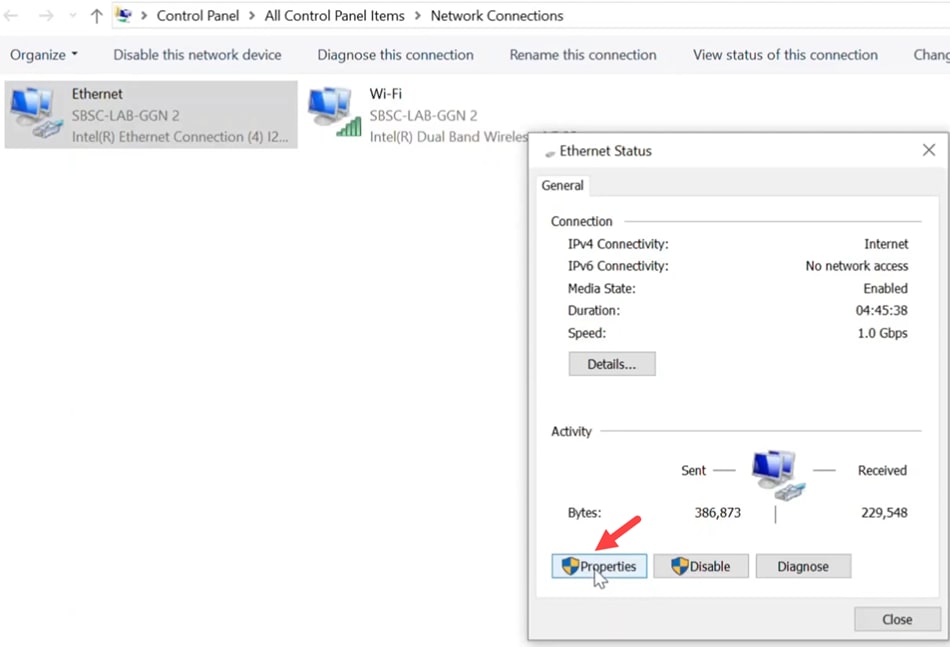
Step 1
On the client laptop, navigate to Network Connections > Ethernet and click on Properties.
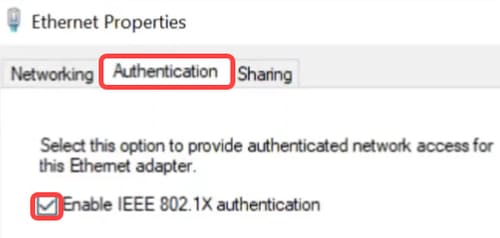
Step 2
Click on the Authentication tab and make sure 802.1X authentication is enabled.
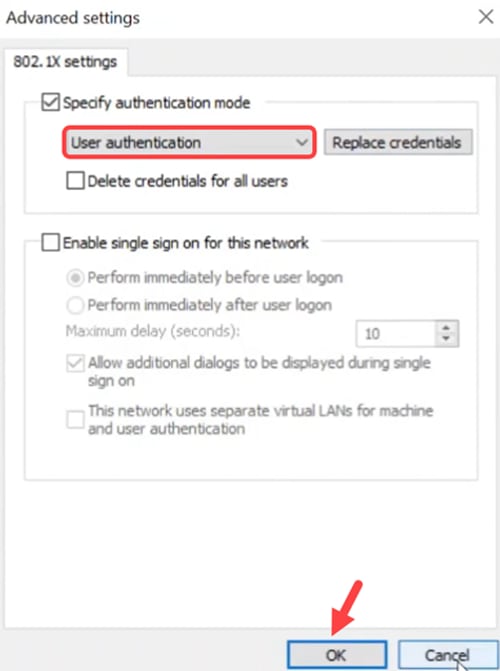
Step 3
Under Additional Settings, select User authentication as authentication mode. Click Save Credentials and then OK.
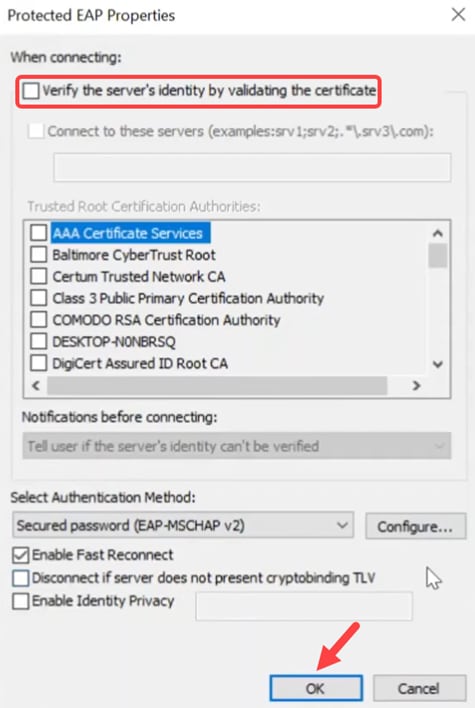
Step 4
Click on Settings and make sure the box next to Verify the server’s identity by validating the certificate is unchecked. Click OK.
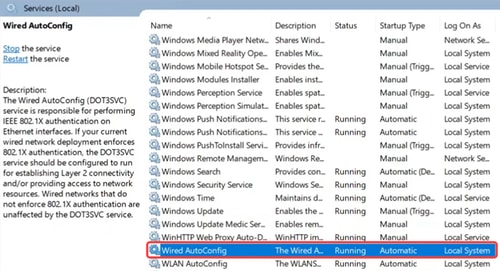
Step 5
Under Services, enable Wired AutoConfig settings.
DACL Verification
Once the user is authenticated, you can verify the downloadable ACL.
Step 1
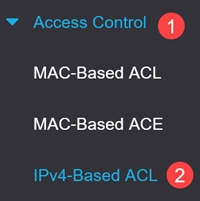
Login to the Catalyst 1300 switch and navigate to Access Control > IPv4-Based ACL menu.
Step 2
The IPv4-Based ACL Table will display the downloaded ACL.
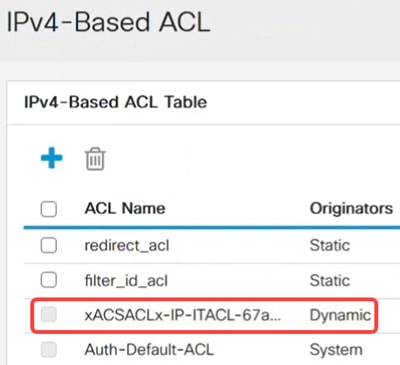
Downloadable ACLs cannot be edited.
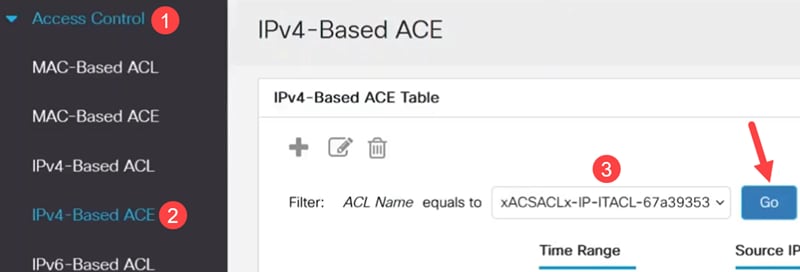
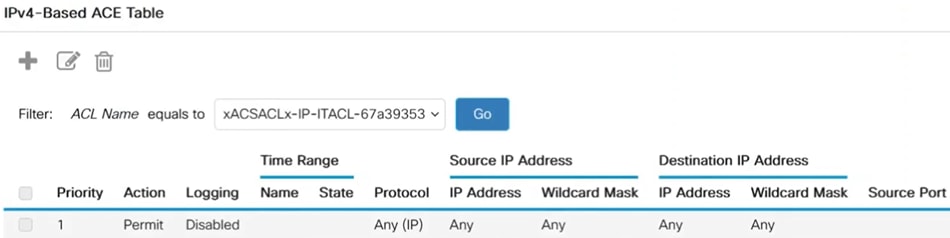
Step 3
Another way to verify is to navigate toIPv4-Based ACE, select the downloadable ACL from the ACL Name drop-down menu, and click Go. The rules that were configured in ISE will be displayed.
Step 4
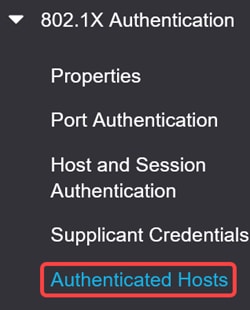
Navigate to Security > 802.1 Authentication > Authenticated Hosts menu. You can verify the users that are authenticated. Click on Authenticated Sessions to see more details.

Step 5
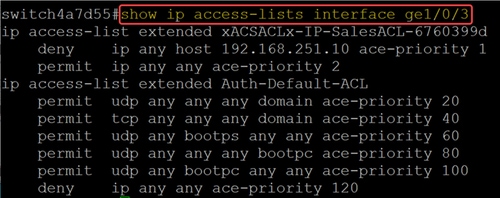
From the CLI, run the command show ip access-lists interface followed by the interface ID.
In this example, ACLs and ACEs applied to Gigabit Ethernet 3 can be seen.
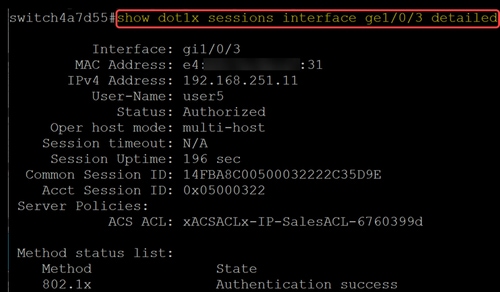
Step 6
You can also see settings relating to the ISE connection and ACL downloads using the command
show dot1x sessions interface <ID> detailed. You can view the status, 802.1x authentication state, and the ACLs downloaded.
Conclusion
There you go! Now you know how downloadable ACL works on Cisco Catalyst 1300 switches with Cisco ISE.
For more information, check out the Catalyst 1300 Admin Guide and the Cisco Catalyst 1300 Series Support Page.
Revision History
| Revision | Publish Date | Comments |
|---|---|---|
1.0 |
18-Jun-2025
|
Initial Release |
 Feedback
Contact Cisco
- Open a Support Case

- (Requires a Cisco Service Contract)