VLAN Membership Configuration on RV215W
Available Languages
Objectives
A Virtual LAN (VLAN) allows a group of hosts that are not connected to the same switch to communicate as if they were on the same broadcast domain. An interface that has VLAN traffic needs to have the VLANs assigned to that interface or packets may be dropped. VLAN configuration helps control the size of the broadcast domain and keeps local traffic local.
When an end station in one VLAN needs to communicate with an end station in another VLAN, Inter VLAN communication is required. This communication is supported by inter-VLAN routing.
This document explains how to configure VLAN membership on the RV215W.
Applicable Devices
• RV215W
Software Version
• 1.1.0.5
VLAN Membership
Add VLAN
Step 1. Log in to the web configuration utility and choose Networking > LAN > VLAN Membership. The VLAN Membership page opens:
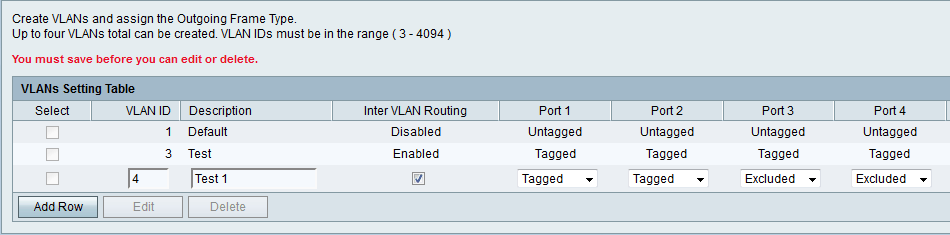
Step 2. Click Add Row to create a new VLAN.
Step 3. Enter the unique VLAN ID in the VLAN ID field. VLAN ID 1 is reserved for the default VLAN, which is used for untagged frames received on the interface. VLAN IDs 1 and 2 are reserved and cannot be used.
Step 4. Enter a short description for the VLAN in the Description field.
Step 5. Check the Inter VLAN Routing check box to enable inter VLAN routing. Inter VLAN Routing creates communication routes between VLANs on different devices.
Step 6. Choose the desired operation for each port from the Port (1-4) drop-down list. The available options are:
• Tagged — This mode specifies that the association between a given VLAN and the port is tagged. The incoming traffic on this port will be forwarded to the given VLAN based on the VLAN information present in the VLAN tag in the frame. The outgoing traffic on this port will have the VLAN tag preserved when association is tagged.
• Untagged — This mode specifies that the association between a given VLAN and the port is untagged. The incoming traffic is forwarded to the VLAN which has untagged association with the port. The outgoing traffic from this port is untagged.
• Exclude — This mode specifies that there is no association between the given VLAN and port. Traffic is disabled between this VLAN and port.
Step 7. Click Save.
Edit VLAN
Step 1. Log in to the web configuration utility and choose Networking > LAN > VLAN Membership. The VLAN Membership page opens:
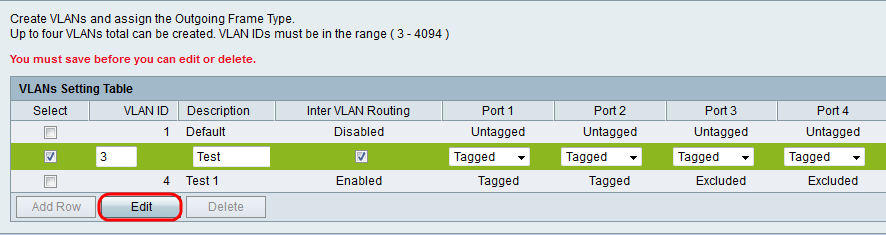
Step 2. Check the Select check box to choose the desired VLAN to be edited.
Step 3. Click Edit. Follow steps 2-6 from the Add VLAN section to make changes on the desired VLAN.
Step 4. After the VLAN has been edited click Save.
Delete VLAN
Step 1. Log in to the web configuration utility and choose Networking > LAN > VLAN Membership. The VLAN Membership page opens:
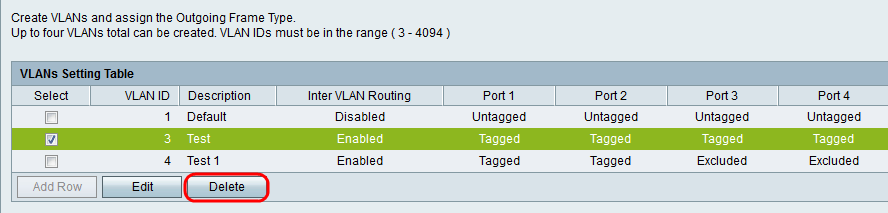
Step 2. Check the Select check box to choose the desired VLAN to be deleted.
Step 3. Click Delete.
 Feedback