Configuring Shrew Soft VPN Client with the RV160 and RV260
Available Languages
Objective
The objective of this document is to show you how to configure the necessary settings to connect Shrew Soft VPN client via RV160 or RV260 Series Routers.
Introduction to the basics of VPN
A Virtual Private Network (VPN) is a great way to connect remote users to a secured network. It establishes an encrypted connection over a less secure network like the Internet.
A VPN tunnel establishes a private network that can send data securely using encryption and authentication. Corporate offices often use a VPN connection since it is both useful and necessary to allow their employees to have access to their internal resources, even if they are outside the office.
The RV160 router supports up to 10 VPN tunnels, and the RV260 supports up to 20.
This article will walk you through the steps needed to configure the RV160/RV260 router and Shrew Soft VPN client. You will learn how to create a user group, user account, IPsec profile, and Client-to-Site profile. On the Shrew Soft VPN client, you will learn how to configure the General, Client, Name Resolution, Authentication, Phase 1, and Phase 2 tabs.
What are the Pros and Cons if I want to use a VPN?
VPNs address real use case scenarios common to many industries and business types. The table below shows some of the pros and cons of using a VPN.
| Pros | Cons |
| Provides secure communications, convenience, and accessibility with access rights tailored to individual users, such as employees, contractors, or partners. | Slow connection speed can occur. Stronger encryption takes time and resources to ensure anonymity as well as security. Encryption of network traffic usually requires a bit more overhead. You may be able to find a couple VPN providers that maintains a good connection speed while keeping anonymity and security, but they are usually paid services. |
| Enhances productivity by extending corporate network and applications. | Potential security risk due to misconfigurations. Designing and implementing a VPN can be complicated. It is necessary to entrust an experienced professional to configure your VPN to make sure your network won’t be compromised. |
| Reduces communications costs and increases flexibility. | If a situation occurs where there is a need to add new infrastructure or a new set of configurations, technical issues may arise due to incompatibility especially if it involves different products or vendors other than the ones you are already using. |
| Actual geographic location of the users is protected and not exposed to the public or shared networks like the Internet. | |
| Protects confidential network data and resources. | |
| A VPN allows new users or a group of users to be added without the need for additional components or a complicated configuration. |
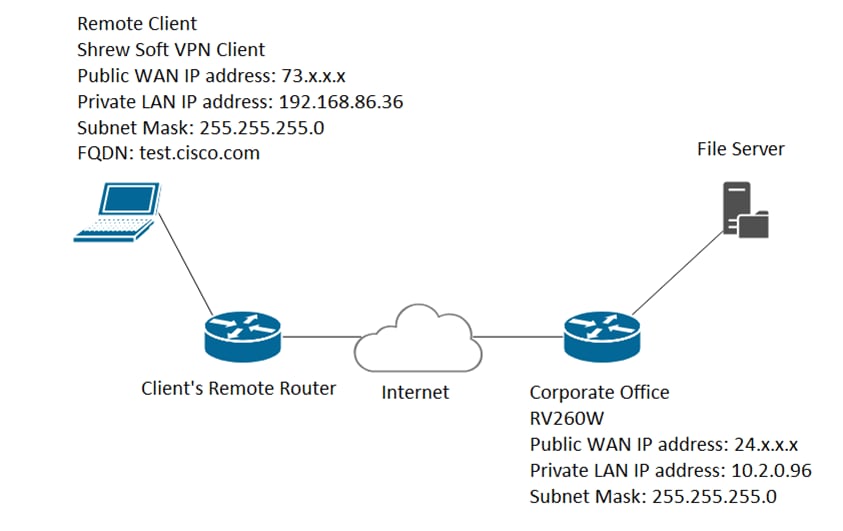
Topology
This is a simple topology of the network.
Note: The public WAN IP address has been blurred out.
Applicable Devices
· RV160
· RV260
Software Version
· 1.0.0.xx (RV160 and RV260)
· 2.2.1 is recommended as 2.2.2 may have connectivity issues with our routers (Shrew Soft VPN Client Download)
Table of Contents
5. Configuring Shrew Soft VPN Client
6. Shrew Soft VPN Client: General Tab
7. Shrew Soft VPN Client: Client Tab
8. Shrew Soft VPN Client: Name Resolution Tab
9. Shrew Soft VPN Client: Authentication Tab
10. Shrew Soft VPN Client: Phase 1 Tab
11. Shrew Soft VPN Client: Phase 2 Tab
12. Shrew Soft VPN Client: Connecting
13. VPN Connection Troubleshooting Tips
14. Verification
15. Conclusion
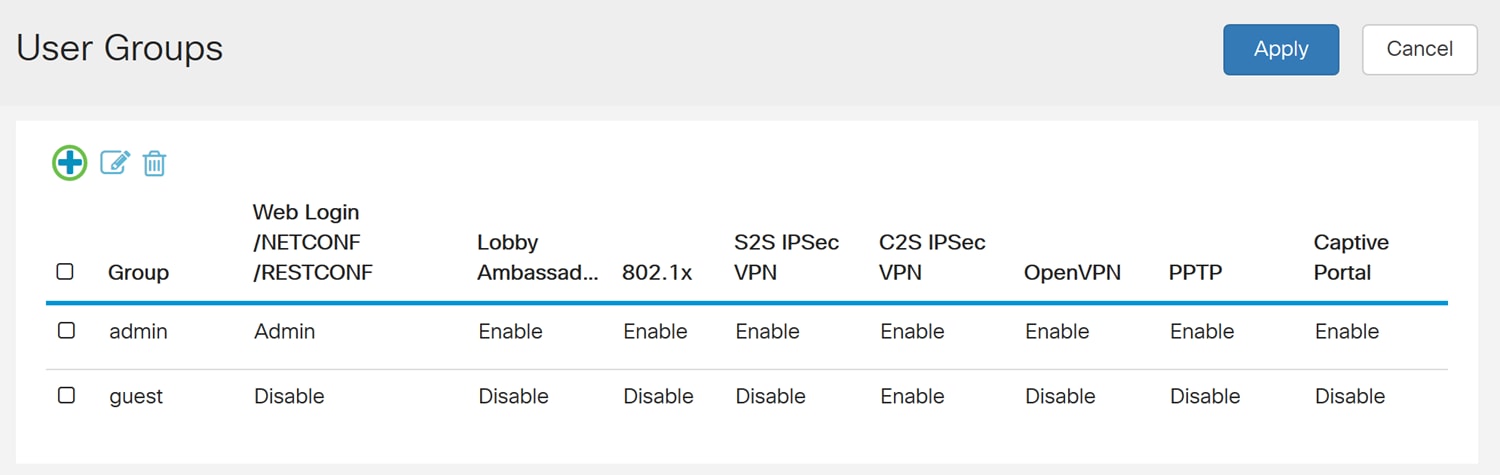
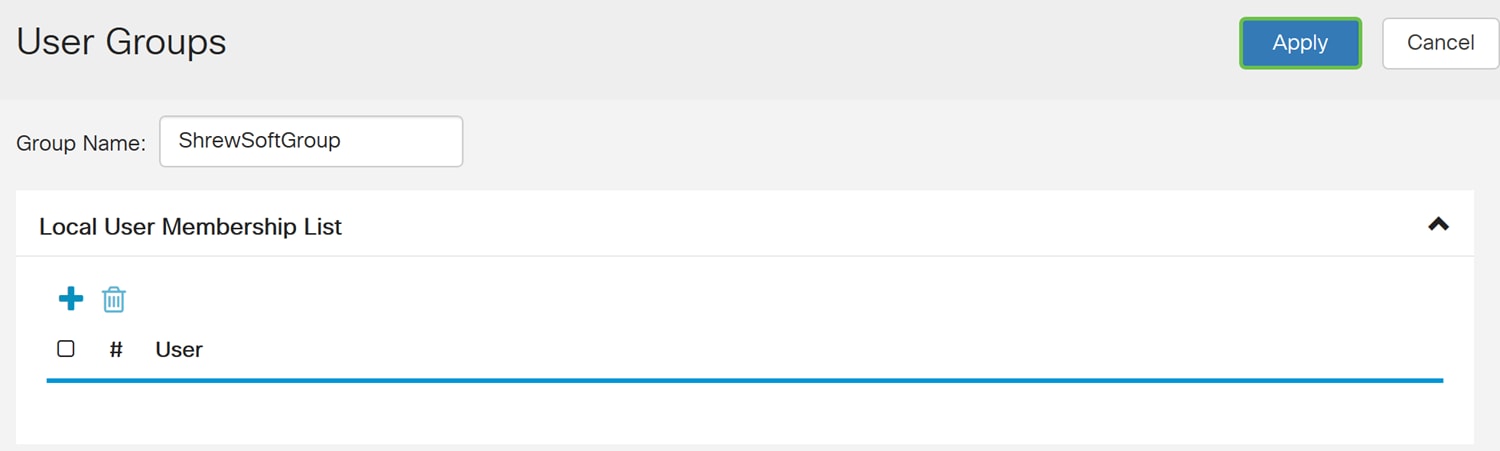
Creating User Groups
Important Note: Please leave the default admin account in the admin group and create a new user account and user group for Shrew Soft. If you move your admin account to a different group, you will prevent yourself from logging into the router.
Step 1. Log in to the web configuration page.

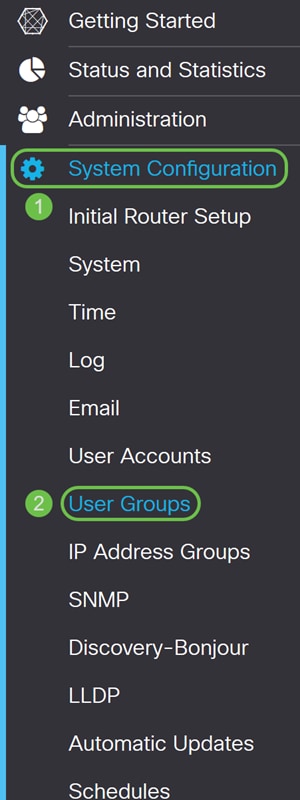
Step 2. Navigate to System Configuration > User Groups.
Step 3. Click the plus icon to add a new user group.
Step 4. Enter a name for the group in the Group Name field.
We will be using ShrewSoftGroup as our example.
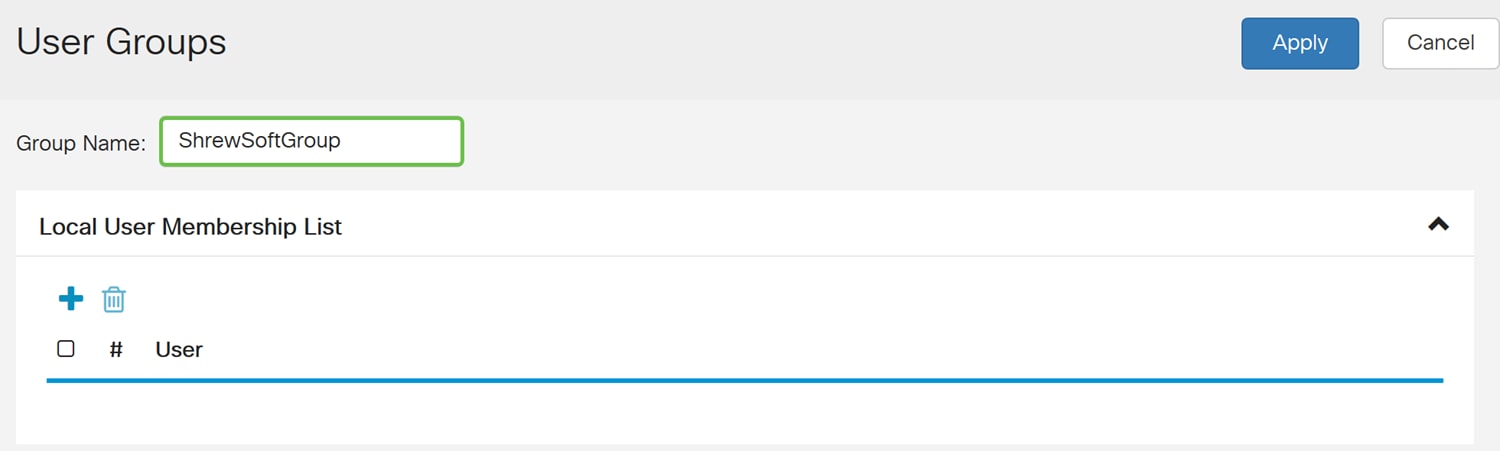
Step 5. Press Apply to create a new group.
Creating User Accounts
Step 1. Navigate to System Configuration > User Accounts.

Step 2. Scroll down to the Local Users table and press the plus icon to add a new user.
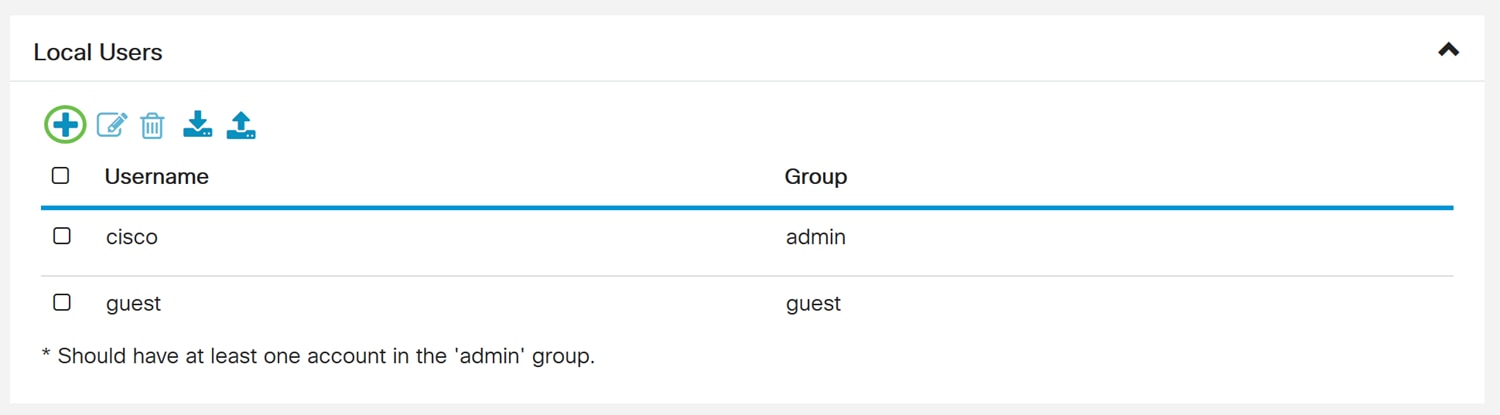
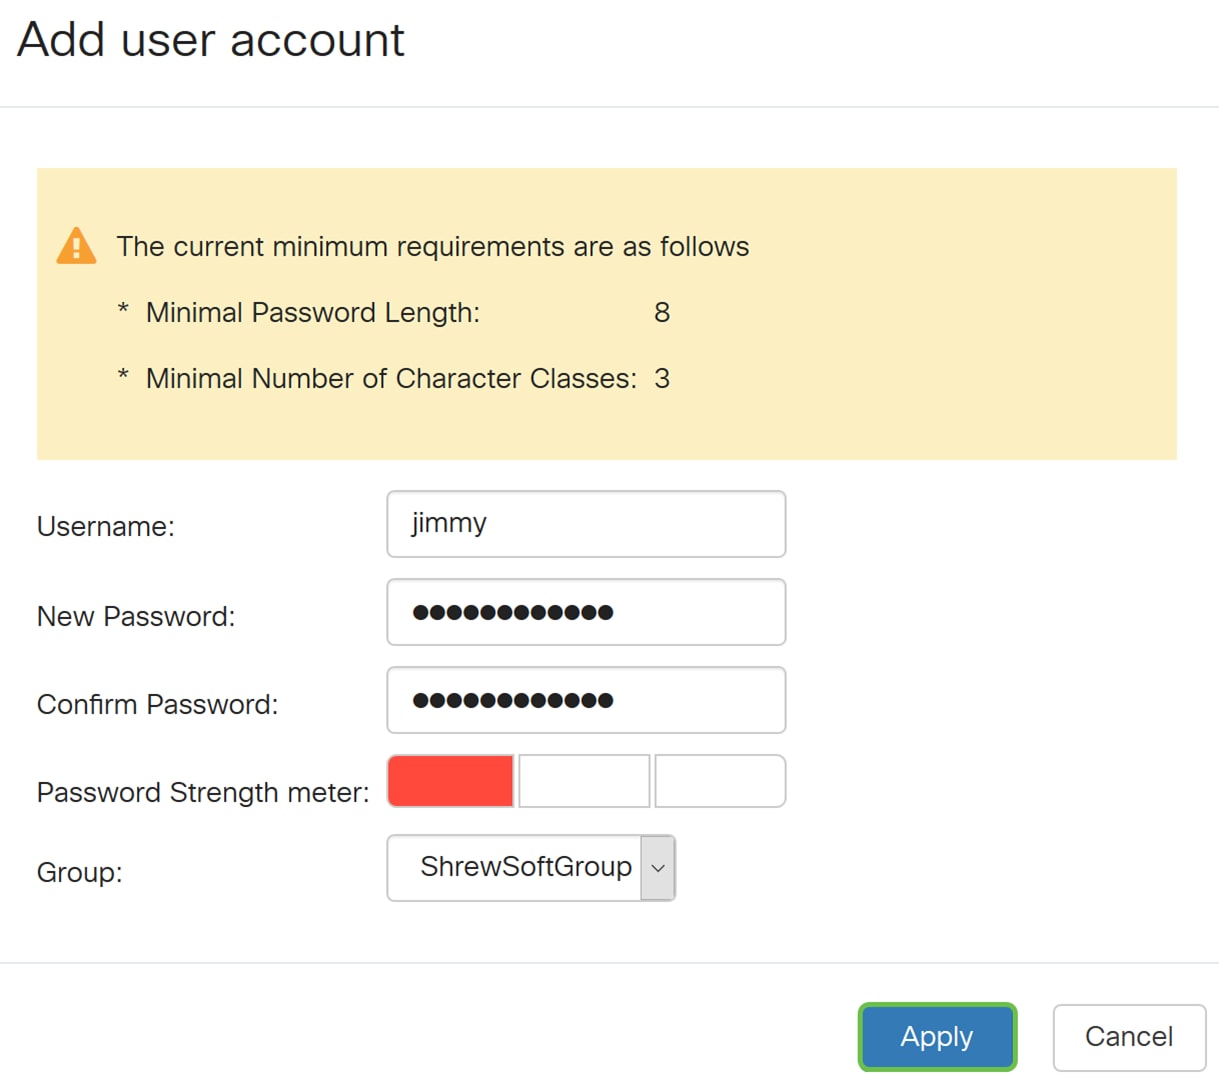
Step 3. The Add user accounts page opens. Enter a username for the user.

Step 4. Enter a password in the New Password field. Re-enter the same password in the Confirm Password field. In this example, we will be using CiscoTest123 as the password.
Note: The password used here is an example. It is recommended to make your password more complex.
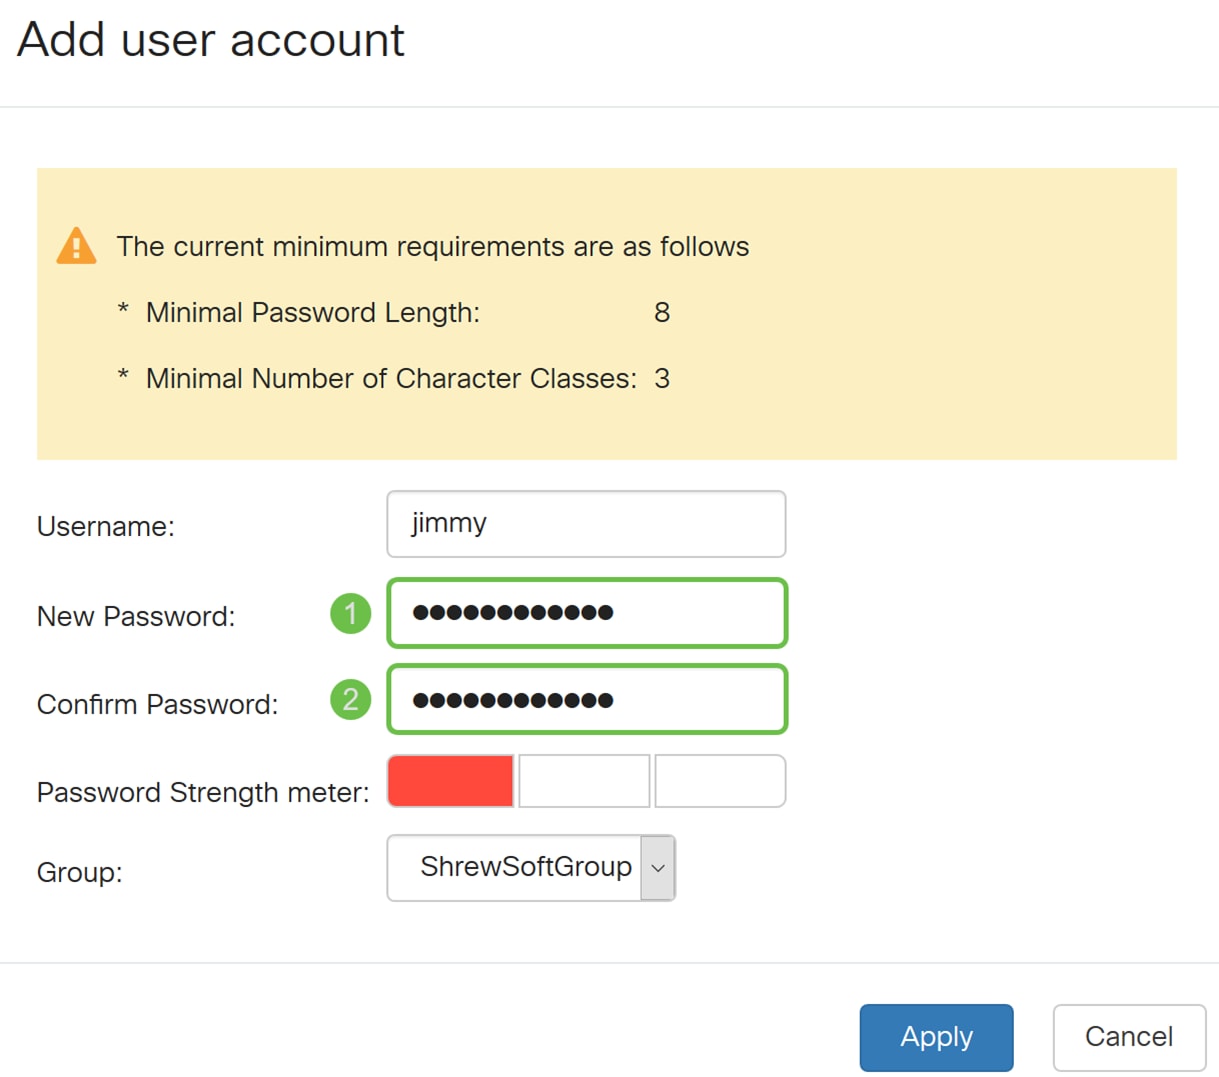
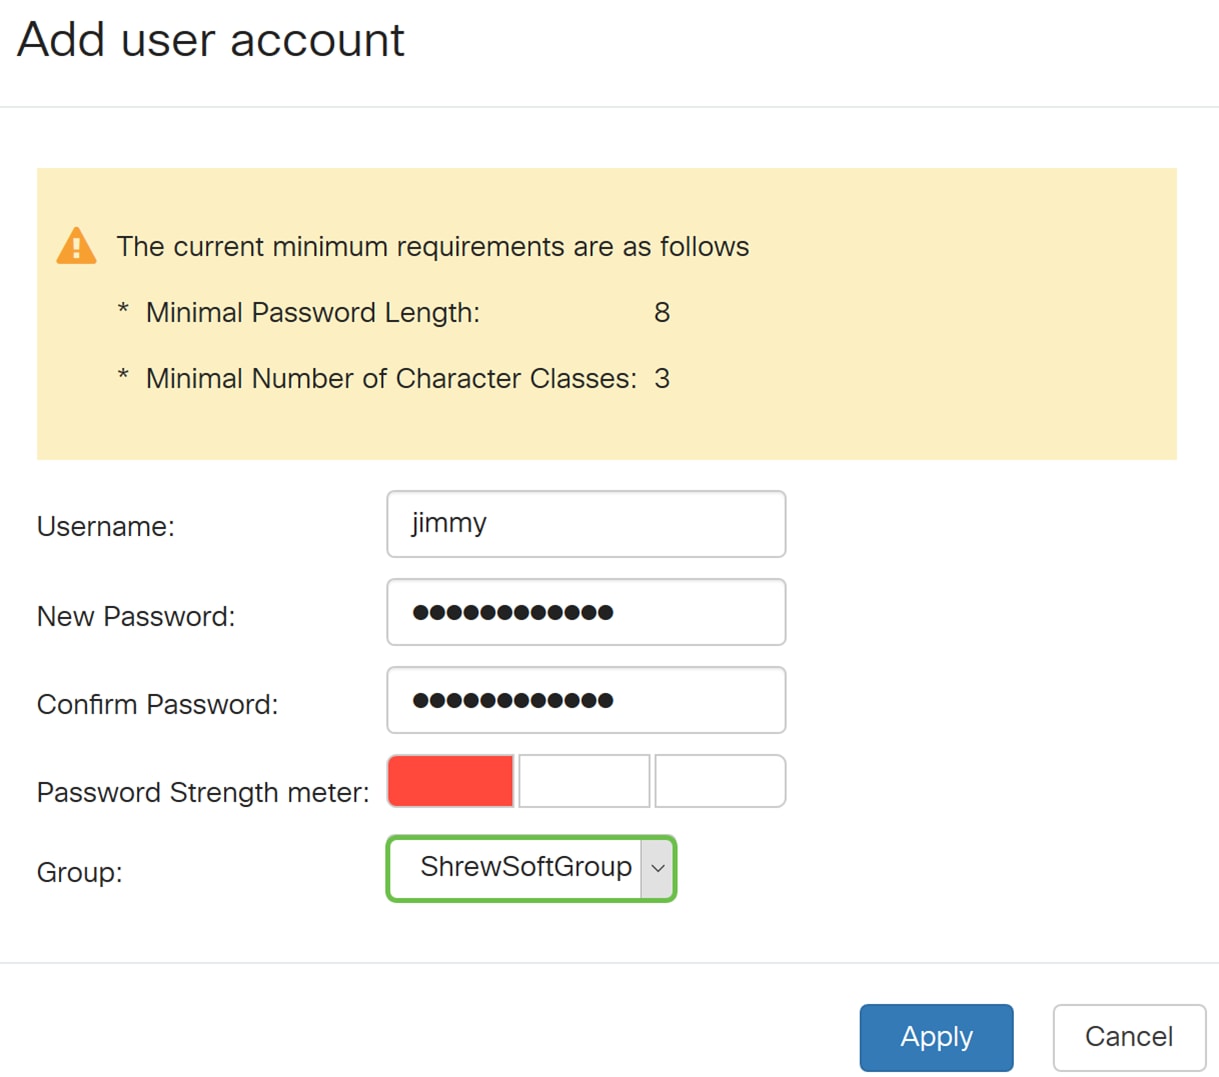
Step 5. In the Group drop-down list, select a group that you want the user to be in.
Step 6. Press Apply to create a new user account.
Configuring IPsec Profile
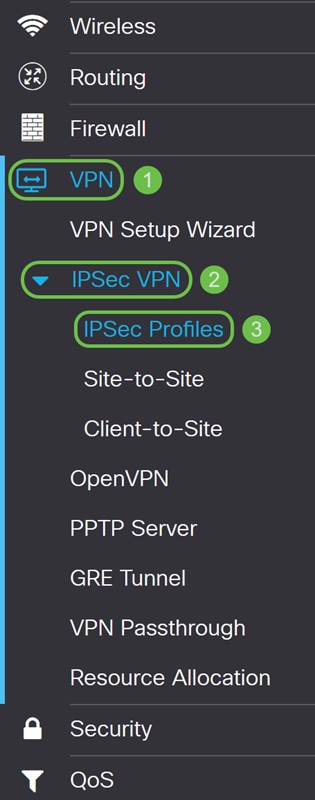
Step 1. Navigate to VPN > IPSec VPN > IPSec Profiles.
Note: For more explanation on how to configure IPsec profiles, click the link to see the article: Configuring IPsec Profiles (Auto Keying Mode) on the RV160 and RV260
Step 2. Click the plus icon to add a new IPsec profile.
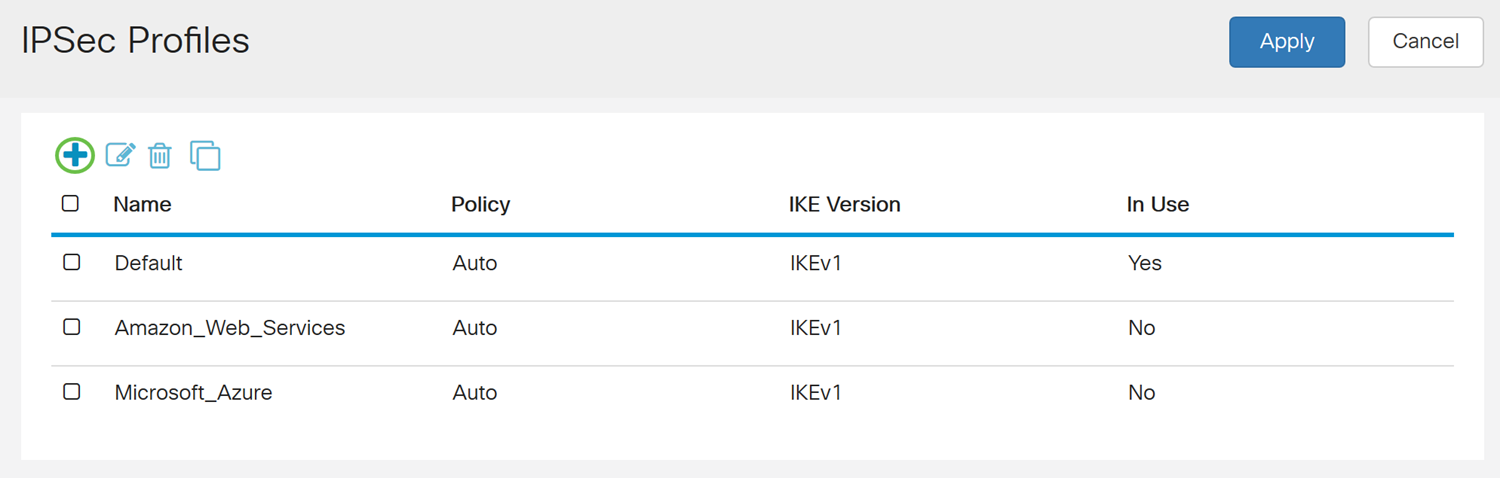
Step 3. Enter a name for the profile in the Profile Name field. We will be entering ShrewSoftProfile as our profile name.
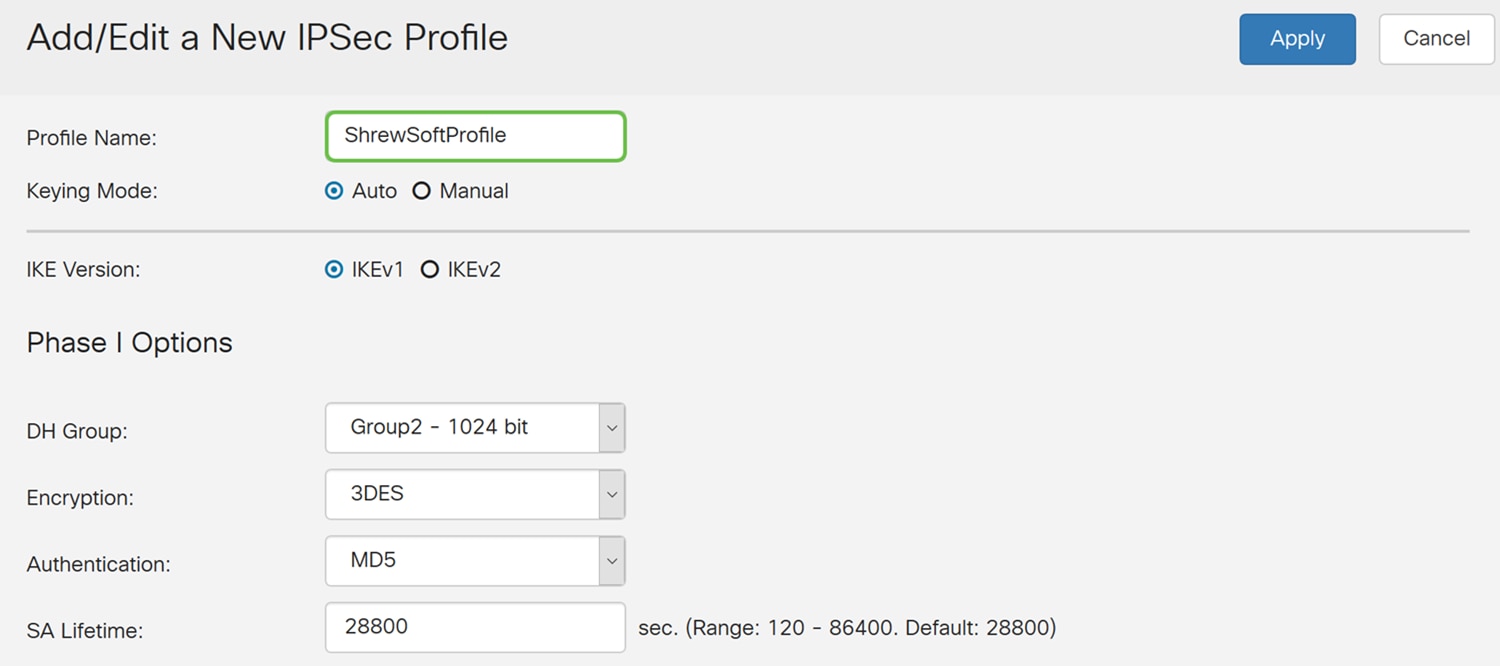
Step 4. Select Auto for Keying Mode.

Step 5. Select either IKEv1 or IKEv2 as the IKE Version. In this example, IKEv1 was selected.
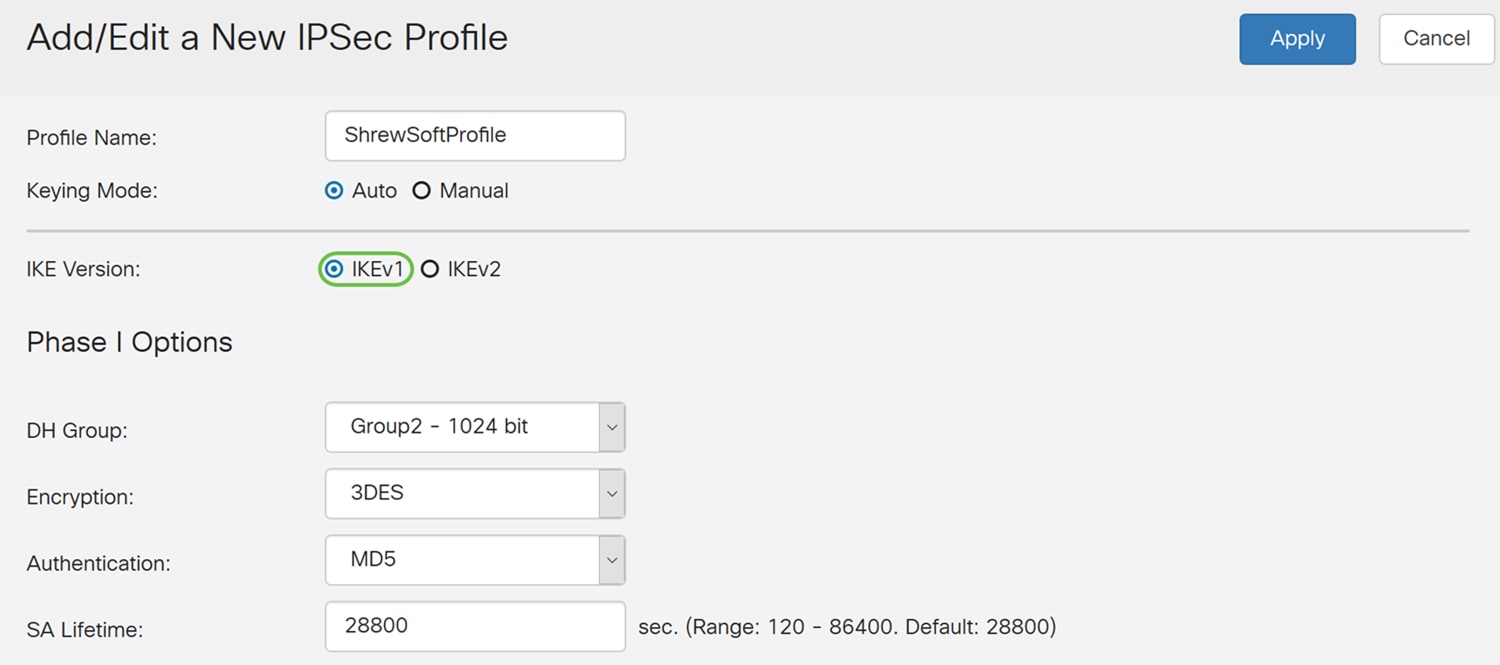
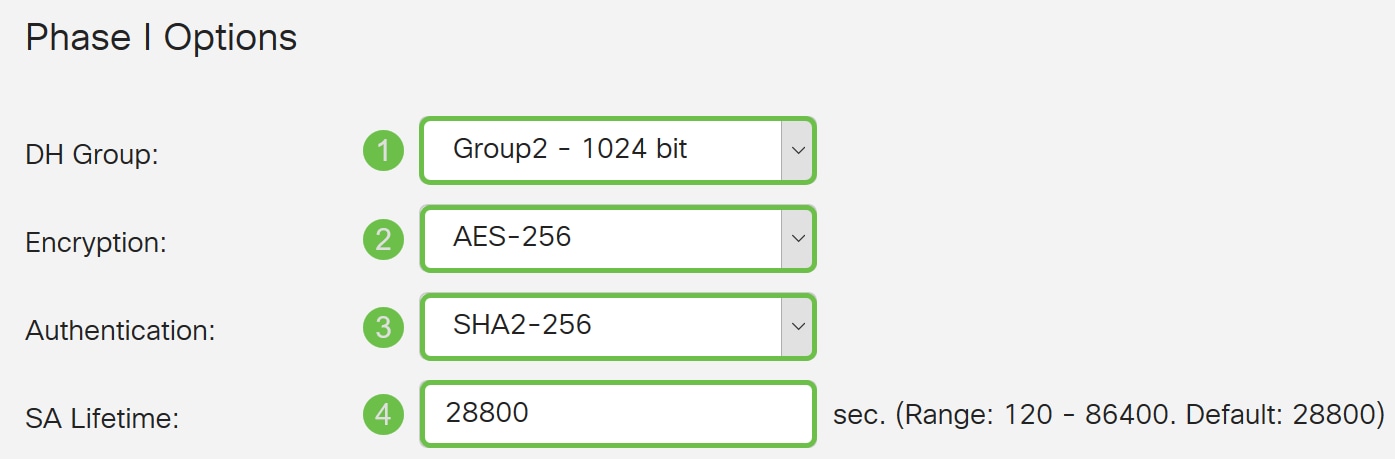
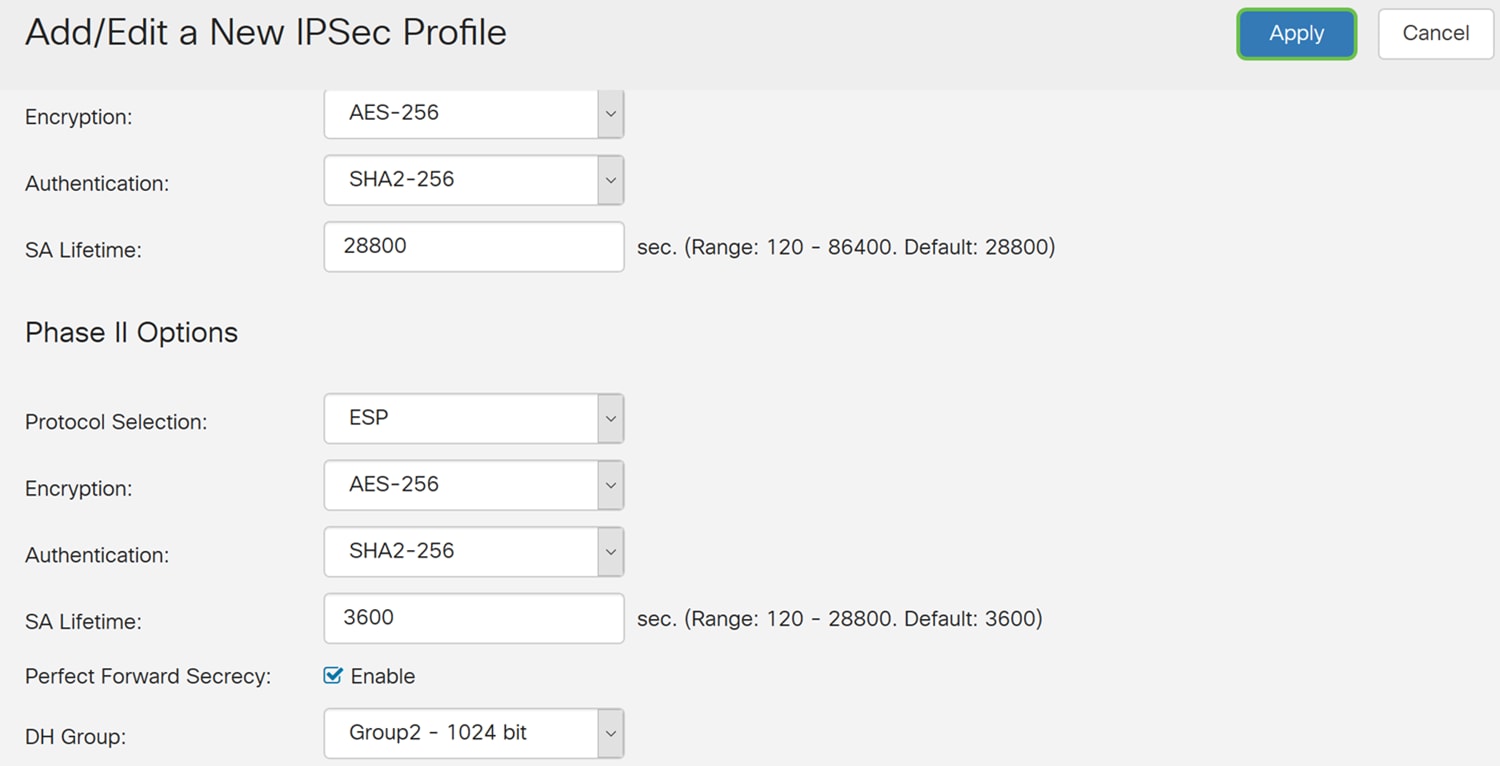
Step 6. Under the Phase I Options section, this is what we have configured for this article.
DH Group: Group2 – 1024 bit
Encryption: AES-256
Authentication: SHA2-256
SA Lifetime: 28800
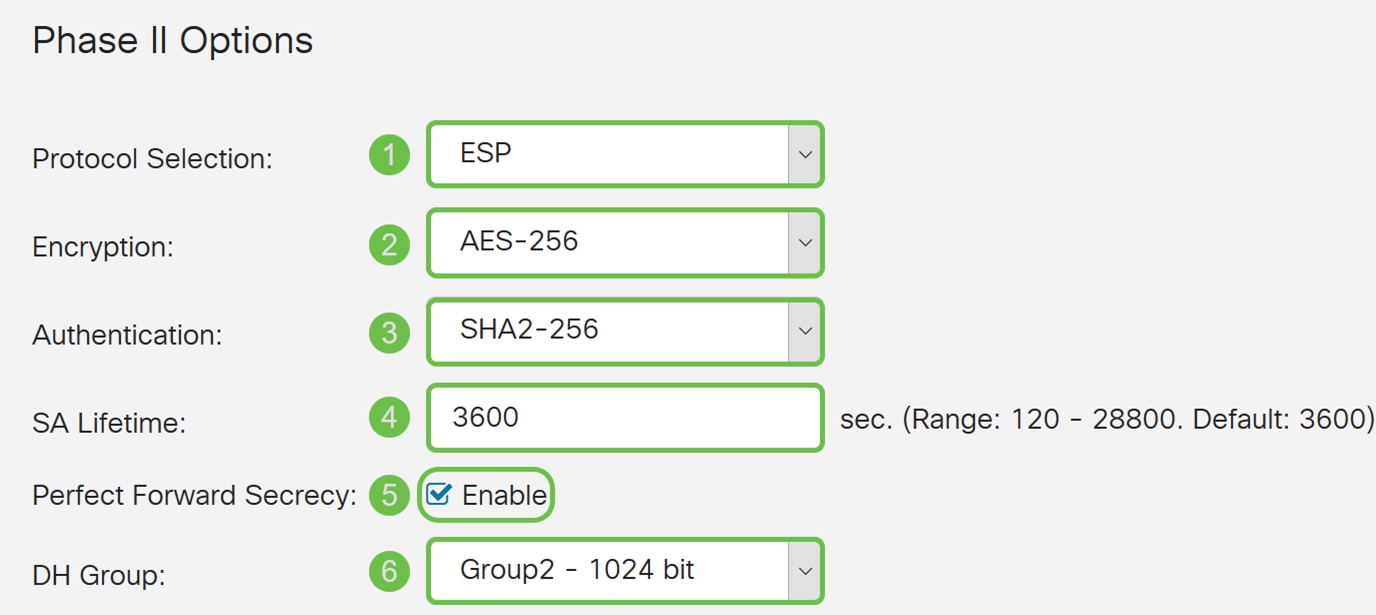
Step 7. Under the Phase II Options, this is what we have configured for this article.
Protocol Selection: ESP
Encryption: AES-256
Authentication: SHA2-256
SA Lifetime: 3600
Perfect Forward Secrecy: Enabled
DH Group: Group2 – 1024 bit
Step 8. Click Apply to create your new IPsec profile.
Configuring Client-to-Site
Step 1. Navigate to VPN > IPSec VPN > Client-to-Site.
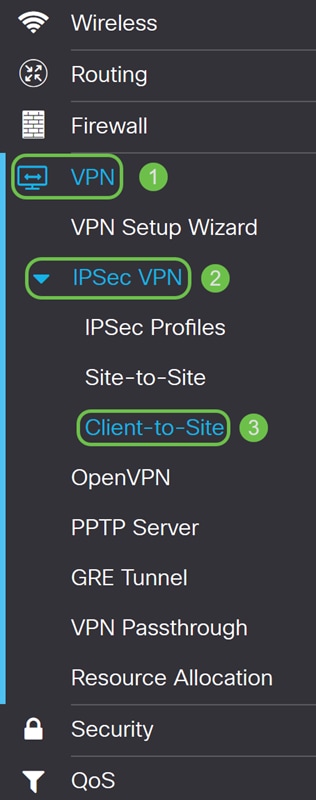
Step 2. Click the plus icon to add a new tunnel.

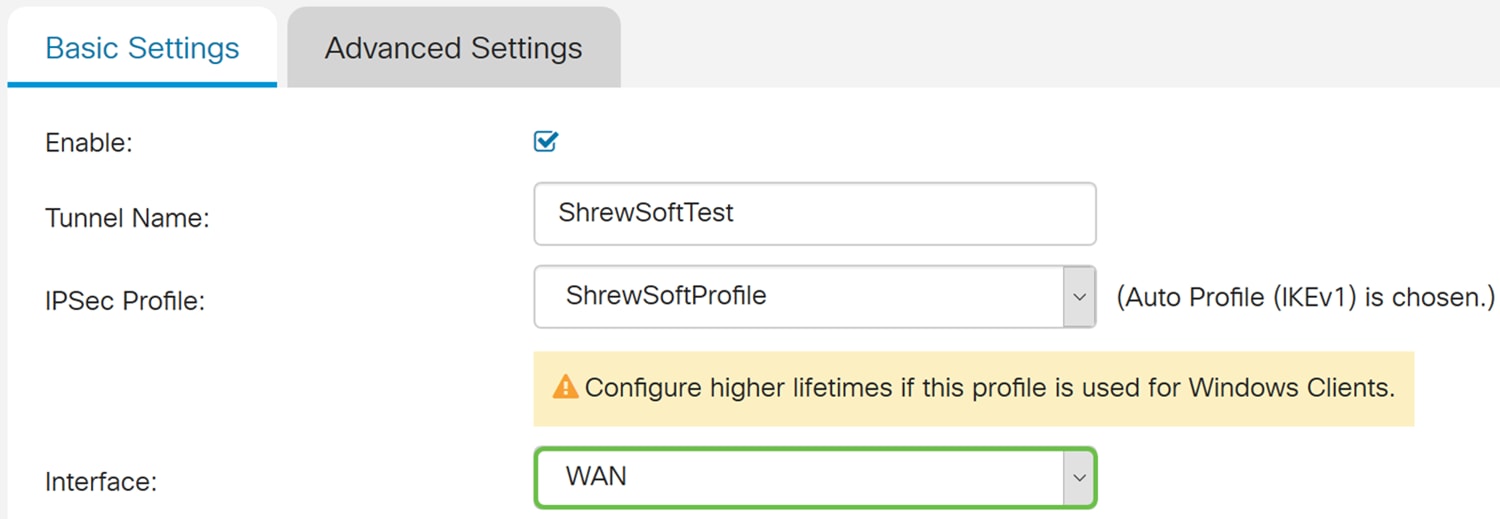
Step 3. Check the Enable checkbox to enable the tunnel.
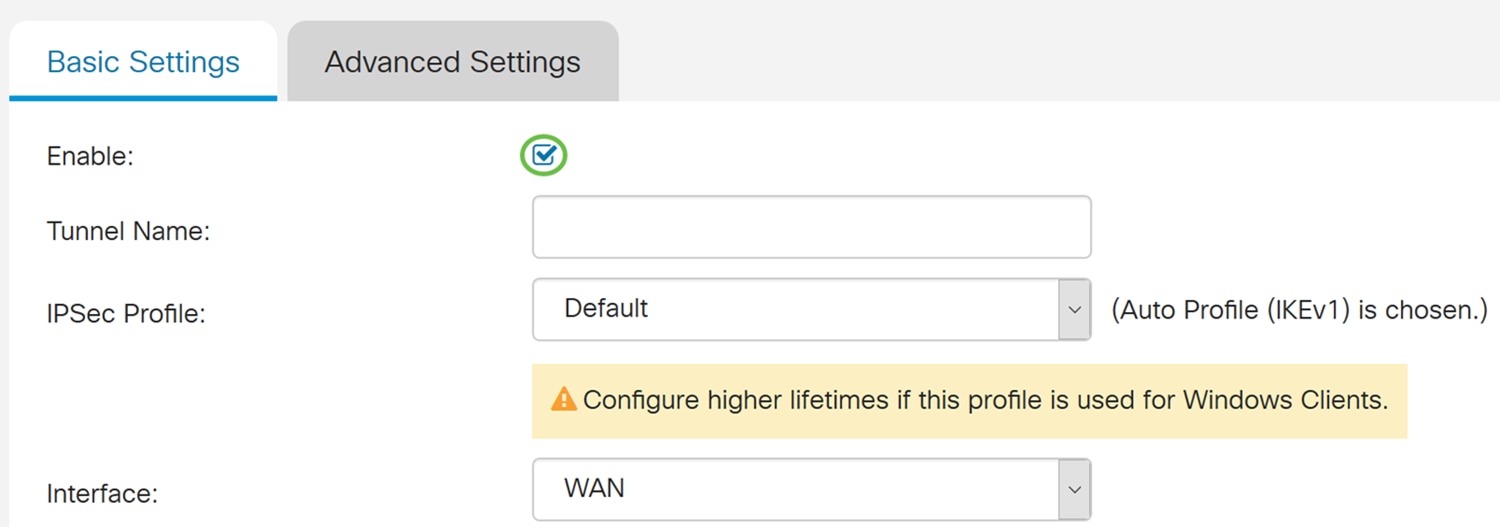
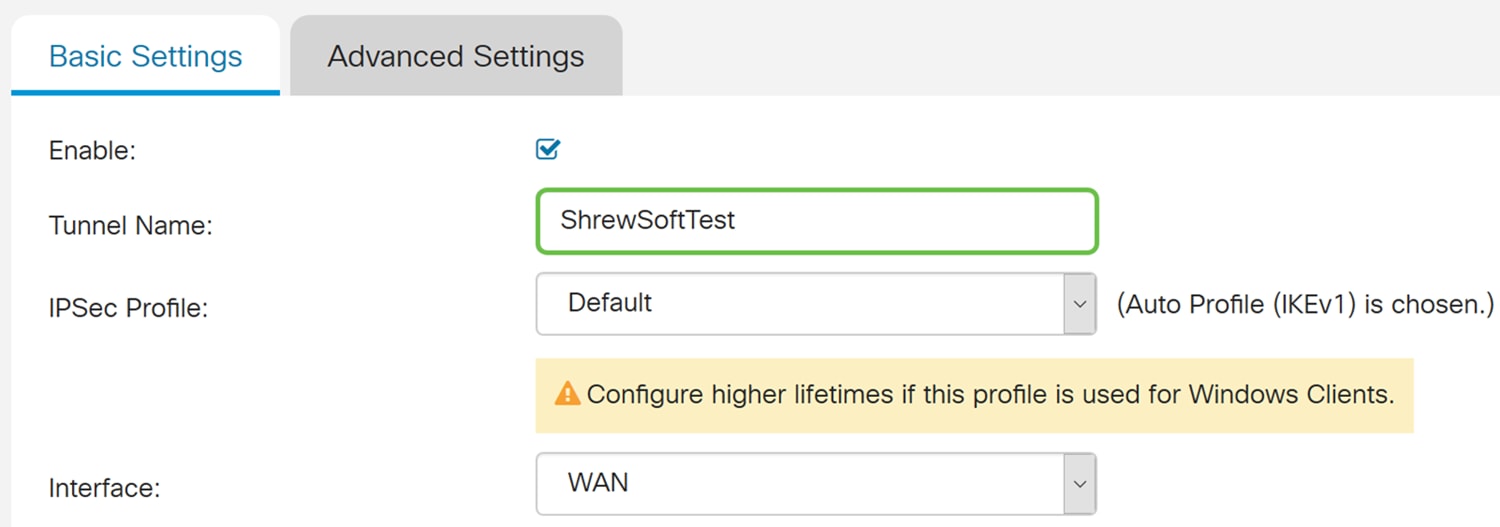
Step 4. Enter a name for the tunnel in the Tunnel Name field.
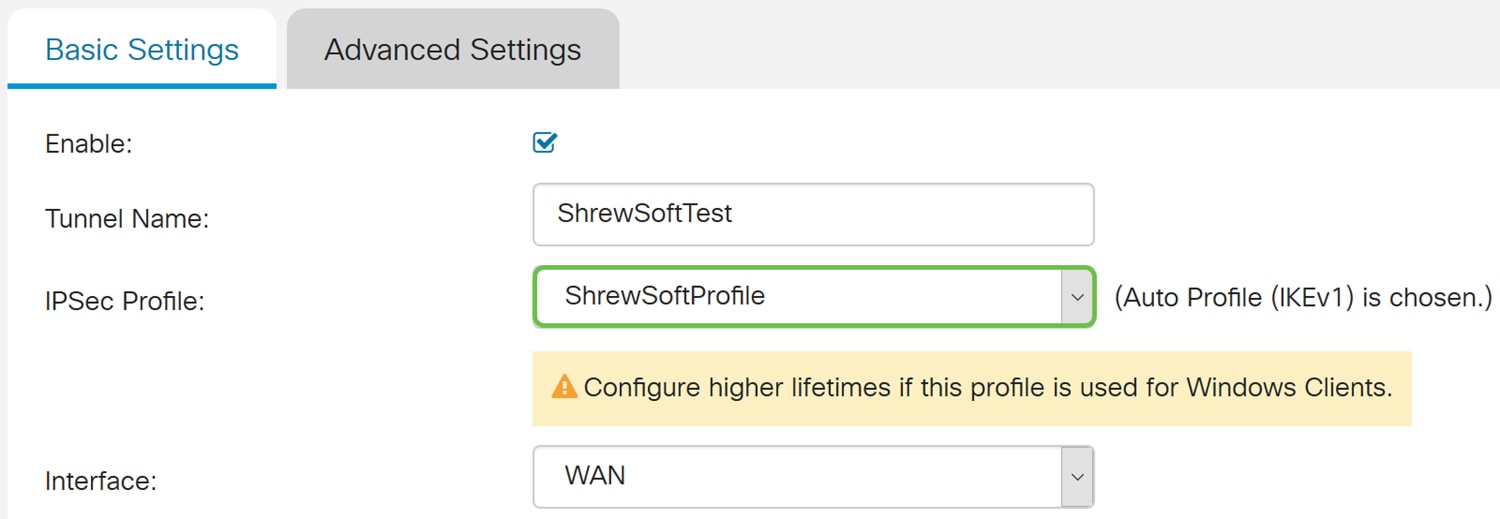
Step 5. In the IPSec Profile drop-down list, select a profile that you want to use. We will be selecting ShrewSoftProfile which was created in the previous section: Configuring IPsec Profile.
Step 6. From the Interface drop-down list, select the interface that you want to use. We will be using WAN as our interface to connect the tunnel.
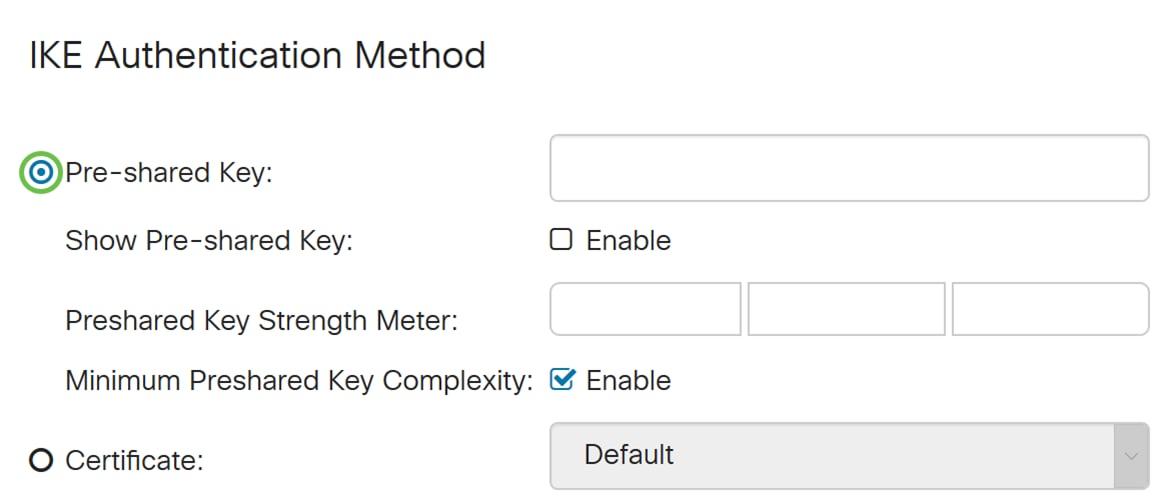
Step 7. Under the IKE Authentication Method section, select either Pre-shared Key or Certificate. We will be using Pre-shared Key as our IKE authentication method.
Note: IKE peers authenticate each other by computing and sending a keyed hash of data that includes the Pre-shared Key. If the receiving peer is able to create the same hash independently using its Pre-shared key, it knows that both peers must share the same secret, thus authenticating the other peer. Pre-shared keys do not scale well because each IPsec peer must be configured with the Pre-shared keys of every other peer with which it establishes a session.
Certificate uses a digital certificate that contains information such as the name, or IP address, serial number, expiration date of the certificate, and a copy of the public key of the bearer of the certificate.
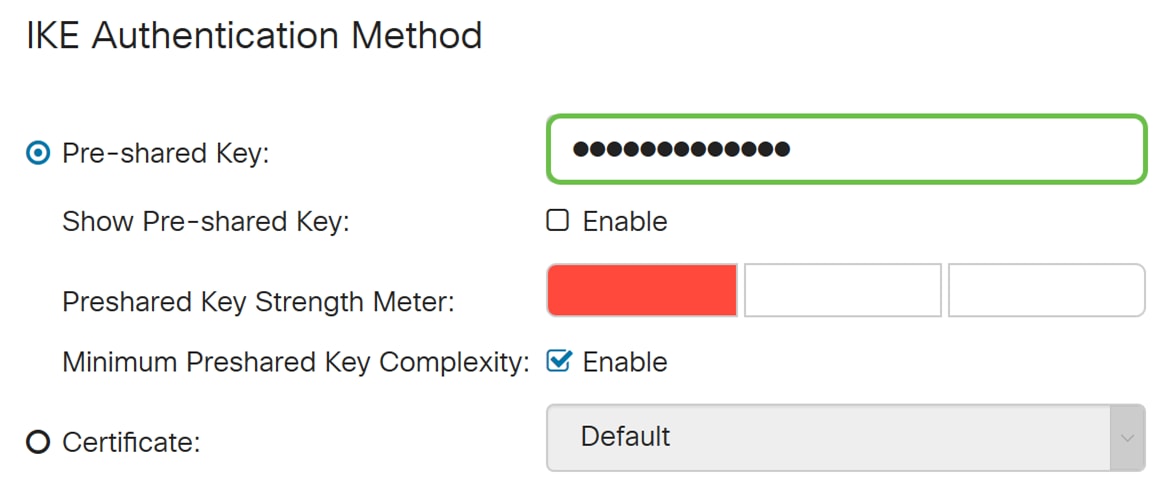
Step 8. Enter in the Pre-shared Key that you want to use to authenticate. Pre-shared key can be whatever you want it to be. The pre-shared key configured on Shrew Soft VPN client will have to be the same as here when you configure it.
In this example, we will be using CiscoTest123! as the pre-shared key.
Note: The pre-shared key that was entered here is an example. It is recommended to enter a more complex pre-shared key.
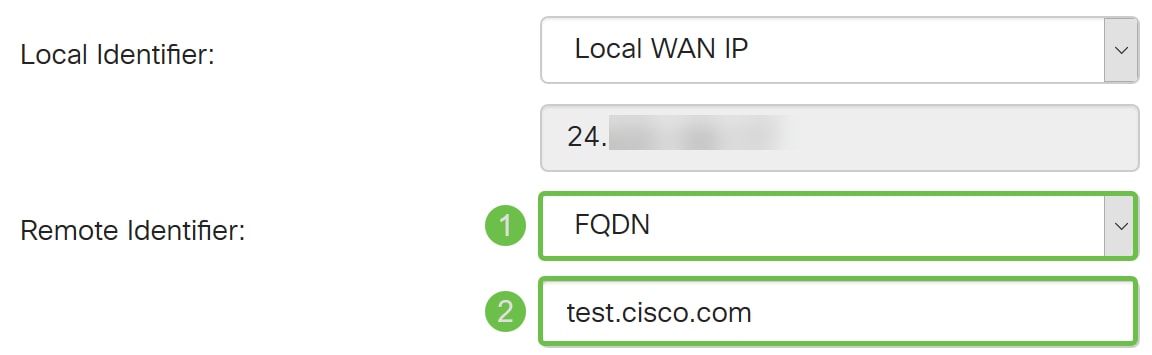
Step 9. Select the Local Identifier from the drop-down list. The following options are defined as:
· Local WAN IP – This option uses the IP address of the Wide Area Network (WAN) interface of the VPN gateway
· IP Address – This option allows you to manually enter an IP address for the VPN connection. You would need to enter the WAN IP address of the router at the site (office).
· FQDN – This option will use the Fully Qualified Domain Name (FQDN) of the router when establishing the VPN connection.
· User FQDN – This option lets you use a complete domain name for a specific user on the Internet.
In this example, we will be selecting Local WAN IP as our local identifier.
Note: The Local WAN IP of the router will automatically be filled in.
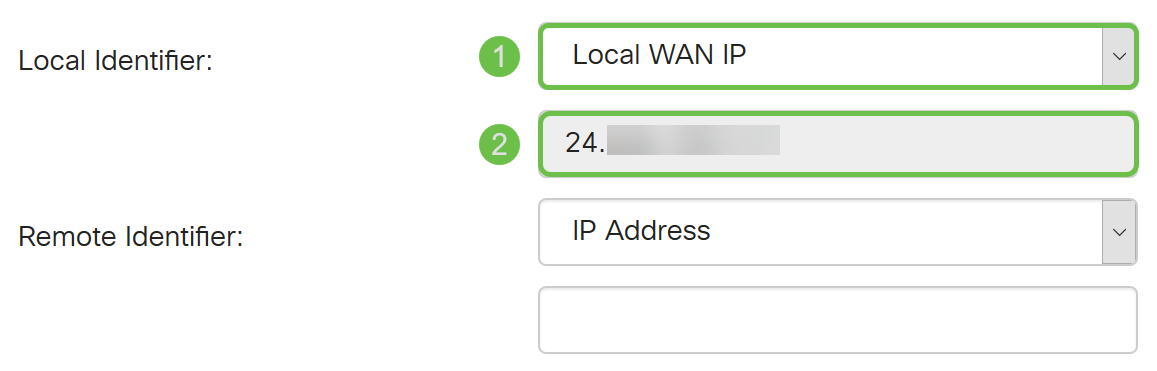
Step 10. In the Remote Identifier drop-down list, select either IP Address, FQDN, or User FQDN. Then enter in the appropriate response from what you have selected. In this example, we will be selecting FQDN and entering test.cisco.com.
Step 11. Check Extended Authentication checkbox to enable. This will provide an additional level of authentication that will require remote users to key in their credentials before being granted access to the VPN.
If you have enabled Extended Authentication, click the plus icon to add a user group. Select the group from the drop-down list that you want to use for extended authentication. We will be selecting ShrewSoftGroup as the group.

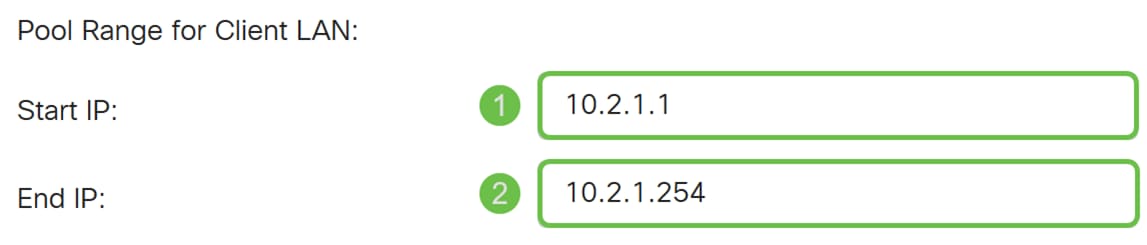
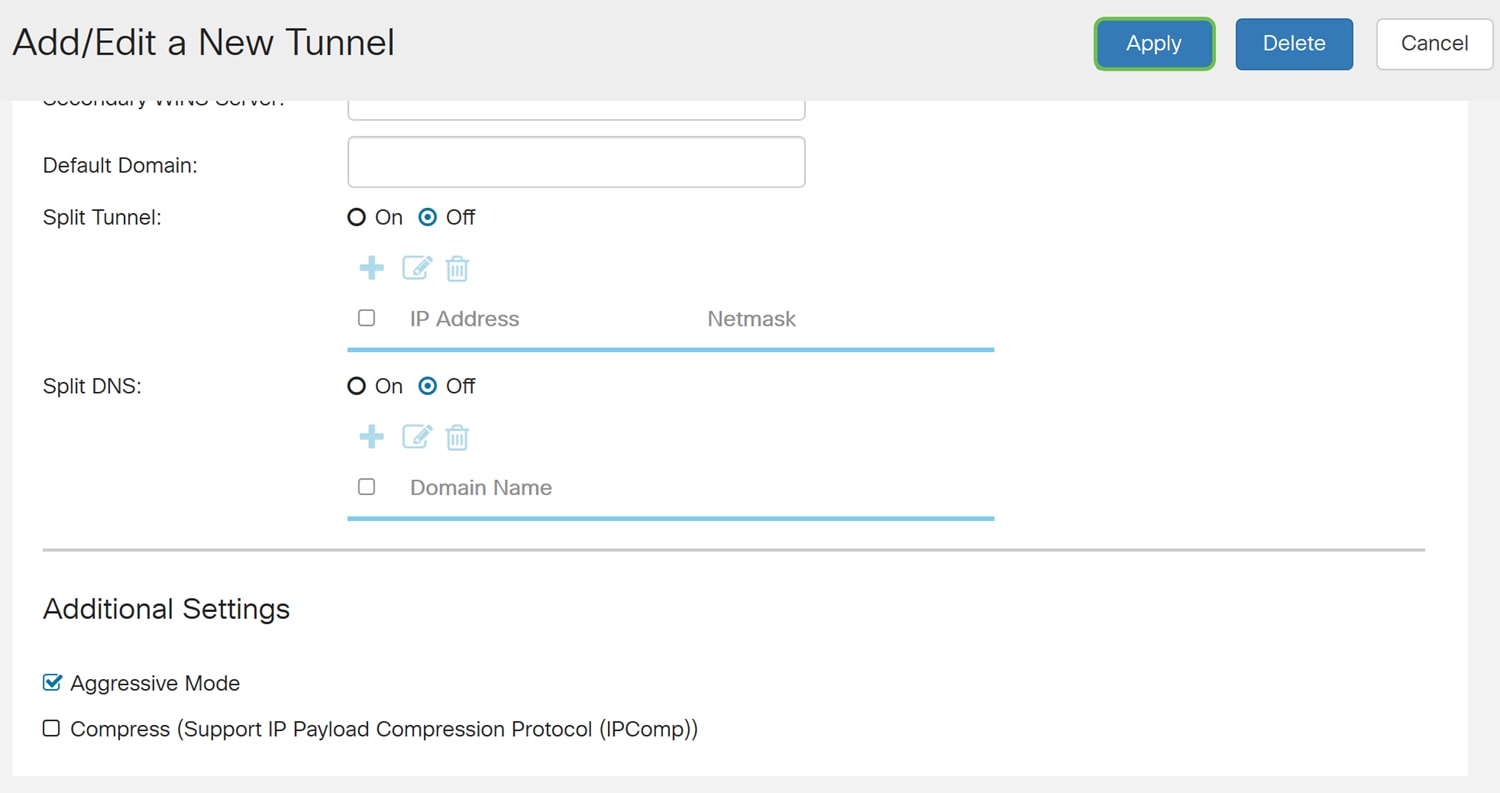
Step 12. In the Pool Range for Client LAN, enter the range of IP addresses that can be assigned to a VPN client in the Start IP and End IP field. This needs to be a pool of addresses that doesn’t overlap with the site addresses.
We will be entering 10.2.1.1 as our Start IP and 10.2.1.254 as our End IP.
Step 13. (Optional) Click the Advanced Settings tab.
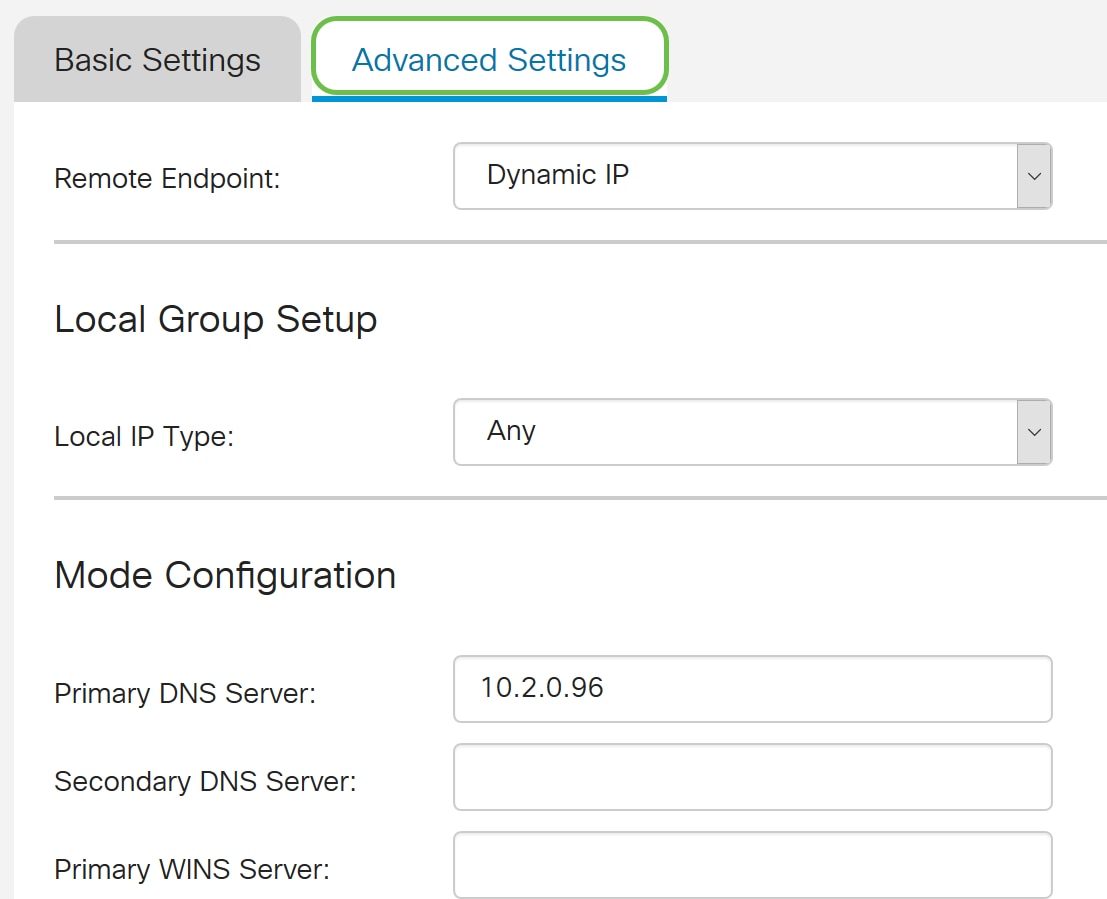
Step 14. (Optional) Here you can specify the Remote Endpoint IP address. In this guide we will use Dynamic IP, as the IP address for the end client is not fixed.
You can also specify which internal resources will be available under the Local Group Setup.
If you select Any, all internal resources will be available.
You can also choose to use Internal DNS and WINS servers. For that you need to specify them under Mode Configuration.
You also have the possibility to use full or split tunnel and split DNS.
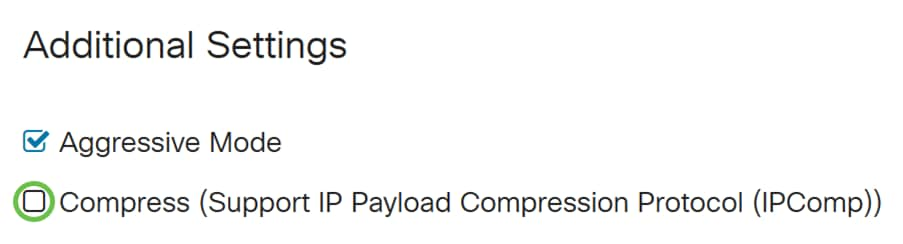
Scroll down to Additional Settings. Check the Aggressive Mode checkbox to enable Aggressive mode. Aggressive mode is when the negotiation for IKE SA is compressed into three packets with all the SA required data to be passed by the initiator. The negotiation is quicker but they have a vulnerability of exchange identities in clear text.
Note: Additional information for main mode vs aggressive mode, please see: Main Mode Vs Aggressive Mode
In this example, we will be enabling Aggressive Mode.
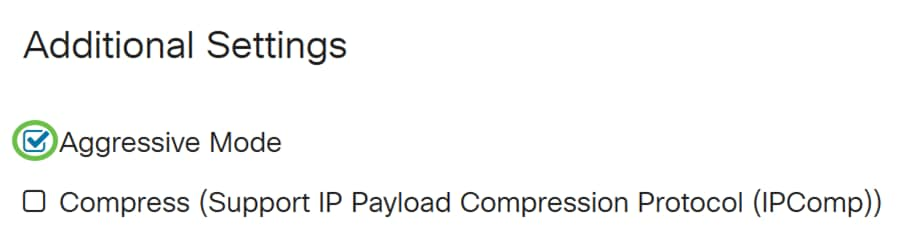
Step 15. (Optional) Check the Compress (Support IP Payload Compression Protocol (IPComp)) checkbox to enable the router to propose compression when it starts a connection. This is a protocol that reduces the size of IP datagrams. If the responder rejects this proposal, then the router does not implement compression. When the router is the responder, it accepts compression, even if compression is not enabled.
We will be leaving Compress unchecked.
Step 16. Click Apply to add the new tunnel.
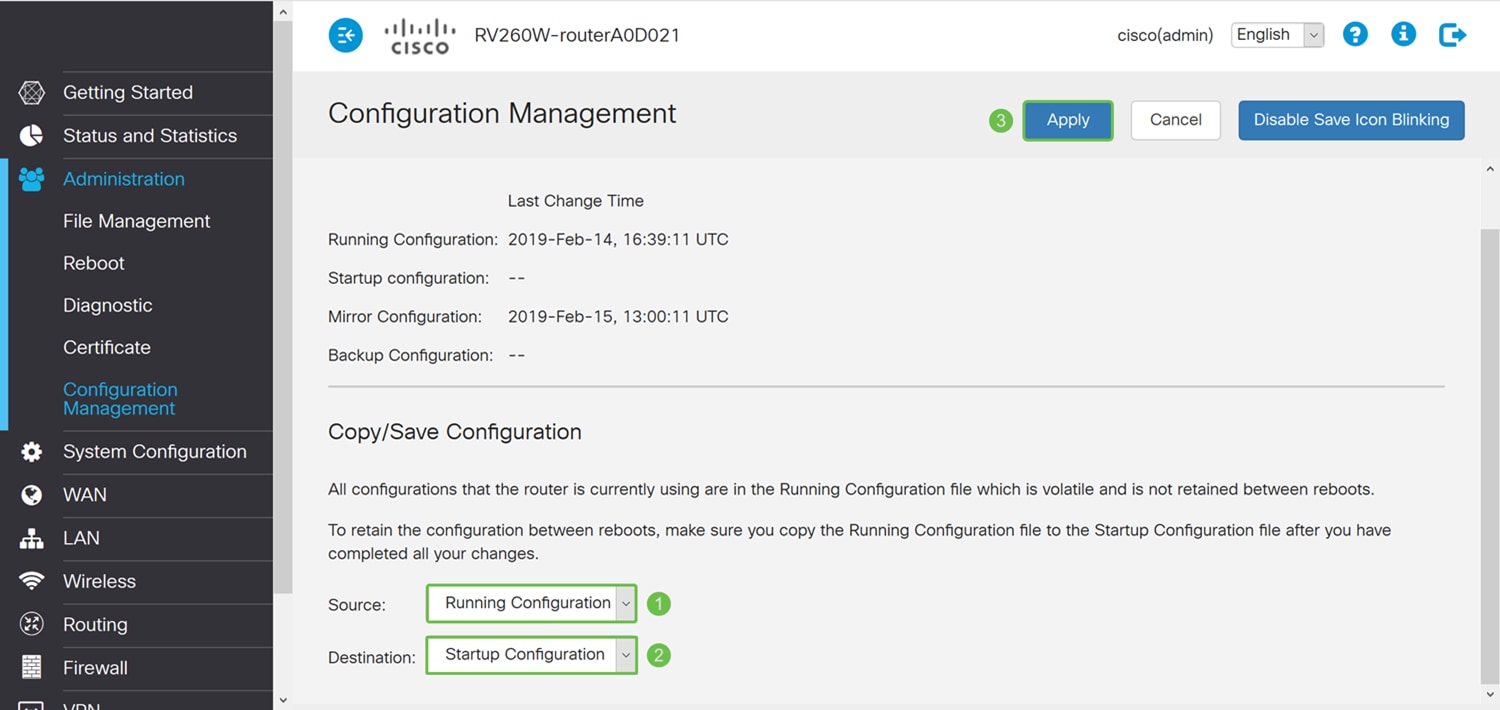
Step 17. Click the flashing Save icon on the top of the web configuration page.
Step 18. The Configuration Management page opens. In the Copy/Save Configuration section, make sure the Source field has Running Configuration and Destination field has Startup Configuration. Then press Apply. All configurations that the router is currently using are in the Running Configuration file which is volatile and is not retained between reboots. Copying the Running Configuration file to the Startup Configuration file will retain your configuration between reboots.
Configuring Shrew Soft VPN Client
If you haven’t downloaded the Shrew Soft VPN client, feel free to download the client by clicking on this link: Shrew Soft VPN Client for Windows. We will be using standard edition. If you have already downloaded Shrew Soft VPN client, feel free to proceed onto the first step.
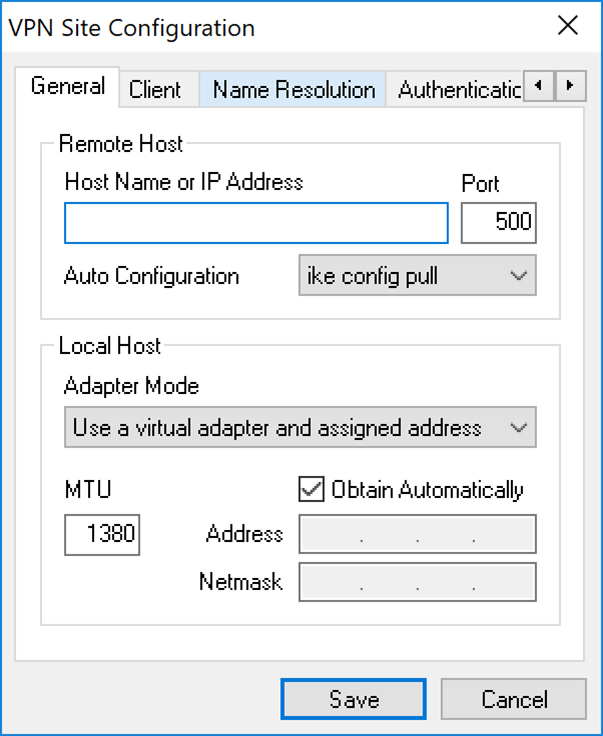
Shrew Soft VPN Client: General Tab
Step 1. Open Shrew VPN Access Manager and click Add to add a new profile.
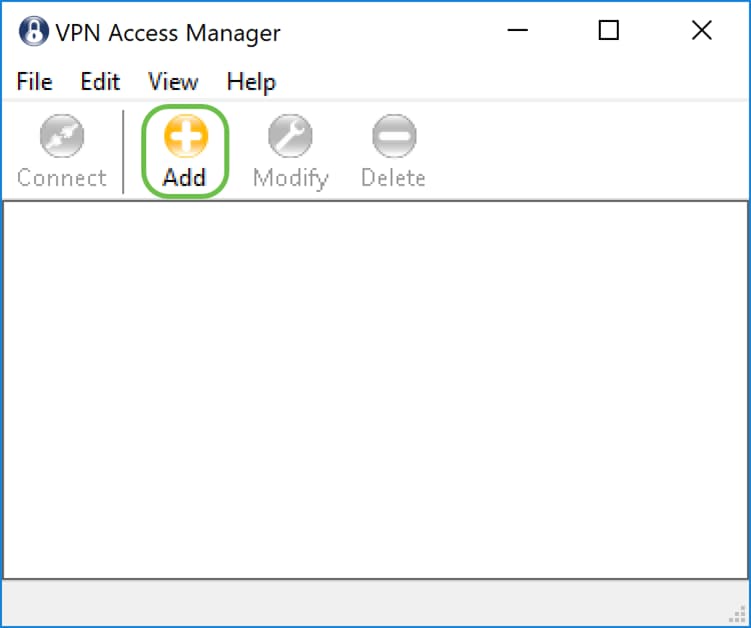
The VPN Site Configuration window appears.
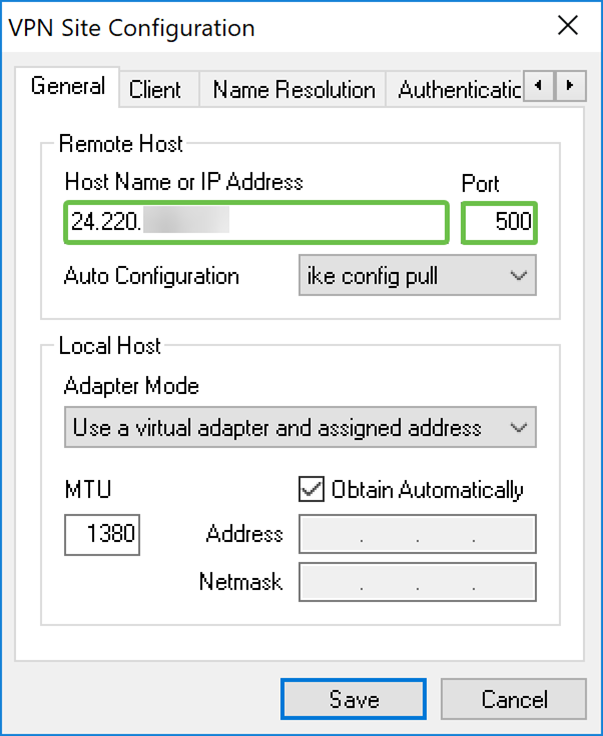
Step 2. In the Remote Host section under the General tab, enter the public Host Name or IP address of the network you are trying to connect to. In this example, we will enter the WAN IP address of the RV160/RV260 on site to setup the connection.
Note: Make sure that the port number is set to the default value of 500. For the VPN to work, the tunnel uses UDP port 500 which should be set to allow ISAKMP traffic to be forwarded at the firewall.
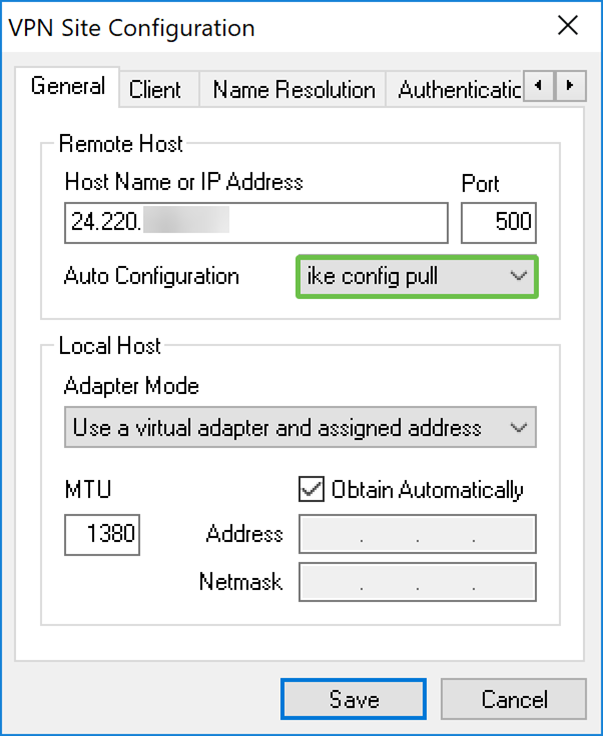
Step 3. In the Auto Configuration drop-down list, select an option. The available options are defined as follows:
· Disabled – disables any automatic client configuration
· Ike Config Pull – Allows setting requests from a computer by the client. With the support of the pull method by the computer, the request returns a list of settings that are supported by the client.
· Ike Config Push – Gives a computer the opportunity to offer settings to the client through the configuration process. With the support of the push method by the computer, the request returns a list of settings that are supported by the client.
· DHCP Over IPsec – Gives the client the opportunity to request settings from the computer through DHCP over IPsec.
In this example, we will be selecting ike config pull.
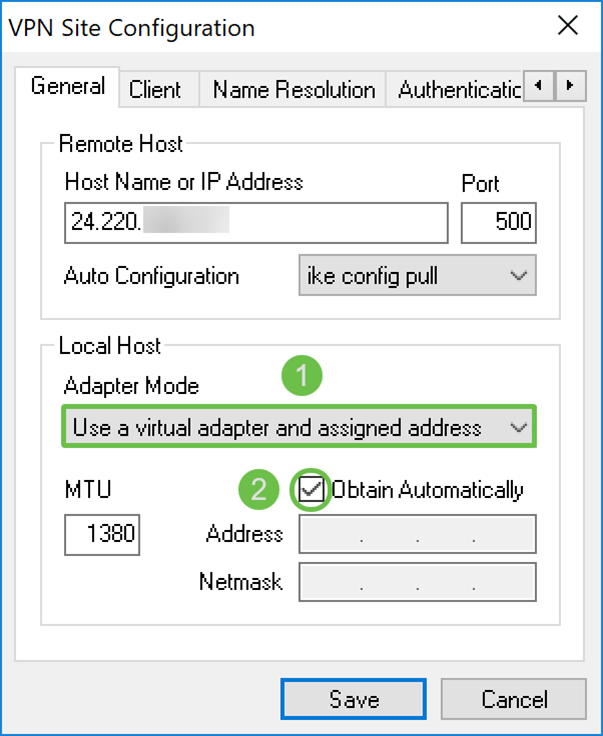
Step 4. In the Local Host section, choose Use a virtual adapter and assigned address in the Adapter Mode drop-down list and check the Obtain Automatically checkbox. The available options are defined as follows:
· Use a virtual adapter and assigned address – Allows the client to use a virtual adapter with a specified address as the source for its IPsec communications.
· Use a virtual adapter and random address – Allows the client to use a virtual adapter with a random address as the source for its IPsec communications.
· Use an existing adapter and current address – Allows the client to only use its existing, physical adapter with its current address as the source for its IPsec communications.
Shrew Soft VPN Client: Client Tab
Step 1. Click on the Client tab. In the NAT Traversal drop-down list, select the same setting you configured on the RV160/RV260 for NAT Traversal. The available Network Address Traversal (NATT) menu options are defined as follows:
· Disabled – The NATT protocol extensions will not be used.
· Enabled – The NATT protocol extensions will only be used if the VPN Gateway indicates support during negotiations and NAT is detected.
· Force-Draft – The Draft version of the NATT protocol extensions will be used regardless of whether or not the VPN Gateway indicates support during negotiations or NAT is detected.
· Force-RFC – The RFC version of the NATT protocol will be used regardless of whether or not the VPN Gateway indicates support during negotiations or NAT is detected.
· Force-Cisco-UDP – Force UDP encapsulation for VPN clients without NAT.
In this document, we will be selecting enable for NAT Traversal and leaving NAT Traversal Port and Keep-alive packet rate as the default value.
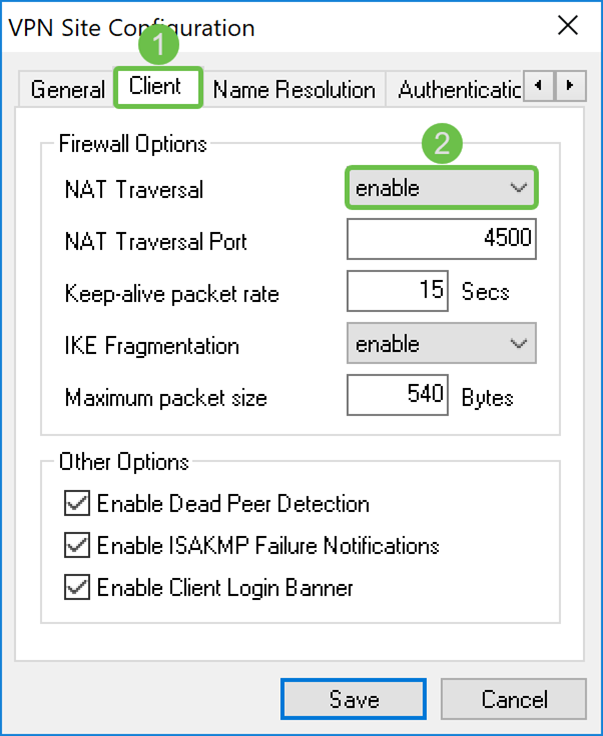
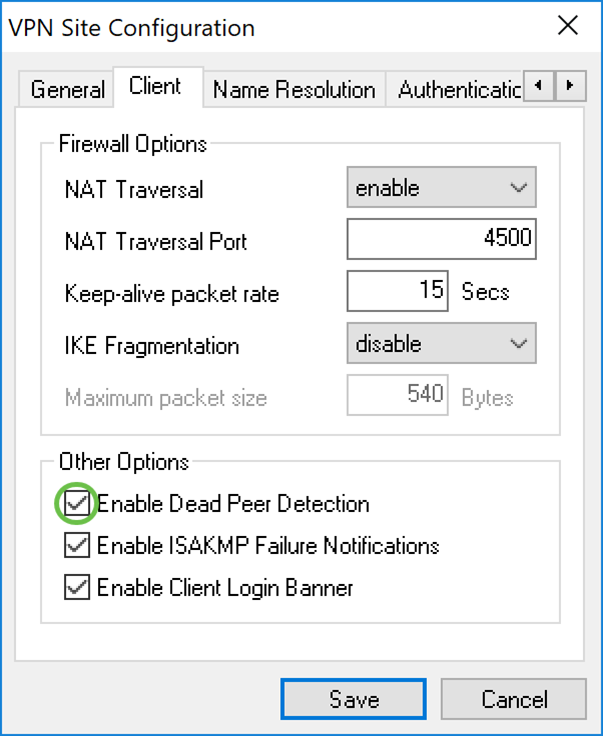
Step 2. In the IKE Fragmentation drop-down list, select either Disable, Enable, or Force. The options are defined as follows:
· Disable – The IKE Fragmentation protocol extension will not be used.
· Enable – The IKE Fragmentation protocol extension will only be used if the VPN gateway indicates support during negotiations.
· Force – The IKE Fragmentation protocol extension will be used regardless of whether or not the VPN Gateway indicates support during negotiations.
We have selected disable for IKE Fragmentation.

Step 3. Check Enable Dead Peer Detection checkbox to enable Dead Peer Detection protocol. If this option is enabled, it will only be used if the router supports it. This allows the client and the router to check the status of the tunnel to detect when one side is no longer able to respond. This option is enabled by default.
In this example, we will be leaving Dead Peer Detection checked.
Step 4. Check the Enable ISAKMP Failure Notification checkbox to enable ISAKMP failure notification from the VPN Client IPsec Daemon. This is enabled by default.
In this example, we will be leaving ISAKMP Failure Notification checked.

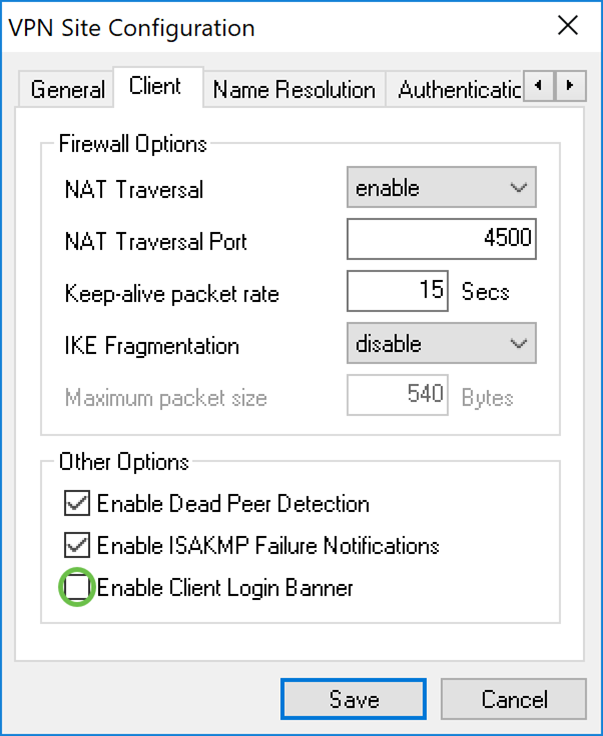
Step 5. Uncheck the Enable Client Login Banner to disable. This will display a login banner after the tunnel is established with the router. The router must support the Transaction Exchange as well as configured to forward a login banner to the client. This value is enabled by default.
We will be unchecking the Client Login Banner.
Shrew Soft VPN Client: Name Resolution Tab
Step 1. Click on the Name Resolution tab, and check the Enable DNS checkbox if you want to enable DNS. If specific DNS settings are not required for your site configuration, uncheck the Enable DNS checkbox.
If Enable DNS is checked and your remote gateway is configured to support the Configuration Exchange, the gateway is able to provide DNS settings automatically. If not, verify that the Obtain Automatically checkbox is unchecked and manually enter a valid DNS Server Address.
In this example, Enable DNS is unchecked.

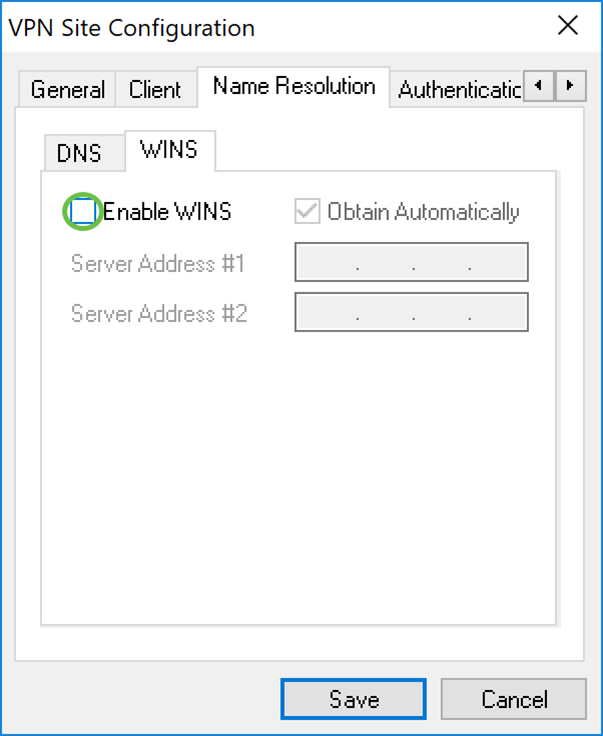
Step 2. Check the Enable WINS checkbox if you want to enable the Windows Internet Name Server (WINS). If your remote gateway is configured to support the Configuration Exchange, the gateway is able to provide WINS settings automatically. If not, verify that the Obtain Automatically checkbox is unchecked and manually enter a valid WINS Server Address.
Note: By providing WINS configuration information, a client will be able to resolve WINS names using a server located in the remote private network. This is useful when attempting to access remote windows network resources using a Uniform Naming Convention path name. The WINS server would typically belong to a Windows Domain Controller or a Samba Server.
In this example, Enable WINS is unchecked.
Shrew Soft VPN Client: Authentication Tab
Step 1. Click on the Authentication tab, and select Mutual PSK + XAuth in the Authentication Method drop-down list. The available options are defined as follows:
· Hybrid RSA + XAuth – The client credential is not needed. The client will authenticate the gateway. The credentials will be in the form of PEM or PKCS12 certificate files or key files type.
· Hybrid GRP + XAuth – The client credential is not needed. The client will authenticate the gateway. The credentials will be in the form of PEM or PKCS12 certificate file and a shared secret string.
· Mutual RSA + XAuth – Client and gateway both need credentials to authenticate. The credentials will be in the form of PEM or PKCS12 certificate files or key type.
· Mutual PSK + XAuth – Client and gateway both need credentials to authenticate. The credentials will be in the form of a shared secret string.
· Mutual RSA – Client and gateway both need credentials to authenticate. The credentials will be in the form of PEM or PKCS12 certificate files or key type.
· Mutual PSK – Client and gateway both need credentials to authenticate. The credentials will be in the form of a shared secret string.
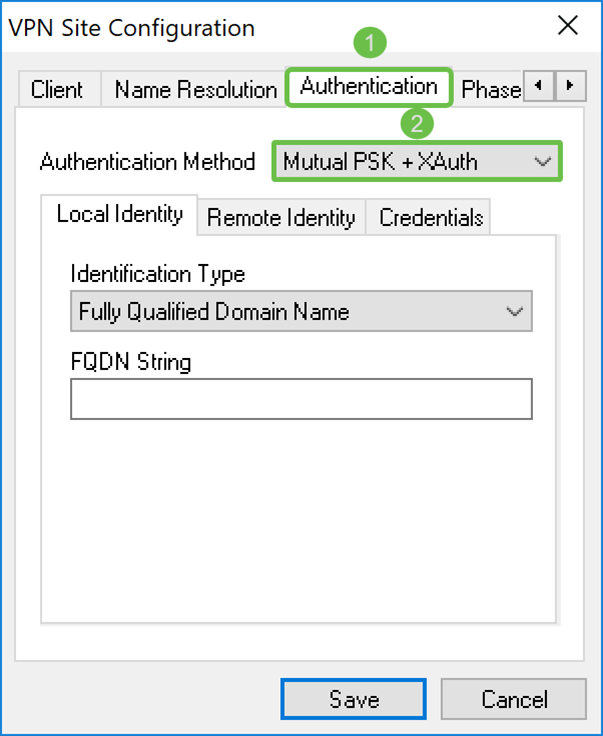
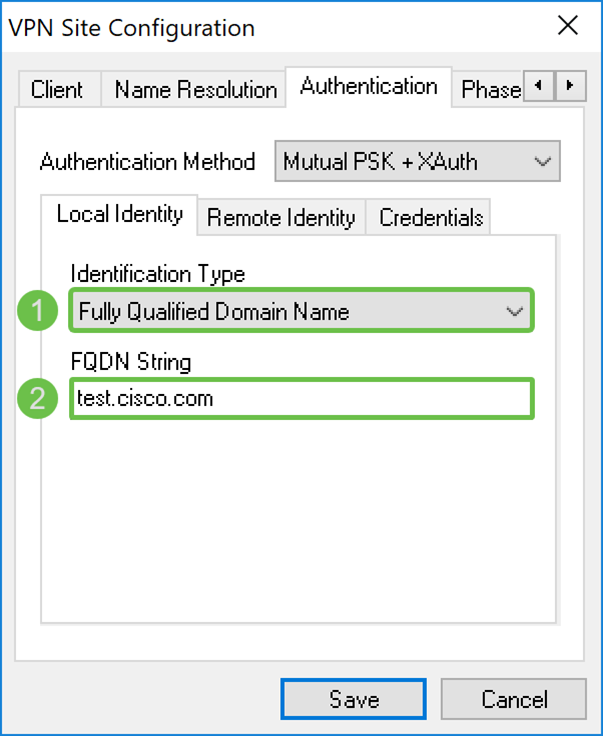
Step 2. In the Local Identity tab, select the identification type and then enter the appropriate string in the empty field. The following options are defined as:
· Any – This is only accepted on the Remote Identity tab. The client will accept any ID type and value. This should be used with caution as it bypasses part of the IKE phase 1 identification process.
· Fully Qualified Domain Name – This option, you must provide a FQDN string in the form of a DNS domain string. For example, “cisco.com” would be an acceptable value. The client would only allow this option to be selected if a PSK Authentication mode is being used.
· User Fully Qualified Domain Name – You must provide a User FQDN string in the form of a user@domain string. For example, “dave@cisco.com” would be an acceptable value. The client would only allow this option to be selected if a PSK authentication mode is being used.
· IP Address – When IP address is selected, the Use a discovered local host address checkbox is automatically checked by default. This means that the value would be automatically determined. Uncheck the checkbox if you would like to use an address other than the adapter address used to communicate with the client gateway. Then, enter in a specific address string. The client will only allow this option to be selected if a PSK authentication mode is being used.
· Key Identifier – When this option is selected, you must provide an identifier string.
In this example, we will be selecting Fully Qualified Domain Name and entering test.cisco.com in the FQDN String field.
Step 3. Click the Remote Identity tab and select the identification type. Options include: Any, Fully Qualified Domain Name, User Fully Qualified Domain Name, IP Address, or Key Identifier.
In this document, we will be using Any as our identification type.

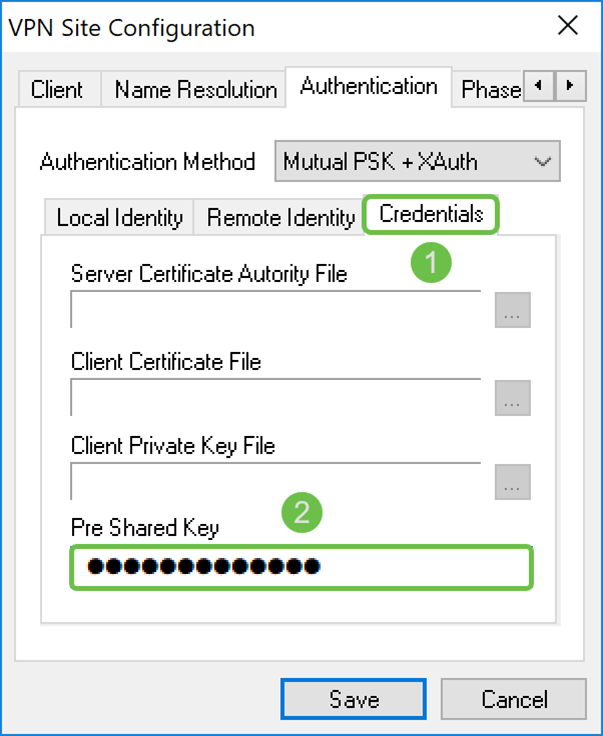
Step 4. Click on the Credentials tab and enter the same pre-shared key you configured on the RV160/RV260.
We will be entering CiscoTest123! in the Pre Shared Key field.
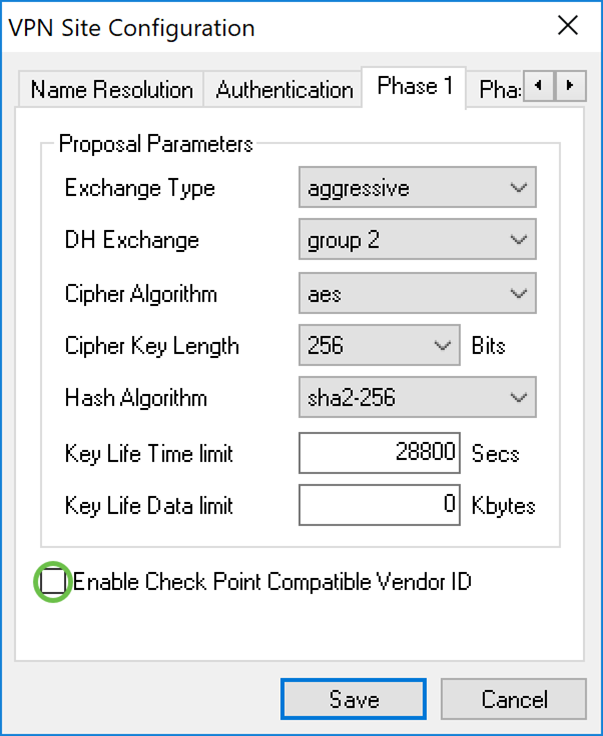
Shrew Soft VPN Client: Phase 1 Tab
Step 1. Click on the Phase 1 tab. Configure the following parameters to have the same settings that you configured for the RV160/RV260.
The parameters in Shrew Soft should match the RV160/RV260 configuration that you selected in Phase 1. In this document, the parameters in Shrew Soft will be set as:
· Exchange Type: aggressive
· DH Exchange: group 2
· Cipher Algorithm: aes
· Cipher Key Length: 256
· Hash Algorithm: sha2-256
· Key Life Time limit: 28800
· Key Life Data limit: 0
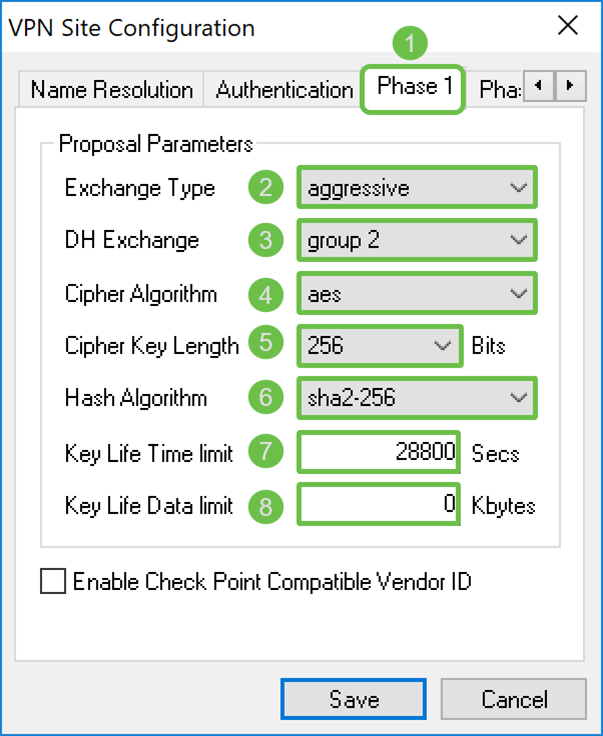
Step 2. (Optional) If your gateway offers a Cisco compatible vendor ID during phase 1 negotiations, check the Enable Check Point Compatible Vendor ID checkbox. If the gate does not offer a Cisco compatible vendor ID or if you are unsure, leave the checkbox unchecked. We will be leaving the checkbox unchecked.
Shrew Soft VPN Client: Phase 2 Tab
Step 1. Click the Phase 2 tab. Configure the following parameters to have the same settings that you configured for the RV160/RV260.
The parameters should match the RV160/260 configuration in Phase 2 as follows:
· Transform Algorithm: esp-aes
· Transform Key Length: 256
· HMAC Algorithm: sha2-256
· PFS Exchange: group 2
· Compress Algorithm: disabled
· Key Life Time limit: 3600
· Key Life Data limit: 0
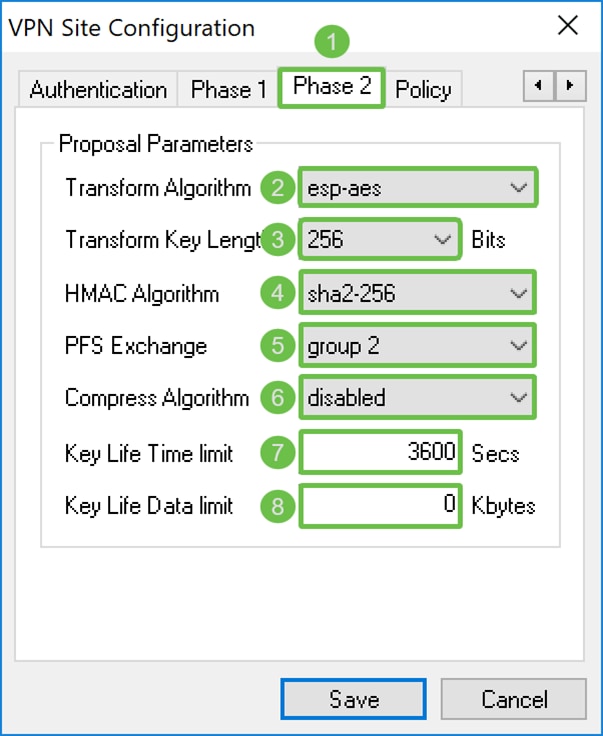
Step 2. Press the Save button at the bottom of the page to save your configuration.
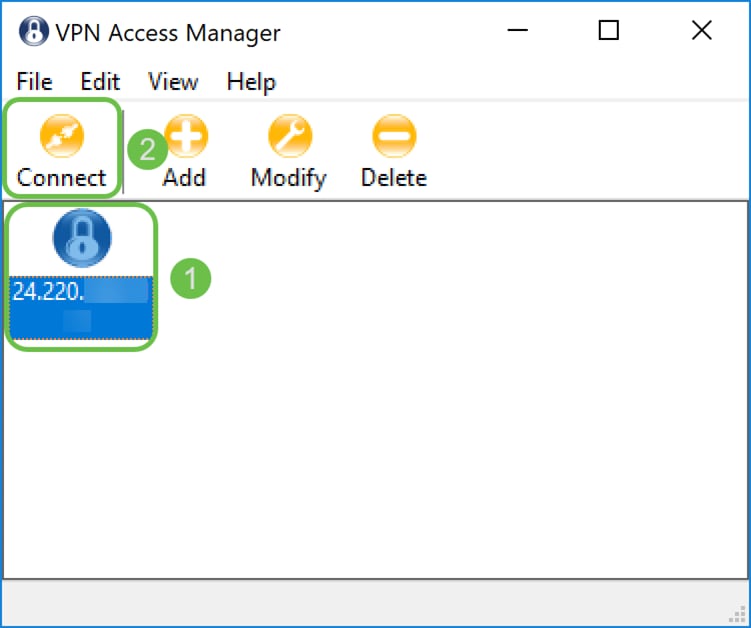
Shrew Soft VPN Client: Connecting
Step 1. In the VPN Access Manager, select the VPN profile that you have just created. Then press Connect.
Note: If you want to rename the VPN profile, right-click on it and select Rename. Part of the IP address in the profile is blurred out to protect that network.
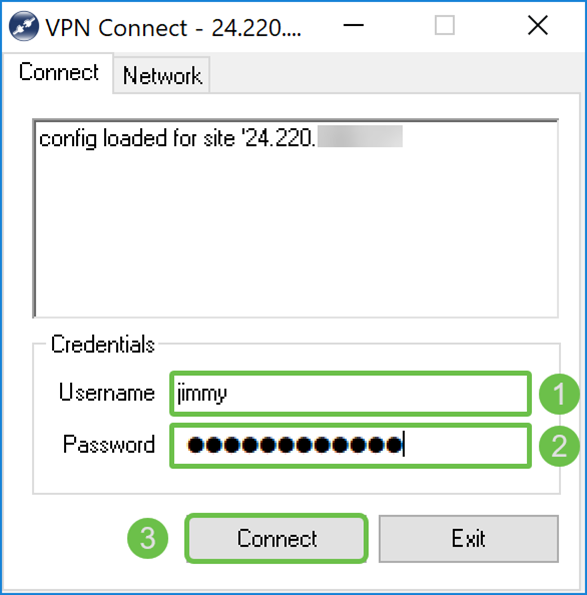
Step 2. A VPN Connect window appears. Enter the username and password that created in the Creating User Account section. Then press Connect.
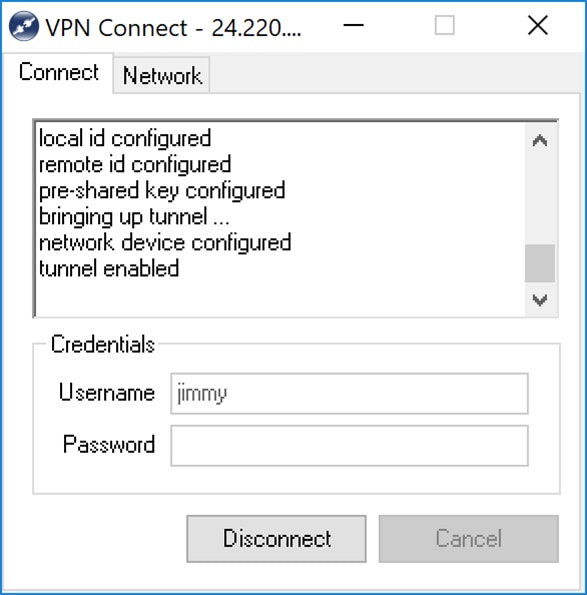
Step 3. After pressing Connect, the configuration information is passed to the IKE Daemon along with a request to communicate. Different messages of the connection state are displayed in the output window. If the connection succeeds, you will get a message that says, “network device configured” and “tunnel enabled”. The Connection button will change to a Disconnect button.
VPN Connection Troubleshooting Tips
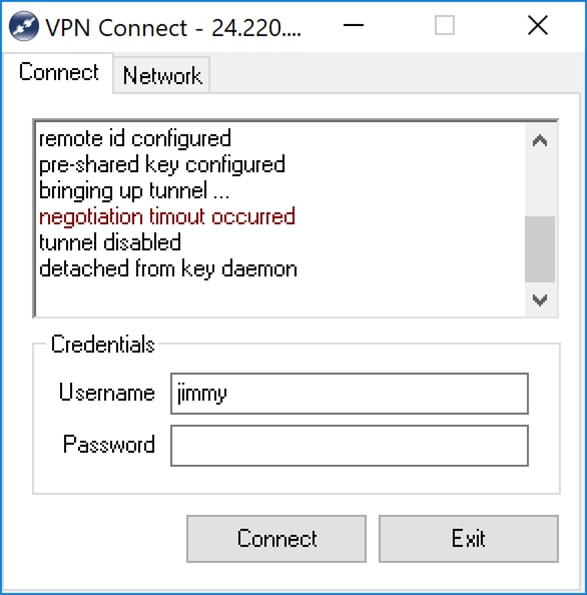
If you get error messages that says, “negotiation timeout occurred”, “tunnel disabled”, and “detached from key daemon”. You might want to double check your configuration on your router and Shrew Soft VPN client to make sure they match.
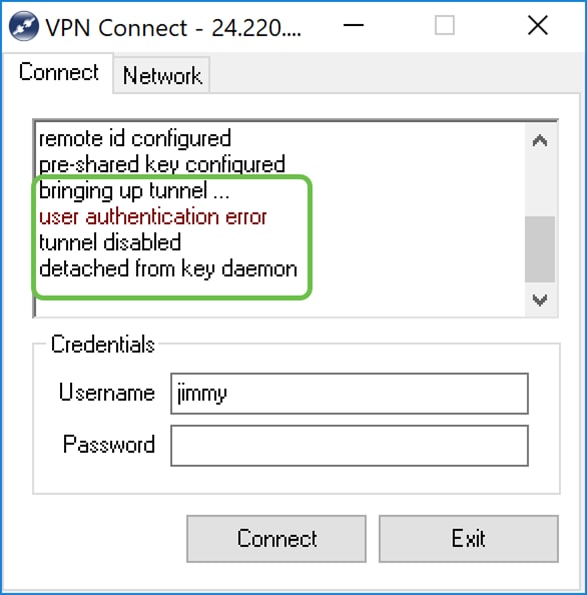
If you get an error message that says, “user authentication error” then that means that you have entered the wrong password for that username. Double check the user credentials and make sure that it is correctly configured and entered.
Verification
Step 1. Click the Network tab in the VPN connect window. In this tab, you should be able to view the current network statistics for the connection. Under the Tunnel section, you should see Connected as the status.

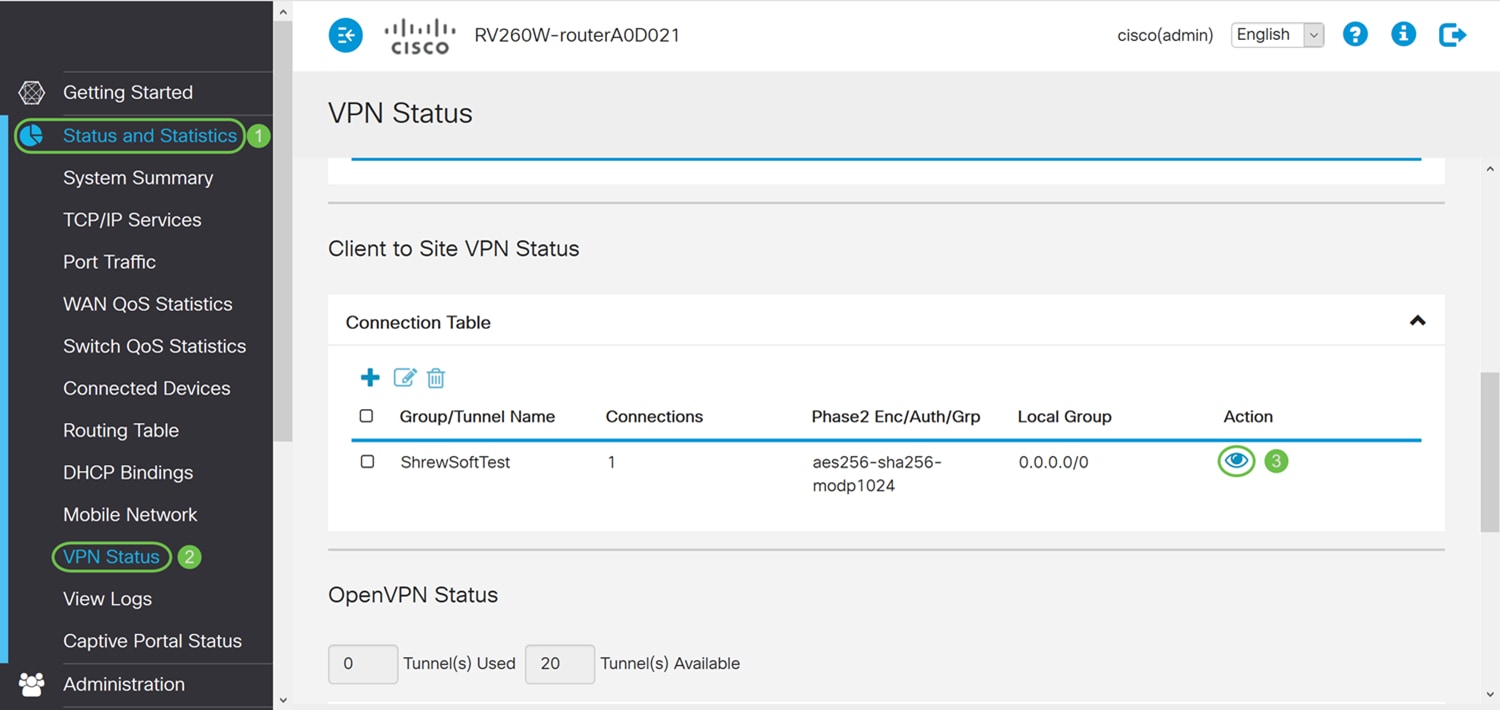
Step 2. On your router, navigate to Status and Statistics > VPN Status. In the VPN Status page, scroll down to Client to Site VPN Status section. In this section, you can view all the Client-to-Site connections. Click the eye icon to view more details.
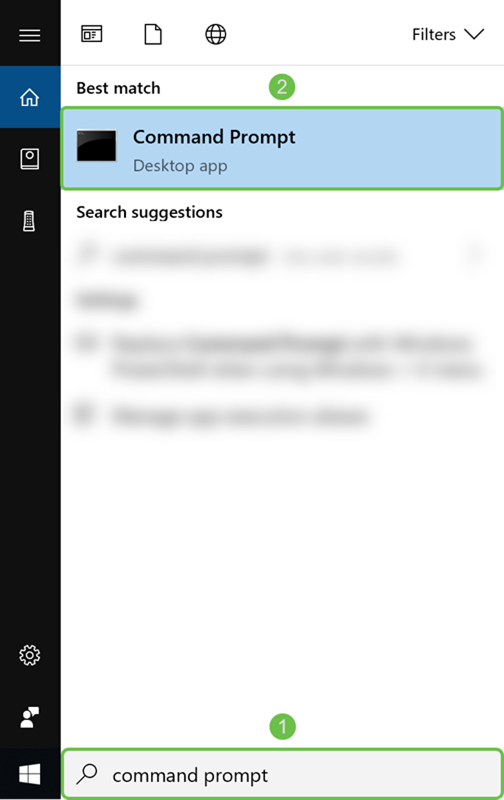
Step 3. Navigate to your search bar on your taskbar and search for Command Prompt.
Note: The following instructions below is used on a Windows 10 operating system. This may vary depending on the operating system that you are using.
Step 4. Type in the command without the quotes, “ping [private IP address of the router]” but enter the private IP address instead of the words. You should be able to successfully ping the private IP address of the router.
In this example, we will be typing in ping 10.2.0.96. 10.2.0.96 is the private IP address of our router.

Conclusion
You should now have successfully connected your Shrew Soft VPN client with RV160 or RV260.
 Feedback