Introduction
This document describes how to configure Cisco Secure Client (CSC) with Umbrella Module for Kandji RMM (macOS).
Prerequisites
Requirements
Cisco recommends that you have knowledge of these topics:
- Access to Umbrella Dashboard.
- Access to Kandji Portal.
- Secure Client Umbrella Module Profile (orginfo.json).
- Secure Client Pre-deployment package for the version to be deployed.

Note: This guide utilizes the .zip deployment method within Kandji, along with a post-install script.
Components Used
The information in this document is based on Cisco Secure Client with Umbrella module.
The information in this document was created from the devices in a specific lab environment. All of the devices used in this document started with a cleared (default) configuration. If your network is live, ensure that you understand the potential impact of any command.
Overview
This article describes how to configure Cisco Secure Client (CSC) with Umbrella Module for Kandji RMM (macOS).

Caution: This article is provided as-is as of March 3, 2025. Cisco Umbrella support does not guarantee these instructions are valid after this date and are subject to change based on updates from Kandji.
Prepping your .zip installer
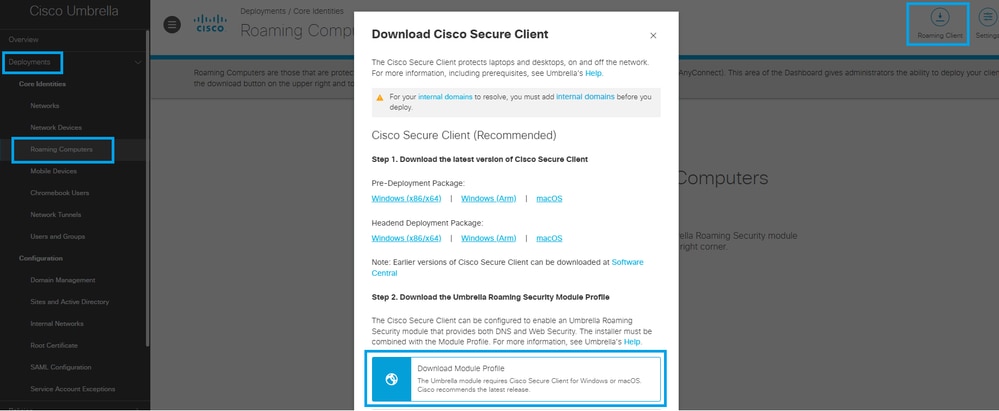
1. Access your Umbrella Dashboard and download the Secure Client Umbrella Module Profile (orginfo.json) by navigating to Deployments > Roaming Clients > Download > Download Module Profile.
 34747396643092
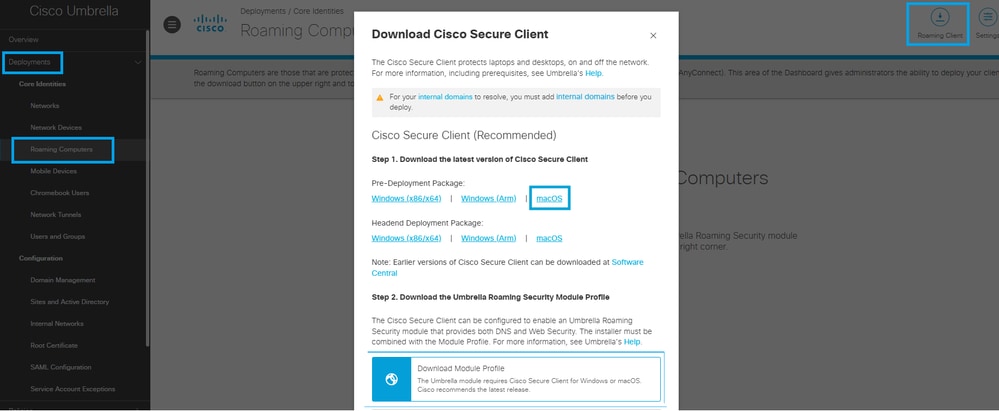
2. You can also download the latest version of the macOS installer by selecting the Pre-Deployment Package.
 34747396644884
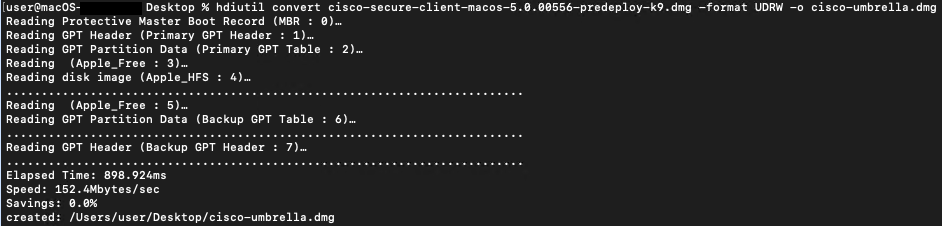
3. You can now configure the .dmg file for deployment by changing the installer image to a writable version. This can be done using Disk Utility or the Terminal application with the command:
hdiutil convert <source dmg> -format UDRW -o <output dmg>
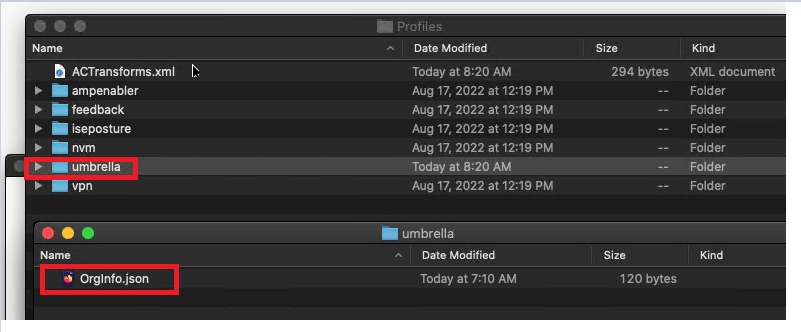
4. Open the newly converted .dmg file and navigate to the 'Profiles' folder. Then, in the Umbrella folder, place the OrgInfo.json file you downloaded from your dashboard.
 34747396647444
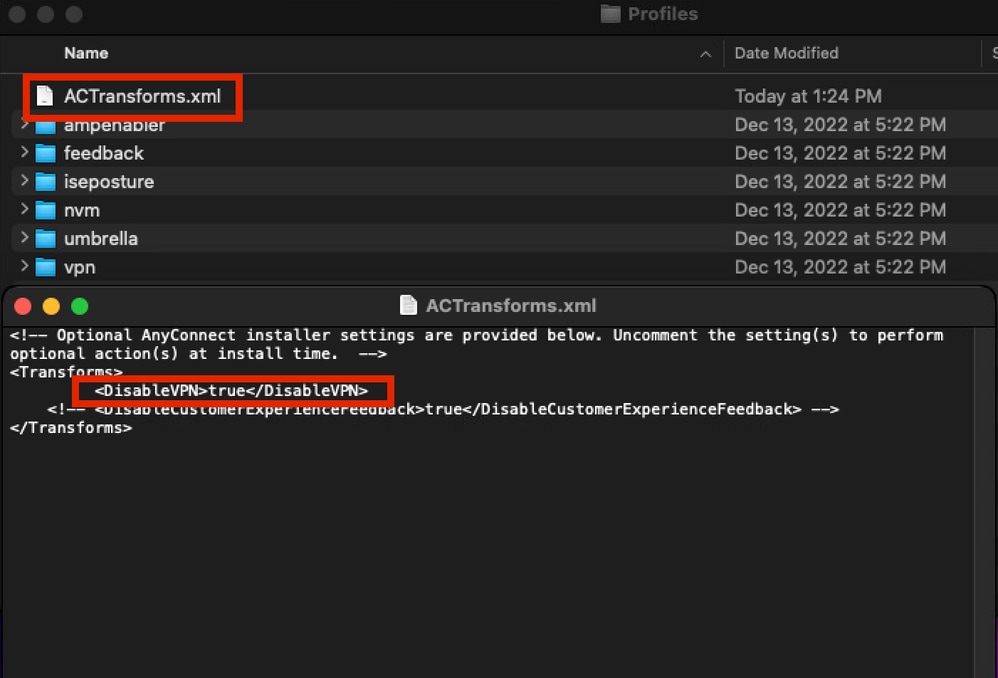
4.1. To optionally hide the VPN module, edit the ACTransforms.xml file. Update the <DisableVPN> element to true and remove the comment tags <!-- and -->
 34747372903956
5. Next, create a new file named install_choices.xml. This file can specify which modules you want to install.
Run this command to generate the file:
installer -pkg /volumes/Cisco\ Secure\ Client\ /Cisco\ Secure\ Client.pkg -showChoiceChangesXML > ~/Downloads/install_choices.xml
- To skip a module, define the module with 0.
- To install a module, define the module with 1.
This file needs to be located in the same folder as the modified .dmg file. Your folder structure can resemble this screenshot:
 34747372904212
In this example, the install_choices.xml file includes the Core VPN, Umbrella, and DART modules, each set to 1, indicating they are included in the Secure Client installation:
<?xml version="1.0" encoding="UTF-8"?>
<!DOCTYPE plist PUBLIC "-//Apple//DTD PLIST 1.0//EN" "http://www.apple.com/DTDs/PropertyList-1.0.dtd">
<plist version="1.0">
<array>
<dict>
<key>attributeSetting</key>
<true/>
<key>choiceAttribute</key>
<string>visible</string>
<key>choiceIdentifier</key>
<string>choice_anyconnect_vpn</string>
</dict>
<dict>
<key>attributeSetting</key>
<false/>
<key>choiceAttribute</key>
<string>enabled</string>
<key>choiceIdentifier</key>
<string>choice_anyconnect_vpn</string>
</dict>
<dict>
<key>attributeSetting</key>
<integer>1</integer>
<key>choiceAttribute</key>
<string>selected</string>
<key>choiceIdentifier</key>
<string>choice_anyconnect_vpn</string>
</dict>
<dict>
<key>attributeSetting</key>
<true/>
<key>choiceAttribute</key>
<string>visible</string>
<key>choiceIdentifier</key>
<string>choice_fireamp</string>
</dict>
<dict>
<key>attributeSetting</key>
<false/>
<key>choiceAttribute</key>
<string>enabled</string>
<key>choiceIdentifier</key>
<string>choice_fireamp</string>
</dict>
<dict>
<key>attributeSetting</key>
<integer>0</integer>
<key>choiceAttribute</key>
<string>selected</string>
<key>choiceIdentifier</key>
<string>choice_fireamp</string>
</dict>
<dict>
<key>attributeSetting</key>
<true/>
<key>choiceAttribute</key>
<string>visible</string>
<key>choiceIdentifier</key>
<string>choice_dart</string>
</dict>
<dict>
<key>attributeSetting</key>
<false/>
<key>choiceAttribute</key>
<string>enabled</string>
<key>choiceIdentifier</key>
<string>choice_dart</string>
</dict>
<dict>
<key>attributeSetting</key>
<integer>1</integer>
<key>choiceAttribute</key>
<string>selected</string>
<key>choiceIdentifier</key>
<string>choice_dart</string>
</dict>
<dict>
<key>attributeSetting</key>
<true/>
<key>choiceAttribute</key>
<string>visible</string>
<key>choiceIdentifier</key>
<string>choice_secure_firewall_posture</string>
</dict>
<dict>
<key>attributeSetting</key>
<false/>
<key>choiceAttribute</key>
<string>enabled</string>
<key>choiceIdentifier</key>
<string>choice_secure_firewall_posture</string>
</dict>
<dict>
<key>attributeSetting</key>
<integer>0</integer>
<key>choiceAttribute</key>
<string>selected</string>
<key>choiceIdentifier</key>
<string>choice_secure_firewall_posture</string>
</dict>
<dict>
<key>attributeSetting</key>
<true/>
<key>choiceAttribute</key>
<string>visible</string>
<key>choiceIdentifier</key>
<string>choice_iseposture</string>
</dict>
<dict>
<key>attributeSetting</key>
<false/>
<key>choiceAttribute</key>
<string>enabled</string>
<key>choiceIdentifier</key>
<string>choice_iseposture</string>
</dict>
<dict>
<key>attributeSetting</key>
<integer>0</integer>
<key>choiceAttribute</key>
<string>selected</string>
<key>choiceIdentifier</key>
<string>choice_iseposture</string>
</dict>
<dict>
<key>attributeSetting</key>
<true/>
<key>choiceAttribute</key>
<string>visible</string>
<key>choiceIdentifier</key>
<string>choice_nvm</string>
</dict>
<dict>
<key>attributeSetting</key>
<false/>
<key>choiceAttribute</key>
<string>enabled</string>
<key>choiceIdentifier</key>
<string>choice_nvm</string>
</dict>
<dict>
<key>attributeSetting</key>
<integer>0</integer>
<key>choiceAttribute</key>
<string>selected</string>
<key>choiceIdentifier</key>
<string>choice_nvm</string>
</dict>
<dict>
<key>attributeSetting</key>
<true/>
<key>choiceAttribute</key>
<string>visible</string>
<key>choiceIdentifier</key>
<string>choice_secure_umbrella</string>
</dict>
<dict>
<key>attributeSetting</key>
<false/>
<key>choiceAttribute</key>
<string>enabled</string>
<key>choiceIdentifier</key>
<string>choice_secure_umbrella</string>
</dict>
<dict>
<key>attributeSetting</key>
<integer>1</integer>
<key>choiceAttribute</key>
<string>selected</string>
<key>choiceIdentifier</key>
<string>choice_secure_umbrella</string>
</dict>
<dict>
<key>attributeSetting</key>
<true/>
<key>choiceAttribute</key>
<string>visible</string>
<key>choiceIdentifier</key>
<string>choice_thousandeyes</string>
</dict>
<dict>
<key>attributeSetting</key>
<false/>
<key>choiceAttribute</key>
<string>enabled</string>
<key>choiceIdentifier</key>
<string>choice_thousandeyes</string>
</dict>
<dict>
<key>attributeSetting</key>
<integer>0</integer>
<key>choiceAttribute</key>
<string>selected</string>
<key>choiceIdentifier</key>
<string>choice_thousandeyes</string>
</dict>
<dict>
<key>attributeSetting</key>
<false/>
<key>choiceAttribute</key>
<string>visible</string>
<key>choiceIdentifier</key>
<string>choice_duo</string>
</dict>
<dict>
<key>attributeSetting</key>
<true/>
<key>choiceAttribute</key>
<string>enabled</string>
<key>choiceIdentifier</key>
<string>choice_duo</string>
</dict>
<dict>
<key>attributeSetting</key>
<integer>0</integer>
<key>choiceAttribute</key>
<string>selected</string>
<key>choiceIdentifier</key>
<string>choice_duo</string>
</dict>
<dict>
<key>attributeSetting</key>
<true/>
<key>choiceAttribute</key>
<string>visible</string>
<key>choiceIdentifier</key>
<string>choice_zta</string>
</dict>
<dict>
<key>attributeSetting</key>
<false/>
<key>choiceAttribute</key>
<string>enabled</string>
<key>choiceIdentifier</key>
<string>choice_zta</string>
</dict>
<dict>
<key>attributeSetting</key>
<integer>0</integer>
<key>choiceAttribute</key>
<string>selected</string>
<key>choiceIdentifier</key>
<string>choice_zta</string>
</dict>
</array>
</plist>
6. You now change the installer image to a read-only version using either Disk Utility or the Terminal application:
hdiutil convert <source dmg> -format UDRO -o <output dmg>
7. The final step in preparing the Umbrella installation is to convert the installation folder into a .zip file, which is ready to upload to the Kandji Dashboard.
Kanji Dashboard Changes
1. For macOS 13 (and later) and Secure Client 5.1, the VPN Agent requires user approval before being launched by the OS. To automate this approval process or prevent users from disabling the Login Items owned by the Secure Client, you must deploy an MDM profile with attributes configured for Managed Login Items.
- Bundle Identifier Prefix: com.cisco.secureclient
- Team Identifier: DE8Y96K9QP
These can be created by using the Kandji guide Configure the Login & Background Items Library Item, which uses the bundle identifier: com.cisco.secureclient.
2. The Cisco Secure Client uses a network system extension on macOS 11 (and later), bundled into an application named "Cisco Secure Client - Socket Filter." Next, you need to have Kandji install this using the identifiers provided here:
- Team Identifier: DE8Y96K9QP
- Bundle Identifier: com.cisco.anyconnect.macos.acsockext
- System Extension Type: NetworkExtension
These identifiers can be set up by using the Kandji guide: System Extensions - Overview and Guide
3. The Cisco Secure Client must be deployed as a Custom App, which can be done by using the Kandji guide: Deploying Custom Apps
When you reach the Add & Configure stage, make these adjustments for deployment:
- Choose Package Type: Choose ZIP file
- Upload Installer: Upload the .zip file configured earlier in step 7.
- If you choose a .zip file type, you can have an additional field to define an unzip location. (Default location is /var/tmp/)
- Post-Install Script: Provide a script to be executed after the package is run.
- Update
<Filename.zip> to the name used in step 7 earlier.
- Update
<Folder Name> that is used to contain the .dmg file and the install_choices.xml file
- Update
<Output dmg file.dmg> to the name declared in step 5 earlier.
Example Script
#!/bin/bash

# Optional extract the ZIP file. (Kandji extracts to /var/tmp by default)
#unzip "/var/tmp/Cisco Secure Client 5-1-7-80.zip" -d /var/tmp/

# Mount the DMG.
hdiutil attach "/var/tmp/<Folder Name>/<Output dmg file.dmg>"

# Run the installer with our xml choices file.
installer -pkg "/Volumes/Cisco Secure Client 5.1.7.80/Cisco Secure Client.pkg" -applyChoiceChangesXML "/var/tmp/<Folder Name>/install_choices.xml" -target /

# Check installer exit code.
if [ $? -ne 0 ]; then
echo "Error: Installation failed."
# Add any necessary cleanup or rollback actions here
exit 1
fi

# Unmount the DMG.
hdiutil detach "Cisco Secure Client 5.1.7.80"

# Remove the temp files & folders.
rm -rf /var/tmp/<Folder Name>
rm -f /var/tmp/<Filename.zip>

exit 0
If you experience deployment issues related to deploying the Cisco Secure Client, you can contact the Cisco TAC team.
For deployment issues related to the Umbrella Module, please log a support ticket with Cisco Umbrella Support.
 Feedback