Introduction
This document describes how to deploy Cisco Secure Client with the Umbrella module to managed macOS devices using JAMF.
Prerequisites
Requirements
Cisco recommends that you have knowledge of these topics:
- macOS devices must be managed by JAMF.
- For MDM enrollment instructions for macOS, refer to JAMF documentation.
Components Used
The information in this document is based on Cisco Secure Client.
The information in this document was created from the devices in a specific lab environment. All of the devices used in this document started with a cleared (default) configuration. If your network is live, ensure that you understand the potential impact of any command.

Caution: This article is provided as-is as of February 1, 2025. Cisco Umbrella Support does not guarantee these instructions are valid after this date and are subject to change based on updates from JAMF and Apple.
Upload the Installation Package (PKG)
1. Download the Cisco Secure Client DMG from the Umbrella dashboard underDeployments > Roaming Computers > Roaming Client > Pre-Deployment Package > macOS.
2. Log in to your JAMF Pro cloud instance.
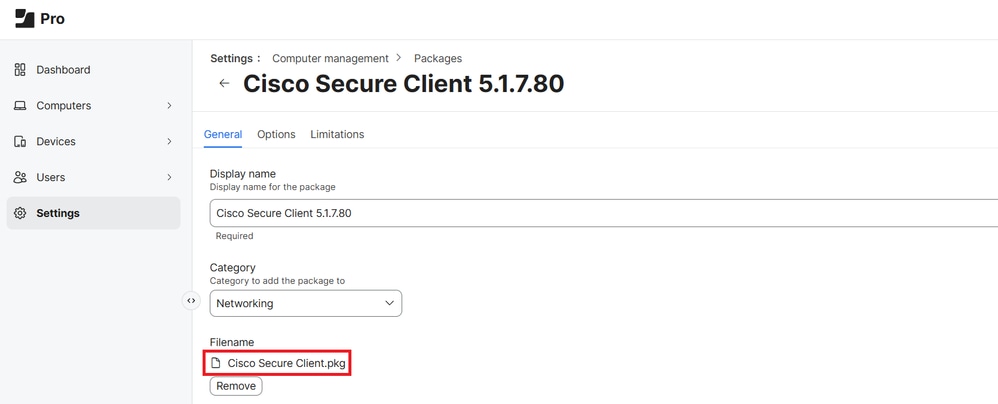
3. Navigate toSettings > Computer Management > Packages > New.
4. Upload the PKG extracted from the DMG package you downloaded from your Umbrella dashboard.
Add Configuration and Module Selection Scripts
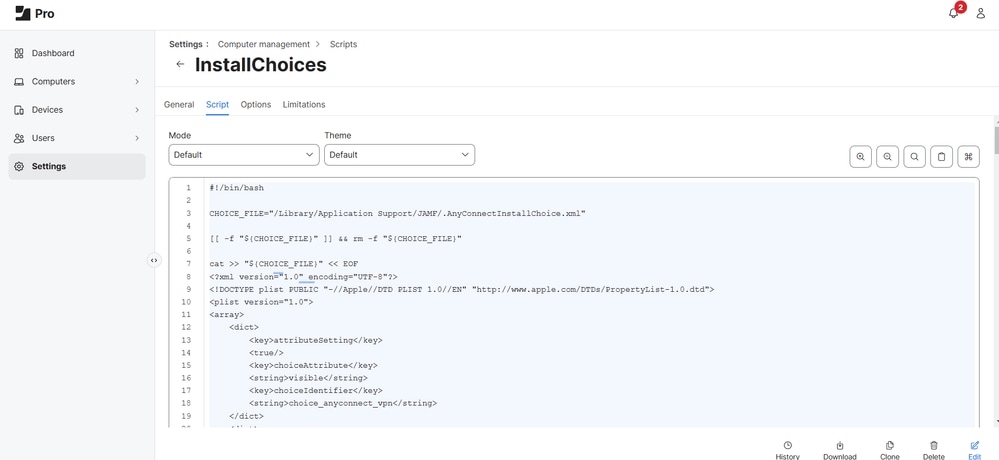
1. Go toSettings > Computer Management > Scripts and add this script to control which modules are installed during deployment.
2. You can control the installation of Secure Client modules by setting a module to 0 to skip it or 1 to install it as the PKG is configured to install all modules by default.
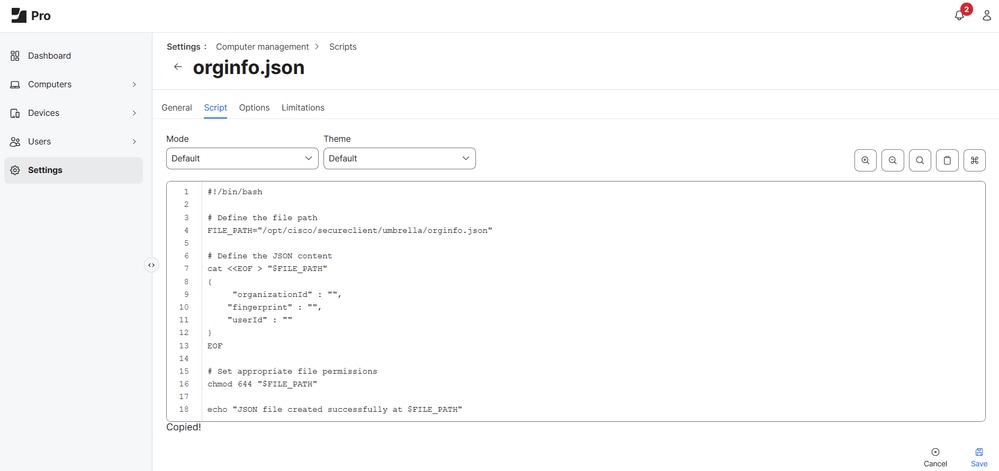
3. Navigate to Settings > Computer management> Scripts and add this script so that it creates a configuration file Orginfo.json that is required by Cisco Secure Client.
- Download the module profile directly from the Umbrella dashboard, then add the Organization ID, Fingerprint, and User ID to the script:
 34452906673812
Create the JAMF Policy
The JAMF Policy is used to determine how and when the Cisco Secure Client with Umbrella module is pushed out.
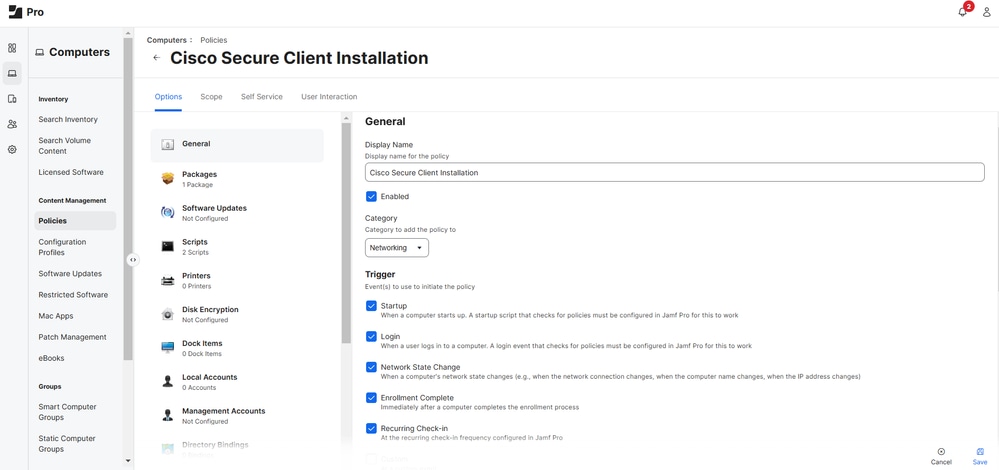
1. Navigate toComputers > Content Management > Policies > New.
2. Assign a unique name to the policy and select your desired Category and Trigger events (for example, when this policy is executed).
3. Optionally, you can also configure a custom command that can be executed under Custom. The command to execute and run this policy would look something like this:
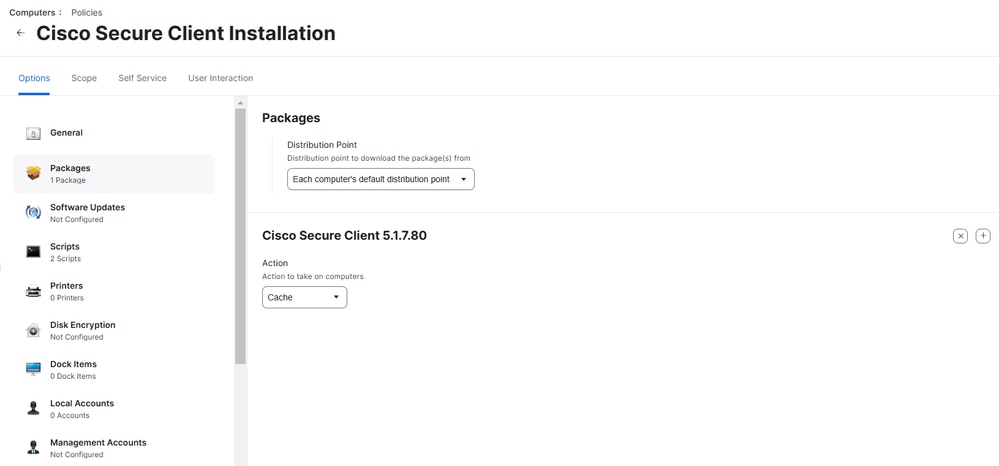
4. Select Packages > Configure and select Add next to your Cisco Secure Client package.
- Under Distribution Point, select Each computer's default distribution point.
- Under Action, select Cache.
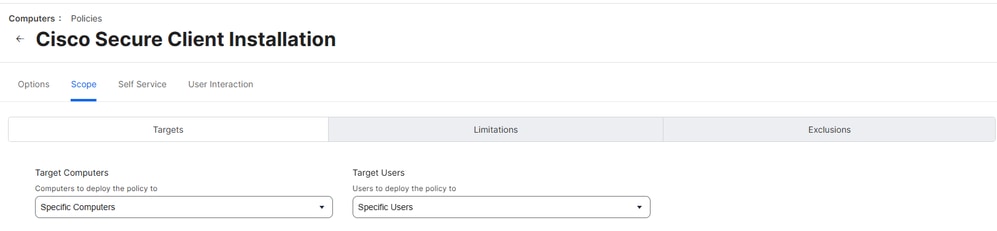
5. Define the scope of devices or users for deployment and select Save.
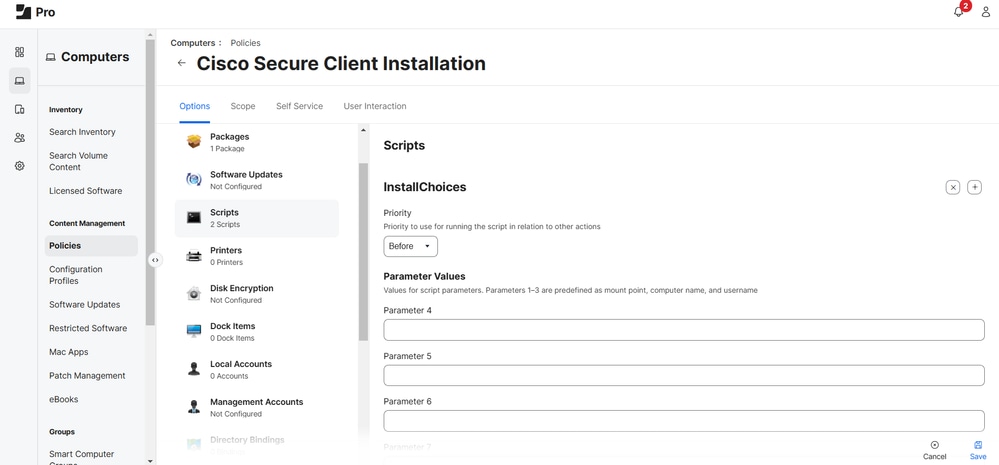
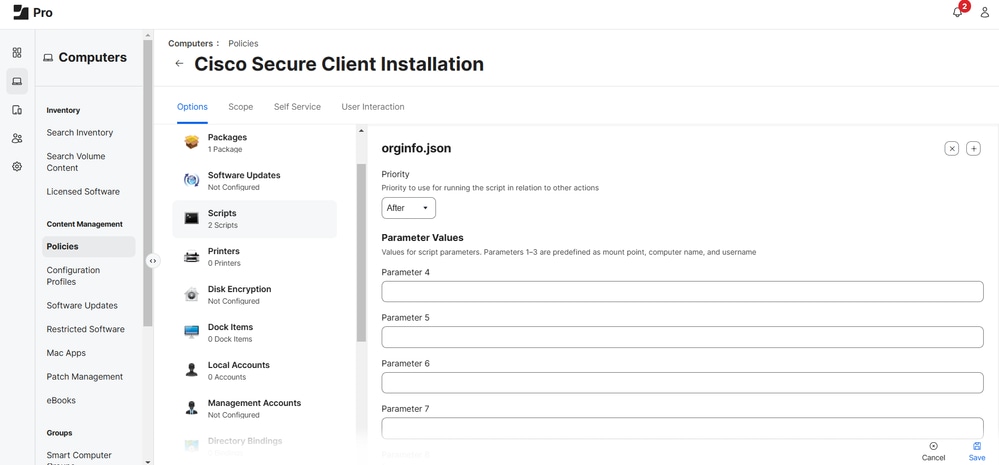
6. Add both the InstallChoicesand orginfo.json scripts and give them a Priority to use for running the script in relation to other actions.
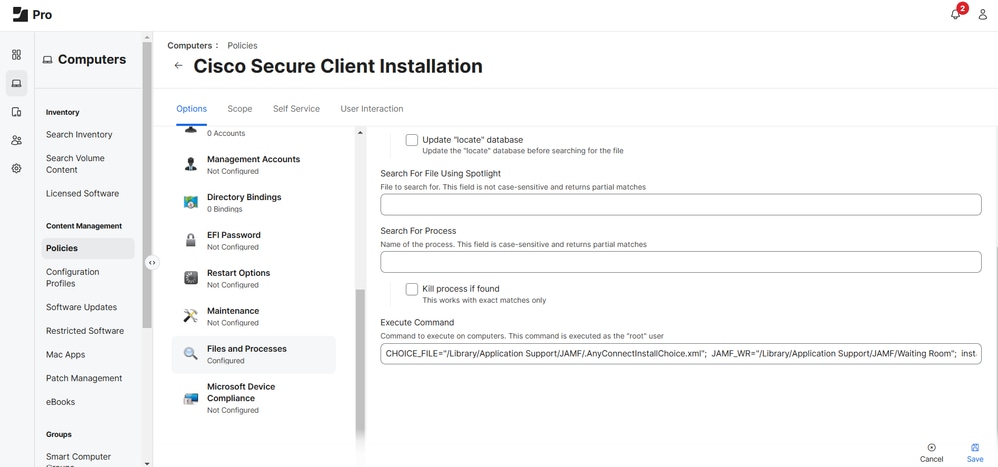
7. Execute this command to install the Cisco Secure Client package with the selected modules on devices:
CHOICE_FILE="/Library/Application Support/JAMF/.AnyConnectInstallChoice.xml"; JAMF_WR="/Library/Application Support/JAMF/Waiting Room"; installer -applyChoiceChangesXML "${CHOICE_FILE}" -pkg "${JAMF_WR}/Cisco Secure Client.pkg" -target / && EC=$?; rm -f "${CHOICE_FILE}"; rm -f "${JAMF_WR}/Cisco Secure Client.pkg"; rm -f "${JAMF_WR}/Cisco Secure Client.pkg.cache.xml"; echo $EC
Configure a Silent Install of System Extension
Next, use JAMF to configure and allow Cisco Secure Client's required System Extensions in order for Cisco Secure Client with Umbrella module to run correctly without user interactions.
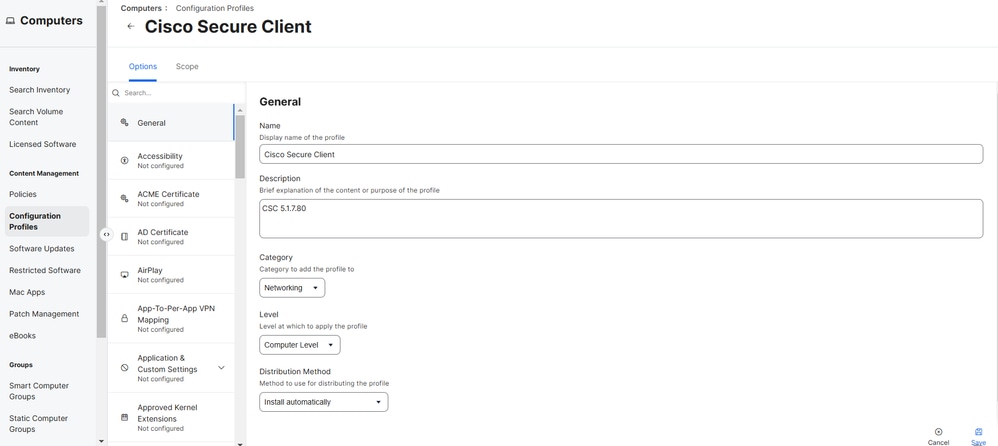
1. Go toComputers > Content Management > Configuration Profiles > New.
2. Give the profile a unique name and select you Category and Distribution Method.
3. EnsureLevel is set to Computer Level.
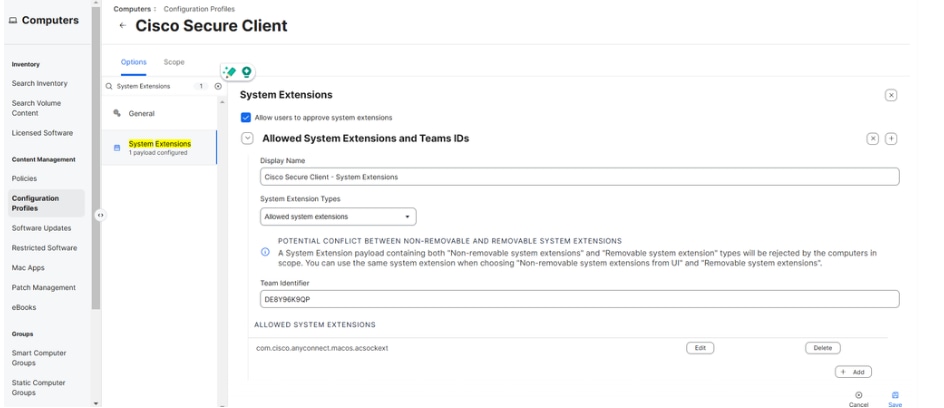
4. Search forSystem Extensions > Configure. Enter these values:
- Display Name: Cisco Secure Client - System Extensions
- System Extension Types: Allowed System Extensions
- Team Identifier: DE8Y96K9QP
- Allowed System Extensions: com.cisco.anyconnect.macos.acsockext, then select Save.
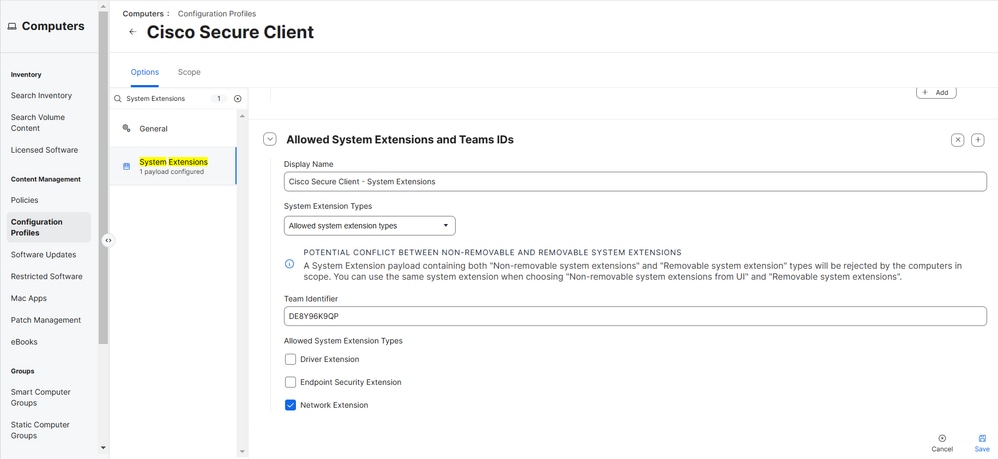
5. Select the + icon next to Allowed Team IDs and System Extensions to add another System Extension. Then, enter these values:
- Display Name: Cisco Secure Client - System Extensions
- System Extension Types: Allow System Extension Types
- Team Identifier: DE8Y96K9QP
- Allow System Extension Types: Network Extension
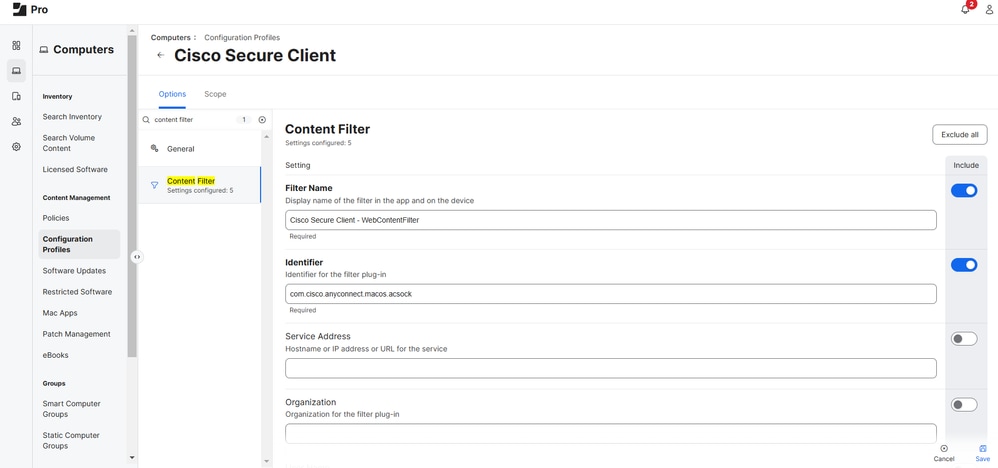
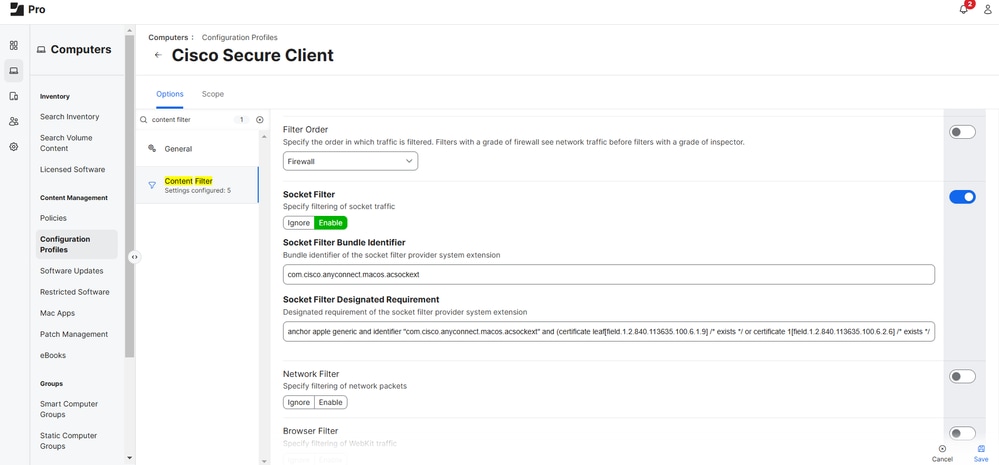
Configure Silent Install for Content Filter
Next, configure a silent install for the Content Filter, which correlates to the Cisco Secure Client with Umbrella module's Socket Filter:
1. Search for Content Filter. Enable and complete these fields with their respective values:
- Filter Name: Cisco Secure Client - WebContentFilter
- Identifier: com.cisco.anyconnect.macos.acsock
- Socket Filter: Enabled
- Socket Filter Bundle Identifier: com.cisco.anyconnect.macos.acsockext
- Socket Filter Designated Requirement:
anchor apple generic and identifier "com.cisco.anyconnect.macos.acsockext" and (certificate leaf[field.1.2.840.113635.100.6.1.9] /* exists */ or certificate 1[field.1.2.840.113635.100.6.2.6] /* exists */ and certificate leaf[field.1.2.840.113635.100.6.1.13] /* exists */ and certificate leaf[subject.OU] = DE8Y96K9QP)
2. Under Custom Data, select Add five times and enter these values:
| Key |
Value |
| AutoFilterEnabled |
false |
| FilterBrowsers |
false |
| FilterSockets |
true |
| FilterPackets |
false |
| FilterGrade |
firewall |
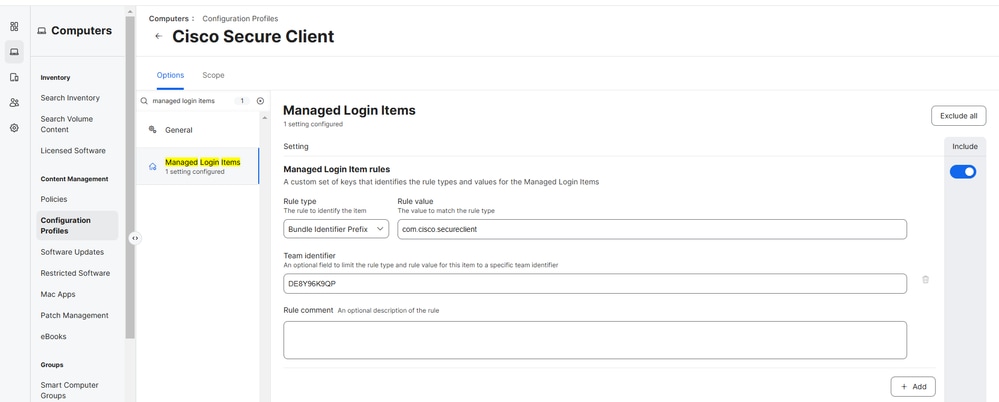
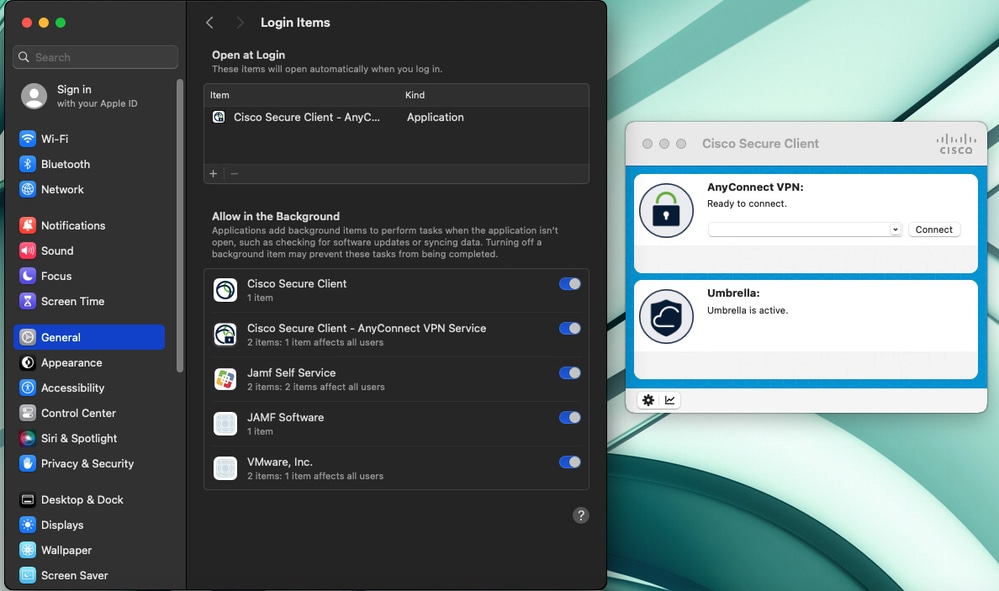
Configure Managed Login Items
Configuring the Managed Login Items for the Cisco Secure Client with Umbrella module ensures that the Cisco Secure Client launches upon device startup.
To configure, search for Managed Login Items and configure the fields with these values:
- Rule Type: Bundle Identifier Prefix
- Rule Value: com.cisco.secureclient
- Team Identifier: DE8Y96K9QP
Assign Scope and Push Deployment
1. Navigate to Scope and define the scope for devices or users.
2. The Cisco Secure Client with Umbrella module can be pushed out to your desired macOS devices when one of the Triggers that you configured in step 2 of Create a JAMF Policy is activated. Alternatively, you can push this out through JAMF's Self Service portal.

Note: Even if a user tries to disable the DNS Proxy or Transparent Proxy in System Settings (Network > Filter), it automatically is re-enabled by default as the Content Filter is enabled via JAMF as described in this article and cannot be disabled.
Configure macOS Firewall Exception
If the macOS firewall is set to Block all incoming connections, you must also add the Cisco Secure Client and its components to its exceptions list:
1. Navigate toComputers > Content Management > Configuration Profiles.
2. Select your Cisco Secure Client configuration profile and locate Security and Privacy.
3. Configure it with these settings:
- Firewall: Enable - Control incoming connections for specific apps
| App Name |
Bundle ID |
| Cisco Secure Client - Socket Extensions |
com.cisco.anyconnect.macos.acsockext |
| Cisco Secure Client |
DE8Y96K9QP |
| Cisco Secure Client - Content Filter |
com.cisco.anyconnect.macos.acsock
|
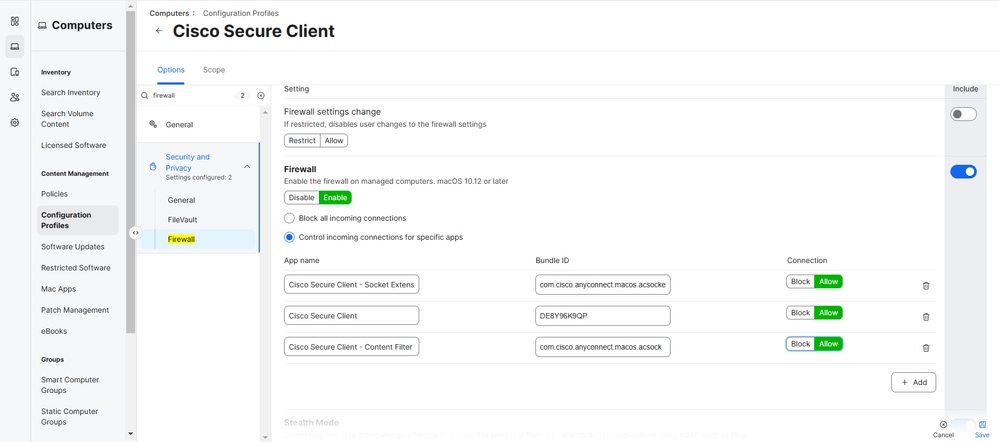
4. Select Save.
5. If you are prompted with Redistribution Options, select Distribute to All to immediately push out the changes to your desired macOS devices.
Deploy the Cisco Umbrella Root Certificate
Note: This step only applies to new deployments of Cisco Secure Client or devices that does not have the Cisco Umbrella Root Certificate deployed previously. If you are migrating over from the Umbrella Roaming Client or Cisco AnyConnect 4.10 client, and/or have deployed the Cisco Umbrella Root Certificate already in the past, you can skip this section.
Download the Cisco Umbrella Root Certificate fromPolicies > Root Certificatein the Umbrella dashboard.
1. In the Umbrella dashboard under Policies > Root Certificate, download the Cisco Umbrella Root Certificate.
2. In JAMF, navigate to Computers > Configuration Profiles > Cisco Secure Client > Edit.
3. Search for Certificate > Configure. Give it a unique name.
4. Under Select Certificate Option, select Upload and upload the Cisco Umbrella Root Certificate that you downloaded previously in Step 1.
5. Ensure you that you do not configure a password here and select Save.
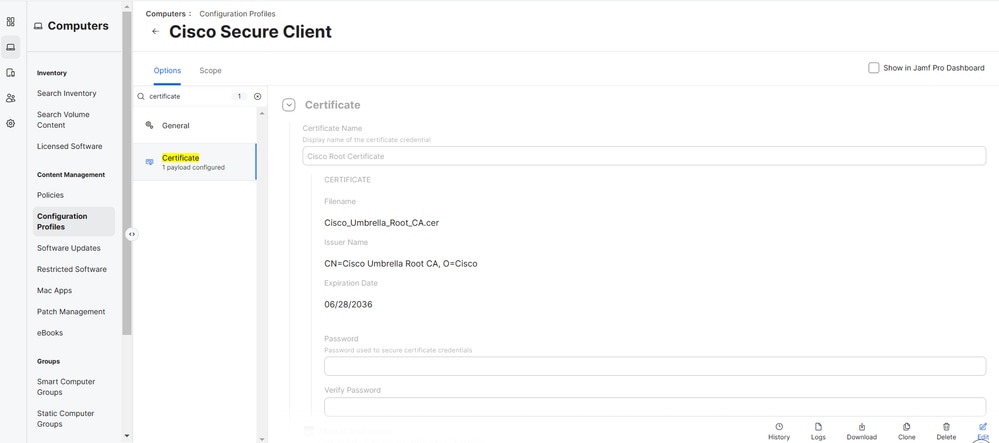
6. If you are prompted with Redistribution Options, select Distribute to All to immediately push out the changes to your desired macOS devices.
Verification
To verify if Cisco Secure Client with Umbrella module is working, browse to https://policy-debug.checkumbrella.com or run this command:
Either output must contain unique and relevant information to your Umbrella organization, such as your OrgID.
Workaround for macOS 14.3
For macOS 14.3 (or later) with Cisco Secure Client 5.1.x, if you encounter "The VPN client agent was unable to create the interprocess communication depot":
1. In JAMF, navigate toSettings > Computer Management > Scripts > New.
2. Give it a unique name and define your category.
3. Navigate to the Script tab and add this:
4. Under Options, ensure the Priority is set to After. This bash script checks if the Cisco Secure Client - AnyConnect VPN service.app is running via returning an expected output with the Process ID from pgrep -fl.
- If it returns an empty output, then you can confirm the
Cisco Secure Client - AnyConnect VPN service.app is not running and the script executes to launch the Cisco Secure Client core services that are required in order for the Umbrella module to run correctly.
Automatic Updates
Cisco has decided to extend auto-update support from the Umbrella dashboard to include Secure Client starting with Secure Client 5.1.6.103 (MR6). Going forward, customers who have upgraded to at least Cisco Secure Client 5.1.6 MR6 are able to auto update to newer versions if auto-update has been configured in the Umbrella dashboard.
 Feedback