Introduction
This document describes how to enable options on DHCP server using in FTD managed by FMC.
Prerequisites
Requirements
- Knowledge of Firepower technology
- Knowledge ofDynamic Host Control Protocol (DHCP) Server/ DHCP Relay.
Components Used
The information in this document was created from the devices in a specific lab environment. All of the devices used in this document started with a cleared (default) configuration. If your network is live, ensure that you understand the potential impact of any command.
Background Information
The threat defense device can transmit information using DHCP options as specified in RFC 2132, RFC 2562, and RFC 5510.
It supports all DHCP options numbered 1 through 255, except for options 1, 12, 50–54, 58–59, 61, 67, and 82.
RFC 2132 specifies two DHCP options pertinent to vendor-specific configurations: Option 60 and Option 43.
The document offers sample configurations and illustrates how DHCP Option 43(Vendor-Specific Info) operates on Windows Server 2019, with FTD functioning as the DHCP Relay Agent.
Option 43 enables DHCP servers to transmit vendor-specific information to clients, facilitating devices such as access points in locating and connecting to their controllers, even when they are on different VLANs or subnets.
Configuration
Network Diagram
 Network_Diagram
Configure DHCP Relay
The FTD interface functions as a DHCP Relay agent, facilitating communication between the client and an external DHCP server.
It listens for client requests and appends essential configuration data, such as the client link information, which the DHCP server requires to allocate an address to the client.
Upon receiving a response from the DHCP server, the interface forwards the reply packet back to the DHCP client.
Configuring DHCP Relay involves two primary steps:
1. Set up the DHCP Relay Agent.
2. Set up the External DHCP Server.
Configure DHCP Relay Agent
To configure the DHCP Relay, check below steps:
1. Navigate to Devices > Device Management.
2. Click the edit button for the FTD appliance.
3. Navigate to the DHCP > DHCP Relay option.
4. Click Add.
Interface: Select the appropriate interface from the drop-down list. This is where the interface listens for client requests, and DHCP clients can connect directly to this interface for IP address requests.
Enable DHCP Relay: Check this box to activate the DHCP relay service.
 DHCP_Relay_Agent_Config
5.Click OK to save the configuration settings for the DHCP relay agent.
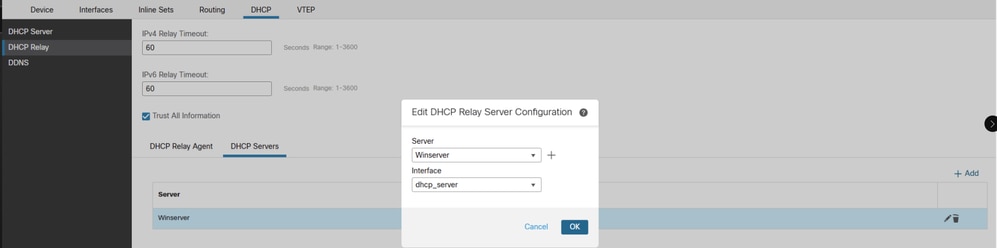
Configure External DHCP Server
To configure the IP address of the external DHCP server to which client requests are forwarded, check below steps:
Navigate to the DHCP Server section and click on Add"
1.In the Server field, enter the IP address of the DHCP server. You can either choose an existing network object from the drop-down menu or create a new one by clicking the plus (+) icon.
2.In the Interface field, specify the interface that connects to the DHCP server.
3.To save the configuration, click OK. Then, click Save to store the platform settings.
 DHCP_Server_Config
4.Next, go to the Deploy option, select the FTD appliance where you wish to apply the changes, and click Deploy to initiate the deployment of the platform settings.
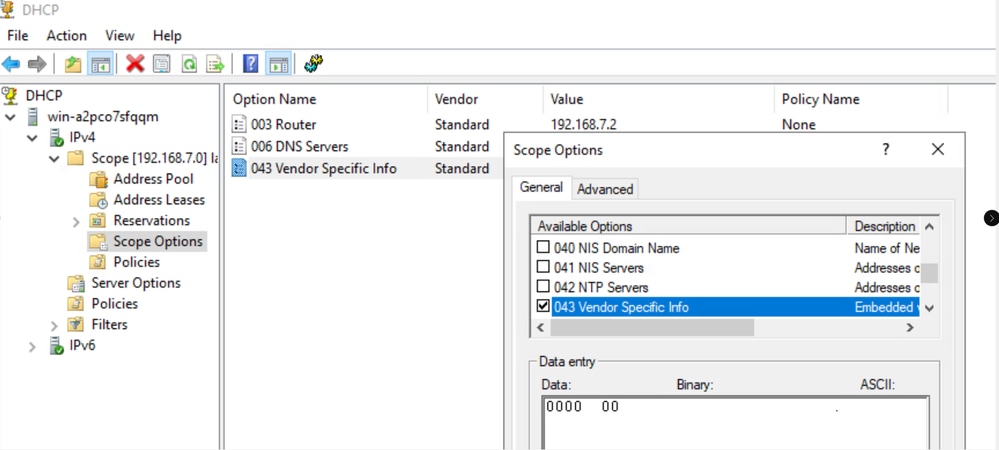
Enable option 43 on External DHCP Server
Kindly Note: As per RFC 2132 , the minimum length for Option 43 is 1.
Navigate to your DHCP server settings and go to IPv4, then select Scope and Scope Options >More Actions >Configure Options and enable Option 43
 Enable_Option_43_On _External_DHCP_Server
Initially, the default setting leaves the value empty, leading FTD to drop the packet and categorize it as malformed.
 Default_Config_Of_Option_43
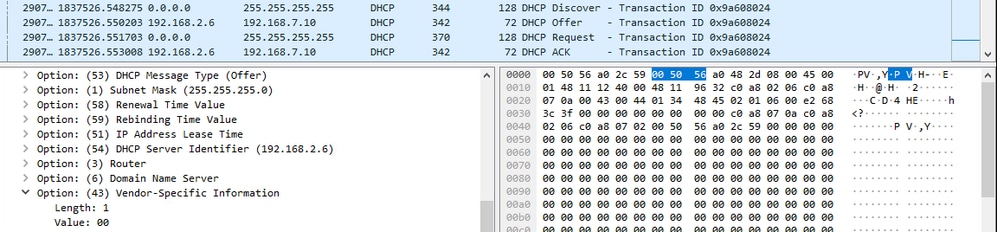
From the server side using Wireshark, we observe that in the OFFER packet, the value is absent for option 43 when the length is 0.
 Non_Working_Server_Side_pcap
The packets are being dropped by Cisco Firepower Threat Defense (FTD) because they have a length of 0 and are considered malformed, violating RFC 2132.
firepower# debug dhcprelay packet
debug dhcprelay packet enabled at level 1
ftd# DHCPD/RA: Relay msg received, fip=ANY, fport=0 on Lan_network interface
DHCP: Received a BOOTREQUEST from interface 3 (size = 302)
DHCPD/RA: Binding successfully added to hash table
DHCPRA: relay binding created for client 0050.56a0.2c59.
DHCPRA: setting giaddr to 192.168.7.2.
dhcpd_forward_request: request from 0050.56a0.2c59 forwarded to 192.168.2.6.
DHCPD/RA: option 43 is malformed.
DHCPD/RA: Unable to load workspace.
DHCPD/RA: Relay msg received, fip=ANY, fport=0 on Lan_network interface
DHCP: Received a BOOTREQUEST from interface 3 (size = 328)
DHCPRA: relay binding found for client 0050.56a0.2c59.
DHCPRA: setting giaddr to 192.168.7.2.
DHCPRA: Server request counter 1
dhcpd_forward_request: request from 0050.56a0.2c59 forwarded to 192.168.2.6.
To adjust the binary value to be greater than 0 in accordance with RFC 2132, double-click on the 043 Vendor Specific Info field and set the value to 00, as illustrated in the image.
This change ensures that the IP address is successfully leased to the client.
 Changed_Binary_Value_to_1
Server side DORA process when value is set as 1 on Option 43
 Server_Side_Working_pcap
Client side DORA process when value is set as 1 on Option 43 and we can see that the client is lease with an IP.
 Client_Side_Working_pcap
firepower# debug dhcprelay packet
debug dhcprelay packet enabled at level 1
ftd# DHCPD/RA: Relay msg received, fip=ANY, fport=0 on Lan_network interface
DHCP: Received a BOOTREQUEST from interface 3 (size = 302)
DHCPRA: relay binding found for client 0050.56a0.2c59.
DHCPRA: setting giaddr to 192.168.7.2.
dhcpd_forward_request: request from 0050.56a0.2c59 forwarded to 192.168.2.6.
DHCPD/RA: Relay msg received, fip=ANY, fport=0 on dhcp_server interface
DHCP: Received a BOOTREPLY from relay interface 2 (size = 300, xid = 0x81f5dddc) at 06:55:25 UTC Tue Mar 18 2025
DHCPRA: relay binding found for client 0050.56a0.2c59.
DHCPD/RA: creating ARP entry (192.168.7.10, 0050.56a0.2c59).
DHCPRA: forwarding reply to client 0050.56a0.2c59.
DHCPRA: Client Ip Address :192.168.7.10
DHCPRA: subnet mask in dhcp options :255.255.255.0
DHCPD/RA: Relay msg received, fip=ANY, fport=0 on Lan_network interface
DHCP: Received a BOOTREQUEST from interface 3 (size = 328)
DHCPRA: relay binding found for client 0050.56a0.2c59.
DHCPRA: Server requested by client 192.168.2.6
DHCPRA: setting giaddr to 192.168.7.2.
DHCPRA: Server request counter 1
dhcpd_forward_request: request from 0050.56a0.2c59 forwarded to 192.168.2.6.
DHCPD/RA: Relay msg received, fip=ANY, fport=0 on dhcp_server interface
DHCP: Received a BOOTREPLY from relay interface 2 (size = 300, xid = 0x81f5dddc) at 06:55:25 UTC Tue Mar 18 2025
DHCPRA: relay binding found for client 0050.56a0.2c59.
DHCPRA: exchange complete - relay binding deleted for client 0050.56a0.2c59.
DHCPD/RA: Binding successfully deactivated
dhcpd_destroy_binding() removing NP rule for client 192.168.7.2
DHCPD/RA: free ddns info and binding
DHCPD/RA: creating ARP entry (192.168.7.10, 0050.56a0.2c59).
DHCPRA: forwarding reply to client 0050.56a0.2c59.
DHCPRA: Client Ip Address :192.168.7.10
DHCPRA: subnet mask in dhcp options :255.255.255.0
Verify
Before setting up the DHCP Server or Relay, ensure that the FTD is registered with the FMC. Additionally, verify that there is connectivity to the DHCP server in the DHCP Relay configuration.
> system support diagnostic-cli
Attaching to Diagnostic CLI ... Press 'Ctrl+a then d' to detach.
Type help or '?' for a list of available commands.
><Press Enter>
firepower# ping <DHCP_Server_IP>
To verify the DHCP Relay Agent configuration from the FTD CLI.
firepower# show running-config dhcprelay
dhcprelay server 192.168.2.6 dhcp_server
dhcprelay enable Lan_network
dhcprelay timeout 60
dhcprelay information trust-all
Troubleshoot
To troubleshoot the issue, consider the these points:
1.Verify the routing between the FTD and the DHCP server to ensure it is reachable from the DHCP-server.
2.Ensure that the DHCP server has a route to access the DHCP relay agent interface.
3.To troubleshoot the issue of the client not receiving an IP address, you can perform a packet capture on the FTD routed interface.
This will allow you to examine the DORA process of the DHCP server within the packet captures.
You can utilize the Use Firepower Threat Defense Captures and Packet Tracer to conduct the packet capture effectively.
To stop and delete a specific packet capture session that you have previously started ,execute below command.
no capture <capture_name>
4.To review the state and collect the dhcprelay debug ,execute below commands
To do so Login to FTD CLI .
system support diagnostic-cli

enable
Press enter.
show dhcprelay statistic
show dhcprelay state
To check if a debug is already enable ,execute below command.
show debug
To capture debug excute below commands
debug dhcprelay packet
debug dhcprelay event
To disable debug
undebug all
Related Information
Configure DHCP Server and Relay on FTD with FMC
DHCP and DDNS
Technical Support & Documentation - Cisco Systems
 Feedback