Introduction
This document describes how to generate the configuration file.zip of a Secure Firewall Device Manager (FDM) to be migrated to an FMC using FMT.
Prerequisites
Requirements
Cisco recommends that you have knowledge of these topics:
- Cisco Firewall Threat Defense (FTD)
- Cisco Firewall Management Center (FMC)
- Firewall Migration Tool (FMT)
- Postman API Platform
Components Used
The information in this document is based on these software versions.
FTD 7.4.2
FMC 7.4.2
FMT 7.7.0.1
Postman 11.50.0
The information in this document was created from the devices in a specific lab environment. All of the devices used in this document started with a cleared (default) configuration. If your network is live, ensure that you understand the potential impact of any command.
Background Information
- FDM can be migrated now to FMC in different ways. In this document, the scenario that is going to be explored is the generation of the configuration .zip file using API requests and later upload of that file to FMT to migrate the configuration to FMC.
- The steps shown in this document start using Postman directly so, it is recommended that you have Postman already installed. The PC or laptop you are going to use, must have access to FDM and FMC, also FMT must be installed and running.
Considerations
- This document is focused on the configuration .zip file generation more than in FMT use.
- FDM migration using configuration .zip file, is for non-live migrations and do not require immediately a destination FTD.

Warning: Choosing this mode, allows to migrate only Access Control Policy (ACP), Network Address Translation Policy (NAT) and Objects. In regards the objects those must be used in an ACP rule or NAT, to be migrated, otherwise those are ignored.
Configuration
API Requests - Postman
- In Postman, create a new collection (in this scenario FDM API is used).
- Click the 3 dots and after click Add request.
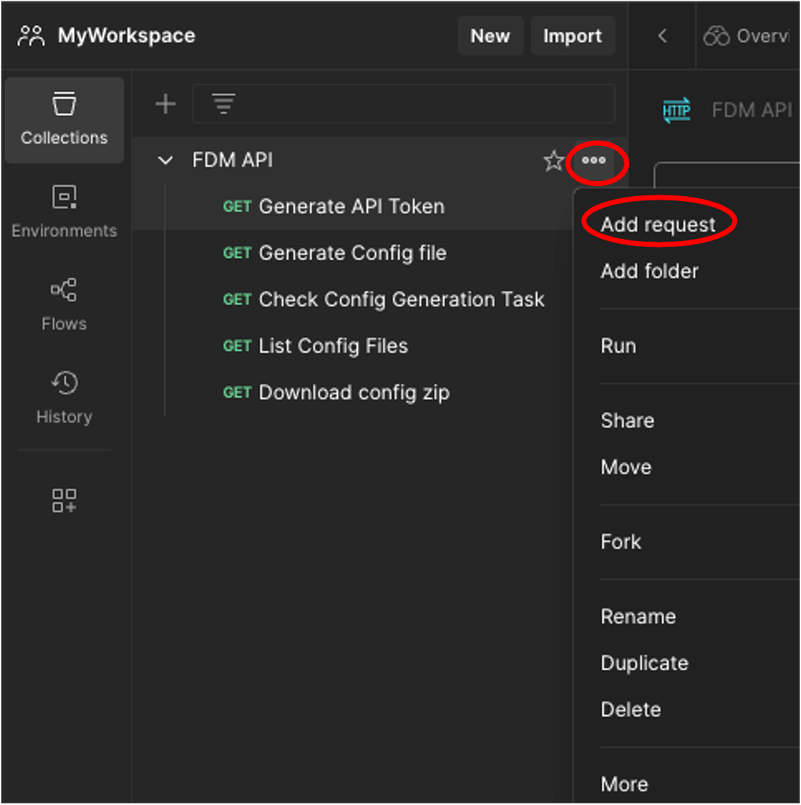 Postman - Collection Creation and Request Addition
- Call this new request: Generate API Token. It is going to be created as a GET request, but at the time you are executing this one, POST must be selected from the drop-down menu. In the text box next to POST, introduce the next line https://<FDM IP ADD>/api/fdm/latest/fdm/token
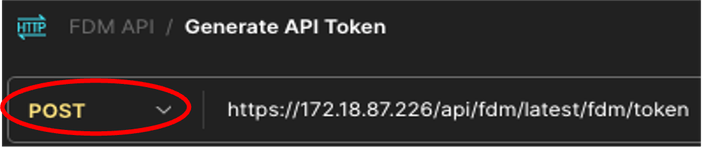 Postman - Token Request
4. In the Body tab, select raw option and introduce the credentials to access FTD (FDM) device using this format.
{
"grant_type": "password",
"username": ”username",
"password": ”password"
}
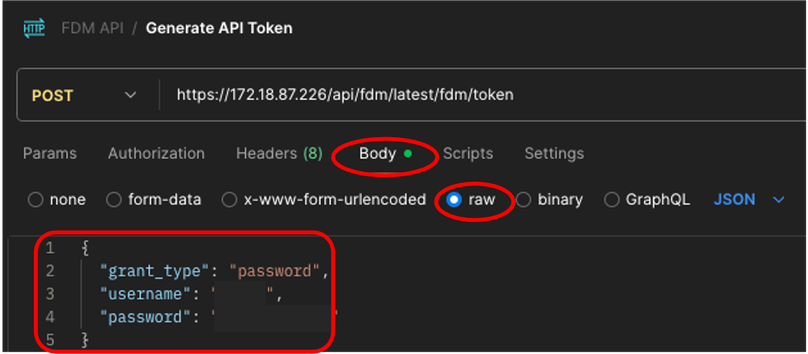 Postman - Token Request Body
5. Finally, click Send to get your Access Token. If everything is fine, you receive a 200 OK response. Make a copy of the entire token (inside the double quotes) because it is going to be used in later steps.
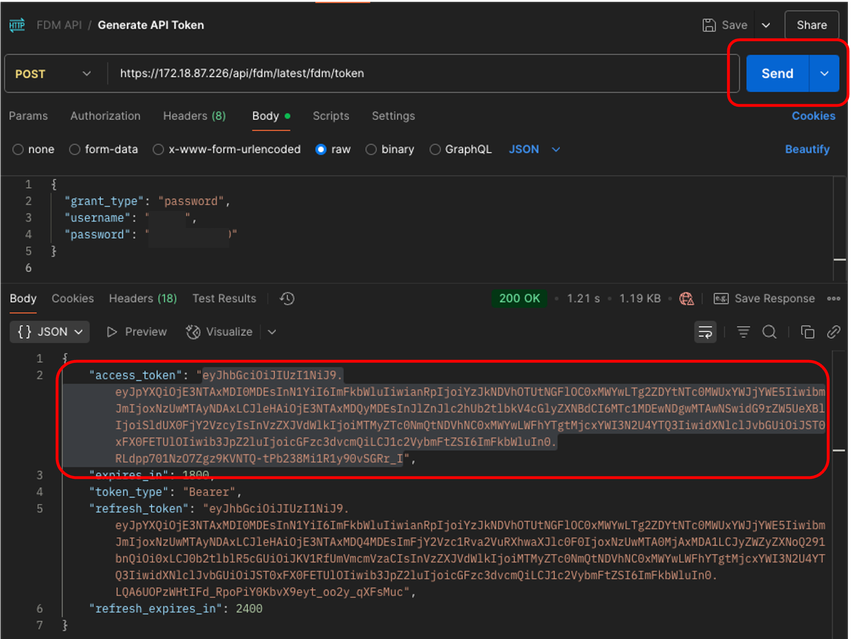 Postman - Token Successfully Generated
6. Repeat step 2, to create a new request, POST is going to be used again.
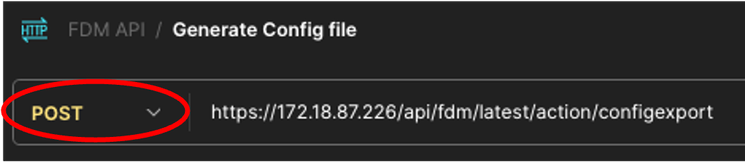
7. Call this new request: Generate Config File. It is going to be created as a GET request, but at the time you are executing this one, POST must be selected from the drop-down menu. In the text box next to POST, introduce the next line https://<FDM IP ADD>/api/fdm/latest/action/configexport
 Postman - Generate Config File Request
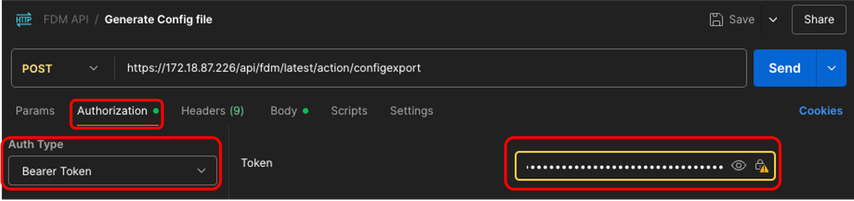
8. In Authorization tab select Bearer Token as Auth Type in the drop down menu, and in the text box next to Token paste the token copied in step 5.
 Postman - Generate Config File Request - Authorization
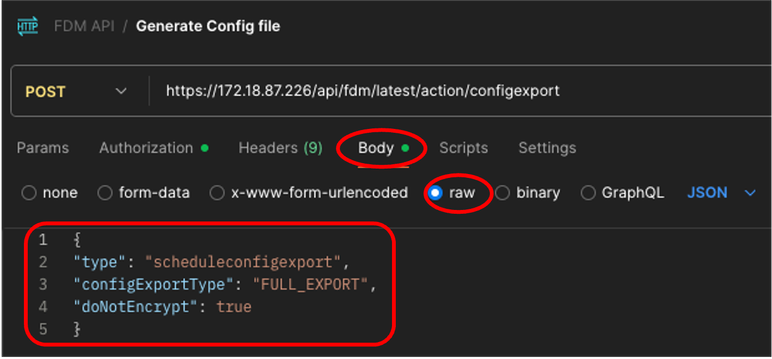
9. In Body tab, select raw option and introduce this information.
{
"type": "scheduleconfigexport",
"configExportType": "FULL_EXPORT",
"doNotEncrypt": true
}
 Postman - Generate Config File Request - Body
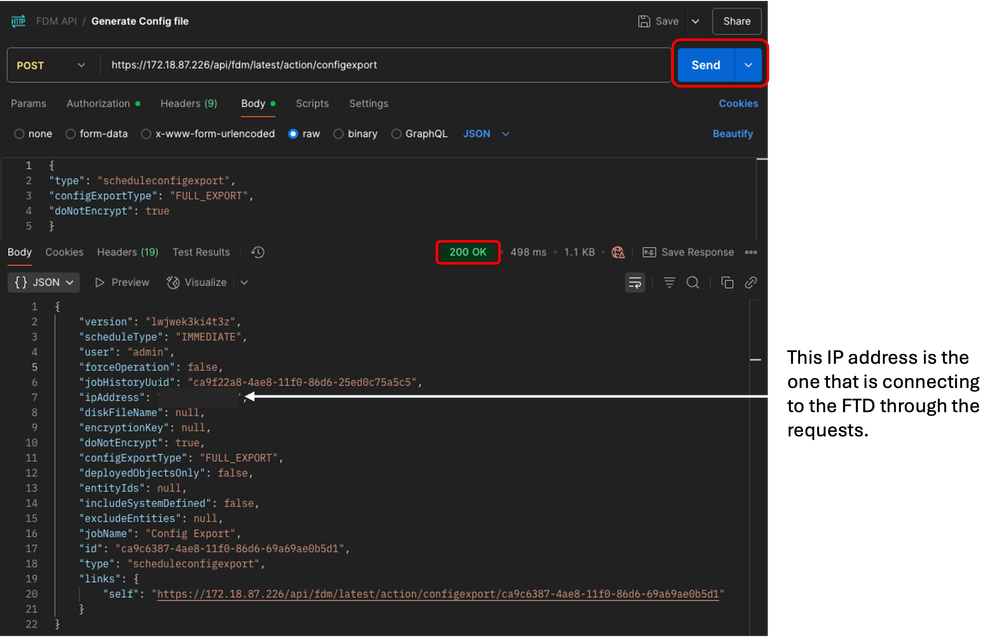
10. Finally, click Send. If everything is fine, you receive a 200 OK response.
 Postman - Generate Config File Request - Output
11. Repeat step 2, to create a new request. GET is going to be used this time.
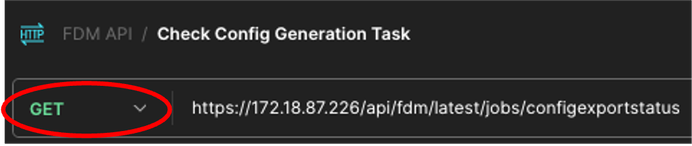
12. Call this new request: Check Config Generation Task. It is going to be created as a GET request. Also, the time you are executing this one, GET must be selected from the drop-down menu. In the text box next to GET, introduce the next line https://<FDM IP ADD>/api/fdm/latest/jobs/configexportstatus
 Postman - Check Config Export Status Request
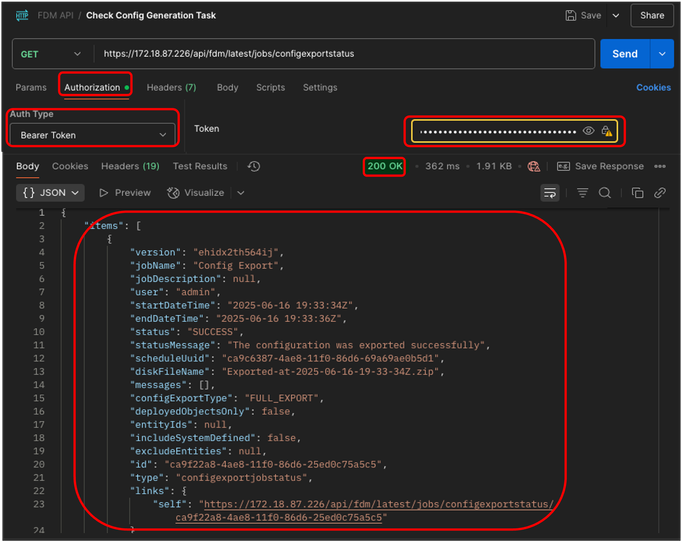
13. In Authorization tab, select Bearer Token as Auth Type in the drop down menu, and in the text box next to Token paste the token copied in step 5. Finally, click Send. If everything is fine, you receive a 200 OK response and in the JSON field, the task status and other details can be seen.
 Postman - Config Export Status Request - Authorization and Output
14. Repeat step 2, to create a new request, GET is going to be used this time.
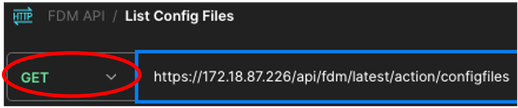
15. Call this new request: List Config Files. It is going to be created as a GET request, also at the time you are executing this one, GET must be selected from the drop-down menu. In the text box next to GET, introduce the next line https://<FDM IP ADD>/api/fdm/latest/action/configfiles
 Postman - List Exported Config Files Request
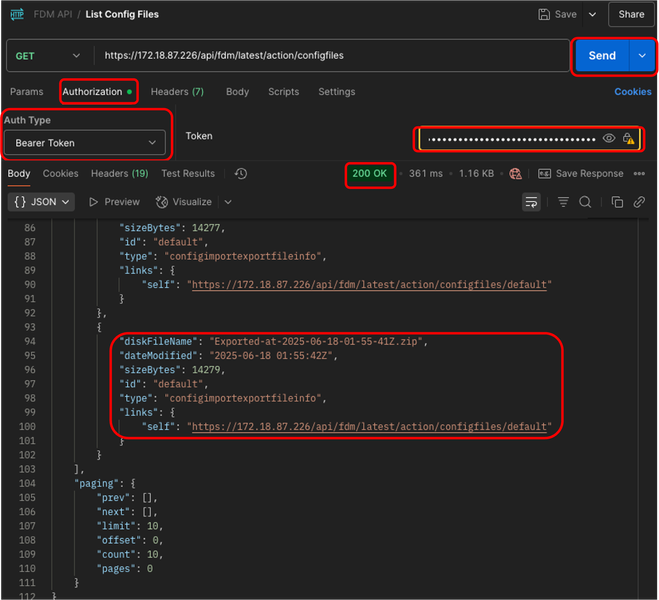
16. In Authorization tab, select Bearer Token as Auth Type in the drop down menu, and in the text box next to Token paste the token copied in step 5. Finally, click Send. If everything is fine, you receive a 200 OK response and in the JSON field, the list of the exported files is shown. The more recent one is listed at the bottom. Copy the latest file name (more recent date in the file name) because it is going to be used in the last step.
 Postman - List Exported Config Files Request - Authorization and Output
17. Repeat step 2, to create a new request, GET is going to be used this time.
18. Call this new request: Download config zip. It is going to be created as a GET request, also at the time you are executing this one, GET must be selected from the drop-down menu. In the textbox next to GET, introduce the next line, pasting at the end the file name you copied in step 16. https://<FDM IP ADD>/api/fdm/latest/action/downloadconfigfile/<Exported_File_name.zip >
 Postman - Download Config.zip File Request
19. In Authorization tab, select Bearer Token as Auth Type in the drop down menu, and in the text box next to Token paste the token copied in step 5. Finally, click the down arrow next to Send and choose Send and Download.
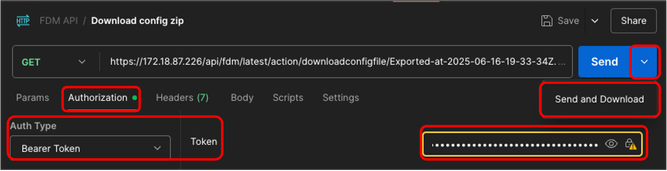 Postman - Download Config.zip File Request - Authorization
20. If everything is fine, you receive a 200 OK response and a pop-up window is displayed asking for the destination folder where the configuration.zip file is going to be saved. This .zip file can now be uploaded to the Firewall Migration Tool.
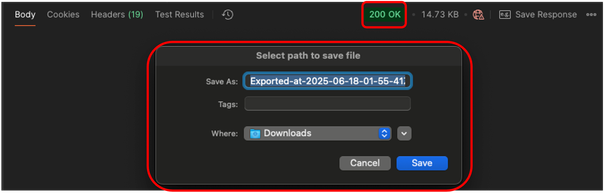 Postman - Download Config.zip File Request - Save
Firewall Migration Tool
21. Open Firewall Migration Tool and in the Select Source Configuration drop down menu, select Cisco Secure Firewall Device Manager (7.2+) and click Start Migration.
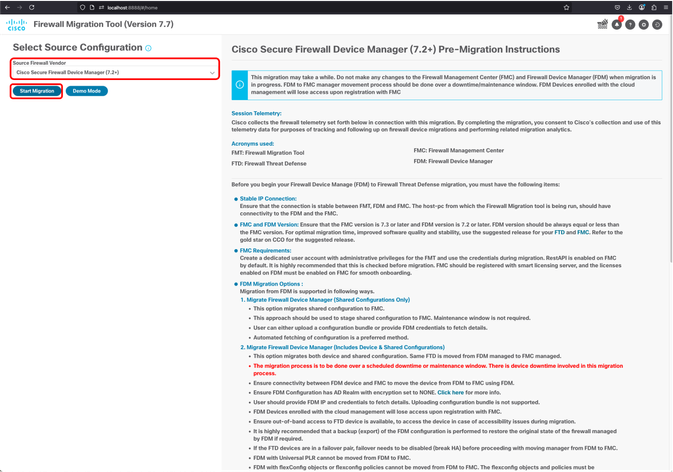 FMT - FDM Selection
22. Check first Radio Button, Migrate Firewall Device Manager (Shared Configurations Only) and click Continue.
 FMT - FDM Migration Shared Configurations Only
23. In the left panel (Manual Configuration Upload) click Upload.
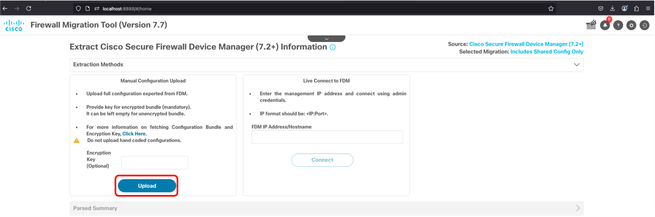 FMT - Upload Config.zip File
24. Select the exported zip config file in the folder you previously saved and click Open.
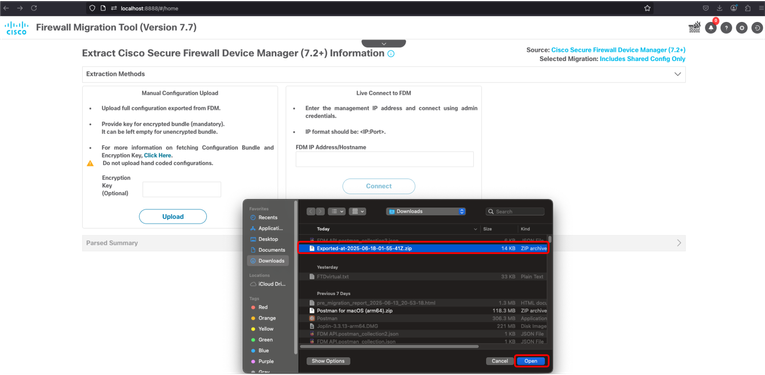 FMT - Config.zip File Selection
25. If everything goes as expected, the Parsed Summary is shown. Also, in the down right corner a pop-up can be seen informing FDM file was successfully uploaded. Click Next.
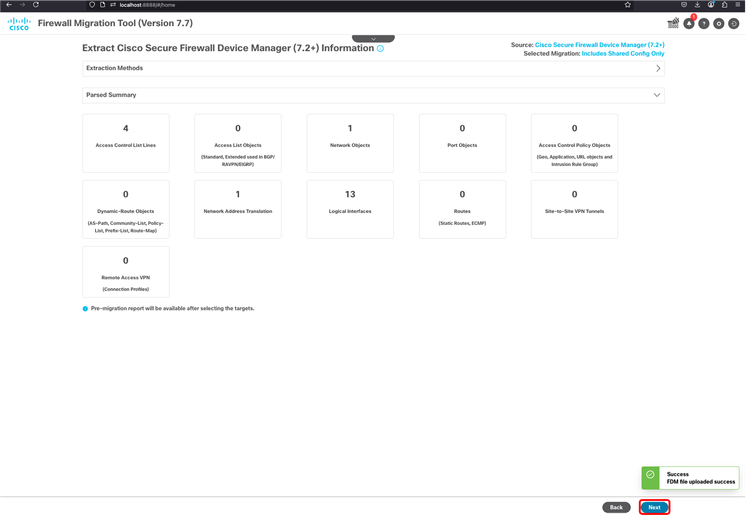 FMT - Parsing Summary
26. Check the option that better suits to your environment (On-Prem FMC or Cd-FMC). In this scenario, an On-Prem FMC is used. Type the FMC IP address and click Connect. A new pop-up comes and asks for FMC credentials, after entering this information, click Login.
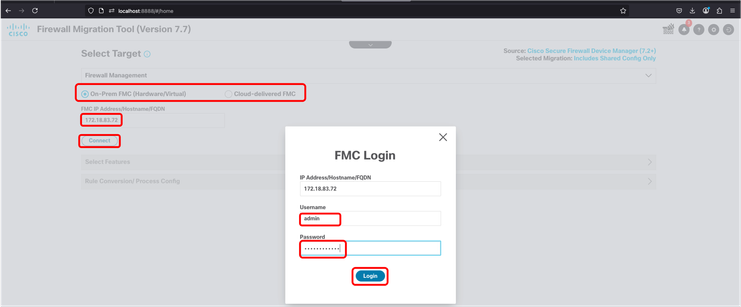 FMT - FMC Target log in
27. Next screen shows the target FMC and the features that are going to be migrated. Click Proceed.
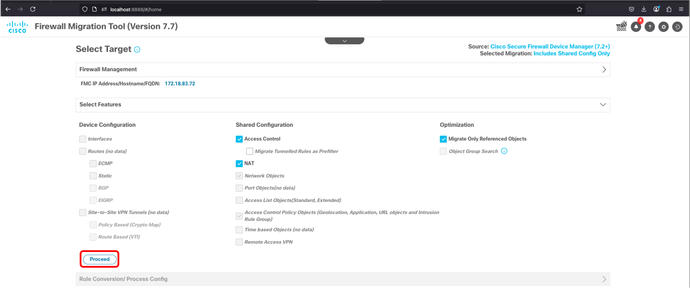 FMT - FMC Target - Feautres Selection
28. Once FMC Target is confirmed, click Start Conversion button.
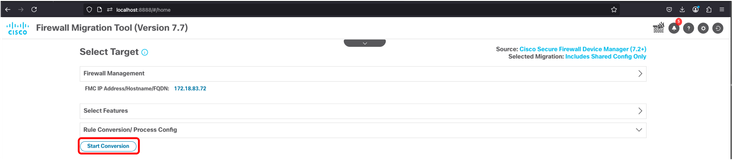 FMT - Starting Config Conversion
29. If everything goes as expected, a pop-up is shown in the down right corner informing that push to FMT database is complete. Click Next.
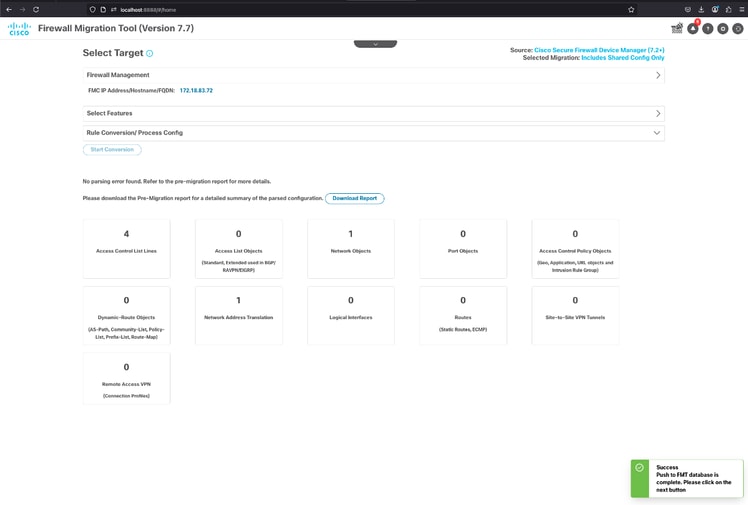 FMT - Database Push Successfully Completed
30. In the next screen, you must manually create, or choose auto-create the security zones and interface groups. In this scenario, auto-create is used.
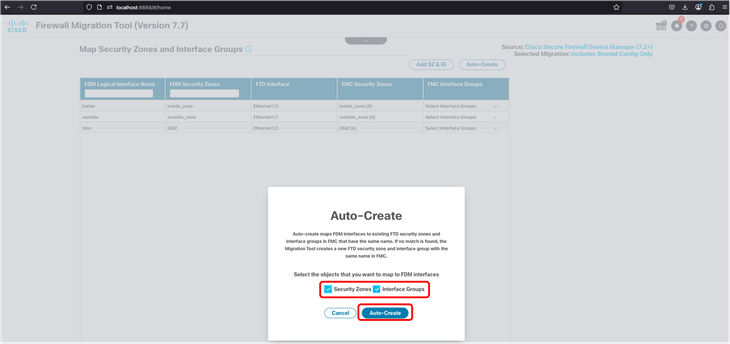 FMT - Auto Creating Security Zones and Interface Groups
31. Once completed, the table shows in the 4th and 5th column, the Security Zone and Interface Group respectively.
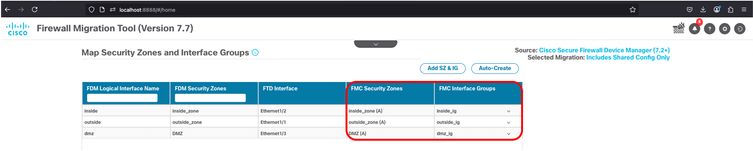 FMT - Security Zones and Interface Groups Successfully Created
32. In the next screen, you can optimize ACL or just validate ACP, Objects and NAT. Once done, click Validate button.
 FMT - Optimize ACL - Validate Migration
33. Validation take couple minutes to be completed.
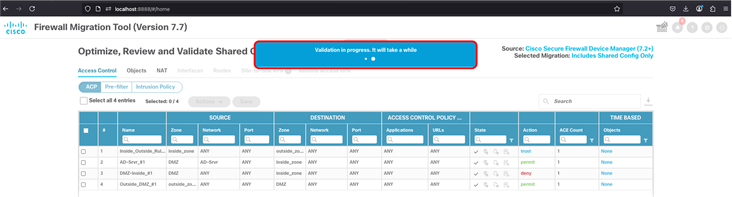 FMT - Validation in Progress
34. Once done, FMT lets you know configuration has been successfully validated and next step is click Push Configuration button.
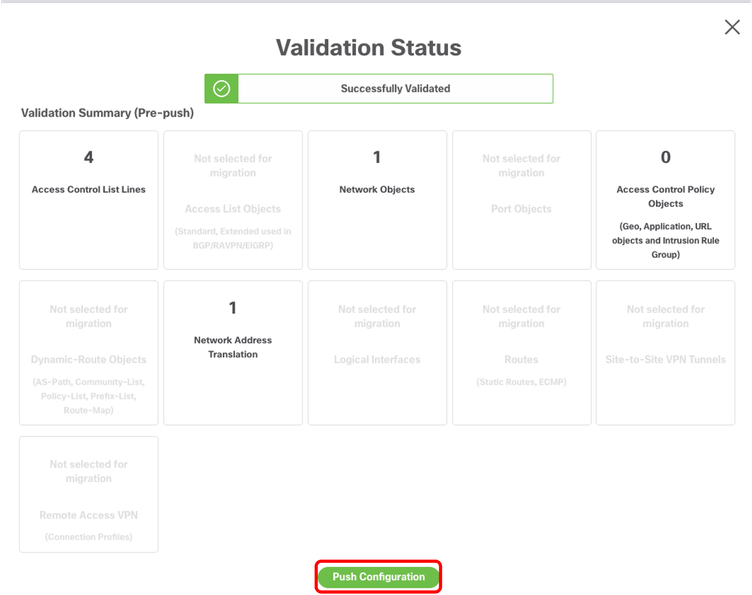 FMT - Validation Succeeded - Push Configuration to FMC
35. Finally, click Proceed button.
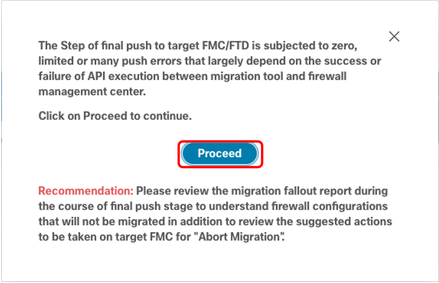 FMT - Proceed With Config Push
36. If everything goes as expected, Migration succeeded notification is shown. FMT asks you to log in to FMC and deploy the migrated policy to FTD.
 FMT - Migration Succeeded Notification
FMC Verification
37. After log in to FMC, the ACP and NAT policies are shown as FTD-Mig. Now, you can proceed deploying to the new FTD.
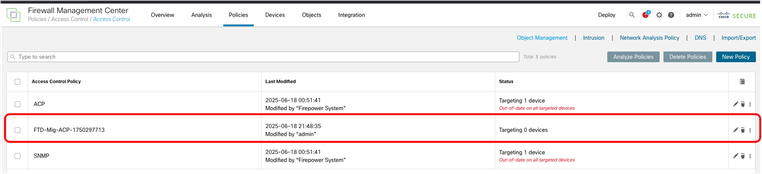 FMC - ACP Migrated
 FMC - NAT Policy Migrated
Related Information
 Feedback