Deploy Cisco Secure Endpoint/Secure Client using Microsoft Intune
Available Languages
Contents
Introduction
This document outlines the process for deploying Cisco Secure Endpoint or Secure Client using Microsoft Intune. The document walks through the steps on how to create a Microsoft Intune supported apps from the Secure Endpoint/Secure Client installers and then use that for deployment using the Microsoft Intune admin center. Specifically, the process includes packaging the Cisco Secure Endpoint installer as a Win32 application using the Intune Win32 Content Prep Tool, followed by configuring and deploying the app through Intune. We have utilized the official Microsoft Prep Tool for creating the app.
Configuration
Secure Endpoint Deployment
Step 1. Download the Cisco Secure Endpoint Installer.
-
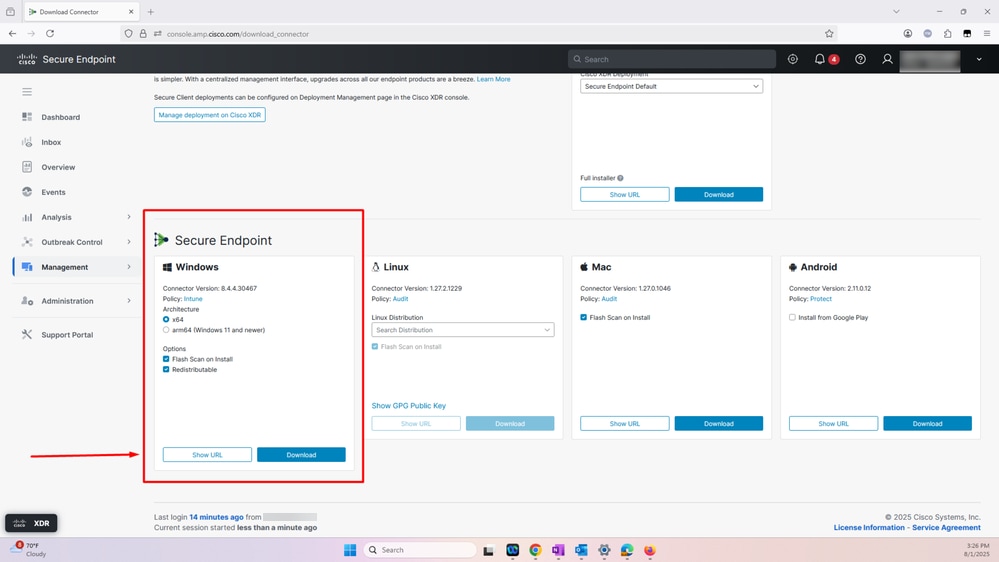
Login to your respective Secure Endpoint Portal, depending on the region: https://apps.security.cisco.com/overview
- Navigate to the Management tab and select Download Connector
- Select the Secure Endpoint group you want the connector to register to
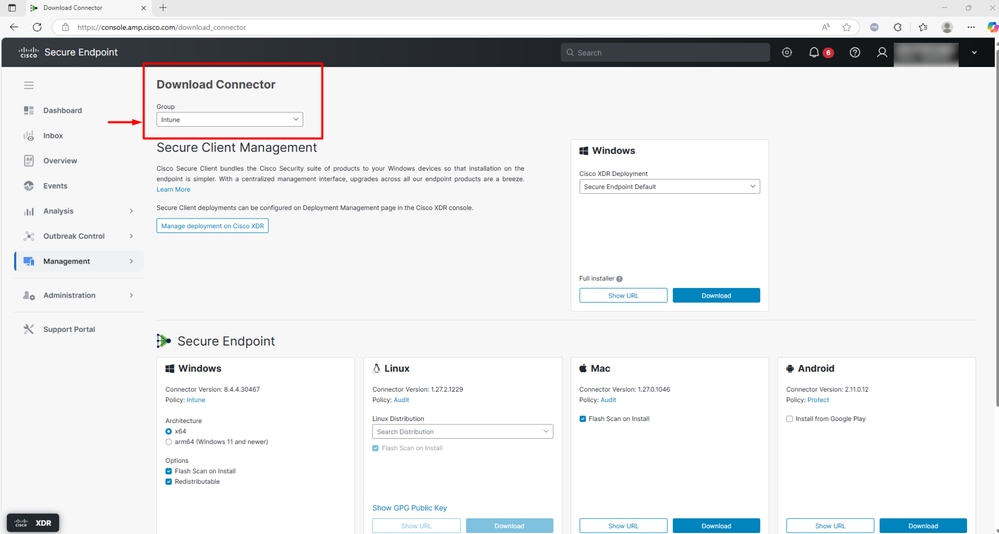
- Select download and the EXE installer gets downloaded locally as shown in the screenshot
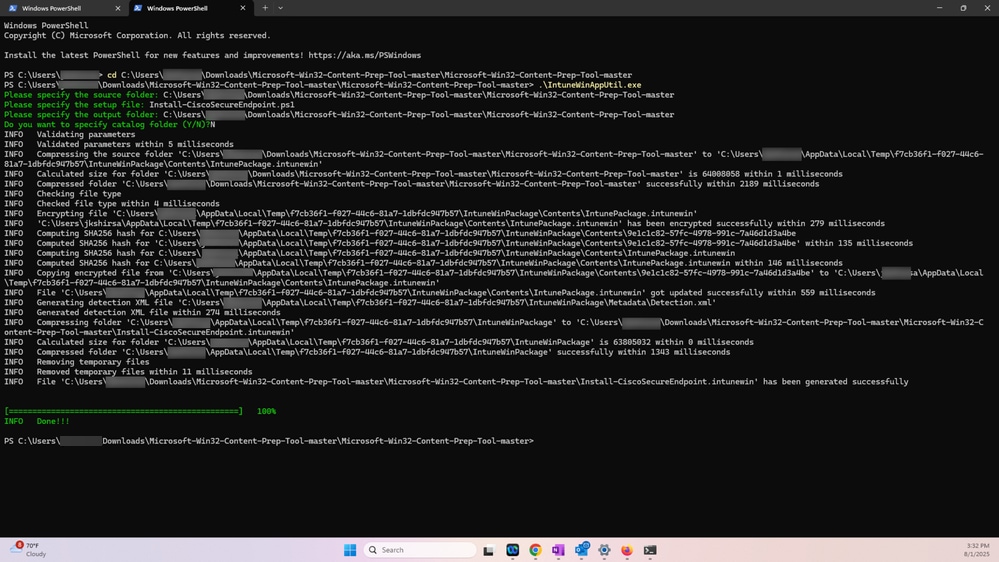
Step 2. Prepare the Intune file using Win32 Content Prep Tool.
The Win32 Content Prep Tool is a utility provided by Microsoft Intune to help IT administrators prepare Win32 applications (i.e., traditional Windows desktop apps) for deployment through Microsoft Intune. The tool converts Win32 application installers (like .exe, .msi, and related files) into a .intunewin file format, which is required for deploying these apps via Intune.
To prepare the Intune file, follow these step:
- Download the Win32 Content Prep Tool from Github. Download: https://github.com/microsoft/Microsoft-Win32-Content-Prep-Tool
- Execute IntuneWinAppUtil.exe
- In the next step, change directory to the folder that contains the Cisco Secure Endpoint executable file that was downloaded in step 1 and the install powershell script (Install-CiscoSecureEndpoint.ps1)
- Then specify the script filename for the setup file: Install-CiscoSecureEndpoint.ps1
- In the next step, specify the folder where the Intunewin file must be generated
- Enter N, when prompted to specify catalog
- Intunewin File is generated as shown in the screenshot:
Step 3. Upload the Secure Endpoint IntuneWin File to Microsoft Intune Admin Center.
Perform the following steps:
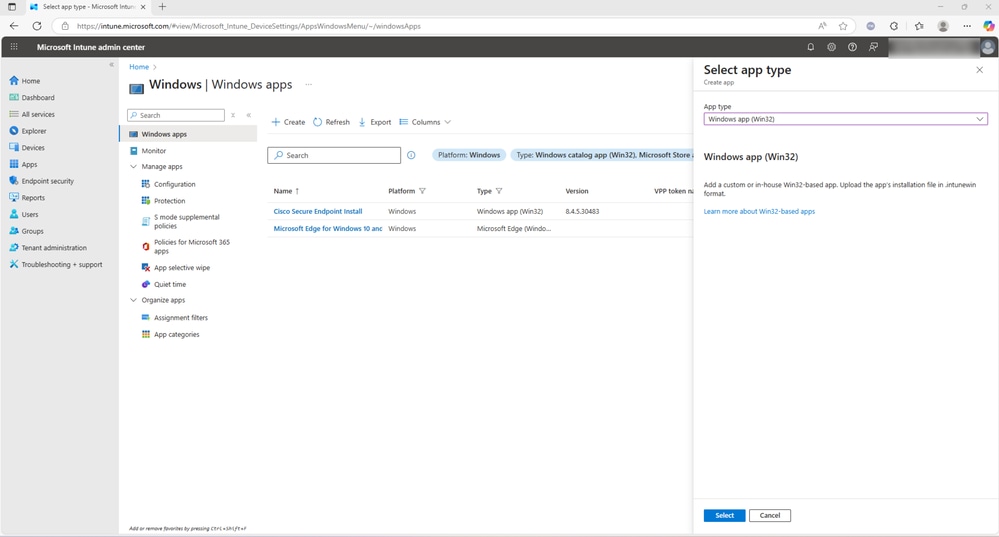
- Log in to Microsoft Intune Admin Center
- Navigate to the Windows Apps in the Microsoft Intune Admin Center and Select App Type – Win32 and select
These two actions are demonstrated in the screenshot:
- In the next step, upload the Secure Endpoint Intunewin file created in step 2 and select OK
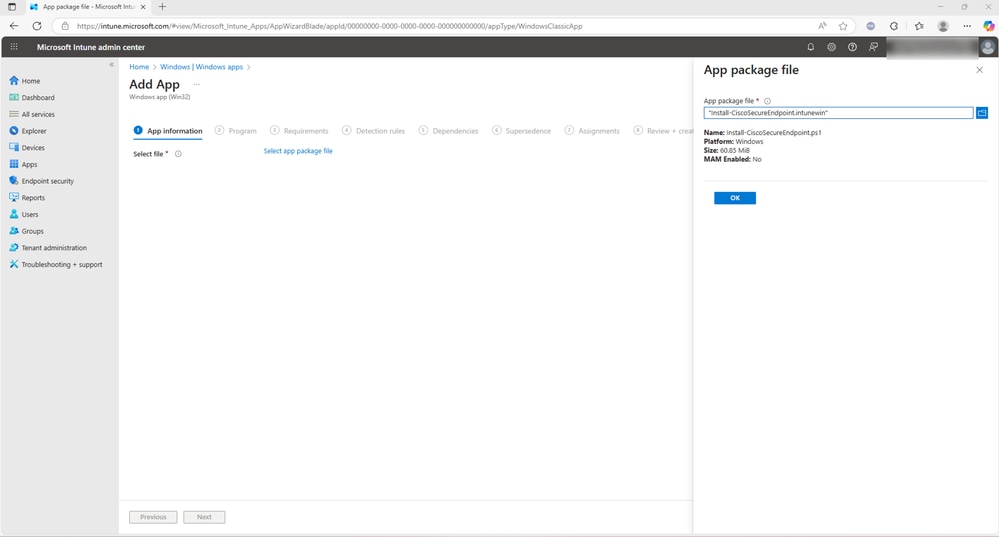
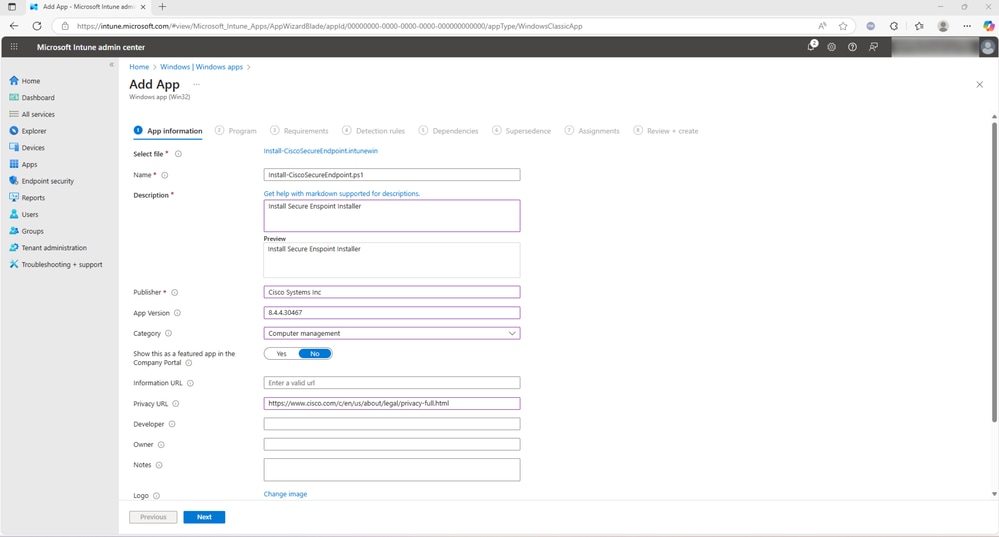
- After selecting OK, enter the information as presented in the screenshot. The optional fields can be left blank on each tab. Proceed to the next step by selecting Next
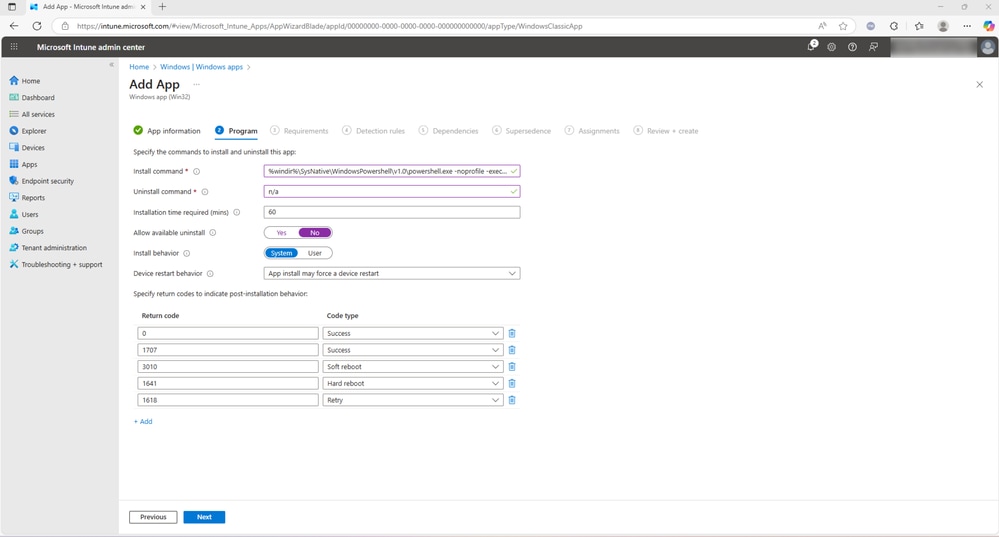
- Enter the Install Command as shown:
%windir%\SysNative\WindowsPowershell\v1.0\powershell.exe -noprofile -executionpolicy Bypass -file .\Install-CiscoSecureEndpoint.ps1
Please note that the code presented here serves as an example and any code can be used as an install command for this installer
- Enter Uninstall as n/a and installation time required as 60 (optional). Set Allow available uninstall as No, select Install behavior as System,and enter any optional details before you select Next
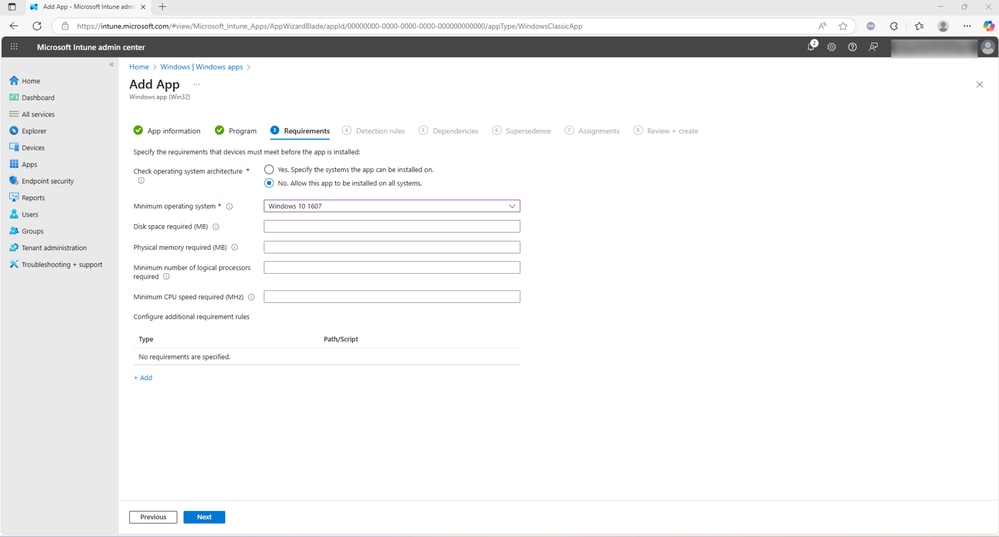
- On the requirements tab, check No. Allow this app to be installed on all systems and select the minimum operating system. Fill and optional fields if desired and select Next
-
On the Detection Rules tab, the Rules format drop-down menu provides two options: Manually configure detection rules and Use a custom detection script. Either option can be selected based on the deployment requirements.
-
When choosing Manually configure detection rules, you can define a rule type such as MSI, File, or Registry to detect the presence of the application. In this document, the alternative option, Use a custom detection script, has been selected.
-
A PowerShell script named Confirm-CSEInstall.ps1 is used to verify successful installation of Cisco Secure Endpoint. It is listed at the bottom of this document.
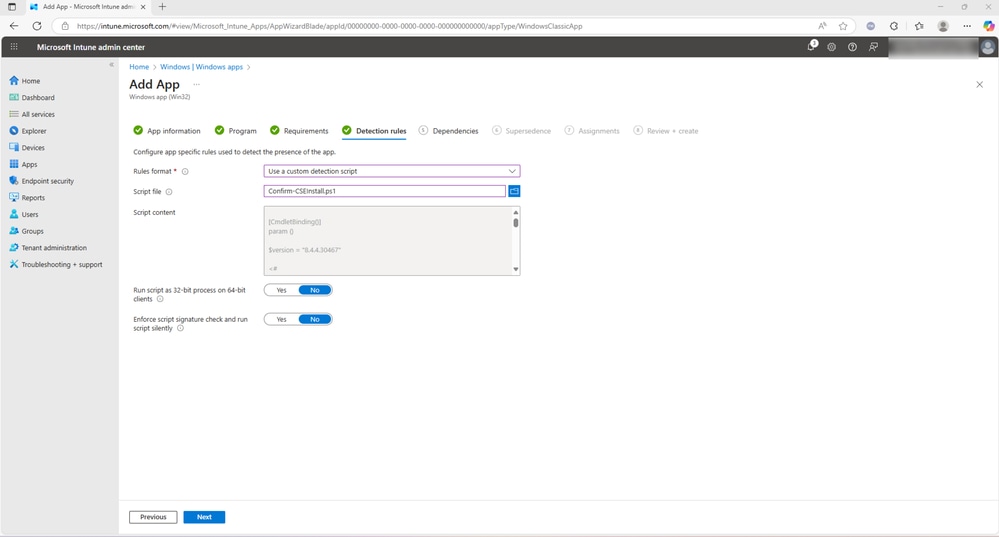
- Select Next to proceed. Note: A custom detection script can be created specifically for this deployment process to suit your environment and detection criteria.
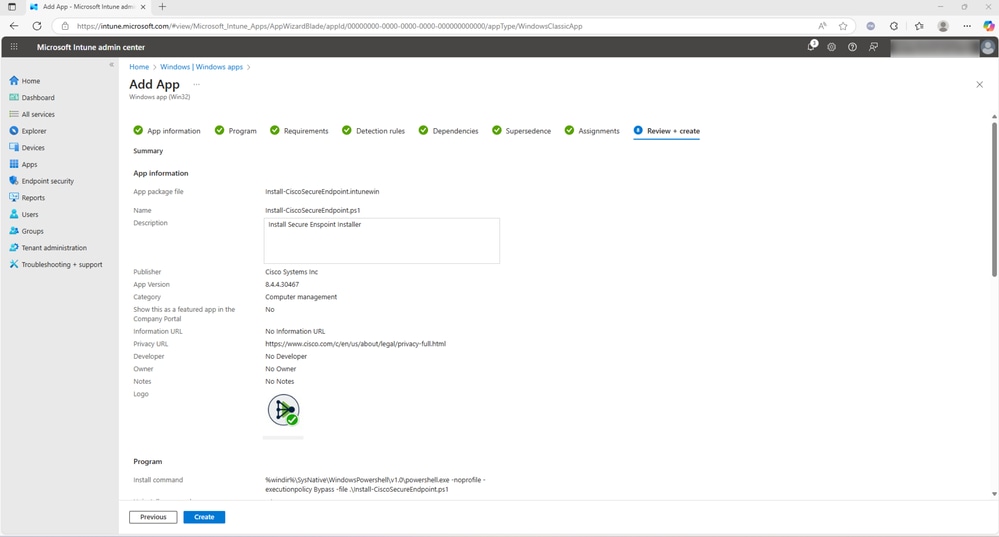
- The next few tabs are optional. No dependencies need to be configured, assign the application to the required group and select Review + create
Secure Client Deployment
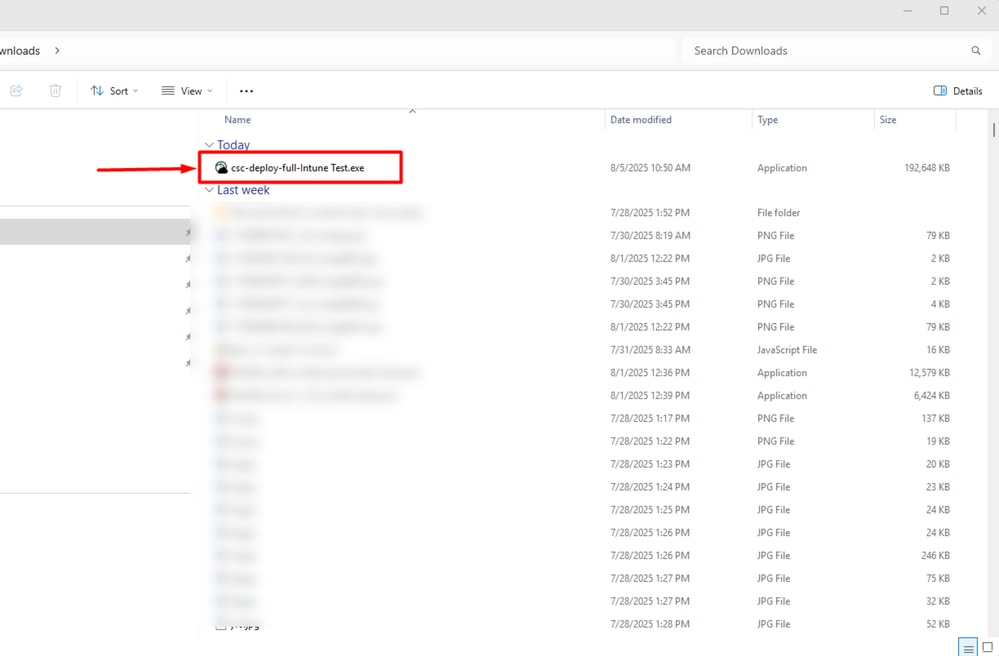
Step 1. Download the Cisco Secure Client Full Deployment
- Log in to the XDR or Secure Client Cloud Management console, depending on the region: https://apps.security.cisco.com/overview
- Create a new deployment and select Full Installer or Network Installer depending on your deployment type

- A csc-deploy-full-Intune Test.exe gets downloaded as shown in the screenshot.
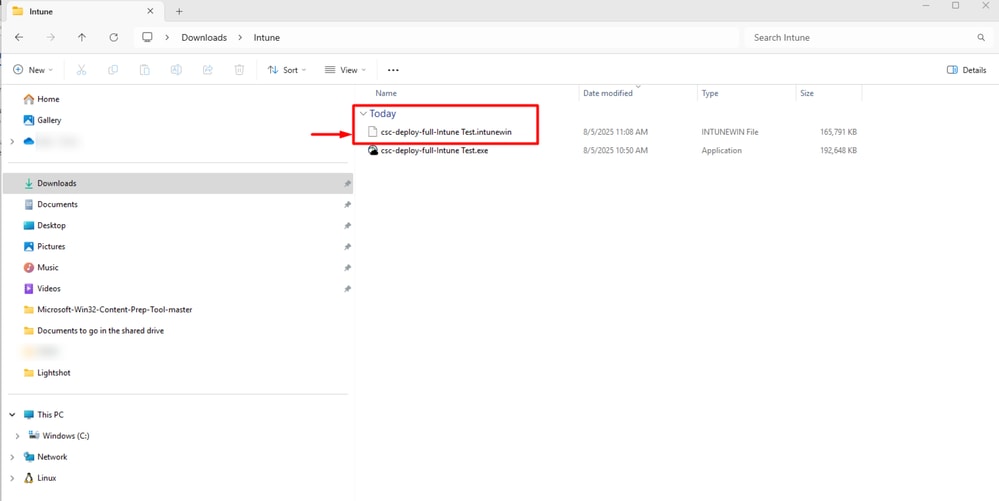
Step 2. Prepare the Intune file by following the same procedure in step 2. This creates csc-deploy-full-Intune Test.intunewin file.
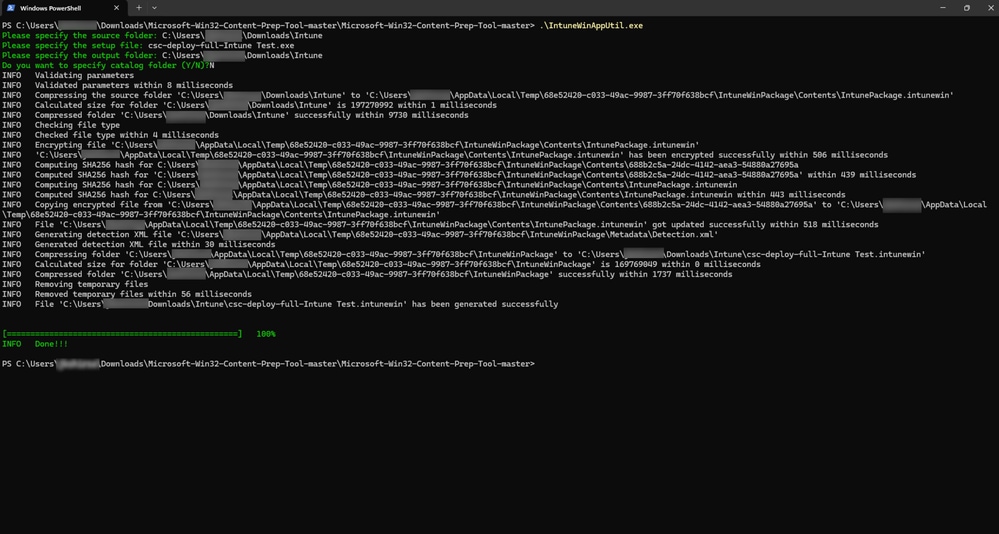
- The above steps results in creating a csc-deploy-full-Intune Test.intunewin file as shown in the screenshot.
Step 3. Upload the csc-deploy-full-intune Test.intunewin file from part 1 to Microsoft Intune Admin Center as per the steps shown above.
This completes the process to deploy Cisco Secure Endpoint using Intune.

Caution: This install script must be combined with the installer using Intune Converter and the exact name of the PS script referenced in the command line mentioned under Step3 in this guide and placed in the Intune under:
Add App --- > Program --- > Install Command

Note: Scripts below are just working samples for demonstrations used in lab environment to create this guide. You can use them as-is after proper testing or modify as you wish.
Install-CiscoSecureEndpoint.ps1 script
[CmdletBinding()]
param ()

$cse_exe = <Secure Endpoint Installer>
$version = <Secure Endpoint Version>

if ($PSCommandPath -eq $null) {
    function GetPSCommandPath() {
        return $MyInvocation.PSCommandPath;
    }
    $PSCommandPath = GetPSCommandPath
}

$script = [pscustomobject]@{
    "Path" = Split-Path $PSCommandPath -Parent
    "Name" = Split-Path $PSCommandPath -Leaf
}

Set-Location -Path $script.Path

$cse_installer = [IO.Path]::Combine($script.Path, $cse_exe)
$csc_installer_args = "/R /S"

<#
    Cannot use -wait for 'Cisco Secure Endpoint' and therefore cannot get the exit code to return.
    Using -wait, returns varied results, instead use Get-Process and while loop to wait for installation to complete.
#>
$install = Start-Process -WorkingDirectory "$($script.Path)" -FilePath "${cse_installer}" -ArgumentList "${csc_installer_args}" -PassThru -NoNewWindow

while (Get-Process "$($cse_exe -replace '.exe', '')" -ErrorAction SilentlyContinue)
{
    Start-Sleep -Seconds 10
}
Install-CiscoXDRDeployment.ps1 script
$exeName = <Your_XDR_Deployment.exe>
$exePath = Join-Path -Path $PSScriptRoot -ChildPath $exeName

if (-not (Test-Path $exePath)) {
    Write-Error "Executable not found: $exePath"
    exit 1
}

# Use silent mode – the most commonly documented switch for Cisco XDR / Secure Client installers
$arguments = "-q"   # or try "--quiet" if -q fails in your specific build

try {
    $process = Start-Process -FilePath $exePath -ArgumentList $arguments -NoNewWindow -Wait -PassThru

    if ($process.ExitCode -eq 0) {
        Write-Output "Cisco XDR installation completed successfully (exit code 0)."
        exit 0
    } else {
        Write-Error "Installation failed with exit code: $($process.ExitCode)"
        exit $process.ExitCode
    }
}
catch {
    Write-Error "Exception during installation: $_"
    exit 1
}
Confirm-CSEInstall.ps1 script

Tip: This is optional, you can always use Manually configured detection rules in Intune Management Portal.
[CmdletBinding()]
param ()

$version = <Secure Endpoint Version>

<#
    https://learn.microsoft.com/en-us/intune/intune-service/apps/apps-win32-add#step-4-detection-rules
    The app gets detected when the script both returns a 0 value exit code and writes a string value to STDOUT

    The Intune agent checks the results from the script. It reads the values written by the script to the STDOUT stream,
    the standard error (STDERR) stream, and the exit code. If the script exits with a nonzero value, the script fails and
    the application detection status isn't installed. If the exit code is zero and STDOUT has data, the application
    detection status is installed.
#>

$cse = Get-ItemProperty HKLM:\Software\Microsoft\Windows\CurrentVersion\Uninstall\*, HKLM:\SOFTWARE\Wow6432Node\Microsoft\Windows\CurrentVersion\Uninstall\* -ErrorAction SilentlyContinue | Where-Object { $_ -like "*Immunet Protect*" } | Where-Object { $_.DisplayName -like "*Cisco Secure Endpoint*" }
if ($cse | Where-Object { [System.Version] $_.DisplayVersion -ge [System.Version] "${version}" })
{
    Write-Host "Installed"
    exit 0
}

exit 1Note: Scripts above are meant only for educational purposes and are not supported by Cisco TAC, each environment could be different with different rules or policies and it’s necessary to conduct proper testing. Troubleshooting 3rd party deployment tools will be treated as best effort and should start with reviewing Intune logs both in the portal or on the managed station.
Revision History
| Revision | Publish Date | Comments |
|---|---|---|
1.0 |
12-Aug-2025
|
Initial Release |
 Feedback
Contact Cisco
- Open a Support Case

- (Requires a Cisco Service Contract)