Introduction
This document describes how to restore files that were quarantined by the Secure Endpoint connector from the Secure Endpoint console.
Prerequisites
Requirements
Cisco recommends that you have knowledge of these topics:
- Cisco Secure Endpoint console
Components Used
The information in this document is based on these software versions:
- Secure Endpoint Console v5.4.2025030619
The information in this document was created from the devices in a specific lab environment. All of the devices used in this document started with a cleared (default) configuration. If your network is live, ensure that you understand the potential impact of any command.
Problem
Files quarantined by the Secure Endpoint (SE) connector can be retrieved for file analysis, false positive submissions, or restoration when the file is known to be safe. Administrators can perform this action directly from the Secure Endpoint Console.
Solution
1. Navigate to Events page on your SE console.
2. Filter the events to show all successful quarantines by selecting the filter Event Type = Threat Quarantined.
 Threat Quarantined Event Type
3. Identify the detection event associated with the file you need to restore.
4. Expand the event details to access the Restore File option. Selecting Restore File restores the file on the affected machine. Selecting All Computers restores the file on all machines where it was quarantined.
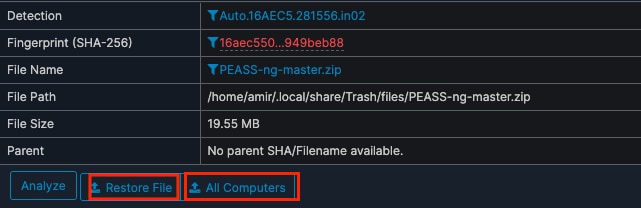 Restore File Options
5. The Heartbeat Interval is the frequency with which the connector calls home to see if there are any files to restore by the administrator. Files are restored once the affected computers are online or the next heartbeat interval occurs.
6. If the file is trusted, add it to an Allow List to prevent it from being quarantined again.

Note: Files remain in quarantine for 30 days or when the quarantine folder reaches 100 MB and the oldest files are purged. Quarantined files can no longer be restored after they are purged.
If you need to simply download a quarantined file for threat analysis or false positive submissions without restoring it to your environment, you can use the File Fetch feature. Steps to Download a Quarantined File:
1. Navigate to Events page on your SE console.
2. Filter the events to show all successful quarantines by selecting the filter Event Type = Threat Quarantined.
3. Identify the detection event associated with the file you need to Download.
4. Click the SHA-256 value of the quarantined file to reveal the File Fetch option.
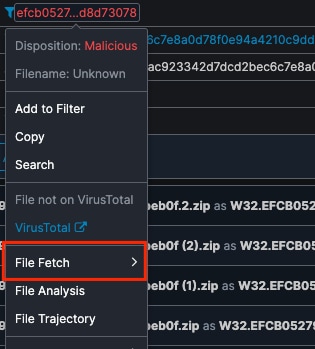 File Fetch
This provides the status of the file fetch, the option to initiate the fetch, and access to view the file in the File Repository.
5. Click Fetch File, select the Computer from which you want to retrieve the file, and confirm by clicking Fetch.
6. An email notification is sent once the file is uploaded to the File Repository.
7. Once the file is available, you can see the file and the option to download it in Analysis> File Repository.
 Download File
All files downloaded from the File Repository are zipped and password protected.
Note: For File Fetch to function properly, network traffic must be allowed to the appropriate File Fetch server based on your cloud region: Europe: rff.eu.amp.cisco.com North America: rff.amp.cisco.com APJC: rff.apjc.amp.cisco.com. Additionally, ensure that Two-Factor Authentication (2FA) is enabled for the Administrator account, as it is required to successfully initiate a file fetch request.

Tip: You can filter events using Event Type = Quarantined Restore Failed and Event Type = File Fetch Failed to identify failures and review the corresponding reasons for Restore and File Fetch operations respectively.
If you are unable to restore the file using the outlined steps, contact Cisco TAC and provide the .qrt file located in the C:\Program Files\Cisco\AMP\Quarantine directory.
 Feedback