Configure AnyConnect SSL VPN on C8000v with Local Authentication
Available Languages
Download Options
Bias-Free Language
The documentation set for this product strives to use bias-free language. For the purposes of this documentation set, bias-free is defined as language that does not imply discrimination based on age, disability, gender, racial identity, ethnic identity, sexual orientation, socioeconomic status, and intersectionality. Exceptions may be present in the documentation due to language that is hardcoded in the user interfaces of the product software, language used based on RFP documentation, or language that is used by a referenced third-party product. Learn more about how Cisco is using Inclusive Language.
Introduction
This document describes how to configure Cisco IOS XE Headend C8000v for AnyConnect SSL VPN with a local user database.
Prerequisites
Requirements
Cisco recommends that you have knowledge of these topics:
-
Cisco IOS XE
-
Cisco Secure Client (CSC)
-
General SSL Operation
-
Public Key Infrastructure (PKI)
Components Used
The information in this document is based on these software and hardware versions:
- Cisco Catalyst 8000V (C8000V) running version 17.16.01a
- Cisco Secure Client version 5.1.8.105
- Client PC with Cisco Secure Client installed
The information in this document was created from the devices in a specific lab environment. All of the devices used in this document started with a cleared (default) configuration. If your network is live, ensure that you understand the potential impact of any command.
Background Information
Cisco IOS XE Secure Socket Layer (SSL) VPN is a router-based solution offering SSL VPN remote-access connectivity integrated with industry-leading security and routing features on a converged data, voice, and wireless platform. With Cisco IOS XE SSL VPN, end users gain access securely from home or any internet-enabled location such as wireless hotspots. Cisco IOS XE SSL VPN also enables companies to extend corporate network access to offshore partners and consultants, keeping corporate data protected all the while.
This feature is supported on the given platforms:
|
Platform |
Supported Cisco IOS XE Release |
|
Cisco Cloud Services Router 1000V Series |
Cisco IOS XE Release 16.9 |
|
Cisco Catalyst 8000V |
Cisco IOS XE Bengaluru 17.4.1 |
|
Cisco 4461 Integrated Services Router Cisco 4451 Integrated Services Router Cisco 4431 Integrated Services Router |
Cisco IOS XE Cupertino 17.7.1a |
Configure
Network Diagram
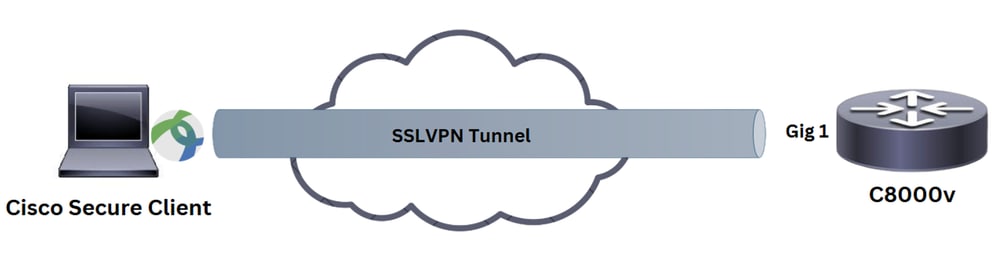 Basic Network Diagram
Configurations
- Enable AAA, configure authentication, authorization lists, and add a username to the local database.
aaa new-model
!
aaa authentication login SSLVPN_AUTHEN local
aaa authorization network SSLVPN_AUTHOR local
!
username test password cisco123

Warning: The aaa new-model command immediately applies local authentication to all lines and interfaces (except console line line con 0). If a telnet session is opened to the router after this command is enabled (or if a connection times out and has to reconnect), then the user has to be authenticated with the local database of the router. It is recommended to define a username and password on the router before you start the AAA configuration, so you are not locked out of the router.

Tip: Before you configure your AAA commands, save your configuration. You can save the configuration again only after you have completed your AAA configuration (and are satisfied that it works correctly). This allows you to recover from unexpected lockouts as you can roll back any change with a reload of the router.
2.Generate Rivest-Shamir-Adleman (RSA) Keypair.
crypto key generate rsa label AnyConnect modulus 2048 exportable
3. Create a Trustpoint to install the identity certificate of router. You can refer to How to Configure Certificate Enrollment for a PKI for more details on the certificate creation.
crypto pki trustpoint TP_AnyConnect
enrollment terminal
fqdn sslvpn-c8kv.example.com
subject-name cn=sslvpn-c8kv.example.com
subject-alt-name sslvpn-c8kv.example.com
revocation-check none
rsakeypair AnyConnect
Note: The Common Name (CN) in the Subject Name must be configured with the IP address or Fully Qualified Domain Name (FQDN) that users use to connect to the Secure Gateway (C8000V). Although not mandatory, correctly entering the CN can help reduce the number of certificate errors users encounter at log in.
4. Define an IP local pool to assign addresses to Cisco Secure Client.
ip local pool SSLVPN_POOL 192.168.13.1 192.168.13.10
5. (Optional) Configure a standard access list to be used for the split-tunnel. This access list consists of the destination networks that can be accessed through the VPN tunnel. By default, all the traffic passes through the VPN tunnel (Full Tunnel) if the split tunnel is not configured.
ip access-list standard split-tunnel-acl
10 permit 192.168.11.0 0.0.0.255
20 permit 192.168.12.0 0.0.0.255
6.Disable HTTP secure server.
no ip http secure-server
7. Configure an SSL proposal.
crypto ssl proposal ssl_proposal
protection rsa-aes128-sha1 rsa-aes256-sha1
8. Configure an SSL policy, call the SSL proposal and the PKI trustpoint.
crypto ssl policy ssl_policy
ssl proposal ssl_proposal
pki trustpoint TP_AnyConnect sign
ip interface GigabitEthernet1 port 443
SSL policy defines the proposal and trustpoint to be used during SSL negotiation. It serves as a container for all parameters involved in the SSL negotiation. The policy selection is made by matching the session parameters against those configured under the policy.
9. (Optional) Create an AnyConnect profile with the help of the Cisco Secure Client Profile Editor Cisco Secure Client Profile Editor . A snippet of XML equivalent of the profile, is given for your reference.
<ClientInitialization>
<UseStartBeforeLogon UserControllable="true">true</UseStartBeforeLogon>
<AutomaticCertSelection UserControllable="false">true</AutomaticCertSelection>
<ShowPreConnectMessage>false</ShowPreConnectMessage>
<CertificateStore>All</CertificateStore>
<CertificateStoreMac>All</CertificateStoreMac>
<CertificateStoreLinux>All</CertificateStoreLinux>
<CertificateStoreOverride>false</CertificateStoreOverride>
<ProxySettings>Native</ProxySettings>
<AllowLocalProxyConnections>true</AllowLocalProxyConnections>
<AuthenticationTimeout>30</AuthenticationTimeout>
<AutoConnectOnStart UserControllable="true">false</AutoConnectOnStart>
<MinimizeOnConnect UserControllable="true">true</MinimizeOnConnect>
<LocalLanAccess UserControllable="true">false</LocalLanAccess>
<DisableCaptivePortalDetection UserControllable="true">false</DisableCaptivePortalDetection>
<ClearSmartcardPin UserControllable="false">true</ClearSmartcardPin>
<IPProtocolSupport>IPv4,IPv6</IPProtocolSupport>
<AutoReconnect UserControllable="false">true
<AutoReconnectBehavior UserControllable="false">ReconnectAfterResume</AutoReconnectBehavior>
</AutoReconnect>
<SuspendOnConnectedStandby>false</SuspendOnConnectedStandby>
<AutoUpdate UserControllable="false">true</AutoUpdate>
<RSASecurIDIntegration UserControllable="false">Automatic</RSASecurIDIntegration>
<WindowsLogonEnforcement>SingleLocalLogon</WindowsLogonEnforcement>
<LinuxLogonEnforcement>SingleLocalLogon</LinuxLogonEnforcement>
<WindowsVPNEstablishment>AllowRemoteUsers</WindowsVPNEstablishment>
<LinuxVPNEstablishment>LocalUsersOnly</LinuxVPNEstablishment>
<AutomaticVPNPolicy>false</AutomaticVPNPolicy>
<PPPExclusion UserControllable="false">Disable
<PPPExclusionServerIP UserControllable="false"></PPPExclusionServerIP>
</PPPExclusion>
<EnableScripting UserControllable="false">false</EnableScripting>
<EnableAutomaticServerSelection UserControllable="false">false
<AutoServerSelectionImprovement>20</AutoServerSelectionImprovement>
<AutoServerSelectionSuspendTime>4</AutoServerSelectionSuspendTime>
</EnableAutomaticServerSelection>
<RetainVpnOnLogoff>false
</RetainVpnOnLogoff>
<CaptivePortalRemediationBrowserFailover>false</CaptivePortalRemediationBrowserFailover>
<AllowManualHostInput>true</AllowManualHostInput>
</ClientInitialization>
<ServerList>
<HostEntry>
<HostName>SSL_C8KV</HostName>
<HostAddress>sslvpn-c8kv.example.com</HostAddress>
</HostEntry>
</ServerList>
</AnyConnectProfile>
10. Upload the created XML profile to the flash memory of the router and define the profile:
crypto vpn anyconnect profile acvpn bootflash:/acvpn.xml
11. Configure SSL Authorisation Policy.
crypto ssl authorization policy ssl_author_policy
client profile acvpn
pool SSLVPN_POOL
dns 192.168.11.100
banner Welcome to C8kv SSLVPN
def-domain example.com
route set access-list split-tunnel-acl
The SSL authorization policy is a container of authorization parameters that are pushed to remote-client.The authorization policy is referred from SSL profile.
12. Configure a Virtual template from which the virtual-access interfaces are cloned.
interface Virtual-Template2 type vpn
ip unnumbered GigabitEthernet1
ip mtu 1400
ip tcp adjust-mss 1300
13. Configure an SSL profile and define authentication , accounting lists and virtual template.
crypto ssl profile ssl_prof
match policy ssl_policy
match url https://sslvpn-c8kv.example.com
aaa authentication user-pass list SSLVPN_AUTHEN
aaa authorization group user-pass list SSLVPN_AUTHOR ssl_author_policy
authentication remote user-pass
virtual-template 2
A profile selection depends on policy and URL values.
Note: The policy and URL must be unique for an SSL VPN profile, and at least one authorization method must be specified to bring up the session.
These are used in SSL Profile:
- match policy - match statement to select an SSL profile ssl_prof for a client on the SSL policy name ssl_policy.
- match url - match statements to select an SSL profile ssl_prof for a client on the URL sslvpn-c8kv.example.com.
- aaa authentication user-pass list - During authentication the SSLVPN_AUTHEN list is used.
- aaa authorization group user-pass list - During the authorization, the network list SSLVPN_AUTHOR is used with the authorization policy ssl_author_policy.
- authentication remote user-pass - Defines authenitcation mode of remote client is username/password based.
- virtual-template 2 - Defines which virtual template to clone.
Connection Flow
To understand the events that take place between Cisco Secure Client and the Secure Gateway during an SSL VPN connection establishment, refer to document Understanding the AnyConnect SSL VPN Connection Flow
Cisco Secure Client (AnyConnect) to C8000v High Level Connection Flow
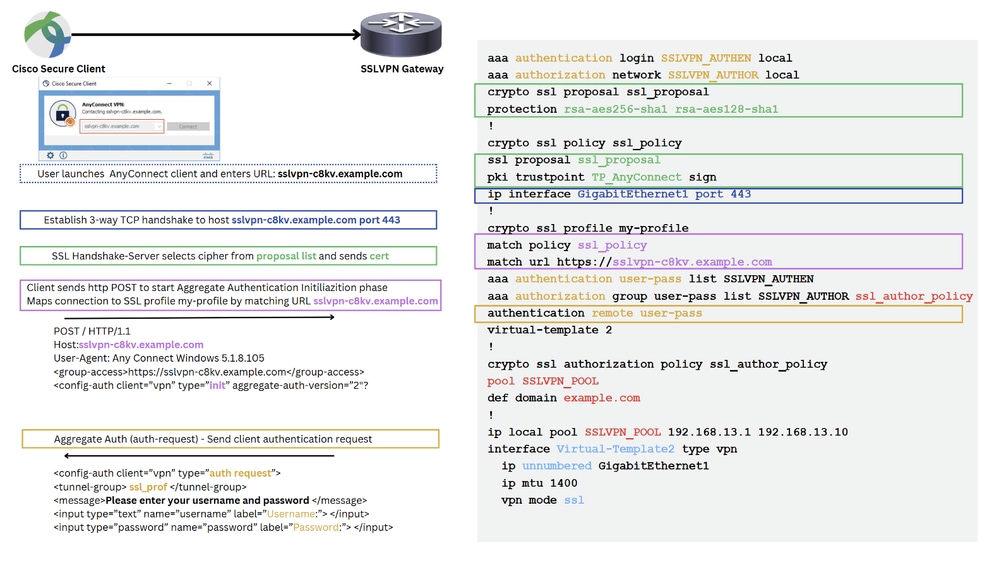 High Level Connection Flow 1
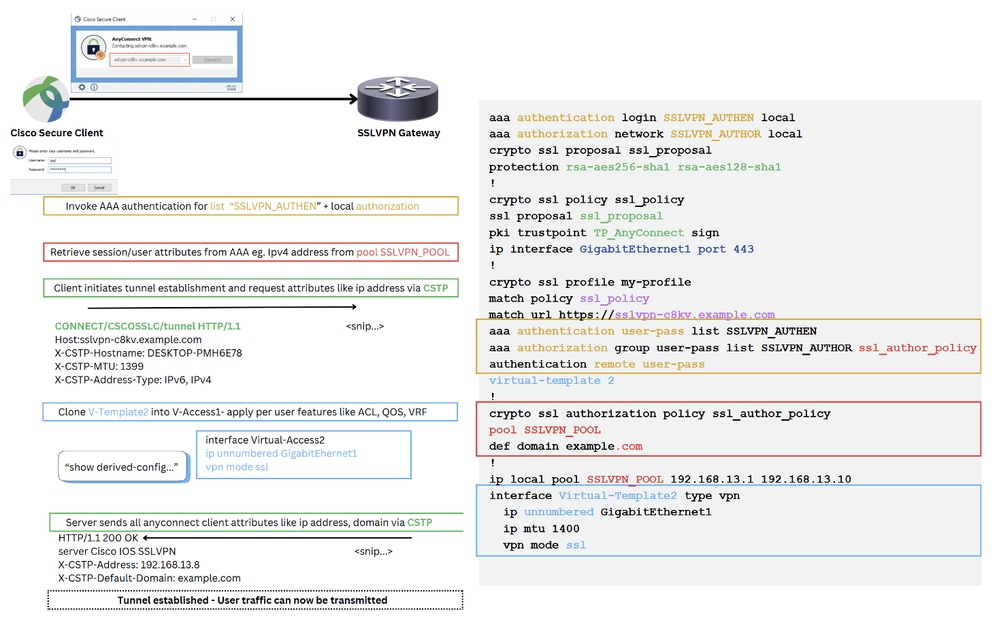 High Level Connection Flow 2
Verify
1. In order to test the authentication, connect from the Cisco Secure Client with Fully Qualified Domain Name (FQDN) or IP address of C8000v, and enter the credentials.

Caution: C8000v does not support client software download from headend. Cisco Secure Client must be pre-installed on the PC.
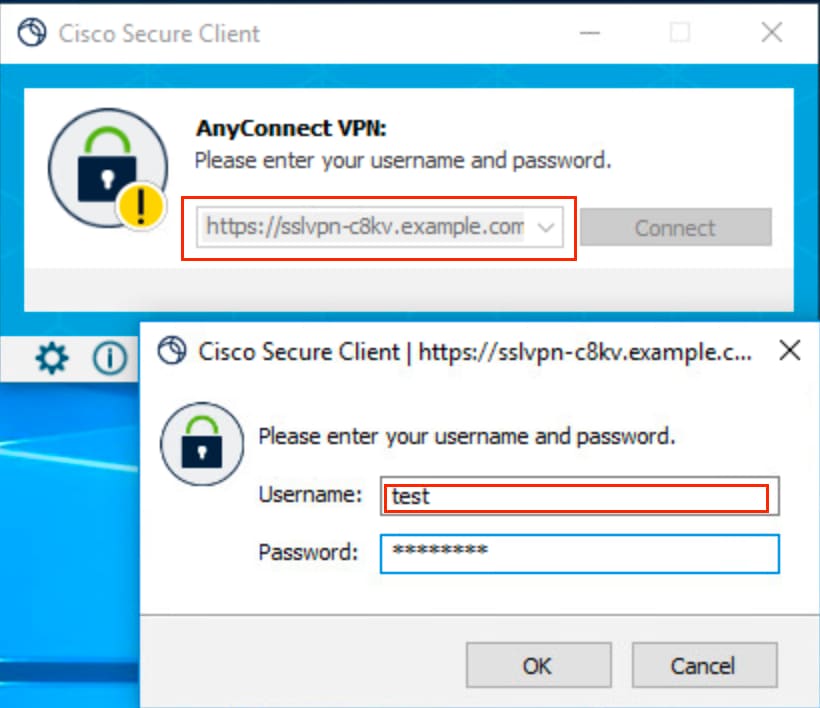 Cisco Secure Client Connection Attempt
Note: With a fresh installation of the Cisco Secure Client (with no XML profiles added), the user can manually enter the FQDN of the VPN gateway in the Cisco Secure Client address bar. After a successful login, the Cisco Secure Client attempts to download the XML profile by default. However, Cisco Secure Client needs to be restarted for the profile to appear in the GUI. Simply closing the Cisco Secure Client window is not sufficient. To restart the process, right-click the Cisco Secure Client icon in the Windows tray and select the Quit option.
2. Once the connection is established, click the gear icon in the lower left corner and navigate to AnyConnect VPN > Statistics. Confirm the information displayed corresponds to the Connection and Address Information.
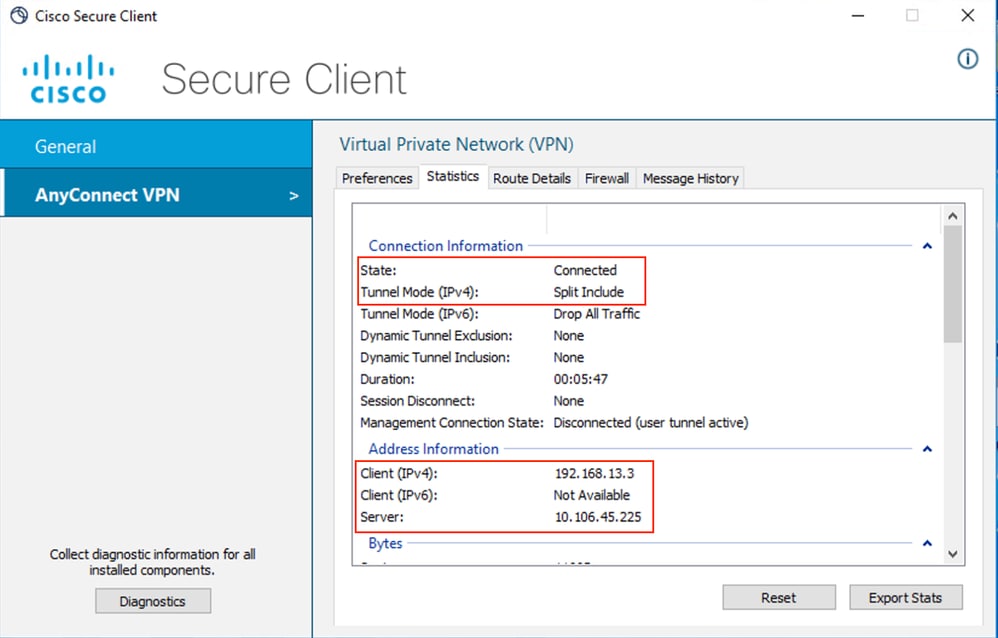 Cisco Secure Client (AnyConnect) Statistics
3. Navigate to AnyConnectVPN > Route details and confirm the information displayed corresponds to the secured routes and non secured routes.
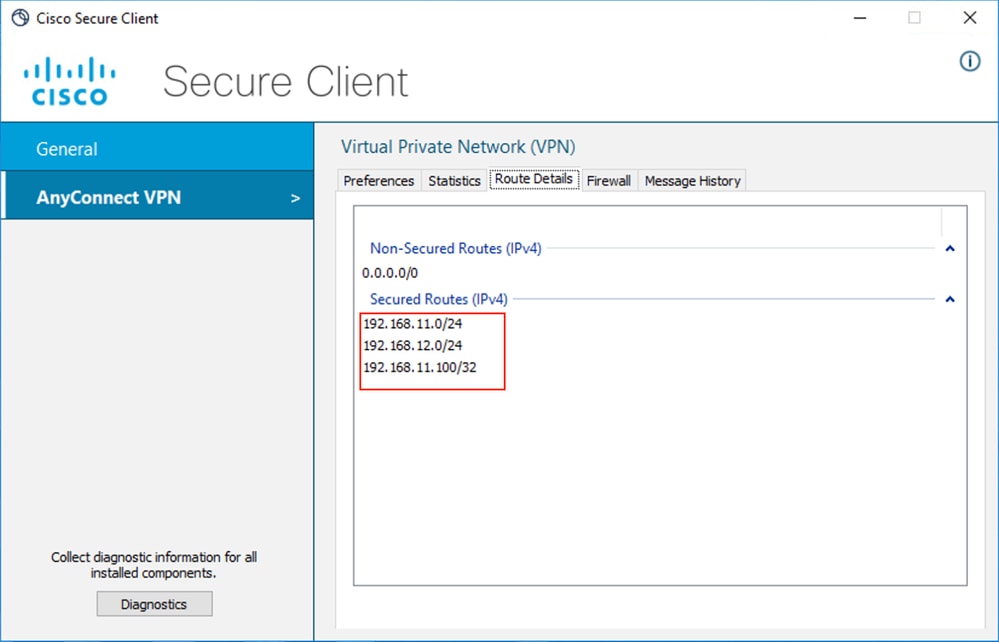 Cisco Secure Client (AnyConnect) Route Details
Use this section in order to confirm that your configuration works properly on C8000v:
1. To display ssl session information - show crypto ssl session{user user-name |profile profile-name}
sal_c8kv#show crypto ssl session user test

Interface : Virtual-Access1
Session Type : Full Tunnel
Client User-Agent : AnyConnect Windows 5.1.8.105

Username : test                        Num Connection : 1
Public IP : 10.106.69.69
Profile : ssl_prof
Policy : ssl_policy
Last-Used : 00:41:40                   Created : *15:25:47.618 UTC Mon Mar 3 2025
Tunnel IP : 192.168.13.3               Netmask : 0.0.0.0
Rx IP Packets : 542                    Tx IP Packets : 410


sal_c8kv#show crypto ssl session profile ssl_prof
SSL profile name: ssl_prof
Client_Login_Name  Client_IP_Address No_of_Connections Created   Last_Used
cisco                10.106.69.69             1        00:49:41  00:49:41
2. To dispaly ssl vpn statistics - show crypto ssl stats [profile profile-name] [tunnel] [detail]
sal_c8kv#show crypto ssl stats tunnel profile ssl_prof

SSLVPN Profile name : ssl_prof

Tunnel Statistics:

    Active connections       : 1
    Peak connections         : 1          Peak time                : 1d23h
    Connect succeed          : 13         Connect failed           : 0
    Reconnect succeed        : 0          Reconnect failed         : 0
    IP Addr Alloc Failed     : 0          VA creation failed       : 0
    DPD timeout              : 0

  Client

    in  CSTP frames          : 23         in  CSTP control         : 23
    in  CSTP data            : 0          in  CSTP bytes           : 872
    out CSTP frames          : 11         out CSTP control         : 11
    out CSTP data            : 0          out CSTP bytes           : 88
    cef in  CSTP data frames : 0          cef in  CSTP data bytes  : 0
    cef out CSTP data frames : 0          cef out CSTP data bytes  : 0

  Server

    In  IP pkts              : 0          In  IP bytes             : 0
    In  IP6 pkts             : 0          In  IP6 bytes            : 0
    Out IP pkts              : 0          Out IP bytes             : 0
    Out IP6 pkts             : 0          Out IP6 bytes            : 0
3. To check the actual configuration applied for the Virtual-Access interface associated with client.
sal_c8kv#show derived-config interface Virtual-Access1
Building configuration...

Derived configuration : 143 bytes
!
interface Virtual-Access1
description ***Internally created by SSLVPN context ssl_prof***
ip unnumbered GigabitEthernet1
ip mtu 1400
end
Troubleshoot
This section provides information you can use to troubleshoot your configuration.
1. SSL debugs to verify the negotiation between the headend and the client.
debug crypto ssl condition client username <username>
debug crypto ssl aaa
debug crypto ssl aggr-auth message
debug crypto ssl aggr-auth packets
debug crypto ssl tunnel errors
debug crypto ssl tunnel events
debug crypto ssl tunnel packets
debug crypto ssl package
2. A few additional commands to verify SSL Configuration.
# show crypto ssl authorization policy
# show crypto ssl diagnose error
# show crypto ssl policy
# show crypto ssl profile
# show crypto ssl proposal
# show crypto ssl session profile <profile_name>
# show crypto ssl session user <username> detail
# show crypto ssl session user <username> platform detail
3. Diagnostic and Reporting Tool (DART) for the Cisco Secure Client.
To collect the DART bundle, perform the steps described in the Run DART to Gather Data for Troubleshooting
Sample debugs of a succesful connection:
debug crypto ssl
debug crypto ssl tunnel events
debug crypto ssl tunnel errors
*Mar 3 16:47:11.141: CRYPTO-SSL: sslvpn process rcvd context queue event
*Mar 3 16:47:14.149: CRYPTO-SSL: Chunk data written..
buffer=0x726BCA8891B8 total_len=621 bytes=621 tcb=0x0
*Mar 3 16:47:15.948: %SSLVPN-5-LOGIN_AUTH_PASSED: vw_ctx: ssl_prof vw_gw: ssl_policy remote_ip: 10.106.69.69 user_name: cisco, Authentication successful, user logged in
*Mar 3 16:47:15.948: %SEC_LOGIN-5-LOGIN_SUCCESS: Login Success [user: cisco] [Source: LOCAL] [localport: 0] at 16:47:15 UTC Mon Mar 3 2025
*Mar 3 16:47:15.949: CRYPTO-SSL: Chunk data written..
buffer=0x726BCA8891E0 total_len=912 bytes=912 tcb=0x0
*Mar 3 16:47:17.698: CRYPTO-SSL: sslvpn process rcvd context queue event
*Mar 3 16:47:20.755: [CRYPTO-SSL-TUNL-EVT]:[726BCA848AB0] CSTP Version recd , using 1
*Mar 3 16:47:20.755: [CRYPTO-SSL-TUNL-ERR]: IPv6 local addr pool not found
*Mar 3 16:47:20.755: [CRYPTO-SSL-TUNL-EVT]:[726BCA848AB0] No free IPv6 available, disabling IPv6
*Mar 3 16:47:20.755: [CRYPTO-SSL-TUNL-EVT]:[726BCA848AB0]
SSLVPN reuqesting a VA creation
*Mar 3 16:47:20.755: [CRYPTO-SSL-TUNL-EVT]:[726BCA848AB0] Per Tunnel Vaccess cloning 2 request sent
*Mar 3 16:47:20.760: %SYS-5-CONFIG_P: Configured programmatically by process VTEMPLATE Background Mgr from console as console
*Mar 3 16:47:20.760: [CRYPTO-SSL-TUNL-EVT]:[0] VACCESS: Received VACCESS PER TUNL EVENT response.
*Mar 3 16:47:20.760: [CRYPTO-SSL-TUNL-EVT]:[726BCA848AB0] VACCESS: Received vaccess Virtual-Access1 from VT manager
*Mar 3 16:47:20.760: [CRYPTO-SSL-TUNL-EVT]:[726BCA848AB0] VACCESS: Cloning Per Tunnel Vaccess
*Mar 3 16:47:20.760: [CRYPTO-SSL-TUNL-EVT]:[726BCA848AB0] VACCESS: Interface Vi1 assigned to Session User cisco
*Mar 3 16:47:20.761: [CRYPTO-SSL-TUNL-EVT]:[726BCA848AB0] Allocating IP 192.168.13.4 from address-pool SSLVPN_POOL
*Mar 3 16:47:20.761: [CRYPTO-SSL-TUNL-EVT]:[726BCA848AB0] Using new allocated IP 192.168.13.4 0.0.0.0
*Mar 3 16:47:20.761: %LINK-3-UPDOWN: Interface Virtual-Access1, changed state to up
*Mar 3 16:47:20.763: [CRYPTO-SSL-TUNL-EVT]:[726BCA848AB0] Full Tunnel CONNECT request processed, HTTP reply created
*Mar 3 16:47:20.763: HTTP/1.1 200 OK
*Mar 3 16:47:20.763: Server: Cisco IOS SSLVPN
*Mar 3 16:47:20.763: X-CSTP-Version: 1
*Mar 3 16:47:20.763: X-CSTP-Address: 192.168.13.4
*Mar 3 16:47:20.763: X-CSTP-Netmask: 0.0.0.0
*Mar 3 16:47:20.763: X-CSTP-DNS: 192.168.11.100
*Mar 3 16:47:20.764: X-CSTP-Lease-Duration: 43200
*Mar 3 16:47:20.764: X-CSTP-MTU: 1406
*Mar 3 16:47:20.764: X-CSTP-Default-Domain: example.com
*Mar 3 16:47:20.764: X-CSTP-Split-Include: 192.168.11.0/255.255.255.0
*Mar 3 16:47:20.764: X-CSTP-Split-Include: 192.168.12.0/255.255.255.0
*Mar 3 16:47:20.764: X-CSTP-Split-Include: 192.168.11.0/255.255.255.0
*Mar 3 16:47:20.764: X-CSTP-Split-Include: 192.168.12.0/255.255.255.0
*Mar 3 16:47:20.765: X-CSTP-Rekey-Time: 3600
*Mar 3 16:47:20.765: X-CSTP-Rekey-Method: new-tunnel
*Mar 3 16:47:20.765: X-CSTP-DPD: 300
*Mar 3 16:47:20.765: X-CSTP-Disconnected-Timeout: 0
*Mar 3 16:47:20.765: X-CSTP-Idle-Timeout: 1800
*Mar 3 16:47:20.765: X-CSTP-Session-Timeout: 43200
*Mar 3 16:47:20.765: X-CSTP-Keepalive: 30
*Mar 3 16:47:20.765: X-CSTP-Smartcard-Removal-Disconnect: false
*Mar 3 16:47:20.766: X-CSTP-Include-Local_LAN: false
*Mar 3 16:47:20.766: [CRYPTO-SSL-TUNL-EVT]:[726BCA848AB0] For User cisco, DPD timer started for 300 seconds
*Mar 3 16:47:20.766: CRYPTO-SSL: Chunk data written..
buffer=0x726BCA8891E0 total_len=693 bytes=693 tcb=0x0
*Mar 3 16:47:21.762: %LINEPROTO-5-UPDOWN: Line protocol on Interface Virtual-Access1, changed state to up
Related Information
Revision History
| Revision | Publish Date | Comments |
|---|---|---|
2.0 |
18-Mar-2025
|
Updated tech content. |
1.0 |
12-Mar-2025
|
Initial Release |
Contributed by Cisco Engineers
- Salman MahajanTechnical Consulting Engineer
 Feedback
Contact Cisco
- Open a Support Case

- (Requires a Cisco Service Contract)