Introduction
This document describes how to configure Secure Access as the VPN gateway and accept connections from the Secure Client through the VPN machine tunnel.
Network Diagram

Prerequisites
- Full Admin role in Secure Access.
- At least one User VPN profile configured on Cisco Secure Access
- User IP pool on Cisco Secure Access
Requirements
It is recommended that you have knowledge of these topics:
Components Used
The information in this document is based on these software and hardware versions:
- Cisco Secure Access
- Cisco Secure Client 5.1.10
- Windows 11
- Windows Server 2019 - CA
The information in this document was created from the devices in a specific lab environment. All of the devices used in this document started with a cleared (default) configuration. If your network is live, ensure that you understand the potential impact of any command.
Background Information
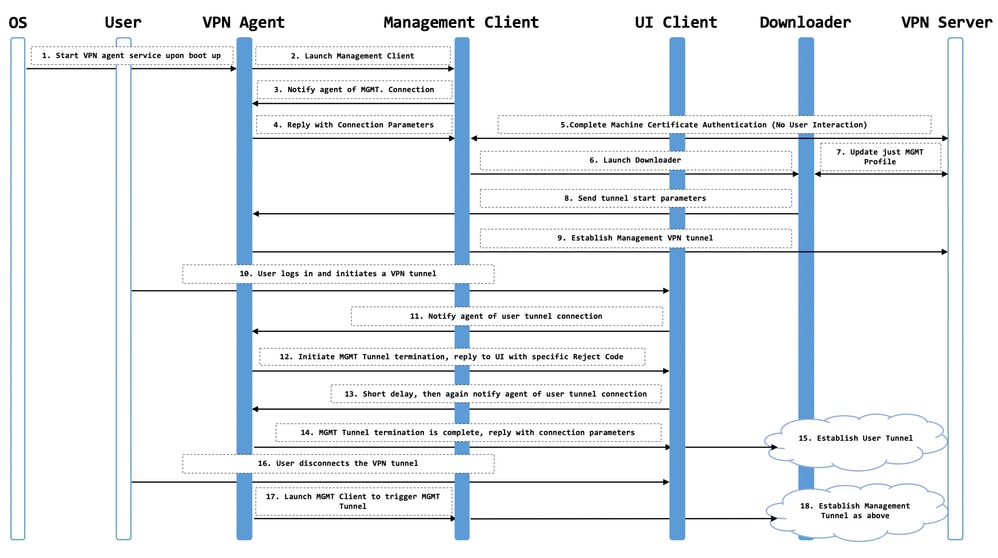
A Secure Access VPN machine tunnel ensures connectivity to the corporate network whenever the client system is powered up, not just when a VPN connection is established by the end user. You can perform patch management on out-of-the-office endpoints, especially devices that are infrequently connected by the user, via VPN, to the office network. Endpoint OS login scripts that require corporate network connectivity also benefit from this feature. For this tunnel to be created without user interaction, certificate-based authentication is used.
The Secure Access machine tunnel allows administrators to have the Cisco Secure Client connected without user intervention prior to when the user logs in. Secure Access machine tunnel is triggered when the endpoint is off-premises and disconnected from a user-initiated VPN. The Secure Access VPN machine tunnel is transparent to the end user and disconnects automatically when the user initiates VPN.
Working on Machine Tunnel
The Secure Client VPN agent service is automatically started upon system boot-up. The Secure Client VPN agent uses the VPN profile to detect that the machine tunnel feature is enabled. If the machine tunnel feature is enabled, the agent launches the management client application to initiate a machine tunnel connection. The management client application uses the host entry from the VPN profile to initiate the connection. Then the VPN tunnel is established as usual, with one exception: no software update is performed during a machine tunnel connection since the machine tunnel is meant to be transparent to the user.
The user initiates a VPN tunnel via the Secure Client, which triggers the machine tunnel termination. Upon machine tunnel termination, the user tunnel establishment continues as usual.
The user disconnects the VPN tunnel, which triggers the automatic re-establishment of the machine tunnel.
Limitations
- User interaction is not supported.
- Certificate-based authentication through Machine Certificate Store (Windows) is only supported.
- Strict Server Certificate checking is enforced.
- A private proxy is not supported.
- A public proxy is not supported (ProxyNative value is supported on platforms where Native Proxy settings are not retrieved from the browser).
- Secure Client Customization Scripts are not supported
Configure
Method 1 - Configure machine tunnel with user machine@sse.com
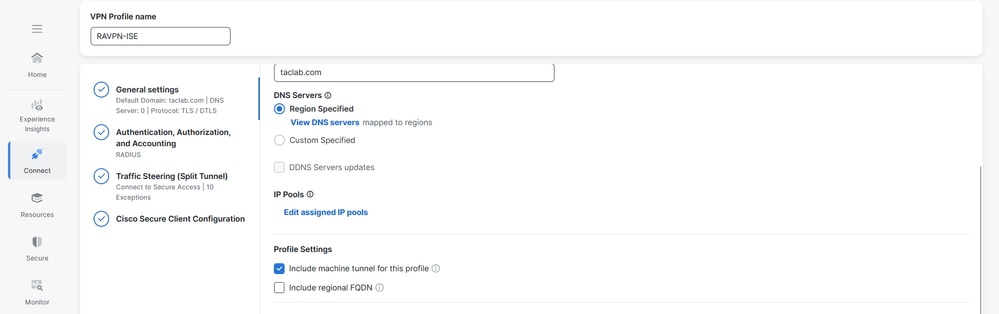
Step 1 - General Settings
Configure the general settings, including the domain and the protocols this machine tunnel use.
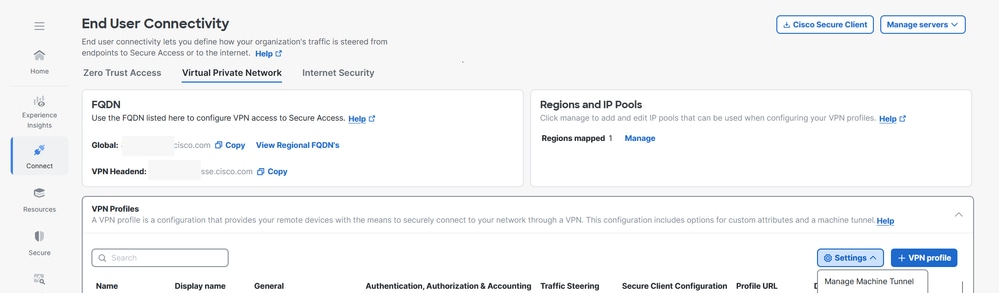
1. Navigate to Connect > End User Connectivity > Virtual Private Network.
2. Navigate to VPN Profiles and configure the settings for the machine tunnel.
a. Click Settings, and then choose Manage Machine Tunnel from the drop-down.
- Enter the Default Domain.
- The DNS Server mapped through the Manage Regions and IP Pools page is set as the default server. You can accept the default DNS server, choose another DNS server from the drop-down, or click + Add to add a new DNS server pair. Selecting another DNS server or adding a new DNS server overwrites this default server.
- Select one IP pool per region from the IP Pools drop-down. VPN profiles must have at least one IP pool assigned in each region for a valid configuration.
- Select the Tunnel Protocol that this machine tunnel use:
- TLS/DTLS
- IPSec (IKEv2)
At least one protocol must be selected.
- Optionally, check Include protocol to enforce client bypass protocol.
a. If Client Bypass Protocol is enabled for an IP protocol and an address pool is not configured for that protocol (in other words, no IP address for that protocol was assigned to client by the ASA), any IP traffic using that protocol is not be sent through the VPN tunnel. It is to be sent outside the tunnel.
b. If Client Bypass Protocol is disabled, and an address pool is not configured for that protocol, the client drops all traffic for that IP protocol once the VPN tunnel is established.
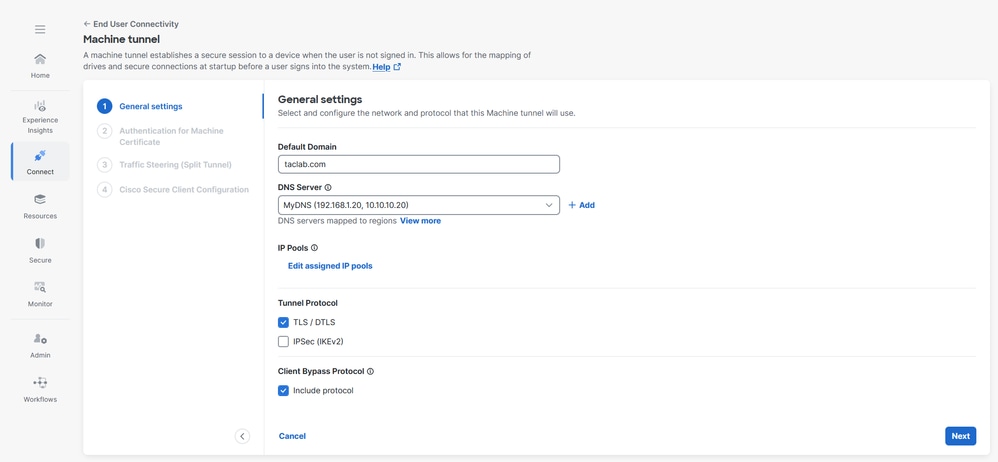
8. Click Next
Step 2 - Authentication for Machine Certificate
The machine tunnel is transparent to the end user and disconnects automatically when the user initiates a VPN session. For this tunnel to be created without user interaction, certificate-based authentication is used.
1. Choose CA certificates from the list or click Upload CA certificates
2. Select the certificate-based authentication fields. For more information see certificate-based authentication fields
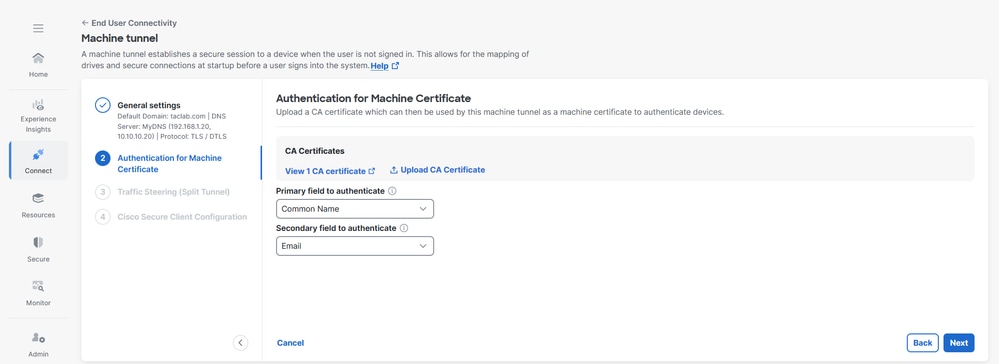
3. Click Next
For Traffic Steering (Split Tunnel), you can configure a machine tunnel to maintain a full tunnel connection to Secure Access, or configure it to use a split tunnel connection to direct traffic through the VPN only if necessary.For more information see Machine Tunnel traffic steering
1. Select the Tunnel Mode
2. Depending on Tunnel Mode selection , you can Add Exceptions
3. Select DNS Mode
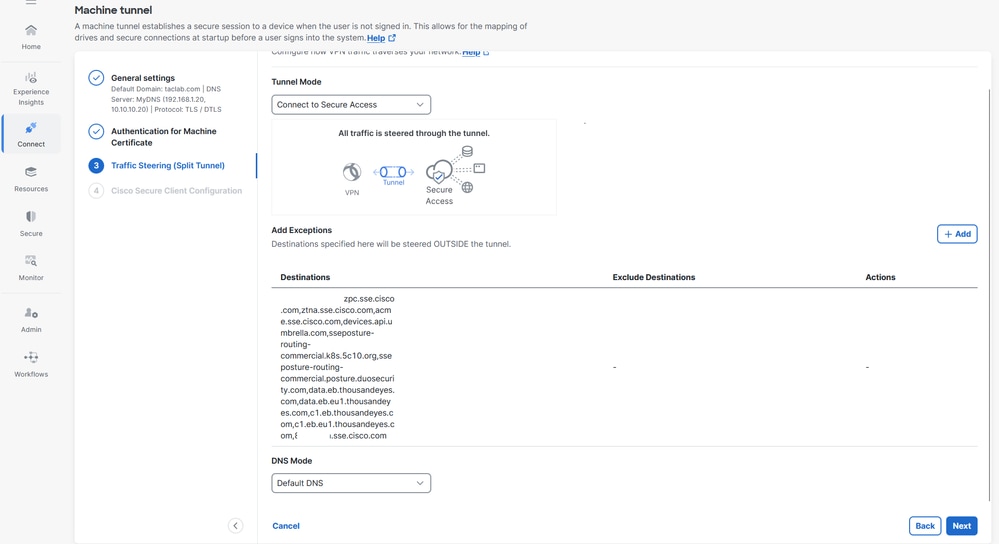
4. Click Next
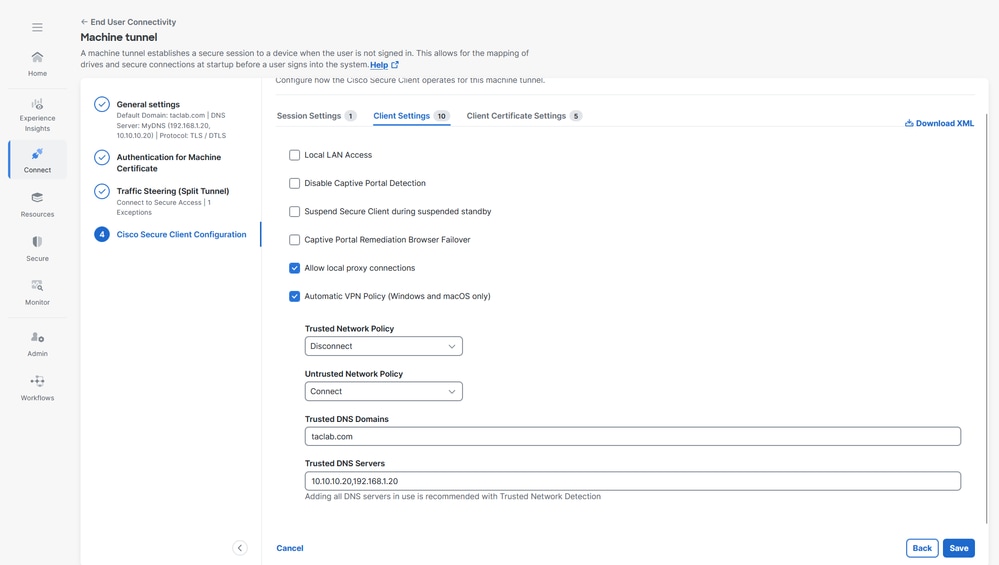
Step 4 – Cisco Secure Client Configuration
You can modify a subset of Cisco Secure Client settings based on the needs of a particular VPN machine tunnel. For more information see Secure Client Configuration
1. Verify Maximum Transmission Unit, the largest size of the packet that can be sent in the VPN tunnel without fragmentation

2. Client Settings , please refer Machine Tunnel Client Settings for more information
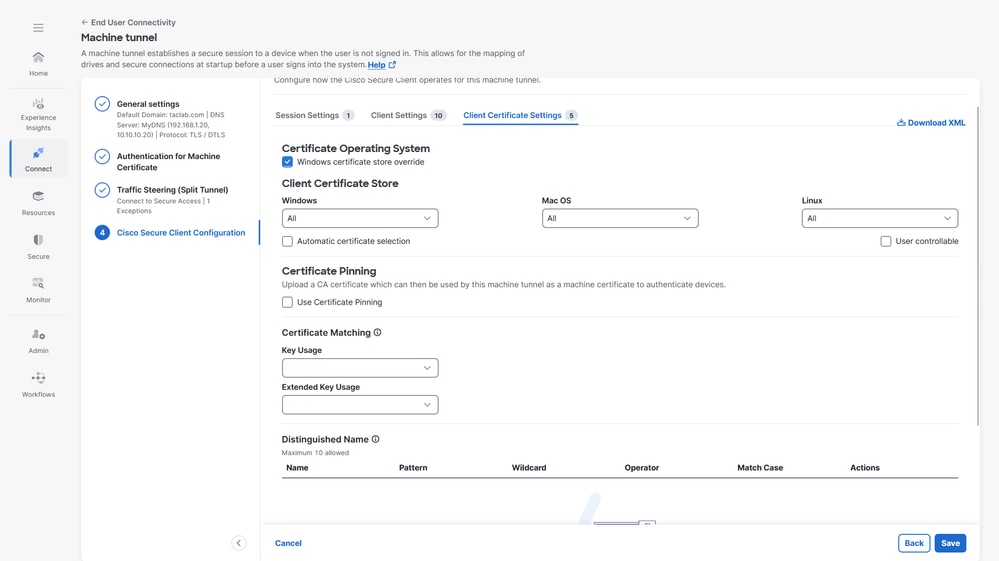
3. Client Certificate Settings, select the options accordingly
a. Windows Certificate Store Override — Allows an administrator to direct Secure Client to utilize certificates in the Windows machine (Local System) certificate store for client certificate authentication.
b. Automatic certificate selection - When multiple certificate authentication is configured on the secure gateway
c. Certificate Pinning - CA certificate which can be used by the machine tunnel as a machine certificate to authenticate devices
d. Certificate Matching - If no certificate matching criteria is specified, Cisco Secure Client applies the certificate matching rules
i. Key Usage : Digitial_Signature
ii. Extended Key Usage: Client Auth
e. Distinguished Name - Specifies distinguished names (DNs) for exact match criteria in choosing acceptable client certificates. When you add multiple Distinguished Names, each certificate is checked against all entries, and all of them must match.
4. Assign Machine Tunnel profile to a User VPN profile, click Save and then there is an option to select the User VPN profiles
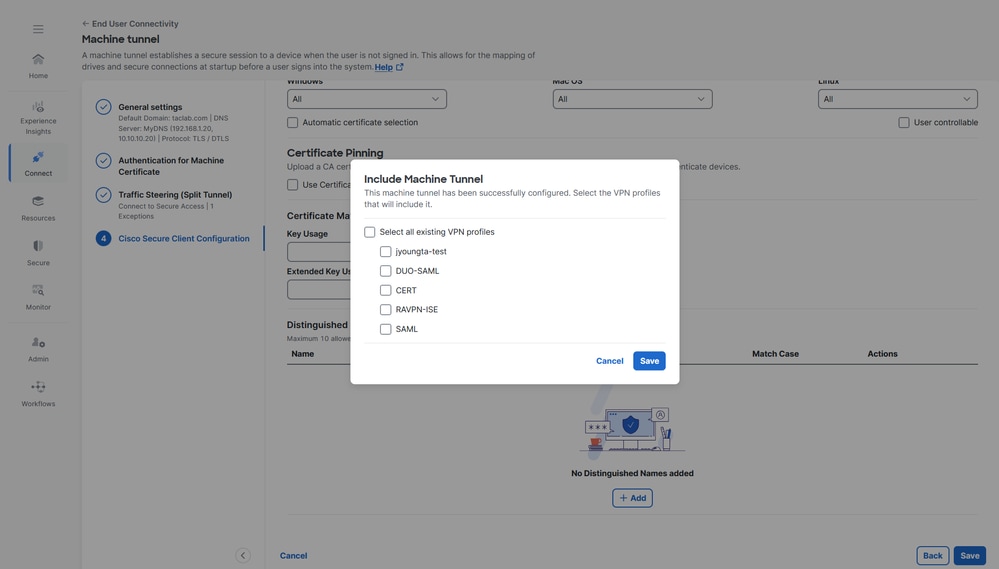
5. Click Save
6. Verfiy if the Machine Tunnel profile is attached to a User VPN profile
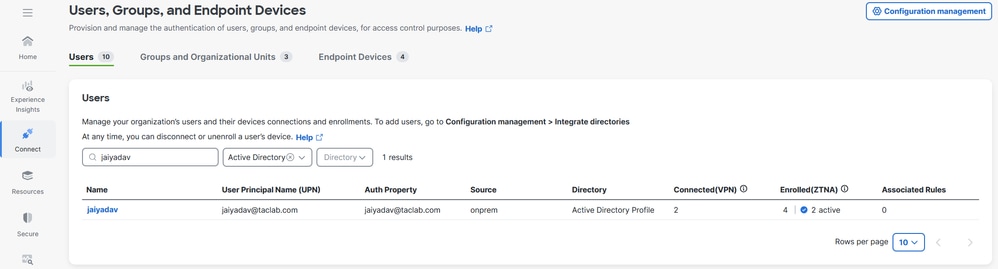
Step 5 - Verify if the machine@sse.com user is present in the Cisco Secure Access
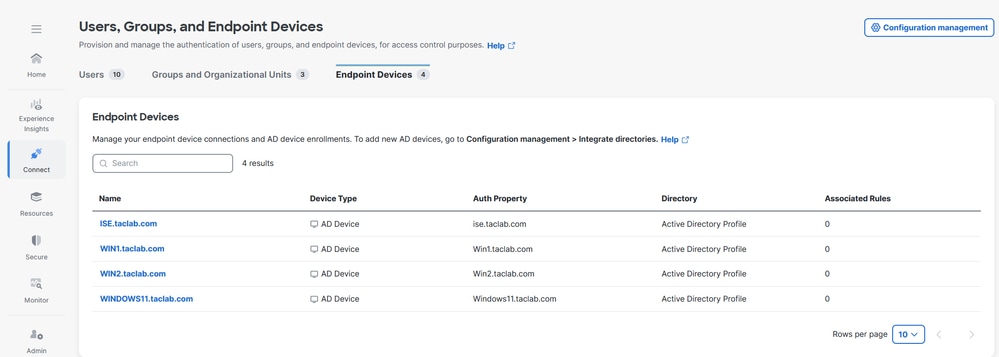
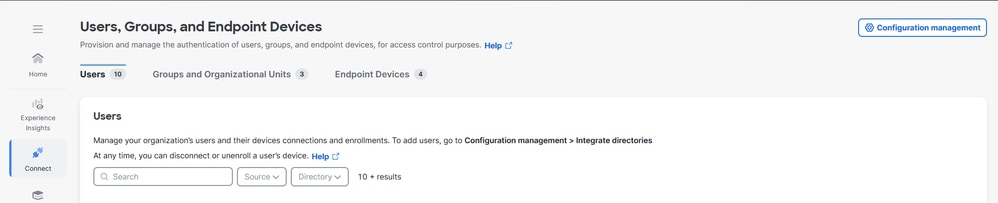
1. Navigate to Connect > Users,Groups, and Endpoint Devices > Users
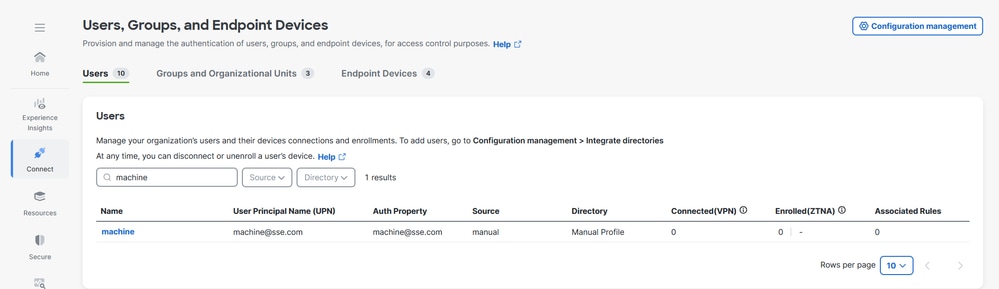
2. If machine@sse.com user is not present the import manually. For more information see Manual Users and Groups import
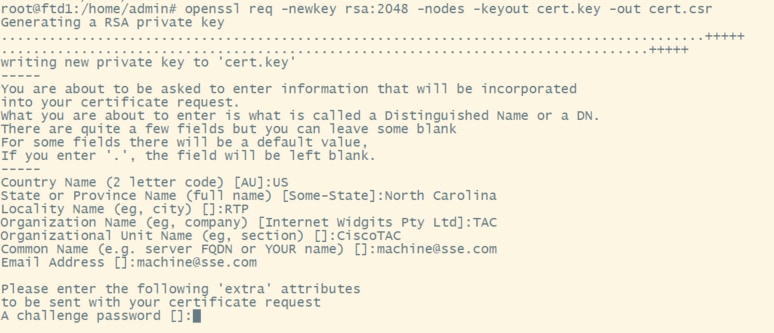
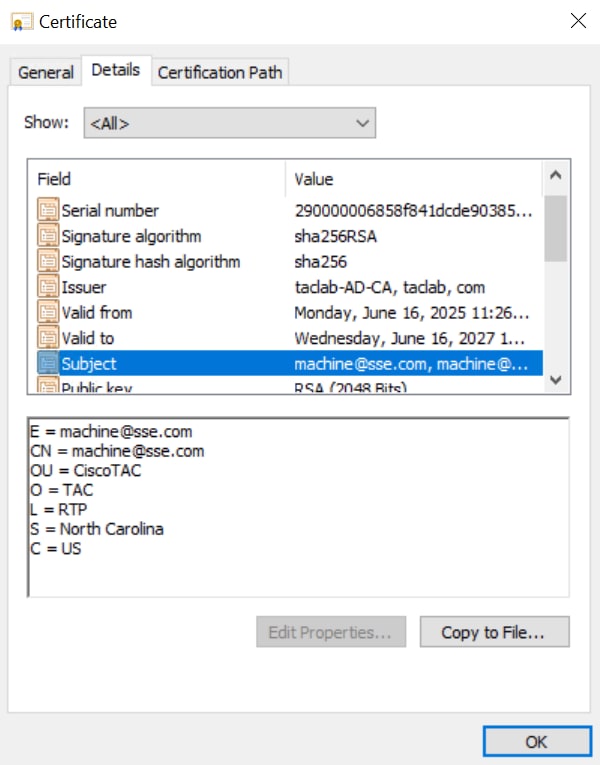
Step 6 - Generate a CA signed certificate for machine@sse.com
1. Generate a Certificate Signing request
a. We can use any online CSR generator software CSR Generator or an openssl CLI
openssl req -newkey rsa:2048 -nodes -keyout cert.key -out cert.csr
2. Copy the CSR and generate a machine certificate

3. Convert the machine certificate into PKCS12 format by using the key and cert generated in previous steps (step1 and 2) respectively
openssl pkcs12 -export -out Machine.p12 -in machine.crt -inkey cert.key

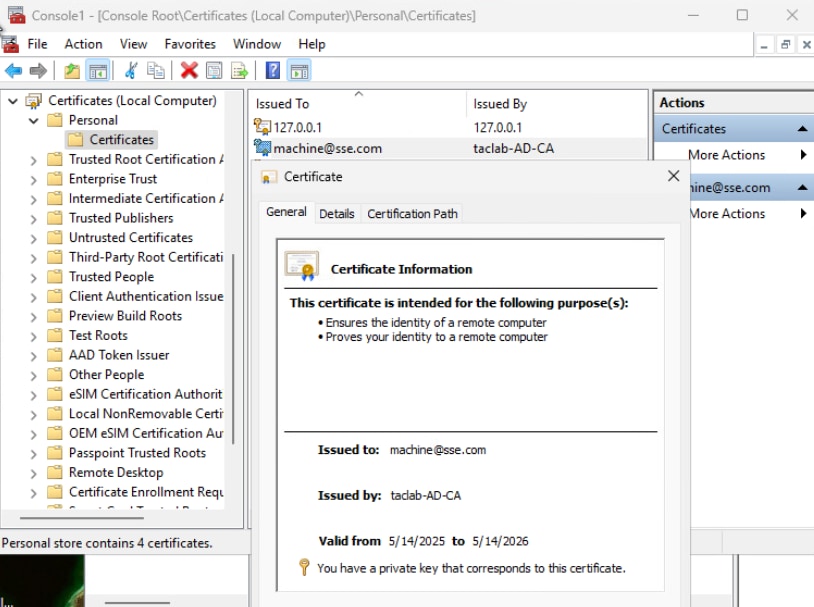
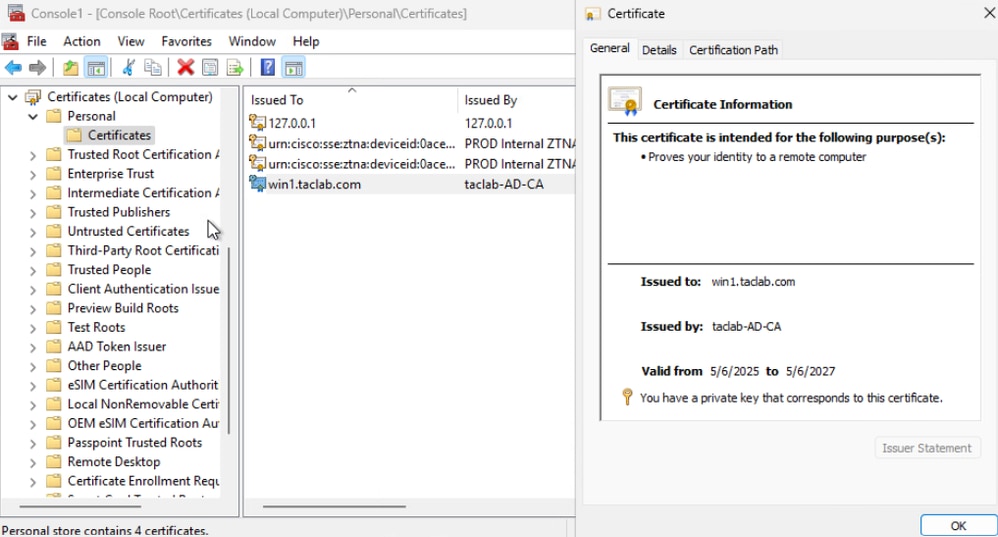
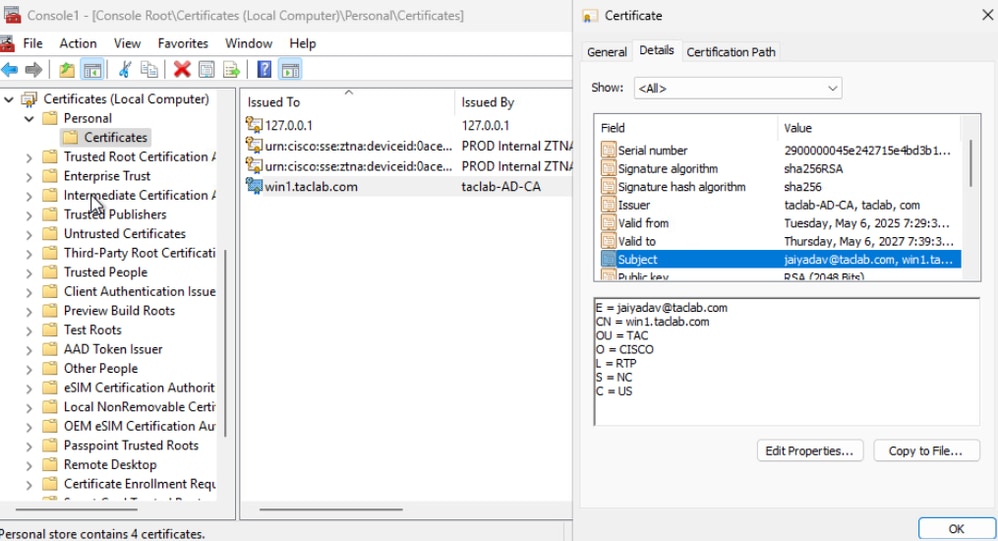
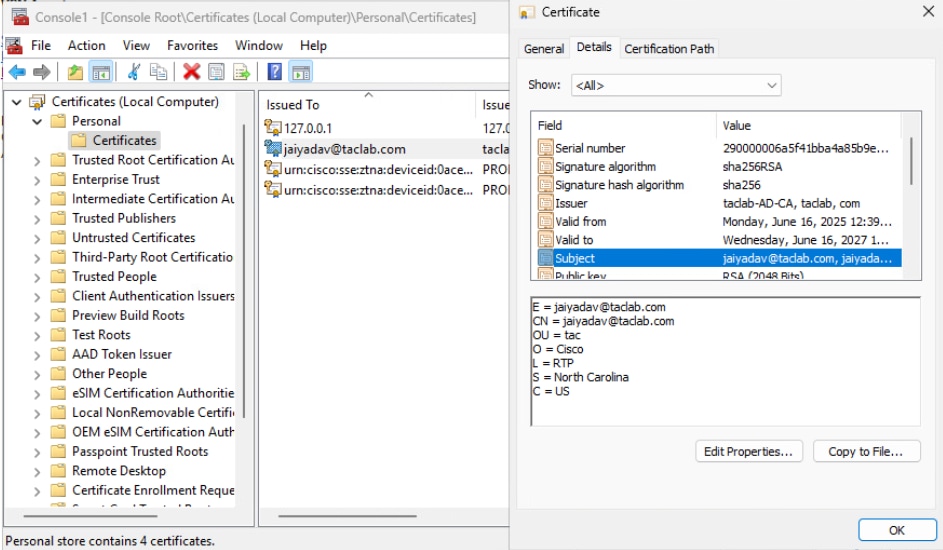
Step 7 - Import the machine certificate on a test machine
a. Import the PKCS12 machine certificate under local or machine store
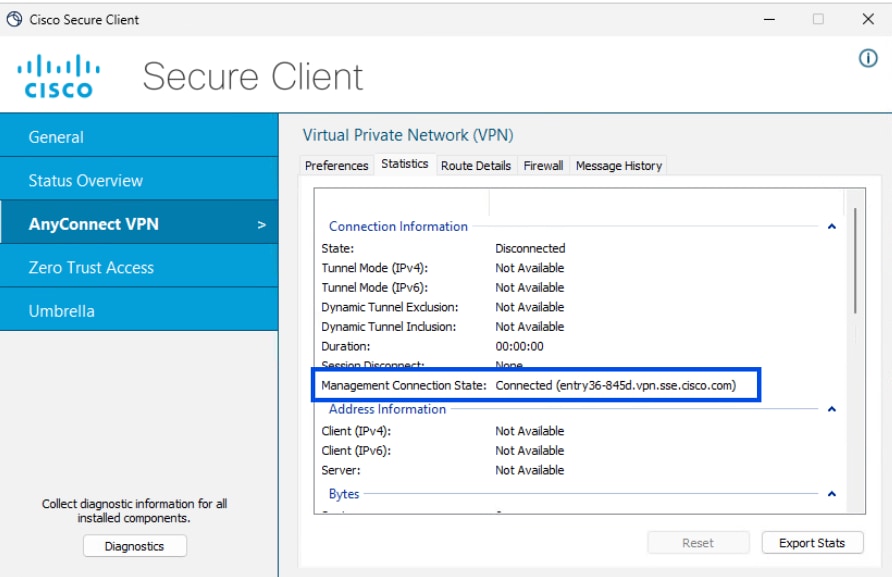
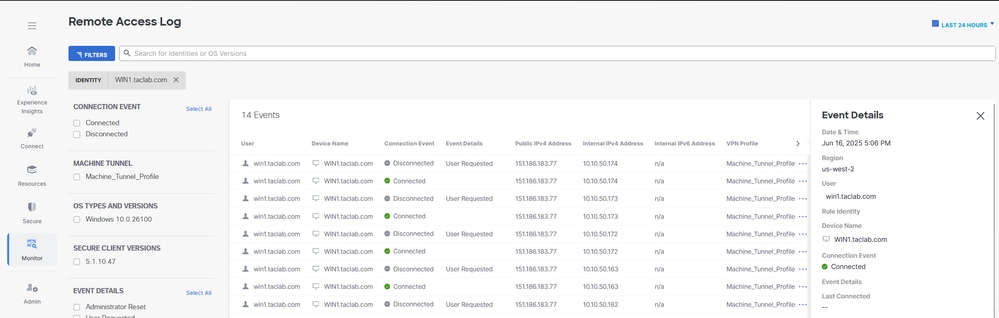
Step 8 - Connect to Machine Tunnel
a. Connect to a User Tunnel , this triggers the machine xml profile to be downloaded.
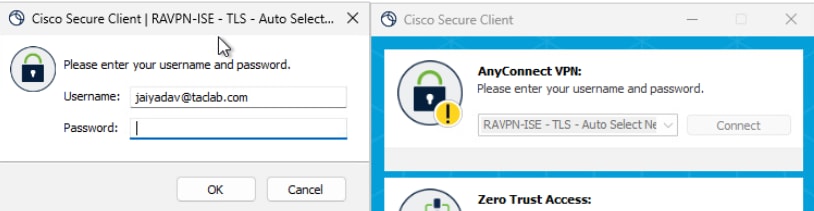

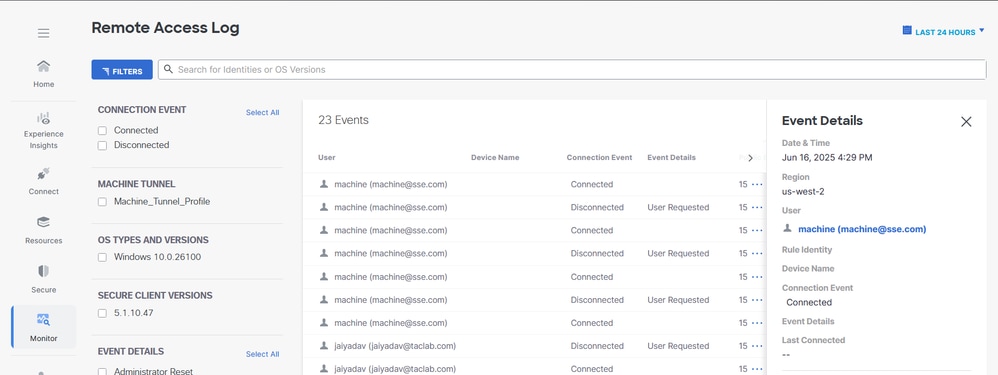
b. Verify the Machine Tunnel Connectivity

Method 2 - Configure Machine Tunnel using Endpoint Certificate
In this case For Primary field to authenticate, choose the certificate field that contains the device name (computer name). Secure Access uses the device name as the machine tunnel identifier. The format of the computer name must match the format of the chosen device identifier
Go Through Step 1 to Step 4 for Machine Tunnel Configuration
Step 5 - Configure AD connector to be able to import Endpoints on the Cisco Secure Access .
For more information see On-Perm Active Directory Integration
Step 6 - Configure Endpoint Devices Authentication
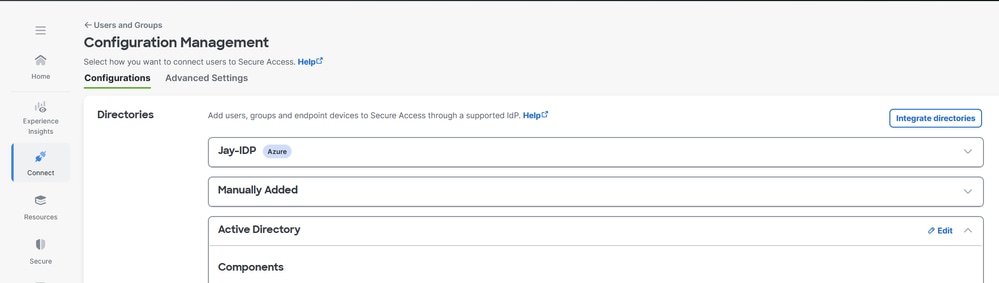
1. Navigate to Connect > Users,Groups and Endpoint Devices.
2. Click on Configuration management
3. Under Configurations , edit Active Directory

4. Set Endpoint Devices Authentication Property to Hostname

5. Click Save and restart AD Connector services on the servers where its installed
Step 7 - Generate and Import Endpoint Certificate
a. Generate CSR , open a CSR generator or OpenSSL tool
b. Generate a endpoint certificate from CA
c. Convert the .cert file into PKCS12 format
d. Import the PKCS12 certificate in endpoint certificate store
Step 8 - Connect to Machine Tunnel
a. Connect to a User Tunnel , it triggers the download of the machine tunnel xml profile


b. Verify the Machine Tunnel Connectivity
Method 3 - Configure Machine Tunnel using User Certificate
In this case For Primary field to authenticate, choose the certificate field that contains the user email or UPN. Secure Access uses the email or UPN as the machine tunnel identifier. The format of the email or UPN must match the format of the chosen device identifier
Go through the Steps 1 to 4 for Machine Tunnel Configuration
Step 5 - Configure AD connector to be able to import Users on the Cisco Secure Access .
For more information see On-Perm Active Directory Integration
Step 6 - Configure Users Authentication
1. Navigate to Connect > Users,Groups and Endpoint Devices.
2. Click on Configuration management

3. Under Configurations , edit Active Directory
4. Set Users Authentication Property to Email

5. Click Save and restart AD Connector services on the servers where its installed
Step 7 - Generate and Import Endpoint Certificate
a. Generate CSR , open a CSR generator or OpenSSL tool
b. Generate a endpoint certificate from CA
c. Convert the .cert file into PKCS12 format
d. Import the PKCS12 certificate in endpoint certificate store

Step 8 - Connect to Machine Tunnel
a. Connect to a User Tunnel , it triggers the download of the machine tunnel xml profile

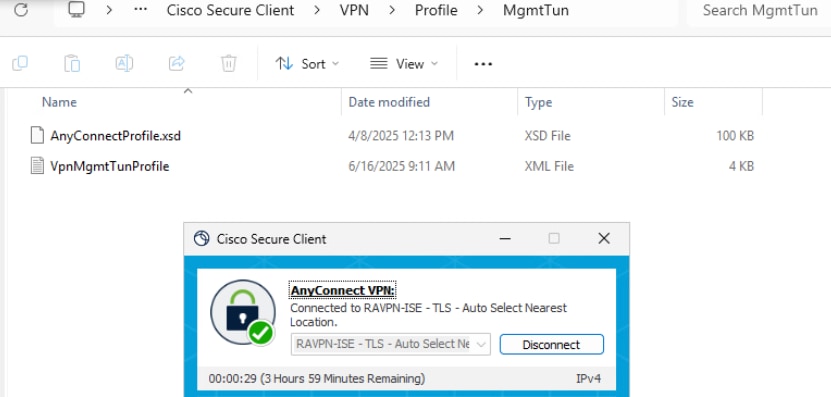
b. Verify the Machine Tunnel Connectivity

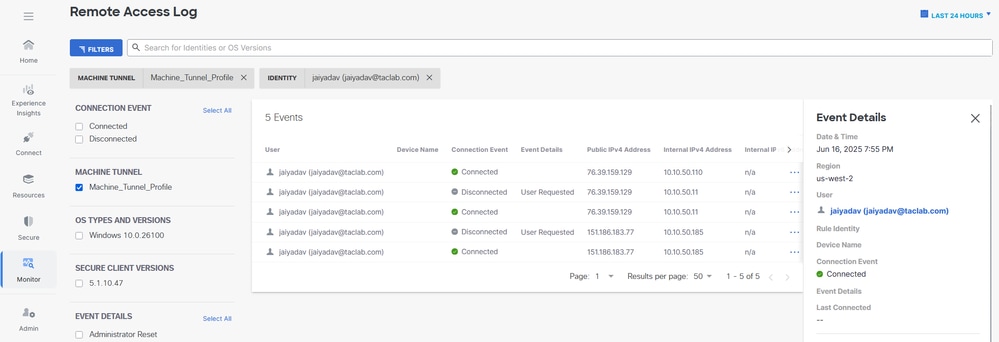
Troubleshoot
Extract DART bundle and open the AnyConnectVPN logs and analyze for the error messages
DARTBundle_0603_1656.zip\Cisco Secure Client\AnyConnect VPN\Logs
 Feedback