Introduction
This document describes step by step how to configure RA VPN on Cisco Secure Access to authenticate against Entra ID.
Prerequisites
Cisco recommends that you have knowledge of these topics:
- Knowledge using Azure/Entra ID.
- Knowledge with Cisco Secure Access.
Requirements
These requirements must be fulfilled before proceeding further:
- Access to your Cisco Secure Access Dashboard as Full Admin.
- Access to Azure as Admin.
- User provisioning already completed to Cisco Secure Access.
Components Used
The information in this document is based on these software and hardware versions:
- Cisco Secure Access Dashboard.
- Microsoft Azure Portal.
- Cisco Secure Client AnyConnect VPN version 5.1.8.105
The information in this document was created from the devices in a specific lab environment. All of the devices used in this document started with a cleared (default) configuration. If your network is live, ensure that you understand the potential impact of any command.
Configure
Azure Configuration
1. Log in to the Cisco Secure Access dashboard and copy the VPN Global FQDN. We are using this FQDN in the Azure Enterprise Application configuration.
Connect > End User Connectivity > Virtual Private Network > FQDN > Global
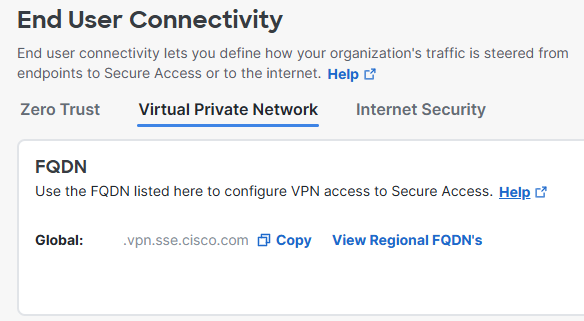 VPN Global FQDN
2. Log in to Azure and Create an Enterprise Application for the RA VPN authentication. You can use the predefined application named "Cisco Secure Firewall - Secure Client (formerly AnyConnect) authentication".
Home > Enterprise Applications > New Application > Cisco Secure Firewall - Secure Client (formerly AnyConnect) authentication > Create
 Create App in Azure
3. Rename the Application.
Properties > Name
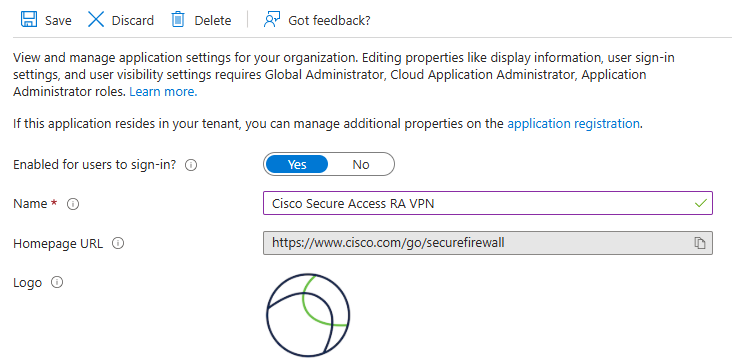 Rename the Application
4. Within the Enterprise Application, assign the users allow to authenticate using the AnyConnect VPN.
Assign users and groups > + Add user/group > Assign
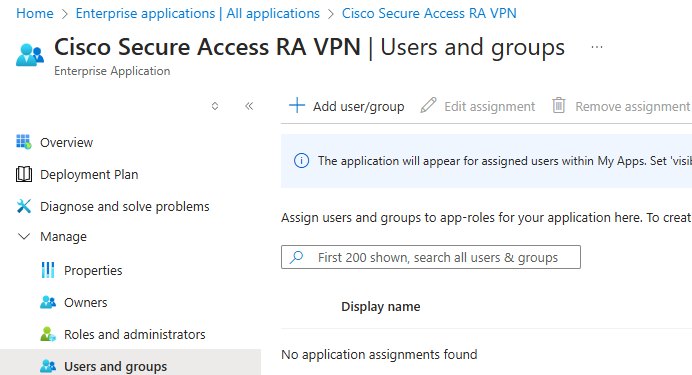 Users/Groups Assigned
5. Click on Single sign-on and configure the SAML parameters. Here we use the FQDN copied in step 1, and also the VPN Profile name you are configuring in "Configuration Cisco Secure Access" later in step 2.
For example, if you VPN Global FQDN is example1.vpn.sse.cisco.com and your Cisco Secure Access VPN Profile name is VPN_EntraID, the values for (Entity ID) and the Reply URL (Assertion Consumer Service URL) are:
Identifier (Entity ID): https://example1.vpn.sse.cisco.com/saml/sp/metadata/VPN_EntraID
Reply URL (Assertion Consumer Service URL): https://example1.vpn.sse.cisco.com/+CSCOE+/saml/sp/acs?tgname=VPN_EntraID
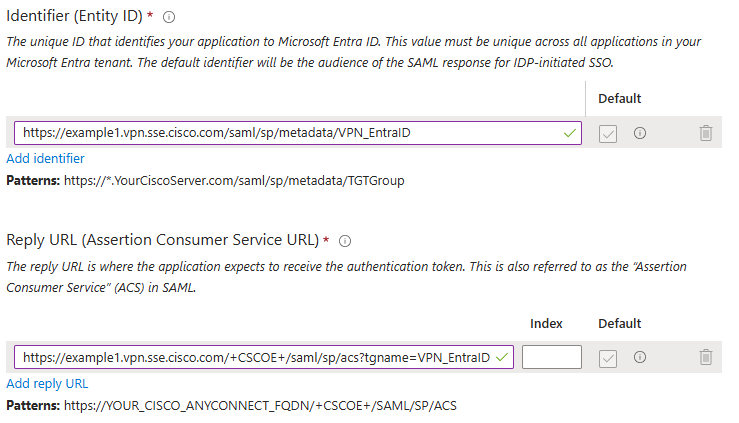 SAML Parameters in Azure
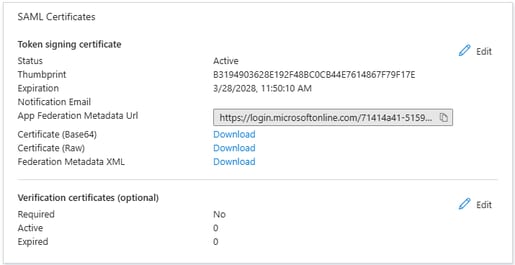
6. Download the Federation Metadata XML.
Cisco Secure Access Configuration
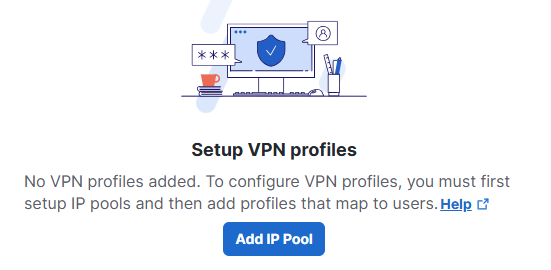
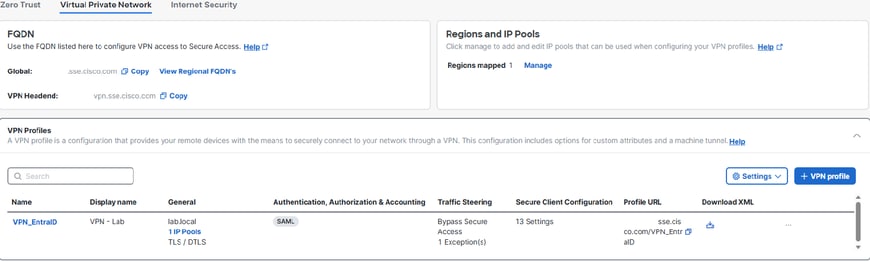
1. Log in to your Cisco Secure Access dashboard, and add an IP Pool.
Connect > End User Connectivity > Virtual Private Network > Add IP Pool
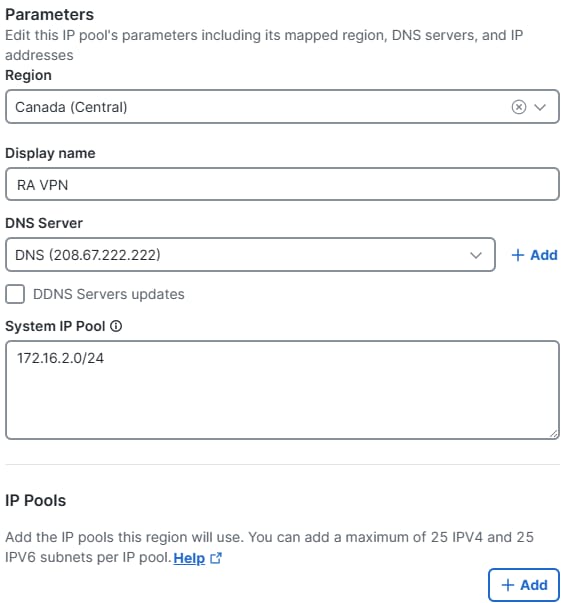
Region: Select the region where your RA VPN is going to be deployed.
Display name: The name for the VPN IP Pool.
DNS Server: Create or assign the DNS Server users are using for DNS resolution once connected.
System IP Pool: Used by Secure Access for features like Radius Authentication, the Authentication Request is sourced by an IP within this range.
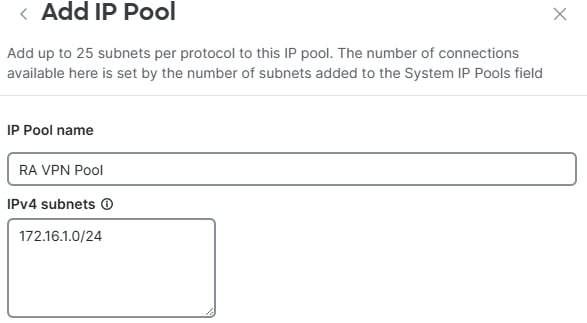
IP Pool: Add a new IP Pool and specify the IPs users get once connected to the RA VPN.
 Add VPN Profile
 Config of IP Pool - Part 1
 Config of IP Pool - Part 2
2. Add a VPN Profile.
Connect > End User Connectivity > Virtual Private Network > + VPN Profile
General Settings

Note: Note: The name of the VPN Profile must match with the name you configured in "Configuration Azure" in step 5. In this configuration guide we used VPN_EntraID so we are configuring the same in Cisco Secure Access as VPN Profile name.
VPN Profile name: Name for this VPN Profile, visible in the dashboard only.
Display name: Name end users see on the 'Secure Client - Anyconnect' drop-down menu see when connecting to this RA VPN Profile.
Default Domain: Domain users get once connected to the VPN.
DNS Servers: DNS Server the VPN users get once connected to the VPN.
Region Specified: Uses the DNS server associated to the VPN IP Pool.
Custom Specified: You can manually assign the DNS desired.
IP Pools: IPs the users get assigned once connected to the VPN.
Profile Settings: To include this VPN Profile for Machine Tunnel or to include regional FQDN so the end user selects the Region they want to connect to (is subject to IP Pools deployed).
Protocols: Select the protocol you want your VPN Users to use for the tunneling of the traffic.
Connect time posture (Optional): If required to do VPN Posture at the connect time. More information here
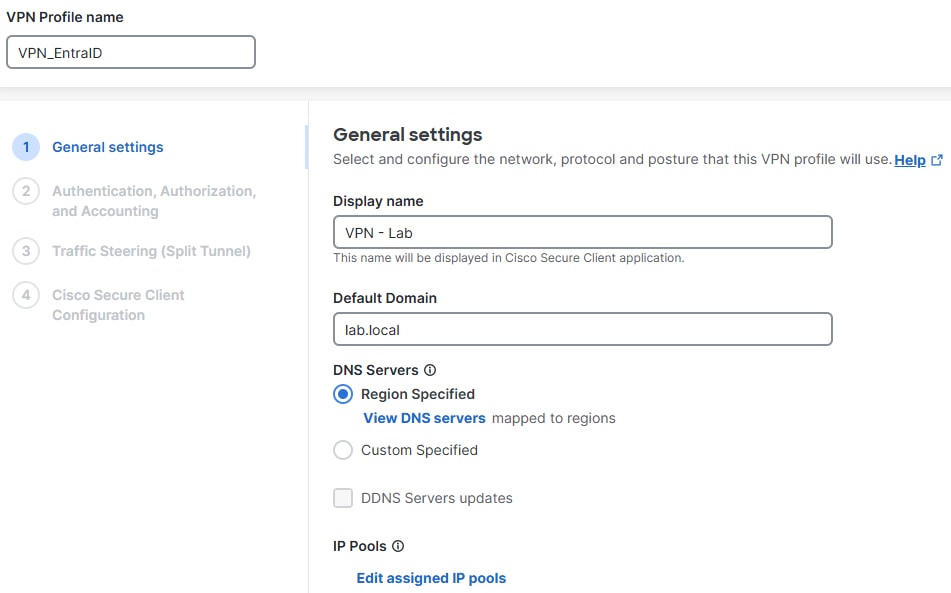 VPN Profile config - Part 1
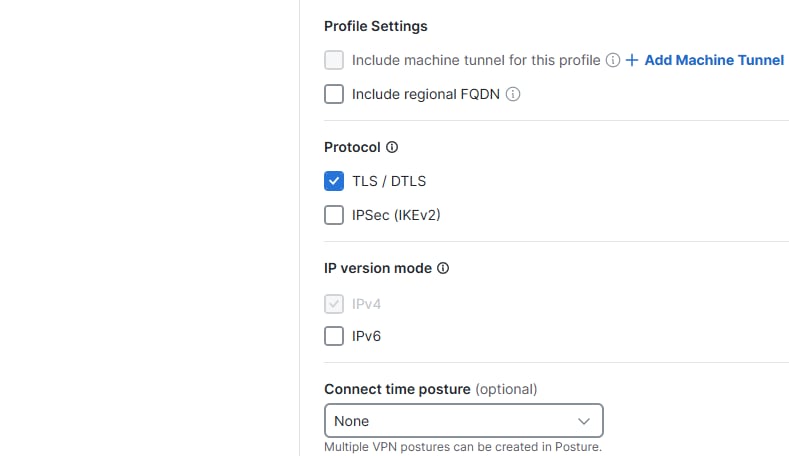 VPN Profile config - Part 2
Authentication, Authorization, and Accounting
Protocols: Select SAML.
Authentication with CA Certificates: In case you want to authenticate using an SSL Certificate and authorize against an IdP SAML Provider.
Force re-authentication: Forces a re-authentication whenever a VPN connection is made. Forced re-authentication is based on Session Timeout. This could be subjected to the SAML IdP settings (Azure in this case).
Upload the XML file Federation Metadata XML file downloaded in "Configure Azure" in step 6.
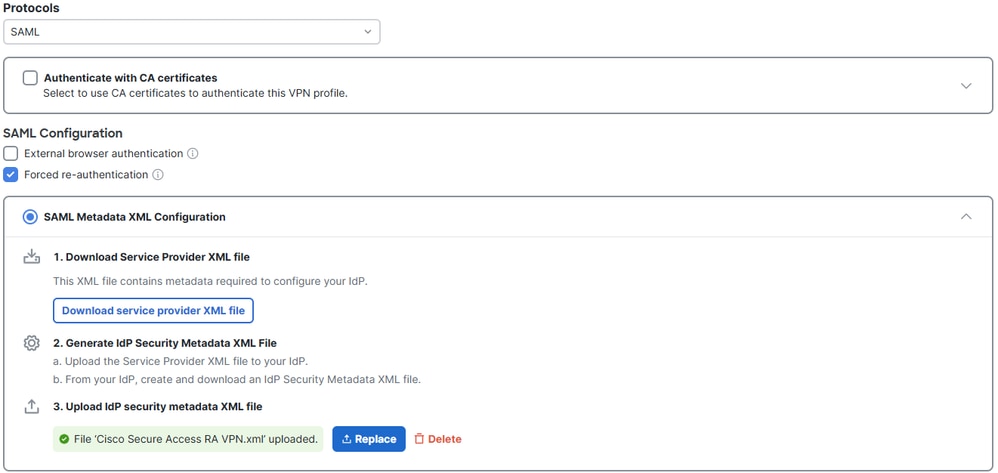 SAML Config
Traffic Steering (Split Tunnel)
Tunnel Mode:
Connect to Secure Access: All traffic is sent thought the tunnel (Tunnel All).
Bypass Secure Access: Just specific traffic defined the in Exceptions section is tunneled (Split Tunnel).
DNS Mode:
Default DNS: All of the DNS queries move through the DNS servers which are defined by the VPN Profile. In the case of a negative response, the DNS queries can also go to the DNS servers which are configured on the physical adapter.
Tunnel All DNS: Tunnels all DNS queries via the VPN.
Split DNS: Just specific DNS queries move through the VPN profile, depending on the domains specified below.
 Traffic Steering Config
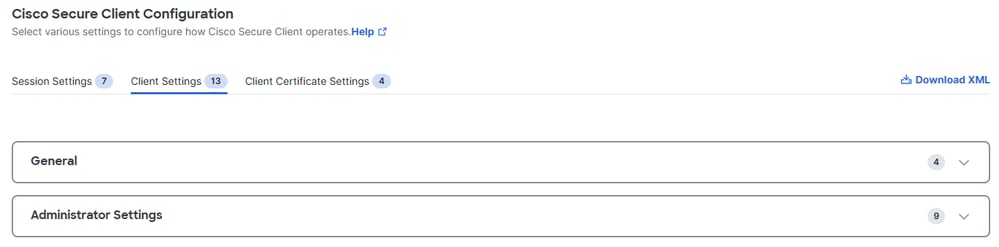
Cisco Secure Client Configuration
For the purpose of this guide, we are not configuring any of these advanced settings. Advanced features can be configured here, for example: TND, Always-On, Certificate Matching, Local Lan Access, and so on. Save the settings here.
 Advanced Settings
3. Your VPN Profile must look like this. You can download and pre-deploy the xml profile to the end users (under "C:\ProgramData\Cisco\Cisco Secure Client\VPN\Profile") to start using the VPN, or provide them with the Profile URL to be entered in the Cisco Secure Client - AnyConnect VPN UI.
 Global FQDN and Profile URL
Verify
At this point, your RA VPN configuration must be ready for testing.
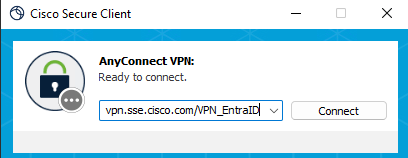
Please notice that the first time the users connect, they need to be given the Profile URL address or pre-deploy the xml profile in their PCs under "C:\ProgramData\Cisco\Cisco Secure Client\VPN\Profile", restart the VPN service and they must see in the drop-down menu the option to connect to this VPN Profile.
In this example, we give the Profile URL address to the user for the first connection attempt.
Prior the first connection:
 Prior VPN Connection
Enter your credentials and connect to the VPN:
 Connected to VPN
After connecting the first time, from the drop-down menu, you must be able to see now the option to connect to the "VPN - Lab" VPN Profile:
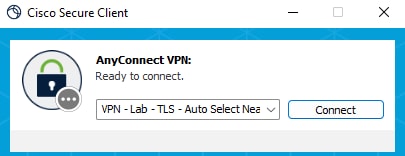 After the first VPN Connection
Check in the Remote Access Logs that the user was able to connect:
Monitor > Remote Access Log
 Logs in Cisco Secure Access
Troubleshooting
Here is described the basic troubleshooting that can be performed for some common issues:
Azure
In Azure make sure that the users have been assigned to the Enterprise Application created for the authentication against Cisco Secure Access:
Home > Enterprise Applications > Cisco Secure Access RA VPN > Manage > Users and Groups
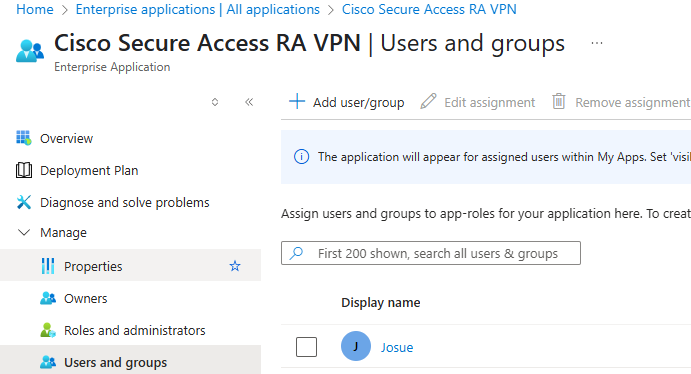 Verify assignment of users
Cisco Secure Access
In Cisco Secure Access, make sure you have provisioned the users that are allowed to connect via RA VPN, and that also the users provisioned in Cisco Secure Access (under users, groups and endpoint devices) match with the users in Azure (the users assigned in the enterprise application).
Connect > Users, Groups, and Endpoint Devices
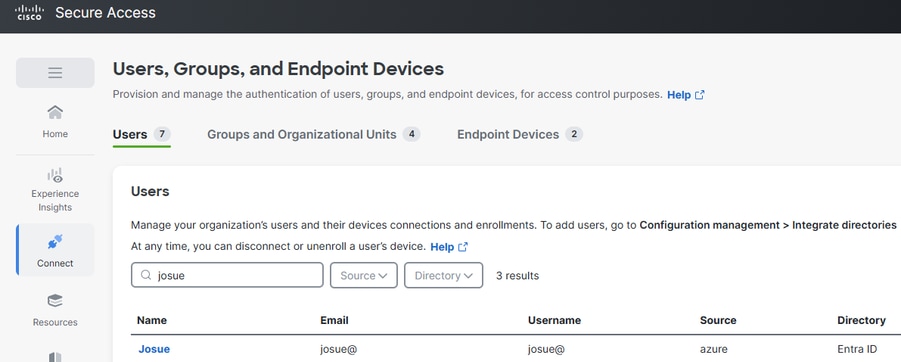 Users in Cisco Secure Access
Verify that the user has been provisioned with either the correct XML file on the PC, or that the user has been given the Profile URL, as stated in the "Verify" step.
Connect > End User Connectivity > Virtual Private Network
 Profile URL and .xml profile
 Feedback