Introduction
This document describes how to configure Microsoft Entra ID Single Sign-on for authenticating to Cisco Secure Email Encryption Service.
Prerequisites
Requirements
Cisco recommends that you have knowledge of these topics:
Components Used
The information in this document was created from the devices in a specific lab environment. All of the devices used in this document started with a cleared (default) configuration. If your network is live, ensure that you understand the potential impact of any command.
Background Information
-
Registered Envelope enables SSO log in for end users who use SAML.
-
Microsoft Entra SSO allows and controls access to your software as a service (SaaS) apps, cloud apps, or on-premises apps from anywhere with single sign-on.
-
Registered Envelope can be set as a managed identity application connected to Microsoft Entra with authentication methods that include multi-factor authentication as password-only authentication is not safe nor recommended.
-
SAML is an XML-based open standard data format that enables administrators to access a defined set of applications seamlessly after the sign into one of those applications.
-
To learn more about SAML, refer to: What is SAML?
Configure
Microsoft Entra ID
1. Navigate to Microsoft Entra ID admin center and click the Add button. Select Enterprise Application, and search for Microsoft Entra SAML Toolkit, as shown in the image:
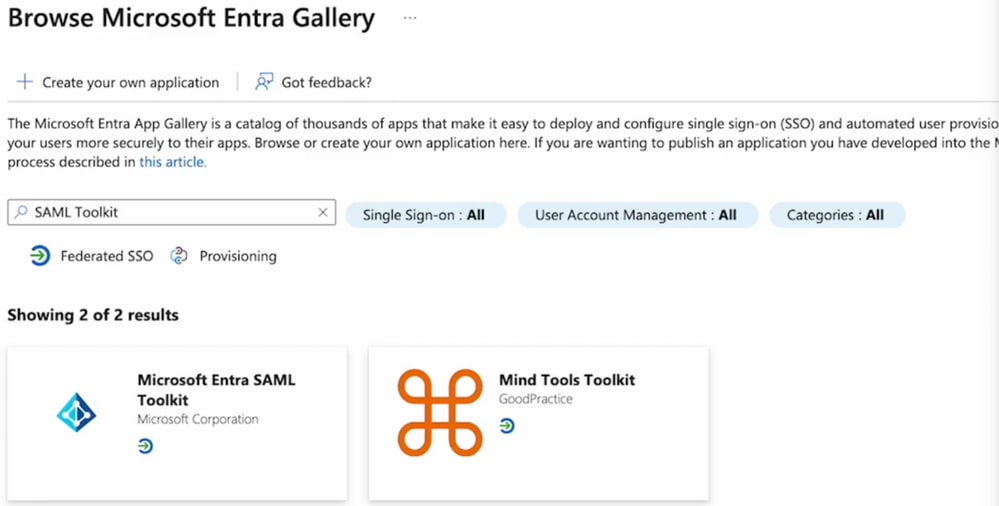 Browse Microsoft Entra Gallery
2. Name it with a meaningful value and click Create. For example, CRES Single Sign On.

Note: To allow all users to sign into CRES portal, you need to manually disable Required Assignment under CRES Sign On (SAML toolkit) properties, and for Assignment Required select No.
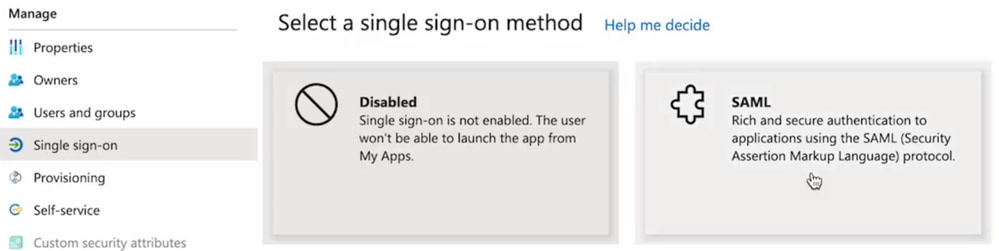
3. Navigate to the left side panel, under the Manage section, click Single sign-on, and select SAML.
4. In the Basic SAML Configuration panel, click Edit, and fill in the attributes as follows:
-
Identifier (Entity ID): https://res.cisco.com/
-
Reply URL (Assertion Consumer Service URL): https://res.cisco.com/websafe/ssourl
-
Sign on URL: https://res.cisco.com/websafe/ssourl
-
Click Save.
5. In the Attributes & Claims panel, click Edit.
Under Required claim, click the Unique User Identifier (Name ID) claim to edit it.
| Name |
Namespace |
Source Attribute |
| emailaddress |
No value |
user.userprincipalname |
| firstName |
No value |
user.givenname |
| lastName |
No value |
user.surname |
Be sure to clear the Namespace field for each claim, as shown below:

6. Once the Attributes & Claims sections are filled, the last section SAML Signing Certificate is populated. Save the next values as they are required in the CRES portal:

- Select the Certificate (Base64) Download link.

Cisco Email Encryption Service
1. Log in to your Secure Email Encryption Service organization portal as an administrator.
2. On the Accounts tab, select the Manage Accounts tab and click your Account Number.
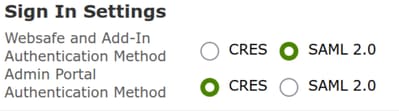
3. In the Details tab, scroll to the Authentication Method and select SAML 2.0.
4.- Fill in the attributes as follows:
-
SSO Alternate EmailAttribute Name: emailaddress
-
SSO Service Provider Entity ID*: https://res.cisco.com/
-
SSO Customer Service URL*: This link is provided by Entra ID, under
-
SSO Logout URL: leave it blank
5.- Click Activate SAML.
Verify
A new window appears confirming that after a successful log in, SAML authentication was enabled. Click Next. It redirects you to the login page of your Identity Provider. Log in using your SSO credentials. After a successful log in, you can close the window. Click Save.
Troubleshoot
If the window did not redirect you to the log in page of your Identity Provider, a trace back is returned providing you with the error. Review the Attributes & Claims, make sure it is configured with the same name as in the CRES Authentication Method section. The user email address used in the SAML log in must match the email address in CRES. Do not use aliases.
 Feedback