Configure IP Options Inspection on ASDM 6.3 and later
Available Languages
Contents
Introduction
This document provides a sample configuration of how to configure the Cisco Adaptive Security Appliance (ASA) in order to pass the IP packets with certain IP options enabled.
Prerequisites
Requirements
There are no specific requirements for this document.
Components Used
The information in this document is based on these software and hardware versions:
-
Cisco ASA running software release version 8.3 and later
-
Cisco Adaptive Security Manager running software release version 6.3 and later
The information in this document was created from the devices in a specific lab environment. All of the devices used in this document started with a cleared (default) configuration. If your network is live, make sure that you understand the potential impact of any command.
Conventions
Refer to the Cisco Technical Tips Conventions for more information on document conventions.
Background Information
Each IP packet contains an IP header with an Options field. The Options field, commonly referred to as IP Options, provides control functions that are required in some situations, but unnecessary for most common communications. In particular, IP Options includes provisions for time stamps, security, and special routing. Use of IP Options is optional, and the field can contain zero, one, or more options.
IP Options is a security risk and if an IP packet with the IP Options field enabled is passed through ASA, it will leak information about the internal setup of a network to the outside. As a result, an attacker can map the topology of your network. As Cisco ASA is a device that enforces security in the enterprise, by default, it drops the packets that have the IP Options field enabled. A sample syslog message is shown here, for your reference:
106012|10.110.1.34||XX.YY.ZZ.ZZ||Deny IP from 10.110.1.34 to XX.YY.ZZ.ZZ, IP options: "Router Alert"
However, in specific deployment scenarios where Video traffic has to pass through Cisco ASA, IP packets with certain IP options has to be passed through otherwise the video conference call may fail. From Cisco ASA software release version 8.2.2 onwards, a new feature called "Inspection for IP options" has been introduced. With this feature, you can control which packets with specific IP options are allowed through Cisco ASA.
By default, this feature is enabled and inspection for the IP Options below are enabled in the global policy. Configuring this inspection instructs the ASA to allow a packet to pass, or to clear the specified IP options and then allow the packet to pass.
-
End of Options List (EOOL) or IP Option 0 - This option appears at the end of all options in order to mark the end of a list of options.
-
No Operation (NOP) or IP Option 1 - This options field makes the total length of the field variable.
-
Router Alert (RTRALT) or IP Option 20 - This option notifies transit routers to inspect the contents of the packet even when the packet is not destined for that router.
Configure
In this section, you are presented with the information to configure the features described in this document.
Note: Use the Command Lookup Tool (registered customers only) in order to obtain more information on the commands used in this section.
ASDM Configuration
Using the ASDM, you can see how to enable the inspection for the IP packets that have the IP Options field, NOP.
The Options field in the IP header can contain zero, one, or more options, which makes the total length of the field variable. However, the IP header must be a multiple of 32 bits. If the number of bits of all options is not a multiple of 32 bits, the NOP option is used as "internal padding" in order to align the options on a 32-bit boundary.
-
Go to Configuration > Firewall > Objects > Inspect Maps > IP-Options, and click Add.

-
The Add IP-Options Inspect Map window appears. Specify the name of the Inspect Map, select Allow packets with the No Operation (NOP) option, and click OK.
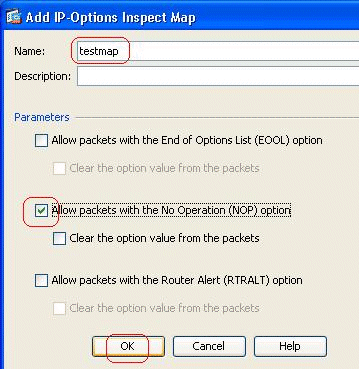
Note: You can also select the Clear the option value from the packets option, so that this field in the IP packet is disabled, and the packets pass through the Cisco ASA.
-
A new inspect map called testmap is created. Click Apply.

-
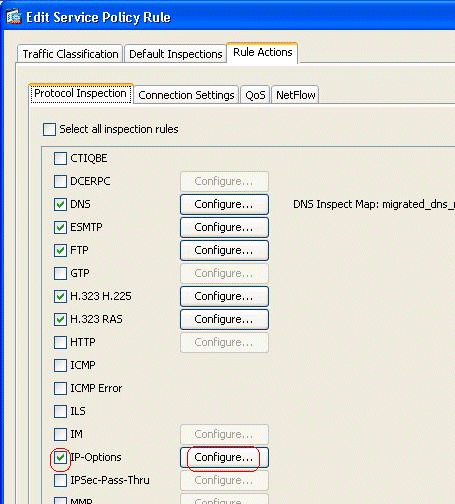
Go to Configuration > Firewall > Service Policy Rules, select the existing global policy, and click Edit. The Edit Service Policy Rule window appears. Select the Rule Actions tab, check mark the IP-Options item, and choose Configure in order to assign the newly created inspection map.
-
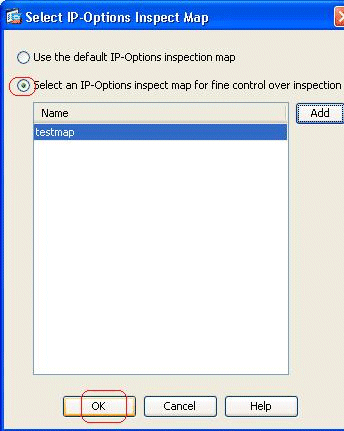
Choose Select an IP-Options inspect map for fine control over inspection > testmap, and click OK.
-
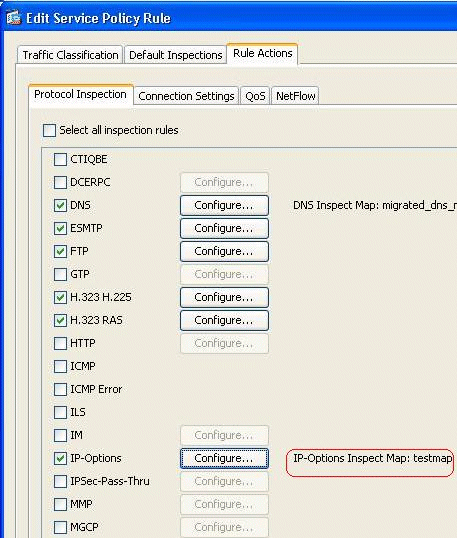
The selected inspect map can be viewed in the IP-Options field. Click OK in order to revert back to the Service Policy Rules tab.
-
With your mouse, hover over the Rule Actions tab so that you can find all the available protocol inspection maps associated with this global map.
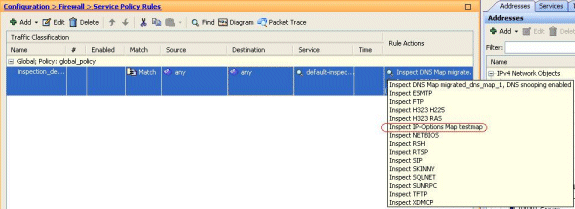
Here is a sample snippet of the equivalent CLI configuration, for your reference:
| Cisco ASA |
|---|
ciscoasa(config)#policy-map type inspect ip-options testmap ciscoasa(config-pmap)#parameters ciscoasa(config-pmap-p)#nop action allow ciscoasa(config-pmap-p)#exit ciscoasa(config)#policy-map global_policy ciscoasa(config-pmap)#class inspection_default ciscoasa(config-pmap-c)#inspect ip-options testmap ciscoasa(config-pmap-p)#exit ciscoasa(config)#write memory |
Default Behavior of Cisco ASA in order to Allow RSVP Packets
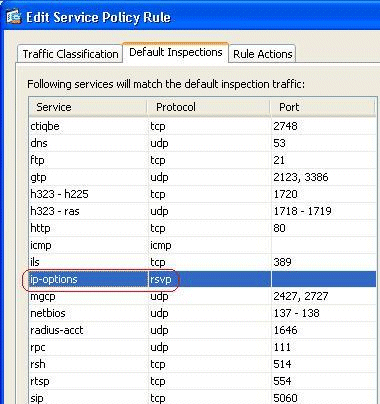
The IP Options Inspection is enabled by default. Go to Configuration > Firewall > Service Policy Rules. Select the Global Policy, click Edit, and select the Default Inspections tab. Here, you will find the RSVP protocol in the IP-Options field. This ensures that the RSVP protocol is inspected and allowed through Cisco ASA. As a result, an end-to-end video call is established without any problem.
Verify
Use this section in order to confirm that your configuration works properly.
The Output Interpreter Tool (registered customers only) (OIT) supports certain show commands. Use the OIT to view an analysis of show command output.
-
show service-policy inspect ip-options - Displays the number of packets dropped and/or allowed as per the configured service-policy rule.
Troubleshoot
There is currently no specific troubleshooting information available for this configuration.
Related Information
Revision History
| Revision | Publish Date | Comments |
|---|---|---|
1.0 |
27-Apr-2012 |
Initial Release |
Contact Cisco
- Open a Support Case

- (Requires a Cisco Service Contract)


 Feedback