ASA: Smart Tunnel using ASDM Configuration Example
Available Languages
Download Options
Bias-Free Language
The documentation set for this product strives to use bias-free language. For the purposes of this documentation set, bias-free is defined as language that does not imply discrimination based on age, disability, gender, racial identity, ethnic identity, sexual orientation, socioeconomic status, and intersectionality. Exceptions may be present in the documentation due to language that is hardcoded in the user interfaces of the product software, language used based on RFP documentation, or language that is used by a referenced third-party product. Learn more about how Cisco is using Inclusive Language.
Contents
Introduction
A smart tunnel is a connection between a TCP-based application and a private site, using a clientless (browser-based) SSL VPN session with the security appliance as the pathway and the security appliance as a proxy server. You can identify applications to which you want to grant smart tunnel access and specify the local path to each application. For applications that run on Microsoft Windows, you can also require a match of the SHA-1 hash of the checksum as a condition for granting smart tunnel access.
Lotus SameTime and Microsoft Outlook Express are examples of applications to which you might want to grant smart tunnel access.
Dependent on whether the application is a client or is a web-enabled application, smart tunnel configuration requires one of these procedures:
-
Create one or more smart tunnel lists of the client applications, and then assign the list to the group policies or local user policies for whom you want to provide smart tunnel access.
-
Create one or more bookmark list entries that specify the URLs of the web-enabled applications eligible for smart tunnel access, and then assign the list to the DAPs, group policies, or local user policies for whom you want to provide smart tunnel access.
You can also list web-enabled applications for which to automate the submission of login credentials in smart tunnel connections over clientless SSL VPN sessions.
This document assumes that the Cisco AnyConnect SSL VPN Client configuration is already made and works properly so that the smart tunnel feature can be configured on the existing configuration. For more information on how to configure Cisco AnyConnect SSL VPN client, refer to ASA 8.x: Allow Split Tunneling for AnyConnect VPN Client on the ASA Configuration Example.
Note: Make sure that the steps 4.b to 4.l described in the ASA Configuration Using ASDM 6.0(2) section of the ASA 8.x : Allow Split Tunneling for AnyConnect VPN Client on the ASA Configuration Example is not performed in order to configure the smart tunnel feature.
This document describes how to configure smart tunnel on Cisco ASA 5500 Series Adaptive Security Appliances.
Prerequisites
Requirements
There are no specific requirements for this document.
Components Used
The information in this document is based on these software and hardware versions:
-
Cisco ASA 5500 Series Adaptive Security Appliances that runs software version 8.0(2)
-
PC that runs Microsoft Vista, Windows XP SP2, or Windows 2000 Professional SP4 with Microsoft Installer version 3.1
-
Cisco Adaptive Security Device Manager (ASDM) version 6.0(2)
The information in this document was created from the devices in a specific lab environment. All of the devices used in this document started with a cleared (default) configuration. If your network is live, make sure that you understand the potential impact of any command.
Conventions
Refer to the Cisco Technical Tips Conventions for more information on document conventions.
Background Information
Smart Tunnel Access Configuration
The smart tunnel table displays the smart tunnel lists, each of which identifies one or more applications eligible for smart tunnel access and its associated operating system (OS). Because each group policy or local user policy supports one smart tunnel list, you must group the nonbrowser-based applications to be supported into a smart tunnel list. Following the configuration of a list, you can assign it to one or more group polices or local user policies.
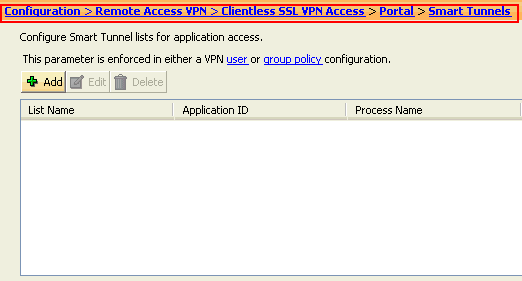
The smart tunnels window (Configuration > Remote Access VPN > Clientless SSL VPN Access > Portal > Smart Tunnels) allows you to complete these procedures:
-
Add a Smart Tunnel List and Add Applications to the List
Complete these steps in order to add a smart tunnel list and add applications to the list:
-
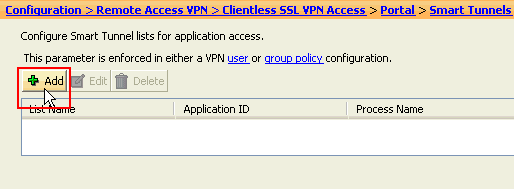
Click Add.
The Add Smart Tunnel List dialog box appears.
-
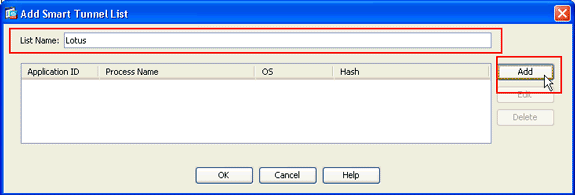
Enter a name for the list, and click Add.
ASDM opens the Add Smart Tunnel Entry dialog box, which allows you to assign the attributes of a smart tunnel to the list.
-
After you assign the desired attributes for the smart tunnel, click OK.
ASDM displays those attributes in the list.
-
Repeat these steps as necessary in order to complete the list, and then click OK in the Add Smart Tunnel List dialog box.
-
-
Change a Smart Tunnel List
Complete these steps in order to change a smart tunnel list:
-
Double-click the list or choose the list in the table, and click Edit.
-
Click Add to insert a new set of smart tunnel attributes into the list or choose an entry in the list, and click Edit or Delete.
-
-
Remove a List
In order to remove a list, choose the list in the table, and click Delete.
-
Add a Bookmark
Following the configuration and assignment of a smart tunnel list, you can make a smart tunnel easy to use by adding a bookmark for the service and clicking the Enable Smart Tunnel option in the Add or Edit Bookmark dialog box.
Smart tunnel access allows a client TCP-based application to use a browser-based VPN connection to connect to a service. It offers the following advantages to users, compared to plugins and the legacy technology, port forwarding:
-
Smart tunnel offers better performance than plug-ins.
-
Unlike port forwarding, smart tunnel simplifies the user experience by does not require the user connection of the local application to the local port.
-
Unlike port forwarding, smart tunnel does not require users to have administrator privileges.
Smart Tunnel Requirements, Restrictions, and Limitations
General Requirements and Limitations
Smart tunnel has the following general requirements and limitations:
-
The remote host originating the smart tunnel must run a 32-bit version of Microsoft Windows Vista, Windows XP, or Windows 2000; or Mac OS 10.4 or 10.5.
-
Smart tunnel auto sign-on supports only Microsoft Internet Explorer on Windows.
-
The browser must be enabled with Java, Microsoft ActiveX, or both.
-
Smart tunnel supports only proxies placed between computers that run Microsoft Windows and the security appliance. Smart tunnel uses the Internet Explorer configuration (that is, the one intended for system-wide use in Windows). If the remote computer requires a proxy server to reach the security appliance, the URL of the terminating end of the connection must be in the list of URLs excluded from proxy services. If the proxy configuration specifies that traffic destined for the ASA goes through a proxy, all smart tunnel traffic goes through the proxy.
In an HTTP-based remote access scenario, sometimes a subnet does not provide user access to the VPN gateway. In this case, a proxy placed in front of the ASA to route traffic between the web and the end user's location provides web access. However, only VPN users can configure proxies placed in front of the ASA. When doing so, they must make sure these proxies support the CONNECT method. For proxies that require authentication, smart tunnel supports only the basic digest authentication type.
-
When smart tunnel starts, the security appliance tunnels all traffic from the browser process the user used to initiate the clientless session. If the user starts another instance of the browser process, it passes all traffic to the tunnel. If the browser process is the same and the security appliance does not provide access to a given URL, the user cannot open it. As a workaround, the user can use a different browser from the one used to establish the clientless session.
-
A stateful failover does not retain smart tunnel connections. Users must reconnect after a failover.
Windows Requirements and Limitations
The following requirements and limitations apply to Windows only:
-
Only Winsock 2, TCP-based applications are eligible for smart tunnel access.
-
The security appliance does not support the Microsoft Outlook Exchange (MAPI) proxy. Neither port forwarding nor the smart tunnel supports MAPI. For Microsoft Outlook Exchange communication using the MAPI protocol, remote users must use AnyConnect.
-
Users of Microsoft Windows Vista who use smart tunnel or port forwarding must add the URL of the ASA to the Trusted Site zone. In order to access the Trusted Site zone, start Internet Explorer, and choose Tools > Internet Options, and click the Security tab. Vista users can also disable Protected Mode in order to facilitate smart tunnel access; however, Cisco recommends against this method because it increases vulnerability to attack.
Mac OS Requirements and Limitations
These requirements and limitations apply to Mac OS only:
-
Safari 3.1.1 or later or Firefox 3.0 or later
-
Sun JRE 1.5 or later
-
Only applications started from the portal page can establish smart tunnel connections. This requirement includes smart tunnel support for Firefox. Using Firefox to start another instance of Firefox during the first use of a smart tunnel requires the user profile named csco_st. If this user profile is not present, the session prompts the user to create one.
-
Applications using TCP that are dynamically linked to the SSL library can work over a smart tunnel.
-
Smart tunnel does not support these features and applications on Mac OS:
-
Proxy services
-
Auto sign-on
-
Applications that use two-level name spaces
-
Console-based applications, such as Telnet, SSH, and cURL
-
Applications using dlopen or dlsym to locate libsocket calls
-
Statically linked applications to locate libsocket calls
-
Configure
In this section, you are presented with the information to configure the features described in this document.
Add or Edit Smart Tunnel List
The Add Smart Tunnel List dialog box lets you add a list of smart tunnel entries to the security appliance configuration. The Edit Smart Tunnel List dialog box lets you modify the contents of the list.
Field
List Name—Enter a unique name for the list of applications or programs. There is no restriction on the number of characters in the name. Do not use spaces. Following the configuration of the smart tunnel list, the list name appears next to the Smart Tunnel List attribute in the Clientless SSL VPN group policies and local user policies. Assign a name that will help you to distinguish its contents or purpose from other lists that you are likely to configure.
Add or Edit Smart Tunnel Entry
The Add or Edit Smart Tunnel Entry dialog box lets you specify the attributes of an application in a smart tunnel list.
-
Application ID—Enter a string to name the entry in the smart tunnel list. The string is unique for the OS. Typically, it names the application to be granted smart tunnel access. In order to support multiple versions of an application for which you choose to specify different paths or hash values, you can use this attribute to differentiate entries, specifying the OS and the name and version of the application supported by each list entry. The string can be up to 64 characters.
-
Process Name—Enter the file name or path to the application. The string can be up to 128 characters
Windows requires an exact match of this value to the right side of the application path on the remote host to qualify the application for smart tunnel access. If you specify only the file name for Windows, SSL VPN does not enforce a location restriction on the remote host to qualify the application for smart tunnel access.
If you specify a path and the user installed the application in another location, that application does not qualify. The application can reside on any path as long as the right side of the string matches the value you enter.
In order to authorize an application for smart tunnel access if it is present on one of several paths on the remote host, either specify only the name and extension of the application in this field or create a unique smart tunnel entry for each path.
For Windows, if you want to add smart tunnel access to an application started from the command prompt, you must specify "cmd.exe" in the process name of one entry in the smart tunnel list and specify the path to the application itself in another entry because "cmd.exe" is the parent of the application.
Mac OS requires the full path to the process and is case sensitive. In order to avoid specifying a path for each user name, insert a tilde (~) before the partial path (for example, ~/bin/vnc).
-
OS—Click Windows or Mac in order to specify the host OS of the application.
-
Hash—(Optional and applicable only for Windows) In order to obtain this value, enter the checksum of the executable file into a utility that calculates a hash using the SHA-1 algorithm. One example of such a utility is the Microsoft File Checksum Integrity Verifier (FCIV), which is available at Availability and description of the File Checksum Integrity Verifier utility. After installing FCIV, place a temporary copy of the application to be hashed on a path that contains no spaces (for example, c:/fciv.exe), then enter fciv.exe -sha1 application at the command line (for example, fciv.exe -sha1 c:\msimn.exe) to display the SHA-1 hash.
The SHA-1 hash is always 40 hexadecimal characters.
Before authorizing an application for smart tunnel access, clientless SSL VPN calculates the hash of the application matching the application ID. It qualifies the application for smart tunnel access if the result matches the value of hash.
Entering a hash provides a reasonable assurance that SSL VPN does not qualify an illegitimate file that matches the string you specified in the application ID. Because the checksum varies with each version or patch of an application, the hash you enter can only match one version or patch on the remote host. In order to specify a hash for more than one version of an application, create a unique smart tunnel entry for each hash value.
Note: You must update the smart tunnel list in the future if you enter hash values and you want to support future versions or patches of an application with smart tunnel access. A sudden problem with smart tunnel access might be an indication that the application that contains hash values is not up-to-date with an application upgrade. You can avoid this problem by not entering a hash.
-
Once you configure the smart tunnel list, you must assign it to a group policy or a local user policy for it to become active as follows:
-
In order to assign the list to a group policy, choose Config > Remote Access VPN> Clientless SSL VPN Access > Group Policies > Add or Edit > Portal, and choose the smart tunnel name from the drop-down list next to the Smart Tunnel List attribute.
-
In order to assign the list to a local user policy, choose Config > Remote Access VPN> AAA Setup > Local Users > Add or Edit > VPN Policy > Clientless SSL VPN, and choose the smart tunnel name from the drop-down list next to the Smart Tunnel List attribute.
-
ASA Smart Tunnel (Lotus Example) Configuration Using ASDM 6.0(2)
This document assumes that the basic configuration, such as interface configuration, is complete and works properly.
Complete these steps in order to configure a smart tunnel:
Note: In this configuration example, the smart tunnel is configured for the Lotus application.
-
Choose Configuration > Remote Access VPN > Clientless SSL VPN Access > Portal > Smart Tunnels in order to start the Smart Tunnel configuration.
-
Click Add.
The Add Smart Tunnel List dialog box appears.
-
In the Add Smart Tunnel List dialog box, click Add.
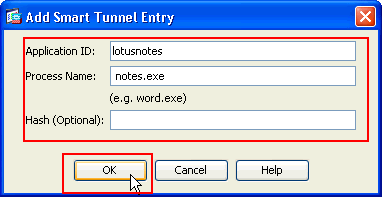
The Add Smart Tunnel Entry dialog box appears.
-
In the Application ID field, enter a string to identify the entry within the smart tunnel list.
-
Enter a file name and extension for the application, and click OK.
-
In the Add Smart Tunnel List dialog box, click OK.
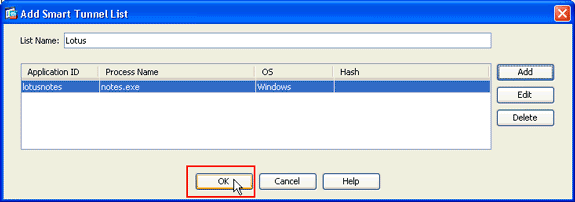
Note: Here is the equivalent CLI configuration command:
Cisco ASA 8.0(2) ciscoasa(config)#smart-tunnel list lotus LotusSametime connect.exe
-
Assign the list to the group policies and local user policies to which you want to provide smart tunnel access to the associated applications as follows:
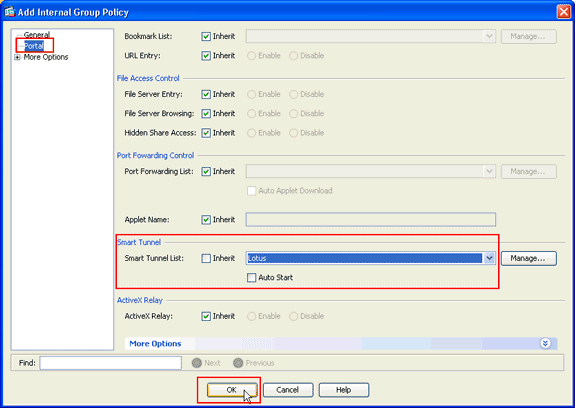
In order to assign the list to a group policy, choose Configuration > Remote Access VPN> Clientless SSL VPN Access > Group Policies, and click Add or Edit.

The Add Internal Group Policy dialog box appears.
-
In the Add Internal Group Policy dialog box, click Portal, choose the smart tunnel name from the Smart Tunnel List drop-down list, and click OK.
Note: This example uses Lotus as the smart tunnel list name.
-
In order to assign the list to a local user policy, choose Configuration > Remote Access VPN> AAA Setup > Local Users, and click Add to configure configure a new user or click Edit to edit an existing user.
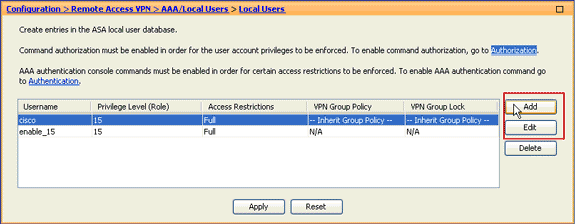
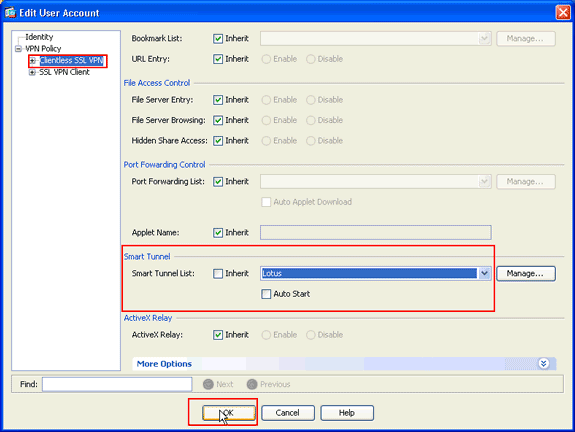
The Edit User Account dialog box appears.
-
In the Edit User Account dialog box, click Clientless SSL VPN, choose the smart tunnel name from the Smart Tunnel List drop-down list, and click OK.
Note: This example uses Lotus as the smart tunnel list name.
The smart tunnel configuration is complete.
Troubleshoot
I am unable to connect using a bookmarked Smart Tunnel URL in the clientless portal. Why does this issue occur, and how can I resolve it?
This issue occurs due to the problem described in Cisco Bug ID CSCsx05766 (registered customers only) . In order to resolve this issue, downgrade the Java Runtime plugin to an older version.
Can I garble the URL of a smart tunnel link configured in WebVPN?
When smart tunnel is used on the ASA, you cannot garble the URL or hide the address bar of the browser. Users can view the URLs of links configured in WebVPN that use smart tunnel. As a result, they can change the port and access the server for some other service.
In order to resolve this issue, use WebType ACLs. Refer to WebType Access Control Lists for more information.
Related Information
Revision History
| Revision | Publish Date | Comments |
|---|---|---|
1.0 |
22-Oct-2009
|
Initial Release |
Contact Cisco
- Open a Support Case

- (Requires a Cisco Service Contract)
 Feedback