Install and Configure of Secure Endpoint Virtual Private Cloud
Available Languages
Download Options
Bias-Free Language
The documentation set for this product strives to use bias-free language. For the purposes of this documentation set, bias-free is defined as language that does not imply discrimination based on age, disability, gender, racial identity, ethnic identity, sexual orientation, socioeconomic status, and intersectionality. Exceptions may be present in the documentation due to language that is hardcoded in the user interfaces of the product software, language used based on RFP documentation, or language that is used by a referenced third-party product. Learn more about how Cisco is using Inclusive Language.
Contents
Introduction
This document describes and focus on how to successfully deploy Virtual Private Cloud (VPC) on servers in ESXi environment. For other documents such as Quick Start Guide, Deployment Strategy, Entitlement Guide, Console and Administrator User Guide please visit this site Documentation
Contributed by Roman Valenta, Cisco TAC Engineers.
Prerequisites
Requirements:
VMware ESXi 5 or later
- Cloud-proxy mode (only): 128 GB RAM, 8 CPU cores (2 CPUs with 4 cores each recommended), 1 TB minimum free disk space on VMware datastore
- Type of drives: SSD required for air gap mode and recommended for proxy
- RAID Type: One RAID 10 group (striped mirror)
- Minimum VMware datastore size: 2 TB
- Minimum datastore random reads for the RAID 10 group (4K): 60K IOPS
- Minimum datastore random writes for the RAID 10 group (4K): 30K IOPS
Cisco recommends that you have knowledge of this topic:
- Basic knowledge how to work with certificates.
- Basic knowledge on how to setup DNS under DNS server (Windows or Linux)
- Installation an Open Virtual Appliance (OVA) Template in the VMWare ESXi
Used in this LAB:
VMware ESX 6.5
- Cloud-proxy mode (only): 48 GB RAM, 8 CPU cores (2 CPUs with 4 cores each recommended), 1 TB minimum free disk space on VMware datastore
- Type of drives: SATA
- RAID Type: One RAID 1
- Minimum VMware datastore size: 1 TB
- MobaXterm 20.2 (Multi-Terminal Program similar to PuTTY)
- Cygwin64 (Used to download AirGap Update)
Additionally
- Certificate that you create either with openSSL or any other supported methods.
- DNS Server (Linux or Windows) In my lab I used Windows Server 2016 and CentOS-8
- Windows VM for our test endpoint
- License
If your memory is bellow 48GB RAM on version 3.2+ VPC become unusable.
Note: The Private Cloud OVA creates the drive partitions so there is no need to specify them in VMWare. server which resolves the clean interface hostname.
Refer to the VPC Appliance Data Sheet for more information about version-specific hardware requirements.
Note:The information in this document was created from the devices in a specific lab environment and its only intend to give you a guidance through the deployment which might vary depending on the version that is being deployed. All of the devices used in this document started with a cleared (default) configuration. If your network is live, ensure that you understand the potential impact of any command.
VPC Deployment
Select the URL provided in the eDelivery or entitlement email. Download the OVA file and proceed with install
VM Installation
Step1:
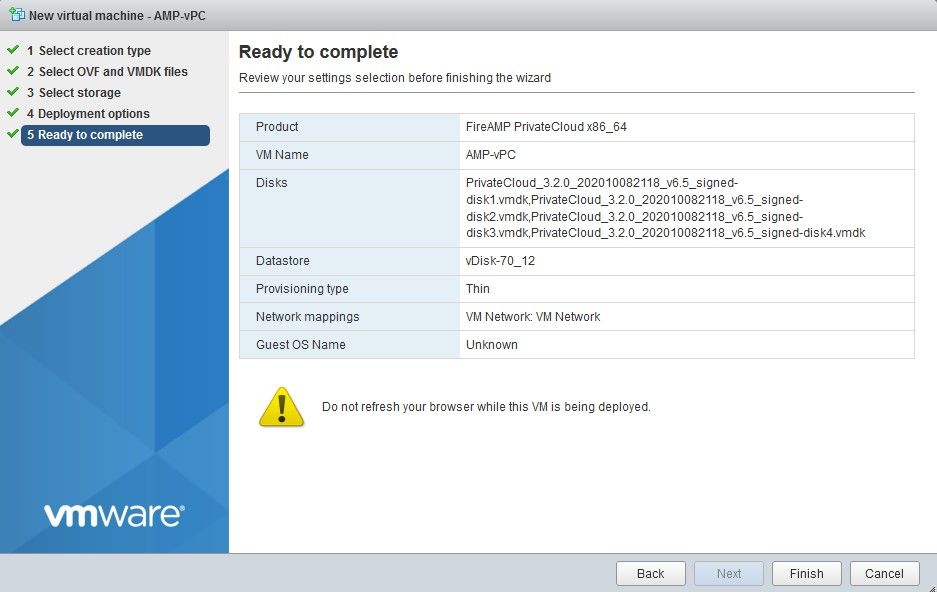
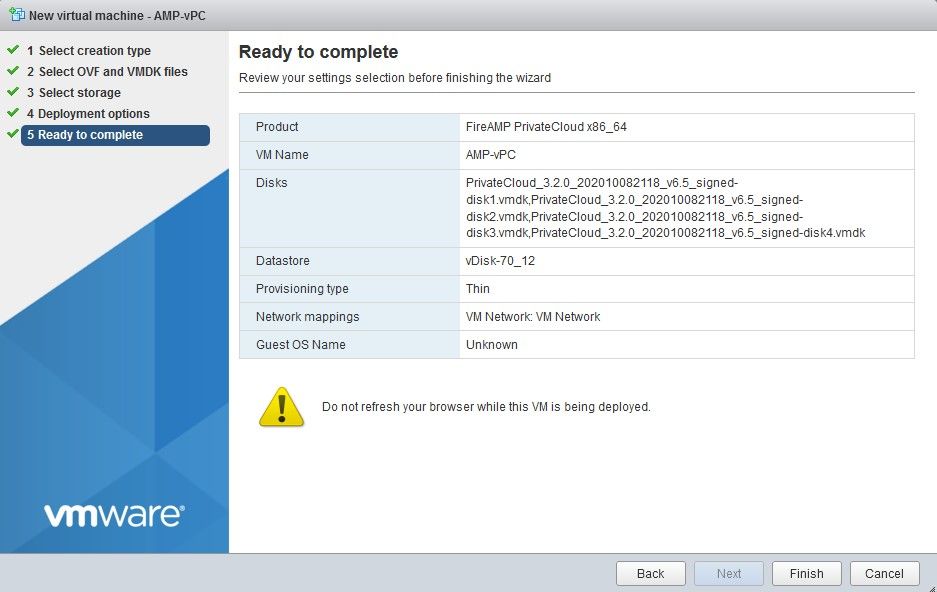
Navigate to File > Deploy OVF Template to open the Deploy OVF Template wizard, as shown in the image.
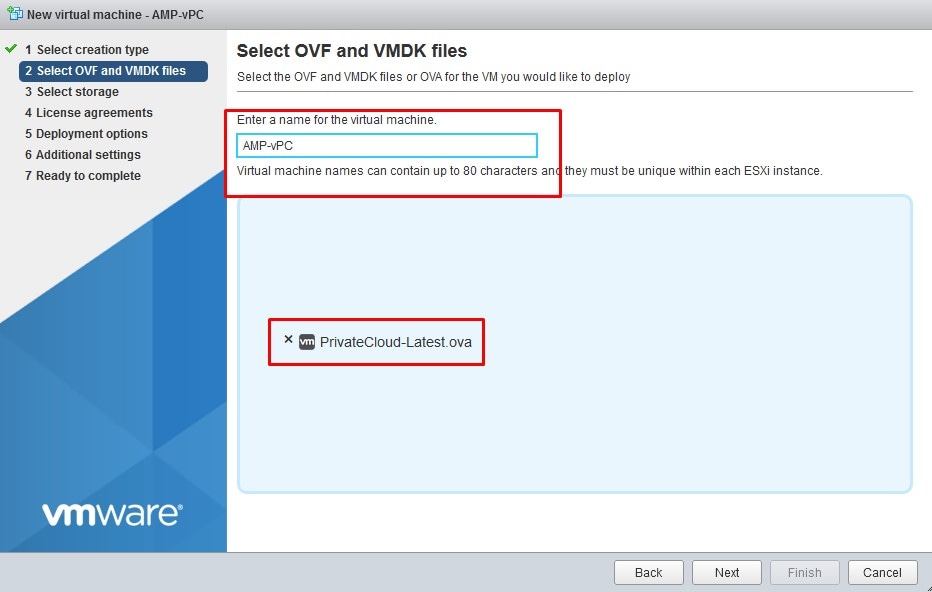
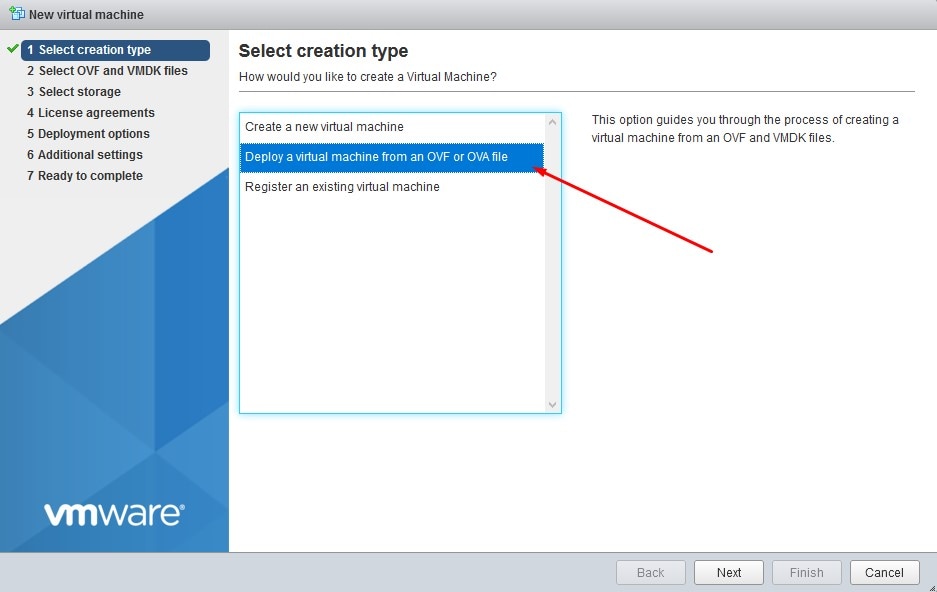
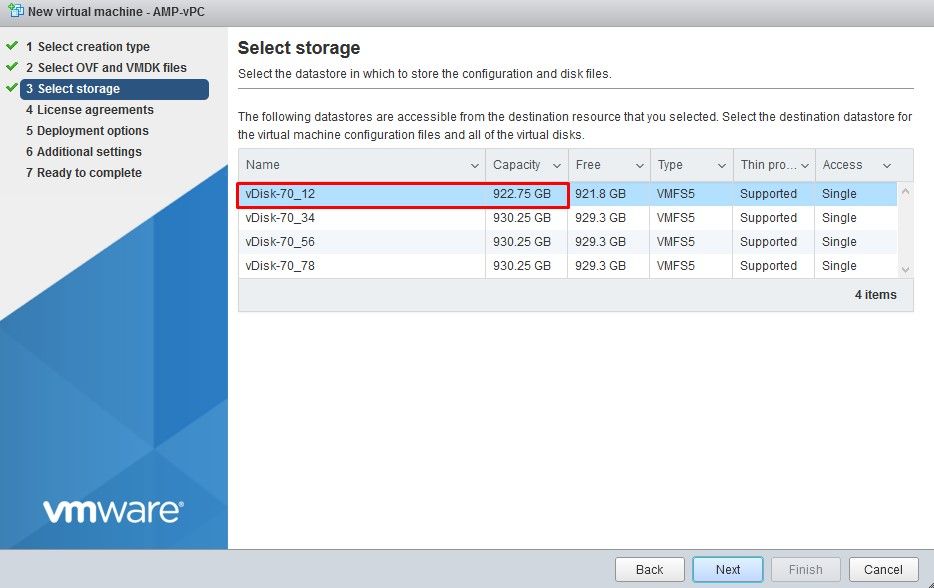
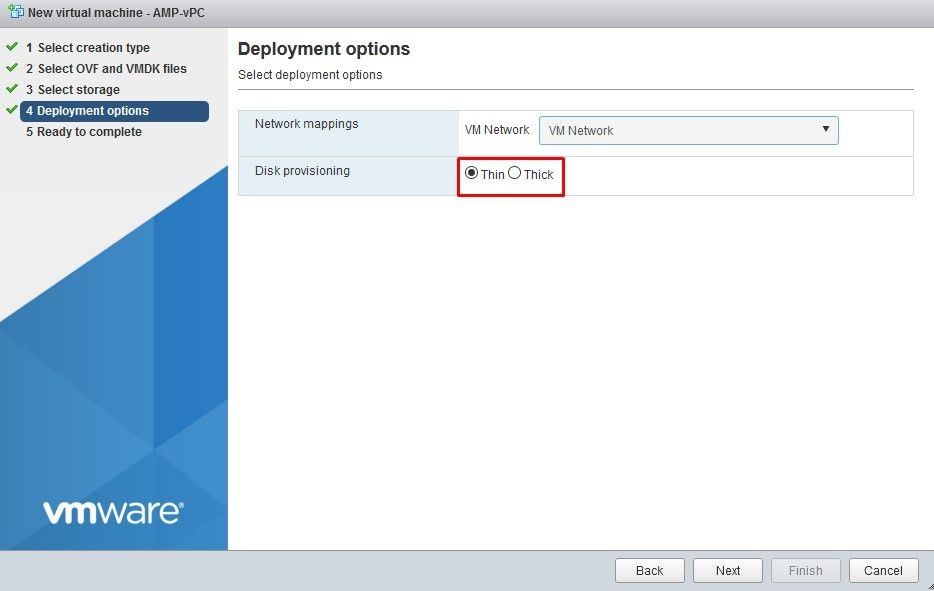
Note: Thick Provisioning reserves space when a disk is created. If you select this option, it can improve the performance over Thin Provisioned. However, this is not mandatory. Now select on Next, as shown in the image.
Step 2:
Select Browse… to select an OVA file, and then select on Next. You notice the default OVA parameters on the OVF Template Details page, as shown in the image. select on Next.
Initial Admin Interface Setup
Once the VM boots up you do the initial configuration through VM Console.
Step 1:
You might notice that the URL shows [UNCONFIGURED] if the interface did not receive an IP address from the DHCP server. Please note that this interface is the Management interface. This is not the Production interface.
Step 2:
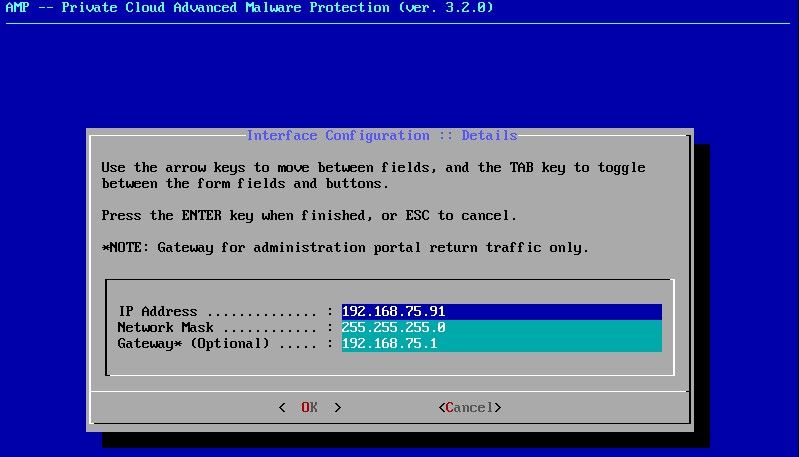
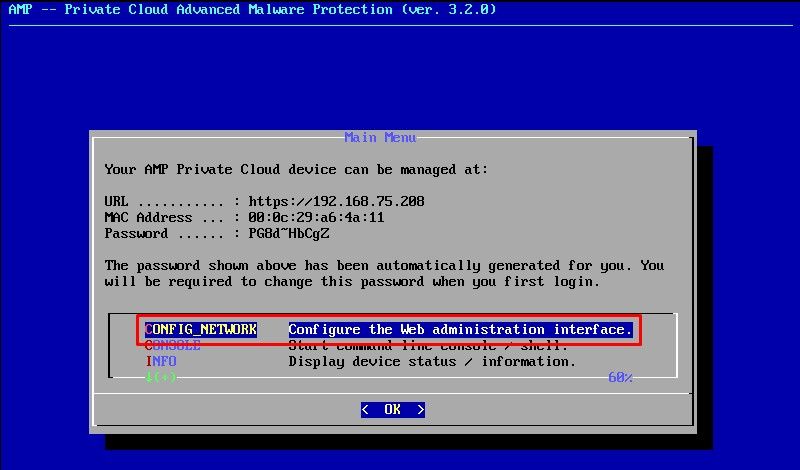
You can navigate through Tab, Enter, and Arrow keys.
Navigate to CONFIG_NETWORK and select the Enter key on your keyboard to begin the configuration of the management IP address for the Secure Endpoint Private Cloud. If you do not want to use DHCP, select No and select Enter key.
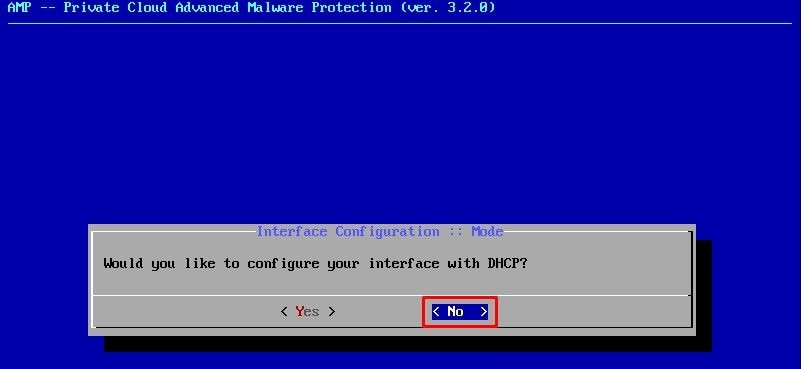
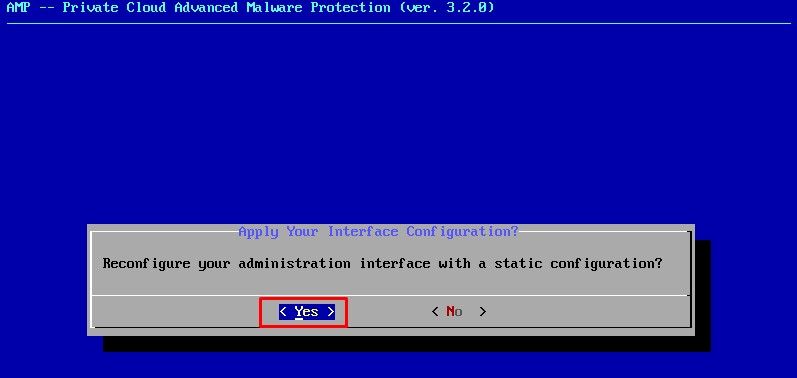
In the appeared window choose Yes and select Enter key.
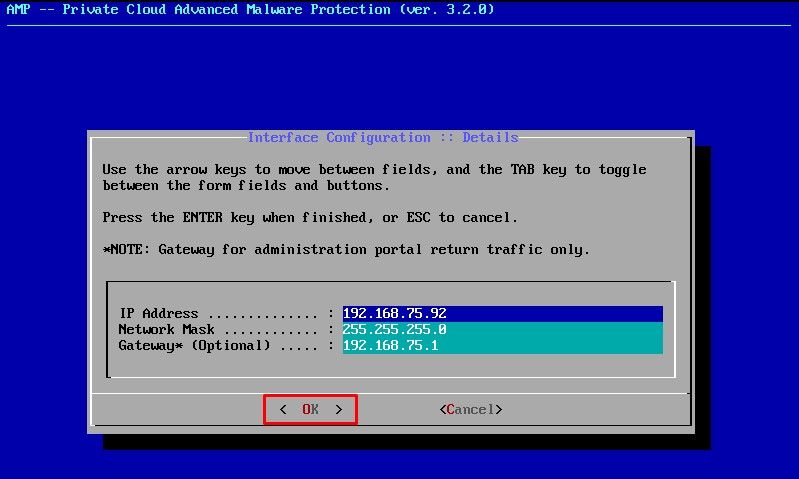
If the IP is already in use you be treated with this error log. Just simply go back and pick something that is unique and not in use.

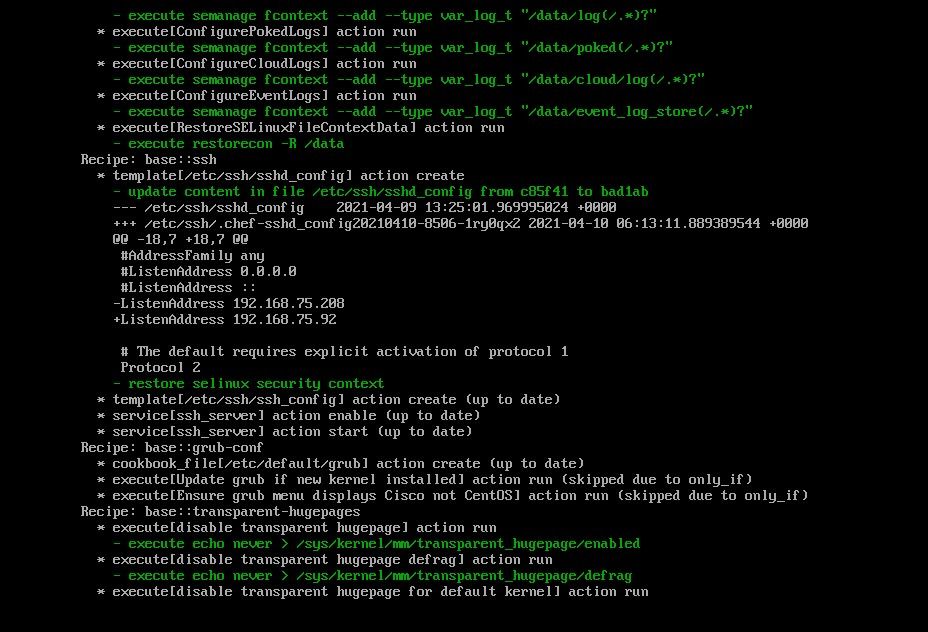
If all goes well, you see output that looks like this

Step 3:
Wait until the blue screen pops again with your new STATIC IP. Also, please note the One Time Password. Take a note and let's open our browser.
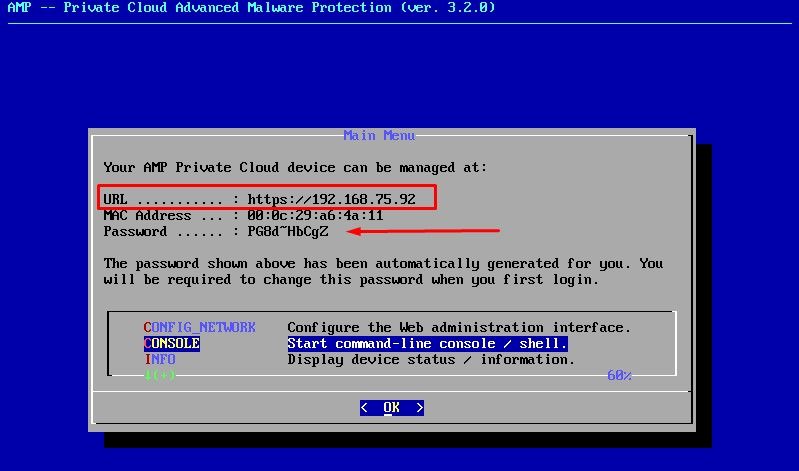
Initial Configuration of the vPC via web GUI
Step 1:
Open a web browser and navigate to the management IP address of the appliance. You can receive a certificate error as the Secure Endpoint Private Cloud initially generates its own HTTPS certificate, as shown in the image. Configure your browser to trust the self-signed HTTPS certificate of Secure Endpoint Private Cloud.
In your browser type the STATIC IP that you configured previously.
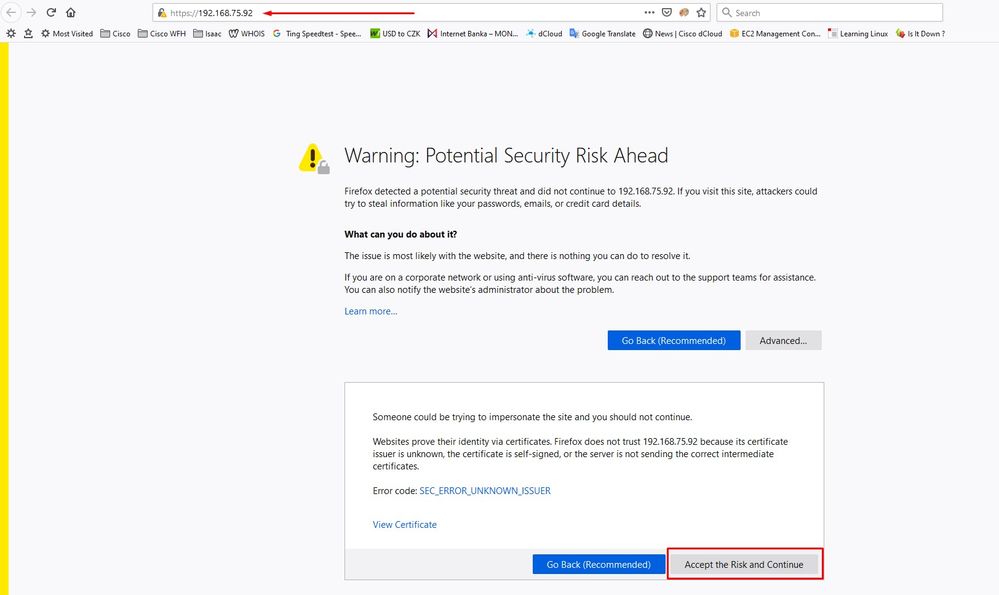
Step 2:
After you log in, you are required to reset the password. Use the initial password from the console in the Old Password field. Use your new password in the New Password field. Re-enter your new password in the New Password field. select on Change Password.
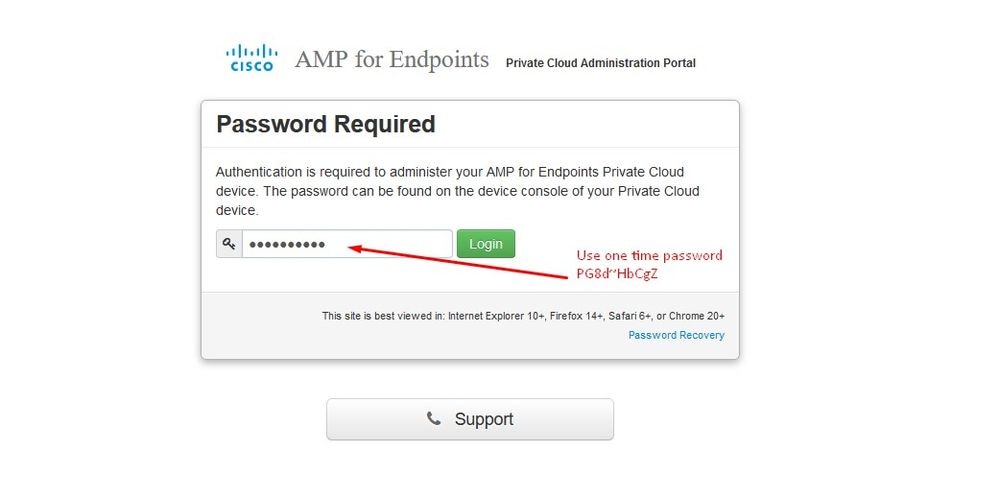
Step 3:
After you log in, you are required to reset the password. Use the initial password from the console in the Old Password field. Use your new password in the New Password field. Re-enter your new password in the New Password field. select on Change Password.
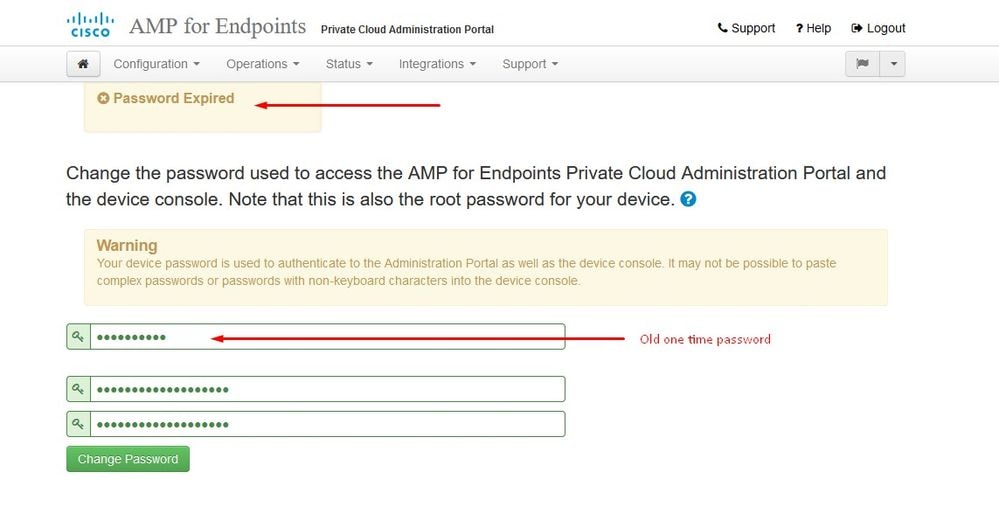
Step 4:
On the next page scroll down to the bottom to accept the license agreement. select on I have read and agree.

Step 5:
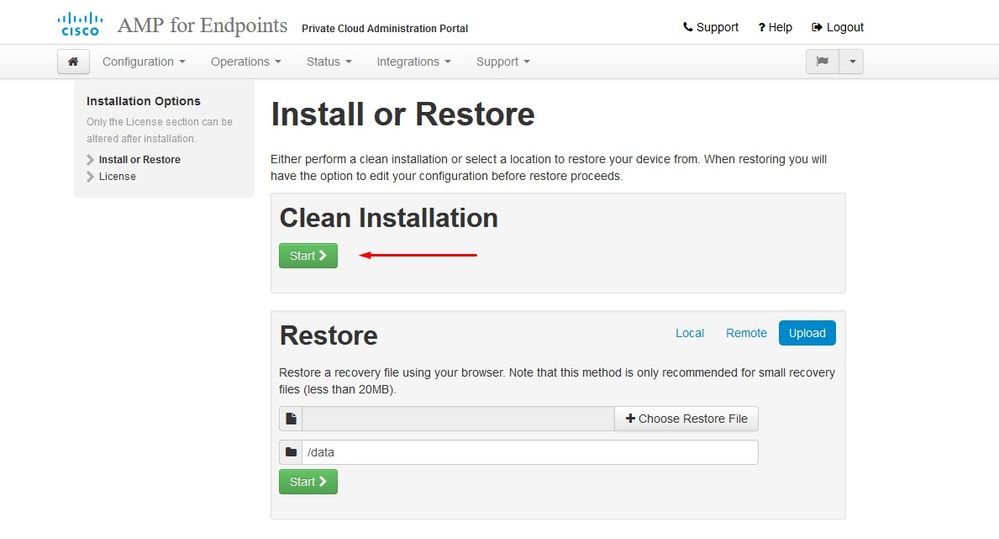
After you accept the agreement, you get the installation screen, as shown in the image. If you want to restore from a backup, you can do that here, however, this guide proceeds with the Clean Installation option. Select on Start in the Clean Installation section.
Step 6:
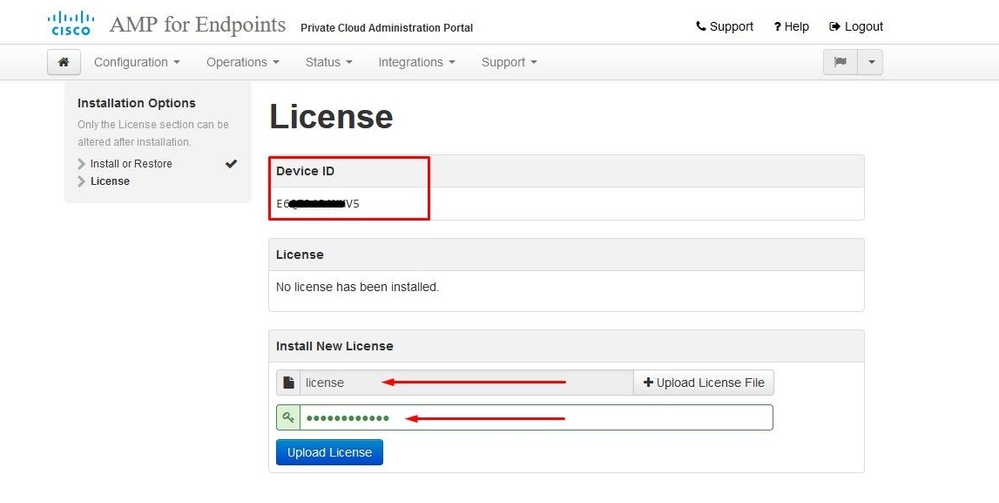
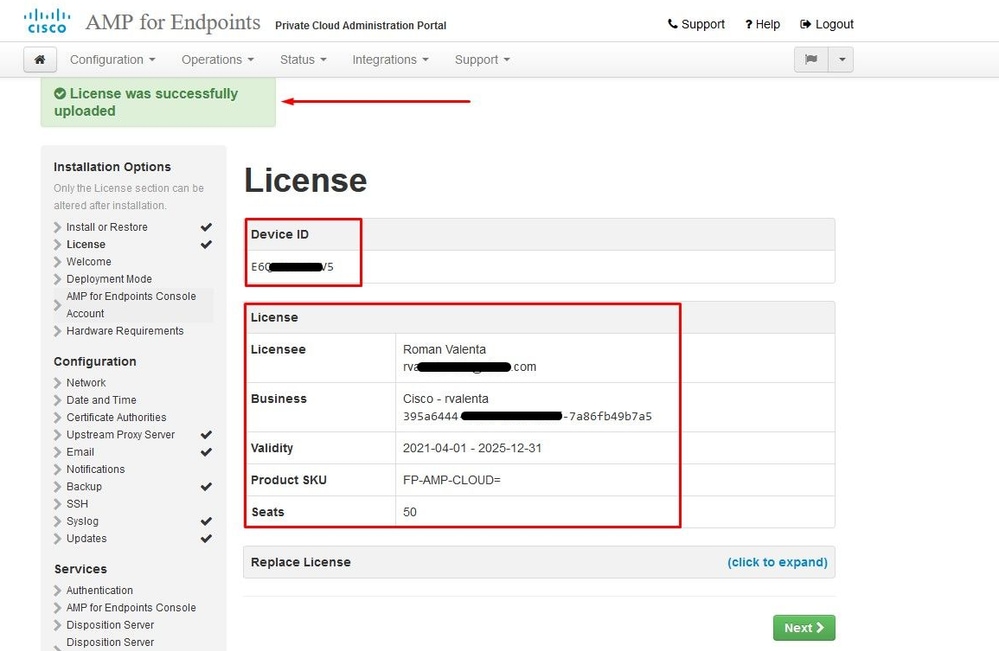
The very first thing you need is license to even move forward. You receive a license and passphrase when you purchase the product. Select on +Upload License File. Choose the license file and enter the passphrase. Select on Upload License. If the upload is unsuccessful, please check if the passphrase is correct. If the upload is successful, a screen with valid license information is displayed. Select on Next. If you still cannot install your license, contact Cisco Technical Support.
Step 7:
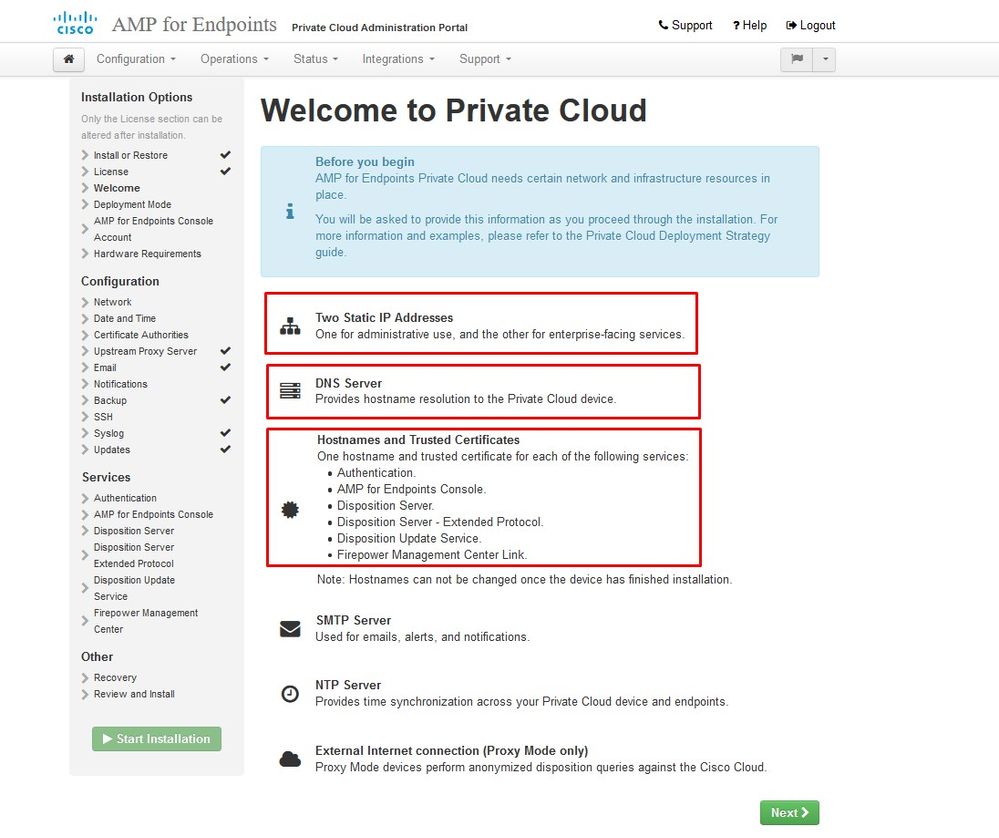
You receive the Welcome Page, as shown in the image. This page shows you the information you must have before the configuration of the Private Cloud. Read the requirements attentively. Select on Next to start the pre-installation configuration.
Configuration
Step 1:
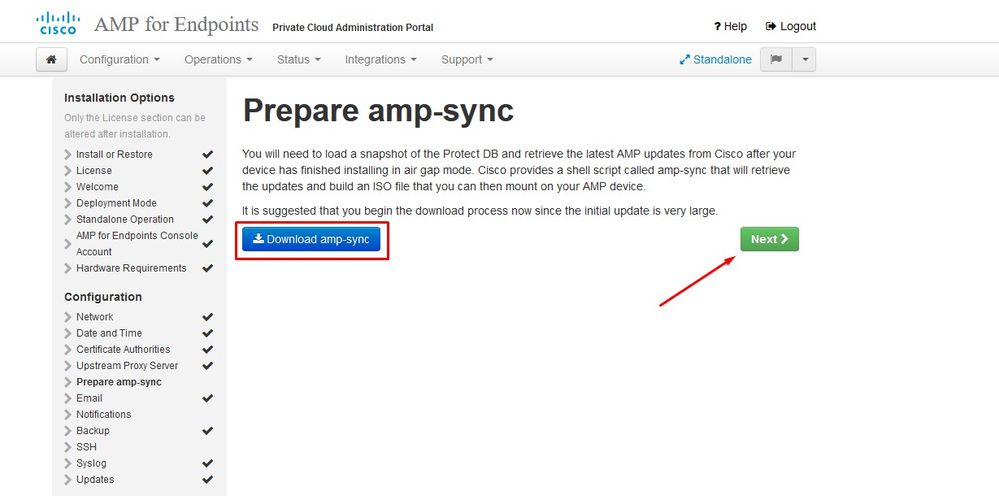
Note: Please note that in next sets of slide we include some exclusive as shown in the image that are unique only to AIR GAP mode , those be enclosed and marked as AIRGAP ONLY
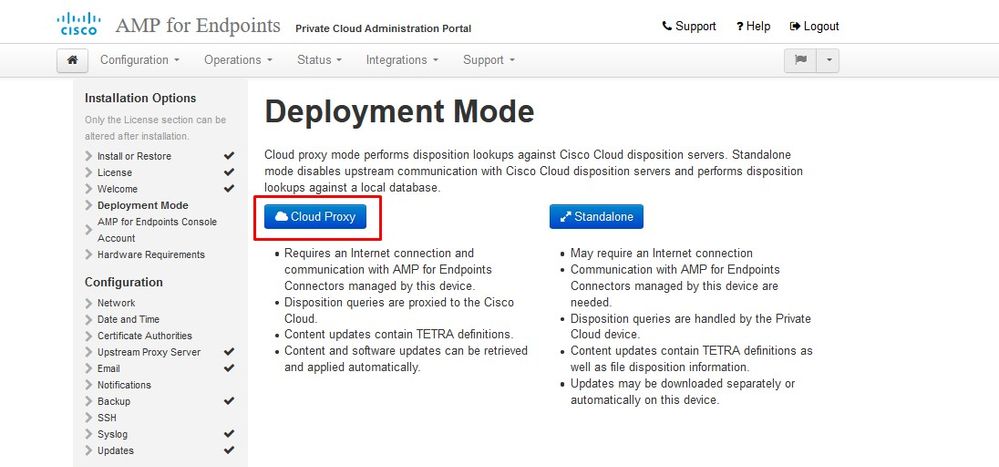
︾ ︾ AIRGAP ONLY ︾ ︾

Note: These steps are applicable only for physical appliance.
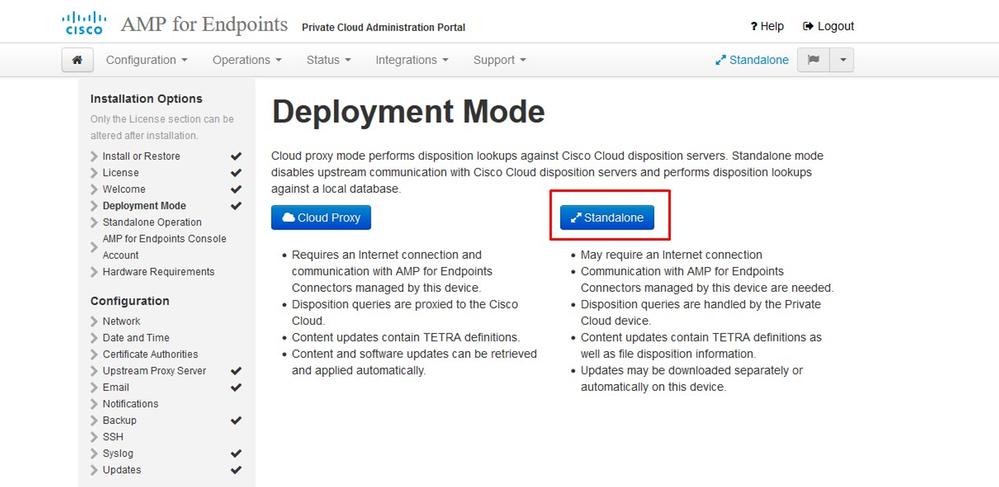
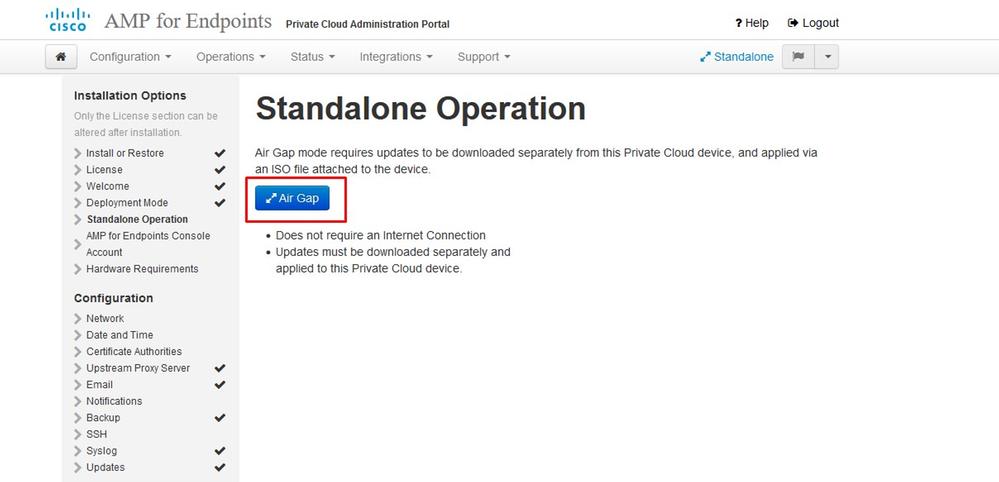
︽ ︽ AIRGAP ONLY ︽ ︽
Step 2:
Navigate to the Secure Endpoint Console Account page. An administrative user is used for the console to create policies, computer groups, and add additional users. Enter Name, Email Address and Password for the Console Account. Select on Next.
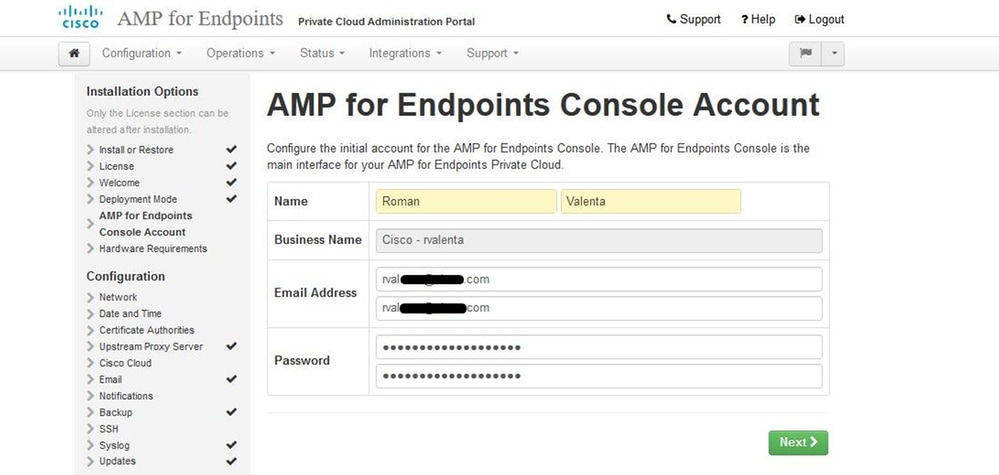
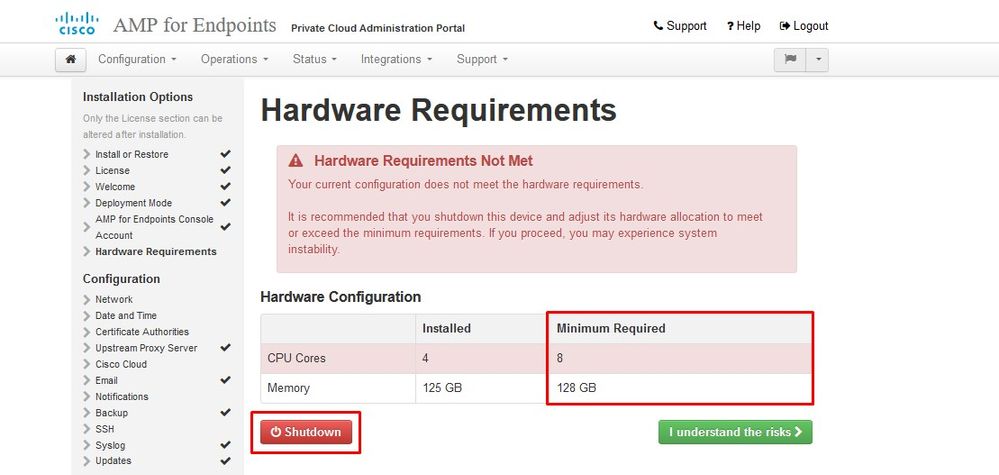
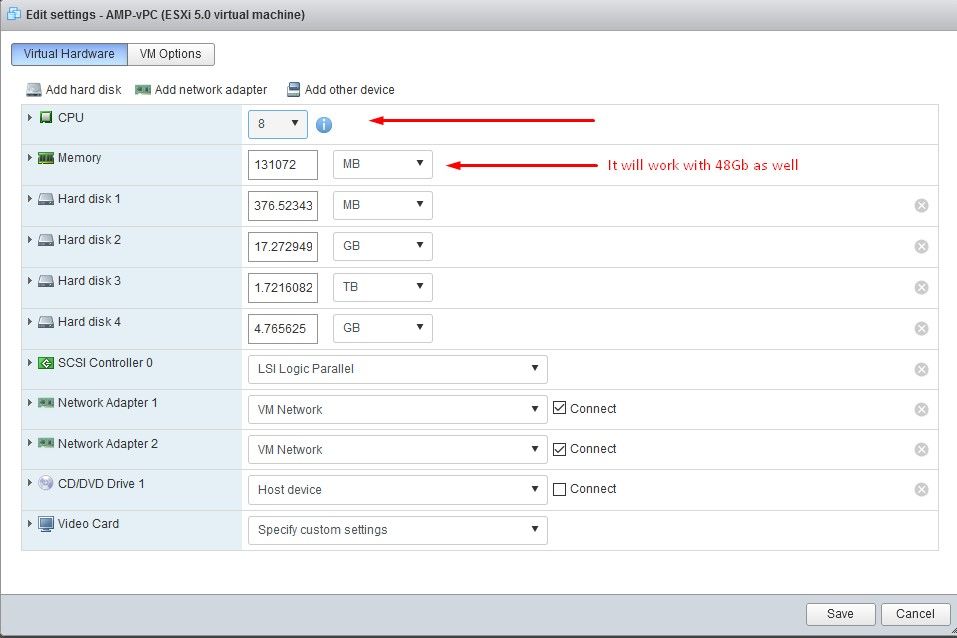
If you run in to this issue when you deploy from the OVA file then you have two choices either, continue and fix this issue later or shutdown then in order to your deployed VM and adjust accordingly. After restart you continue where you left.
Note: This was fixed in OVA file for version 3.5.2 which loads correctly with 128GB RAM and 8CPU Cores
Note: Use only recommended values unless this is for lab purposes
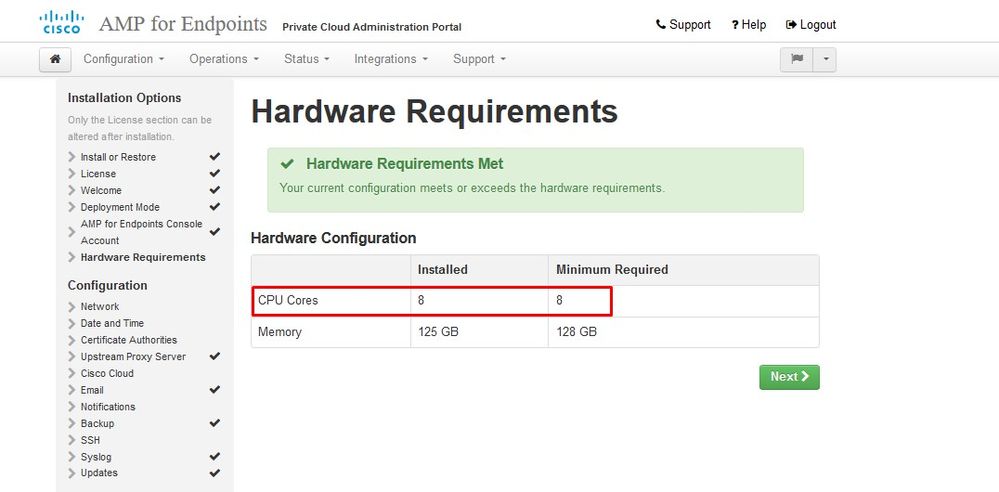
Once rebooted we continue where we left.
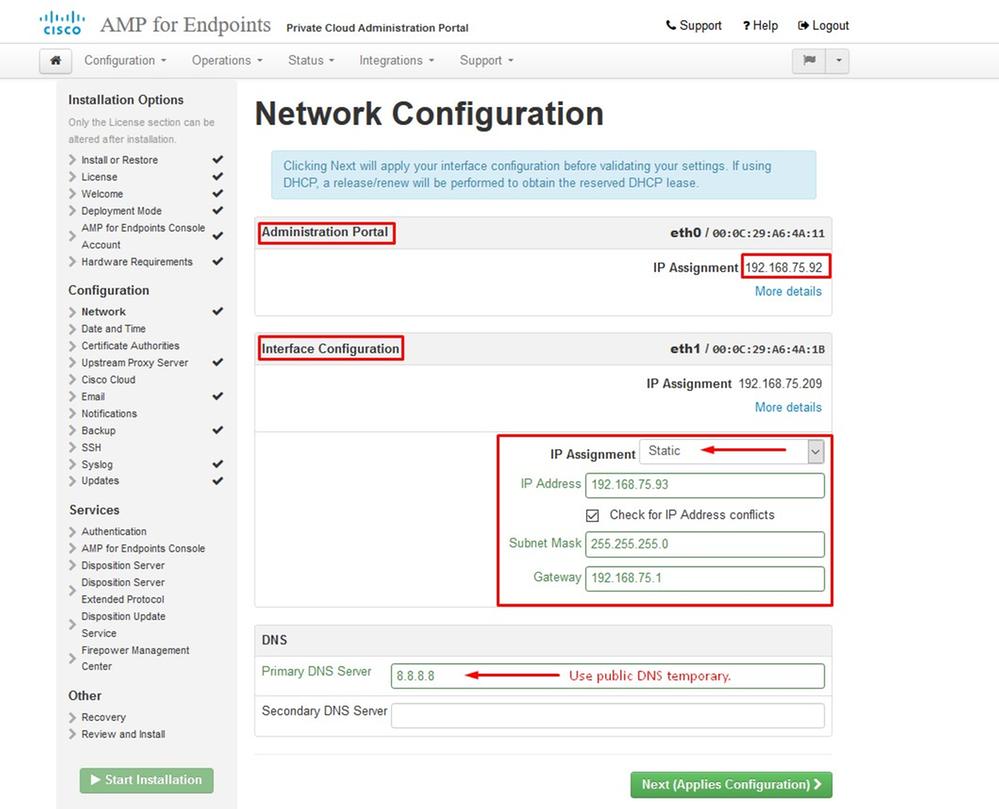
Ensure you configure ETH1 with STATIC IP as well.
Note: You must never configure your device to use DHCP unless you have created MAC address reservations for the interfaces. If the IP addresses of your interfaces change this can cause serious problems with your deployed Secure Endpoint Connectors. If you don't have your DNS server configured you can use public DNS temporary to finish your installation.
Step 3:
Step 4:
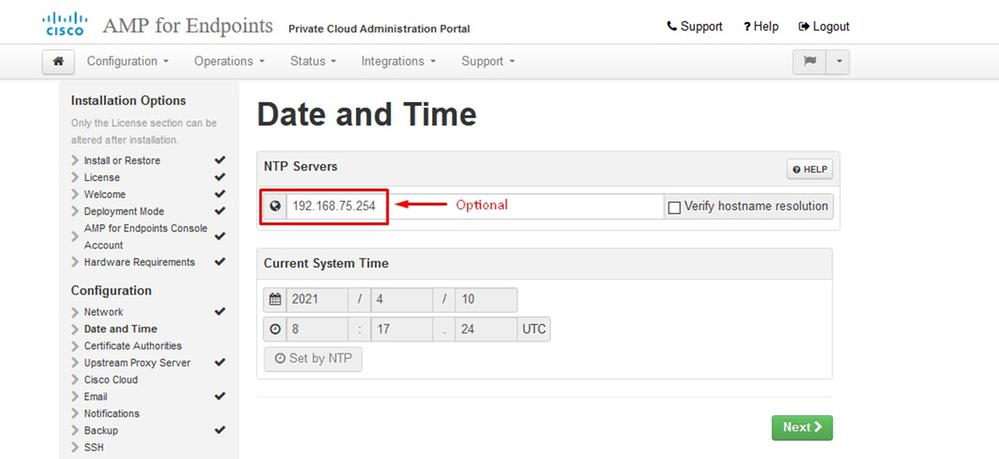
You get the Date and Time page. Enter the addresses of one or more NTP servers you want to use for Date and Time synchronization. You can use internal or external NTP servers and specify more than one through a comma or space delimited list. Synchronize the time with your browser or run amp-ctl ntpdate from the device console to force an immediate time synchronization with your NTP servers. Select on Next.
︾ ︾ AIRGAP ONLY ︾ ︾

Note: These steps are applicable only for physical appliance.
︽ ︽ AIRGAP ONLY ︽ ︽
Step 5:
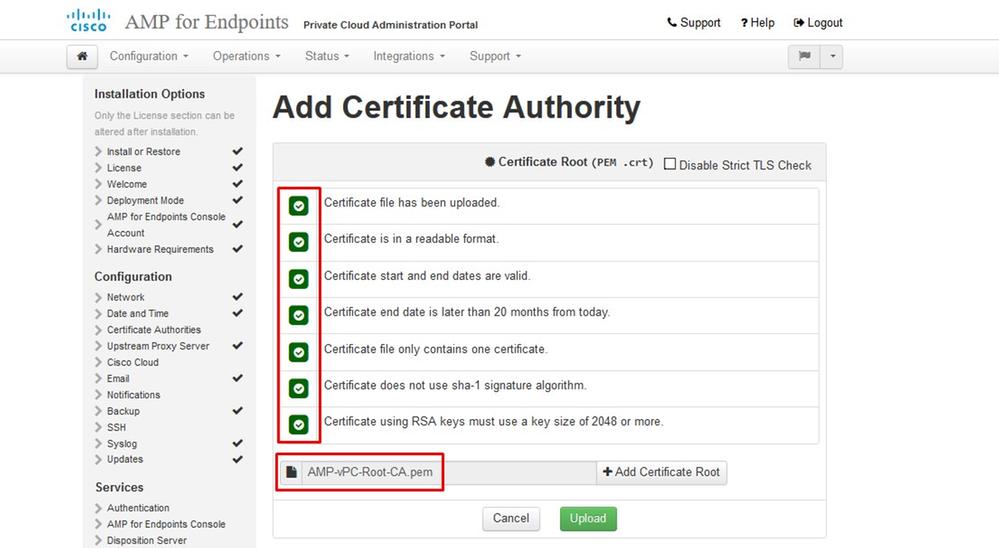
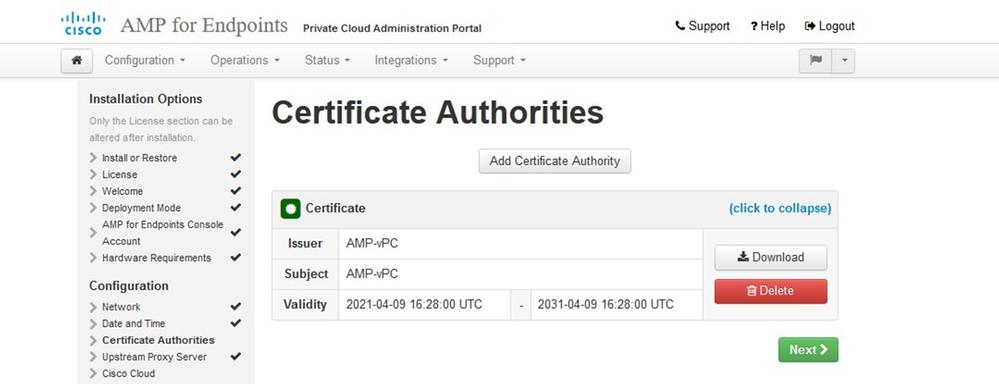
You get the Certificate Authorities page, as shown in the image. Select on Add Certificate Authority to add your root certificate.

Step 6:
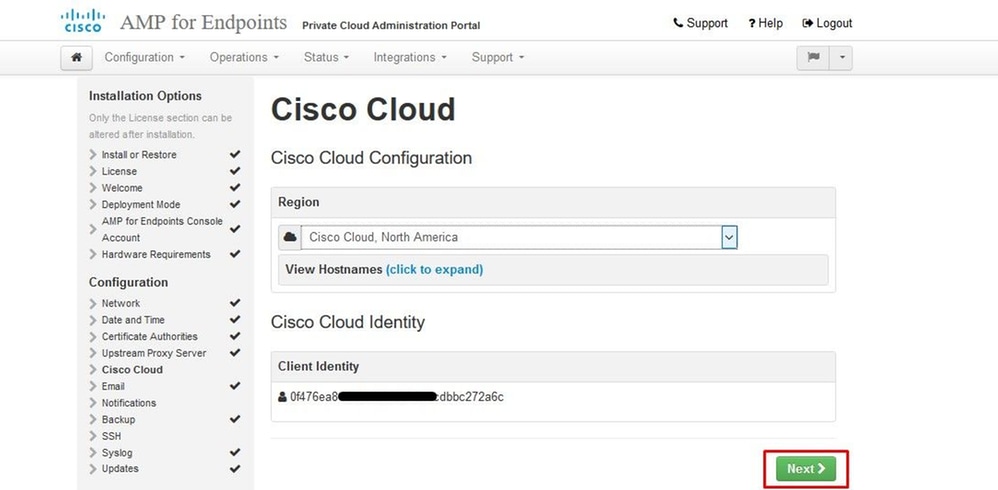
The next step is configure Cisco Cloud page, as shown in the image. Select the appropriate Cisco Cloud Region. Expand View Hostnames if you need to create firewall exceptions for your Secure Endpoint Private Cloud device to communicate with the Cisco Cloud for file lookups and device updates. Select on Next.
Step 7:
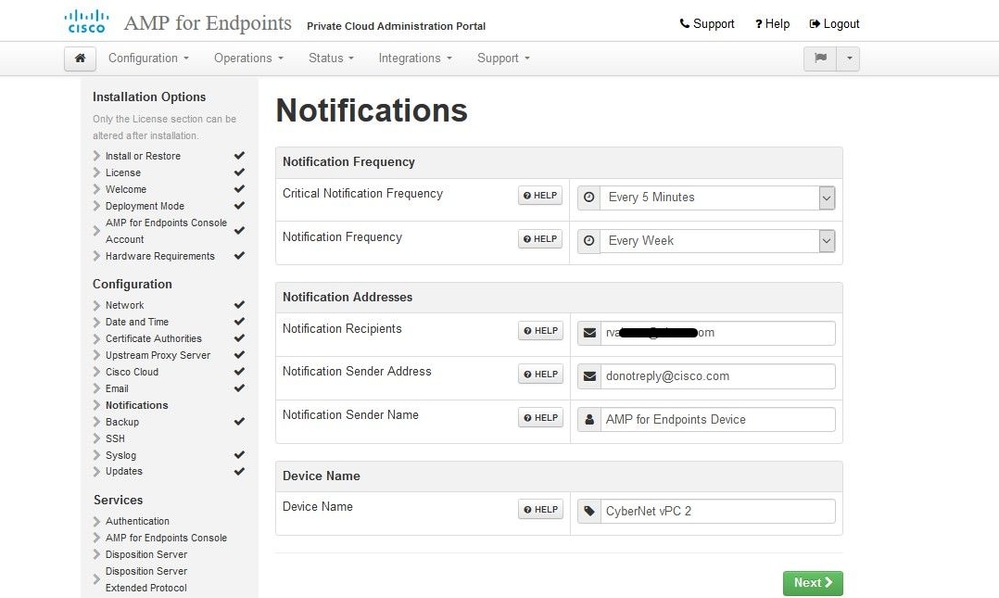
Navigate to notifications page, as shown in the image. Select the frequency for critical and regular Notifications. Enter the email addresses you want to receive alert notifications for the Secure Endpoint device. You can use email aliases or specify multiple addresses through a comma-separated list. You can also specify the sender name and email address used by the device. These notifications are not the same as Secure Endpoint Console subscriptions. You can also specify a unique Device Name if you have multiple Secure Endpoint Private Cloud devices. Select on Next.
Step 8:
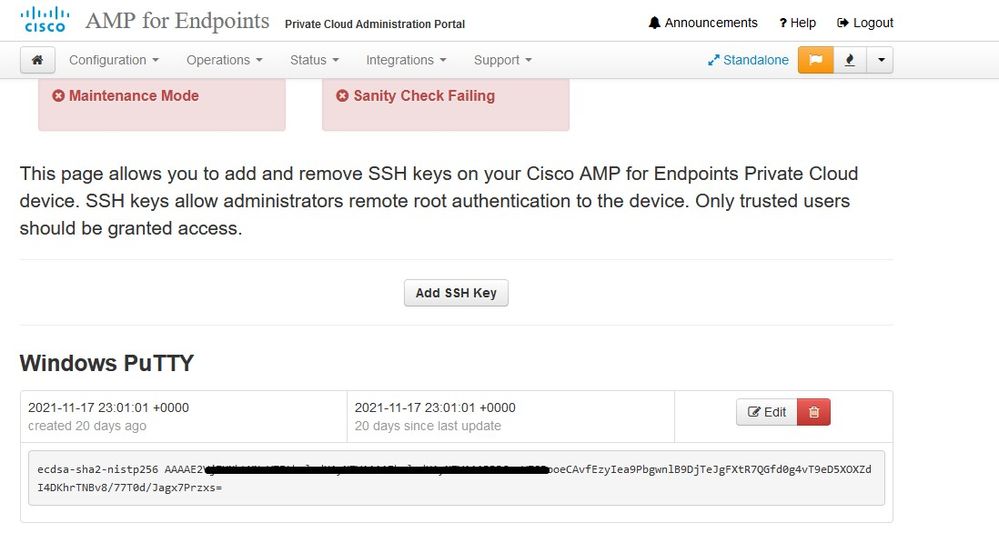
Next you navigate to SSH Keys page, as shown in the image. Select on Add SSH Key to enter any public keys you want to add to the device. SSH keys allow you to access the device via a remote shell with root privileges. Only trusted users must be granted access. Your Private Cloud device requires an OpenSSH formatted RSA key. You can add more SSH keys later through Configuration > SSH in your Administration Portal. Select on Next.
Next you get the Services section. On the next pages you need to assign hostnames and upload the appropriate certificate and key pairs for these device services. In next few slides we can see configuration of one of the 6 certificates.
Services
Step 1:
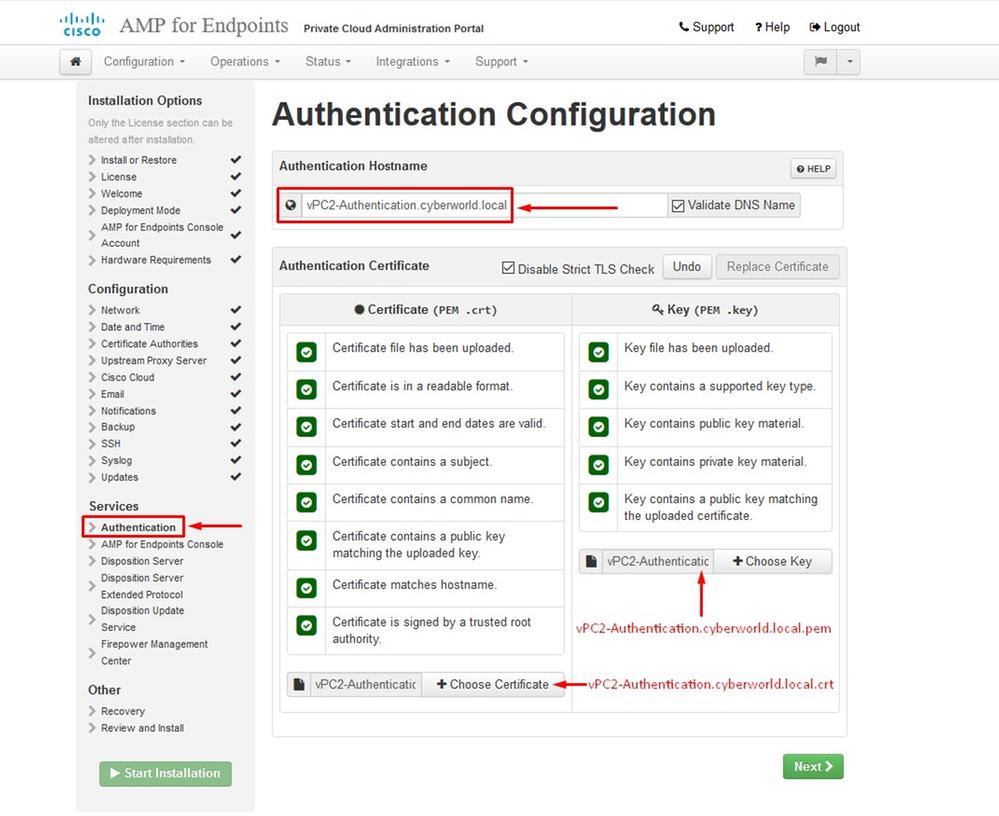
During configuration process you might run in to these errors.
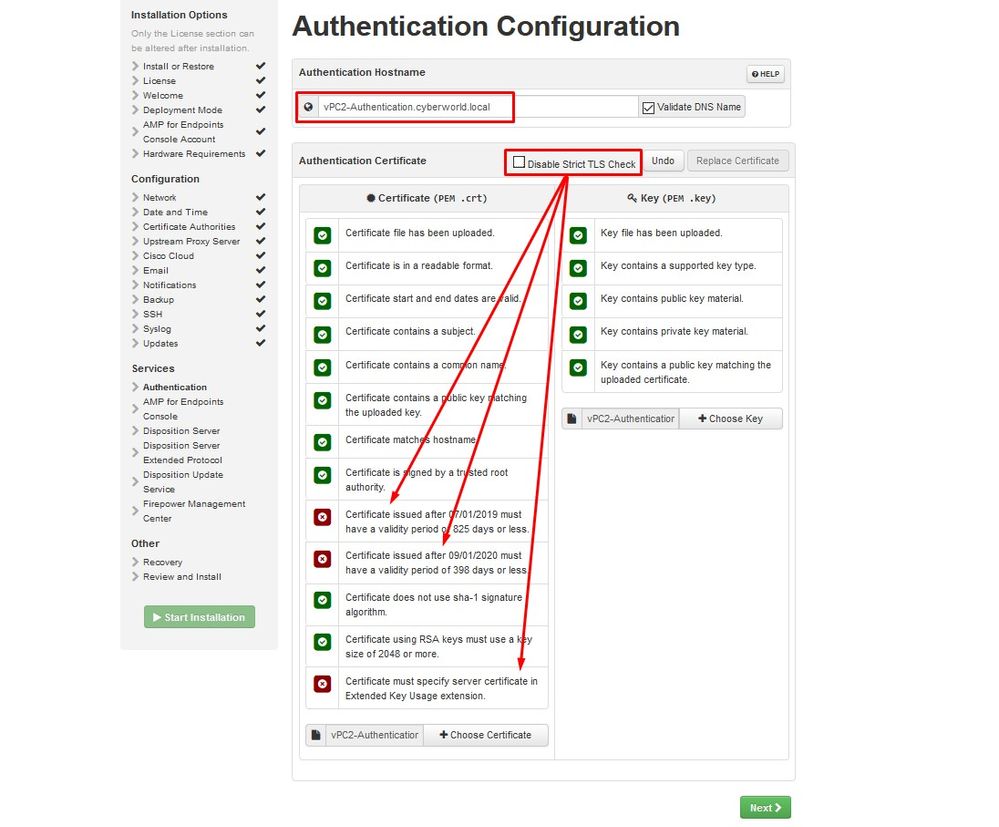
First “error” that you might notice is highlighted with the 3 arrows. To bypass this just simply un-check “Disable Strict TLS Check”

Caution: On VPC 3.8.2 and up TLS Web Server Authentication is now required for the certificate to be accepted, Service Certificate cannot exceed validity of 398 Days.
Without Strict TLS Check
Step 2:
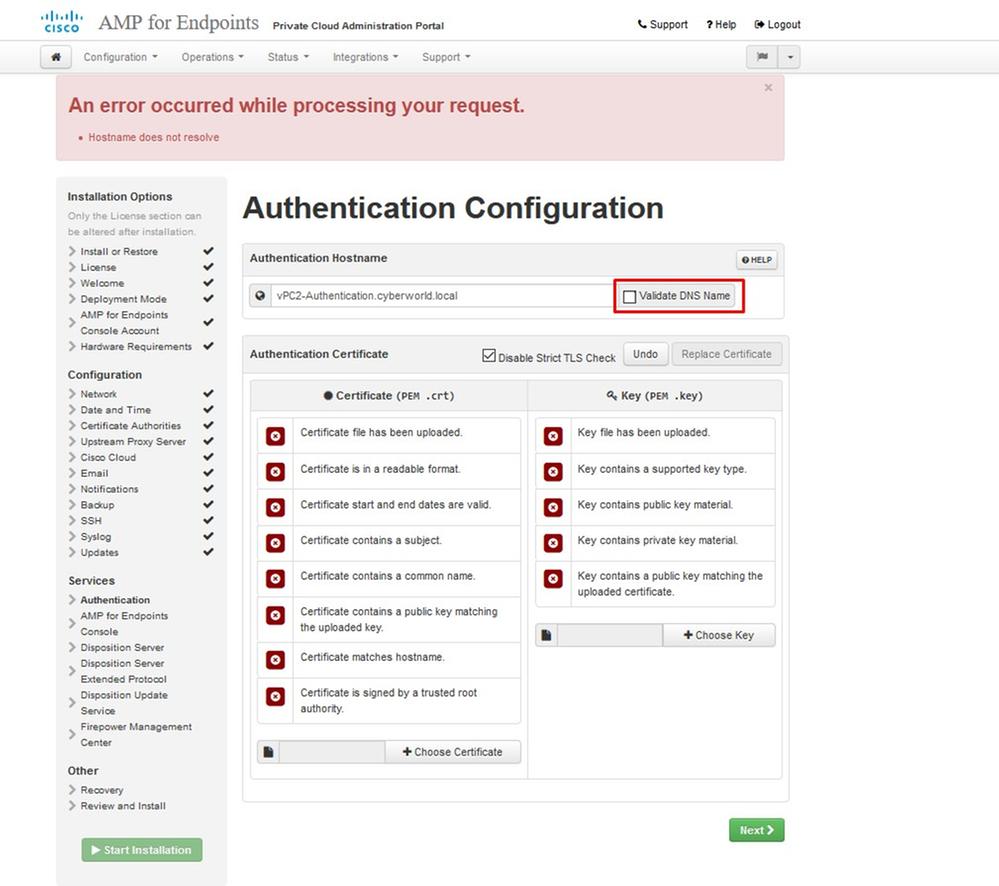
The next error you get is if you leave “Validate DNS Name” checked. Here you have two choices.
#1: Either un-check the Validate DNS check mark
#2: Return to your DNS Server and configure rest of your host records.
Now repeat the same process five more times for the rest of the certificates.
Authentication
- The Authentication service be used in future versions of Private Cloud to handle user authentication.
Secure Endpoint Console
- Console is the DNS name where the Secure Endpoint administrator can access the Secure Endpoint Console and Secure Endpoint Connectors receive new policies and updates.
Disposition Server
- Disposition Server is the DNS name where the Secure Endpoint Connectors send and retrieve cloud lookup information.
Disposition Server - Extended Protocol
- Disposition Server - Extended Protocol is the DNS name where newer Secure Endpoint Connectors send and retrieve cloud lookup information.
Disposition Update Service
- Disposition Update Service is used when you link a Cisco Threat Grid appliance to your Private Cloud device. The Threat Grid appliance is used to send files for analysis from the Secure Endpoint Console and the Disposition Update Service is used by Threat Grid to update the disposition (clean or malicious) of files after they have been analyzed.
Firepower Management Center
-Firepower Management Center Link lets you link a Cisco Firepower Management Center (FMC) device to your Private Cloud device. This allows you to display Secure Endpoint data in your FMC dashboard. For more information on FMC integration with Secure Endpoint see your FMC documentation.
Caution: hostnames cannot be changed once the device has finished the installation.
Make a note of the required hostnames. You need to create six unique DNS A records for the Secure Endpoint Private Cloud. Each record points to the same IP Address of the Virtual Private Cloud Console interface (eth1) and must be resolved by both the Private Cloud and the Secure Endpoint.
Step 3:
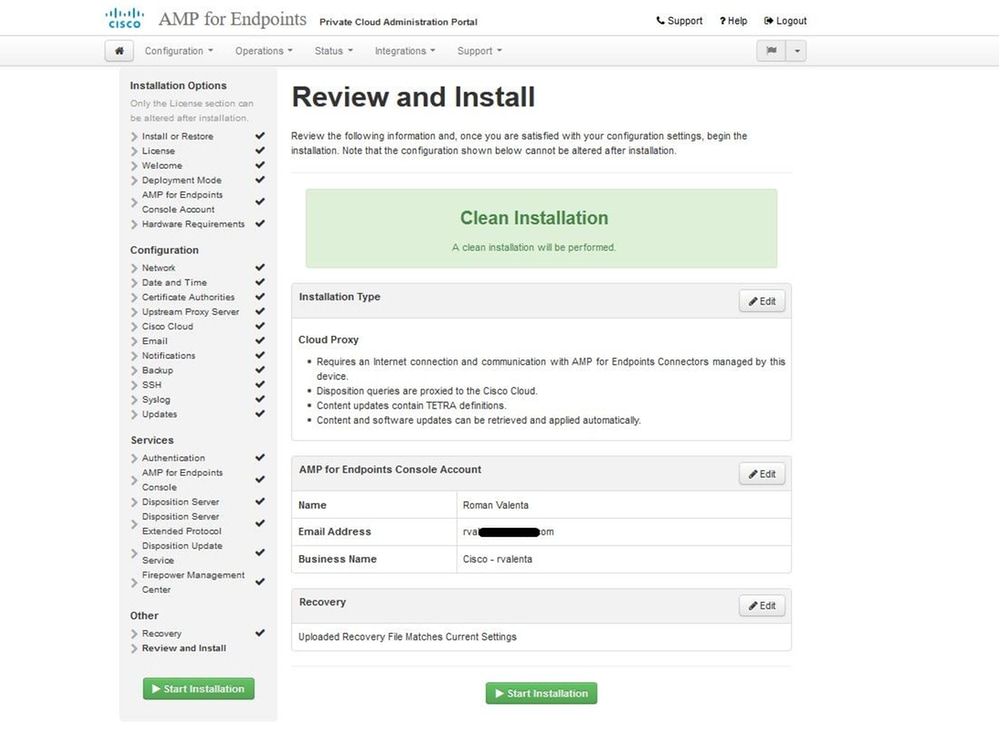
On next page download and then verify Recovery File.
You get the Recovery page, as shown in the image. You must download and verify a backup of your configuration before the start of the installation. The recovery file contains all of the configuration as well as the server keys. If you lose a recovery file, you are unable to restore your configuration and all Secure Endpoint connectors have to be reinstalled. Without an original key, you have to reconfigure the entire private cloud infrastructure with new keys. The recovery file contains all the configurations related to the opadmin portal. The backup file contains the contents of recovery file as well as any dashboard portal data like events, connector history and so on. If you would like to restore just the opadmin without the event data and all, you can use the recovery file. If you restore from the backup file, then the opadmin and dashboard portal data be restored.
Select on Download to save the backup to your local computer. Once the file has been downloaded, select on Choose File to upload the backup file and verify that it is not corrupt. Select on Next to verify the file and proceed.

︾ ︾ AIRGAP ONLY ︾ ︾

Note: These steps are applicable only for physical appliance.
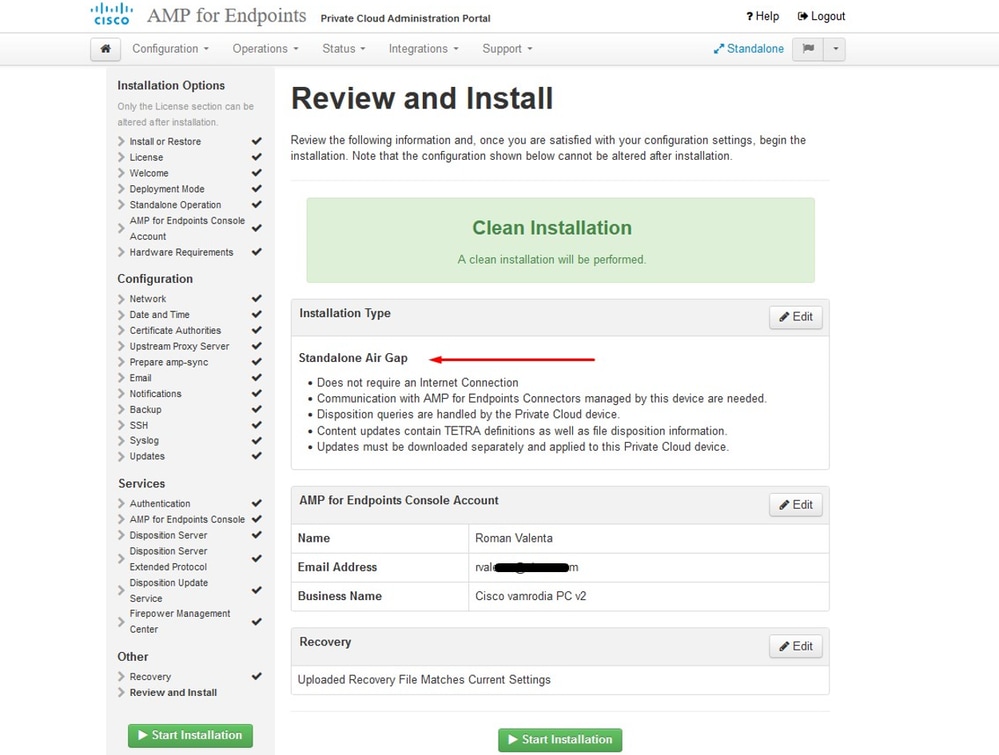
︽ ︽ AIRGAP ONLY ︽ ︽
You see similar input like this…
Caution: When you are on this page do not refresh as it can cause issues.
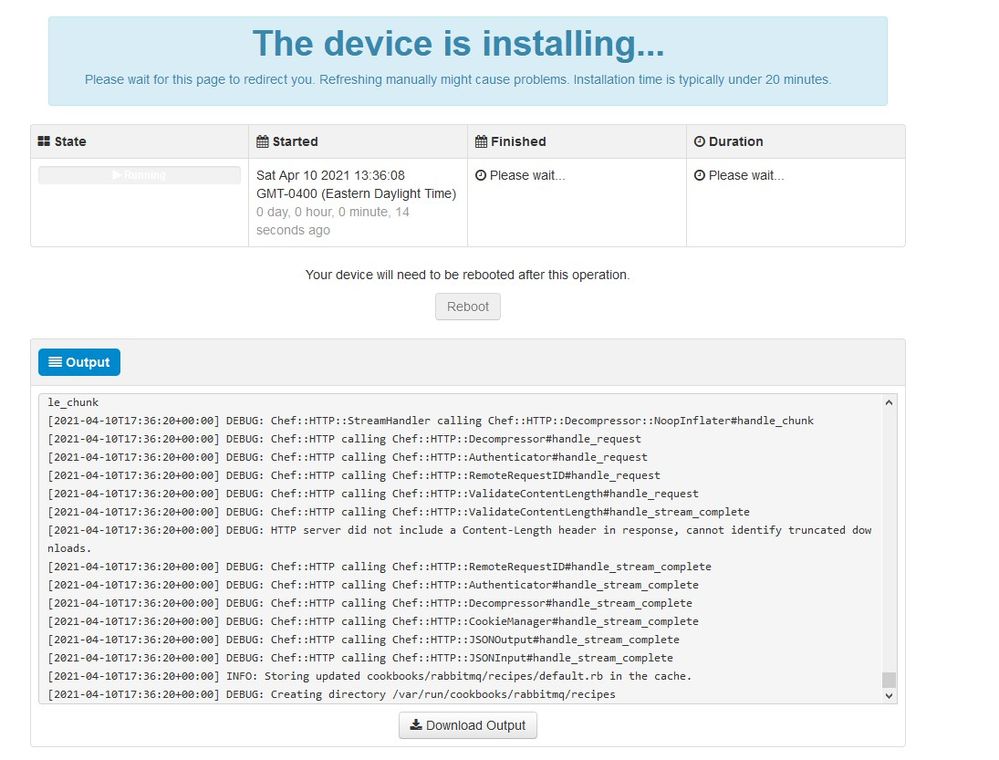
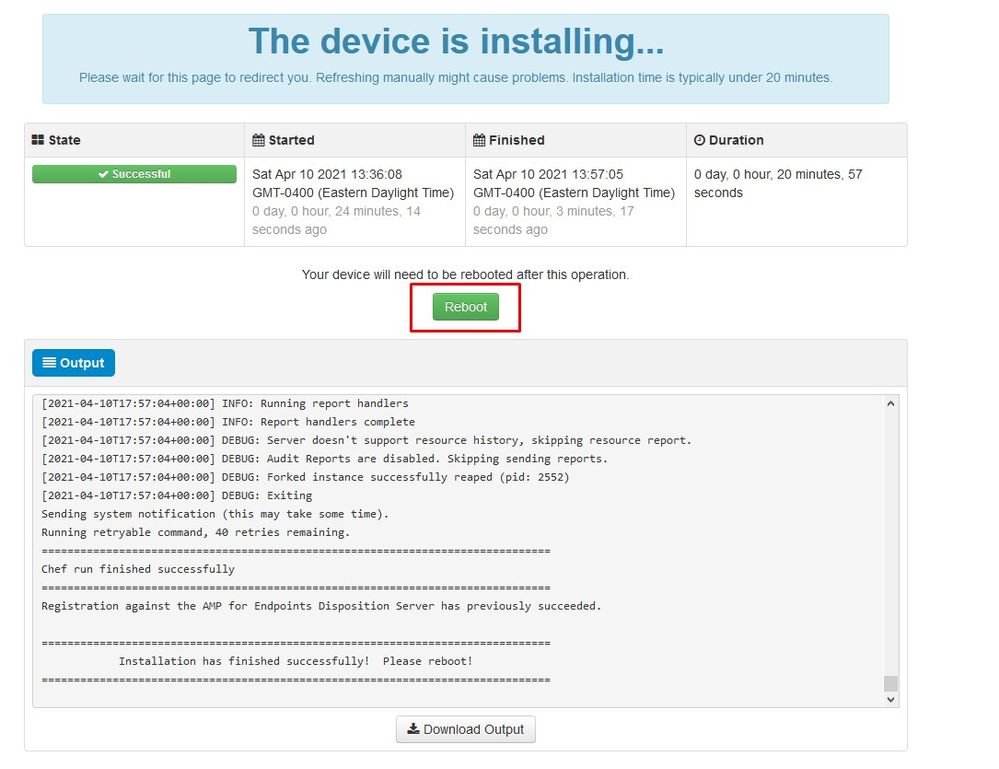
Once the installation is done hit the reboot button
︾ ︾ AIRGAP ONLY ︾ ︾

Note: These steps are applicable only for physical appliance.
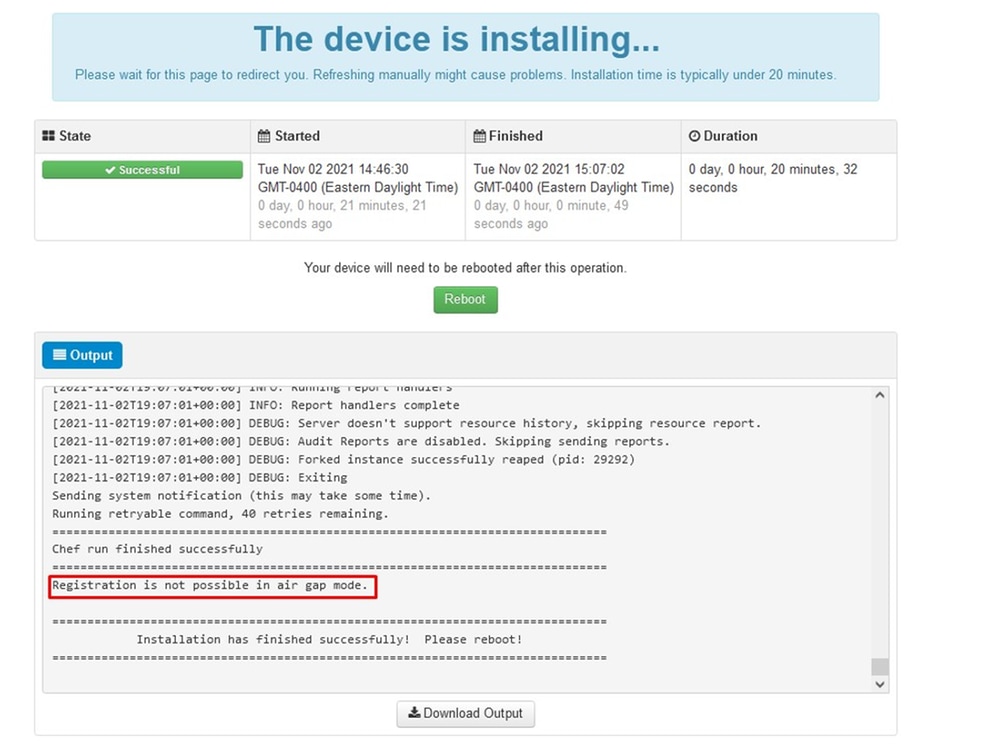
︽ ︽ AIRGAP ONLY ︽ ︽

Note: These steps are applicable only for physical appliance.
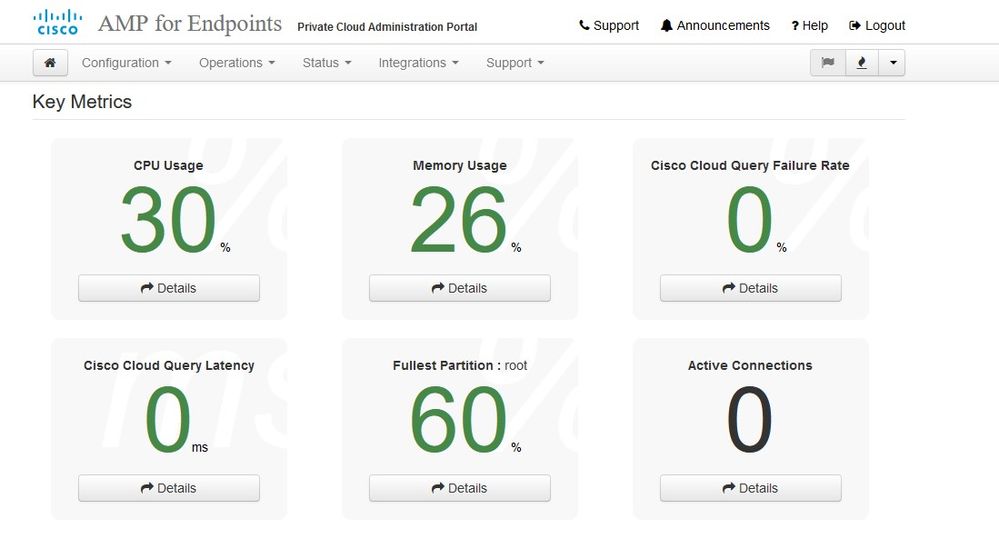
Once the appliance is fully booted, next time you log in with your admin interface you get presented with this dashboard. You might notice high CPU at the beginning but if you give few minutes it gets settle down.
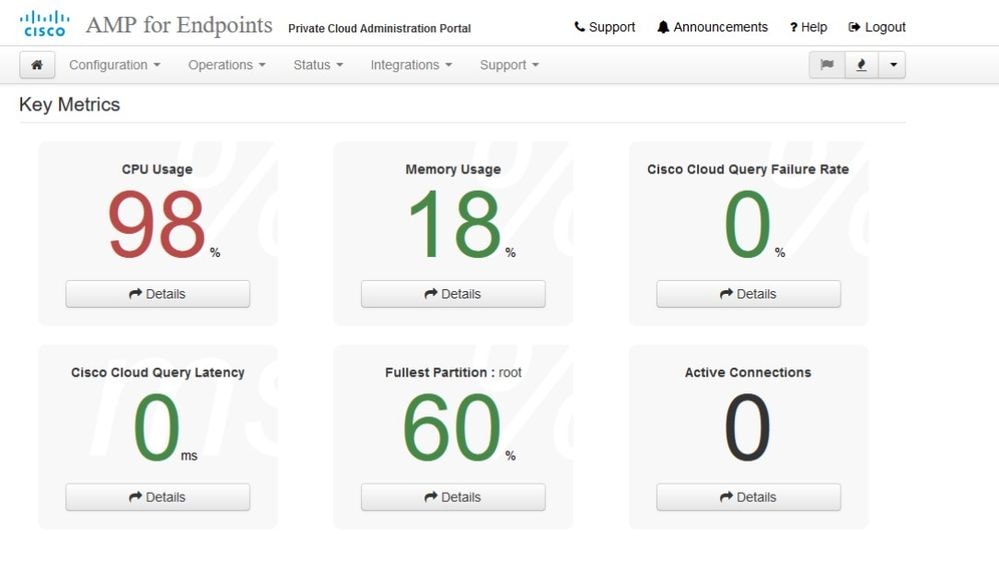
After few minutes...
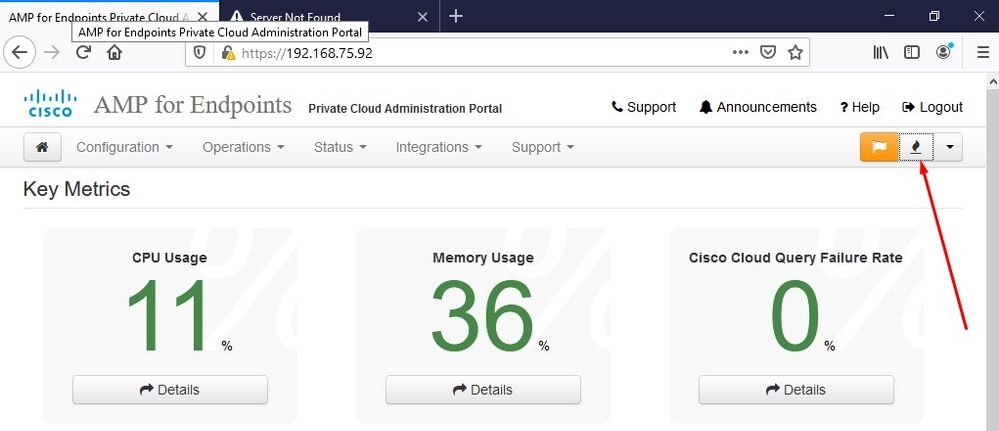
From here you navigate to Secure Endpoint console. Click on the little icon that looks like fire in right corner next to the flag.
︾ ︾ AIRGAP ONLY ︾ ︾

Note: These steps are applicable only for physical appliance.
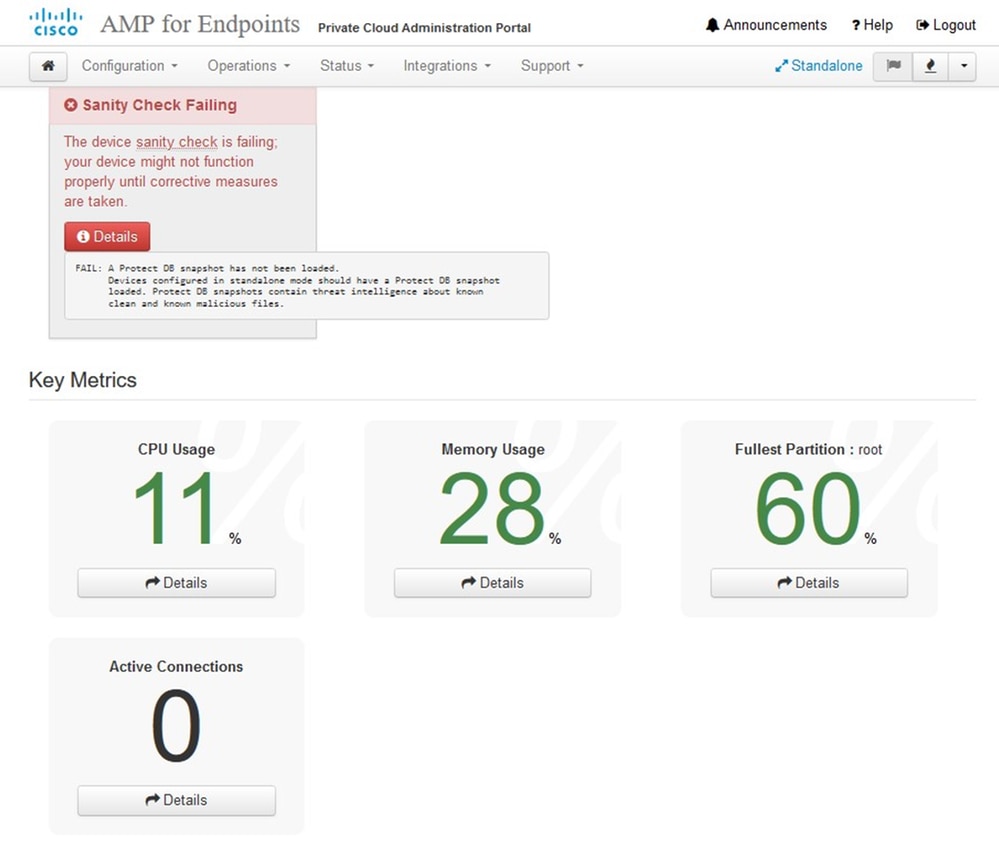
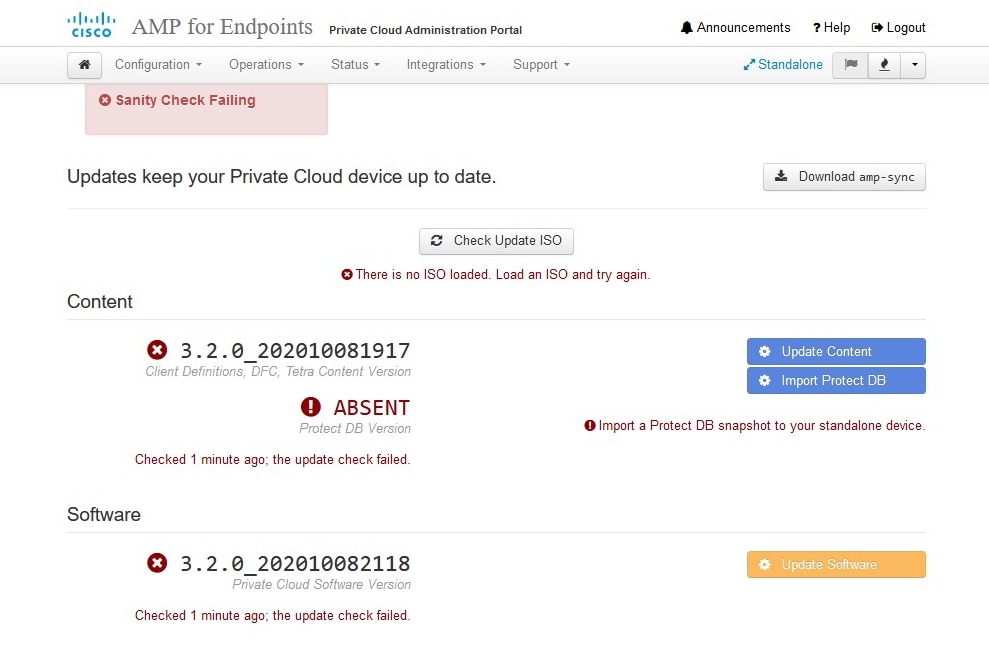
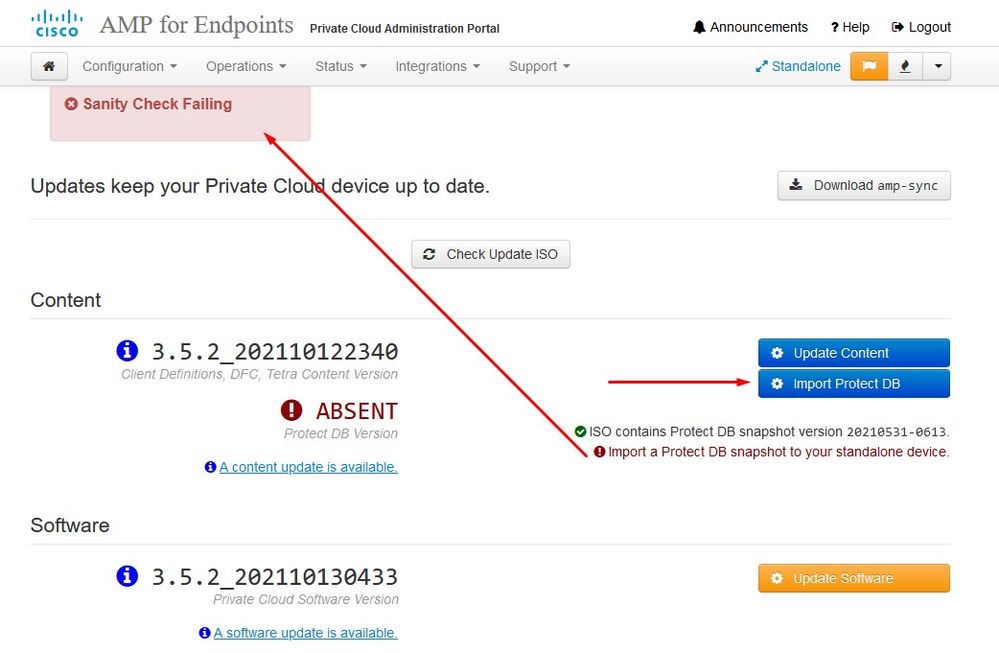
As you can see, we failed sanity check due to DB Protect Snapshot , also Client Definitions, DFC and Tetra. This must be done by offline update via downloaded ISO file previously prepared through amp-sync and uploaded to NFS location.
AirGap Update Package
For the first time we have to use this command in order to receive the Protect DB
./amp-sync allNote: Download all the packages via this command and then verify could take long time. Depend on the speed and link quality. In my case with 1Gig fiber it still end up take almost 25hrs to complete. Partially this is also due to fact that this download is directly from AWS and hence is throttled. Lastly note that this download is rather big. In my case the downloaded file was 323GB.
In this example we used CygWin64
1. Download and install the x64 version of Cygwin.
2. Run setup-x86_64.exe and go through the installation process choose all the defaults.
3. Choose a download mirror.
4. Select packages to install:
All -> Net -> curl
All -> Utils -> genisoimage
All -> Utils -> xmlstarlet
* VPC 3.8.x up - > xorriso
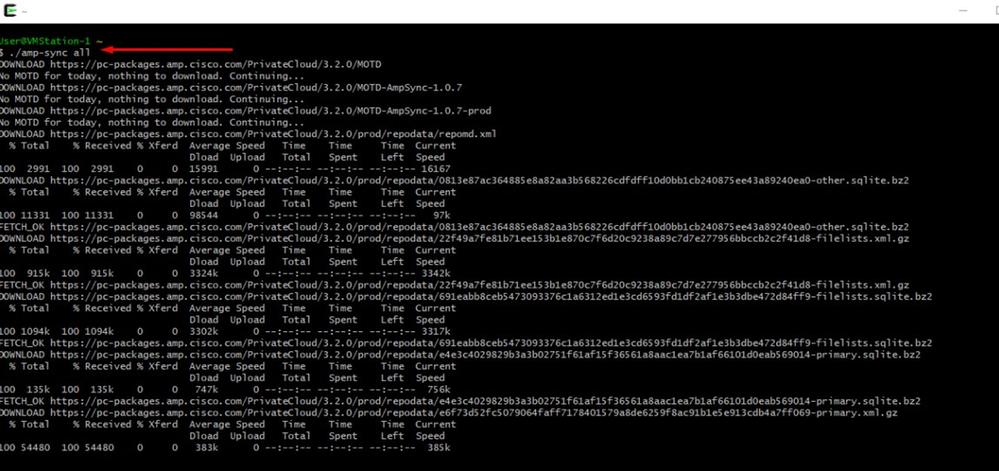
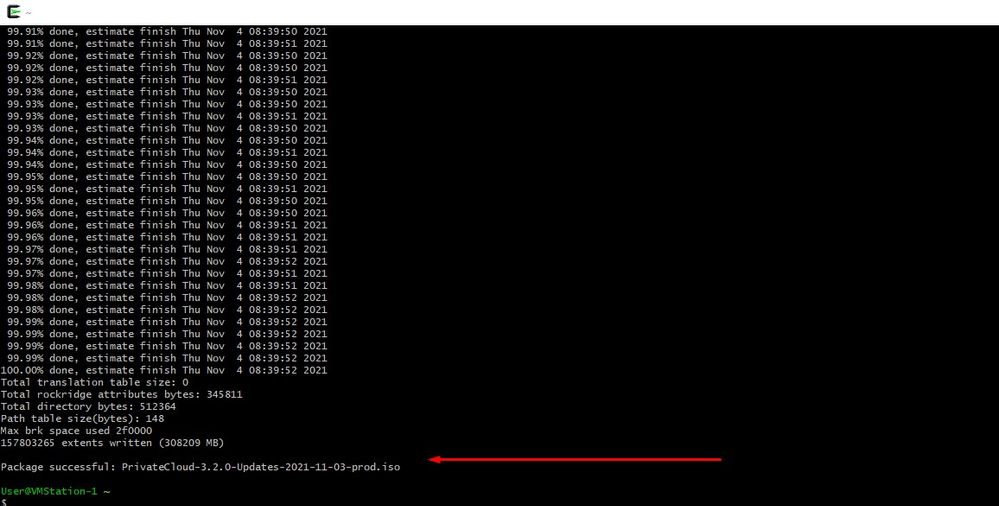

Note: In the newest update VPC 3.8.x with CygWin64 as your main downloading tool you can encounter this issue described below.
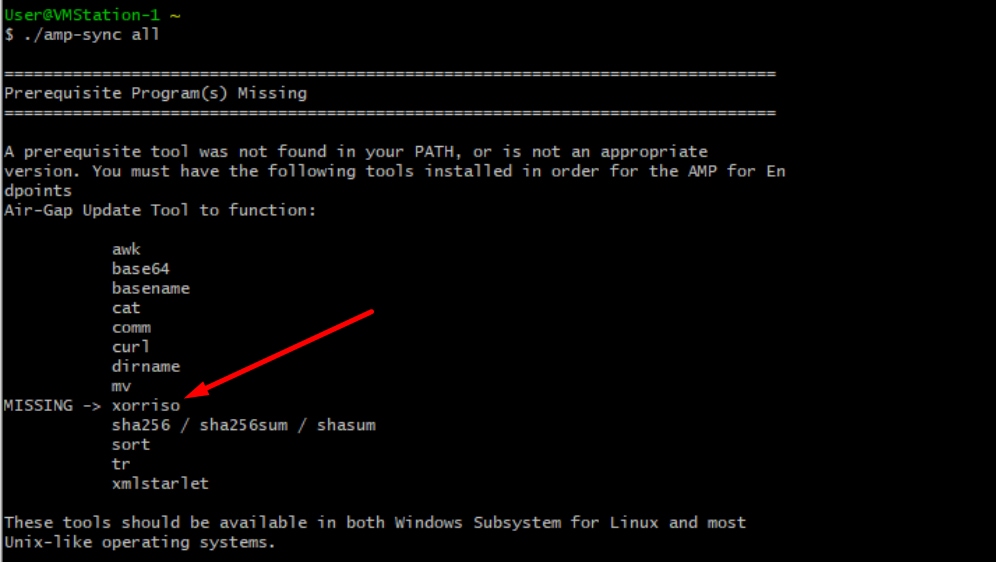
Release notes Page #58. As you can see “xorriso” is now required. We changed the format of the ISO to the ISO 9660 and that dependency is what converts the image to proper format so the update can complete. Unfortunately, CygWin64 do not offer xorriso in any of their built-in repositories. However, for those that would still like to use CygWin64 there is a way to overcome this issue.
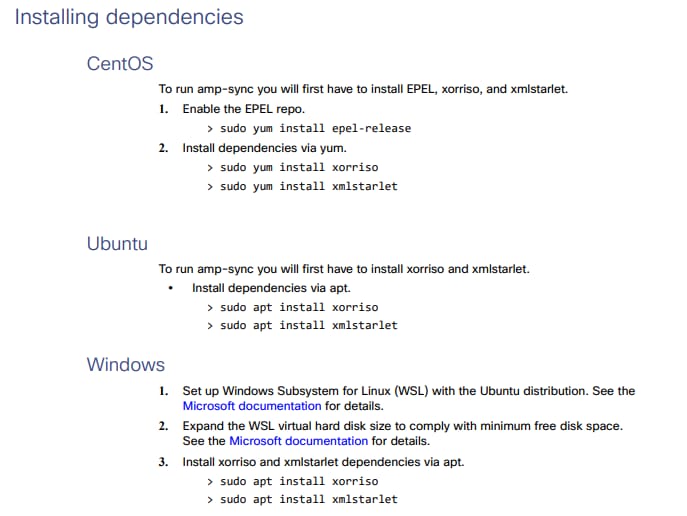
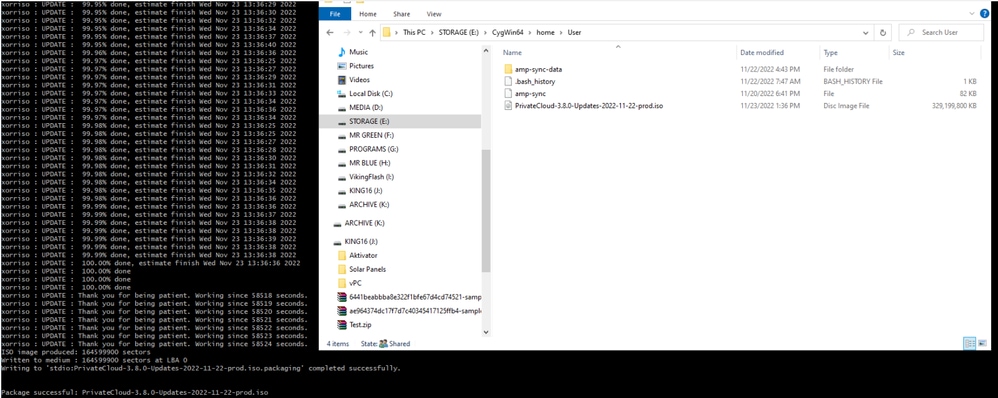
To be able use CygWin once again you must to manually download xorriso from GitHub repository. Open your browser and type <Latest xorriso.exe 1.5.2 pre-build for Windows> it should come up as first link named as <PeyTy/xorriso-exe-for-windows – GitHub> navigate to that GitHub page and download <xorriso-exe-for-windows-master.zip> file inside of the zip file you find among few other file named <xorriso.exe> copy and paste this file in to <CygWin64\bin> path of your local CygWin installation. Try again run <amp-sync> command. You should no longer see the error message and download start and finish as shown in the picture.
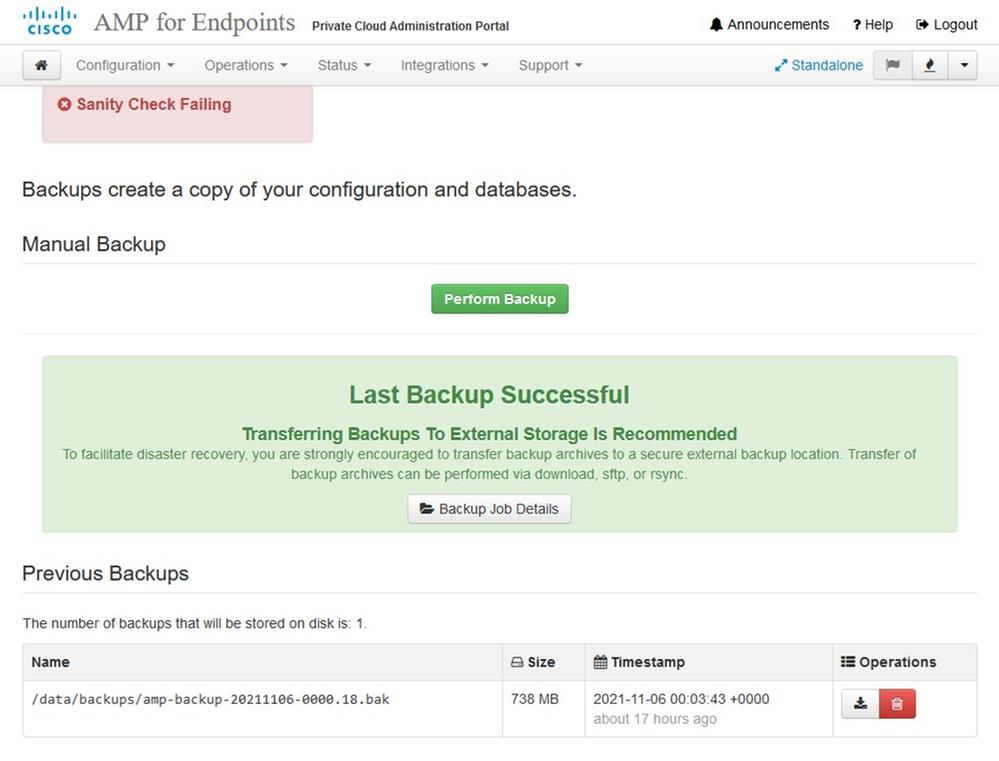
Perform the backup of the current (in this case) 3.2.0 VPC in Airgap Mode.
You can use this command form CLI
rpm -qa | grep Pri
Or you can also Navigate to Operations > Backups, as shown in the image and Perform Backup there.
Transfer the latest ISO generated with amp-sync to the VPC. This can take up to several hours as well based on your speed. In this case the transfer took over 16Hrs
/data/tmp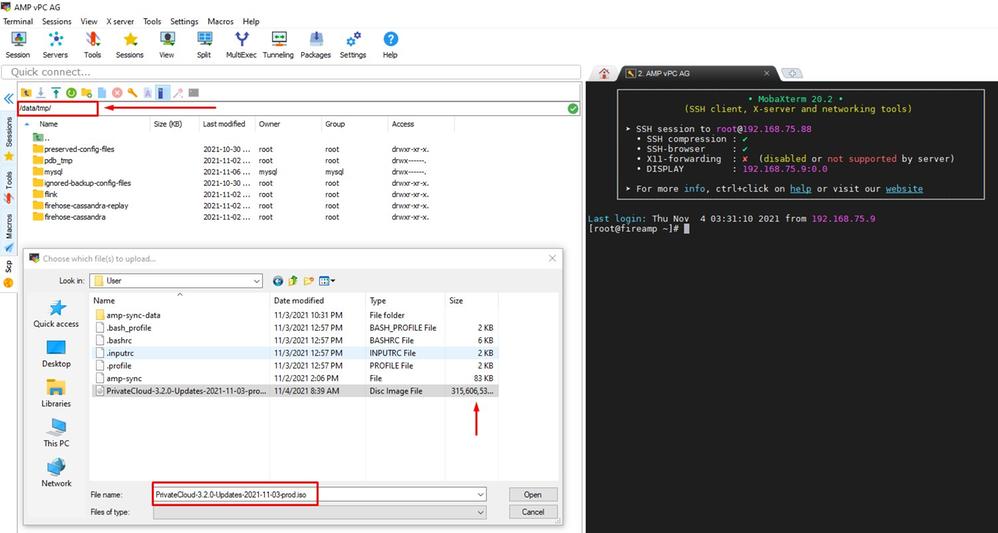
After the upload is done mount the ISO
mount /data/tmp/PrivateCloud-3.2.0-Updates-2021-11-03-prod.iso /data/updates/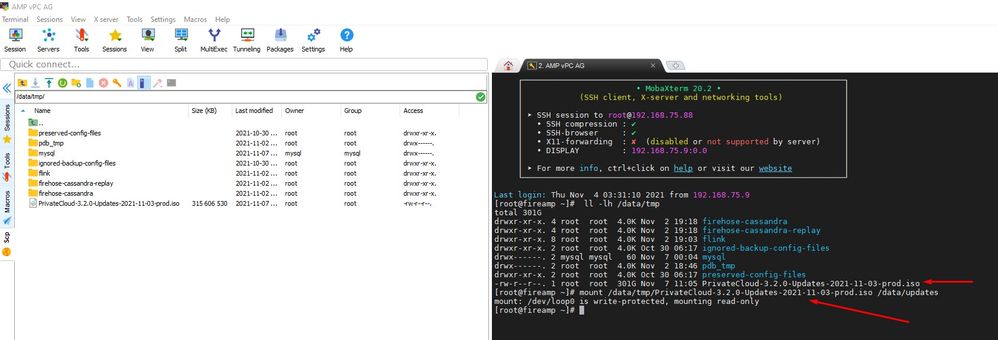
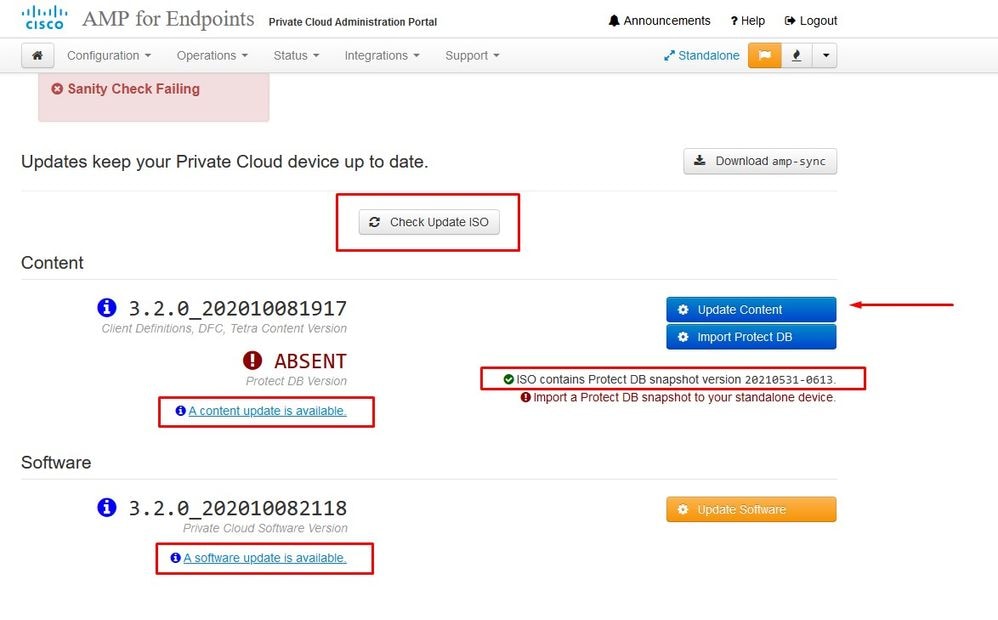
Navigate to opdamin UI to perform the update Operations > Update Device > Select Check update ISO.
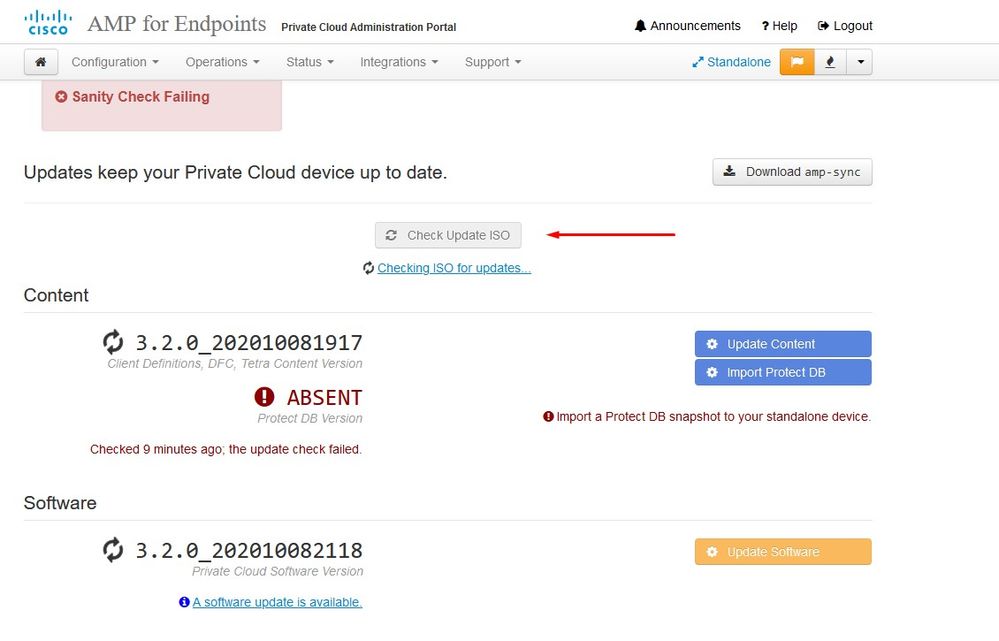
In this example I proceed with Update Content first
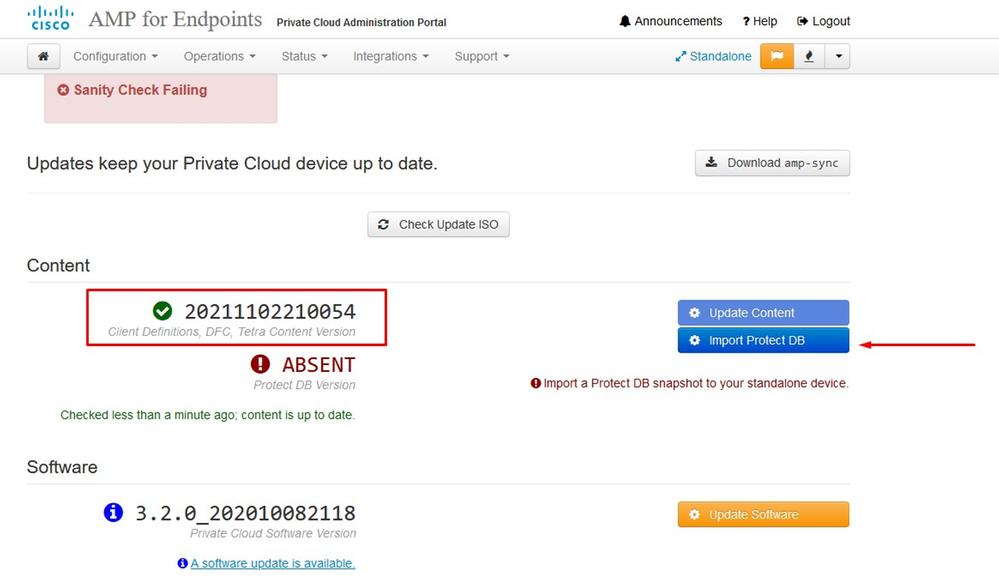
Then select Import Protect DB.
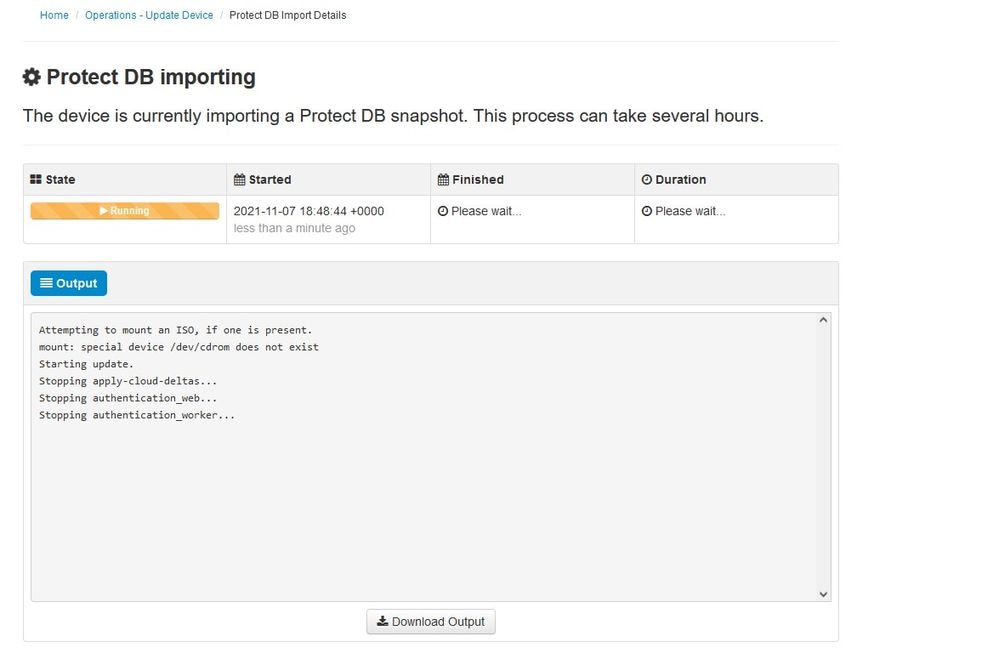
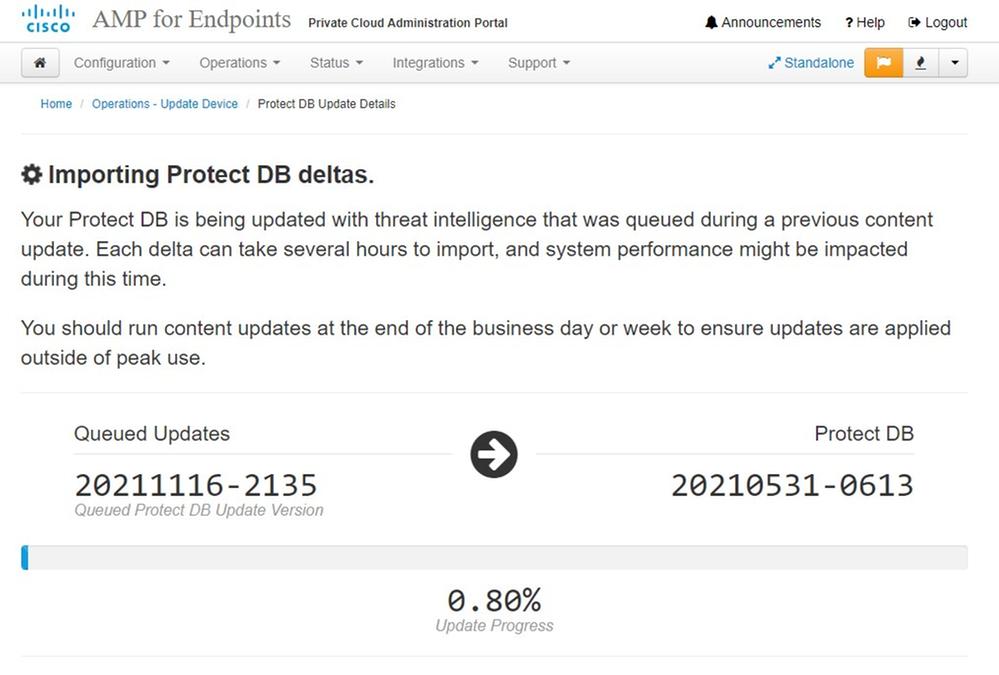
As you can see this is another very lengthy process that can take long time to complete.
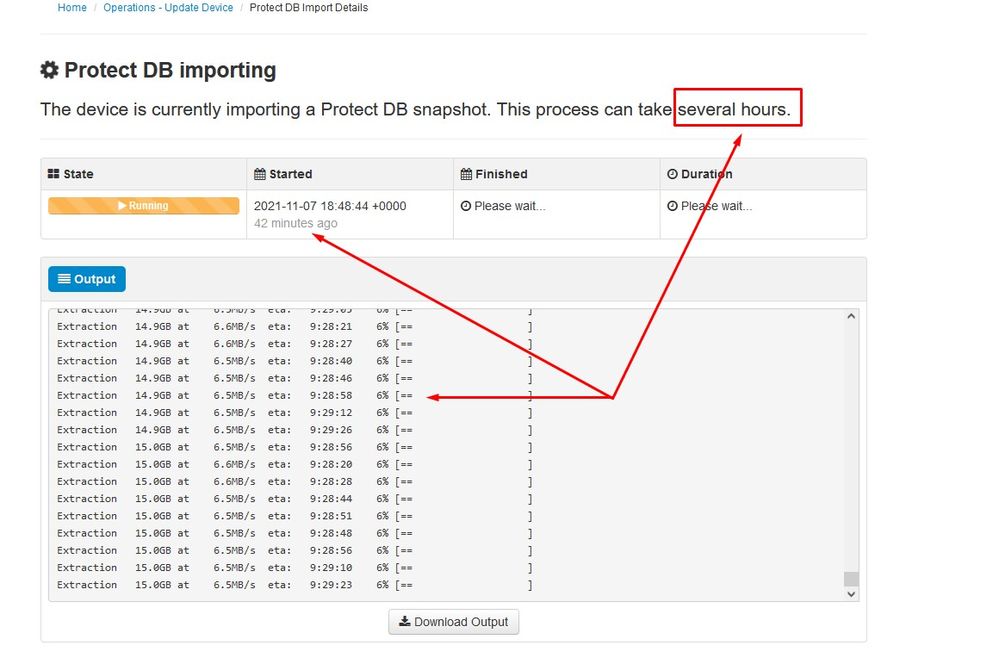

Problem #1 - Exhausted room in Data Store
Here you can ran in to two issues. Since vPC prior to 3.5.2 don't have the ability to mount external NFS storage you have to upload the update ISO file to the /data/temp directory. In my case since my datastore was only 1TB I ran out of the room and the VM crashed. In other words you need at least 2TB of space on your Data Store to successfully deploy AirGap VPC that is bellow version 3.5.2
This image bellow is from the ESXi server which shows the error that there is no more available space on the HDD when you try to boot the VM. I was able to recover from this error by temporary switch the 128 GB RAM to 64GB. Then I was able to boot up again. Also remember that if you provision this VM as Thin Client the downside of the Thin Client deployment is that disk size can grow, but it wouldn't shrink even if you free up some space. In other word let’s say you uploaded your 300GB file to the directory of the vPC and then deleted. The disk in ESXi still show 300GB less space on your HDD

Problem #2 - Old Update
The 2nd problem is if you run the software update first like I did in my 2nd trial and from 3.2.0 I end up with VPC to upgrade to 3.5.2 and because of that I had to download brand new ISO update file since the 3.2.0 become invalid due to a fact that I was no longer on the original 3.2.0 version.
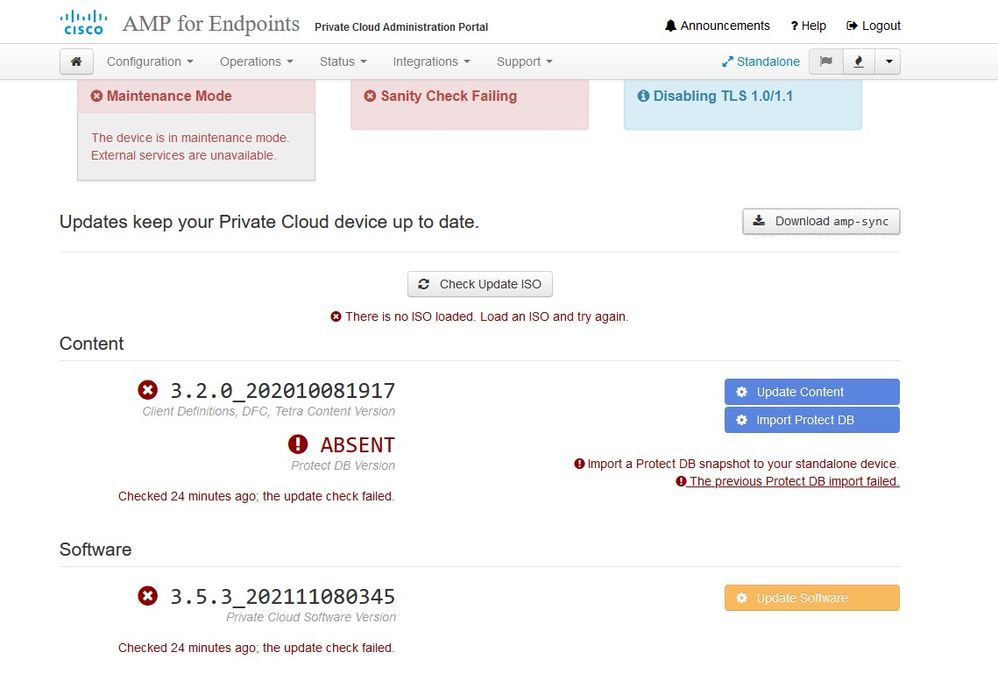
This is the error you see if you try mount the ISO update file again.
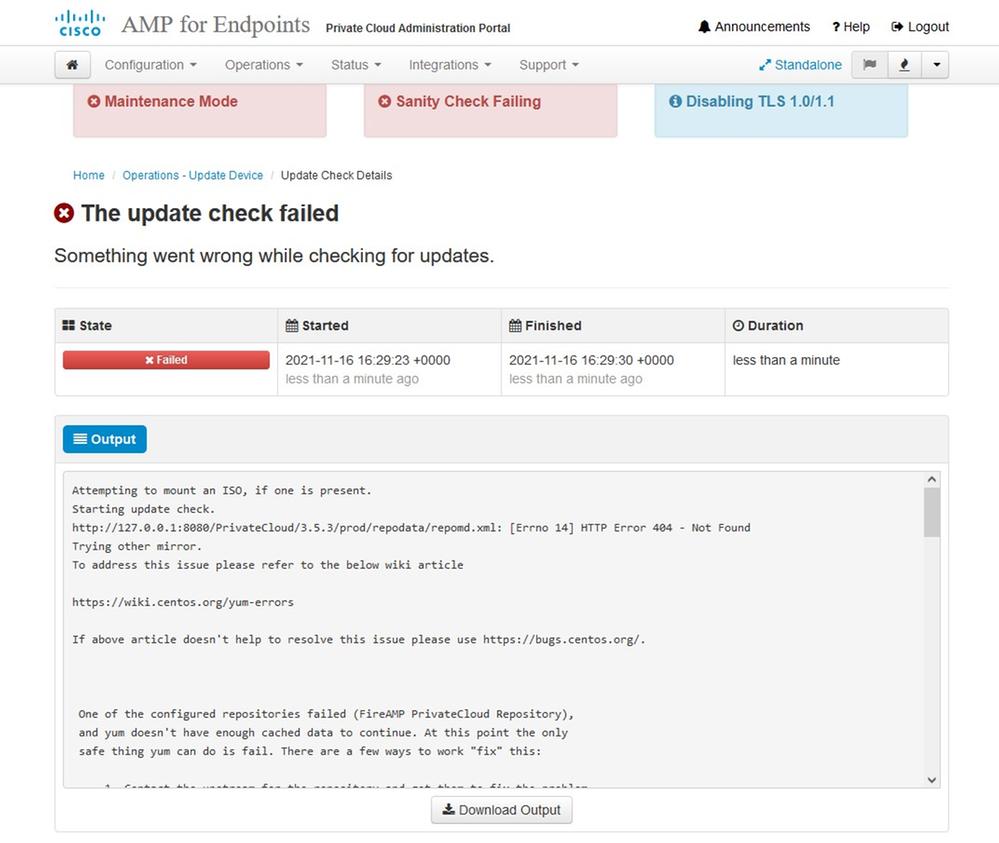
This picture shows alternative way how to mount update image to your VPC. In version 3.5.x you can use remote location such as NFS storage to share the update file with your VPC.
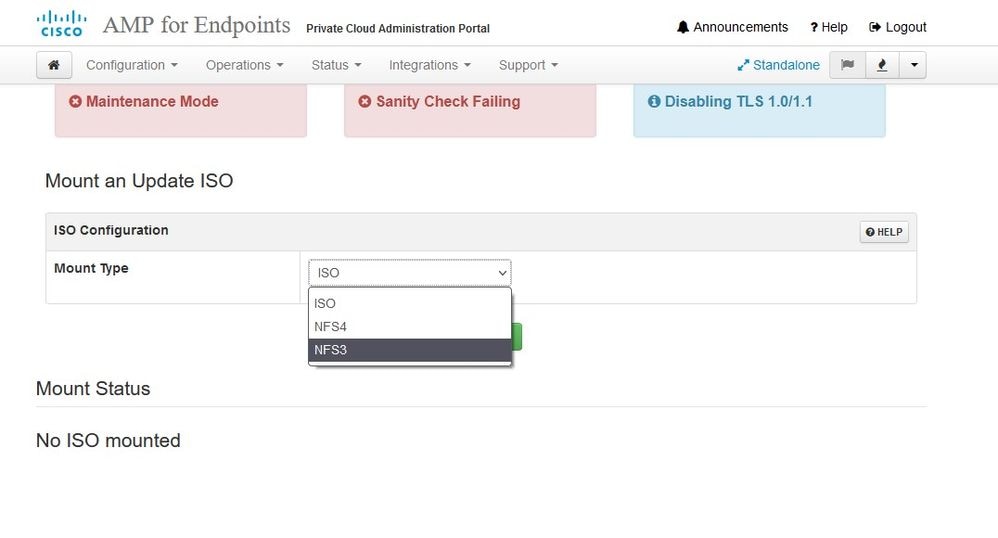
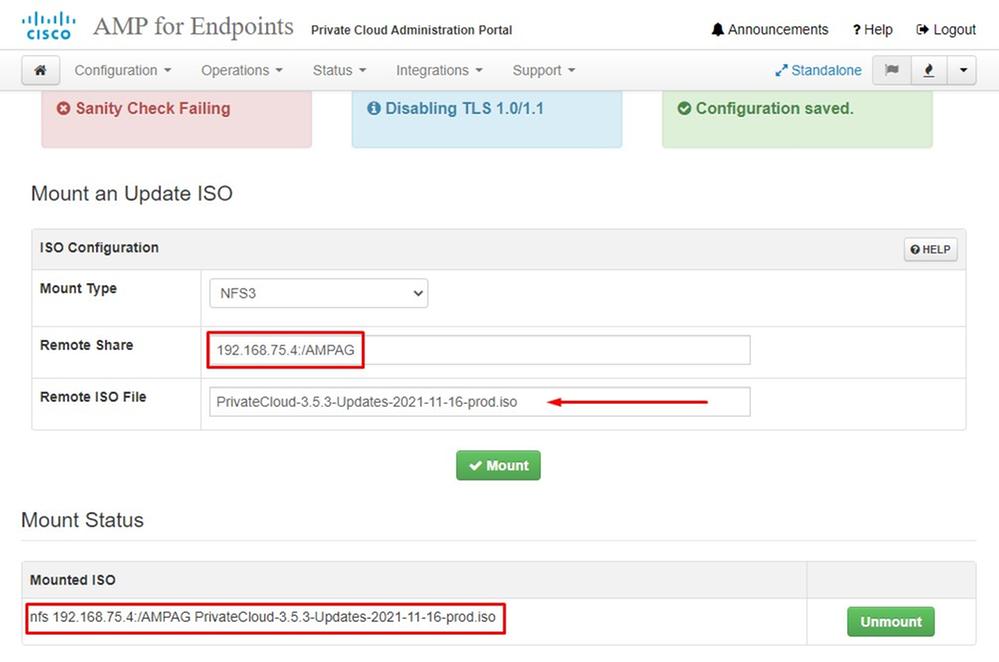
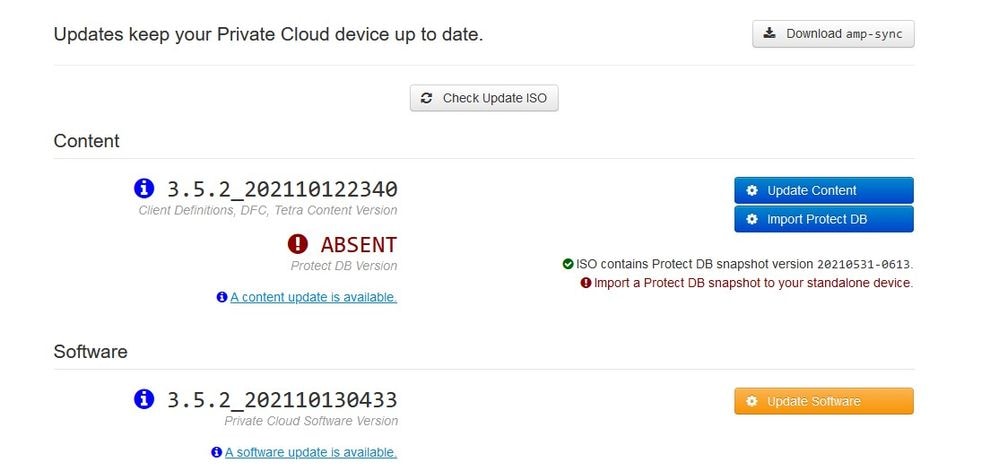
Sanity Check Failing is related to Protect DB not currently available on the VPC
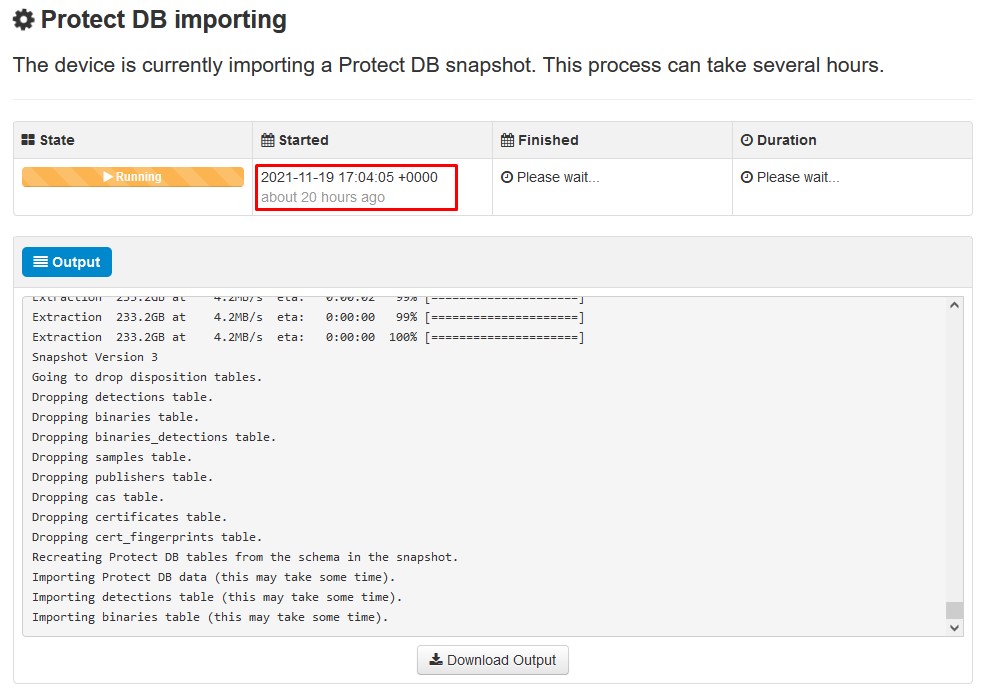
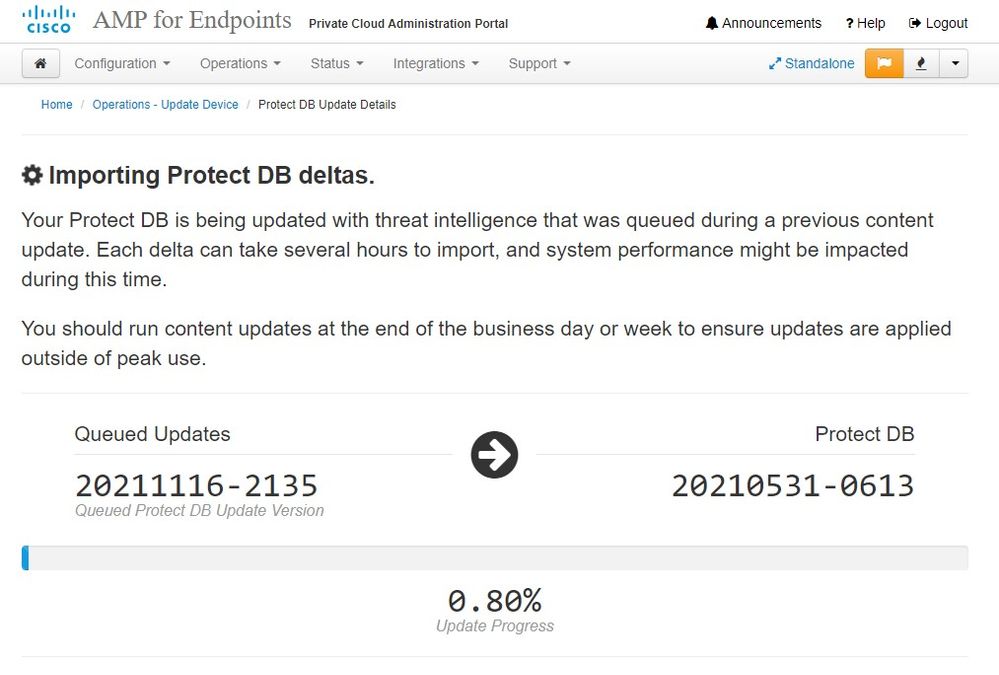
Next update start automatically
After this very lengthy process of the import Protect DB Database you can move and update Client Definition and Software which roughly can take additional 3+ Hrs.
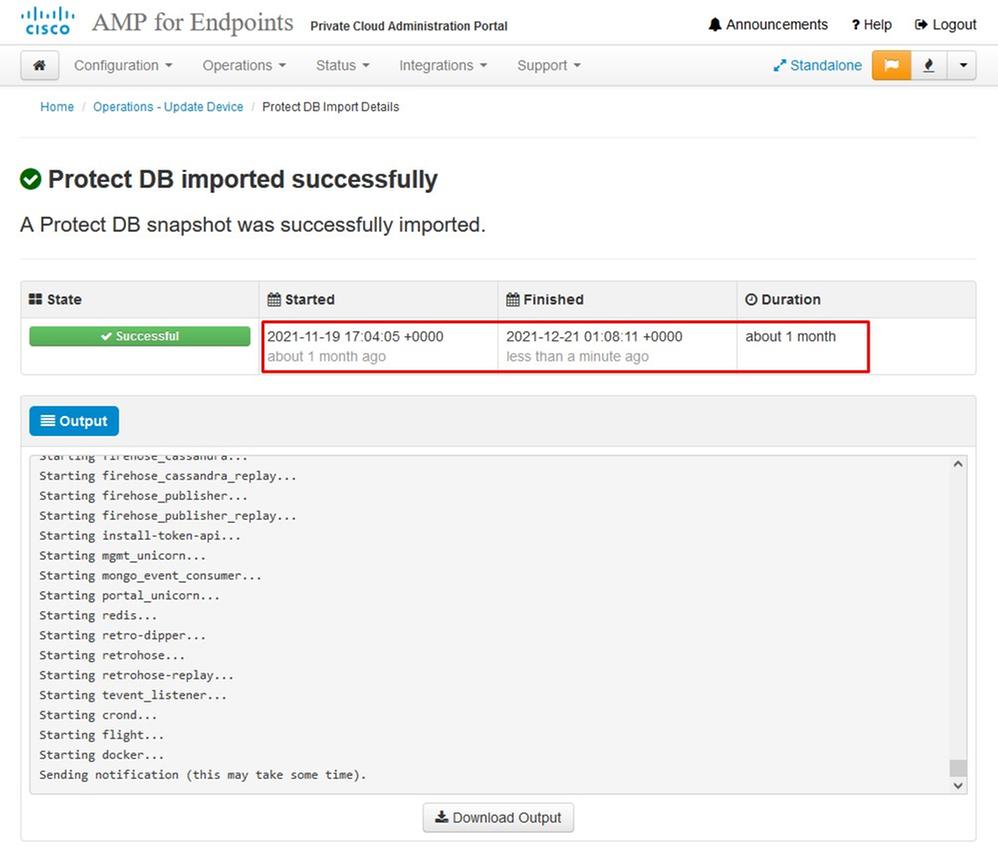
And finally done, please note that this process will take very long time.
For VPC appliance visit this TZ which contain other methods how to update HW Appliance, mount ISO file and boot from USB.
︽ ︽ AIRGAP ONLY ︽ ︽
Basic Troubleshooting
Problem #1 - FQDN and DNS Server
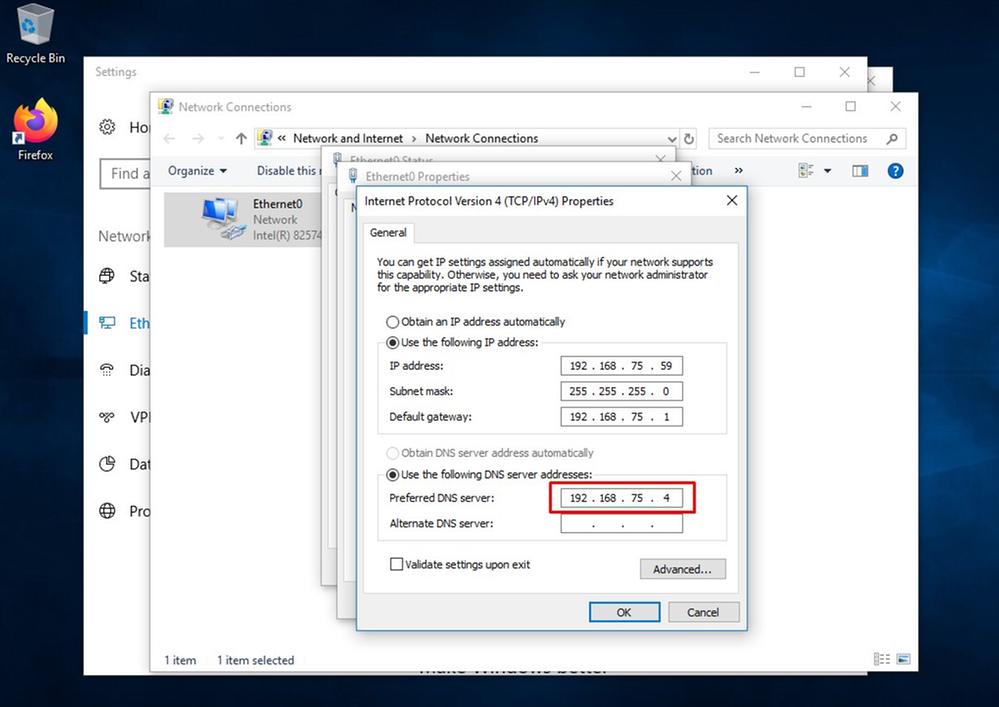
The first issue you can encounter is if your DNS server is not established and all FQDN are not properly recorded and resolved. The issue might look like this when you try navigate to Secure Endpoint console through Secure Endpoint "fire" icon. If you use just IP address it work, but you be not able to download the connector. As you can see in 3rd picture bellow.

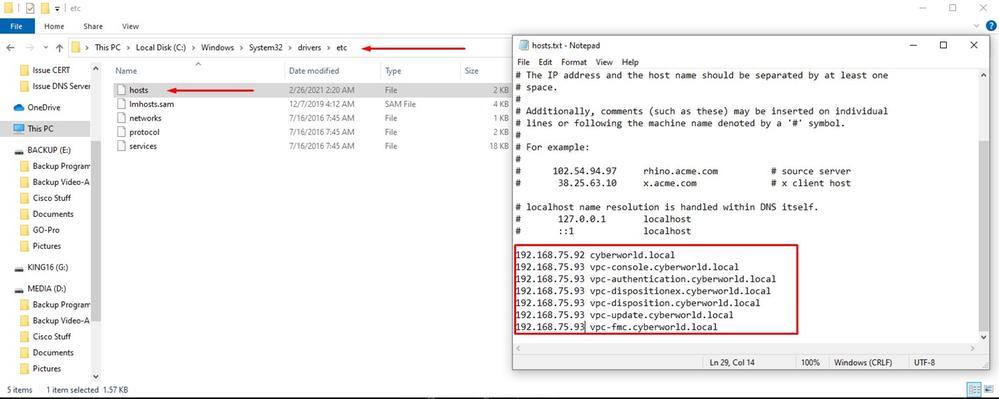
If you modify HOSTS file on your local machine like as shown in the image solve the issue and you end up with errors.
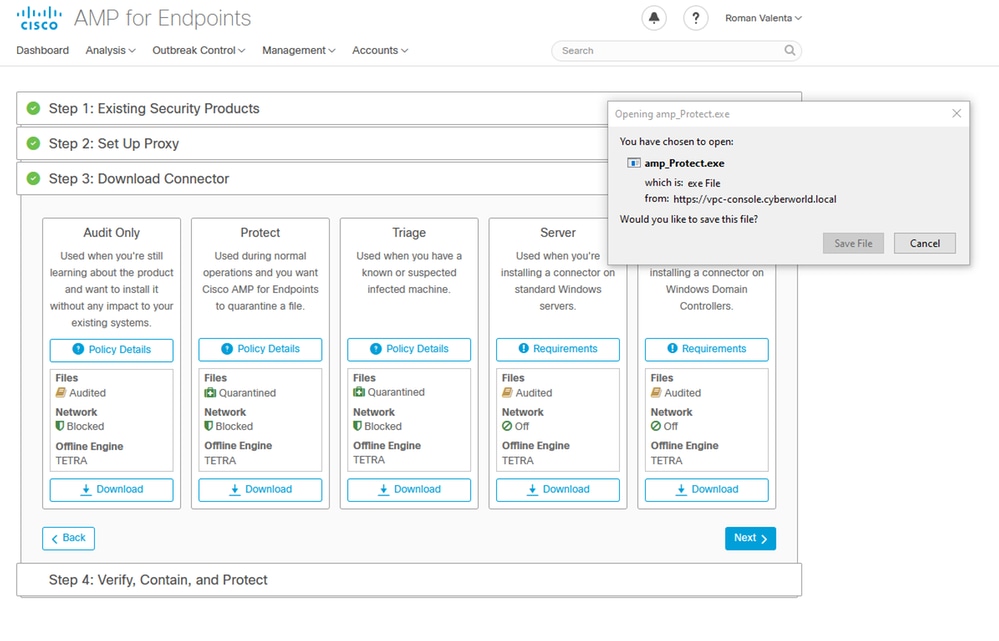
You receive this error while you try to download the Secure Endpoint connector installer.

After some troubleshooting, the only correct solution was to setup DNS server.
DNS Resolution Console: nslookup vPC-Console.cyberworld.local (Returned 1, start 2021-03-02 15:43:00 +0000, finish 2021-03-02 15:43:00 +0000, duration 0.047382799

================================================================================

Server:         8.8.8.x
Address:        8.8.8.x#53

** server can't find vPC-Console.cyberworld.local: NXDOMAIN
Once you record all FQDN's in your DNS server and change the record in Virtual Private Cloud from public DNS to your DNS Server everything start work as it supposed to.
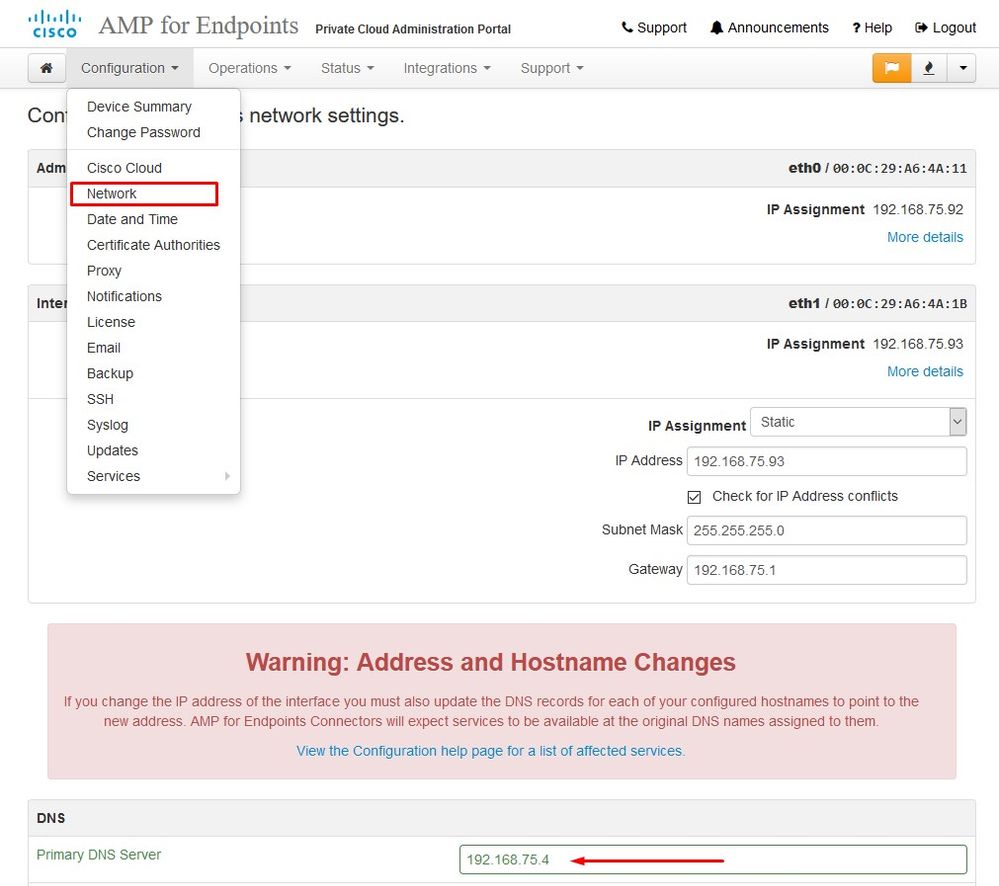

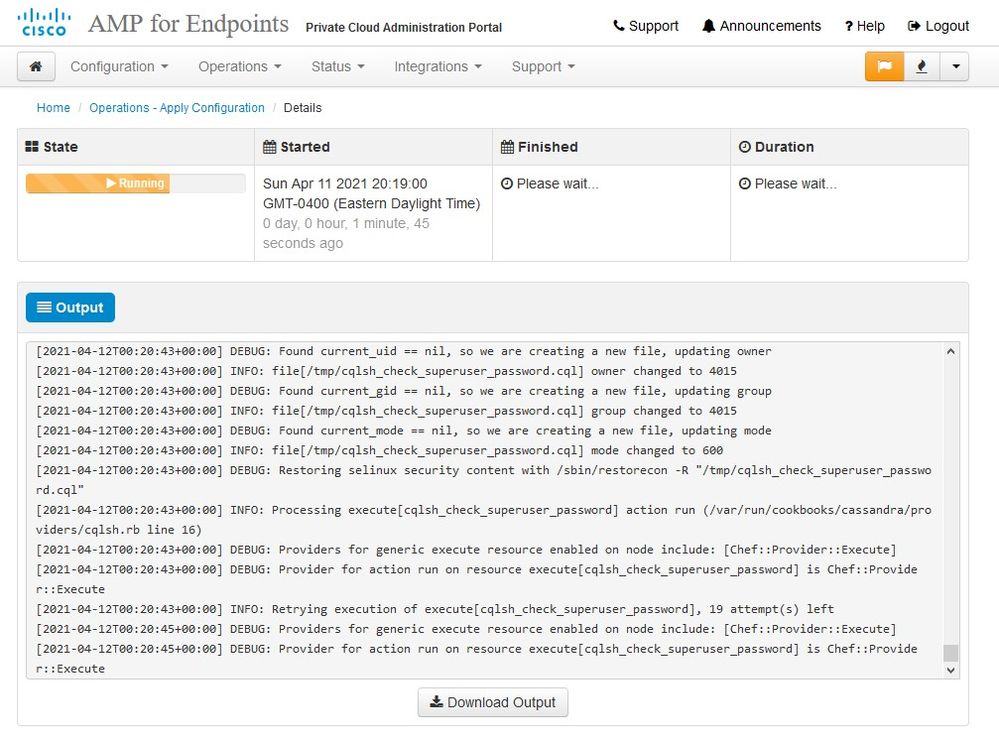
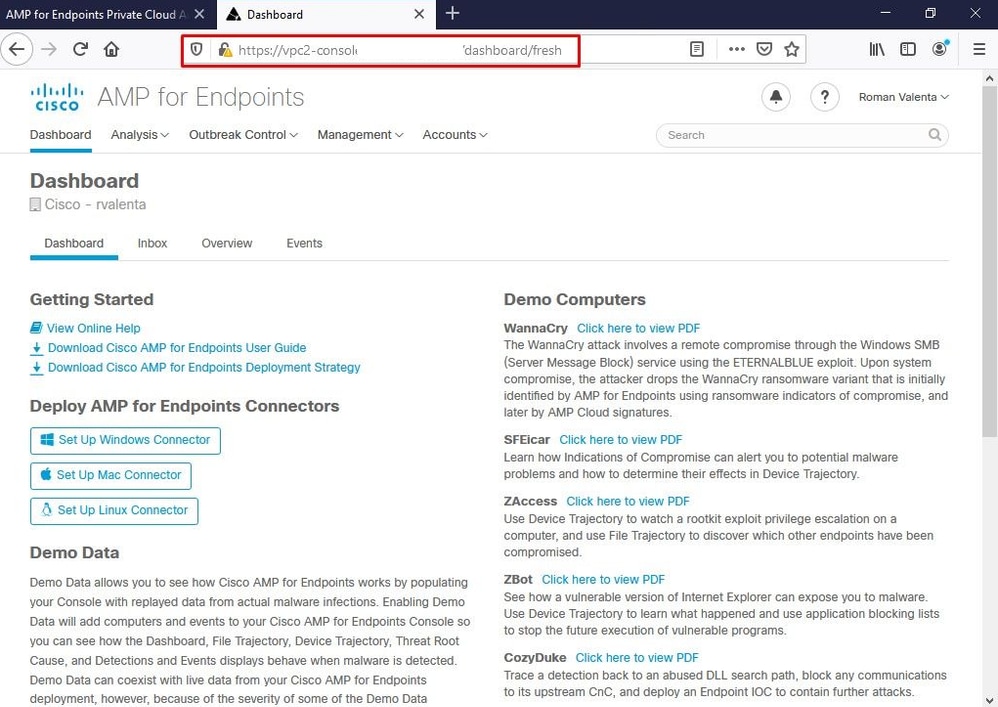
At this point you be able to log in and download the connector

You get the initial Secure Endpoint policy wizard for your environment. It walks you through the selection of anti-virus product you use, if any, as well as proxy , and the types of policies you wish to deploy. Select on appropriate Set Up... button depends on the operating system of the connector.
You get the Existing Security Products page, as shown in the image. Choose the security products you use. It automatically generates applicable exclusions to prevent performance issues on your endpoints. Select on Next.
Download connector.
Problem #2 - Issue with Root CA
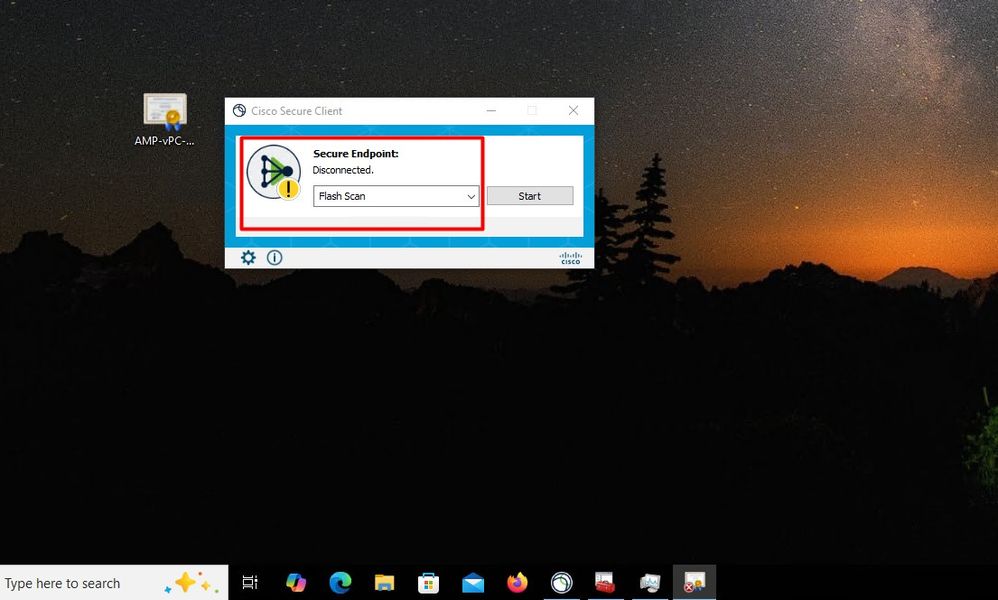
The next issue you can face is if you use your own in-house certificates is that after the initial install, connector can show as disconnected.
Once you install the connector Secure Endpoint can be seen as Disconnected. Run diagnostic bundle and look through the logs, you be able to determine the issue.
Based on this output collected from diagnostic bundle you can see the Root CA error
(804765, +0 ms) Mar 06 00:47:07 [8876]: [http_client.c@1011]: GET request https://vPC-Console.cyberworld.local/health failed (60): SSL peer certificate or SSH remote key was not OK (SSL certificate problem: unable to get local issuer certificate)

(804765, +0 ms) Mar 06 00:47:07 [8876]: [http_client.c@1051]: async request failed (SSL peer certificate or SSH remote key was not OK) to https://vPC-Console.cyberworld.local/health

(804765, +0 ms) Mar 06 00:47:07 [8876]: [http_client.c@1074]: response failed with code 60
Once you upload the Root CA into trusted Root CA store and restart the Secure Endpoint service. Everything start work as expected.
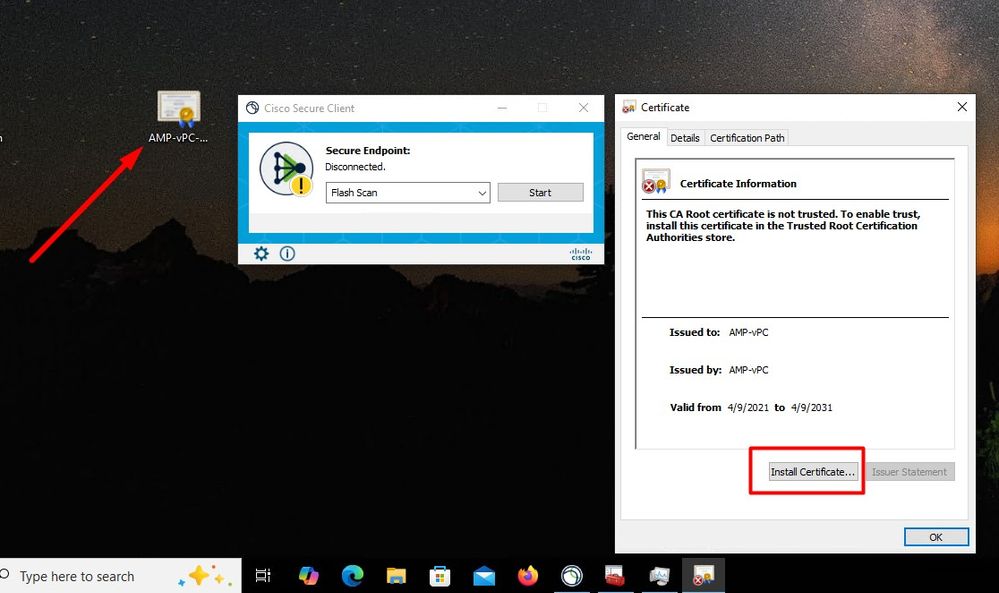
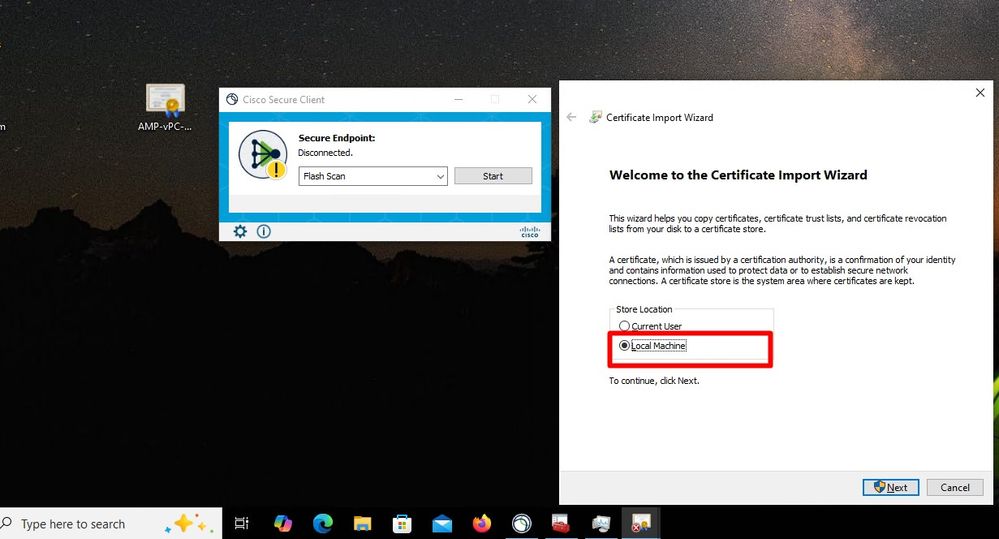
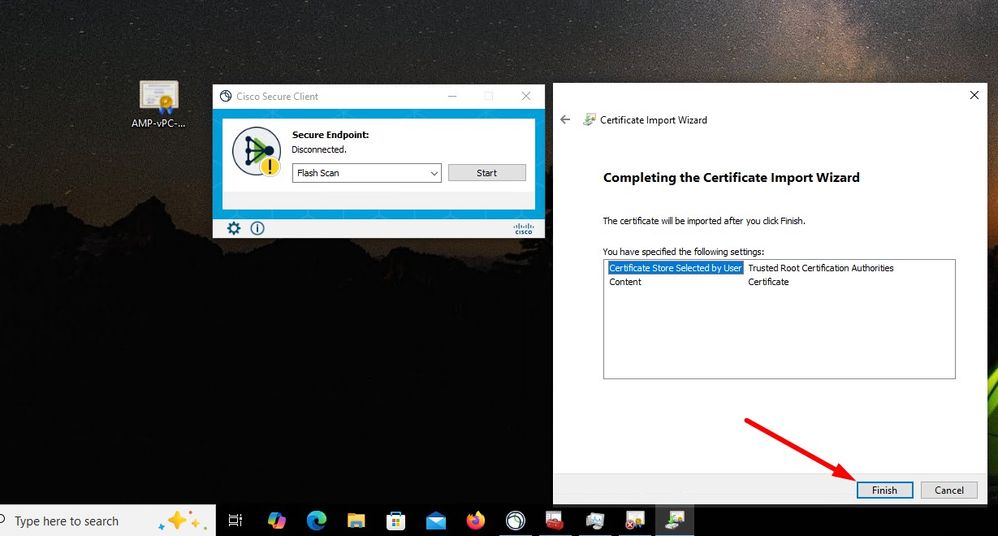
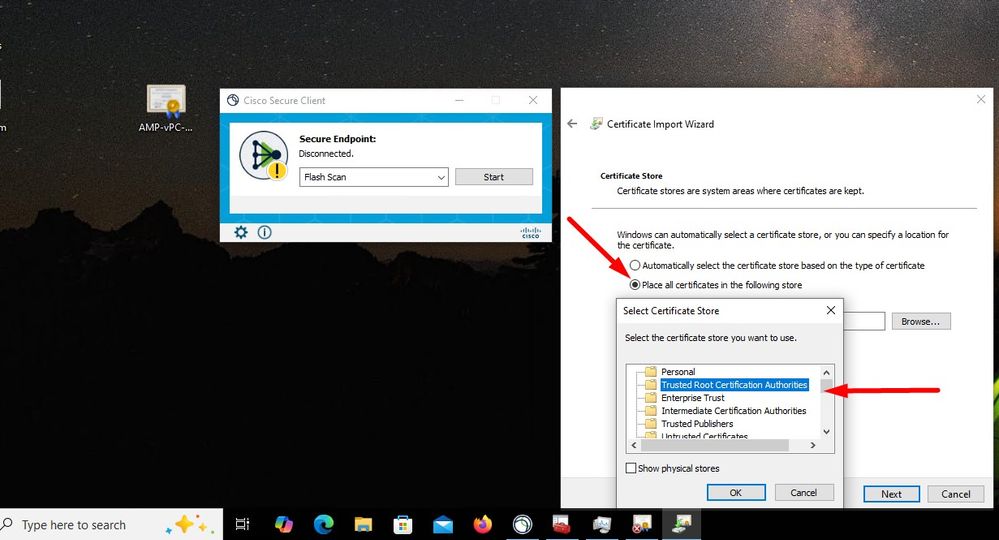
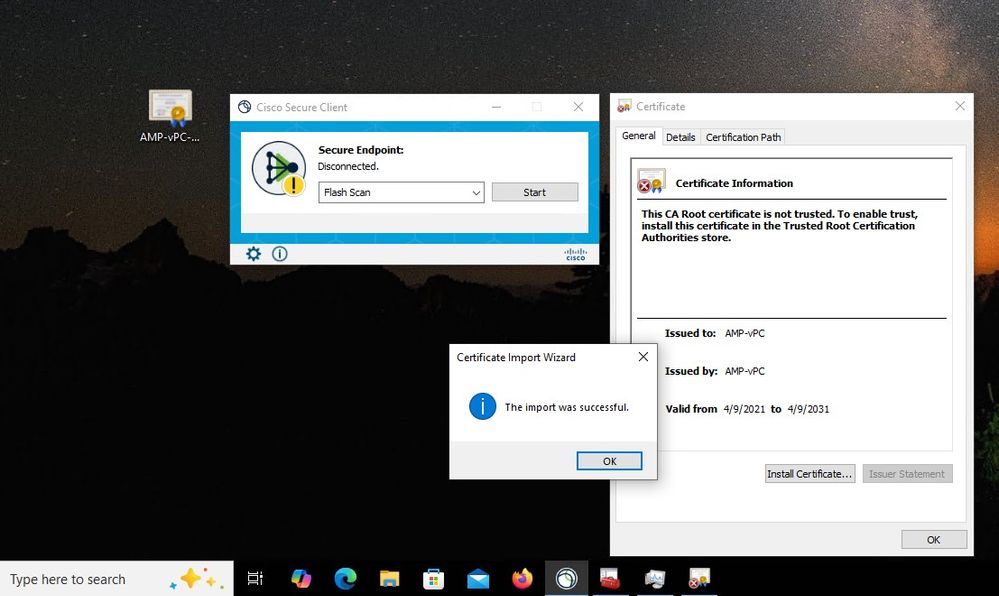
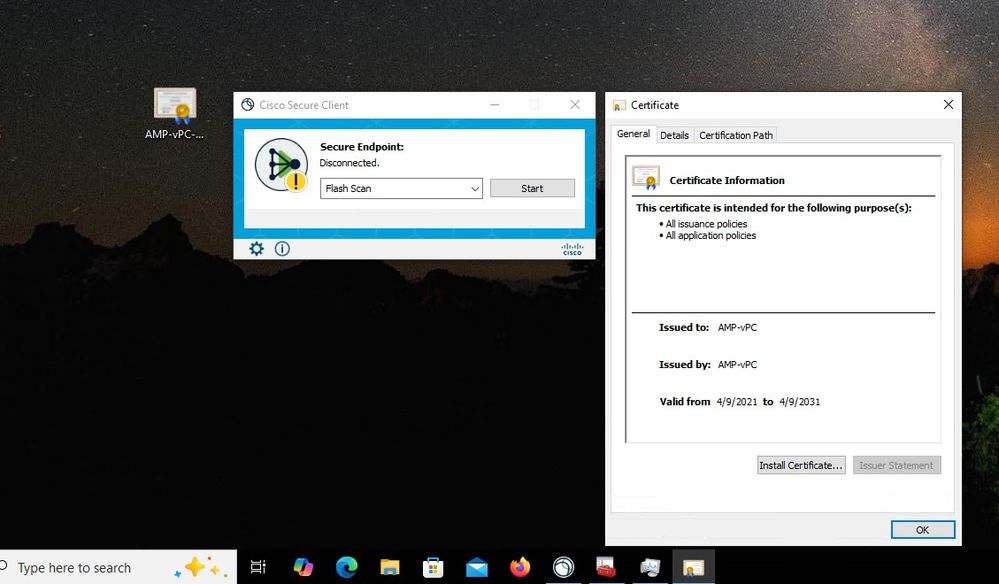
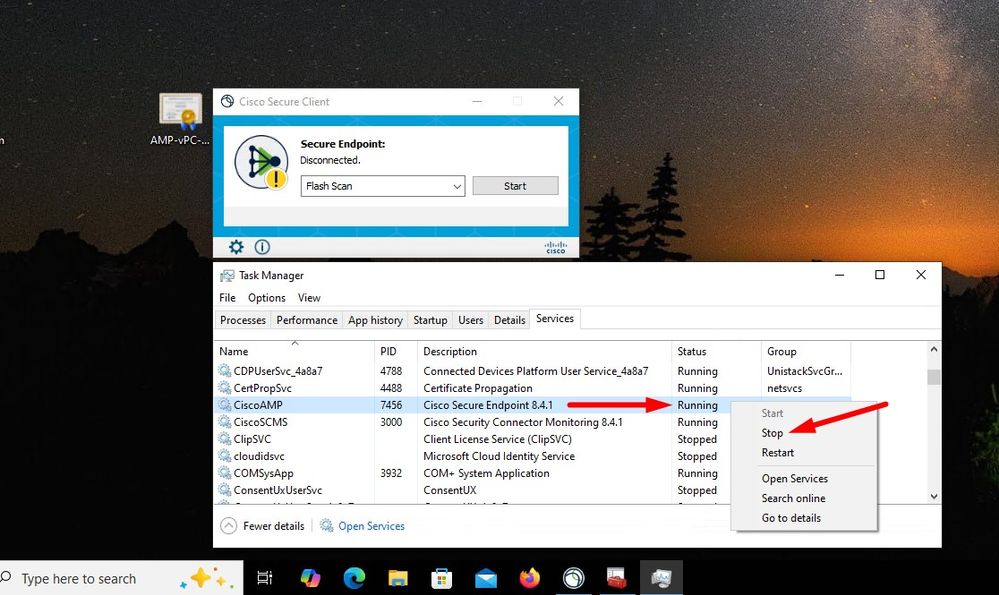
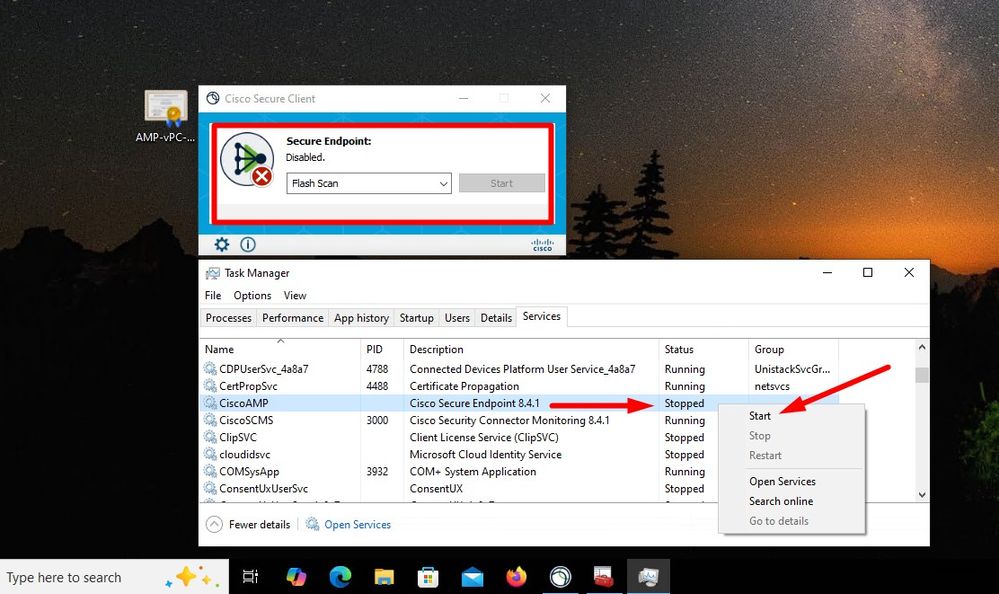
Once we bounce the Secure Endpoint service connector become online as expected.

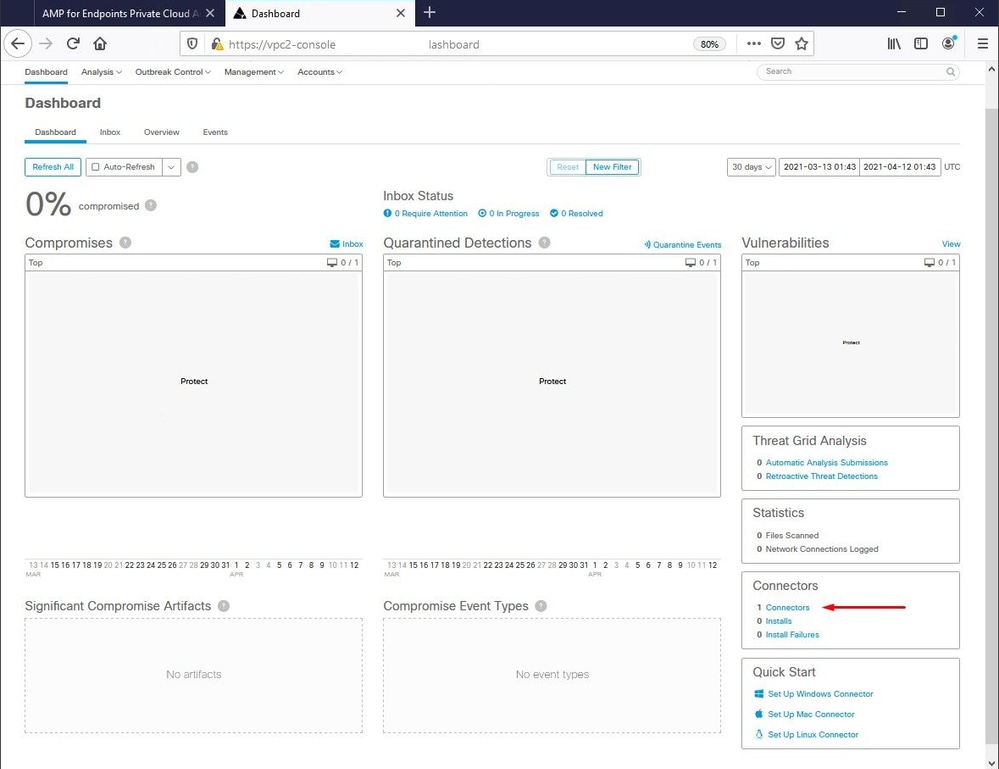
Tested malicious activity

Revision History
| Revision | Publish Date | Comments |
|---|---|---|
3.0 |
26-Apr-2022
|
Updating content |
1.0 |
21-Mar-2022
|
Initial Release |
Contributed by Cisco Engineers
- Roman ValentaCisco TAC Engineer
Contact Cisco
- Open a Support Case

- (Requires a Cisco Service Contract)
 Feedback