Integration of AMP Virtual Private Cloud and Threat Grid Appliance
Available Languages
Download Options
Bias-Free Language
The documentation set for this product strives to use bias-free language. For the purposes of this documentation set, bias-free is defined as language that does not imply discrimination based on age, disability, gender, racial identity, ethnic identity, sexual orientation, socioeconomic status, and intersectionality. Exceptions may be present in the documentation due to language that is hardcoded in the user interfaces of the product software, language used based on RFP documentation, or language that is used by a referenced third-party product. Learn more about how Cisco is using Inclusive Language.
Contents
Introduction
This document describes the procedure to complete the integration of the Advanced Malware Protection (AMP) Virtual Private Cloud and the Threat Grid Appliance. The document provides as well troubleshooting steps for issues related to the integration process.
Contributed by Armando Garcia, Cisco TAC Engineer.
Prerequisites
Requirements
Cisco recommends that you have knowledge of these topics:
- Work and operate AMP Virtual Private Cloud
- Work and operate Threat Grid Appliance
Components Used
The information in this document is based on these software and hardware versions:
- AMP Private Cloud 3.2.0
- Threat Grid Appliance 2.12.0.1
Note: The documentation is valid for Threat Grid appliances and AMP Private Cloud devices in the appliance or virtual version.
The information in this document was created from the devices in a specific lab environment. All of the devices used in this document started with a cleared (default) configuration. If your network is live, ensure that you understand the potential impact of any command.
Background Information
Architecture of the Integration
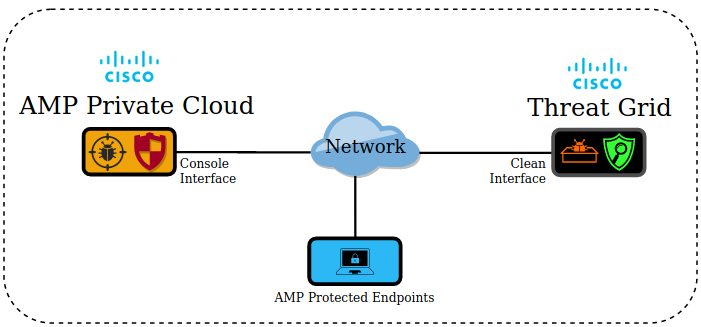
Basic information about the Integration
- The Threat Grid appliance analyzes samples submitted by the AMP Private Cloud device.
- Samples can be manually or automatically be submitted to the Threat Grid appliance.
- Automatic analysis is not enabled by default in the AMP Private Cloud device.
- The Threat Grid appliance provides to the AMP Private Cloud device a report and score from the analysis of the sample.
- The Threat Grid appliance informs (poke) the AMP Private Cloud device about any sample with a greater than or equal to 95 score.
- If the score from the analysis is greater than or equal to 95, the sample in the AMP database is marked with a disposition of malicious.
- Retrospective detections are applied by the AMP Private Cloud to samples with a score greater than or equal to 95.
Procedure
Step 1.Set up and configure the Threat Grid Appliance (no integration yet). Check for updates and install, if necessary.
Step 2.Set up and configure the AMP for Endpoints Private Cloud (no integration yet).
Step 3. In the Threat Grid admin UI, select the Configuration tab and choose SSL.
Step 4.Generate or upload a new SSL certificate for the Clean interface (PANDEM).
Regenerating SSL Certificates
A new self-signed certificate can be generated if the hostname of the clean interface does not match the Subject Alternative Name (SAN) in the certificate currently installed in the appliance for the clean interface. The appliance generates a new certificate for the interface, configuring the current interface hostname in the SAN field of the self-signed certificate.
Step 4.1. From the Actions column select (…) and from the pop-up menu select Generate New Certificate.
Step 4.2. In the Threat Grid UI, select Operations, in the next screen select Activate and choose Reconfigure.
Note: This generated certificate is self-signed.
Uploading SSL Certificates
If there is a certificate already created for the Threat Grid appliance clean interface, then this certificate can be uploaded to the appliance.
Step 4.1. From the Actions column select (…) and from the pop-up menu select Upload New Certificate.
Step 4.2. Copy the certificate and the corresponding private key in PEM format in the text boxes that appear on the screen and select Add Certificate.
Step 4.3. In the Threat Grid UI, select Operations, in the next screen select Activate and choose Reconfigure.
Step 5. In the AMP Private Cloud device admin UI, select Integrations and choose Threat Grid.
Step 6. In the Threat Grid Configuration Details, select Edit.
Step 7. In the Threat Grid Hostname enter the FQDN of the clean interface of the Threat Grid appliance.
Step 8. In the Threat Grid SSL Certificate, add the certificate of the clean interface of the Threat Grid appliance. (See notes below)
Certificate in the Threat Grid appliance clean interface is self-signed
Step 8.1. In the Threat Grid admin UI, select the Configuration and choose SSL.
Step 8.2. From the Actions column select (…) and from the pop-up menu select Download Certificate.
Step 8.3. Proceed to add the downloaded file to the AMP Virtual Private device in the Threat Grid integration page.
Certificate in the Threat Grid appliance clean interface is signed by a corporate Certificate Authority (CA)
Step 8.1. Copy in a text file the certificate of the Threat Grid appliance clean interface and the complete CA certificate chain.
Note: The certificates in the text file must be in PEM format.
Example
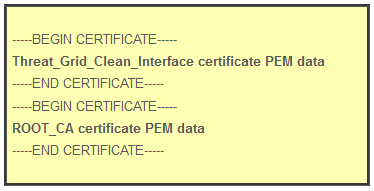
If the complete certificate chain is: ROOT_CA certificate > Threat_Grid_Clean_Interface certificate; then the text file needs to be created, as shown in the image.
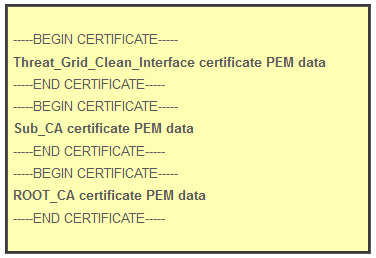
If the complete certificate chain is: ROOT_CA certificate > Sub_CA Certificate > Threat_Grid_Clean_Interface certificate; then the text file needs to be created, as shown in the image.
Step 9. In Threat Grid API Key enter the API key from the Threat Grid user that will be linked to the uploaded samples.
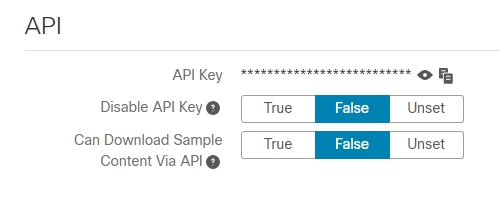
Note: In the account settings from the Threat Grid user confirm the Disable API Key parameter is not set to True.
Step 10. After all changes are completed select Save.
Step 11. Apply a reconfiguration to the AMP Virtual Cloud device.
Step 12. From the AMP Private Cloud device admin UI, select Integrations and choose Threat Grid.
Step 13. From Details copy the values of the Disposition Update Service URL, the Disposition Update Service user, and the Disposition Update Service password. This information is used in Step 17.
Step 14. In the Threat Grid admin UI, select Configuration and choose CA Certificates.
Step 15. Select Add Certificate and copy in PEM format the CA certificate that signed the AMP Private Cloud Disposition Update Service certificate.
Note: If the CA certificate that signed the AMP Private Cloud Disposition Update certificate is a Sub-CA, repeat the process until all the CAs in the chain are uploaded to CA Certificates.
Step 16. In the Threat Grid portal, select Administration and select Manage AMP Private Cloud Integration.
Step 17. In the Disposition Update Syndication Service page enter the information collected in Step 13.
- Service URL: FQDN of the Disposition Update Service of the AMP Private Cloud device.
- User: User from the Disposition Update Service of the AMP Private Cloud device.
- Password: Password for the Disposition Update Service of the AMP Private Cloud device.
At this point, if all steps were applied correctly, the integration must be working successfully.
Verification
These are the steps to confirm the Threat Grid appliance was integrated successfully.
Note: Only steps 1, 2, 3, and 4 are suitable to be applied in a production environment to verify the integration. Step 5 is provided as information to learn more about the integration and is not advised to be applied in a production environment.
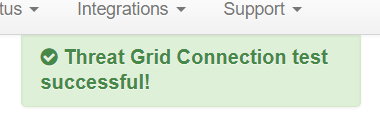
Step 1. Select Test Connection in AMP Private Cloud Device Admin UI > Integrations > Threat Grid, and confirm the message Threat Grid Connection test successful! is received.

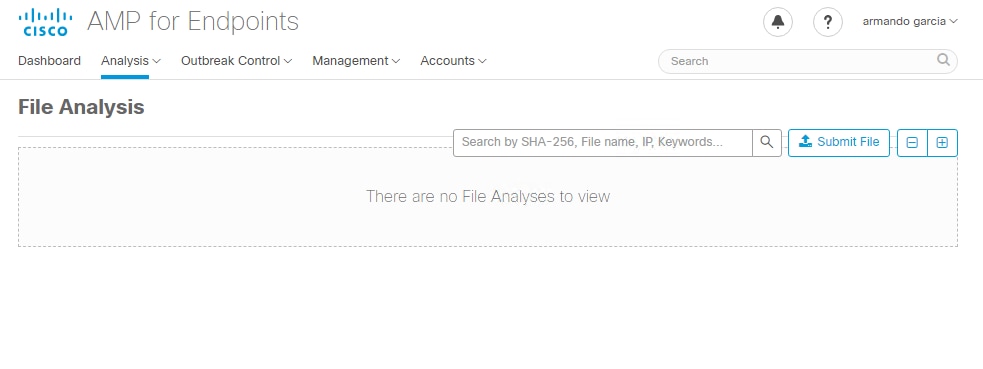
Step 2. Confirm the File Analysis webpage in the AMP Private Cloud console is loaded without errors.
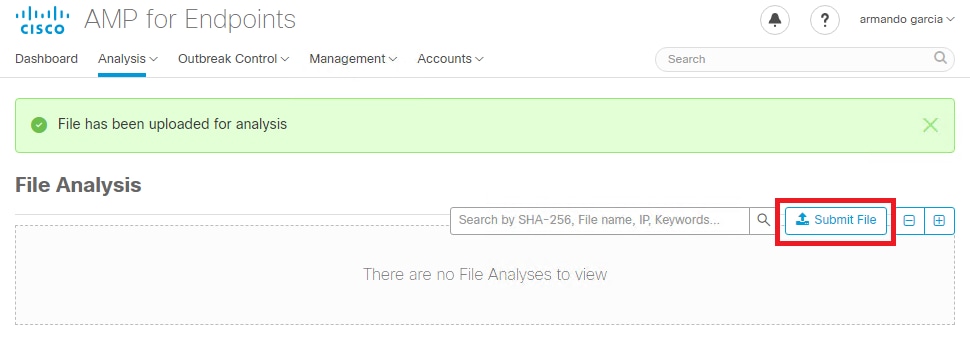
Step 3. Confirm that files manually submitted from the AMP Private Cloud console Analysis > File Analysis are perceived in the Threat Grid appliance, and a report with a score is returned by the Threat Grid appliance.

Step 4. Confirm the CAs that signed the Disposition Update Service certificate of the AMP Private Cloud device are installed in the Threat Grid appliance in Certificate Authorities.
Step 5. Confirm that any sample marked by the Threat Grid appliance with a score >=95 is recorded in the AMP Private Cloud database with the disposition of malicious after the report and the sample score are provided by the Threat Grid Appliance.
Note: A successful reception of sample report and a >=95 sample score in the AMP Private Cloud console the File Analysis tab, does not necessarily mean the file disposition was changed in the AMP database. If the CAs that signed the Disposition Update Service certificate of the AMP Private Cloud device is not installed in the Threat Grid appliance in Certificate Authorities, reports and scores are received by the AMP Private Cloud device, but no pokes are received from the Threat Grid appliance.
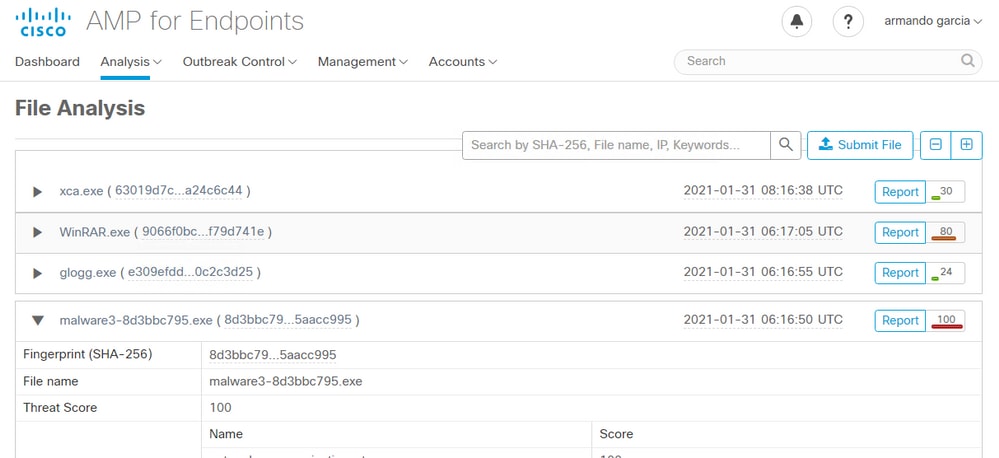
Warning: The next test was completed to trigger a sample disposition change in the AMP database after the Threat Grid appliance has marked a file with a >=95 score. The purpose of this test was to provide information about the internal operations in the AMP Private Cloud device when the Threat Grid Appliance provides a sample score of >=95. In order to trigger the disposition change process, a malware-imitation test file was created with the Cisco internal makemalware.exe application. Sample: malware3-419d23483.exeSHA256: 8d3bbc795bb47447984bf2842d3a0119bac0d79a15a59686951e1f7c5aacc995.
Caution: It is not advised to detonate any malware-imitation test file in a production environment.
Confirmation of sample disposition update in the AMP Private Cloud Database
The test malware file was manually submitted to the Threat Grid appliance from File Analysis in the AMP Private Cloud console. After the analysis of the sample, a sample report and a sample score of 100 were provided to the AMP Private Cloud device by the Threat Grid appliance. A sample score >=95 triggers a disposition change for the sample in the AMP Private Cloud device database. This change of the sample disposition in the AMP database based on a >=95 sample score provided by Threat Grid is what is known as a poke.
If:
- The integration was completed successfully.
- Sample reports and scores are perceived in File Analysis after manually submitting files.
Then:
- For each sample that the Threat Grid appliance marks with a score >=95, an entry is added to the file /data/poked/poked.log in the AMP Private Cloud device.
- The /data/poked/poked.log is created in the AMP Private Cloud device after the first >=95 sample score is provided by the Threat Grid appliance.
- The db_protect database in the AMP Private Cloud holds the current disposition for the sample. This piece of information can be used to confirm if the sample has a disposition of 3 after the Threat Grid appliance provided the score.
If the sample report and the >=95 score are perceived in File Analysis in the AMP Private Cloud console, apply these steps:
Step 1. Log in via SSH to the AMP Private Cloud device.
Step 2. Confirm there is an entry in /data/poked/poked.log for the sample.
Listing the /data/poked/ directory in an AMP Private Cloud device that has never have received a >=95 sample score from a Threat Grid appliance shows the poked.log file has not been created in the system.
If the AMP Private Cloud device has never received a poke from a Threat Grid appliance the /data/poked/poked.log file is not found in the directory, as shown in the image.

Listing the /data/poked/ directory after the first >=95 sample score has been received, shows the file was created.
After receiving the first sample with a >=95 score.

Sample information from the poke provided by the Threat Grid appliance can be perceived inside the poked.log file.
Step 3. Run this command with the sample SHA256 to retrieve the current disposition from the database of the AMP Private Cloud device.
mysql -e "select hex(fingerprint), disposition_id from protect.binaries where fingerprint=0x<SHA256 hash of the sample>;"Example
A database query to get the sample disposition before the sample is uploaded to the Threat Grid Appliance provides no results, as shown in the image.

A database query to get the sample disposition after the report and score were received from the Threat Grid appliance, shows the sample with a disposition of 3 which is considered malicious.

Troubleshooting
In the integration process, possible issues can be perceived. In this part of the document, some of the most common issues are addressed.
Warning in AMP Private Cloud device about host invalid, certificate not tested, API key not tested
Symptom
The warning message: Threat Grid host is invalid, Threat Grid SSL Certificate could not be tested, Threat Grid API key could not be tested, is received in the AMP Private Cloud device after is selected the Test Connection button in Integrations > Threat Grid.

There is a problem at the network level in the integration.
Recommended Steps:
- Confirm the AMP Private Cloud device console interface can reach the Threat Grid appliance clean interface.
- Confirm the AMP Private Cloud device can resolve the FQDN of the Threat Grid appliance clean interface.
- Confirm there is not a filtering device in the network path of the AMP Private Cloud device and the Threat Grid appliance.
Warning in AMP Private Cloud device about invalid Threat Grid API key
Symptom
The warning message: Threat Grid Connection test failed, Threat Grid API is invalid, is received in the AMP Private Cloud device after is selected the Test Connection button in Integrations > Threat Grid.

The Threat Grid appliance API key configured in the AMP Private cloud.
Recommended Steps:
- Confirm in the account settings of the Threat Grid appliance user, the Disable API Key parameter is not set to True.
- The Disable API Key parameter must be set to: False or Unset.
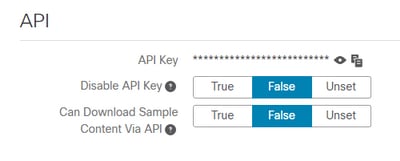
- Confirm the Threat Grid API key configured in the AMP Private Cloud admin portal Integrations > Threat Grid, is the same API key in the user settings in the Threat Grid appliance.
- Confirm if the correct Threat Grid API key is saved in the AMP Private Cloud device database.
From the AMP Private Cloud device command line, it can be confirmed the current Threat Grid API key configured in the AMP device. Log in to the AMP Private Cloud device via SSH and run this command to retrieve the current Threat Grid user API key:
mysql -e "select tg_api_key, tg_login, api_client_id from db_smbe.businesses;"This is a correct entry in the database of the AMP Private Cloud device for the Threat Grid appliance API key.

Even though the Threat Grid username was not directly configured in the AMP Private Cloud Device in any step of the integration, the Threat Grid username is perceived in the tg_login parameter in the AMP database if the Threat Grid API key was correctly applied.
This is an erroneous entry in the AMP database for the Threat Grid API key.

The tg_login parameter is NULL. The Threat Grid username was not retrieved from the Threat Grid appliance by the AMP Private Cloud device after applying the reconfiguration.
Sample scores >=95 are received by the AMP Private Cloud device, but no change perceived in the sample disposition
Symptom
Reports and >=95 sample scores are received successfully from the Threat Grid appliance after a sample is submitted, but no change in the sample disposition is perceived in the AMP Private Cloud device.
Recommended Steps:
- Confirm in the AMP Private Cloud device if the sample SHA256 is in the content of /data/poked/poked.log.
If the SHA256 is found in /data/poked/poked.log, then run this command to confirm the current sample disposition in the AMP database.
mysql -e "select hex(fingerprint), disposition_id from protect.binaries where fingerprint=0x<SHA256 hash of the sample>;"- Confirm the correct AMP Private Cloud integration password was added to the Threat Grid appliance administration portal in Administration > Manage AMP Private Cloud Integration.
AMP Private Cloud administration portal.

Threat Grid appliance console portal.

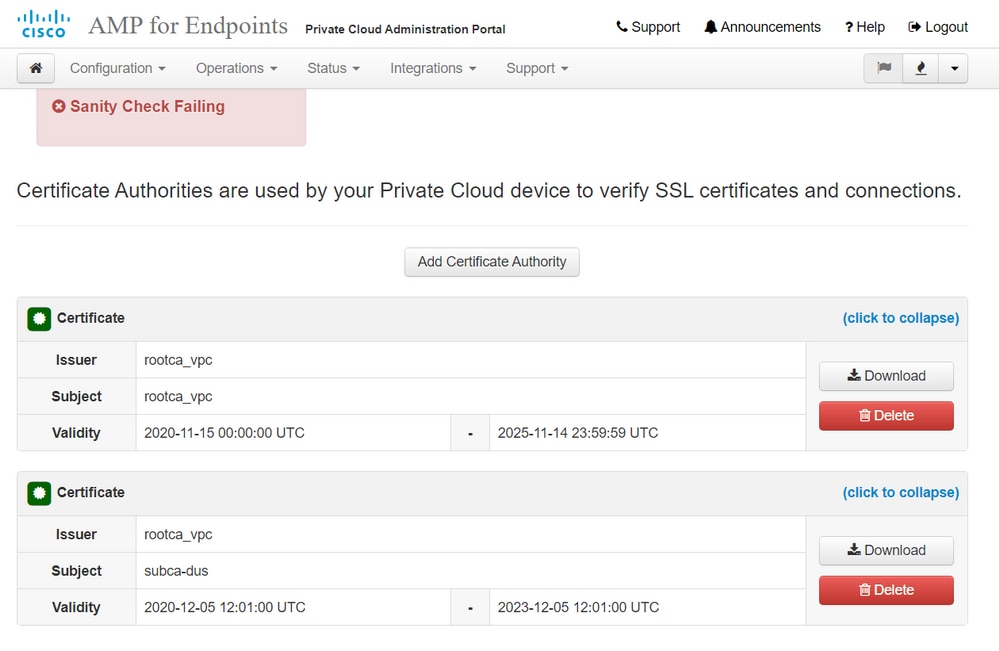
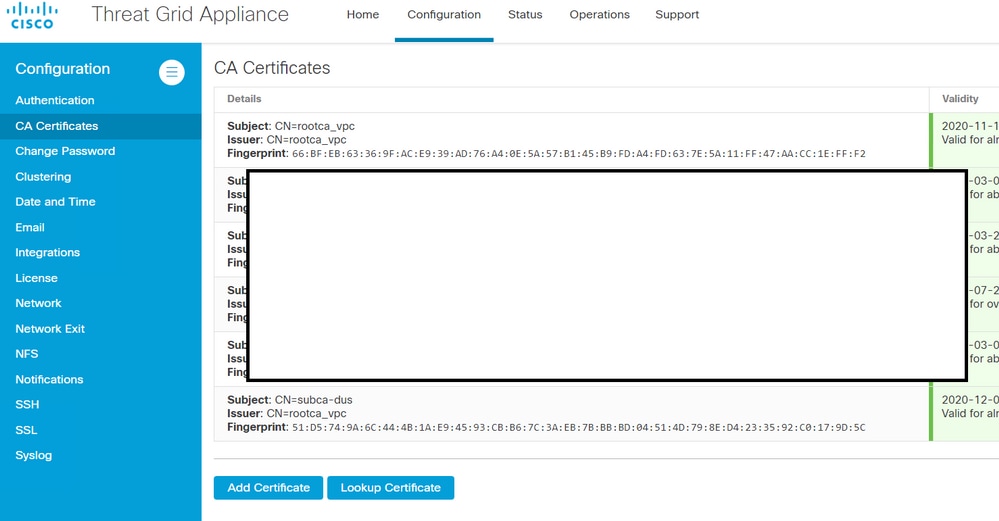
- Confirm the CAs that signed the AMP Private Cloud device Disposition Update Service certificate was installed in the Threat Grid appliance administration portal in CA Certificates.
In the below example the certificate chain for the AMP Private Cloud device Disposition Update Service certificate is Root_CA > Sub_CA > Disposition_Update_Service certificate; therefore, the RootCA and the Sub_CA must be installed in CA Certificates in the Threat Grid Appliance.
Certificates authorities in the AMP Private Cloud administration portal.
Threat Grid administration portal:
- Confirm the AMP Private Cloud device Disposition Update Service FQDN was correctly added to the Threat Grid appliance administration portal in Administration > Manage AMP Private Cloud Integration. Confirm as well the IP address of the AMP Private Cloud device console interface was not added instead of the FQDN.

Warning in AMP Private Cloud device about invalid Threat Grid SSL certificate
Symptom
The warning message: "Threat Grid SSL certificate is invalid", is received in the AMP Private Cloud device after is selected the Test Connection button in Integrations > Threat Grid.

Recommended Steps:
- Confirm if the certificate installed in the Threat Grid appliance clean interface is signed by a corporate CA.
If it is signed by a CA then the complete certificate chain must be added inside a file to the AMP Private Cloud device administration portal Integrations > Threat Grid in Threat Grid SSL Certificate.
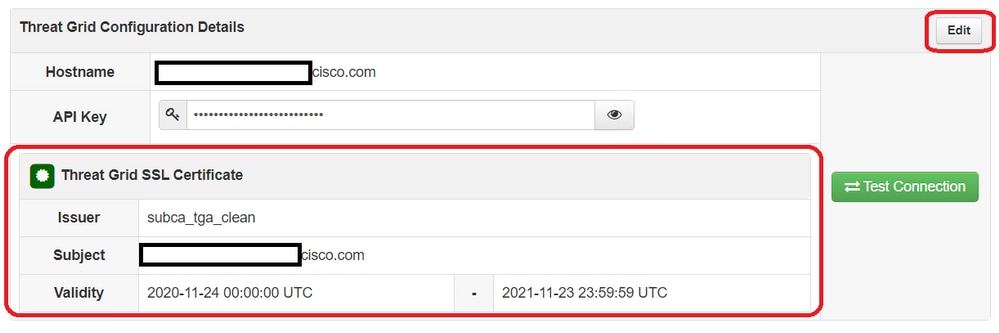
In the AMP Private Cloud device the currently Threat Grid appliance certificates installed can be found in: /opt/fire/etc/ssl/threat_grid.crt .
Warnings in Threat Grid appliance related to certificates
Warning Message - Public key derived from private key does not match
Symptom
The warning message: public key derived from private key does not match, is received in the Threat Grid appliance after an attempt to add a certificate to an interface.
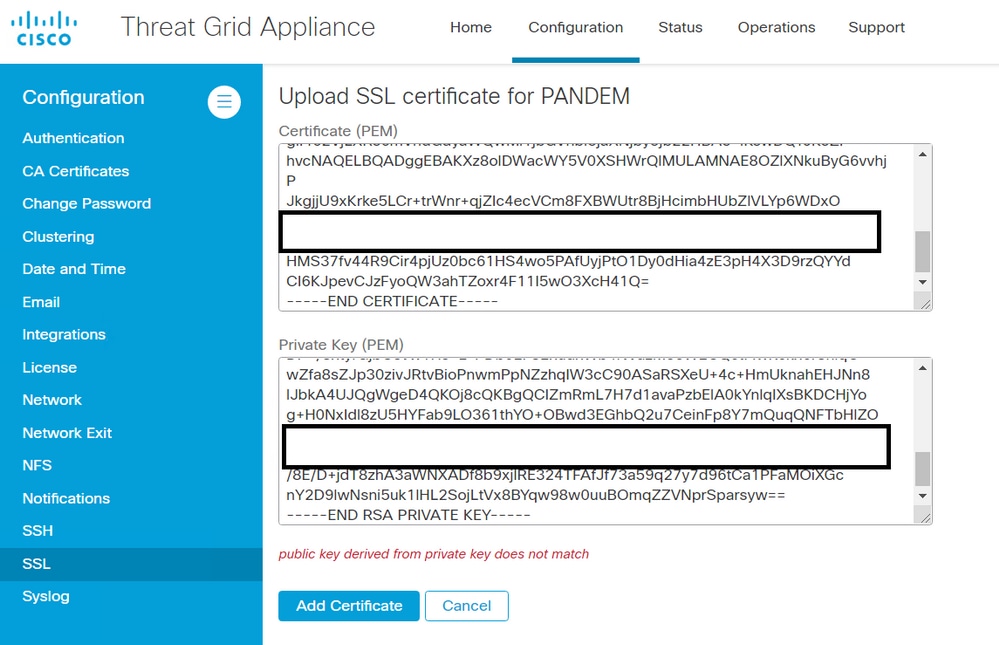
The public key exported from the private key does not match with the public key configured in the certificate.
Recommended Steps:
- Confirm if the private key matches the public key in the certificate.
If the private key matches the public key in the certificate, then the modulus and the public exponent must be the same. For this analysis, it is enough to confirm if the modulus has the same value in the private key and the public key in the certificate.
Step 1. Use the OpenSSL tool to compare the modulus in the private key and the public key configured in the certificate.
openssl x509 -noout -modulus -in <certificate in PEM format> | openssl md5

openssl rsa -noout -modulus -in <private key in PEM format> | openssl md5
Example. Successful match of a private key and a public key configured in a certificate.

Warning Message - Private key contains non-PEM content
Symptom
The warning message: Private key contains non-PEM content, is received in the Threat Grid appliance after an attempt to add a certificate to an interface.
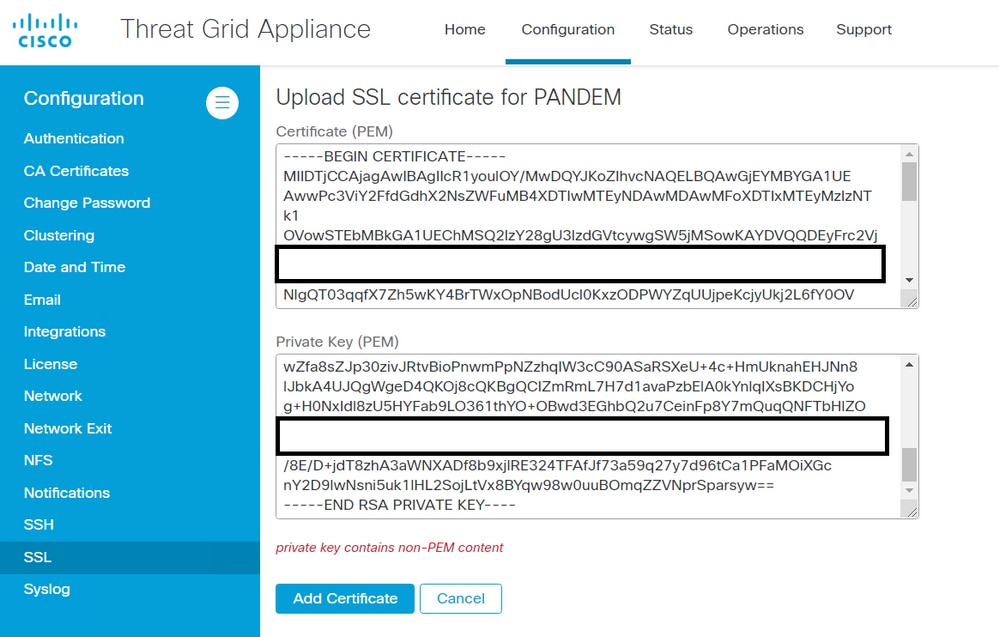
The PEM data inside the private key file is corrupted.
Recommended Steps:
- Confirm the integrity of the data inside the private key.
Step 1. Use the OpenSSL tool to verify the integrity of the private key.
openssl rsa -check -noout -in <private key in PEM format>Example. Outputs from a private key with errors in the PEM data inside the file, and from another private key with no errors in the PEM content.

If the OpenSSL command output is not RSA Key ok, this means problems were found with the PEM data inside the key.
If problems were found with the OpenSSL command, then:
- Confirm if PEM data inside the private key is missing.
PEM data inside the private key file is displayed in lines of 64 characters. A quick eye check of the PEM data inside the file can show if data is missing. The line with missing data is not aligned with other lines in the file.
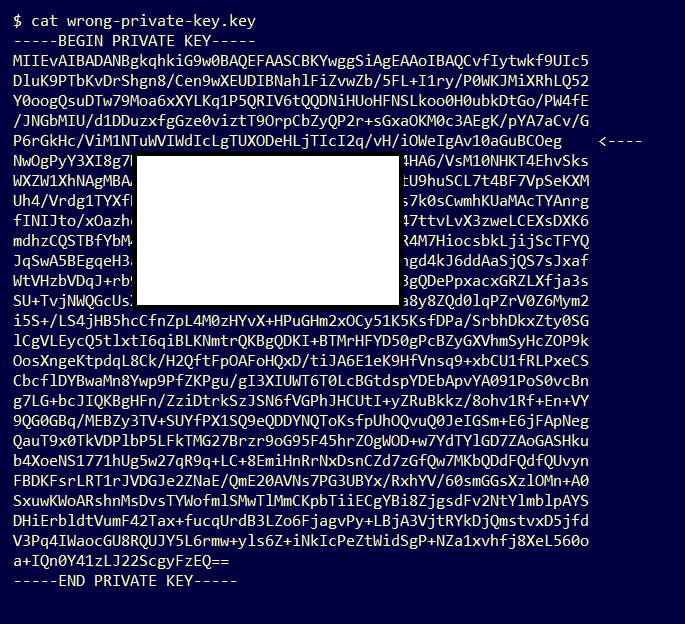
- Confirm the first line in the private key starts with 5 hyphens, the words BEGIN PRIVATE KEY, and ends with 5 hyphens.
Example.
-----BEGIN PRIVATE KEY-----
- Confirm the last line in the private key starts with 5 hyphens, the words END PRIVATE KEY, and ends with 5 hyphens.
Example.
-----END PRIVATE KEY-----
Example. Correct PEM format and data inside a private key.
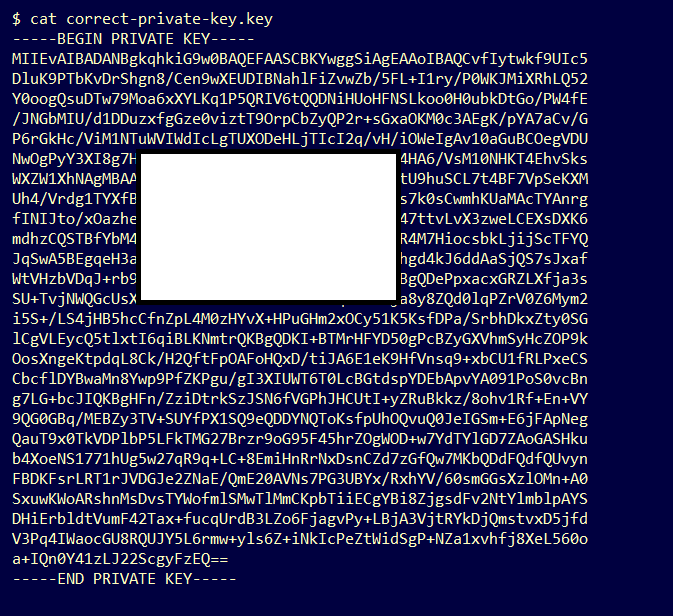
Warning Message - Cannot generate public key from the private key
Symptom
The warning message: cannot generate public key from the private key, is received in the Threat Grid appliance after an attempt to add a certificate to an interface.
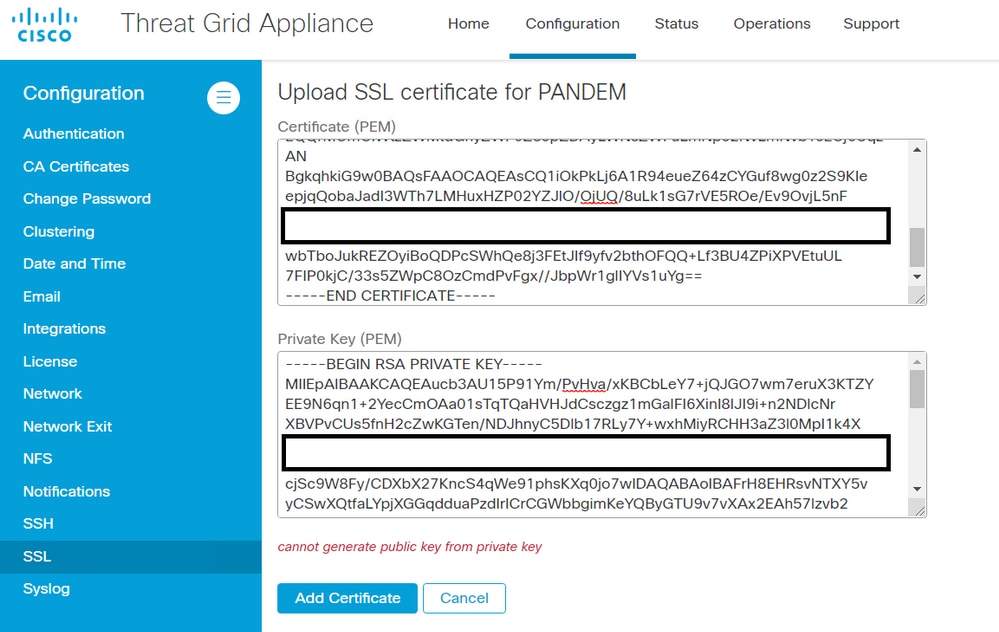
The public key cannot be generated from the current PEM data inside the private key file.
Recommended Steps:
- Confirm the integrity of the data inside the private key.
Step 1. Use the OpenSSL tool to verify the integrity of the private key.
openssl rsa -check -noout -in <private key in PEM format>If the OpenSSL command output is not RSA Key ok, this means problems were found with the PEM data inside the key.
Step 2. Use the OpenSSL tool to verify if the public key can be exported from the private key.
openssl rsa -in <private key in PEM format> -puboutExample. Failed public key export and a successful public key export.

Warning Message - parse error: PEM data could not be decoded
Symptom
The warning message: parse error: PEM data could not be decoded, is received in the Threat Grid appliance after an attempt to add a certificate to an interface.
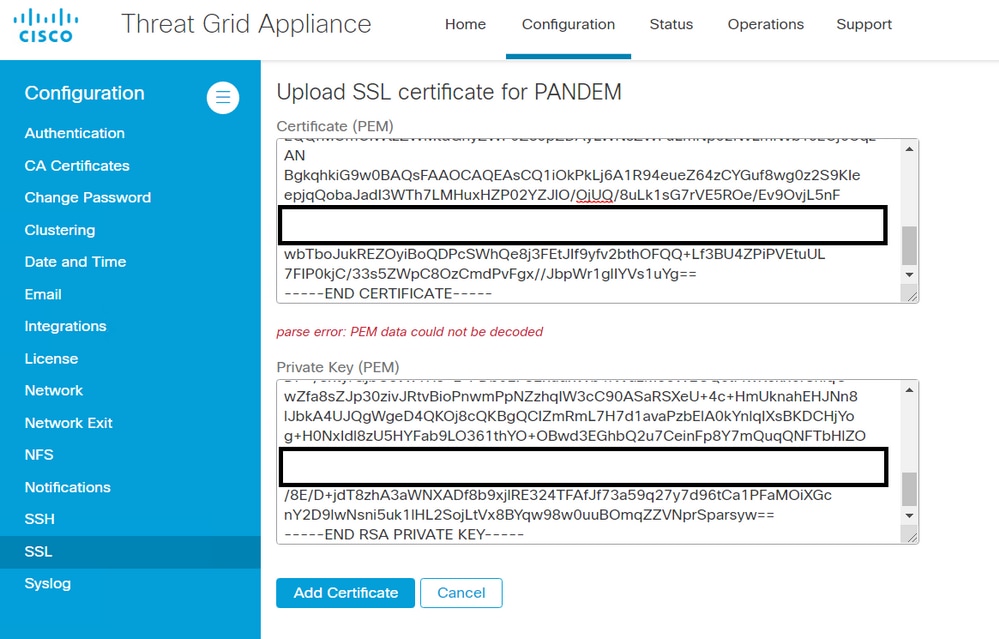
The certificate cannot be decoded from the current PEM data inside the certificate file. The PEM data inside the certificate file is corrupted.
- Confirm if the certificate information can be retrieved from the PEM data inside the certificate file.
Step 1. Use the OpenSSL tool to display the certificate information from the PEM data file.
openssl x509 -in <certificate in PEM format> -text -nooutIf the PEM data is corrupted an error is perceived when the OpenSSL tool tries to load the certificate information.
Example. Failed attempt to load the certificate information due to corrupt PEM data in the certificate file.

Warning Message - not a client/server CA cert
Symptom
The warning message: parse error: not a client/server CA cert, is received in the Threat Grid appliance after an attempt to add a CA certificate to Configuration > CA Certificates.
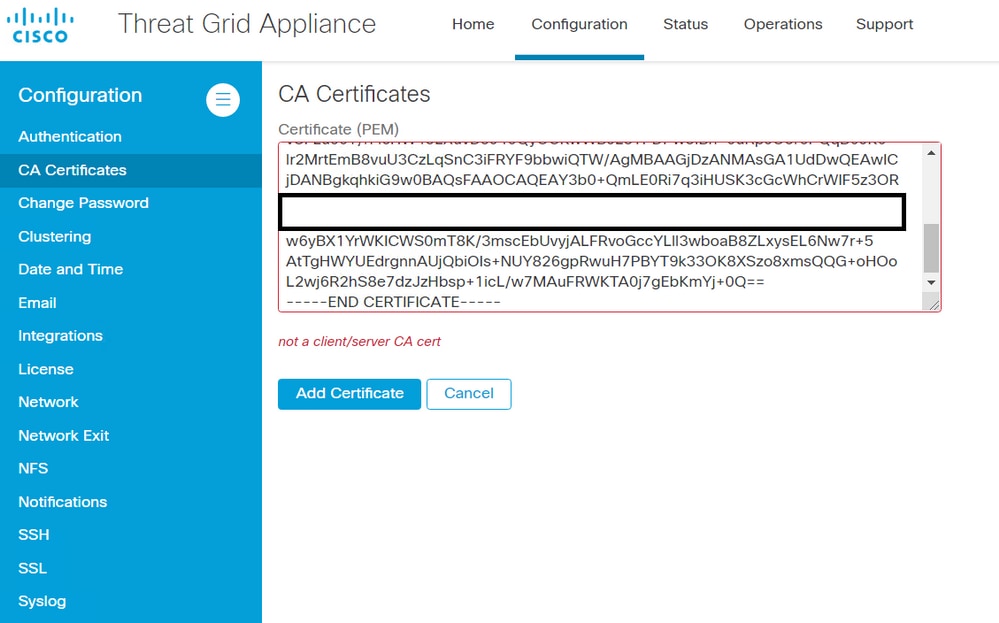
The Basic Constraints extension value in the CA certificate is not defined as CA: True.
Confirm with the OpenSSL tool if the Basic Constraints extension value is set to CA: True in the CA certificate.
Step 1. Use the OpenSSL tool to display the certificate information from the PEM data file.
openssl x509 -in <certificate in PEM format> -text -noout
Step 2. Search in the certificate information the current value of the Basic Constraints extension.
Example. Basic Constraint value for a CA accepted by the Threat Grid appliance.

Related Information
Contributed by Cisco Engineers
- Armando GarciaCisco TAC Engineer
- Edited by Yeraldin SanchezCisco TAC Engineer
Contact Cisco
- Open a Support Case

- (Requires a Cisco Service Contract)
 Feedback