Introduction
This document describes TACACS+ Configuration on Palo Alto with Cisco ISE.
Prerequisites
Cisco recommends that you have knowledge of these topics:
- Cisco ISE and TACACS+ protocol.
Components Used
The information in this document is based on these software and hardware versions:
- Palo Alto Firewall version 10.1.0
- Cisco Identity Services Engine (ISE) version 3.3 Patch 4
The information in this document was created from the devices in a specific lab environment. All of the devices used in this document started with a cleared (default) configuration. If your network is live, ensure that you understand the potential impact of any command.
Network Diagram
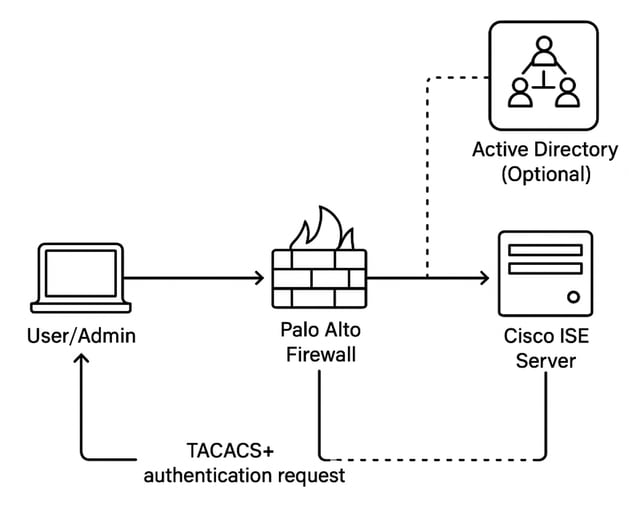
Authentication Flow
1. The administrator logs into the Palo Alto firewall.
2. Palo Alto sends a TACACS+ authentication request to Cisco ISE.
3. Cisco ISE:
- If AD is integrated, it queries AD for authentication and authorization.
- If no AD, it uses local identity stores or policies.
- Cisco ISE sends an authorization response to Palo Alto based on the configured policies.
- The administrator gains access with the appropriate privilege level.
Configure
Section 1: Configure Palo Alto Firewall for TACACS+
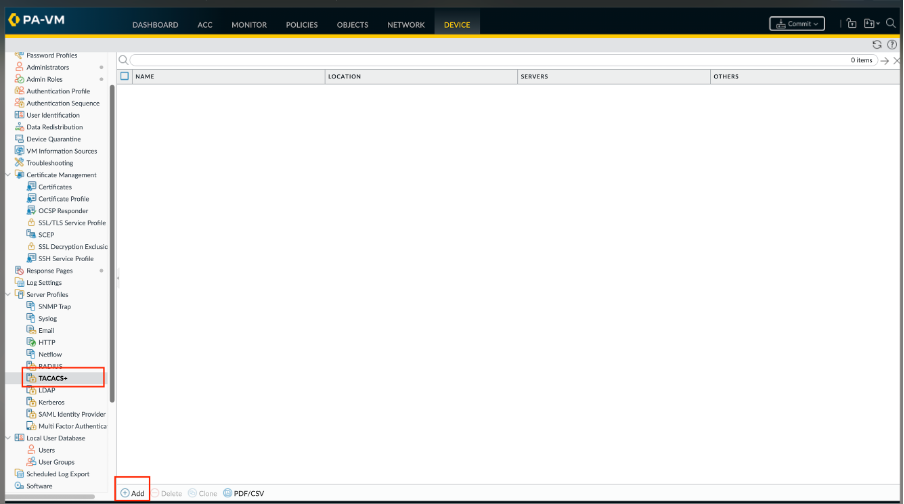
Step 1. Add a TACACS+ server profile.
The profile defines how the firewall connects to the TACACS+ server.
- Select Device > Server Profiles > TACACS+ or Panorama > Server Profiles > TACACS+ on Panorama and Add a profile.
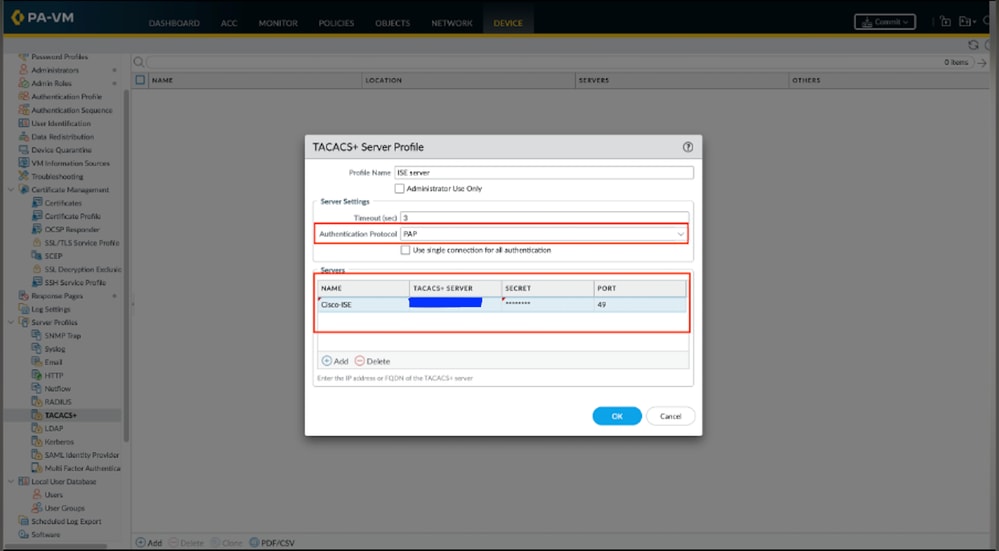
- Enter a Profile Name to identify the server profile.
- (Optional) Select Administrator Use Only to restrict access to administrators.
- Enter a Timeout interval in seconds after which an authentication request times out (default is 3; range is 1–20).
- Select the Authentication Protocol (default is CHAP) that the firewall uses to authenticate to the TACACS+ server.
- Add each TACACS+ server and perform these steps:
- A Name to identify the server.
- The TACACS+ Server IP address or FQDN. If you use an FQDN address object to identify the server and you subsequently change the address, you must commit the change for the new server address to take effect.
- A Secret and Confirm Secret to encrypt usernames and passwords.
- The server Port for authentication requests (default is 49). Click OK to save the server profile.
7. Click OK to save the server profile.
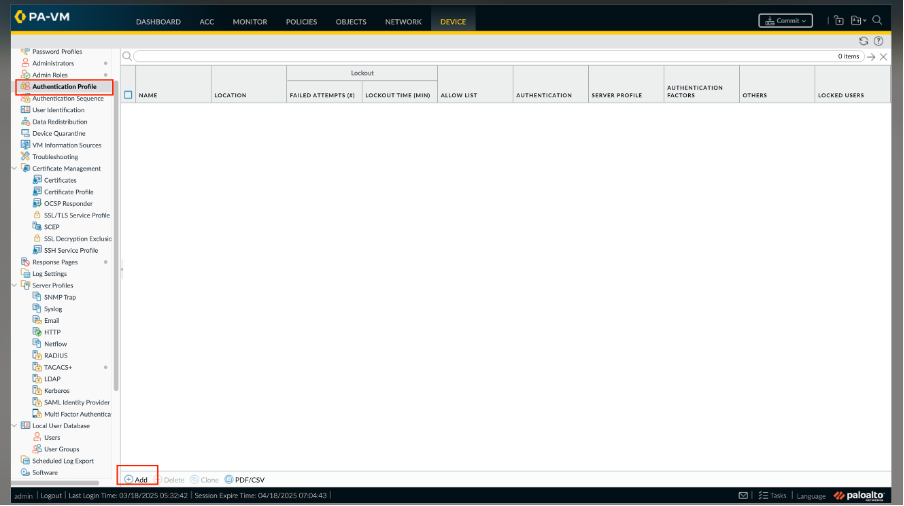
Step 2. Assign the TACACS+ server profile to an authentication profile.
The authentication profile defines the authentication settings that are common to a set of users.
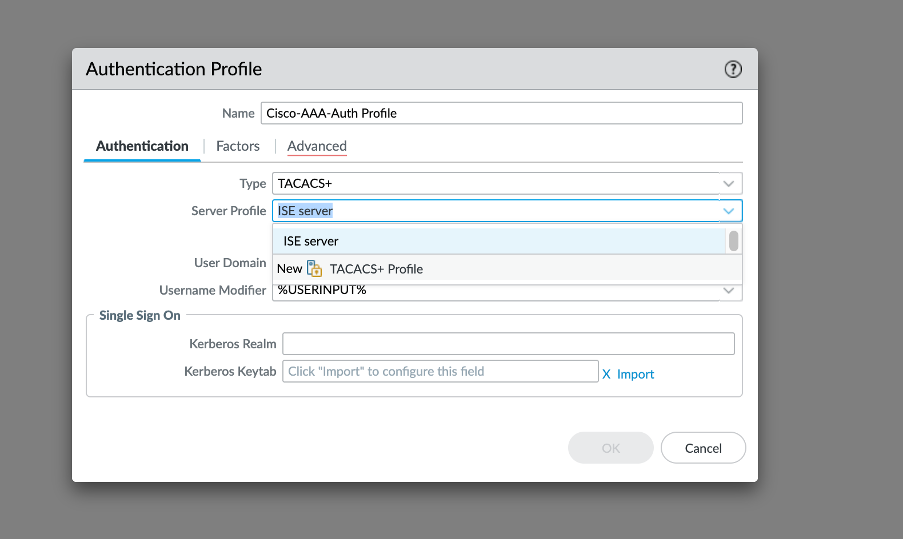
- Select Device > Authentication Profile and Add a profile.
- Enter a Name to identify the profile
- Set the Type to TACACS+.
- Select the Server Profile you configured.
- Select Retrieve user group from TACACS+ to collect user group information from VSAs defined on the TACACS+ server.
The firewall matches the group information using the groups you specify in the Allow List of the authentication profile.
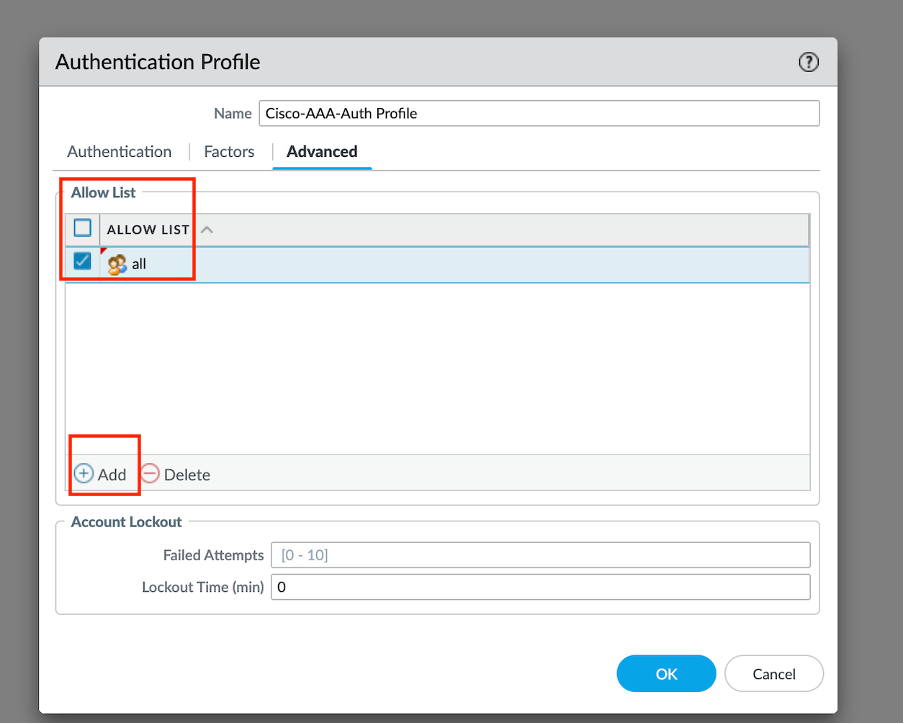
- Select Advanced and in the Allow List, Add the users and groups that can authenticate with this authentication profile.
- Click OK to save the authentication profile.
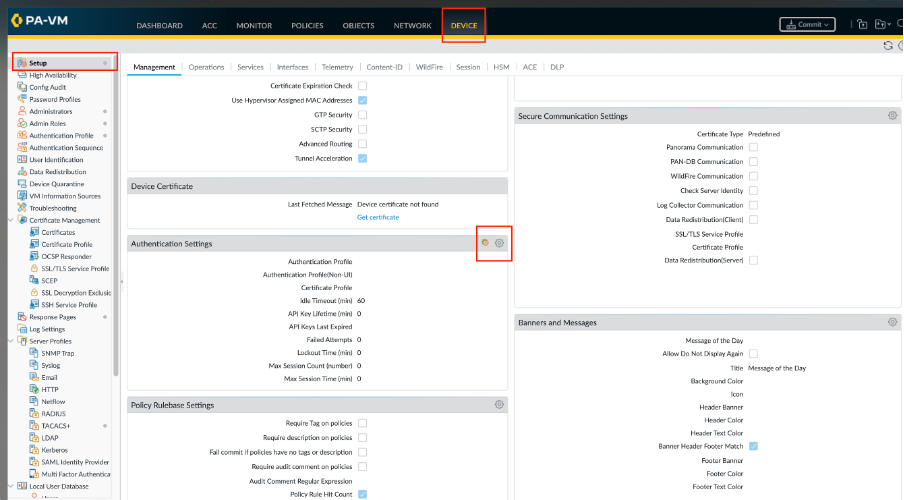
Step 3. Configure the firewall to use the authentication profile for all administrators.
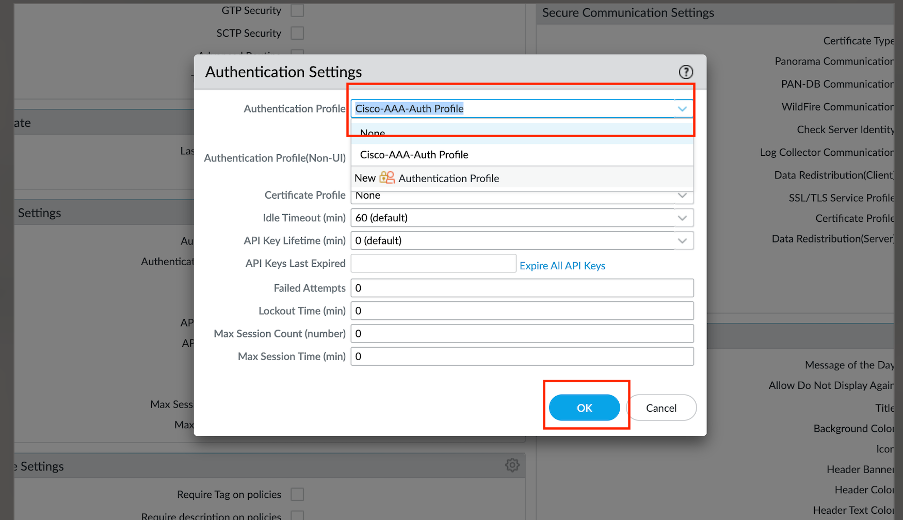
- Select Device > Setup > Management and edit the Authentication Settings.
- Select the Authentication Profile you configured and click OK.
Step 4. Configure an Admin Role Profile.
Select Device > Admin Roles and click Add. Enter a Name to identify the role.

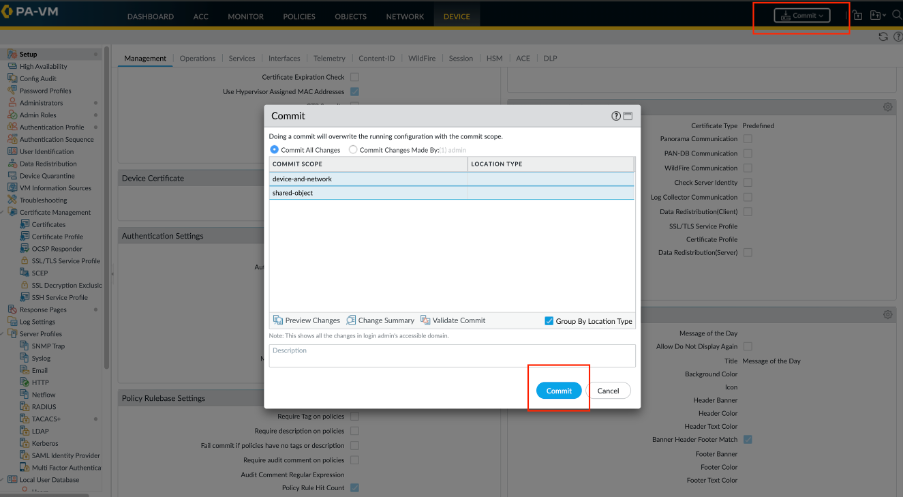
Step 5. Commit your changes to activate them on the firewall.
Section 2: TACACS+ Configuration on ISE
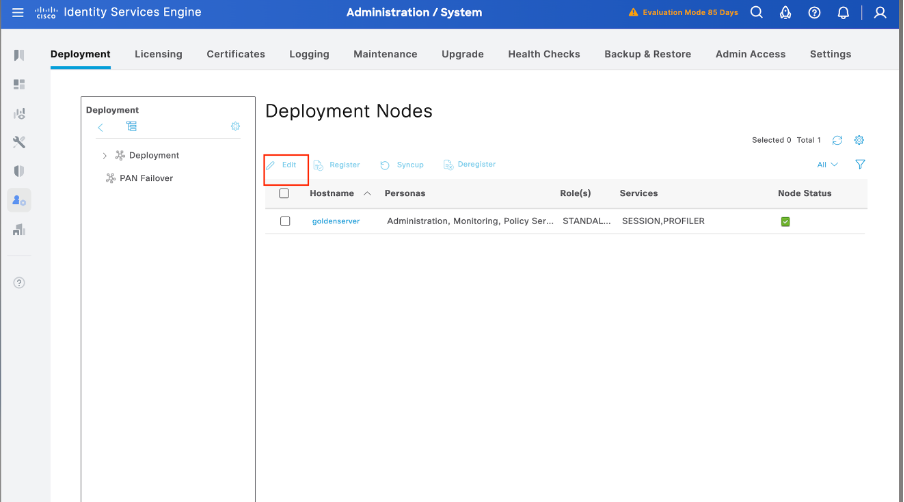
Step 1. The initial step is to verify whether Cisco ISE has the necessary capabilities to handle TACACS+ authentication. To do this, confirm that the desired Policy Service Node (PSN) has the Device Admin Service feature enabled. Navigate to Administration > System > Deployment, select the appropriate node where ISE processes TACACS+ authentication, and click Edit to review its configuration.
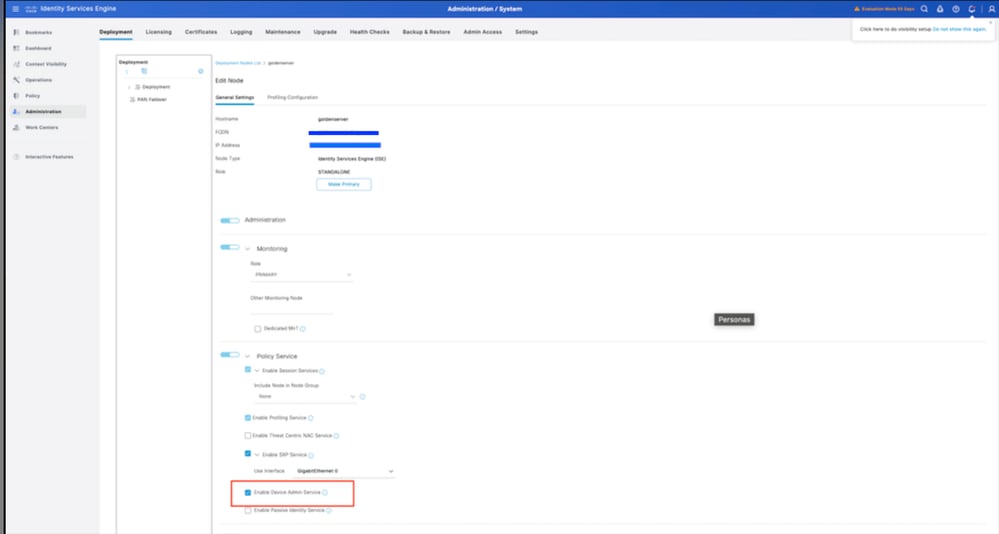
Step 2. Scroll down to locate the Device Administration Service feature. Note that enabling this feature requires the Policy Service persona to be active on the node, along with available TACACS+ licenses in the deployment. Select the checkbox to enable the feature, then save the configuration.
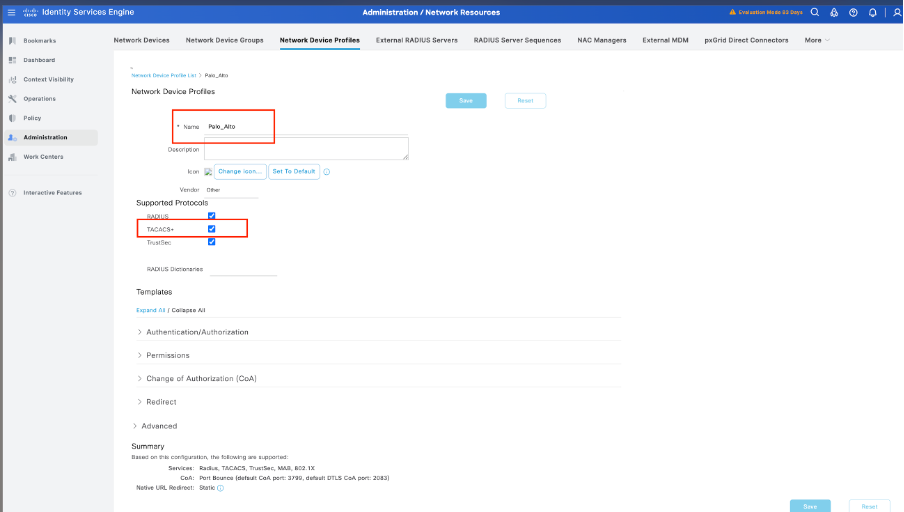
Step 3. Configure Palo Alto Network Device Profile for Cisco ISE.
Navigate to Administration > Network Resources > Network device profile. Click Add and mention the name (Palo Alto) and enable TACACS+ under supported protocols.
Step 4. Add Palo Alto as a Network Device.
- Navigate to Administration > Network Resources > Network Devices > +Add.
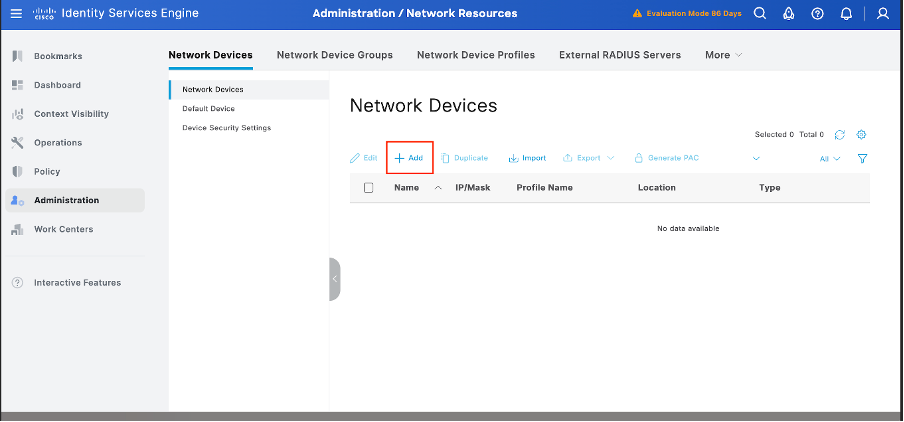
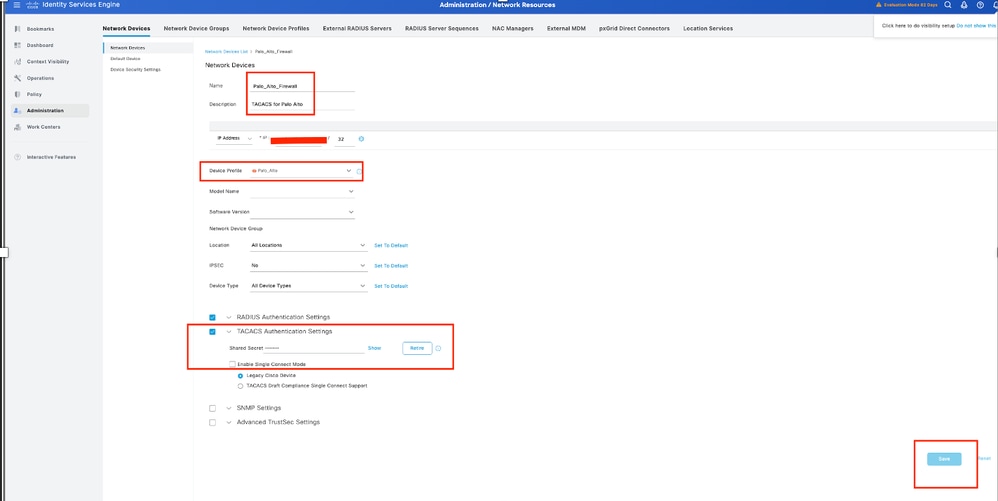
2. Click Add and enter these details:
Name: Palo-Alto
IP Address: <Palo-Alto IP>
Network Device Profile: select Palo Alto
TACACS Authentication Settings:
Enable TACACS+ Authentication
Enter the Shared Secret (must match Palo Alto configuration)
Click Save.
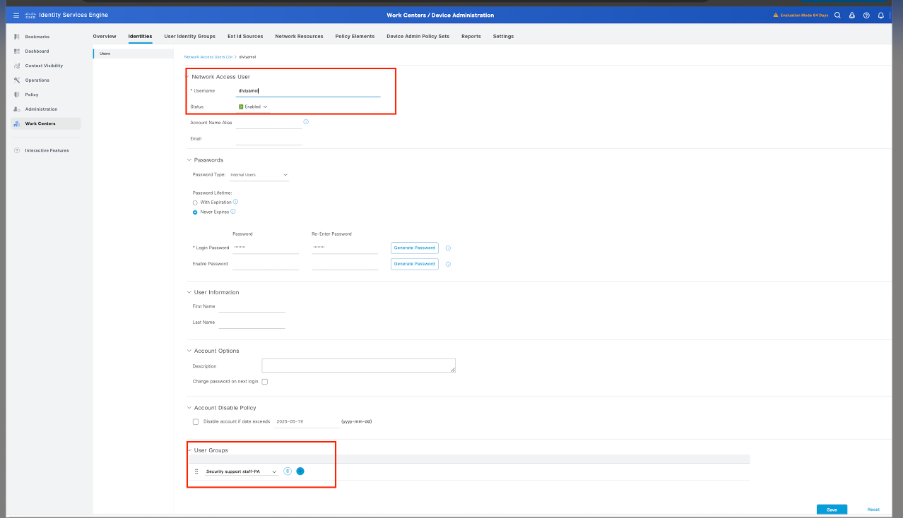
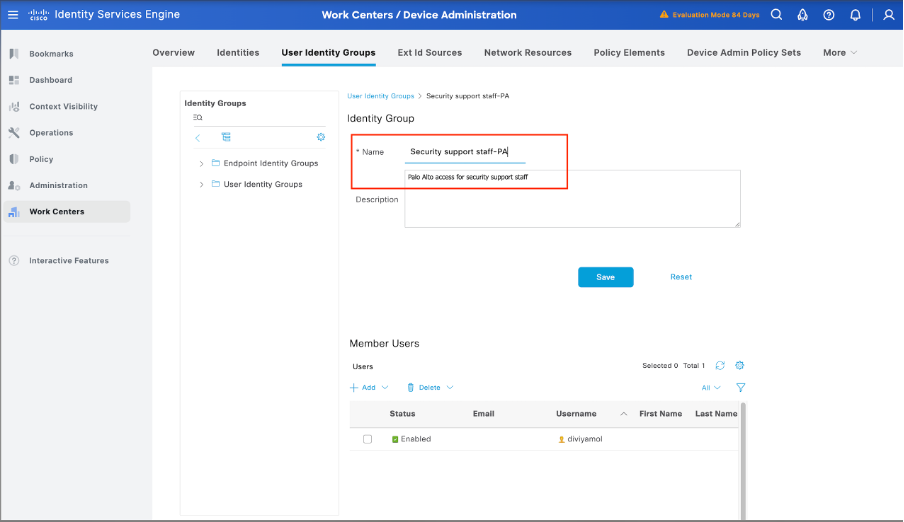
Step 5. Create User Identity Groups.
Navigate to Work Centers > Device Administration > User Identity Groups, then click Add and specify the name for the user group.

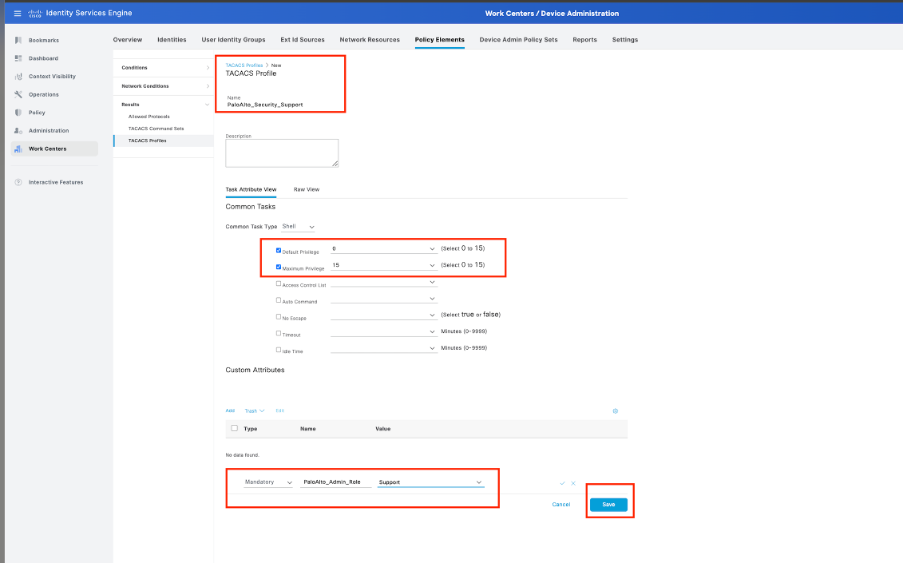
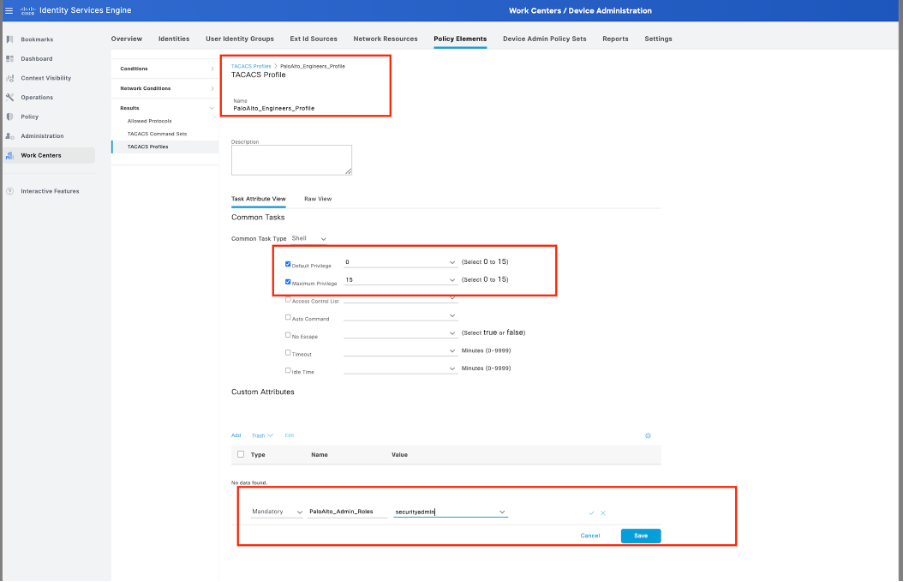
Step 6. Configure A TACACS Profile.
Next up is configuring a TACACS Profile, which is where you can configure settings such as Privilege Level and timeout settings. Navigate to Work Centers > Device Administration -> Policy Elements -> Results -> TACACS Profiles.
Click Add to create a new TACACS Profile. Give the profile a good name.
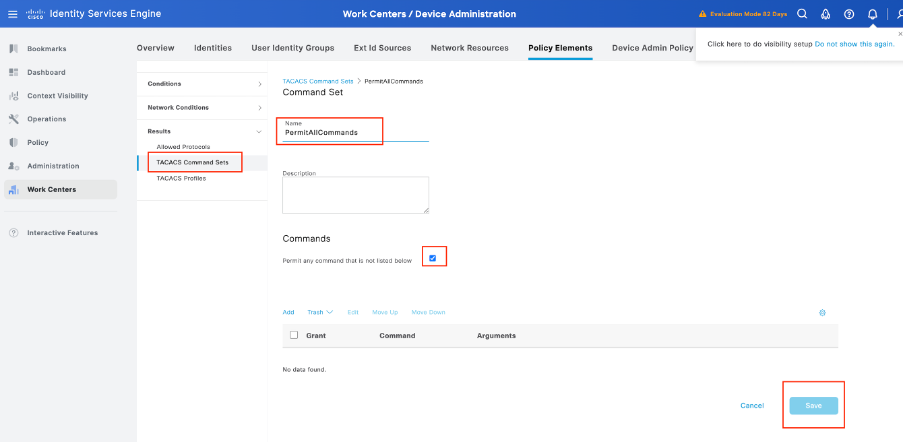
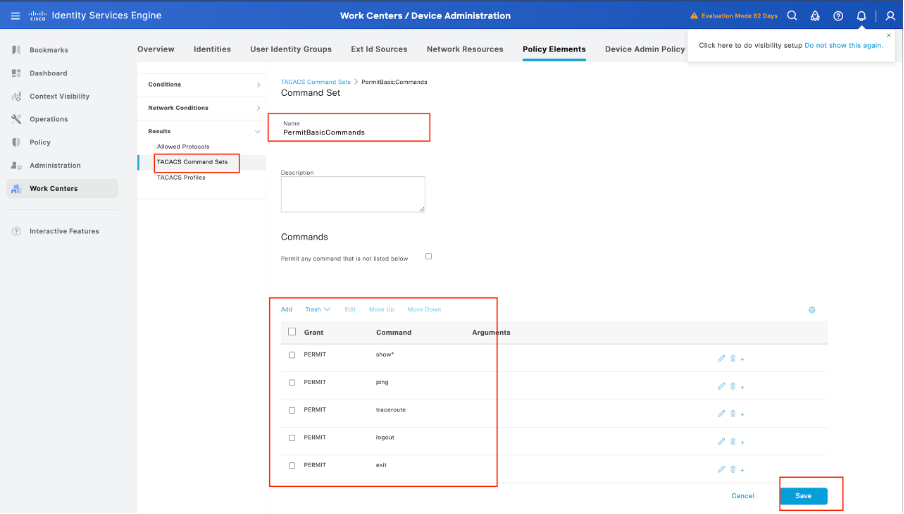
Step 6. Configure TACACS Command Sets.
Now, it is time to configure which commands users are allowed to be use. Since you can grant both of these use cases the Privilege Level 15, which gives access to every command available, use TACACS Command Sets to limit which commands can be used.
Navigate to Work Centers > Device Administration > Policy Elements >Results -> TACACS Command Sets. Click Add to create a new TACACS Command Set and name it PermitAllCommands. Apply this TACACS Command Set for Security Support.
The only thing you need to configure in this TACACS Command Set is to check the box for Permit any command that is not listed below.
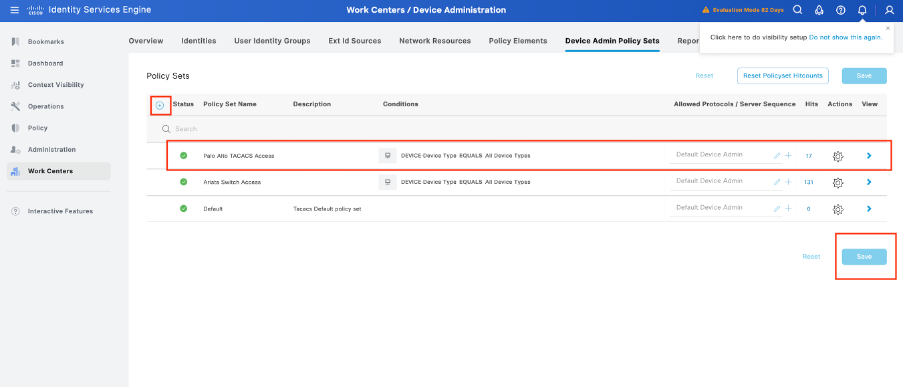
Step 7. Create a Device Admin Policy Set to be used for your Palo Alto, Navigate the menu Work Centers > Device Administration > Device Admin Policy Sets, Click the Add + icon.
Step 8. Name this new Policy Set, add conditions depending upon the characteristics of the TACACS+ authentications that is ongoing from the Palo Alto Firewall, and select as Allowed Protocols > Default Device Admin. Save your configuration.
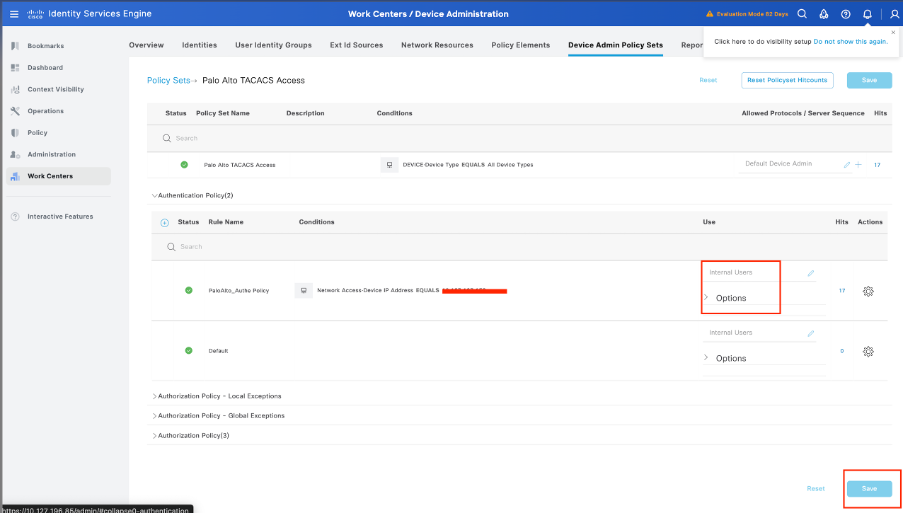
Step 9. Select in the > view option, then in the Authentication Policy section, select the external identity source that Cisco ISE uses to query the username and credentials for authentication on the Palo Alto Firewall. In this example, the credentials correspond to Internal Users stored within ISE.
Step 10. Scroll down until the section named Authorization Policy until the Default policy, select the gear icon, and then insert one rule above.
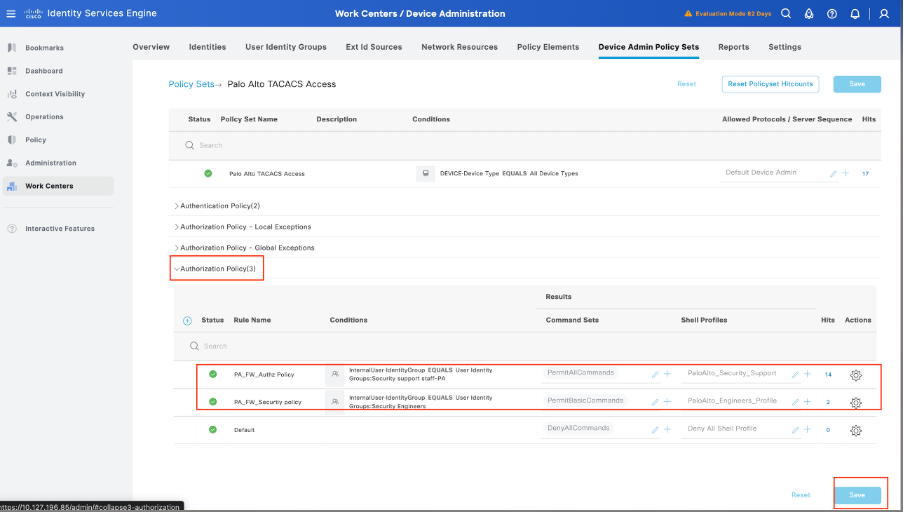
Step 11. Name the new Authorization Rule, add conditions concerning the user that is authenticated already as group membership, and in the Shell Profiles section add the TACACS profile that you configured previously, save the configuration.
Verify
ISE Review
Step 1. Review if the TACACS+ serviceability is running, this can be checked in:
- GUI: Review if you have the node listed with the service DEVICE ADMIN in Administration -> System -> Deployment.
- CLI: Run the command show ports | include 49 to confirm that there are connections in the TCP port that belong to TACACS+

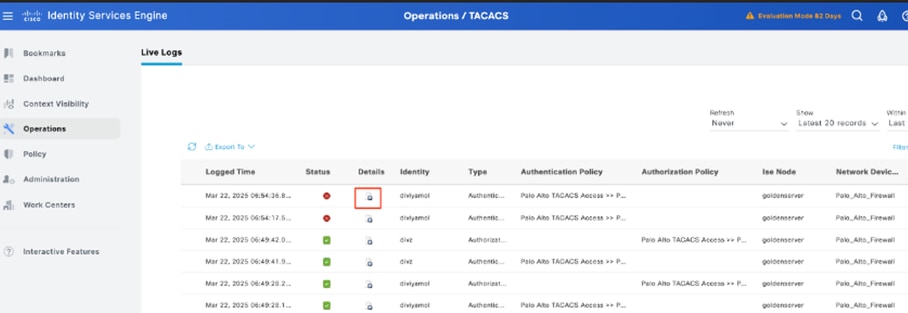
Step 2. Confirm if there are live logs concerning TACACS+ authentications attemps : this can be checked in the menu Operations -> TACACS -> Live logs.
Depending upon the failure reason you can adjust your configuration or address the cause of failure.
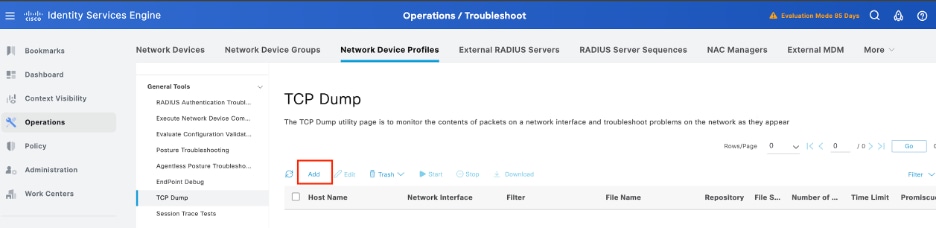
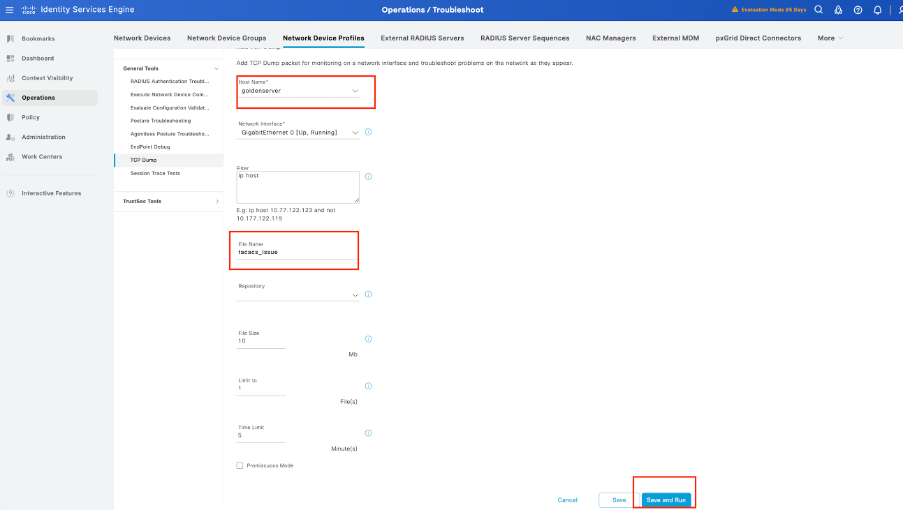
Step 3. In case you don’t see any live log, proceed to take a packet capture navigate to the menu Operations > Troubleshoot > Diagnostic Tools > General Tools > TCP Dump , select Add.
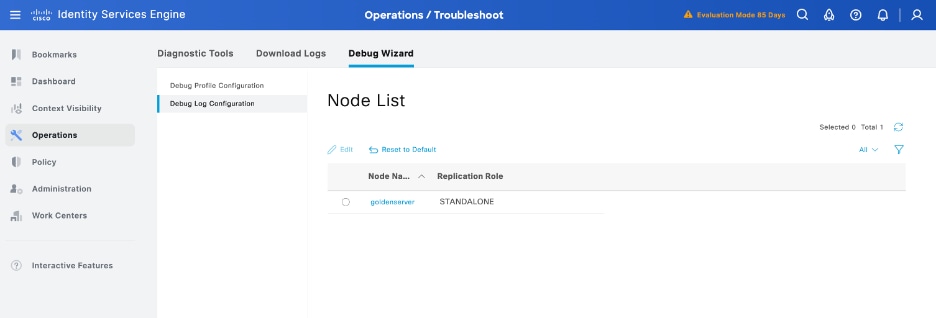
Step 4. Enable the component runtime-AAA in debug within the PSN from where the authentication is being performed in Operations > Troubleshoot > Debug Wizard > Debug log configuration, select PSN node , select then next in edit button .
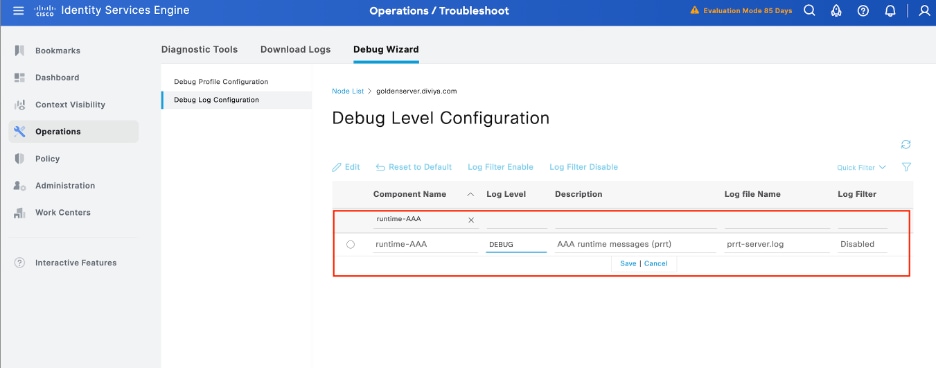
Identify the runtime-AAA component, set its logging level to debug, reproduce the issue, and analyse the logs for further investigation.
Troubleshooting
TACACS: Invalid TACACS+ Request Packet – Possibly Mismatched Shared Secrets
Problem
TACACS+ authentication between the Cisco ISE and the Palo Alto firewall (or any network device) fails with the error message:
"Invalid TACACS+ request packet - possibly mismatched Shared Secrets"
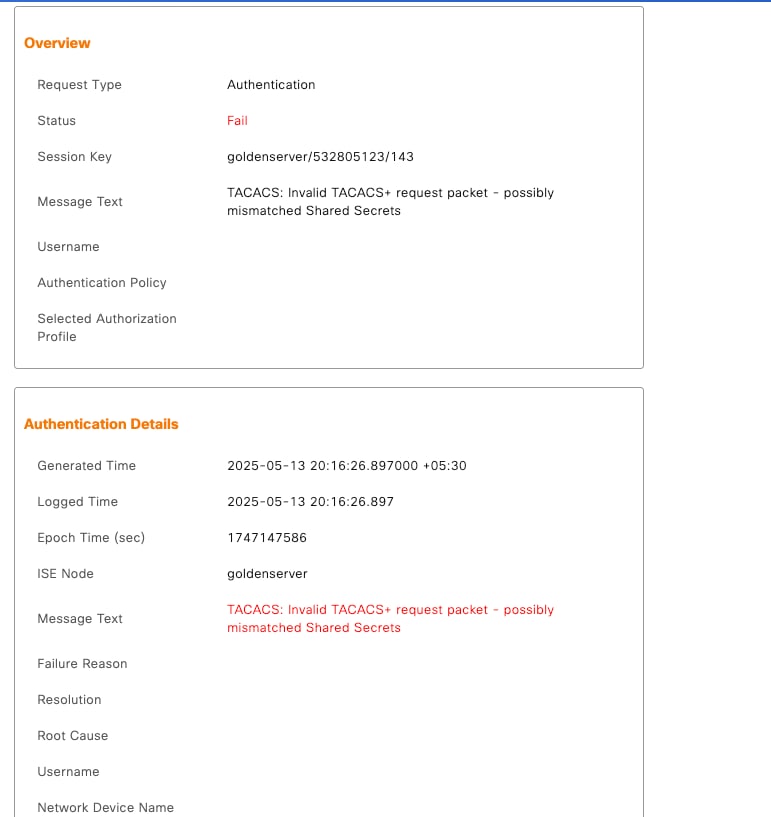
This prevents successful administrative login attempts and can impact device access control through centralized authentication.
Possible Causes
-
A mismatch in the shared secret configured on Cisco ISE and the Palo Alto firewall or network device.
-
Incorrect TACACS+ server configuration on the device (such as wrong IP address, port, or protocol).
Solution
There are several possible resolutions for this issue:
1. Verify the Shared Secret:
-
On Cisco ISE:
Navigate to Administration > Network Resources > Network Devices, select the affected device, and confirm the shared secret.
-
On the Palo Alto firewall:
Go to Device > Server Profiles > TACACS+, and ensure the shared secret matches exactly, including case and special characters.
2. Check TACACS+ Server Settings:
 Feedback