Configure SNMP on Cloud-Registered Endpoints
Available Languages
Download Options
Bias-Free Language
The documentation set for this product strives to use bias-free language. For the purposes of this documentation set, bias-free is defined as language that does not imply discrimination based on age, disability, gender, racial identity, ethnic identity, sexual orientation, socioeconomic status, and intersectionality. Exceptions may be present in the documentation due to language that is hardcoded in the user interfaces of the product software, language used based on RFP documentation, or language that is used by a referenced third-party product. Learn more about how Cisco is using Inclusive Language.
Contents
Introduction
This document describes how to configure and troubleshoot SNMP on a cloud-registered endpoint.
Prerequisites
Requirements
It is recommended that you have some familiarity with these topics:
- Control Hub Platform
- Endpoint Administration via the Graphical User Interface (GUI) of the endpoint and the Control Hub Devices section
- SSH to an endpoint as an admin user
- Room OS
- SNMP (SNMPv2c and SNMPv3)
- Snmpwalk or other utility/tool or Network Management System(NMS) to test the SNMP configuration
Components Used
The equipment listed here has been used to make the tests and produce the results described in this document:
- Control Hub Organization
- Cisco Room Kit Pro
- Cisco Room Bar Pro
- Linux Server to host snmpwalk utility for testing SNMP configuration.
The information in this document was created from the devices in a specific lab environment. All of the devices used in this document started with a cleared (default) configuration. If your network is live, ensure that you understand the potential impact of any command.
What is SNMP
SNMP stands for Simple Network Management Protocol. It is a protocol used to collect and manage information about the devices within a network, monitor device status, or make configuration changes. Those devices can be routers, switches, servers, printers, or any other type of device. It is a prerequisite that these devices have been assigned an IP address. There are three versions of SNMP. Room OS supports SNMPv2c and SNMPv3. SNMPv1 is not supported.
This article concentrates on the configuration and troubleshooting of SNMP on Collaboration endpoints running Room OS that are cloud-registered (not using Webex Edge for Devices).

Caution: This article is approaching the SNMP configuration only from the endpoint perspective. Any configuration done on the network side and the tools used to request/update SNMP-related information on the endpoints are outside of the scope of this article.
TAC is not supporting the troubleshooting of SNMP within the network, nor can offer any inferences on why SNMP is not working as expected from a network perspective. Your network team must be involved in troubleshooting these issues further.
Management of SNMP can be achieved with many different tools. Those tools are not supported by TAC. If there is a discrepancy in the information those tools collect from the endpoints, the issue must be troubleshooted by the network team at first and then escalated in TAC if sufficient information exists that proves it is an endpoint-related issue.
What Information Can Be Requested
Using SNMP, you can request a limited amount of information from the endpoint. OIDs and MiBs supported can be seen in this link, under the details of the NetworkService SNMP Mode command description:
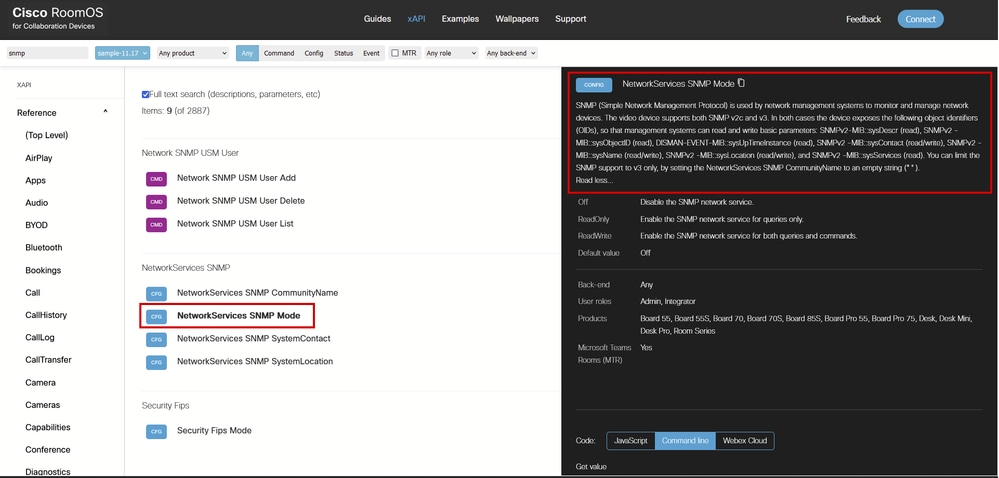 NetworkService SNMP Mode Command Description in Room OS xAPI Documentation
The endpoints expose these OIDs for both SNMPv2 and SNMPv3:
- SNMPv2-MIB::sysDescr (read),
- SNMPv2 -MIB::sysObjectID (read),
- DISMAN-EVENT-MIB::sysUpTimeInstance (read),
- SNMPv2 -MIB::sysContact (read/write),
- SNMPv2 -MIB::sysName (read/write),
- SNMPv2 -MIB::sysLocation (read/write),
- SNMPv2 -MIB::sysServices (read).

Note: NetworkServices SNMP CommunityName can be set to an empty string if you wish to use only SNMPv3.
Configure SNMP on a Cloud-Registered Endpoint
Generally, configuration changes on endpoints can happen in four different ways:
- The Webex APIs available
- The endpoint GUI
- Control Hub
- SSH directly to the endpoint
Note: To access an endpoint GUI, open a browser, and on the URL bar, type the endpoint's IP address. You need to be on the same network with the endpoint, and you need to have user credentials to be able to log in.
Not all configurations are possible to be made in all four ways. For the scenario of this document, SNMP mode can be enabled in all four ways, but in order to create an SNMP user that is able to communicate with the device over SNMP, you need to SSH to the endpoint, or use the Webex APIs, or use the endpoint's GUI at Developer API under the Customization section. USM users can not be created from the Control Hub All Configurations section of the endpoint.
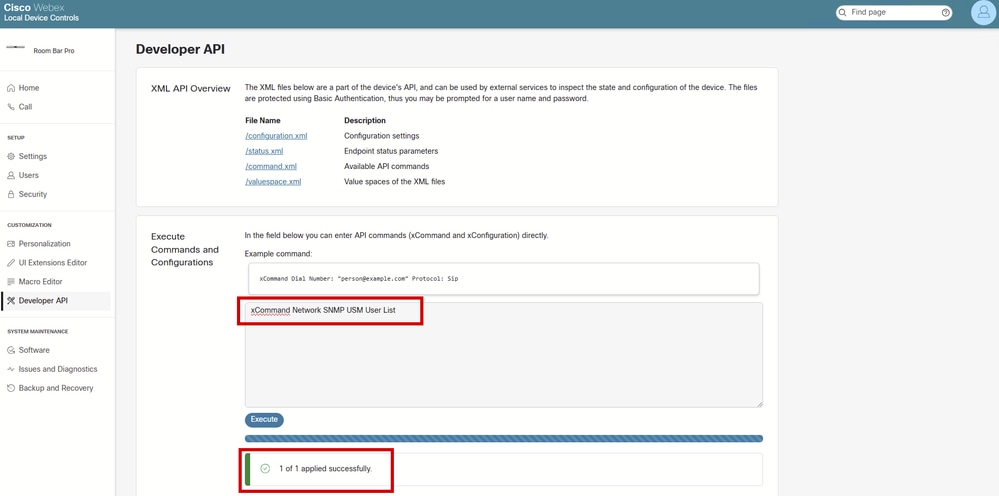 Developer API Section on Endpoint GUI
Caution: The commands issued in the Execute Commands and Configurations text box are not returning any results. You only see if the command was successfully executed or not. This is why the command that lists the USM users does not return any results in the previous screenshot. This means that you can create a USM user from this section of the GUI of the endpoint successfully, but in order to double-check if the user is created you need to SSH to the device.
For configuring SNMPv2c, it is not needed to create a user. Authentication takes place with the use of the community name (also called community string) that is configured on the endpoint. The endpoint's SNMP agent, which already exists on the device, responds to requests that match the configured community name on the device. If an SNMP request from a management system does not include a matching community name (case sensitive), the message is dropped, and the SNMP agent in the video device is not going to send a response.
However, SNMPv3 requires the configuration of a USM user for the authentication to be successful. For this purpose, Network SNMP USM User commands are necessary to be used. This can happen by SSH directly to the device or by using the device GUI under the Developer API section. Alternatively, the Webex API can be used.
Caution: You need to decide if you are going to enable SNMPv2, SNMPv3, or both. SNMPv1 is not supported on Cisco endpoints. Any attempt to use SNMPv1 is going to fail.
In this document, the SNMPv2 and SNMPv3 protocols are going to be enabled and configured in Control Hub, but the USM user necessary for SNMP3 authentication is configured over SSH.
Enable SNMPv2c Mode in Control Hub
Navigate to admin.webex.com and log in with your admin credentials. It is suggested to be a Full admin. Navigate to Devices under Management section on the left side of the user interface. Under Devices tab, select the device that you want to configure. In this example, a Cisco Room Kit Pro is used.
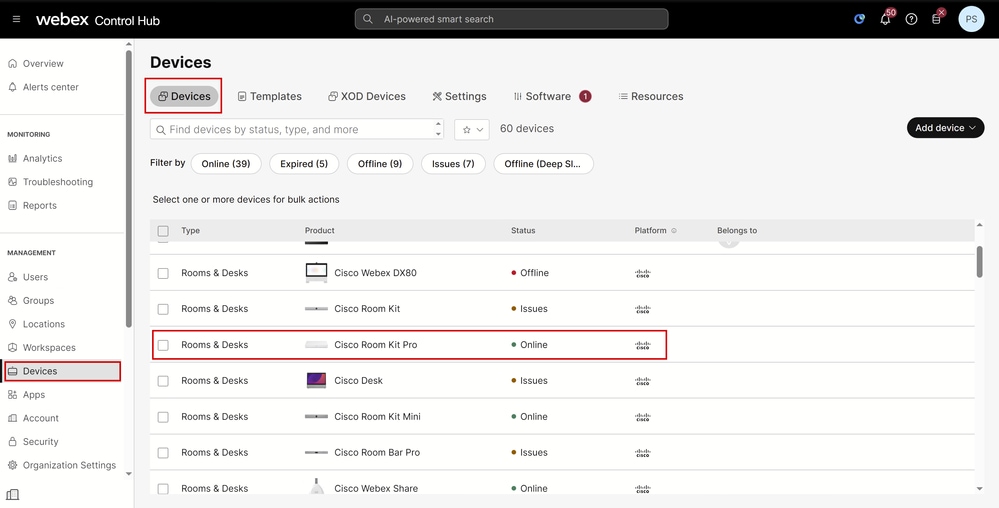 Control Hub Devices Section
Under the device details in the new Control Hub page that opens, navigate to the Configurations section and click All Configurations:
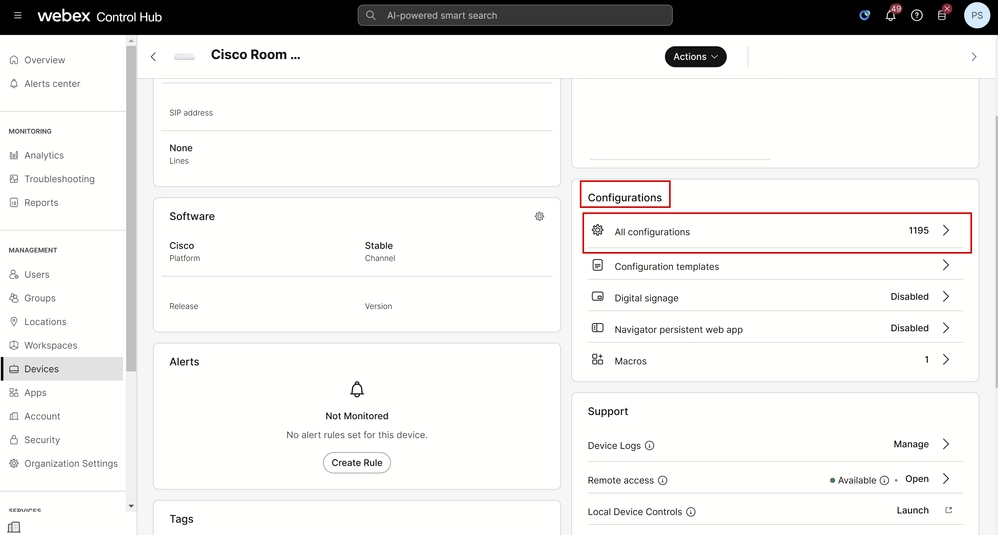 Control Hub Device Details for Room Kit Pro
In the search bar, type snmp and select NetworkServices > SNMP > Mode:
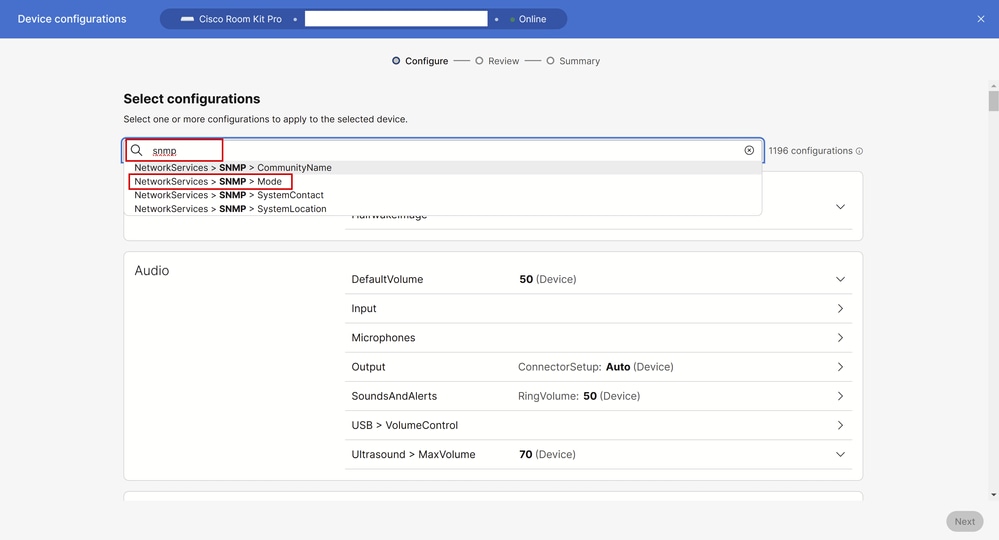 Control Hub All Configurations Window
Select the mode you need to enable in your environment. There are three options available:
- Off: Disable the SNMP network service.
- ReadOnly: Enable the SNMP network service for queries only.
- ReadWrite: Enable the SNMP network service for both queries and commands.
For this example, ReadWrite is selected. Then, click SNMP in the settings navigation section, as seen in the picture. This takes you back one step in the settings, and you are able to see all SNMP-related settings that can be configured on the device via Control Hub:
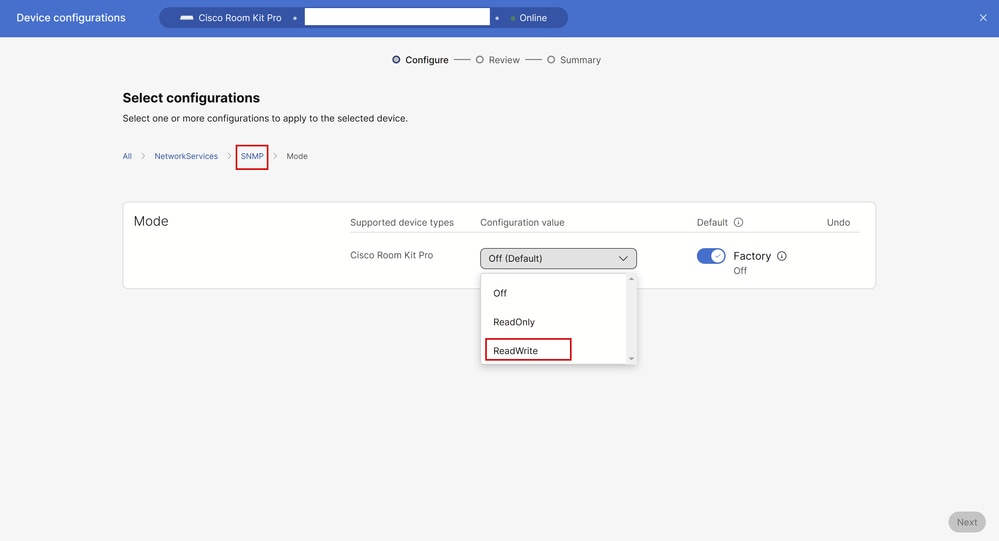 SNMP Mode Setting under All Configurations in Control Hub
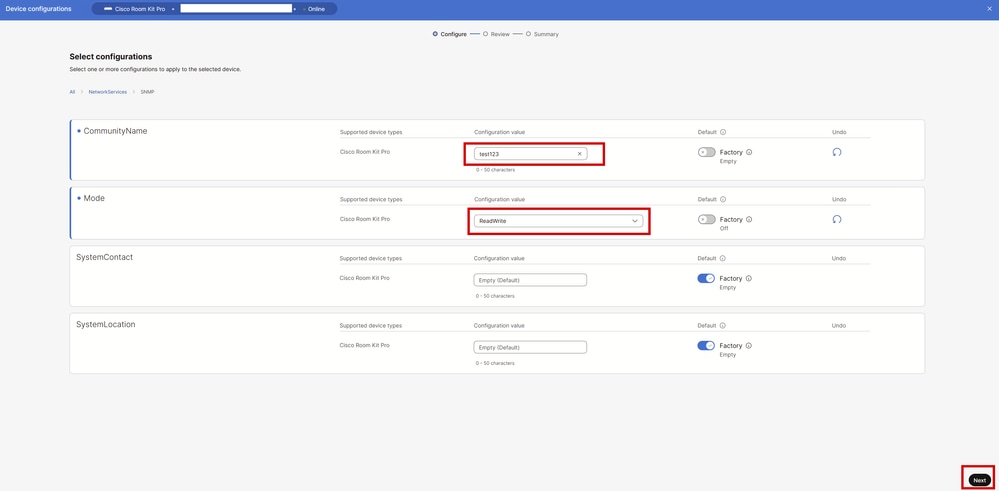
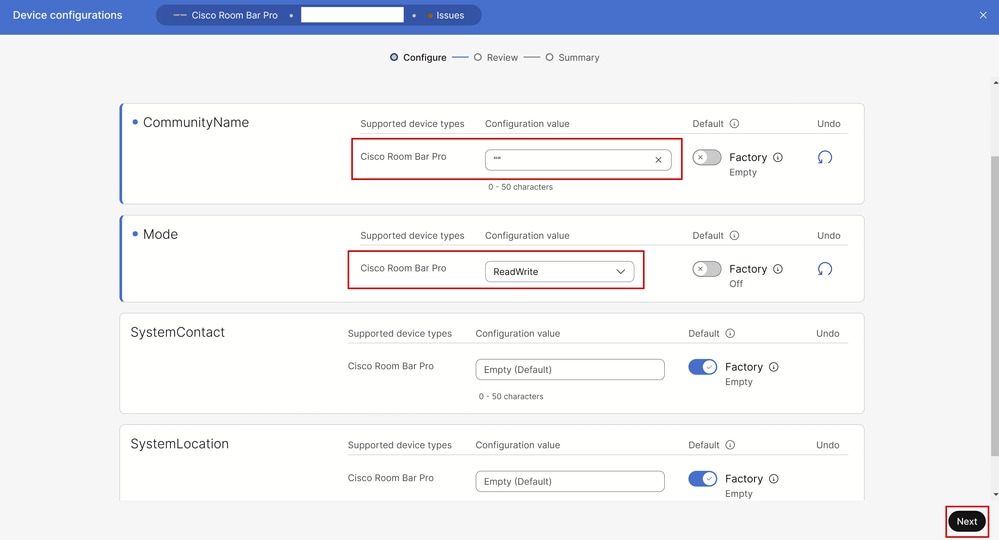
After clicking SNMP, all SNMP options available appear, as seen in the this picture. For SNMPv2 to be set up successfully, a Community Name needs to be set up. The Community Name is used for authentication between the SNMP server and the SNMP agent that exists on the endpoint. The Community Name is set to test123 for this example. Click Next at the bottom right corner.
 SNMP Settings under All Configurations in Control Hub
Review the device Configurations and click Apply at the bottom right corner:
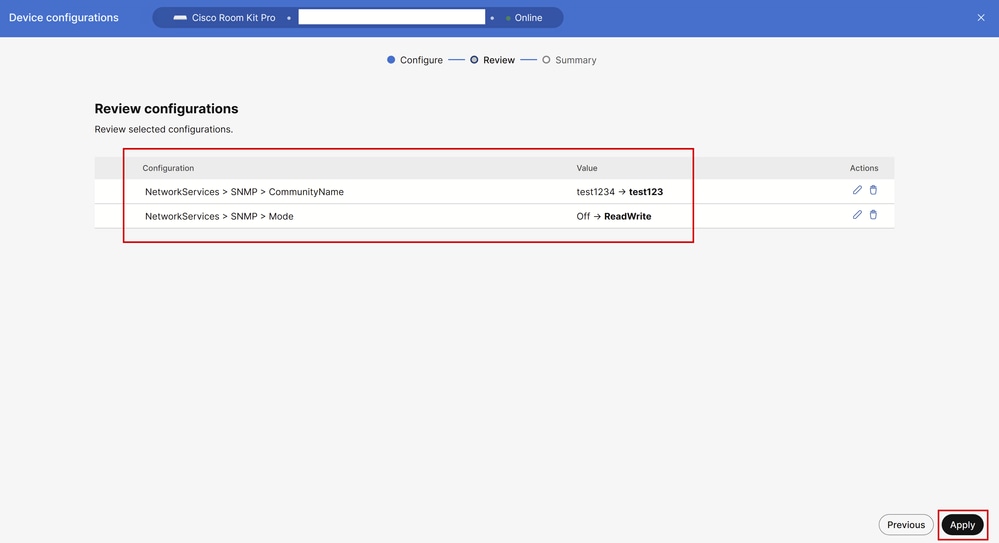 Review Configurations Before Applying the Changes
Verify that the configuration changes have been applied successfully. Then, click Close.
 Endpoint Configurations Successfully Applied in Control Hub
At this stage, SNMPv2c is successfully enabled on the endpoint, and the community name is set up.
Enable SNMPv3 Mode in Control Hub
SNMPv3 provides more security and requires a different configuration on the endpoint compared to SNMPv2c. Navigate to Devices under Management section in Control Hub. Remain under the Devices tab and select one of your endpoints that you want to configure with SNMPv3. For this example, a Cisco Room Bar Pro is used.
Under the device details, navigate to the Configurations section and click All Configurations. The Device Configurations page opens. Type snmp in the search bar and select NetworkServices > SNMP > Mode. For this example, SNMP mode is set to ReadWrite. Click SNMP to see all the configurable SNMP settings on the device.
Note: All steps mentioned up to now for SNMPv3 have already been described when SNMPv2c was configured in a previous example. Because of this, no screenshot of the steps is provided. Refer to the section Enable SNMPv2c Mode in Control Hub if there is any doubt about how to navigate through the Control Hub settings.
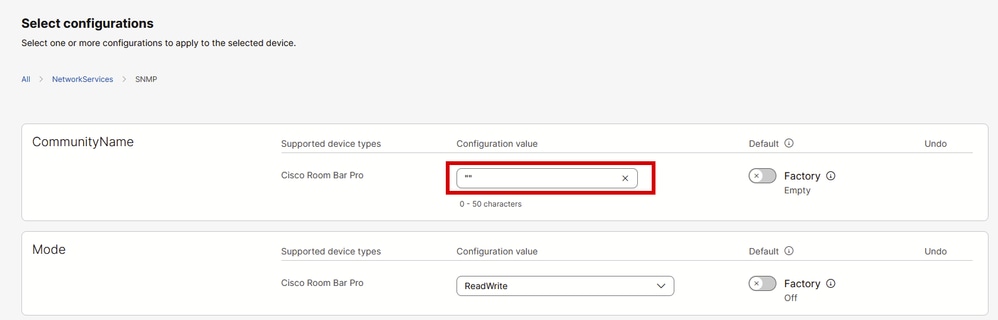
To support only SNMPv3, you need to set up the community name as an empty string surrounded by quotes: "".
 SNMP Settings under All Configurations in Control Hub
Click Next, then review the configuration changes and click Apply. Click Close to close the device configuration page.
This concludes the configuration that can be performed in Control Hub. At this stage, only SNMPv3 is enabled.
How Does the SNMP Configuration Look Like in the Endpoint GUI
The same configurations can be performed from the device GUI. Open a browser tab and type the endpoint's IP address (you need to be in the same network as the endpoint). Log in as an admin user and in the endpoint GUI, navigate to Settings under the SETUP section. Remain on the Configurations tab, and on the settings search bar type snmp. This image shows how the SNMP settings are displayed for the SNMPv3 configuration done on the Room Bar Pro in the previous section:
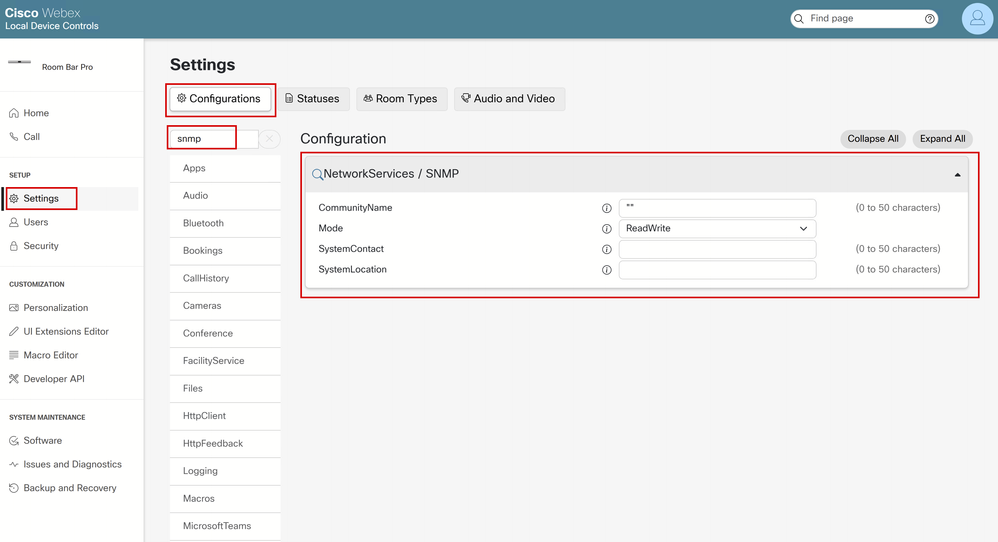 SNMPv3 Configuration on the Endpoint's GUI
Configure the USM User for SNMPv3
In order to be able to use SNMPv3, you need to create a USM user. The available commands to perform this action can be found in the Room OS documentation link here. Use SSH to connect to the device. For that, you need to have an admin account on the device. If not, then you need to create an admin account. This section goes through this whole process.
Navigate to Devices under Management section in Control Hub. Remain under the Devices tab and select one of your endpoints that you want to create an admin user for. For this example, a Cisco Room Bar Pro is used.
Under the device details, navigate to the Support section and click Local Device Controls (you need to be in the same network as the endpoint for this to work). The device GUI opens. Navigate to Users under SETUP section and click Create User.
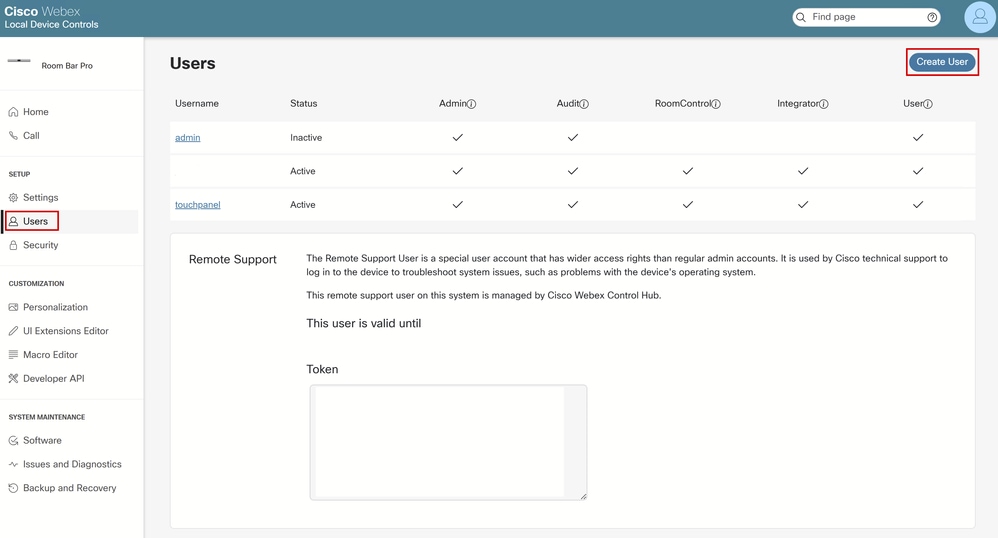 Users Section in the Endpoint's GUI
Provide a username and passphrase (password). Make sure that the user has full admin privileges and is active:
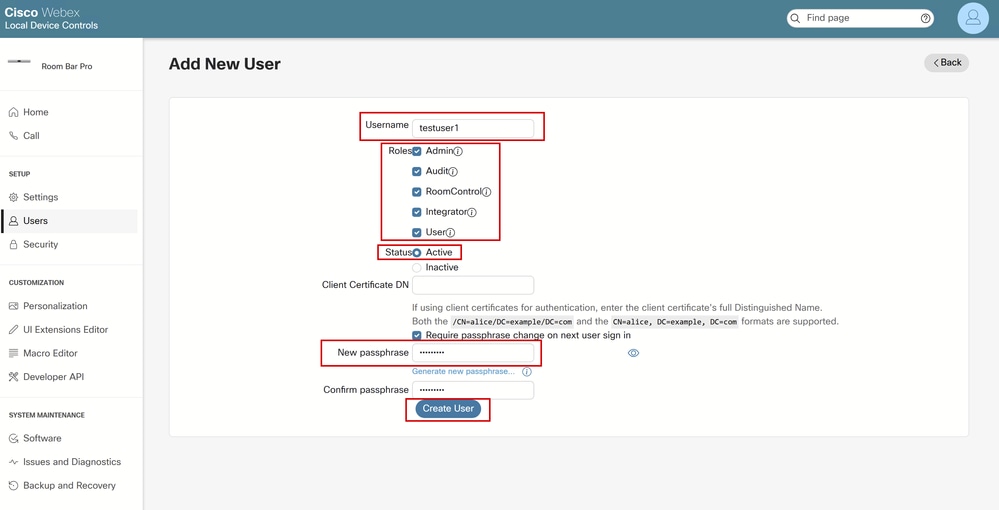 Create a User from Endpoint's GUI
Verify that the user has been created and is active from the Users page:
 New User Created and Listed Among Other Users
Note: On the first SSH log in attempt with a newly created user, you are asked to change your password. You see a prompt similar to:
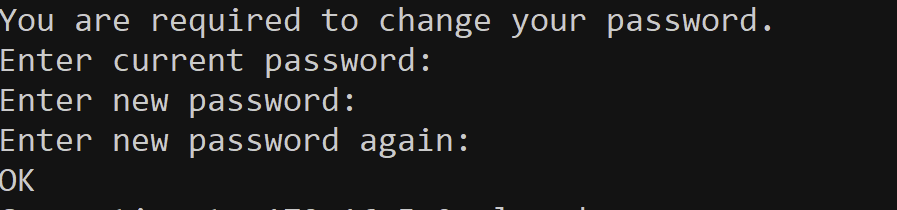 Change Password when SSH for the First Time
Once the password is changed, you are immediately disconnected and you need to start a new SSH connection.
Once the admin user is successfully created, use an SSH client of your choice and connect to the endpoint. Log in with the admin credentials. This is the prompt you see:
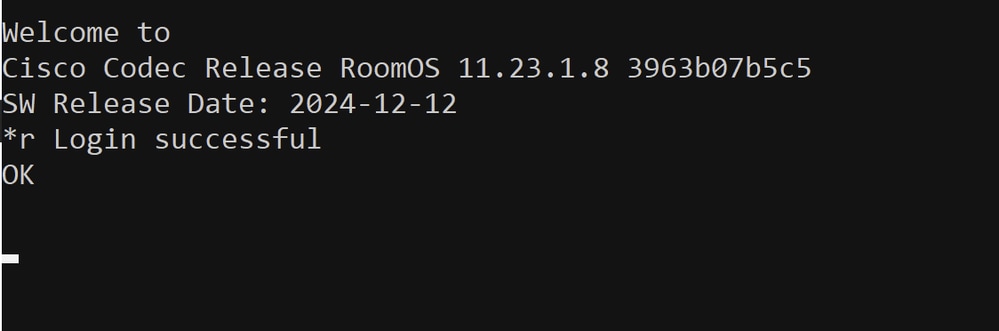 Successful Log in Attempt via SSH to the Endpoint
Use the Network SNMP USM User Add command as described in this article. For this demonstration, the command used is:
xCommand Network SNMP USM User Add AuthenticationPassword: testuser123 AuthenticationProtocol: SHA-256 Name: psitaras PrivacyPassword: test1234The result of this command, when successful, is:
 USM User Creation via SSH
For the command to execute with no errors, you need to abide by certain rules described in the command documentation shared in this link. For convenience, the current requirements at the time of writing this document for this command are pasted in this picture, but you must make sure to refer to this link when creating your user. At the end of the picture, notice that there is the exact syntax of the command.
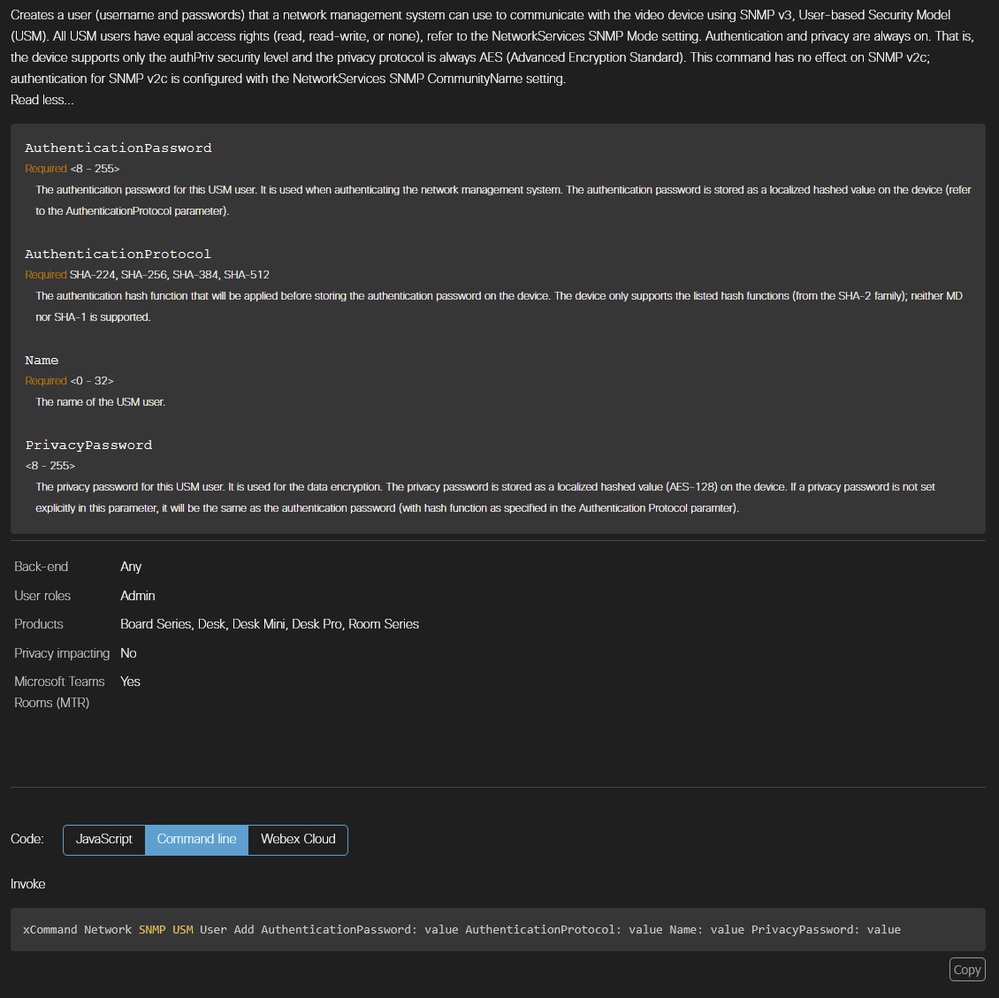 USM User Creation Command Syntax from xAPI Documentation

Warning: In case there is a typo or there is a requirement not met, the command returns an error, and the user is not going to be created. An example is provided, where instead of providing a Privacy Password with at least 8 characters, a shorter 7-character password is given:
 Unsuccessful USM User Creation due to Short Privacy Password
You can test if your user was created by using the Network SNMP USM User List command. This command lists all USM users that are stored on the device:
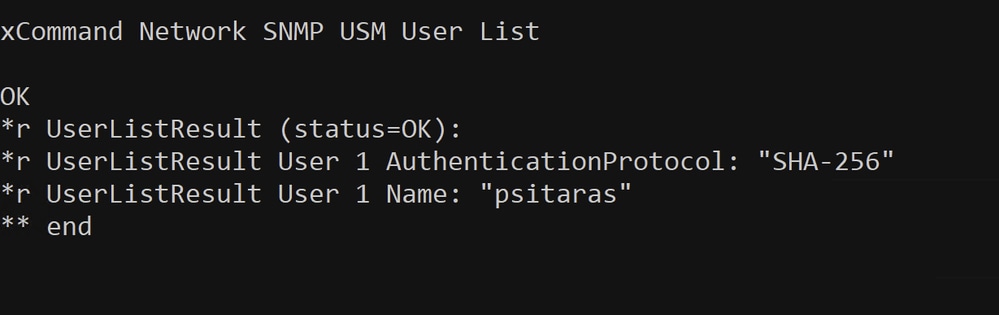 Network SNMP USM User List Command Used to Confirm User Creation
At this stage, it has been confirmed that the user psitaras has been successfully created. The SNMPv3 configuration has been completed.
Note: The USM user psitaras is not visible in the endpoint's GUI under the Users section. This is expected.
 USM Users are not Visible under Users in Endpoint's GUI
Testing SNMPv2c and SNMPv3 Configuration
At this stage, you can proceed with testing the SNMPv2c and/or SNMPv3 configuration with your Network Management System (NMS). For this article, the lab configuration does not contain any NMS or SNMP server running an SNMP service. To test the configuration, the utility called snmpwalk is used. This utility is installed on a Linux server.
Caution: Snmpwalk is not a suggested tool for testing the SNMP configuration on your collaboration endpoints. It is not supported by TAC engineers, and you need to be familiar with how to use the tool before proceeding to testing. Instead of snmpwalk, you can use any other SNMP tool or your NMS to test your configuration. Snmpwalk is used in this article just as an example (a tool is needed to test the configuration for demonstration purposes), and there is no commitment or promotion related to its use.
The installation of snmpwalk is not part of this guide and is omitted. Depending on the Operating System (OS) of the machine you are using for testing, the installation requirements can vary. You must work on successfully installing it before testing.
Snmpwalk is a tool that can be used for verifying the SNMP configuration. It performs a walk through the endpoint's MiBs and returns the information available. Cloud-registered endpoints expose 7 Object Identifiers (OIDs):
- SNMPv2-MIB::sysDescr (read),
- SNMPv2 -MIB::sysObjectID (read),
- DISMAN-EVENT-MIB::sysUpTimeInstance (read),
- SNMPv2 -MIB::sysContact (read/write),
- SNMPv2 -MIB::sysName (read/write),
- SNMPv2 -MIB::sysLocation (read/write),
- SNMPv2 -MIB::sysServices (read).
Note: The internal IPs used for the snmpwalk tests listed are private IPs and are not in use anymore. The lab used for this guide has been decommissioned and the devices are factory reset.
The Cisco Room Kit Pro endpoint is configured with SNMPv2c. Authentication happens using community strings. Issue the this command:
# '-c' option is used to provide the community string
# '-v' option is used to provide the SNMP version used
# The IP provided is the endpoint's IP

snmpwalk -c test123 -v 2c 172.16.5.9

iso.3.6.1.2.1.1.1.0 = STRING: "Cisco Codec
SoftW: ce11.26.1.5.53ff615d0d9
MCU: Cisco Codec Pro
Date: 2025-02-28
S/N: FDO2706JG49"
iso.3.6.1.2.1.1.2.0 = OID: iso.3.6.1.4.1.5596.150.6.4.1
iso.3.6.1.2.1.1.3.0 = Timeticks: (106770681) 12 days, 8:35:06.81
iso.3.6.1.2.1.1.4.0 = ""
iso.3.6.1.2.1.1.5.0 = ""
iso.3.6.1.2.1.1.6.0 = ""
iso.3.6.1.2.1.1.7.0 = INTEGER: 72
iso.3.6.1.2.1.1.7.0 = No more variables left in this MIB View (It is past the end of the MIB tree)
Snmpwalk returns 7 results as expected. There are three MiBs that are empty:
- SNMPv2 -MIB::sysContact (read/write), (iso.3.6.1.2.1.1.4.0)
- SNMPv2 -MIB::sysName (read/write), (iso.3.6.1.2.1.1.5.0)
- SNMPv2 -MIB::sysLocation (read/write), (iso.3.6.1.2.1.1.6.0)
There are three xConfiguration commands that can be used to set values to these MiBs. SSH to the endpoint and issue these commands:
xConfiguration NetworkServices SNMP SystemContact: testuser1
xConfiguration NetworkServices SNMP SystemLocation: Room1
xConfiguration SystemUnit Name: My_Room_Kit_Pro
Note: Instead of using these three commands, you can perform changes to these settings from Control Hub, from the endpoint GUI, or from Webex APIs.
Once the above commands are issued, use snmpwalk again on the same endpoint. You notice that the previously empty MiBs are populated with the values provided via the xConfiguration commands:
snmpwalk -c test123 -v 2c 172.16.5.9

iso.3.6.1.2.1.1.1.0 = STRING: "Cisco Codec
SoftW: ce11.26.1.5.53ff615d0d9
MCU: Cisco Codec Pro
Date: 2025-02-28
S/N: FDO2706JG49"
iso.3.6.1.2.1.1.2.0 = OID: iso.3.6.1.4.1.5596.150.6.4.1
iso.3.6.1.2.1.1.3.0 = Timeticks: (107047446) 12 days, 9:21:14.46
iso.3.6.1.2.1.1.4.0 = STRING: "testuser1"
iso.3.6.1.2.1.1.5.0 = STRING: "My_Room_Kit_Pro"
iso.3.6.1.2.1.1.6.0 = STRING: "Room1"
iso.3.6.1.2.1.1.7.0 = INTEGER: 72
iso.3.6.1.2.1.1.7.0 = No more variables left in this MIB View (It is past the end of the MIB tree)
At this stage, it is confirmed that the SNMPv2c configuration made on the Room Kit Pro device is operational.
The Cisco Room Bar Pro endpoint is configured with SNMPv3. For SNMPv3, you need to ensure you use the proper authentication. Community strings are not used. Instead, SNMPv3 uses usernames and passwords.
# '-v3' option selects SNMPv3.
# '-u' option provides the USM username configured.
# '-x' option provides the privacy protocol (encryption algorithm). Options are DES and AES. Cloud-registered endpoints support only AES.
# '-l' option specifies the security level. Options are 'noAuthNoPriv', 'authNoPriv', and 'authPriv'. Cloud-registered endpoints support only 'authpriv'.
# '-a' option specifies the authentication protocol. Cloud-registered endpoints support only SHA-2 protocols.
# '-A' option specifies the authentication passphrase.
# '-X' specifies the privacy pass phrase for the encrypted SNMPv3 messages.

snmpwalk -v3 -u psitaras -x AES -l authPriv -a SHA-256 -A testuser123 -X test1234 172.16.5.23

iso.3.6.1.2.1.1.1.0 = STRING: "Cisco Codec
SoftW: ce11.23.1.8.3963b07b5c5
MCU: Cisco Room Bar Pro
Date: 2024-12-12
S/N: FOC2732H1VU"
iso.3.6.1.2.1.1.2.0 = OID: iso.3.6.1.4.1.5596.150.6.4.1
iso.3.6.1.2.1.1.3.0 = Timeticks: (112579044) 13 days, 0:43:10.44
iso.3.6.1.2.1.1.4.0 = ""
iso.3.6.1.2.1.1.5.0 = ""
iso.3.6.1.2.1.1.6.0 = ""
iso.3.6.1.2.1.1.7.0 = INTEGER: 72
iso.3.6.1.2.1.1.7.0 = No more variables left in this MIB View (It is past the end of the MIB tree)
At this stage, it is confirmed that the SNMPv3 configuration made on the Room Bar Pro device is operational.
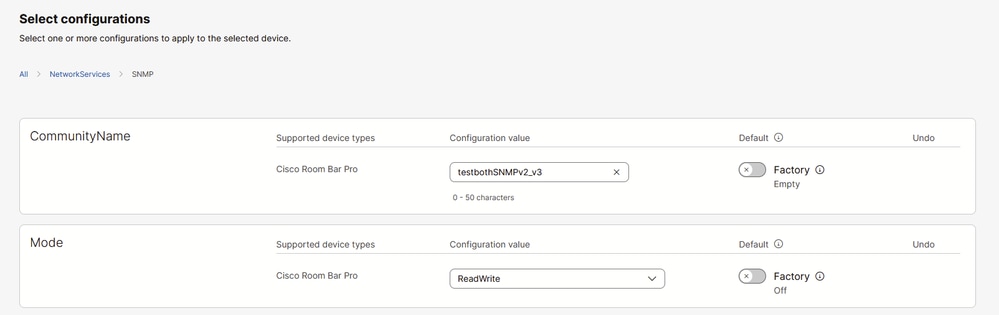
Can an Endpoint Have Both SNMPv2c and SNMPv3 Active Simultaneously
Yes, it is possible. However, during the SNMP configuration, you need to set up a community name in order to be able to have SNMPv2c authentication. For this test, the Room Bar Pro from previous examples is used. The current configuration in the Control Hub All Configurations section of the endpoint is:
 Endpoint SNMP Configurations in Control Hub
Notice that the community name is not empty. There are two quotes, which indicate the community name is an empty string. You can limit the SNMP support to version 3 only, by setting the NetworkServices SNMP CommunityName to an empty string (""). You need to replace this string with a community name, for example, testbothSNMPv2_v3.
 Add Community Name for SNMPv2c in Control Hub Endpoint Configuration Settings
It is already confirmed that SNMPv3 is working on the Room Bar Pro. Snmpwalk is used to test if SNMPv2c is working too, after setting up the community name:
snmpwalk -c testbothSNMPv2_v3 -v 2c 172.16.5.23

iso.3.6.1.2.1.1.1.0 = STRING: "Cisco Codec
SoftW: ce11.23.1.8.3963b07b5c5
MCU: Cisco Room Bar Pro
Date: 2024-12-12
S/N: FOC2732H1VU"
iso.3.6.1.2.1.1.2.0 = OID: iso.3.6.1.4.1.5596.150.6.4.1
iso.3.6.1.2.1.1.3.0 = Timeticks: (112696957) 13 days, 1:02:49.57
iso.3.6.1.2.1.1.4.0 = ""
iso.3.6.1.2.1.1.5.0 = ""
iso.3.6.1.2.1.1.6.0 = ""
iso.3.6.1.2.1.1.7.0 = INTEGER: 72
iso.3.6.1.2.1.1.7.0 = No more variables left in this MIB View (It is past the end of the MIB tree)
Can Multiple Endpoints be Configured via Control Hub with SNMP
Yes, it is possible to configure multiple devices at once in Control Hub. This article provides information on how to perform it step by step under the section Configure multiple devices.
Important Details to Remember
- Only specific MiBs are available. The number of available MiBs is limited by design from the engineering team that designs the endpoints. MiBs cannot be expanded or enhanced to provide more information.
- SNMPv2c authenticates using Community Name (also referred to as Community String), whereas SNMPv3 authenticates using username and password, and offers encryption too. When testing, ensure you are using the correct authentication method (with snmpwalk or another tool/NMS) for the protocol you have configured.
- Authentication and privacy are always on on SNMPv3. The endpoints support only the authPriv security level and the privacy protocol is always Advanced Encryption Standard (AES).
- SNMPv3 is supported with User-based Security Model (USM) options only. There is no support for SMNPv3 over TLS.
- USM user commands used to configure users for SNMP authentication have no effect on SNMPv2c.
- SNMP CommunityName setting on endpoints has no effect on SNMPv3 configuration.
- SNMP CommunityName is case-sensitive.
- You can limit the SNMP support to v3 only, by setting the NetworkServices SNMP CommunityName to an empty string ("").
- SNMPv1 is not supported.
- For both SNMPv2c and SNMPv3, endpoints expose the same object identifiers (OIDs).
- For SNMPv3, the Authentication protocol needs to be in the SHA-2 family (neither MD nor SHA-1 is supported). If not, then SNMP Requests fail to authenticate and remain unanswered.
- The privacy password is stored as a localized hashed value (AES-128) on the device. If a privacy password is not set explicitly in this parameter, it is set to be the same as the authentication password (with a hash function as specified in the Authentication Protocol parameter).
- Passwords/passphrases and usernames need to be within specific length boundaries. For example, USM username needs to be up to 32 characters, and the authentication password needs to be a minimum of 8 characters and a maximum of 255. If these requirements are not met, then the Network SNMP USM User Add command fails to create the user and returns an error.
Contacting TAC to Resolve an SNMP Issue on an Endpoint
If the SNMP configuration of the endpoint has been completed, but an issue has been raised, you need to contact TAC and share this information:
- Provide your Organization ID in Control Hub and the Serial Number (SN) of the endpoint affected.
- Describe the scenario faced.
- Provide the SNMP version you are trying to configure.
- Provide any error messages seen.
- If there is an issue with the configuration of the device, explain clearly in which step the configuration process has stopped and provide screenshots. Share the configuration command that returns an error.
- Collect endpoint logs and upload them on your case.
- Share the utility\NMS or other tool used to test your SNMP configuration. If you are using a utility to test against the SNMP agent of the endpoints, provide the full command used.
Related Information
Room OS xAPI Documentation - SNMP-related Commands
Device Configurations for Board, Desk, and Room Series Devices
Revision History
| Revision | Publish Date | Comments |
|---|---|---|
1.0 |
06-May-2025
|
Initial Release |
Contributed by Cisco Engineers
- Petros SitarasTechnical Consulting Engineer
 Feedback
Contact Cisco
- Open a Support Case

- (Requires a Cisco Service Contract)