Deploy DNS VNF with SRIOV Network on Openstack CVIM - Configuration Example for Prime Network Registrar (DNS)
Available Languages
Download Options
Bias-Free Language
The documentation set for this product strives to use bias-free language. For the purposes of this documentation set, bias-free is defined as language that does not imply discrimination based on age, disability, gender, racial identity, ethnic identity, sexual orientation, socioeconomic status, and intersectionality. Exceptions may be present in the documentation due to language that is hardcoded in the user interfaces of the product software, language used based on RFP documentation, or language that is used by a referenced third-party product. Learn more about how Cisco is using Inclusive Language.
Contents
Introduction
This document describes the step-by-step deployment of CPNR on OpenStack Cisco Virtualized Infrastructure Manager (CVIM) using SR-IOV and Active-Backup bonding.
Prerequisites
Requirements
Cisco recommends that you have knowledge of these topics:
- Familiarity with OpenStack and Single Root Input/Output Virtualization (SR-IOV) concepts
- Working knowledge on Cisco Virtual Interface Manager (VIM) and Cisco Elastic Services Controller and Linux commands and networking
Components Used
This document is not restricted to specific software and hardware versions.
The information in this document was created from the devices in a specific lab environment. All of the devices used in this document started with a cleared (default) configuration. If your network is live, ensure that you understand the potential impact of any command
Background Information
In the current networking landscape, Virtual Network Functions (VNFs) play a critical role in enabling agile, scalable, and efficient network services. For VNFs requiring high-performance network connectivity, SR-IOV is a commonly used technology. SR-IOV allows VNFs to bypass the hypervisor virtual switch and directly access physical Network Interface Controller (NIC) resources, thereby, reducing latency and increasing throughput.
Configuration
Before proceeding with the deployment, ensure these prerequisites are met.
1. Hardware Requirements
- SR-IOV Capable NICs:
- At least two SR-IOV-capable physical NICs with SR-IOV enabled in the BIOS/Unified Extensible Firmware Interface (UEFI).
- Example:sriov0mapped to Non-Uniform Memory Access (NUMA) node 0 andsriov1mapped to NUMA node 1.
- NUMA-Aware Hosts:
- Compute nodes must support NUMA architecture.
- NUMA support must be enabled in the hosts BIOS/UEFI.
2. Identifying Intel NIC Cards
Intel XL710 and E810CQDA2 NIC cards are commonly used for high-performance SR-IOV networking. In order to verify the NIC card model on the host, refer these steps:
Step 1. Using lspci Command
Execute this command to list Peripheral Component Interconnect (PCI) devices related to network controllers:
lspci | grep -i ethernet
Output Example:
81:00.0 Ethernet controller: Intel Corporation Ethernet Controller XL710 for 40GbE QSFP+ (rev 02)
82:00.0 Ethernet controller: Intel Corporation Ethernet Controller E810-C for QSFP (rev 03)
Step 2. Verifying XL710
If the NIC is Intel XL710, you can see Ethernet Controller XL710in the output.
Step 3. Verifying E810CQDA2
If the NIC is Intel E810CQDA2, you can see Ethernet Controller E810-Cin the output.
Step 4. Confirming Driver Support
In order to check the NIC driver in use, run:
ethtool -i <NIC_INTERFACE_NAME>
Output Example for XL710:
driver: i40e
version: 2.13.10
Output Example for E810CQDA2:
driver: ice
version: 1.7.12
Ensure that the driver version matches the compatibility matrix for your OpenStack and Linux distribution.
3. BIOS/UEFI Configuration
- Enable SR-IOV:
Ensure that SR-IOV is enabled in the servers BIOS/UEFI.
- Enable Virtualization Technology for Directed I/O (VT-d)/AMD-Vi:
Intel VT-d or AMD-Vi must be enabled for PCI passthrough and SR-IOV functionality.
4. OpenStack Setup
- Core OpenStack Services:
Ensure OpenStack services such as Nova, Neutron, Glance, and Keystone are installed and configured.
- Neutron Configuration:
Neutron must support both Openvswitch (OVS) for orchestration/management networks and SR-IOV for application/service networks.
- SR-IOV Configuration:
The compute nodes must be configured to support SR-IOV, with Virtual Functions (VFs) created on the NICs.
5. Cisco Prime Network Registrar (CPNR) VNF Image
- VNF Image Compatibility:
The CPNR VNF image must support SR-IOV interfaces and include necessary drivers.
- Upload to Glance:
Ensure the CPNR VNF image is available in OpenStack Glance.
6. Administrative Access
- OpenStack CLI:
Ensure access to the OpenStack CLI for creating networks, flavors, and launching the VNF.
- Root or Admin Privileges:
Root or administrative access to configure networking on the Linux host and within the VNF.
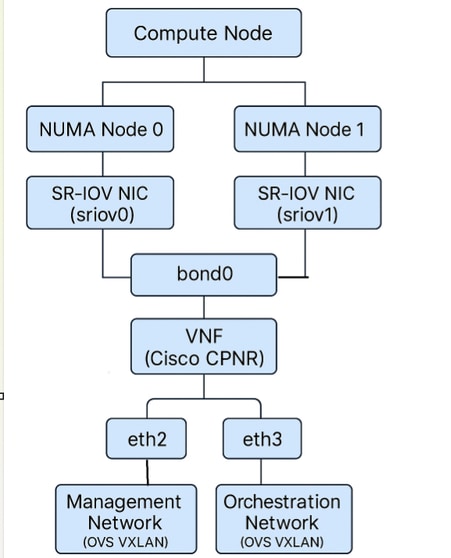
Architecture Overview
VNF Network Interface Connectivity Diagram
Flow Chart
 SRIOV
SRIOV
Sample Configurations
Here is a sample Cisco Elastic Services Controller (ESC) XML, demonstrating Virtual Machine (VM) deployment using SR-IOV networking (with type>direct</type>) for a tenant named test-tenant and a VM named sriov-vm-1. This includes multiple interfaces, including SR-IOV (direct) interfaces:
<esc_datamodel xmlns="http://www.cisco.com/esc/esc">
    <tenants>
        <tenant>
            <name>test-tenant</name>
            <managed_resource>true</managed_resource>
            <vim_mapping>false</vim_mapping>
            <deployments>
                <deployment>
                    <name>sriov-vm-deployment</name>
                    <vm_group>
                        <name>sriov-vm-1-group</name>
                        <locator>
                            <vim_id>vim1</vim_id>
                            <vim_project>default</vim_project>
                        </locator>
                        <image>sriov-image</image>
                        <flavor>custom-flavor</flavor>
                        <bootup_time>300</bootup_time>
                        <recovery_wait_time>30</recovery_wait_time>
                        <recovery_policy>
                            <action_on_recovery>REBOOT_ONLY</action_on_recovery>
                        </recovery_policy>
                        <interfaces>
                            <!-- Management Interface -->
                            <interface>
                                <nicid>0</nicid>
                                <network>mgmt-net</network>
                                <ip_address>192.168.10.101</ip_address>
                            </interface>

                            <!-- SR-IOV Interface 1 -->
                            <interface>
                                <nicid>1</nicid>
                                <type>direct</type>
                                <network>sriov-net-1</network>
                                <addresses>
                                    <address>
                                        <address_id>0</address_id>
                                        <subnet>sriov-subnet-1</subnet>
                                        <ip_address>10.10.10.10</ip_address>
                                    </address>
                                </addresses>
                            </interface>

                            <!-- SR-IOV Interface 2 -->
                            <interface>
                                <nicid>2</nicid>
                                <type>direct</type>
                                <network>sriov-net-2</network>
                                <addresses>
                                    <address>
                                        <address_id>0</address_id>
                                        <subnet>sriov-subnet-2</subnet>
                                        <ip_address>10.10.20.10</ip_address>
                                    </address>
                                </addresses>
                            </interface>
                        </interfaces>
                        <scaling>
                            <min_active>1</min_active>
                            <max_active>1</max_active>
                            <elastic>false</elastic>
                        </scaling>
                        <config_data>
                            <configuration>
                                <dst>--user-data</dst>
                                <file>file://tmp/init/sriov-vm-1.cfg</file>
                            </configuration>
                        </config_data>
                    </vm_group>
                </deployment>
            </deployments>
        </tenant>
    </tenants>
</esc_datamodel>
Key Points
-
type>direct</type> under <interface> enables SR-IOV (PCI passthrough) for that NIC.
-
Each SR-IOV interface has its own network and subnet.
-
You can associate IPv4/IPv6 in <addresses> as needed.
Sample Day0 File to pass on the Cisco ESC XML:
Content-Type: multipart/mixed; boundary="===============2678395050260980330=="
MIME-Version: 1.0`

--===============2678395050260980330==
MIME-Version: 1.0
Content-Type: text/cloud-boothook; charset="us-ascii"

#cloud-boothook
#!/bin/bash
if [ ! -f /etc/cloud/cloud.cfg.orig ]; then
cp /etc/cloud/cloud.cfg /etc/cloud/cloud.cfg.orig
cp /etc/cloud/cloud.cfg.norootpasswd /etc/cloud/cloud.cfg
fi

--===============2678395050260980330==
MIME-Version: 1.0
Content-Type: text/cloud-config; charset="us-ascii"

#cloud-config
hostname: cpnr
ssh_authorized_keys:
 - ssh-rsa AAAAB3NzaC1yc2EAAAADAQABAAACAQC7pf8gvOWH/Zv8iAlTv6LWEiPGA3B6t96G6LwTHF6iXOqQxyIUkg8IkqZ6wNwxsDV8DYESOzFGp//aXO6wZDtoawMExe9sNEx0qVOt/ueP3IYQ8731fNJwFtWQsCQTM7VQjpcg5/d6eMxQ8zvmiIYo2huwfclE+zLdihjL/Y6v4HK760u/DQ+OaEIgqTgrwePJK5Db/gMDf+oXI9KvNxDb2vtxzroX0APEnZ9JX+Ic0JGWTkD4smMkTdWsjaqDYXqW6SUsyCc4Bf9tHL5Irr1AgUR4hEbLnbk6NlIqWrgVeI5CQVMMFpWqV0o2hyDz2rMA7tbBeYzD/ynslQAerU7DmBRb1FDVh79+JeaCNIM8EpwbCUKHT6CQAjPK8cYBieO1yEHKjHyFTsZgpvdi4rVMP+Qsvab+J5RPPcJeKj7o8KIrtyyESXbLNcZv1uGwZ8nLZKfZQSJP04HUkRKoQJ/JoMvMurEKG/cJ1VtocV4AJiRHj+367D3uzrKd6eHYlM9oD+zpPeJ1P1J2TDPUp2K7GcKCrItn9blSGo/n/+gYBO793QjSdkmc/Ag4TEVhUfG17l0WlSvAw4L0csMlYBAGGqKAUEEx3BJGYNJ851bj23m6JBe83OVWGRWrDIIE+G14/tx8qYXDaFxFUFPb2zj+gmDXq80hYpv++/yFtTocbw== cpnr@INVITN14SLM1BULD01CO
 - ssh-rsa AAAAB3NzaC1yc2EAAAADAQABAAACAQDAmkQGCZUrYqkZ0C0J9t7mF9La9zYOqfzzFkk1wWtPga+aANOaFgjqbjj+VlBdd3zJy1p6BMWZhaZIcOh0+knCisJArcHM3HlurQZXO45zHtBcm7tB1FQ0W1HI9GbvJ+IPIe7kpPme/socd5ytTx0ZkYtlcRDDZuxTwYY4P4/vpnzXuwPS2dfcfQscubj6MkSlx4JHhc/hkDsmtJUipkWEungE/UsldjQzkj8oJorymYHQXE/czNxwzCGizK1YinhebeHFcmHd6Jcqd5oZZWnmkGKGeW6o0ddSFI5NmwzHd5RzwjztU2nqmiyOA8mu7YkCm6X82uhACwQlfY0pGRpTVkIhlf+tKDwKQRuwpcbR1ZUHmli0zi5QZtbzc31aLNlUPpR21BptS4GSfbKJaMOaDUClfe8rGk+9GCgm6wnZiT+SMa4/wEA9NILlwobrwHxVsb/kFlFKXg0aPkdvmqWPNcd09vF50enrs0aXFsqCyl6CPMJpZtGAgckvX8iU2bCJkxzD9F4rAu2D/FNb8KG5cbw7uptiwB4yoek6Q36NyxHYYJyOGiV4oQJ02T9MRPkvjLf7ASx9HA25nG+J4CZXWkuV7XYX1N5DFvOg/kwA7xMPyNgTEkblTRpIcfXU2PCWYSZcn1vYmsazf2uVCY+mjfLcvi85c/1mLnUGikiovQ== admin@invitn14slm1escx01co
runcmd:
 - /usr/sbin/useradd FMLVL1 -d /home/FMLVL1 -s /bin/bash -g users; (/bin/echo changeme; /bin/echo changeme) | /usr/bin/passwd FMLVL1
 - nmcli con add type ethernet con-name eth0 ifname eth0 ip4 10.xx.xx.xx/24
 - nmcli con add type ethernet con-name eth1 ifname eth1 ip4 172.xx.xx.xx/23
 - nmcli connection add type bond con-name bond0 ifname bond0 bond.options "mode=active-backup,miimon=1000,fail_over_mac=1" ipv4.addresses 'xx.xx.xx.xx/29' ipv4.gateway 'xx.xx.xx.xx' ipv4.method manual ipv6.addresses '2402:xxxx:xx:0025::5/64' ipv6.gateway '2402:xxxx:xx:0025::1' ipv6.method manual
 - nmcli connection add type ethernet ifname ens6 master bond0
 - nmcli connection add type ethernet ifname ens7 master bond0
 - nmcli con up eth0
 - nmcli con up eth1
 - nmcli con up bond-slave-ens6
 - nmcli con up bond-slave-ens7
 - nmcli con down bond0
 - nmcli con up bond0
 - nmcli connection reload
 - hostnamectl set-hostname CPNRDNS01CO

--===============2678395050260980330==
Deploying CPNR VNF with SR-IOV Ports and Active-Backup Bond Interface on OpenStack
CPNR is a vital Virtual Network Function (VNF) that provides IP Address Management (IPAM), DHCP, and Domain Name Server (DNS) services for enterprise and service provider networks. Deploying CPNR as a VNF in OpenStack requires careful planning, especially when leveraging SR-IOV ports, cross-NUMA configurations, and an Active-Backup bond interface for redundancy and performance.
This article explains the step-by-step process for deploying the CPNR VNF on OpenStack. It includes:
- Configuring cross-NUMA mode, which is critical for accessing SR-IOV NICs from multiple NUMA nodes.
- Setting up Active-Backup bonding, ensuring high availability without requiring switch-side configurations.
- Configuring OpenStack networks, flavors, and Glance.
- IP address planning, configuring Linux networking using ifcfg files, and deploying the VNF using Cisco ESC.
Key Features of the Deployment
-
Cross-NUMA Awareness:
- The CPNR VNF spans NUMA nodes to access SR-IOV NICs (sriov0 on NUMA 0 and sriov1 on NUMA 1).
- Cross-NUMA mode is required because, in single-NUMA mode, OpenStack only allows a VNF to connect to NICs that are physically located on the same NUMA node where the VNF is launched. By enabling cross-NUMA mode, the VNF can utilize NICs and resources from both NUMA nodes.
-
Active-Backup Bonding:
- A bond0 interface is created using SR-IOV NICs (eth2 from sriov0 and eth3 from sriov1).
- Active-Backup mode ensures redundancy and fault tolerance without requiring switch-side configurations.
-
OpenStack Networking:
- Orchestration and Management Networks: Openvswitch-based for control and administrative traffic.
- Application/Service Networks: SR-IOV-based for high-performance traffic.
Why Cross-NUMA Mode is Required
1. NUMA-Aware Networking in OpenStack
NUMA is a memory architecture where each CPU (and its local memory and devices) is grouped into a NUMA node. In OpenStack, NUMA-aware placement ensures VNFs are optimally assigned to resources on the same NUMA node to minimize latency and maximize performance.
-
SR-IOV NICs Are NUMA-Local:
- Each physical NIC is tied to a specific NUMA node. For example:
- sriov0 is connected to NUMA node 0.
- sriov1 is connected to NUMA node 1.
- Each physical NIC is tied to a specific NUMA node. For example:
-
Single-NUMA Mode Limitation:
- When a VNF is launched in single-NUMA mode, OpenStack only allows the VNF to connect to NICs that are local to the NUMA node where the VNF is launched. This means:
- If the VNF is launched on NUMA 0, it can only connect to NICs on sriov0.
- If the VNF is launched on NUMA 1, it can only connect to NICs on sriov1.
- When a VNF is launched in single-NUMA mode, OpenStack only allows the VNF to connect to NICs that are local to the NUMA node where the VNF is launched. This means:
2. Why Cross-NUMA Mode Is Necessary
The CPNR VNF requires access to:
- Orchestration Network(Openvswitch, NUMA-agnostic)
- Management Network(Openvswitch, NUMA-agnostic)
- SR-IOV Network 1: Connected tosriov0(NUMA node 0)
- SR-IOV Network 2: Connected tosriov1(NUMA node 1).
In this deployment, the CPNR VNF requires access to SR-IOV NICs from both NUMA 0 (sriov0) and NUMA 1 (sriov1) to provide redundancy and high availability. In order to achieve this:
- The VNF must be launched in cross-NUMA mode, which allows OpenStack to allocate CPU, memory, and NICs from multiple NUMA nodes.
- This ensures the VNF can connect to NICs on sriov0 and sriov1, enabling the use of both SR-IOV ports in an Active-Backup bond configuration.
Conntrack Size Limitation for OVS Ports
What is Conntrack?
Conntrack is a Linux kernel feature used to track network connections, particularly for Network Address Translation (NAT) and firewall rules. For OVS-based ports in OpenStack, conntrack is used to manage connection state and enforce security group rules.
How Conntrack Affects OVS Ports
-
Conntrack Table:
- Each active connection consumes an entry in the conntrack table.
- The size of the conntrack table is limited by thenf_conntrack_maxparameter.
-
Default Limit:
- By default, the conntrack table size is 65536 entries. For workloads with high connection rates (for example, VNFs with many simultaneous flows), this limit can be quickly exhausted, resulting in dropped packets.
- By default, the conntrack table size is 65536 entries. For workloads with high connection rates (for example, VNFs with many simultaneous flows), this limit can be quickly exhausted, resulting in dropped packets.
-
Impact on OVS Ports:
- If the conntrack table is full, new connections are dropped, which can severely impact VNF performance.
- This is especially relevant for theOrchestrationandManagement networks, which use OVS ports.
How to Mitigate Conntrack Limitations
-
Increase Conntrack Table Size:
- View the current limit:
sysctl net.netfilter.nf_conntrack_max - Increase the limit:
sysctl -w net.netfilter.nf_conntrack_max=262144 - Make the change persistent:
echo "net.netfilter.nf_conntrack_max=262144" >> /etc/sysctl.conf
- View the current limit:
-
Monitor Conntrack Usage:
Check conntrack statistics:cat /proc/sys/net/netfilter/nf_conntrack_count -
Optimize Security Group Rules:
Reduce the number of rules applied to OVS ports to minimize conntrack overhead.
How SR-IOV Resolves Conntrack Issues
1. Eliminates Conntrack Dependency
SR-IOV ports bypass the OVS datapath and Linux kernel features like conntrack. This removes connection tracking overhead entirely.
2. Higher Scalability
Unlike OVS ports, which are limited by the conntrack table size (nf_conntrack_max), SR-IOV ports can handle a virtually unlimited number of connections.
3. Reduced Latency
By offloading packet processing to the NIC hardware, SR-IOV ports eliminate the latency introduced by software-based conntrack processing.
Why Active-Backup Mode is Chosen for SR-IOV Ports on CPNR VM
The Active-Backup bonding mode is particularly well-suited for this deployment due to its simplicity, fault tolerance, and compatibility with SR-IOV interfaces. Here is why:
1. Redundancy Without Complexity
- Active-Backup Mode: Only one interface (theactiveinterface) transmits and receives traffic at any given time. The other interface(s) remain in standby mode.
- If the active interface fails (for example, due to a link failure or hardware issue), the bond automatically switches to a standby interface. This ensures continuous network connectivity without requiring manual intervention.
2. No Link Aggregation Group (LAG) Required
- Unlike other bonding modes (for example,802.3adorbalance-alb), Active-Backup mode does not require Link Aggregation Control Protocol (LACP) or switch-side configurations.
- This is especially important for SR-IOV ports, as SR-IOV VFs typically do not support LACP or LAG configurations.
3. Seamless Failover
- Failover is near-instantaneous, with minimal disruption to traffic.
- When the active interface fails, the bond immediately promotes a standby interface to active status.
4. Hardware Independence
Active-Backup mode works independently of the underlying physical switches or hardware. The failover logic resides entirely in the Linux kernel, making it highly portable and versatile.
5. Optimized for SR-IOV
SR-IOV VFs are tied to specific physical NICs and NUMA nodes. By using Active-Backup mode, you can combine VFs from different NUMA nodes into a single logical bond interface (bond0). This ensures high availability while making efficient use of NUMA resources.
Active-Backup mode is one of the simplest and most widely used modes in Linux bonding. It is designed to provide high availability by ensuring that traffic continues to flow seamlessly even if one of the bonded interfaces fails. This is an in-depth explanation of how Active-Backup mode works, its key characteristics, and advantages.
What is a Linux Bond Interface?
A bond interface in Linux combines two or more network interfaces into a single logical interface. This logical interface, referred to as the bond (for example, bond0), is used to provide:
- Redundancy: Ensuring high availability of network connectivity.
- Performance Improvement: In other modes (for example,balance-rror802.3ad), it can also aggregate bandwidth.
How Does Active-Backup Mode Work?
In Active-Backup mode, only one interface (called the active interface) is used at any given time to transmit and receive traffic. The other interface(s) remain in a standby mode. If the active interface fails, one of the standby interfaces is promoted to active status, and traffic is automatically rerouted to the new active interface.
Key Features of Active-Backup Mode
-
Single Active Interface:
- At any given time, only one physical interface in the bond is active for transmitting and receiving traffic.
- Standby interfaces are completely passive unless a failover occurs.
-
Automatic Failover:
- If the active interface fails (for example, due to a hardware issue, cable disconnection, or link failure), the bond automatically switches to a standby interface.
- Failover is seamless and does not require manual intervention.
-
Failback Support:
Once the failed interface is restored, it can automatically become active again (if configured to do so) or remain in standby mode, depending on the bonding configuration. -
No Switch-Side Requirements:
- Unlike other bonding modes (for example,802.3adorbalance-rr), Active-Backup mode does not require any special configuration on the physical switches (for example, LAG or LACP).
- This makes it ideal for scenarios where switch-side configuration is not possible or when bonding SR-IOV virtual functions, which do not support LAG.
-
Monitoring:
- The bond continuously monitors the health of all member interfaces using the
miimon(Media Independent Interface Monitor) parameter. - If a link failure is detected, the bond immediately switches to a healthy standby interface.
- The bond continuously monitors the health of all member interfaces using the
How Traffic Flows in Active-Backup Mode
Normal Operation
-
Active Interface:
- Traffic flows exclusively through the active interface (for example,eth2in a bond ofeth2andeth3).
- The standby interface (eth3) remains idle and does not transmit or receive traffic.
-
Monitoring:
- The bond periodically monitors the status of all member interfaces. This is done using:
- miimon: Checks the link status of each interface at a configurable interval (for example, every 100ms).
- Address Resolution Protocol (ARP) monitoring(optional): Sends ARP requests to ensure the active interface is reachable.
- The bond periodically monitors the status of all member interfaces. This is done using:
Failover Scenario
-
Link Failure on Active Interface:
If the active interface (eth2) fails (for example, cable unplugged, NIC hardware failure, or link down), the bond immediately detects the failure usingmiimonor ARP monitoring. -
Automatic Failover:
- The bond switches to the standby interface (eth3), which becomes the new active interface.
- Traffic is rerouted through the new active interface without requiring manual intervention.
-
Failover Timeliness:
The failover process is near-instantaneous (typically within a few milliseconds, depending on themiimoninterval).
Failback Scenario
-
Restoration of Failed Interface:
- When the previously failed interface (eth2) is restored, it can:
- Automatically reclaim the active role (if configured to do so).
- Remain in standby mode (default behavior).
- When the previously failed interface (eth2) is restored, it can:
-
Traffic Continuity:
Failback is seamless, ensuring no disruption to ongoing traffic flows.
Use Case: Active-Backup Bonding with SR-IOV Ports
Active-Backup mode is particularly well-suited for SR-IOV interfaces because:
- SR-IOV VFs typically do not support link aggregation protocols like LACP.
- The bond in Active-Backup mode can provide redundancy without any switch-side configuration.
For example:
- eth2is mapped to an SR-IOV VF onsriov0(NUMA node 0).
- eth3is mapped to an SR-IOV VF onsriov1(NUMA node 1).
- The bond (bond0) combines these interfaces, providing seamless failover between SR-IOV VFs.
Step 1. OpenStack Networking
The CPNR VNF requires the these four networks:
- Orchestration Network: For control and orchestration traffic (Openvswitch-based).
- Management Network: For administrative access (Openvswitch-based).
- SR-IOV Network 1: Application/service traffic on sriov0.
- SR-IOV Network 2: Application/service traffic on sriov1.
Step-by-Step Deployment:
Step 1.1. Create Openvswitch Networks
-
Orchestration Network:
openstack network create --provider-network-type vxlan orchestration-network -
Management Network:
openstack network create --provider-network-type vxlan management-network
Step 1.2. Create Subnets for Openvswitch Networks
-
Orchestration Subnet:
openstack subnet create --network orchestration-network \ --subnet-range 192.168.100.0/24 orchestration-subnet -
Management Subnet:
openstack subnet create --network management-network \
--subnet-range 10.10.10.0/24 management-subnet
Step 1.3. Create SR-IOV Networks
-
SR-IOV Network 1:
openstack network create --provider-network-type vlan \ --provider-physical-network sriov0 --provider-segment 101 sriov-network-1 -
SR-IOV Network 2:
openstack network create --provider-network-type vlan \
--provider-physical-network sriov1 --provider-segment 102 sriov-network-2
Step 2. OpenStack Flavors
Step 2.1. Create a Cross-NUMA Flavor
In order to ensure the VNF can access SR-IOV NICs from both NUMA nodes, create a flavor with cross-NUMA support:
openstack flavor create --ram 8192 --vcpus 4 --disk 40 cross-numa-flavorStep 2.2. Configure NUMA Properties
Set NUMA-specific properties:
openstack flavor set cross-numa-flavor \
--property hw:numa_nodes=2 \
--property hw:cpu_policy=dedicated \
--property hw:mem_page_size=large
Step 3. Configure Bonding in Active-Backup Mode
After launching the VNF, configure the bond interface for SR-IOV ports (eth2 and eth3) on the VNF.
Step 3.1. Bond Interface Configuration
Create a bond interface (bond0) in Active-Backup mode:
vi /etc/sysconfig/network-scripts/ifcfg-bond0DEVICE=bond0
BOOTPROTO=static
ONBOOT=yes
BONDING_OPTS="mode=active-backup miimon=100"
IPADDR=172.16.1.10
NETMASK=255.255.255.0
GATEWAY=172.16.1.1Step 3.2. Configure Slave Interfaces
-
eth2:
vi /etc/sysconfig/network-scripts/ifcfg-eth2DEVICE=eth2 ONBOOT=yes MASTER=bond0 SLAVE=yes -
eth3:
vi /etc/sysconfig/network-scripts/ifcfg-eth3DEVICE=eth3 ONBOOT=yes MASTER=bond0 SLAVE=yes
Step 3.3. Apply Configuration
Restart the network service in order to apply the configuration:
systemctl restart network
Verify
After deploying the VNF, verify its functionality using the these steps:
1. Verify VNF Status
Check that the VNF instance is active:
openstack server show cpnr-instance
Ensure the status is ACTIVE.
2. Verify Network Connectivity
-
Ping Test: Verify that the VNF can communicate over all networks:
ping <IP_ADDRESS_OF_ORCHESTRATION_NETWORK> ping <IP_ADDRESS_OF_MANAGEMENT_NETWORK> -
Bond Interface:
-
Confirm thatbond0 is active:
cat /proc/net/bonding/bond0Look for:
- Currently Active Slave: Indicates the active interface.
- Slave Interface: Confirms botheth2andeth3 are part of the bond.
-
3. Verify NUMA Placement
Ensure the VNF is using resources from both NUMA nodes:
nova show <INSTANCE_ID> --human | grep numaBest Practices
-
Monitoring and Troubleshooting: Use tools liketcpdumpandethtoolto monitor the SR-IOV interfaces.
-
Security: Carefully manage access to the physical network and enforce strict isolation between tenants.
-
Scaling: Plan for physical NIC capacity when scaling SR-IOV deployments, as the number of available VFs is limited by the NIC hardware.
Troubleshoot
If the deployment does not work as expected, refer to these troubleshooting steps:
1. Verify SR-IOV Configuration
- Check if SR-IOV is enabled in the BIOS:
dmesg | grep -i "SR-IOV" - Confirm VFs are created on NICs:
lspci | grep Ethernet
2. Verify NUMA Placement
If the VNF cannot access both NICs, ensure cross-NUMA mode is enabled:
- Check NUMA properties of the flavor:
openstack flavor show cross-numa-flavor
3. Bond Interface Issues
- Check the bond status:
cat /proc/net/bonding/bond0 - If the bond is not functioning:
- Ensure the slave interfaces (eth2andeth3) are correctly configured as part of the bond.
- Restart the network service:
systemctl restart network
4. Network Connectivity Issues
- Verify the OpenStack port bindings:
openstack port list --server cpnr-instance - Check for correct IP configuration within the VNF:
ip addr show
Conclusion
Deploying CPNR VNF on OpenStack with SR-IOV ports requires cross-NUMA mode to enable the VNF to connect to NICs from both NUMA nodes. This is essential because OpenStack restricts VNFs in single-NUMA mode to only access resources (NICs, CPUs, memory) within the NUMA node where the VNF is launched. Combining cross-NUMA mode with Active-Backup bonding ensures high availability, fault tolerance, and efficient resource utilization, making this deployment highly resilient and performant.
Revision History
| Revision | Publish Date | Comments |
|---|---|---|
1.0 |
10-Jul-2025
|
Initial Release |
Contributed by
- Alok ShingalaCustomer Experience Delivery Architect
- Bhavesh BhandariCustomer Experience Engineer
- Rinil KuriakoseCustomer Experience Engineer
 Feedback
Contact Cisco
- Open a Support Case

- (Requires a Cisco Service Contract)