Zero Trust: User and Device Security Design Guide
Available Languages
Bias-Free Language
The documentation set for this product strives to use bias-free language. For the purposes of this documentation set, bias-free is defined as language that does not imply discrimination based on age, disability, gender, racial identity, ethnic identity, sexual orientation, socioeconomic status, and intersectionality. Exceptions may be present in the documentation due to language that is hardcoded in the user interfaces of the product software, language used based on RFP documentation, or language that is used by a referenced third-party product. Learn more about how Cisco is using Inclusive Language.
Zero Trust is a strategic approach to security that centers on the concept of eliminating trust from an organization's network architecture. Trust is neither binary nor permanent. It can no longer be assumed that internal entities are trustworthy, that they can be directly managed to reduce security risk, or that checking them one time is enough. The Zero Trust model of security prompts you to question your assumptions of trust at every access attempt.
Traditional security approaches assume that anything inside the corporate network can be trusted. The reality is that this assumption no longer holds true, thanks to mobility, BYOD (Bring Your Own Device), IoT (Internet of Things), cloud adoption, increased collaboration, and a focus on business resiliency. A Zero Trust model considers all resources to be external and continuously verifies trust before granting only the required access.
The key to comprehensive Zero Trust is extending security throughout the entire network environment with examples such as:
● Employees accessing sensitive applications, both on and off the enterprise network
● Contractors and guests using the network infrastructure
● Application to application communications
● Communication between industrial control systems
Cisco Zero Trust for User and Device Security design guide covers the following components:
● Cisco Secure Access by Duo
◦ Multi-factor authentication
◦ Trusted Endpoints
◦ Adaptive Policies
◦ Single sign on using SAML 2.0
● Cisco Duo Network Gateway (DNG)
● Cisco Secure Client
◦ AnyConnect VPN Module
◦ Identity Services Engine (ISE) Posture Module
◦ Network Access Manager (NAM) Module
◦ Network Visibility Module (NVM)
◦ Secure Endpoint Module
◦ Umbrella Roaming Security Module
● Cisco Secure Endpoint
◦ Cisco Orbital
● Cisco SecureX
● Cisco Meraki
◦ Application Installation
● Cisco Umbrella
Cisco Zero Trust for User and Device Security design guide does not cover the following topics:
● Duo authentication using RADIUS, LDAP, or APIs
● Duo Network Gateway for SSH or RDP sessions
● VPN setup on a Cisco Secure Firewall
● Posture setup on ISE
● 802.1x setup on ISE and network devices
● Telemetry collector configuration
● Meraki Systems Manager features beyond application installation
● Windows Server installation and configuration
● MacOS devices
● Windows 8 and earlier devices
Zero Trust Companion Documents
This Zero Trust guide for User and Device Security is presented as one part in a series that also covers Zero Trust capabilities for Network, Cloud, Applications, and Data.
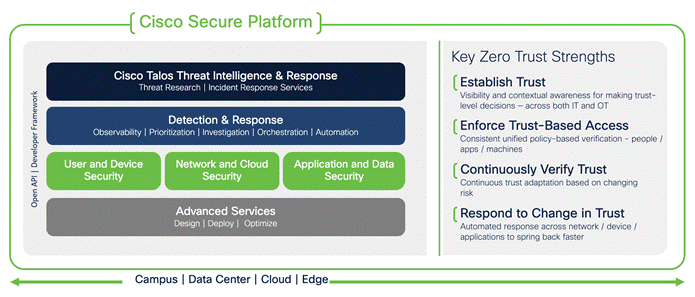
Cisco Zero Trust Framework
To help understand the architecture, Cisco has broken it down into three pillars:
● User and Device Security: making sure users and devices can be trusted as they access systems, regardless of location
● Network and Cloud Security: protect all network resources on-prem and in the cloud, and ensure secure access for all connecting users
● Application and Data Security: preventing unauthorized access within application environments irrespective of where they are hosted
The three guides complement each other and provide multiple integration points. For example, device management capabilities covered in this guide provide AnyConnect clients and profile configuration that are used to perform 802.1X authentication against ISE in the Cisco Zero Trust: Network and Cloud Security Design Guide. Integration points between the guides are noted in the sections where they occur, along with hyperlinks to the relevant sections in the other guides.
Zero Trust Security Frameworks
The following table shows how other Zero Trust Frameworks map to the Cisco Zero Trust Framework.
| Cisco |
NIST Cyber Security Framework |
CISA |
Common |
| User and Device Security |
Users |
Identity |
Visibility & Analytics Automation & Orchestration Governance |
| Devices |
Device |
||
| Network and Cloud Security |
Networks/Hybrid Multi-Cloud |
Network/ Environment |
|
| Application and Data Security |
Applications |
Application Workload |
Table 1. Zero Trust Security Frameworks
This design guide is focused on the Cisco Zero Trust Framework with the User and Device Security pillar. If interested in how Cisco products map to other Zero Trust Frameworks, refer to Zero Trust Frameworks.
The scope of this design guide will focus on Zero Trust as it relates to securing your users and the devices they use to access work applications. Users may include employees, partners, vendors, contractors, and many others, making it more difficult to maintain control over their devices and access. This complete Zero Trust security model allows you to mitigate, detect, and respond to risks across your environment. Verifying trust before granting access across your applications, devices, and networks can help protect against identity-based and other access security risks.
A Zero Trust approach for user and device security should provide your organization the tools necessary to evaluate and make access decisions based on specific risk-based context as defined by your organization. For example - Is the user verified using Multifactor Authentication (MFA)? Are their devices trusted and/or managed? Do their devices meet your security requirements?
Security teams need to be able to answer these questions to establish trust in users and devices accessing an organization’s assets. They also need to do it using an approach that balances security with usability.
This trust-centric security approach for the extended perimeter makes it much more difficult for attackers or unauthorized users to gain access to applications without meeting certain identity, device, and application-based criteria as defined by your organization.
Zero Trust User and Device Security Business Flows
The Cisco Zero Trust Architecture guide introduced the concept of SAFE business flows. Cisco SAFE uses the concept of business flows to simplify the analysis and identification of threats, risks, and policy requirements for effective security. This enables the selection of very specific capabilities necessary to secure each flow.
This design guide addresses the Zero Trust User and Device Security aspects of the following business flows:
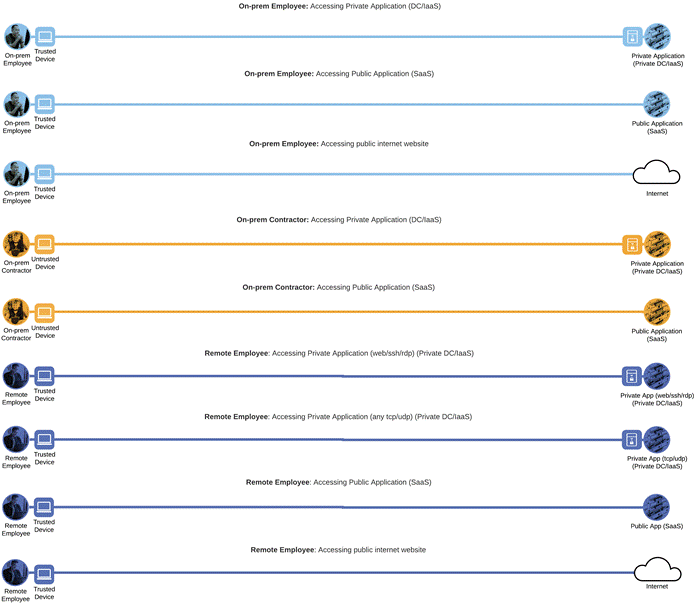
Zero Trust User and Device Security Business Flows
Not all business flows have the same requirements. Some use cases are subject to a smaller attack vector and therefore require less security to be applied. Some have larger and multiple vectors and require more security. Evaluating the business flow by analyzing the attack surfaces provides the information needed to determine and apply the correct capabilities for flow specific and effective security. This process also allows for the application of capabilities to address risk and administrative policy requirements. In the following figure, the blue security capabilities will be covered within this Zero Trust: User and Device Security Design Guide while the gray security capabilities will be covered later in the Zero Trust: Network and Cloud Security Design Guide or the Zero Trust: Application and Data Security Design Guide.
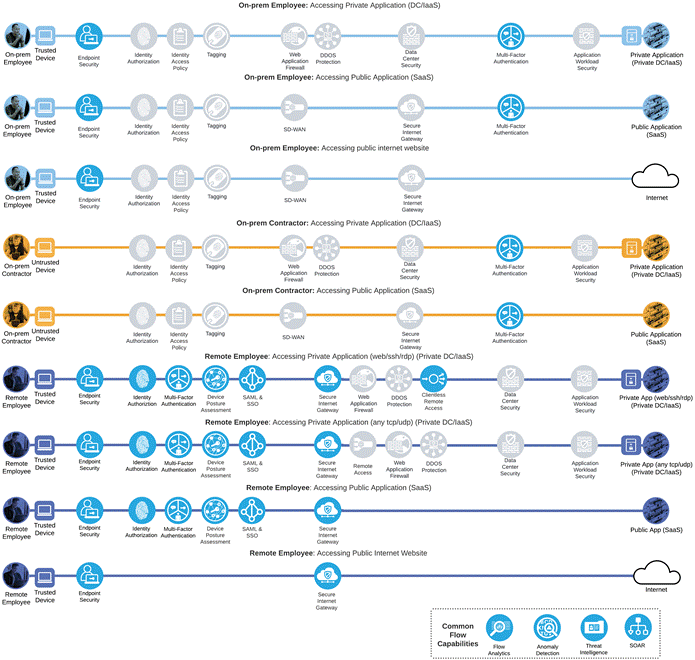
Zero Trust User and Device Security Business Flows with required capabilities
The primary security capability Endpoint Security can be expanded to the following secondary capabilities:
| Capability Icon |
Capability Name |
|
|
Mobile Device Management |
|
|
Anti-Virus |
|
|
Anti-Malware |
|
|
Device Health Connector |
|
|
DNS Security Connector |
|
|
Web Security Connector |
Table 2. Endpoint Security Secondary Capabilities
The primary security capability Secure Internet Gateway can be expanded to the following secondary capabilities:
| Capability Icon |
Capability Name |
|
|
DNS Security |
|
|
Firewall |
|
|
Intrusion Prevention |
|
|
Web Security |
|
|
Web Reputation Filtering |
|
|
TLS/SSL Decryption |
|
|
Remote Browser Isolation |
|
|
Network Anti-Malware |
|
|
Malware Sandbox |
|
|
Cloud Access Security Broker (CASB) |
|
|
Data Loss Prevention |
|
|
Application Visibility & Control |
Table 3. Secure Internet Gateway Secondary Capabilities
Product Overview
This Cisco Validated Design guide covers the following cloud-based platforms and software to accomplish a comprehensive and secure Zero Trust: User and Device Security design:
● Cisco Secure Access by Duo
● Duo Network Gateway
● Cisco Meraki MDM
● Cisco Umbrella
● Cisco Secure Endpoint
● Cisco Secure Client
● Cisco SecureX
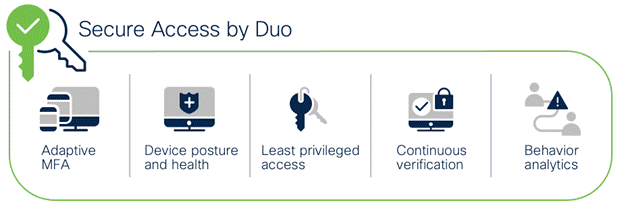
Cisco Secure Access by Duo

Cisco Secure Access by Duo mapped to SAFE Capabilities
Zero Trust can be summed up as “never trust; always verify.” This security approach treats every access attempt as if it originates from an untrusted network — so access won’t be allowed until trust is demonstrated. Once users and devices have been deemed trustworthy, Zero Trust ensures that they have access only to the resources they absolutely need to prevent any unauthorized lateral movement through an environment. Cisco Secure Access by Duo is a cloud-based security platform that protects access to all applications, for any user and device, from anywhere. Duo is designed to be both easy to use and deploy while providing complete endpoint visibility and control.
Cisco Secure Access by Duo
Multifactor Authentication
Multifactor Authentication adds a second layer of trust that your users are who they say they are. After completing primary authentication (usually by entering a username and password), users verify their identity a second time, through a different channel. This reduces the likelihood that someone else can log in, since they would need both the password and their second factor to pose as the original user.
Duo provides flexible authentication options to fit a broad range of users, security profiles, and technical backgrounds such as employees, frequent travelers, contractors, vendors, customers, and partners. For more secure access to high-risk applications, require the use of:
● Easy to use, out-of-band mobile push notifications
● Phishing-proof Universal 2nd Factor (U2F) security keys
● Biometric-based WebAuthn
Other MFA methods support diverse user login scenarios:
● Phone callback for users who can’t receive texts
● Mobile one-time passcodes for travelers while offline
● Text message passcodes for users without Internet connectivity
● Temporary bypass codes for users who temporarily can't use their enrolled devices
Duo Device Health
During login, Duo can check the security health of all user devices attempting to access your applications. By leveraging the visibility of devices connecting to your applications, you can establish device-based access policies to prevent any risky or untrusted devices from accessing your applications. For access to high-risk applications, you may require a device to be corporate-owned or managed by your organization’s IT team
Duo allows you to establish mobile device trust with or without the use of Mobile Device Management (MDM) software. Users may object to installing MDMs on their personal devices due to privacy concerns, resulting in lower overall adoption and reduced insight into their device security. And sometimes it’s outside of your IT team’s control to install an agent on the personal devices of third-party provider that may need access to your applications.
Whether or not you have an MDM solution, Duo can allow you to block devices from accessing your applications based on:
● OS, browser, and plug-in versions and how long they’ve been out of date
● Status of enabled security features (configured or disabled)
● Full disk encryption
● Mobile device biometrics (face ID/touch ID)
● Screen lock
● Tampered (jailbroken, rooted, or failed Google’s SafetyNet)
Adaptive Access Policies
With Duo, you can enforce contextual access policies allowing access to your applications with user-, device-, and location-based controls. The context includes different aspects of their login attempt such as where they are located, what role they have in your organization, what type of device, they are using, etc. With these policies, you can limit access to only what your users need to do their jobs and add stricter controls for access to more sensitive applications without negatively impacting use workflows.
Duo Single Sign On
Duo provides a cloud based Single Sign On (SSO) solution, Duo Single Sign On, that is hosted and maintained by Duo. Duo SSO provides a consistent login experience for any SAML 2.0 enabled app, letting your users log in once to access all of their cloud and internal work applications. This SSO is protected by MFA and contextual access policies and will check the security of your users’ devices each time before granting access.
Duo Network Gateway (DNG)

Duo Network Gateway mapped to SAFE Capabilities
Duo Network Gateway (DNG) provides clientless remote access to on-premises websites, web applications, RDP sessions, and SSH servers with MFA and device inspection using the Duo Prompt. It can use Duo Single Sign On or any SAML IdP for authentication.
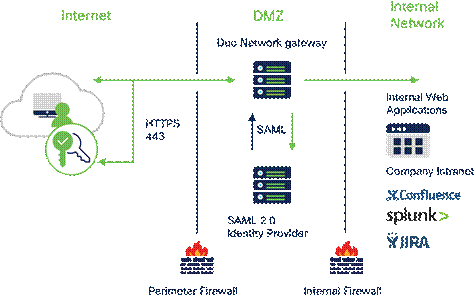
Cisco Duo Network Gateway
In addition to MFA and device inspection, DNG gives you granular access control per web application, RDP session, SSH server, and user group. You can specify different policies to make sure only trusted users and endpoints are able to access your internal services. For example, you can require that SharePoint users complete two-factor authentication at every login, but only once every seven days when accessing Confluence. Duo checks the user, device, and network against an application's policy before allowing access to the application.
Cisco Meraki Mobile Device Manager

Cisco Meraki Mobile Device Manager mapped to SAFE Capabilities
Cisco Meraki MDM is a subset of Systems Manager, is a complete endpoint management solution that provides deep visibility and control over your Android, Chrome OS, iOS, macOS, and Windows devices. It unifies endpoint management into a single pane of glass through an easy-to-use, cloud-based Dashboard shared with the rest of the Meraki stack and is the only solution to bring network level security and visibility to the endpoint. Features include:
● Manage and monitor endpoint devices - Cisco Meraki Systems Manager provides visibility into managed endpoint devices to help you better understand and react to changes. State changes include events such as a non-sanctioned application being installed, corporate applications being removed, and a device leaving a predetermined area. The dynamic tagging functionality in Systems Manager continually assesses the state of endpoints and automatically takes corrective action. Systems Manager profiles that are deployed on devices restrict or enable device capabilities based on your organization’s best practices.
● Manage and distribute mobile and enterprise applications - Systems Manager application management enables the deployment of macOS, Windows, Android, and iOS applications. Organizing multi-device application management in a single interface allows you to monitor and set policies on applications holistically
● Investigate and change device functionality based on device status - Systems Manager applies and actively enforces the security status of macOS, Windows, iOS, and Android devices to maintain device security integrity. By setting and responding to security requirements, you can better understand and control device access and capabilities
Cisco Umbrella

Cisco Umbrella mapped to SAFE Capabilities
With the advent of the cloud era, network architectures designed to provide robust connectivity to a corporate data center is increasingly inefficient and must evolve. Most of the network traffic today occurs either within the data center itself (East-West traffic) or from an organization’s various locations to the cloud via the Internet (North-South traffic). As a result, backhauling network traffic from remote or branch locations over MPLS wide-area network (WAN) links, or roaming user traffic over virtual private network (VPN) connections, is no longer an efficient or viable option. Organizations are increasingly providing Direct Internet Access (DIA) broadband links for their remote, branch, and roaming users to access their SaaS applications without the slow performance and latency associated with backhauling traffic to a corporate office with a single security stack. To alleviate the inconvenience of separately managing security settings at each branch location, Umbrella Secure Internet Gateway (SIG) provides a cloud managed solution. Features include:
● DNS Security – By enforcing security at the DNS and IP layers, Umbrella blocks requests to malicious and unwanted destinations before a connection is even established — stopping threats over any port or protocol before they reach your network or endpoints.
● Secure Web Gateway (SWG) – Umbrella includes a cloud-based full proxy that can log and inspect all your web traffic for greater transparency, control, and protection.
● Cloud-Delivered Firewall (CDFW) – The Umbrella CDFW provides visibility and control for traffic that originated from requests going to the internet, across all ports and protocols.
● Cloud Access Security Broker (CASB) – Umbrella helps expose shadow IT by detecting and reporting on cloud applications in use across your environment. Insights can help manage cloud adoption, reduce risk, and block the use of offensive or inappropriate cloud applications.
● Data Loss Prevention (DLP) – Umbrella DLP analyzes data in-line to provide visibility and control over sensitive data leaving your organization.
● Remote Browser Isolation (RBI) – By isolating web traffic from the user device and the threat, Umbrella Remote Browser Isolation (RBI) delivers an extra layer of protection to the Umbrella secure web gateway so that users can safely access risky websites.
Cisco Secure Endpoint

Cisco Secure Endpoint mapped to SAFE Capabilities
Cisco Secure Endpoint offers cloud-delivered endpoint protection and advanced endpoint detection and response across multi-domain control points. Features include:
● Prevention – Block known malware automatically leveraging the best global threat intelligence and enforce Zero Trust by blocking risky endpoints from gaining access to applications
● Detection – Run complex queries and advanced investigations across all endpoints, and continuously monitor all file activity to detect stealthy malware
● Response – Rapidly contain the attack by isolating an infected endpoint and remediating malware across PCs, Macs, Linux, servers, and mobile devices (Android and iOS)
For files that have unknown disposition to Cisco Secure Endpoint, Secure Malware Analytics (formerly Threat Grid) combines advanced sandboxing with threat intelligence into one unified solution to protect organizations from malware. With a robust, context-rich malware knowledge base, you will understand what malware is doing, or attempting to do, how large a threat it poses, and how to defend against it.
Cisco Orbital
Orbital is a service that uses osquery to provide you and your applications with information about your hosts. osquery exposes an entire operating system as a relational database that you can query with SQL to gather information about the host. Orbital can be used by both Cisco customers and their applications to query their computers wherever Orbital has been deployed.
Secure Endpoint Advantage customers can deploy Orbital on supported platforms with a simple configuration change in the Secure Endpoint console. Up to 30 minutes later, Orbital will be available and ready for queries.
Once deployed, Orbital can provide detailed forensic snapshots, run live queries, and schedule periodic queries. Orbital works well in combination with Secure Endpoint host isolation to provide a means of quarantining a suspicious host while performing an investigation.
Cisco Secure Client

Cisco Secure Client mapped to SAFE Capabilities
Cisco Secure Client is unified security endpoint agent that delivers multiple security services to the roaming workforce. It is available across multiple platforms, including Windows, MacOS, Linux, and more. Cisco Secure Client not only provides VPN access through Secure Sockets Layer (SSL) and IPsec IKEv2 but also offers enhanced security through various built-in modules. Modules used or referenced in this design guide include:
● AnyConnect VPN - Cisco Secure Client provides many options for automatically connecting, reconnecting, or disconnecting VPN sessions. These options offer a convenient way for your users to connect to your VPN and support your network security requirements.
● Cloud Management - SecureX Cloud Management Deployment for Cisco Secure Client enables Administrators to create cloud-managed deployments of Cisco Secure Client. The deployment configuration generates the option to download a lightweight bootstrapper that contains the information needed by the endpoint to contact the cloud for the specified Cisco Secure Client modules by the deployment with their associated profiles.
● Umbrella Roaming Security – The Umbrella module installs two agents on the localhost, Umbrella Roaming Security Agent, and SWG Agent. The Umbrella Roaming Security Agent enforces security at the DNS layer to block malware, phishing, and command and control callbacks over any port while the user is not on a trusted network. The IP Layer Enforcement feature of Umbrella Roaming agent can also block IP to IP communication. The SWG Agent enforces security at the URL layer, to provide security and visibility for web traffic.
● Network Access Manager - Network Access Manager manages user and device identity and the network access protocols required for secure access. It works intelligently to prevent end-users from making connections that violate administrator-defined policies.
● Network Visibility Module - The Network Visibility Module delivers a continuous feed of high-value endpoint telemetry, which allows organizations to see endpoint and user behaviors on their networks. It collects flow from endpoints on and off-premises and valuable contexts like users, applications, devices, locations, and destinations. It caches this data and sends it to a collector when it is on a trusted network (such as the corporate network on-prem or through VPN.
● ISE Posture - ISE Posture is a module you can choose to install as an additional security component of the Cisco Secure Client product. Perform endpoint posture assessment on any endpoint that fails to satisfy all mandatory requirements and is deemed non-compliant.
● Secure Endpoint - Available with Cisco Secure Client for Windows, Secure Endpoint functions as a module within Cisco Secure Client and is accessible via the Cisco Secure Client user interfaces. The Cisco Secure Endpoint Cloud can also deploy Cisco Secure Client with Cisco Secure Endpoint, as can the SecureX Cloud Management.
For information on additional Cisco Secure Client features, such as the ability to do NetFlow analysis for the roaming workforce, see Cisco Secure Client.
Cisco SecureX

Cisco SecureX mapped to SAFE Capabilities
Cisco has been on a mission for several years to simplify security. That mission culminated in the launch of the Cisco SecureX platform, which integrates the entire Cisco security portfolio as well as additional security, networking, and IT technologies from both Cisco and third parties. It is included with all the Cisco security products, so once you have one, you can begin using SecureX. Features include:
● Threat Response – Accelerate threat investigations and incident management by aggregating and correlating global intelligence and local context in one view
● Orchestration – Automate routine tasks using prebuilt workflows that align to common use cases, or build your own workflows with a no-to-low code, drag-and-drop canvas
● Device Insights – Allows you to discover, normalize, and consolidate information about the devices in your environment.
● Ribbon and single sign-on – Use the dashboard ribbon for quick access to Cisco SecureX features. SSO helps share and maintain context around incidents in one location
● SSO across all Cisco platforms – Easily access all your Cisco Security products, with one set of credentials, from any device.
Zero Trust User and Device Security Design
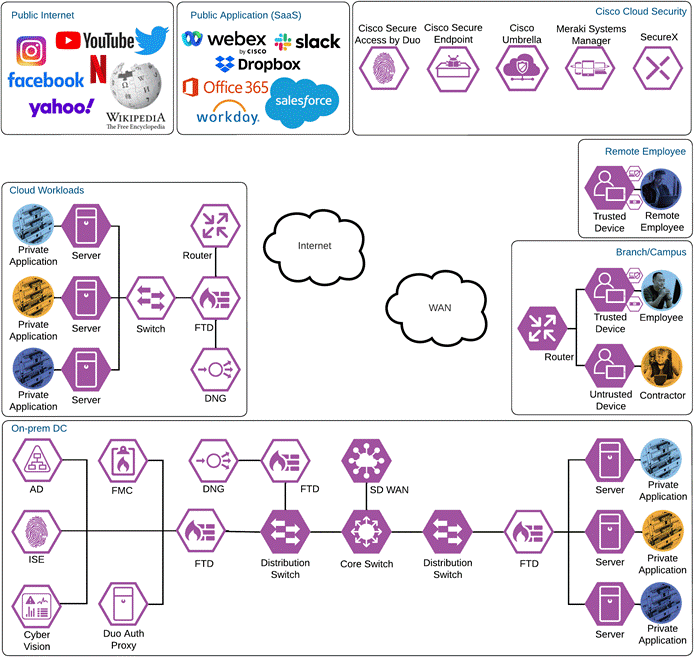
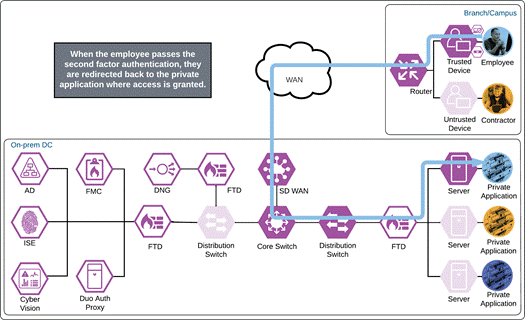
Cisco Zero Trust User and Device Security Design
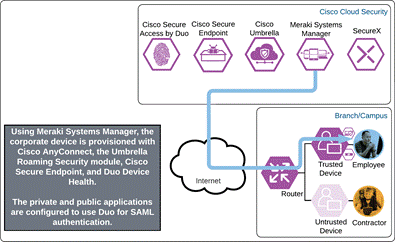
The employee’s device is provisioned with the Meraki Agent, Meraki management profile, Duo Device Health, and Cisco Secure Client which will include the Cisco Secure Endpoint module and Umbrella Roaming Security module. Additionally, the employee has successfully enrolled with Duo and setup their phone for MFA with the Duo mobile app.
Private Application (Private DC)
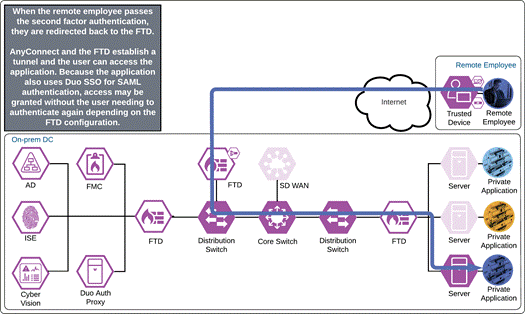
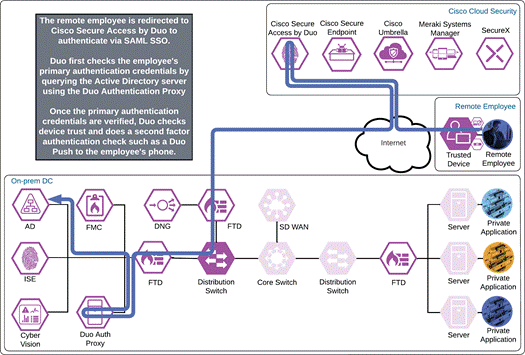
The employee attempts to access an on-premises application configured to use Duo SSO authentication over the WAN. The application checks to see if the user has an active SSO session with Duo. Because the employee does not, they are directed to Duo for verification.
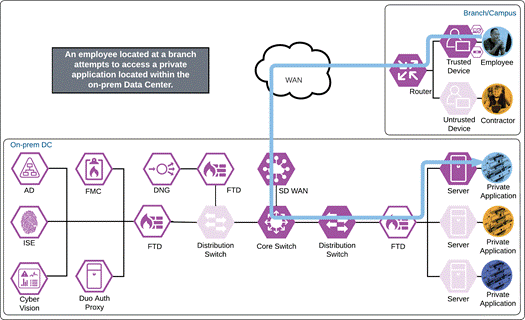
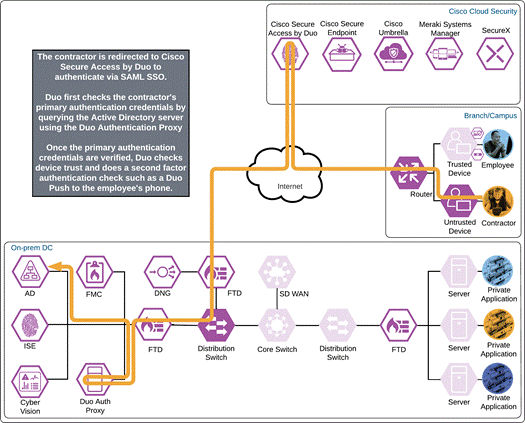
Duo SSO requests the user’s primary authentication credentials and checks these credentials against the on premises Active Directory server. Duo does this through Duo Authentication Proxy, which has been setup and configured to query Active directory. When Active Directory has validated the employee’s primary credentials, Duo sends a Duo Push to the user along with an option to use other MFA methods that have been approved for the application. This second factor authentication must be validated before the user can proceed. In addition to this, the device’s trust is checked. For example, is the device logging in from an acceptable location? Is the device managed by your company? Has Secure Endpoint detected any potential indications of compromise? The user approves the Duo Push request on their phone.

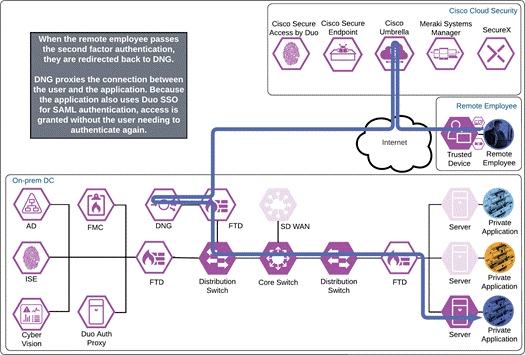
Once the Duo Push is approved by the employee and device’s trust has been verified, Duo redirects the user back to the application which can now be accessed.
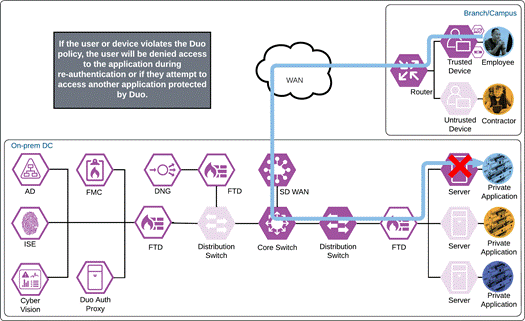
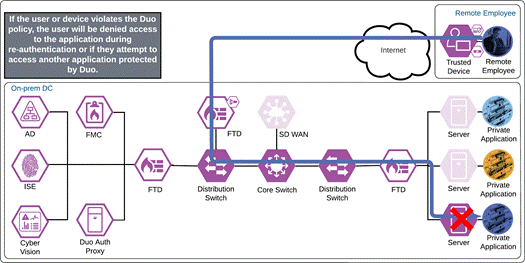
If something happens which lowers user or device trust such as Cisco Secure Endpoint detecting an indication of compromise, when the user attempts to re-authenticate to the application or authenticate to any other applications secured by Duo, authentication will be denied and depending on the issue the user will be asked to remediate the issue.
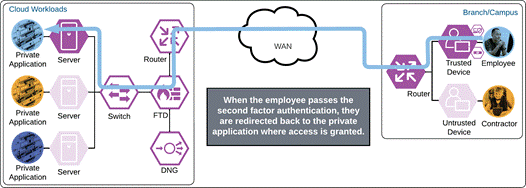
Private Application (Private IaaS)
The employee attempts to access a cloud workload configured to use Duo SSO authentication by entering the URL of that workload. The workload checks to see if the user already has an active SSO with Duo. The employee does not and is redirected to Duo for verification.

Duo Single Sign On requests the user’s primary authentication credentials and checks these credentials against the on premises Active Directory server. To do this, Duo Authentication Proxy has been setup and configured to query Active directory. When Active Directory has validated the employee’s primary credentials, Duo does a secondary authentication check using a method that is previously setup by the employee during enrollment. In this example, a Duo Push request is sent to the employee’s phone, and they must approve the authentication attempt before authentication is successful. In addition to this, the device’s trust is checked. For example, is the device logging in from an acceptable location? Is the device managed by your company? Has Secure Endpoint detected any potential indications of compromise?

Once the secondary authentication is approved by the employee and device’s trust has been verified, Duo will redirect the user back to the cloud workload and the employee will be allowed to access the workload.
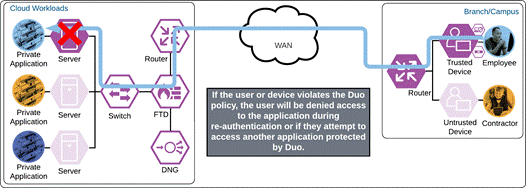
If something happens which lowers user or device trust such as Cisco Secure Endpoint detecting an indication of compromise, when the user attempts to re-authenticate to the application or authenticate to any other applications secured by Duo, authentication will be denied and depending on the issue the user will be asked to remediate the issue.
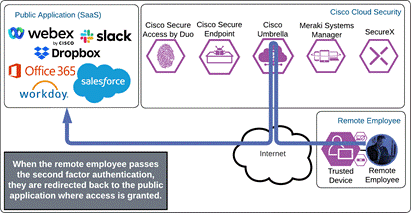
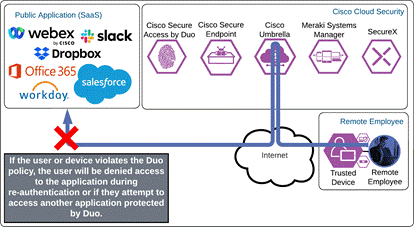
Public Application (SaaS)
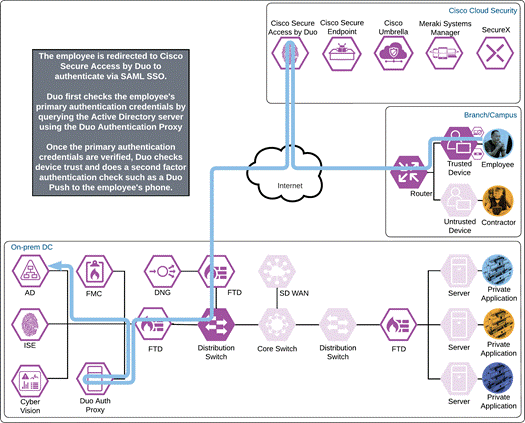
The employee attempts to access a public SaaS application configured to use Duo SSO by entering the URL of that application. The application checks to see if the user has an active SSO session with Duo. Because the employee does not, they are directed to Duo for verification.
Duo SSO requests the user’s primary authentication credentials and checks these credentials against the on premises Active Directory server. Duo does this through Duo Authentication Proxy, which has been setup and configured to query Active directory. When Active Directory has validated the employee’s primary credentials, Duo sends a Duo Push to the user along with an option to use other MFA methods that have been approved for the application. This second factor authentication must be validated before the user can proceed. In addition to this, the device’s trust is checked. For example, is the device logging in from an acceptable location? Is the device managed by your company? Has Secure Endpoint detected any potential indications of compromise? The user approves the Duo Push request on their phone.
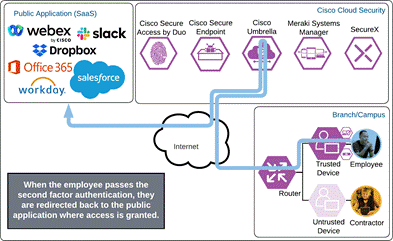
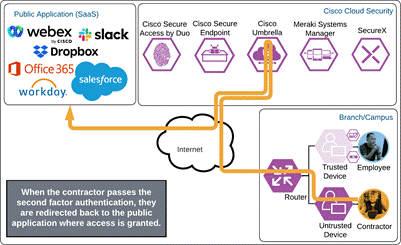
Once the Duo Push is approved by the employee and device’s trust has been verified, Duo redirects the user back to the application which can now be accessed.
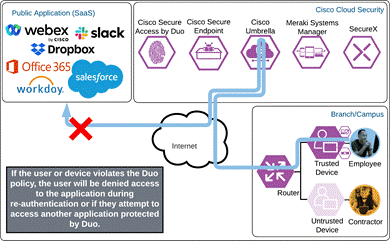
If something happens which lowers user or device trust such as Cisco Secure Endpoint detecting an indication of compromise, when the user attempts to re-authenticate to the application or authenticate to any other applications secured by Duo, authentication will be denied and depending on the issue the user will be asked to remediate the issue.
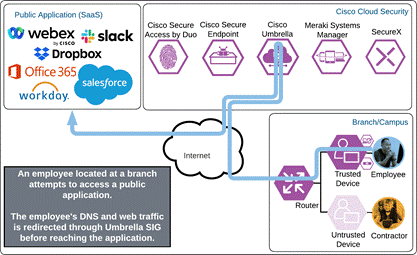
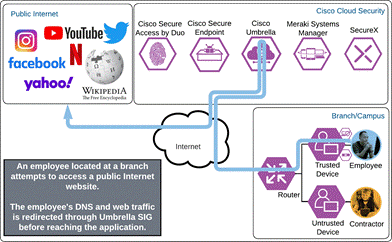
Internet
The employee attempts to access a resource on the Internet. While the endpoint is on an Umbrella protected network, the Umbrella Roaming Security will disable itself so that the user can be protected by any Umbrella security policies applied to the network. Secure Endpoint will continue to protect the device from malware threats.
Branch and Campus - Contractor
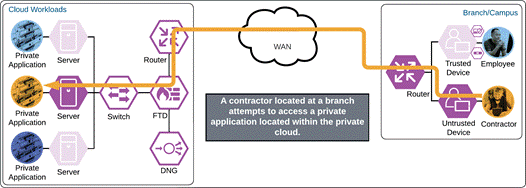
Depending on the organization's security policy, the contractor’s device may or may not be provisioned with all the same applications as an employee. In this example, no applications are installed on the contractor’s device, and it is considered untrusted.
Private Application (Private DC)
The contractor attempts to access an on-premises application configured to use Duo SSO authentication over the WAN. The application checks to see if the user has an active SSO session with Duo. Because the contractor does not, they are directed to Duo for verification.
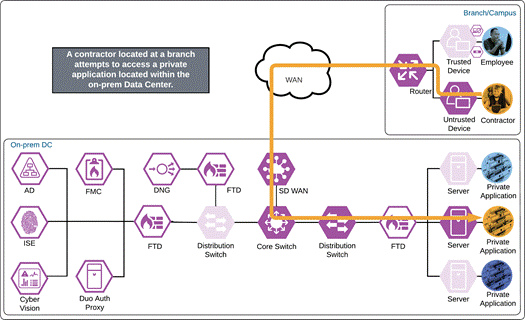
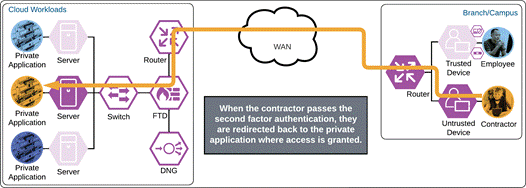
Duo SSO requests the user’s primary authentication credentials and checks these credentials against the on premises Active Directory server. Duo does this through Duo Authentication Proxy, which has been setup and configured to query Active directory. When Active Directory has validated the contractor’s primary credentials, Duo sends a Duo Push to the user along with an option to use other MFA methods that have been approved for the application. This second factor authentication must be validated before the user can proceed. In addition to this, the device’s trust is checked. The contractor’s device is not managed in this example, but Duo is still able to check certain variables. For example, is the device logging in from an acceptable location? Is the browser used by the contractor up to date? The user approves the Duo Push request on their phone.

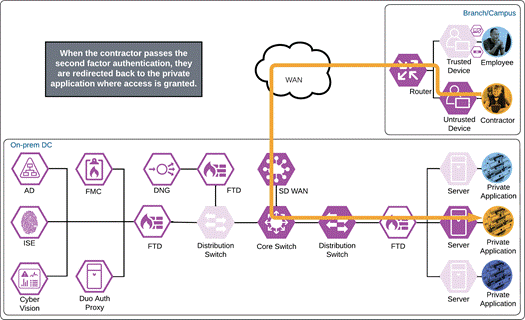
Once the Duo Push is approved by the contractor and device’s trust has been verified, Duo redirects the user back to the application which can now be accessed.
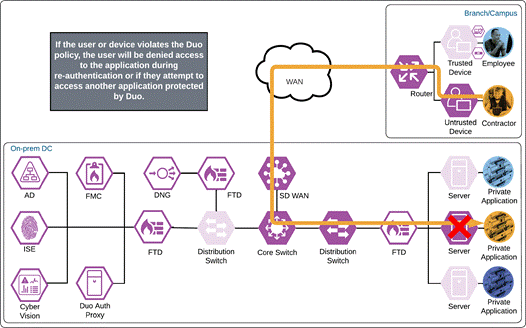
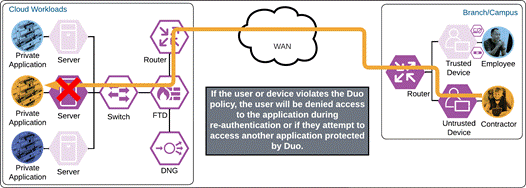
If something happens which lowers user or device trust such as Cisco Secure Endpoint detecting an indication of compromise, when the user attempts to re-authenticate to the application or authenticate to any other applications secured by Duo, authentication will be denied and depending on the issue the user will be asked to remediate the issue.
Private Application (Private IaaS)
The contractor attempts to access a cloud workload by entering the URL of that workload. The workload has been setup to use Duo SSO for authentication and redirects the contractor to Duo for verification.
Duo Single Sign On requests the user’s primary authentication credentials and checks these credentials against the on premises Active Directory server. To do this, Duo Authentication Proxy has been setup and configured to query Active directory. When Active Directory has validated the contractor’s primary credentials, Duo does a secondary authentication check using a method that is previously setup by the contractor during enrollment. In this example, a Duo Push request is sent to the contractor’s phone, and they must approve the authentication attempt before authentication is successful. In addition to this, the device’s trust is checked. For example, is the device logging in from an acceptable location? Is the browser used by the contractor up to date?
Once the secondary authentication is approved by the contractor and device’s trust has been verified, Duo will redirect the user back to the cloud workload and the contractor will be allowed to access the workload.
If something happens which lowers user or device trust such as Cisco Secure Endpoint detecting an indication of compromise, when the user attempts to re-authenticate to the application or authenticate to any other applications secured by Duo, authentication will be denied and depending on the issue the user will be asked to remediate the issue.
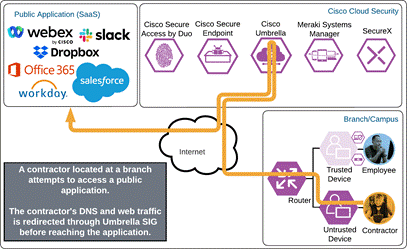
Public Application (SaaS)
The contractor attempts to access a SaaS application configured to use Duo SSO authentication by entering the URL of that application. The application checks to see if the user has an active SSO session with Duo. Because the contractor does not, they are directed to Duo for verification.
Duo SSO requests the user’s primary authentication credentials and checks these credentials against the on premises Active Directory server. Duo does this through Duo Authentication Proxy, which has been setup and configured to query Active directory. When Active Directory has validated the contractor’s primary credentials, Duo sends a Duo Push to the user along with an option to use other MFA methods that have been approved for the application. This second factor authentication must be validated before the user can proceed. In addition to this, the device’s trust is checked. The contractor’s device is not managed in this example, but Duo is still able to check certain variables. For example, is the device logging in from an acceptable location? Is the browser used by the contractor up to date? The user approves the Duo Push request on their phone.
Once the Duo Push is approved by the contractor and device’s trust has been verified, Duo redirects the user back to the application which can now be accessed.
If something happens which lowers user or device trust such as Cisco Secure Endpoint detecting an indication of compromise, when the user attempts to re-authenticate to the application or authenticate to any other applications secured by Duo, authentication will be denied and depending on the issue the user will be asked to remediate the issue.

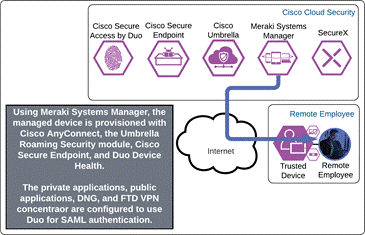
The Remote Employee’s device is provisioned in the same way as an on-prem employee. The Meraki Agent, Meraki management profile, Duo Device Health, and Cisco Secure Client which will include the Cisco Secure Endpoint module and Umbrella Roaming Security module are installed and configured on their device. The remote employee has also successfully enrolled with Duo and setup their phone for MFA with the Duo mobile app.
Private Application (Private DC Clientless)
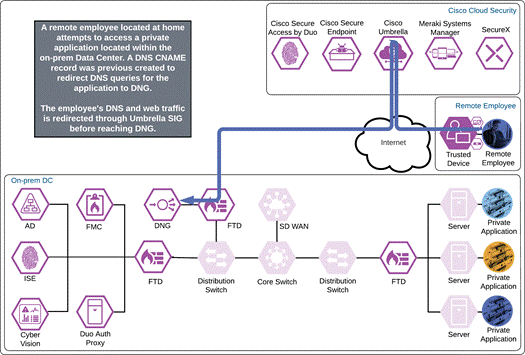
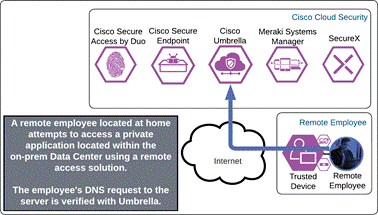
The remote employee attempts to access an on-premises application configured to use Duo SSO authentication by entering the external URL of that application as configured within the Duo Network Gateway. A DNS CNAME record was previously created to redirect DNS queries for the application to DNG. The DNS request is verified by Umbrella and web traffic is protected by Umbrella SIG via the Umbrella Roaming Security module. DNG checks to see if the user has an active SSO session with Duo. Because the employee does not, they are directed to Duo for verification.
Duo SSO requests the user’s primary authentication credentials and checks these credentials against the on premises Active Directory server. Duo does this through Duo Authentication Proxy, which has been setup and configured to query Active directory. When Active Directory has validated the employee’s primary credentials, Duo sends a Duo Push to the user along with an option to use other MFA methods that have been approved for the application. This second factor authentication must be validated before the user can proceed. In addition to this, the device’s trust is checked. For example, is the device logging in from an acceptable location? Is the device managed by your company? Has Secure Endpoint detected any potential indications of compromise? The user approves the Duo Push request on their phone.

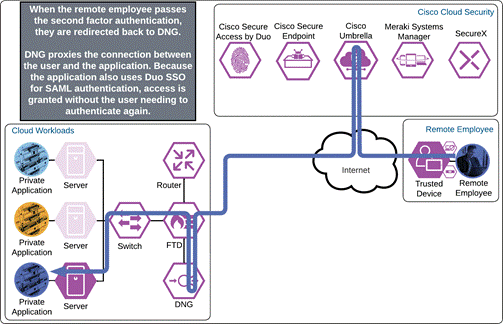
Once the Duo Push is approved by the employee and device’s trust has been verified, Duo redirects the user back to DNG and the remote employee will be allowed to access the application through the reverse proxy created by DNG. Because the application also uses Duo SSO for authentication in this example and the user now has an active SSO session with Duo SSO (because they logged in successfully through DNG), the user will be directed to Duo SSO again but not need to enter their credentials. If the application is not configured for SAML SSO authentication with Duo SSO, the remote employee will have to repeat authentication. Duo quickly redirects the user back to the application which can now be accessed providing a visually similar authentication process as if they were on the corporate network.
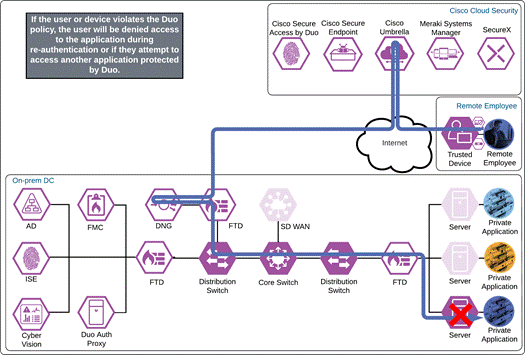
If something happens which lowers user or device trust such as Cisco Secure Endpoint detecting an indication of compromise, when the user attempts to re-authenticate to the application or authenticate to any other applications secured by Duo, authentication will be denied and depending on the issue the user will be asked to remediate the issue.
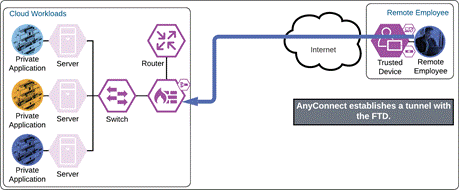
Private Application (Private DC Remote Access)
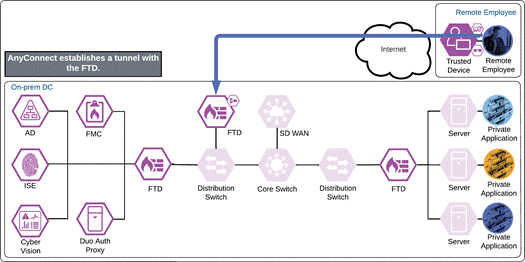
The remote employee attempts to access an on-premises application configured to use Duo SSO authentication by opening Cisco Secure Client and choosing to connect to the VPN concentrator within the AnyConnect VPN module. Before the tunnel is negotiated, Umbrella verifies and responds to the DNS query sent for the VPN concentrator via the Umbrella Roaming Security module.
The VPN concentrator could be an on-premises ASA or FTD, or a cloud-based service such as Cisco Secure Connect Now. After receiving an answer to the DNS query, the AnyConnect VPN module begins establishing a tunnel with the VPN concentrator. During the authentication step of establishment, the VPN concentrator directs the user to Duo SSO.
Note: ASA 9.17 and FTD 7.1 add support for SAML authentication using an external browser when using AnyConnect VPN module 4.10.04065 and later. This feature allows for SSO with other SAML enabled applications when using the same browser.
Duo SSO requests the user’s primary authentication credentials and checks these credentials against the on premises Active Directory server. Duo does this through Duo Authentication Proxy, which has been setup and configured to query Active directory. When Active Directory has validated the employee’s primary credentials, Duo sends a Duo Push to the user along with an option to use other MFA methods that have been approved for the application. This second factor authentication must be validated before the user can proceed. In addition to this, the device’s trust is checked. For example, is the device logging in from an acceptable location? Is the device managed by your company? Has Secure Endpoint detected any potential indications of compromise? The user approves the Duo Push request on their phone.

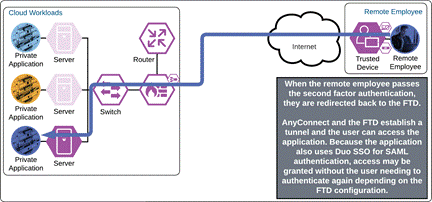
Once the Duo Push is approved by the employee and device’s trust has been verified, Duo redirects the user back to the VPN concentrator and the tunnel is established. If the external browser feature is supported on the VPN concentrator and the AnyConnect VPN module, and the application also uses Duo SSO for authentication, the user will be directed to Duo SSO again but because the user has an active SSO session with Duo SSO, the user will not need to enter their credentials again. Duo quickly redirects the user back to the application where access is granted.
If something happens which lowers user or device trust such as Cisco Secure Endpoint detecting an indication of compromise, when the user attempts to re-authenticate to the application or authenticate to any other applications secured by Duo, authentication will be denied and depending on the issue the user will be asked to remediate the issue.
Private Application (Private IaaS Clientless)
The remote employee attempts to access a cloud workload by entering the URL of that workload. The workload has been setup to use Duo SSO for authentication and redirects the employee to Duo for verification.

Duo Single Sign On requests the user’s primary authentication credentials and checks these credentials against the on premises Active Directory server. To do this, Duo Authentication Proxy has been setup and configured to query Active directory. When Active Directory has validated the employee’s primary credentials, Duo does a secondary authentication check using a method that is previously setup by the employee during enrollment. In this example, a Duo Push request is sent to the employee’s phone, and they must approve the authentication attempt before authentication is successful. In addition to this, the device’s trust is checked. For example, is the device logging in from an acceptable location? Is the device managed by your company? Has Secure Endpoint detected any potential indications of compromise?
Once the secondary authentication is approved by the remote employee and device’s trust has been verified, Duo will redirect the user back to the cloud workload and the remote employee will be allowed to access the workload.
If something happens which lowers user or device trust such as Cisco Secure Endpoint detecting an indication of compromise, when the user attempts to re-authenticate to the application or authenticate to any other applications secured by Duo, authentication will be denied and depending on the issue the user will be asked to remediate the issue.
Private Application (Private IaaS Remote Access)
The remote employee attempts to access an application located in a private cloud that is configured to use Duo SSO authentication by opening Cisco Secure Client and choosing to connect to the VPN concentrator in the AnyConnect VPN module. Before the tunnel is negotiated, Umbrella verifies and responds to the DNS query sent for the VPN concentrator via the Umbrella Roaming Security module.

The VPN concentrator could be an on-premises ASA or FTD, or a cloud-based service such as Cisco Secure Connect Now. After receiving an answer to the DNS query, the AnyConnect VPN module begins establishing a tunnel with the VPN concentrator. During the authentication step of establishment, the VPN concentrator directs the user to Duo SSO.
Note: ASA 9.17 and FTD 7.1 add support for SAML authentication using an external browser when using AnyConnect VPN module 4.10.04065 and later. This feature allows for SSO with other SAML enabled applications when using the same browser.
Duo Single Sign On requests the user’s primary authentication credentials and checks these credentials against the on premises Active Directory server. To do this, Duo Authentication Proxy has been setup and configured to query Active directory. When Active Directory has validated the employee’s primary credentials, Duo does a secondary authentication check using a method that is previously setup by the employee during enrollment. In this example, a Duo Push request is sent to the employee’s phone, and they must approve the authentication attempt before authentication is successful. In addition to this, the device’s trust is checked. For example, is the device logging in from an acceptable location? Is the device managed by your company? Has Secure Endpoint detected any potential indications of compromise?

Once the Duo Push is approved by the employee and device’s trust has been verified, Duo redirects the user back to the VPN concentrator and the tunnel is established. If the external browser feature is supported on the VPN concentrator and the AnyConnect VPN module, and the application also uses Duo SSO for authentication, the user will be directed to Duo SSO again but because the user has an active SSO session with Duo SSO, the user will not need to enter their credentials again. Duo quickly redirects the user back to the application where access is granted.
If something happens which lowers user or device trust such as Cisco Secure Endpoint detecting an indication of compromise, when the user attempts to re-authenticate to the application or authenticate to any other applications secured by Duo, authentication will be denied and depending on the issue the user will be asked to remediate the issue.

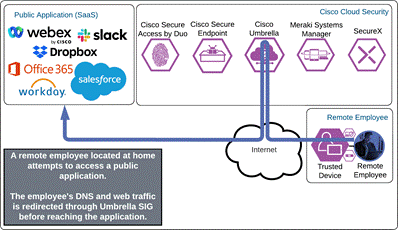
Public Application (SaaS)
The remote employee attempts to access a SaaS application configured to use Duo SSO by entering the URL of that application. The application checks to see if the user has an active SSO session with Duo. Because the employee does not, they are directed to Duo for verification.
Duo SSO requests the user’s primary authentication credentials and checks these credentials against the on premises Active Directory server. Duo does this through Duo Authentication Proxy, which has been setup and configured to query Active directory. When Active Directory has validated the employee’s primary credentials, Duo sends a Duo Push to the user along with an option to use other MFA methods that have been approved for the application. This second factor authentication must be validated before the user can proceed. In addition to this, the device’s trust is checked. For example, is the device logging in from an acceptable location? Is the device managed by your company? Has Secure Endpoint detected any potential indications of compromise? The user approves the Duo Push request on their phone.
Once the Duo Push is approved by the employee and device’s trust has been verified, Duo redirects the user back to the application which can now be accessed.
If something happens which lowers user or device trust such as Cisco Secure Endpoint detecting an indication of compromise, when the user attempts to re-authenticate to the application or authenticate to any other applications secured by Duo, authentication will be denied and depending on the issue the user will be asked to remediate the issue.
Internet
The remote employee attempts to access a resource on the Internet. This may occur while they are using VPN with split tunneling o using DNG to access a corporate application. The Cisco Umbrella Roaming Security module forwards the user’s DNS and internet web traffic to Umbrella SIG to protect them from Internet based threats. Secure Endpoint will continue to protect the device from malware threats.

Zero Trust User and Device Security Deployment
SecureX provides cloud-based unified visibility and SSO capabilities with products in the Cisco security portfolio and 3rd party products. In this design guide, the Cisco solutions listed in the Product Overview will be integrated into SecureX. By doing this, we can use the data from these products to create Dashboards that show high level statistics, utilize data from products within Threat Response to simplify incident analysis, compile an inventory of assets within Device Insights, and much more. Capabilities of SecureX, such as threat response and the dashboard ribbon can be explored further in the Cisco Breach Defense Design guide.
Duo
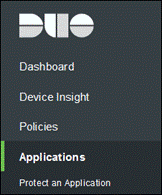
Step 1. In the Duo Admin Panel, navigate to Applications.
Step 2. Click Protect an Application.

Step 3. Search for SecureX Dashboard and click Protect next to Cisco SecureX Dashboard.

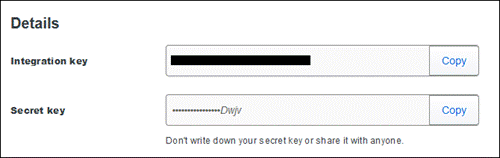
Step 4. Copy the Integration key and Secret key.
Step 5. Click Save.
Step 6. In the SecureX Dashboard, navigate to Integration Modules > Available Integration Modules.

Step 7. Find Duo from the available integrations then click Add.

Step 8. Paste the Integration key into the Duo Integration Key field. Paste the Secret key into the Duo Secret Key field.
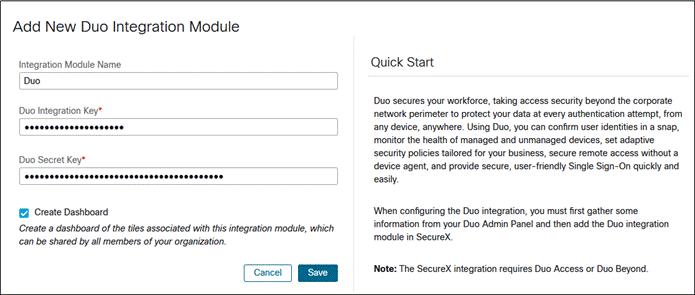
Step 9. Click Save.
Meraki System Manager
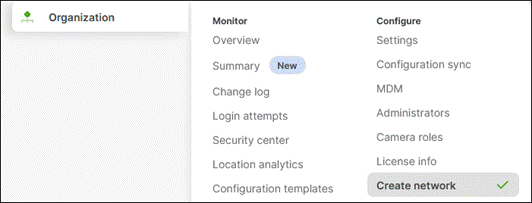
Step 1. In the Meraki Dashboard, navigate to Organization > Configure > Settings.

Step 2. Scroll down to Dashboard API Access and click the checkbox next to Enable access to the Cisco Meraki Dashboard API.

Step 3. Click Save Changes.
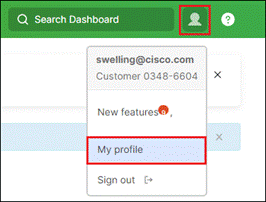
Step 4. In the upper right corner of the screen, click the user icon (or email in the older UI) then click My profile.
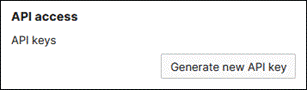
Step 5. Scroll down to API Access and click Generate new API key.
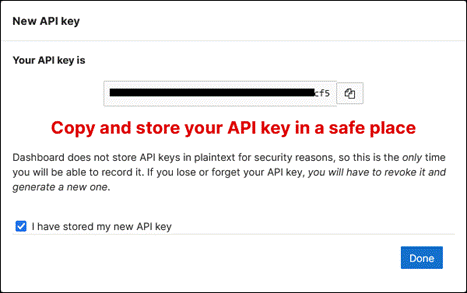
Step 6. Copy the API key, click the checkbox next to I have stored my new API key once you’ve done so, then click Done.
Step 7. In the Meraki Dashboard, navigate to Systems Manager > Configure > General.
Note: This requires that you’ve already created a Systems Manager network under Organization > Configure > Create Network.

Step 8. Scroll down to SecureX and copy the Network ID.

Step 9. In the SecureX Dashboard, navigate to Integration Modules > Available Integration Modules.

Step 10. Find Meraki Systems Manager from the available integrations then click Add.
Step 11. Paste the API Key copied in step 6 into the API Key field. Paste the Network ID coped in step 8 in the Network ID field.
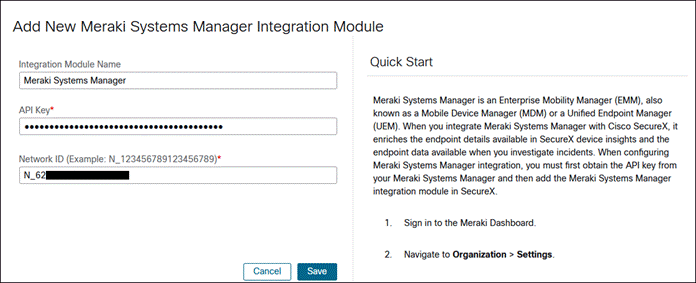
Step 12. Click Save.
Secure Endpoint
Step 1. In the SecureX Dashboard, navigate to Integration Modules > Available Integration Modules.

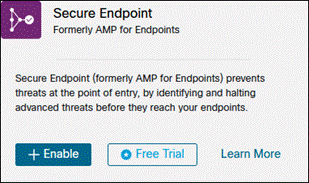
Step 2. Find Secure Endpoint from the available integrations then click Enable.
Step 3. Login to your Secure Endpoint Cisco Security account to allow Secure Endpoint to integrate with SecureX
Orbital
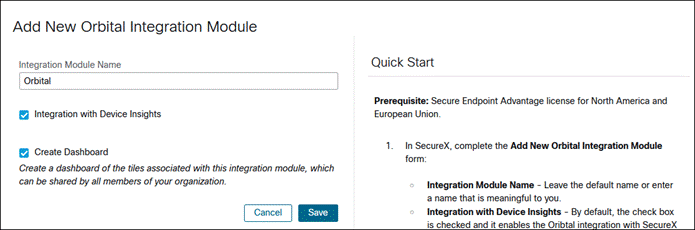
Step 1. In the SecureX Dashboard, navigate to Integration Modules > Available Integration Modules.
Step 2. Find Orbital from the available integrations then click Add.
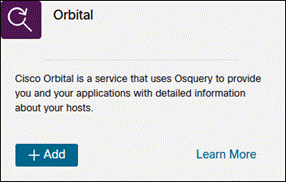
Step 3. Review the default options, then click Save.
Umbrella
Step 1. After logging in to the Umbrella Dashboard, copy the Organization ID within the URL. This is the value from the Umbrella browser URL between /o/ and /#/. This will be used for the Umbrella Organization ID in SecureX.
![]()
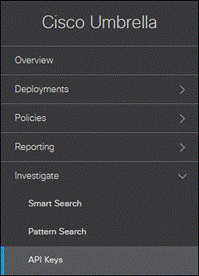
Step 2. In the Umbrella Dashboard, navigate to Investigate > API Keys.
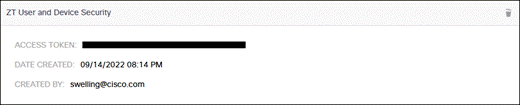
Step 3. Click Create New Token.

Step 4. Provide an appropriate name for the API Key then click Create.
Step 5. Copy and save the Access Token value for later. This will be used for the Umbrella Investigate API Token in SecureX.
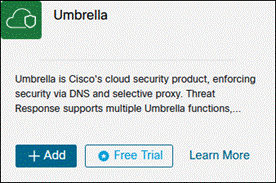
Step 6. In the Umbrella Dashboard, navigate to Policies > Policy Components > Integrations.
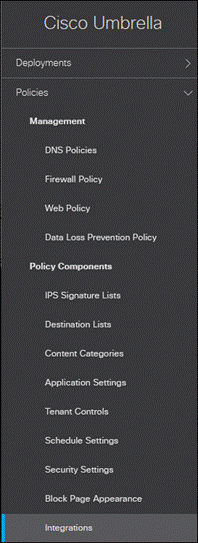
Step 7. Click Add.
![]()
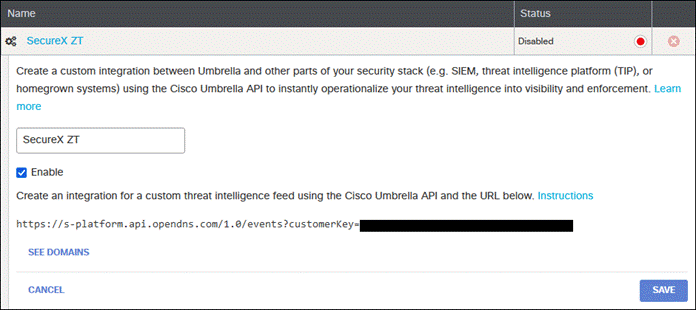
Step 8. Provide an appropriate name then click Create.

Step 9. Click the newly created integration.

Step 10. Click the checkbox next to Enable, copy and save the URL, then click Save. The URL will be used for the Umbrella Enforcement Custom Umbrella Integration URL in SecureX.
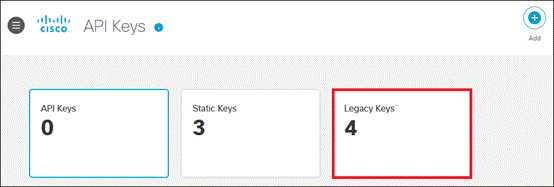
Step 11. In the Umbrella Dashboard, navigate to Admin > API Keys.
Step 12. Click Legacy Keys.
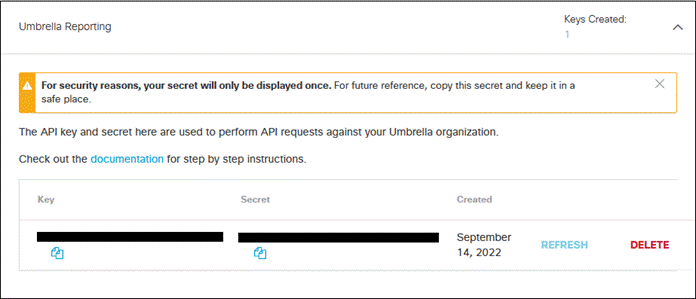
Step 13. Click Umbrella Reporting, then click Generate Token.
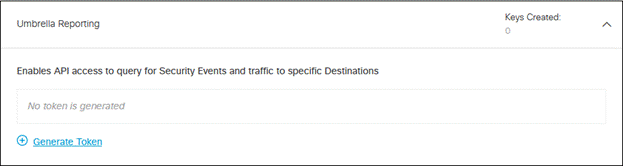
Step 14. Copy and save the Key and Secret values. These will be used for the Umbrella Reporting API Key and API Secret in SecureX.
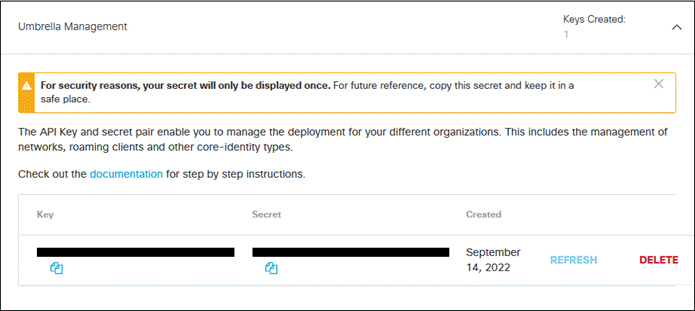
Step 15. Click Umbrella Management, then click Generate Token.
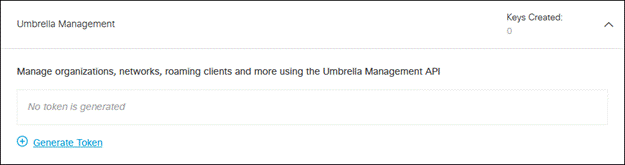
Step 16. Copy and save the Key and Secret values. These will be used for the Umbrella Management API Key and API Secret in SecureX.
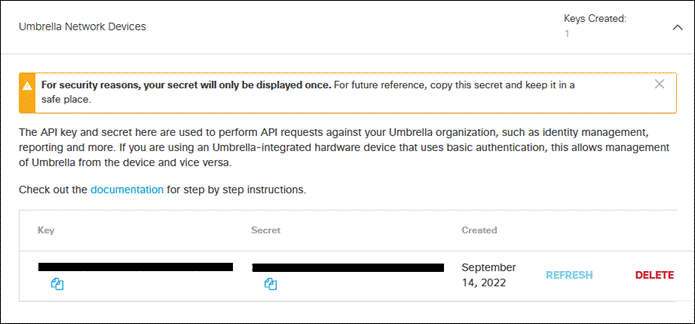
Step 17. Click Umbrella Network Devices, then click Generate Token.
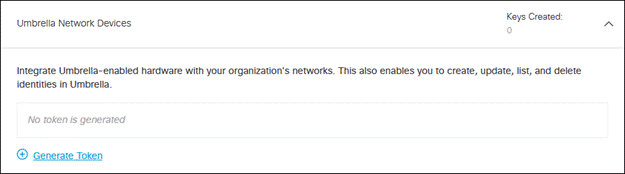
Step 18. Copy and save the Key and Secret values. These will be used for the Umbrella Network Devices & Policies API Key and API Secret in SecureX.
Step 19. In the SecureX Dashboard, navigate to Integration Modules > Available Integration Modules.

Step 20. Find Umbrella from the available integrations then click Add.
Step 21. In the Organization ID field, paste the value obtained in step 1.
Step 22. In the Investigate API Token field, paste the value obtained in step 5
Step 23. In the Enforcement Custom Umbrella Integration URL field, paste the value obtained in step 10.
Step 24. In the Reporting API Key and API Secret fields, paste the Key and Secret values obtained in step 14, respectively.
Step 25. In the Management API Key and API Secret fields, paste the Key and Secret values obtained in step 16, respectively.
Step 26. In the Network Devices & Policies API Key and API Secret fields, paste the Key and Secret values obtained in step 18, respectively.
Step 27. Click Save.
Secure Endpoint and Orbital Setup
Cisco Secure Endpoint (Formally AMP for Endpoints) is a cloud-managed endpoint security solution that prevents cyber attacks and rapidly detects, contains, and remediates malicious files on endpoints. Cisco Secure Endpoint contains a comprehensive database of every file that has ever been seen and maintains a corresponding good or bad disposition. As a result, known malware is quickly and easily quarantined at the point of entry without any processor-intensive scanning.
Policies determine how Secure Endpoint behaves on the device. For example, how Secure Endpoint responds to suspicious files, specific exclusions, or how often it checks for updates.
Step 1. In the Secure Endpoint console, navigate to Management > Policies.
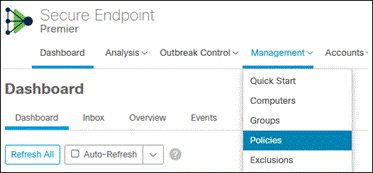
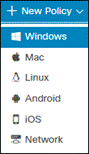
Step 2. Click New Policy.
![]()
Step 3. Select Windows from the dropdown.
Step 4. Add a Name and select Conviction Modes for the policy. You can also use Cisco recommended settings on the right by clicking Apply Workstation Settings or Apply Server Settings.
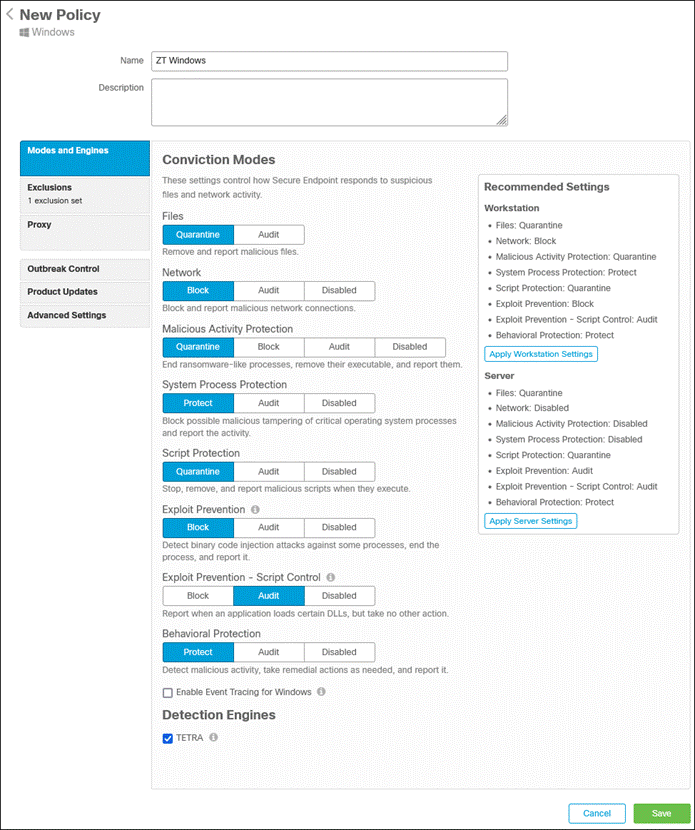
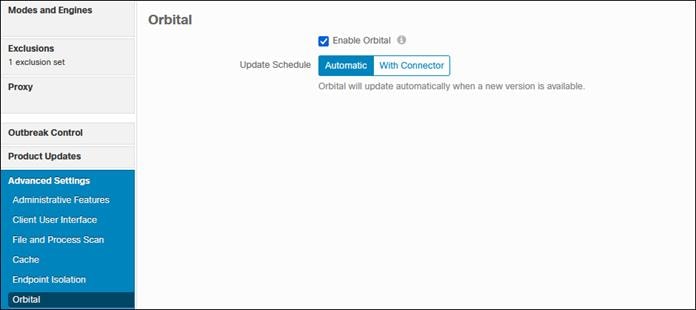
Step 5. Orbital is enabled by default however you can verify it will be installed by going to Advanced Settings > Orbital then ensure Enable Orbital is checked.
Step 6. Click Save.
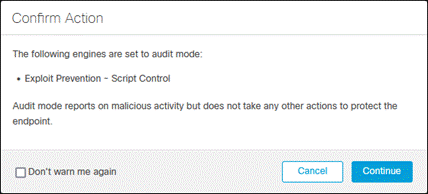
Step 7. Confirm the action for engines set to audit. Click Continue.
Creating Groups
Once a policy is created, it must be applied to a Group before it can be assigned to a computer.
Step 1. In the Secure Endpoint console, navigate to Management > Groups.
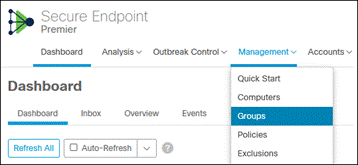
Step 2. Click Create Group.
Step 3. Give the group a relevant name and select the policy that will be used for each operating system. In this design guide, the ZT Windows policy created in the previous steps will be used.
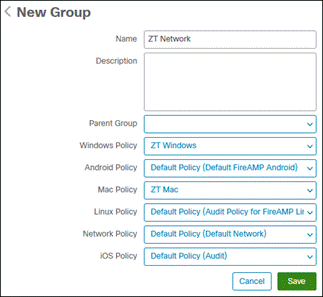
Step 4. Click Save.
Cisco Umbrella brings multiple capabilities to clients on and off trusted networks. For details on setting up Umbrella DNS security, web security, Cloud Access Security Broker, Data Loss Prevention, and Remote Browser Isolation for roaming clients, refer to the Cisco Umbrella Security Policy section of the Cisco Secure Access Service Edge (SASE) with Meraki SD-WAN Design Guide.
In addition to these configurations, the following settings are used to enable Umbrella SIG for roaming users and to prevent Umbrella Roaming computer settings from taking priority over Network Umbrella settings when the user is on the corporate network.
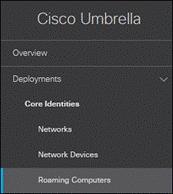
Step 1. In the Umbrella Dashboard, navigate to Deployments > Core Identities > Roaming Computers.

Step 2. Click Settings in the top right.

Step 3. Click the Cisco Secure Client Roaming Client tab.
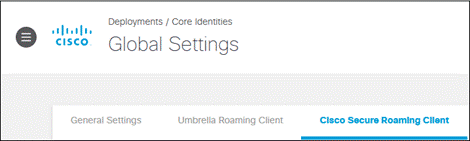
Step 4. Under Traffic Forwarding on Umbrella Protected Networks, depending on the security policy for your Umbrella protected network, Enable DNS Redirection for DNS Tunnels, SWG Tunnels, or both.
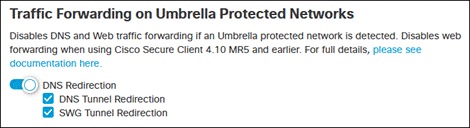
Step 5. Under Secure Web Gateway, ensure SWG is enabled.

Bypass Meraki HTTPS Inspection
When enabling HTTPS Inspection within your Web Policy, it is important to exclude traffic to the domain meraki.com from inspection. Inspecting this traffic can cause issues enrolling (if the device is already protected by Umbrella) or pushing applications.
Step 1. In the Umbrella Dashboard, navigate to Policies > Policy Components > Selective Decryption Lists.
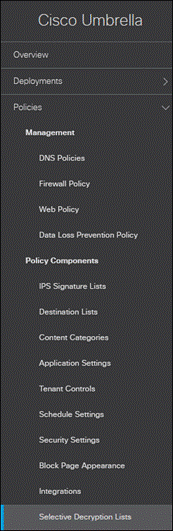
Step 2. Click Add.

Step 3. Give a meaningful List Name to the decryption list.
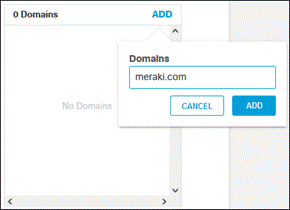
Step 4. Next to Domains, click Add.
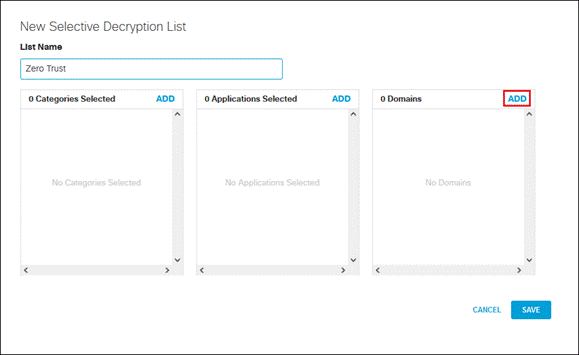
Step 5. Enter meraki.com in the textbox then click Add.
Step 6. Click Save.
Microsoft 365 Compatibility
HTTPS inspection can also have a negative impact on Microsoft 365 traffic as there are several known compatibility issues with it and web proxies. Because Microsoft 365 is used in this guide, the Microsoft 365 Compatibility setting is enabled within umbrella Web Policy Global Settings. To access these settings, navigate to Policies > Management > Web Policy and click Global Settings. For more information, see Microsoft 365 Compatibility.
Before provisioning devices with Cisco Secure Client along with your chosen modules, policies and profiles are setup for each module. In this section, we will setup the Cloud Management profile, Umbrella Roaming client policies, Secure Endpoint policies and groups, briefly cover creating or uploading profiles for other modules used within the Cisco Zero Trust: Network and Cloud Security Design Guide such as the Network Access Manager module, then assign these profiles to a CSC Deployment.
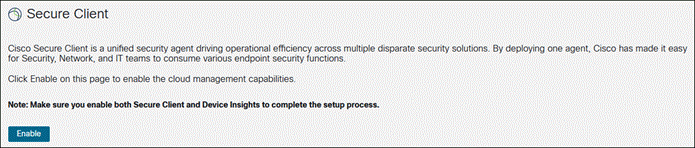
Cloud Management Module
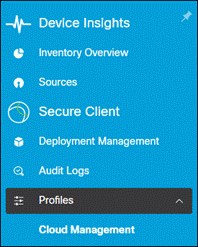
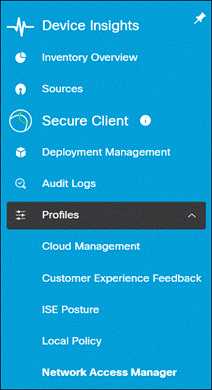
Step 1. In the SecureX Dashboard, navigate to Insights.

Step 2. In the column to the left, click Secure Client.

Step 3. Click the Enable button. After click Enable, you may need to refresh the page to see the new options in the column.
Step 4. Navigate to Secure Client > Profiles > Cloud Management
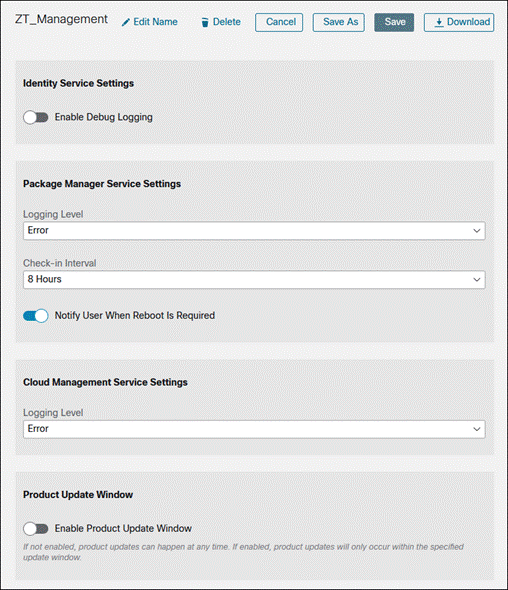
Step 5. Click Create New.
![]()
Step 6. Modify the name of the Cloud Management Profile to something appropriate by clicking the Edit Name button. Modify the default configuration as needed. When done, click Save.
Umbrella Roaming Security Module
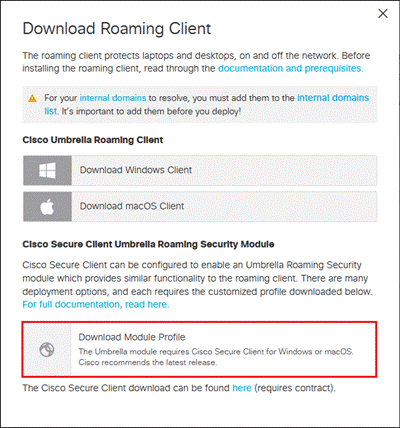
The OrgInfo.json file contains specific information about your Cisco Umbrella service subscription that lets the Umbrella Security Roaming module know where to report and which policies to enforce. It will be uploaded to the SecureX so that it can be easily deployed with the Secure Client Cloud Management module. Although Cloud Management doesn’t support deploying the Umbrella Root certificate, it can be deployed via Meraki MDM.
Step 1. Navigate to Deployments > Core Identities > Roaming Computers.
Step 2. Click Roaming Client.

Step 3. Under Cisco Secure Client Umbrella Roaming Security Module, click Download Module Profile to obtain the OrgInfo.json file.
Step 4. In SecureX, navigate to Insights.
Step 5. Go to Secure Client > Profiles > Umbrella.
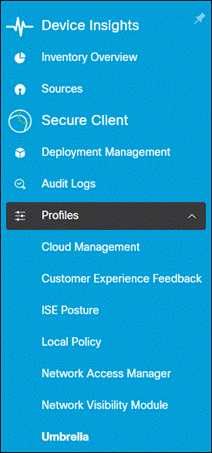
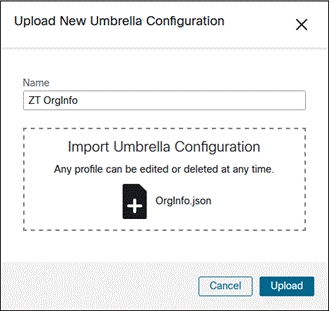
Step 6. Click Upload.
![]()
Cisco Secure Endpoint Module
After creating a Group within the Secure Endpoint console with the policies for each operating system and integrating Secure Endpoint with SecureX, no additional steps are needed other than creating the Deployment Configuration which will be covered later within this guide. Creating the Policies and Group can be found within the Secure Endpoint Setup section and integrating Secure Endpoint with SecureX can be found in the SecureX Integration section of this guide.
AnyConnect VPN Module
Cloud Management provides another method to deploy the AnyConnect VPN module and VPN profile outside predeployment and web deployment. Configuration such as deploying signing certificates (for trusting internally signed VPN concentrator certificates) can be done through an MDM like Meraki MDM. VPN concentrator setup is out of scope for this design guide. For information on setting up Secure Firewall (FTD) as a VPN concentrator, refer to the Secure Remote Worker for On-Prem Design Guide.
Step 1. Go to Secure Client > Profiles > VPN
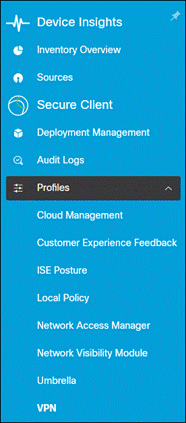
Step 2. If you are uploading a VPN profile from another source, click Upload.
![]()
Provide a Name for the VPN Configuration, upload the VPN profile, then click Upload.
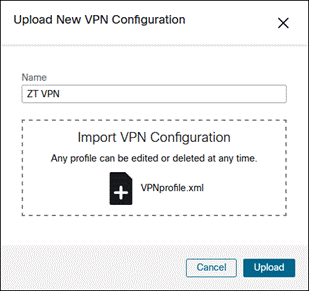
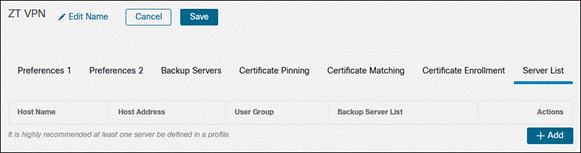
Otherwise, click Create New.
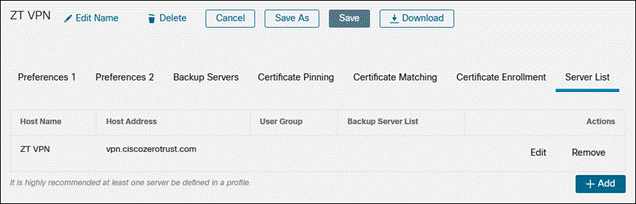
Step 3. Click Edit Name to provide a name for the VPN profile. There are multiple options that can be chosen here. For more information on the available options, click here. At minimum, the Server List should be edited to add the FQDN or IP Address of the VPN concentrator. Click the Server List tab then click Add.
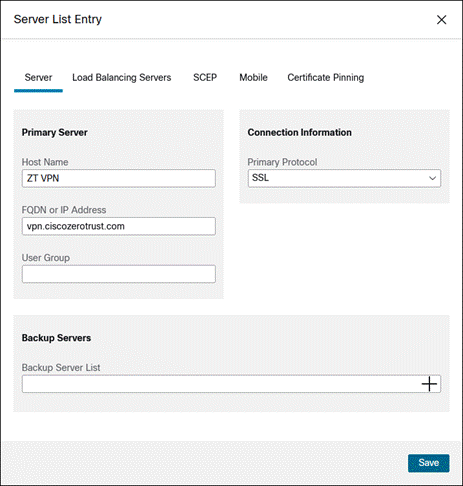
Step 5. Click Save again when done with any other profile changes.
Network Access Manager Module
NAM profiles can be deployed using Cloud management, however at the time of writing this guide Cloud management does not support creating the profile within SecureX. Profile creation will require using a method such as the Profile Editor. For more information on this, review Appendix A.
Network configuration for 802.1x user and machine authentication is out of scope for this guide. Information on setting this up is included in the Cisco Zero Trust: Network and Cloud Security Design Guide.
Step 1. Go to Secure Client > Profiles > Network Access Manager.
Step 2. Click Upload.
![]()
Provide a Name for the Network Access Manager Configuration, upload the profile, then click Upload.
ISE Posture Module
Using Cloud Management, the ISE Posture module and ISE Posture profile can be installed before a user connects to ISE. Although Cloud Management doesn’t support deploying the ISE Compliance Module or the CA (Certificate Authority) certificate that signed the ISE server’s identity certificate, these can both be deployed via Meraki MDM. Installing these on the user’s device before the device initially connects to ISE can prevent the user from needing to go through installing the ISE Network Setup Assistant (NSA) during the Client Provisioning Portal and seeing untrusted server errors.
ISE configuration for ISE Posture is out of scope for this design guide. Information on setting up the ISE configuration for ISE posture will be included in a future version of the Cisco Zero Trust: Network and Cloud Security Design Guide.
Step 1. Go to Secure Client > Profiles > ISE Posture.
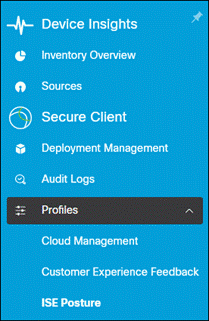
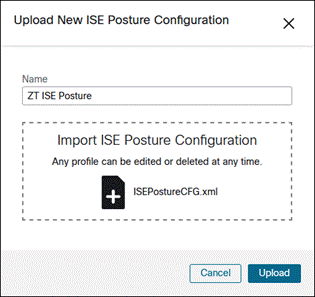
Step 2. If you are uploading an ISE Posture profile from another source, click Upload.
![]()
Provide a Name for the ISE Posture Configuration, upload the ISE Posture profile, then click Upload.
Otherwise, click Create New.
Step 3. Click Edit Name to provide a name for the ISE Posture profile.
![]()
There are multiple options that can be chosen here. For more information on the available options, click here. At the time of writing this design guide, SecureX only offers a scaled down version of ISE Posture profile. If you require more options, consider pre-deploying the ISE profile separately using an MDM. This is covered in Appendix A and B of this design guide. At minimum, the Server name rules will need to be entered. You can also add the Discovery host. When done, navigate to the top and click Save.
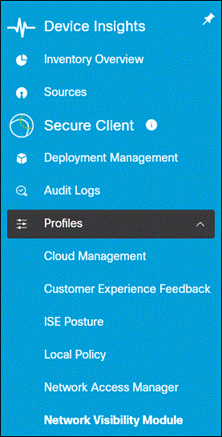
Network Visibility Module
NVM profiles can be created and deployed using Cloud management. You can also upload an NVM profile created externally, such as via the Profile Editor. For more information on this, review Appendix A.
Telemetry collection configuration such as setting up a collector to process NVM telemetry data is out of scope for this guide. For more information on this, click here.
Step 1. Go to Secure Client > Profiles > Network Access Manager.
Step 2. If you are uploading an NVM profile from another source, click Upload.
![]()
Provide a Name for the Network Visibility Module Configuration, upload the profile, then click Upload.
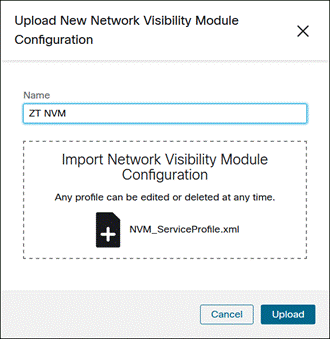
Otherwise click Create New.
Step 3. Click Edit Name to provide a name for the NVM profile.
![]()
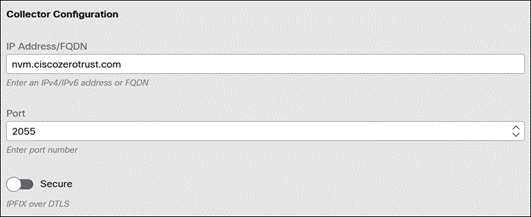
Step 4. There are multiple options that can be chosen here. For more information on the available options, click here. Under Collector Configuration, provide the IP Address/FQDN and Port of the collector. Depending on if DTLS is supported by the collector, disable or enable the Secure checkbox.
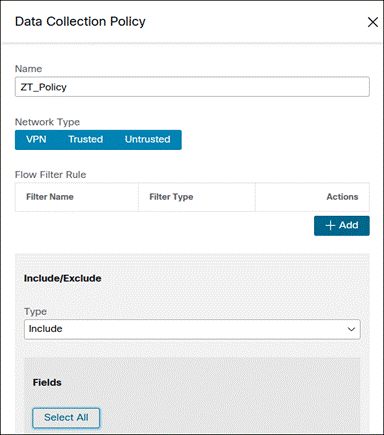
Step 5. Scroll down to Data Collection Policy and expand the dropdown. Click Add. NVM will not collect data without a policy being created first.

Step 6. Create a Name for the Data Collection Policy. Select the Network Types the policy should apply to. Under the Include/Exclude section, specify whether to Include or Exclude certain fields and specify the Fields. Click Save.
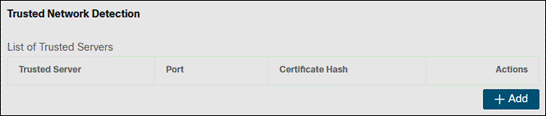
Step 7. In the Trusted Network Detection section (TND), click Add. NVM uses Trusted Network Detection to determine if the device is on a trusted network or not. On a trusted network, NVM can immediately send telemetry to the collector. On an untrusted network, NVM can cache the data to send it later when on a trusted network.
Note: Alternatively, the Trusted Network Detection configuration can be set up under the VPN profile. If NVM is being deployed with the AnyConnect VPN module, rather than standalone, it may be preferred to configure TND settings here for more options.
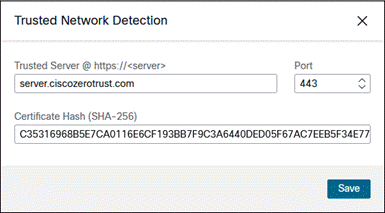
Step 8. Enter the IP address or FQDN of the trusted server, along with the port if it uses something other than 443. Add the SHA-256 hash in the Certificate Hash section. The SHA-256 Hash can be obtained through a browser while accessing the server, typically by clicking the lock next to the URL then clicking to find more information on the secure connection. Alternatively, if you have the trusted server certificate you can use the following openssl command to obtain the hash from a PEM (Privacy Enhanced Mail) format certificate: openssl x509 -noout -fingerprint -sha256 -inform pem -in [certificate]. In either case, make sure to remove the colons before adding it to the Certificate Hash field. Click Save when done.
Step 9. Navigate back to the top and click Save.
Deployment Setup
After all necessary profiles are configured, you can create a Deployment configuration that determines which modules and profiles will be installed on the devices. You can create multiple Deployments for different groups of users.
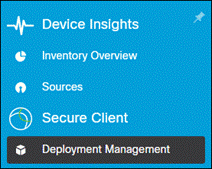
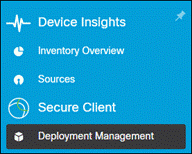
Step 1. Go to Secure Client > Deployment Management.
Step 2. Click Create New.
![]()
Step 3. Click Edit Name to provide a name for the Deployment.
![]()
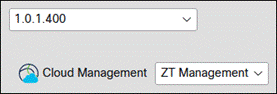
Step 4. In the top left box, choose the Cloud Management module version or leave it as default. In the other section, choose the Cloud Management profile created earlier.
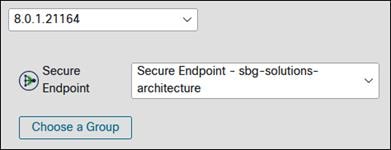
Step 5. In the top right box, choose the Secure Endpoint version. Choose an Instance for Secure Endpoint. You will not see a Secure Endpoint instance if you have not integrated Secure Endpoint with SecureX as done previously in this design guide.
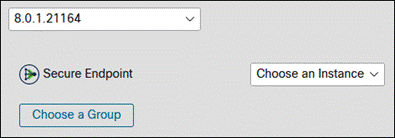
Click Choose a Group.
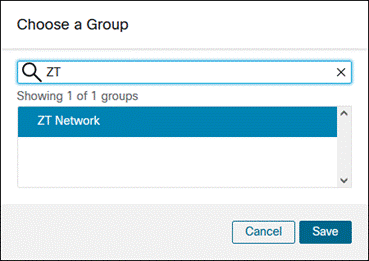
Search for and select the Secure Endpoint group that has the policies you want to use for devices this will be installed on. In this design guide, the ZT Network group created earlier will be used. Click Save.
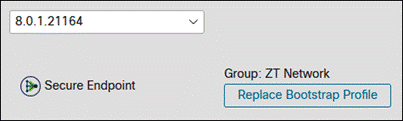
Once a group is chosen, it will be shown beside Group. To change the group, click Replace Bootstrap Profile.
Step 6. In the lower box, choose the version that will be used for the remaining Secure Client modules. Versions with Latest and Recommended beside them will change and can trigger updates on user devices when they do. Once a version has been chosen, you can enable Secure Client modules and apply profiles for modules that use profiles. If a profile isn’t added, the profile will not be deployed when the module is installed and will need to be deployed through some other method before the module can be used.
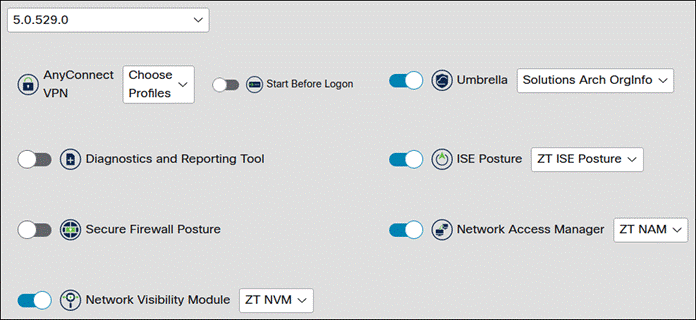
At the time of writing this design guide, the AnyConnect VPN module cannot be disabled and will be installed with or without a profile. If you want the VPN UI to be disabled, leave the VPN profile dropdown empty and deploy a VPNDisable_ServiceProfile.xml vpn profile to the clients outside of Cloud Management. This is covered in the next section of this design guide.
Step 7. When done, click Save.
![]()
For managed company devices, applications are installed to verify device trust and protect the device and user from threats. These applications are Duo Device Health and Cisco Secure Client with the Cisco Secure Endpoint module and the Umbrella Roaming Security Module. While these applications can be installed locally, this is not a scalable solution. Meraki MDM allows administrators to manage devices on and off the corporate network.
In this section, we will first create an Enterprise mobility management (EMM) network, enroll Windows devices with both the Meraki agent and Meraki profile, then create custom apps that will be pushed to enrolled devices.
Getting Started
Before devices can be enrolled or applications pushed, you must first create an EMM network in Meraki. You can enroll all devices into a single network or use multiple networks to organize your devices more granularly.
Step 1. In the Meraki Dashboard, navigate to Organization > Configure > Create Network.
Step 2. In the Network name field, enter a name that defines the purpose of the network.
![]()
Step 3. In the Network type drop down, select EMM (Systems manager).
![]()
Step 4. Ensure you have enough licenses for your new network then click Create network.
Device Enrollment
To enroll a device, you can install a Meraki agent or a Meraki management profile. Either one can be used for enrollment, but since each enables a different subset of features, both should be utilized, when possible, to access all available MDM features. For more information on the differences between both methods, see Systems Manager Agent and MDM Profile Enrollment. In this design guide, both enrollment methods will be used to deploy the custom apps and certificates.
Meraki Agent Enrollment
The Meraki Agent can be installed on Windows devices in a few different ways:
● Command Line - Command line can be used to support use cases where scripting for mass deployment and/or custom installations are required. See Windows Enrollment - Command Line Options for information on this method.
● GUI Installation – The MSI file can be executed on the device and the user can go through the enrollment steps in the GUI. For information on this method, see Windows Enrollment.
Meraki Management Profile Enrollment
For Meraki management profile enrollment on Windows devices, see Windows Enrollment - Profile Installation.
Configuration profiles are containers or wrappers for various configuration settings that are installed onto your managed devices in Systems Manager. To use configuration profiles, the user’s device must be registered via management profile enrollment. Devices enrolled in Systems Manager can have multiple profiles installed at once, which allows you to structure your profiles any number of ways. For Windows, a configuration profile will be created to trust the Umbrella Root CA certificate on enrolled devices.
The same Meraki SM steps can be used to create configuration profiles to deploy the EAP certificate and ISE server certificate used within the Cisco Zero Trust: Network and Cloud Security Design Guide. These certificates are trusted so the client can validate the ISE server for 802.1x authentication and the user can be redirected to the ISE server without seeing an untrusted server warning. These steps can be taken to trust other certificates within your environment.
Umbrella Root CA Certificate
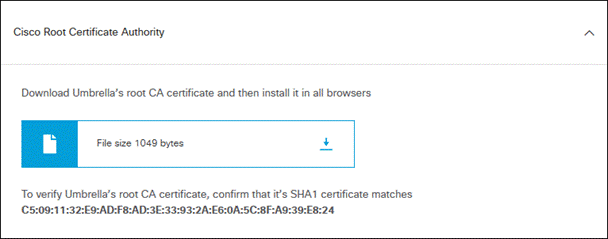
Advanced Cisco Umbrella features, such as IP Layer Enforcement, SSL Decryption through the intelligent proxy, and the ability to block your own custom URLs require that you install the Cisco Umbrella root certificate. Other features, such as File Inspection, gain greater efficacy from having the certificate present as Umbrella can proxy and block more traffic. If the root certificate is not trusted by your browser, an error page may be displayed. Typical errors include “The security certificate presented by this website was not issued by a trusted certificate authority” (Internet Explorer), “The site’s security certificate is not trusted!” (Google Chrome) or “This Connection is Untrusted” (Mozilla Firefox). The following steps cover obtaining the Umbrella root CA certificate and using a Meraki configuration profile so that it is trusted on your devices.
Note: Enabling Firefox to trust this certificate is out of scope for this design guide. See Configuring Firefox to use the Windows Certificate Store for guidance on enabling this trust. Similar steps may be able to be taken for macOS devices.
Download Umbrella Root Certificate
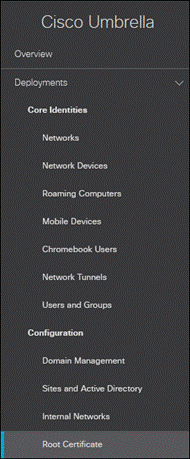
Step 1. From the Umbrella dashboard navigate to Deployments > Configuration > Root Certificate.
Step 2. Expand Cisco Root Certificate Authority.

Step 3. Download the Cisco Umbrella Root certificate.
Step 4. In the Meraki Dashboard, navigate to Systems Manager > Manage > Settings.

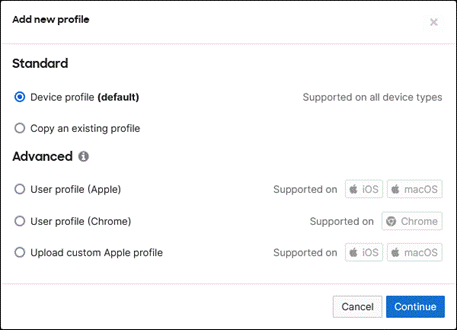
Step 5. Click Add profile.

Step 6. Click Device profile then click Continue.
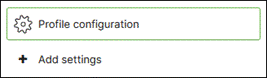
Step 7. Enter a name for the configuration profile.


Step 9. In the left column, click Add settings.
Step 10. Search for and click on Certificate.

Step 11. Enter a descriptive name for the certificate.

Step 12. Ensure the System store is selected in the CertStore field.
![]()
Step 13. In the Certificate field, click Browse.
![]()
Step 14. Choose the Umbrella root certificate downloaded previously.

Step 15. Click Save.
Custom Apps
With Meraki MDM, you can deploy applications to your enrolled devices. See Installing Custom Apps on Windows and Mac Devices for details on setting up custom applications within Meraki. Additional setup will be needed for some of the applications before they are added to Meraki.
Duo Device Health
The Duo Device Health application analyzes a device to assess the status of its security posture and reports the results of this scan to Duo. The following steps will describe how to obtain and install the Duo Device Health using Meraki MDM for Windows devices.
The Windows installation file can be downloaded from the Duo Device Health Application guide.
Duo Device Health
Step 1. In the Meraki Dashboard, navigate to Systems Manager > Manage > Apps.

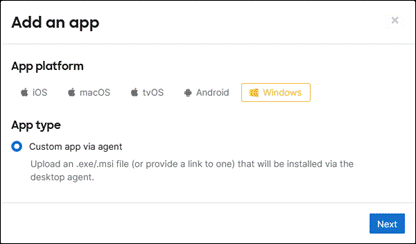
Step 2. Click Add app.
![]()
Step 3. Under App platform, select Windows. Under App type, select Custom app via agent.
Step 4. In the Name field within the Details section, use the value Duo Device Health.
Step 5. In the Type drop down within the Source section, select Upload to the Meraki cloud. Click the dotted box next to App file and browse to the Duo MSI file downloaded from the Duo site in earlier steps.
Step 6. Within the Options section, select any additional options you’d like to apply for the Duo application. In the lab, the default options were used.
Step 7. Within the Targets section, choose the Scope and potential Device tags, Policy tags, and/or Users tags that should be used to determine which devices the application should be installed on. For example, you may decide to only decide to install this application on managed Windows and not unmanaged BYOD devices. Because this custom app only applies to Windows devices, the scope is left to the default option All devices.
Step 8. Click Save at the bottom of the page.
Cisco Secure Client
Cisco Secure Client is a modular unified client that can be tailored to the needs of your environment. In this design guide, Meraki MDM will be used to deploy the CSC Cloud Management Full Installer which will install the following modules:
● Cloud Management module
● Umbrella Roaming Security module
● Secure Endpoint module
● AnyConnect VPN module (The UI will be disabled)
● Network Access Manager module
● ISE Posture module
● ISE Compliance module
● Network Visibility module
Only the Cloud Management, Umbrella Roaming Security, and Secure Endpoint modules will be validated within this design guide.
Download the Cisco Secure Client Cloud Management installer
Step 1. In the SecureX Dashboard, navigate to Insights.

Step 2. Go to Secure Client > Deployment Management.
Step 3. Select the Deployment created earlier in this guide then click Full Installer or Network Installer. Network Installer will create an executable with only the CSC Cloud Management module. If there are other modules and profiles within the Deployment that are not installed on the device, the cloud Management module will download and install those modules and profiles. Full Installer will create an executable with all the modules and profiles added to the Deployment. This may be preferred for network setups that have bandwidth restrictions since the device will not need to download the modules and profiles. In this design guide, the Full Installer will be used.

Create Custom Cisco Secure Client EXE (Windows)
The cloud management module can simplify Cisco Secure Client deployments, however there are additional tasks that may need to be done along with its installation. Specifically:
● If the AnyConnect VPN module will not be used, it is best to disable the VPN UI.
● If there are modules or profiles you’d like to deploy that are not currently supported by the Cloud Management module, such as the ISE compliance module.
If none of these are required, you can simply deploy the Cloud Management Full/Network Installer in the next section (Cisco Secure Client Custom App) without any additional modifications.
If you do require these tasks to be done, Meraki MDM can be configured to do these additional tasks. To allow Meraki MDM to successfully install these components at once, a script must be created and converted into an executable. While there are multiple ways of accomplishing this, the following steps describe a method that should not require additional software to be installed on a Windows 10 device.
Step 1. Create a folder to store the executables and other files. In this lab, the folder Temp was created under the C:\ drive.
Step 2. Copy the CSC deploy executable into the created folder.
Step 3. (Optional) Create a VPN Profile to disable the VPN module UI for deployments that do not use VPN. In a text editor of your choice, such as Notepad, copy and paste the following lines:
<?xml version="1.0" encoding="utf-8"?>
<!--
Cisco AnyConnect VPN Profile -
This profile is a sample intended to allow for the disabling of VPN service
for those installations that do not require VPN support.
-->
<AnyConnectProfile xmlns="http://schemas.xmlsoap.org/encoding/" xmlns:xsi="http://www.w3.org/2001/XMLSchema-instance" xsi:schemaLocation="http://schemas.xmlsoap.org/encoding/ AnyConnectProfile.xsd">
<ClientInitialization>
<ServiceDisable>true</ServiceDisable>
</ClientInitialization>
</AnyConnectProfile>
Save this as a .xml file with the name “VPNDisable_ServiceProfile.xml” and add it to the created folder.
Step 4. (Optional) If you are deploying the ISE Posture module and profile to the device, you may consider also deploying the ISE Compliance module to the device as well. This file can be found here. If you decide to do this, the Cloud Management Full installer will need to be used rather than the Cloud Management Network installer. This is because CSC will need to be fully installed before the ISE Compliance module can be installed.
Step 5. In a text editor of your choice, such as Notepad, copy, paste, and modify the following PowerShell code.
Note: This is an example script which should be tailored to your environment.
#Variables
$CSCCloud = "csc-deploy-[Name].exe"
$CSCISECompliance = "cisco-secure-client-win-4.3.3064.6145-isecompliance-predeploy-k9.msi"
#Create temp directory for installation
New-Item -Path $env:TEMP -Name "Deploy-CSC" -ItemType "directory"
xcopy . $env:TEMP\Deploy-CSC /S /E /Y
cd $env:TEMP\Deploy-CSC
#Disable CSC VPN module UI
New-Item -ItemType Directory -Force -Path "C:\ProgramData\Cisco\Cisco Secure Client\VPN\Profile"
xcopy VPNDisable_ServiceProfile.xml "C:\ProgramData\Cisco\Cisco Secure Client\VPN\Profile\" /Y
#Install CSC using Full Installer or Network Installer
$CSCCloudInstall = Start-Process $CSCCloud -ArgumentList "-q" -PassThru
$CSCCloudInstall.WaitForExit()
#Install ISE Compliance module (Requires Full Installer)
$CSCISEComplianceArgs = "/I " + $CSCISECompliance + " /quiet /norestart /passive"
Start-Process msiexec.exe -Wait -ArgumentList $CSCISEComplianceArgs
#Delete temp installation directory
cd $env:TEMP
Remove-Item $env:TEMP\Deploy-CSC -Recurse
Under Variables, you will need to modify each variable to match your environment:
● CSCCloud should match the name of the Cisco Secure Client Cloud Management EXE downloaded from SecureX (with quotations added).
● CSCISECompliance should match the name of the ISE Compliance module downloaded from the Cisco software site.
Other sections of the script can be modified as needed. For example, to prevent the VPN module from being disabled, you can comment out two lines after “#Disable CSC VPN module UI” by adding a ‘#’ character in front of those lines. These lines create the profile directory used by the VPN module then copy the VPN profile that disabled the VPN UI to that directory. You can copy these lines and modify them for importing other module profiles as well. The Cisco Secure Client guide shows the location of profiles for each module here. Another set of lines you may consider commenting out are the two under “#Install ISE Compliance module (Requires Full Installer)” if you do not want to install the ISE Compliance module to your devices.
Save this as a .ps1 file (for example: “DeployCSCWin.ps1”) and add it to the created folder.
Step 6. Verify all the necessary files are added to the folder create in step 1.
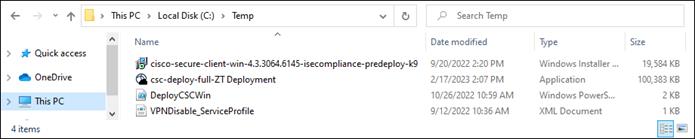
Step 7. (Optional) Test the script before creating the custom EXE. Search for Windows PowerShell in the Windows Search Box, then Run as Administrator.
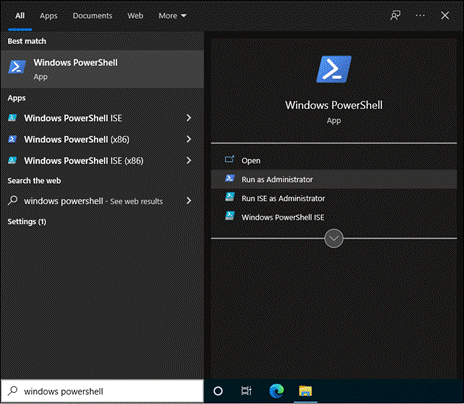
From PowerShell, navigate to the folder the script and files are located.
PS C:\Users\administrator> cd C:\Temp
PS C:\Temp> ls
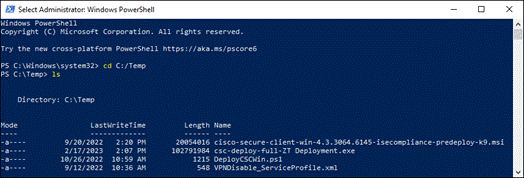
Execute the script.
PS C:\Temp> .\DeployCSCWin.ps1
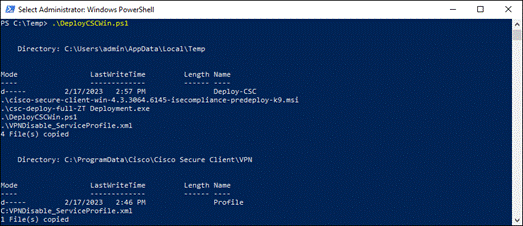
You can now verify that CSC is installed with all the selected modules.
Step 8. Search for iexpress in the Windows Search Box. Click Run as administrator.
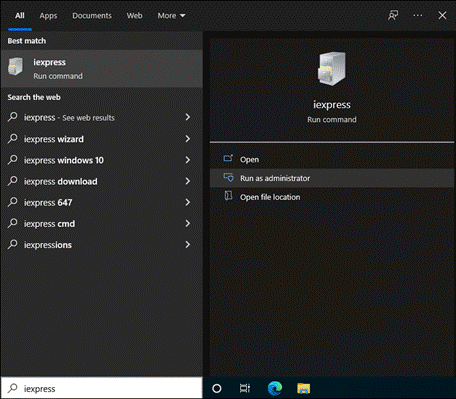
Step 9. On the Welcome to IExpress 2.0 page, use the option Create new Self Extraction Directive file. Click Next.
Step 10. On the Package purpose page, use the option Extract files and run an installation command. Click Next.
Step 11. On the Package title page, give the package a title. Click Next.
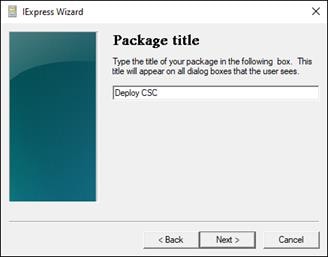
Step 12. On the Confirmation prompt page, use the option No prompt. Click Next.
Step 13. On the License agreement page, use the option Do not display a license. Click Next.
Step 14. On the Packaged files page, click Add and select the AnyConnect Core VPN MSI, the AnyConnect Umbrella Roaming Security module MSI, the OrgInfo.json file, and the PowerShell script saved in Step 5. Click Next.
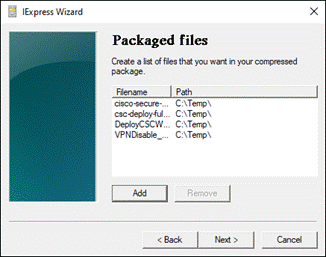
Step 15. On the Install Programs to Launch page, in the Install Program section add the line powershell.exe -ExecutionPolicy Bypass -File <FileName> where <FileName> is the name of the PowerShell script saved in Step 3. For example: powershell.exe -ExecutionPolicy Bypass -File DeployAnyConnectWin.ps1. Click Next.
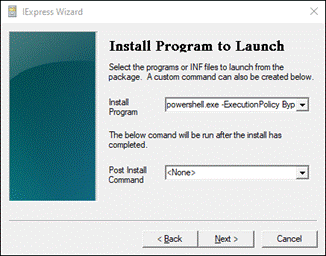
Step 16. On the Show window page, use the option Hidden. Click Next.
Step 17. On the Finished message page, click the option No message. Click Next.
Step 18. On the Package Name and Options page, click Browse and select a directory to save the executable in and create a name for the exe file.
Note: Make sure to use lower case .exe at the end of the file name or else Meraki MDM may present an error when uploading the executable.
Step 19. Select both options Hide File Extracting Progress Animation from User and Store files using Long File Name inside Package. Click Next.
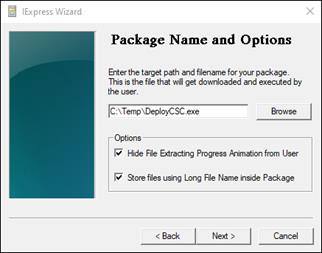
Step 20. On the Configure restart page, use the option No restart. Click Next.
Step 21. On the Save Self Extraction Directive page, use the option Don’t save. Click Next.
Step 22. On the Create package page, click Next. The package will be created. Click Finish.
Step 23. (Optional) Test the executable to verify that Cisco Secure Client is installed along with the enabled modules. If testing on the same machine the script was tested on in step 4, make sure to uninstall Cisco Secure Client before testing again.
Cisco Secure Client Custom App
Step 1. In the Meraki Dashboard, navigate to Systems Manager > Manage > Apps.

Step 2. Click Add app.
![]()
Step 3. Under App platform, select Windows. Under App type, select Custom app via agent.
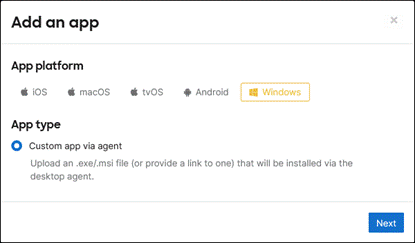
Step 4. In the Name field within the Details section, use the value Cisco Secure Client – Cloud Management.
Note: The Name value is used for tracking if an application is installed or not by Meraki Systems Manager for the purpose of pushing missing applications to devices. At the time of writing this design guide, there is no simple way to track each individual CSC module because that would require creating a separate custom app for each module. Doing this can lead to installation issues because some modules cannot be installed separately due to reliance on other modules to be installed first. For example, the Core VPN module must be installed before the Umbrella Roaming Security module can be installed. While it is possible to write a script to check for these dependencies and install prerequisite modules, that is out of scope for this design guide. Due to this limitation, the name “Cisco Secure Client – Cloud Management” was chosen because in this lab, the Cloud Management module will always be installed for updating and reinstalling the other CSC modules. If the Cloud Management module will not be used in your environment, you may consider using a different name reflecting the module that is most important for tracking.
Step 5. In the Type drop down within the Source section, select Upload to the Meraki cloud. Click the dotted box next to App file and browse to the custom AnyConnect EXE file created in earlier steps.
Step 6. Within the Options section, select any additional options you’d like to apply for the AnyConnect application. In the lab, the default options were used.
Step 7. Within the Targets section, choose the Scope and potential Device tags, Policy tags, and/or Users tags that should be used to determine which devices the application should be installed on. For example, you may decide to only decide to install this application on managed Windows devices and not unmanaged BYOD devices. Because this custom app only applies to Windows devices, the scope is left to the option All devices.
Step 8. Click Save.
Deploying Applications
If the Auto-Install option left as the default value, the custom apps should have deployed to any enrolled devices within scope. For devices enrolled after applications have been added, you can deploy these applications using the following steps.
Step 1. In the Meraki Dashboard, navigate to Systems Manager > Manage > Apps.

Step 2. Select the applications you wish to deploy.
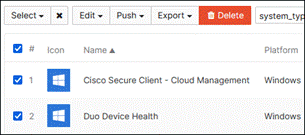
Step 3. Click Push > Push to Missing then click Confirm.

In this design guide, two applications will be protected using Cisco Secure Access by Duo and Duo Network Gateway: WordPress as a Private Application and Microsoft 365 as a Public Application. To secure these applications, we will first setup users and groups, then have those users complete Duo enrollment. To easily sync users and groups with an existing Active Directory server, Duo Authentication Proxy is setup. After enrollment, Duo SSO and DNG are configured.
Once these steps have been completed, the Global Policy which is enforced by default for all applications is configured. In addition to this, a Custom Policy is created for more granular control over application access when the Global Policy alone is not sufficient. For the applications protected in this design guide, the following security policies will be enforced:
Global Policy
● Enrollment enforced
● Duo Push 2FA enforced
● Users must have a device managed by the company and have Duo Device Health and Cisco Secure Endpoint installed.
● Devices must authenticate within the United States
● Users will be warned if their browser is out of date and prevented from access if their browser is out of date by 1 month or more
● Devices will be remembered for all web-based applications for 24 hours so that users do not need to repeat 2FA checks when using SSO enabled applications
WordPress (Private App) protected by Duo SSO and DNG
● Contractors are allowed to bypass device trust while on premises and accessing the private app on-since their devices are unmanaged. Contactors are not allowed to use DNG to access the application remotely.
● Employees (On-prem and remote) must go through the same user and device checks whether they use Duo SSO to access the application directly or use DNG to access the application remotely
● All other setting enforced by the Global Policy
Microsoft 365 (Public App) protected by Duo SSO
● Contractors will be denied access to the public app.
● All other setting enforced by the Global Policy
The applications that will be protected by Duo are then selected within the Duo Admin Panel and configured with the appropriate policies and settings. Finally, steps will need to be taken in the application’s configuration so that users who access that application must go through Duo SSO for authentication.
Duo Authentication Proxy
The Duo Authentication Proxy is an on-premises software service used for multiple Duo services. Best practices recommend secure access to applications by separating your primary authentication method from your secondary (using MFA). The Authentication Proxy allows Duo to check your user’s primary credentials and groups without storing that information, preventing the risk of a vendor-based breach exposing both primary and secondary authentication.
In this design guide, the Authentication Proxy is installed on an Ubuntu virtual machine. It will be used for syncing user and groups from an on-premises Active Directory server for easier user enrollment and to verify a user’s primary authentication credentials against Active Directory when using Duo SSO. For steps on how to install the Duo Authentication Proxy on Linux or Windows, review the Authentication Proxy Reference guide.
While not in scope for this design guide, the proxy can also be used to add Duo MFA to devices, services, and applications that use RADIUS or LDAP authentication. Additionally, high availability can be setup for the proxy. For information on setting up high availability for the authentication proxy, see Best practices for setting up the Duo Authentication Proxy for high availability and disaster recovery.
Duo Enrollment
Before users can use MFA through Duo, they must first be enrolled. Since many large organizations already rely on an on-premises Active Directory (AD) server, OpenLDAP Directory, or a cloud-hosted Azure AD directory to manage their users, Duo offers tools to import users and groups from those identity stores into Duo, with the option of automatically sending an enrollment email to every user imported without an attached phone who has a valid email address. For all methods of enrolling users, review the Duo Administration – Enroll Users guide.
In this design guide, user and groups from Active Directory are synced into Duo. See Synchronizing Users from Active Directory for steps on doing this in your environment. Following these steps, the following configuration is added to the authproxy.cfg file found under the directory /opt/duoauthproxy/conf/ on the Duo authentication proxy:
[cloud]
ikey=DIXXXXXXXXXXXXXXXXXX
skey=2v3O7uCJmdhFK6hsKS82HGyNUR5L1XGCRx44DjCQ
api_host=api-XXXXXXXX.duosecurity.com
service_account_username=duoservice@ciscozerotrust.com
service_account_password=XXXXXXXXXXXXXXXX
Because a Linux server is used for the authentication proxy, Plain is selected as the Authentication type under Directory Configuration because the other types are not compatible with Linux.
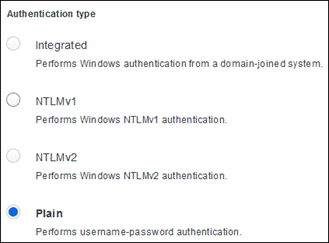
Additionally, it is recommended to use LDAPS or STARTTLS for the Transport type.
In the lab, groups ZTEmployees and ZTContractors were created in Active Directory and synced into Duo.

User employee@ciscozerotrust.com is a member of ZTEmployees and user contractor@ciscozerotrust.com is a member of ZTContractors. These users are not immediately added until the configuration is saved, and a sync is completed. To immediately start a sync, press Sync Now under Directory Sync.
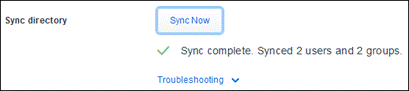
Duo Single Sign On
Duo Single Sign On is a cloud-hosted SAML identity provide (IdP) that adds two factor authentication to cloud services such as Microsoft 365 and Amazon Web Services. It can also be used for on-premises applications that support SAML 2.0 for authentication. Single Sign On allows for a consistent login experience that reduces user frustration by allowing users to sign on once to gain access to all authorized applications whether those applications are SaaS, cloud workloads, or on-premises.
Duo SSO can authenticate your users using an existing SAML Identity Provider or on-premises AD credentials and prompts for two-factor authentication before permitting access to protected applications. A solution using on-premises AD credentials requires deployment of the Duo Authentication Proxy within your internal network to verify primary logon credentials against AD. End users will sign in and perform 2FA at Duo’s cloud-hosted SSO service, and do not contact the on-premises authentication proxy servers directly. For steps on setting up Duo SSO, see Duo Single Sign-On.
In this design guide, Active Directory is used as the primary authentication source. When modifying the authproxy.cfg on the authentication proxy, the following lines were appended to the file.
rikey=RIXXXXXXXXXXXXXXXXXX
service_account_username=duoservice@ciscozerotrust.com
service_account_password=XXXXXXXXXXXXXXXX
Ignoring commented lines, after the configuration is added for Active Directory syncing and Duo SSO the authproxy.cfg file should look similar to this:
[cloud]
ikey=DIXXXXXXXXXXXXXXXXXX
skey=2v3O7uCJmdhFK6hsKS82HGyNUR5L1XGCRx44DjCQ
api_host=api-XXXXXXXX.duosecurity.com
service_account_username=duoservice@ciscozerotrust.com
service_account_password=XXXXXXXXXXXXXXXX
[sso]
rikey=RIXXXXXXXXXXXXXXXXXX
service_account_username=duoservice@ciscozerotrust.com
service_account_password=XXXXXXXXXXXXXXXX
Because a Linux server is used for the authentication proxy, Plain is selected as the Authentication type under Configure Active Directory because the other types are not compatible with Linux.

LDAPS or STARTTLS is recommended for the Transport type to improve security.
The Duo Network Gateway provides MFA enabled remote access for users allowing them to access internal web applications without having to connect a VPN. Any Duo policies applied to on-prem users for the internal applications such as device trust or authentication methods can be applied to remote users, or a different policy can be used all together. In addition to this, when the application is SAML 2.0 capable and configured to use the same Identity Provider as DNG, Single Sign On can be used to simplify user logins. DNG can be setup for active/active and active/standby high availability. See High Availability for more information.
For this design guide, DNG is installed on an Ubuntu virtual machine and the primary authenticator used is Duo SSO. For installation and configuration of the DNG see Install Duo Network Gateway.
Step 1. In the Duo Admin Panel and navigate to Applications.

Step 2. Click Protect an Application.

Step 3. Search for Duo Network Gateway and click Protect next to Duo Network Gateway 2FA with SSO hosted by Duo.
![]()
Step 4. Copy the Entity ID, Single Sign-On URL, and Single Logout URL within the Metadata section. Click Download certificate within the Downloads section to obtain Duo SSO’s IdP signing certificate.

Step 5. In the Domain name field within the Service Provider section, enter the domain name that will be given to DNG. This should be the fully qualified domain name of DNG that will be reachable from the internet.

Step 6. In the Name field within the Settings section, the application an appropriate name.

Step 7. Complete the prerequisites needed for DNG according to Duo documentation. For this design guide, DNG is installed on an Ubuntu virtual machine and the SAML Identity Provider used as its primary authentication source is Duo SSO which is configured in the previous section. Additionally, a DNS A record is created for DNG based on the Domain name entered in step 5.
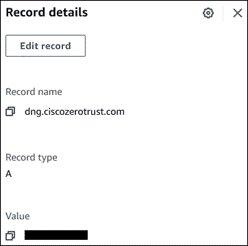
Step 8. Install Duo Network Gateway on the Linux server.
Step 9. Begin Initial Duo Network Gateway Configuration. The same Domain name provided in Step 5 is added as the hostname for DNG.
Step 10. You should now be on the Welcome page. In the DNG admin console, navigate to Primary Authentication.
Step 11. DNG provides service provider metadata settings within the Metadata section if using an Identity Provider other than Duo SSO. Since Duo SSO is being used as the primary authenticator, this is ignored.
Step 12. Within the Configure SAML Identity Provider section, fill out each field with the information obtained in Step 4.
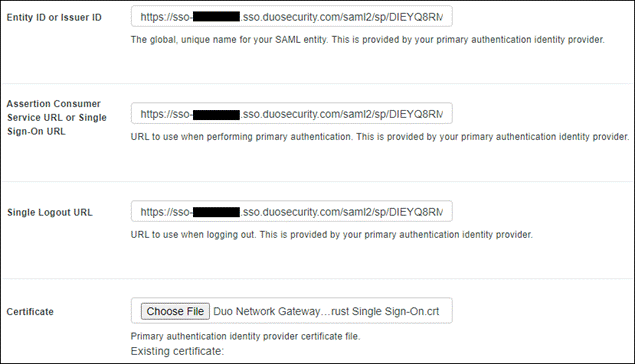
Trusted Endpoints
Trusted Endpoints helps you distinguish between managed and unmanaged devices that attempt to access your browser-based applications. Duo policies that track trusted endpoints status can then allow only devices that are managed. Before creating the policies that will enforce this, steps must be taken on your endpoint management solution, devices, and Duo.
Windows Trusted Endpoints Integration
Duo Integrates with several 3rd party solutions to track device management. See Duo Management Integration Deployment to determine which applications can be integrated. In this design guide, Active Directory Domain Services will be used for Windows devices. For steps on integrating Active Directory Domain Services with Duo, see Trusted Endpoints - Active Directory Domain Services.
Cisco Secure Endpoint Integration
Integrating Duo with Secure Endpoint allows you to prevent access to applications from devices that have been identified as compromised by Cisco Secure Endpoint, preventing the potential spread of malware in your network. Once the compromised device has been resolved within Cisco Secure Endpoint, Duo resumes access to the application with its existing set of security controls. To integrate Duo and Cisco Secure Endpoint, see Trusted Endpoints – Cisco AMP for Endpoints.
Duo Policy Creation
Policies provide a flexible way to implement security for users and applications in your network. The Global Policy in Duo applies to all applications by default and will take effect if there are no custom policies applied to the application.
Global Policy
Step 1. In the Duo Admin Panel, navigate to Policies.
Step 2. Click Edit Global Policy.
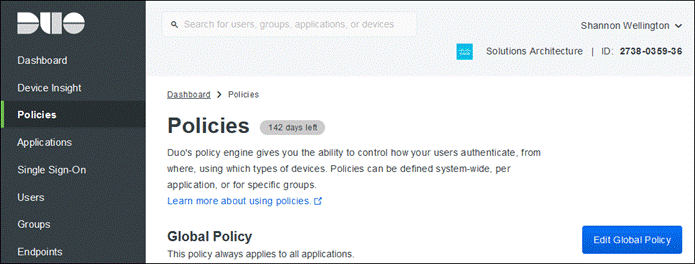
Step 3. Within the New User policy section, click Require enrollment.
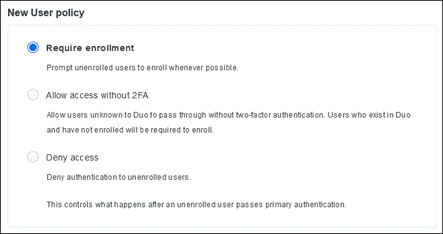
Step 4. Within the Authentication policy section, click Enforce 2FA.
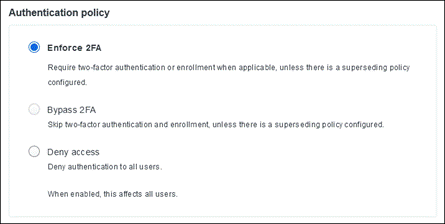
Step 5. Within the User location section, enter all countries that you expect to receive authentication from and choose No action from the dropdown list. For all other countries, choose Deny access.
Note: Access attempts from internal IPs and unknown countries will default to “No action”.

Step 6. Within the Trusted Endpoints section, click Require endpoints to be trusted and Allow Cisco Secure Endpoint to block compromised endpoints. This allows Duo to block devices that have been deemed to be compromised by Cisco Secure Endpoint.
Note: Further steps are needed to enable Trusted Endpoints. For more information, review the Trusted Endpoints section of this design guide.
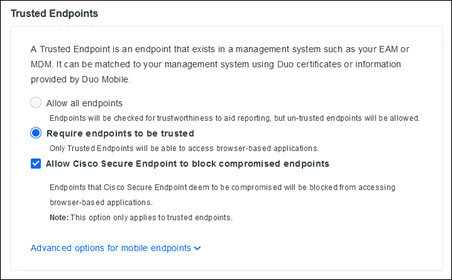
Step 7. Within the Device Health application section, choose if you want your application to require the Duo Device Health application to be installed on the endpoint. This allows us to restrict user access with device metrics such as if the device firewall is off or if a password has not been set on the device. For this design guide, we will check Require users to have the app for Windows devices. Additionally, we will check Block access if an endpoint security agent is not running, select Cisco Secure Endpoint, and add remediation instructions for end users.
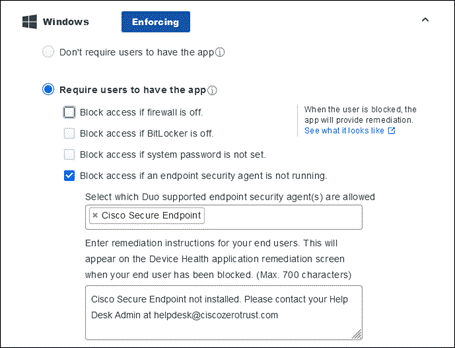
Step 8. Within the Remembered devices section, select to Remember devices for browser-based applications, specify how long the device should be remembered, then specify if it should apply per each application or For all protected web applications. For this design guide, we will check For all protected web applications. Remembered devices allow users to skip subsequent 2FA requests which can be useful for applications protected by Duo Network Gateway. Without this setting, even when SAML SSO is configured with Duo protected applications and users won’t need to enter their primary credentials multiple times, users will still be prompted for 2FA every time they access a Duo protected applications. By enabling remembered devices for browser-based applications, the user will only need to 2FA once per the amount of time the device is remembered. For more information, see Duo Administration - Remembered Devices & Authorized Networks Controls and How do Remembered Devices work.
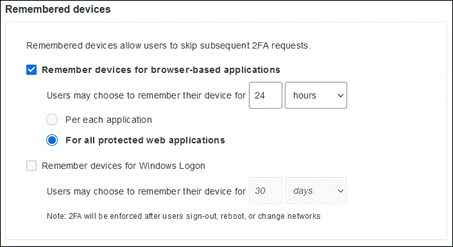
Step 9. Within the Operating systems section, leave all settings as default. This section allows us to do version control, such as forcing users to update their operating system to a specified version or by completely blocking an operating system from the network.
Step 10. Within the Browsers section, select both settings to warn and block users if their browser is out of date. This section allows us to do version control or completely block browsers used to access protected applications.
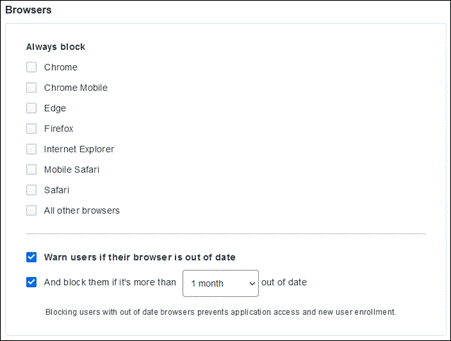
Step 11. Within the Plugins section, leave all settings as default. This section allows us to do version checking and blocking of Flash and Java plugins.
Step 12. Within the Authorized networks section, leave all settings as default. This section allows us to control if connections from certain networks and IP addresses bypass Duo 2FA checks, require Duo 2FA, or are block completely.
Step 13. Within the Anonymous networks section, leave all settings as default. This section allows you to monitor and optionally prevent authentication attempts originated from known anonymous IP addresses, such as those provided by TOR and I2P, HTTP/HTTPS proxies, or anonymous VPNs.
Step 14. Within the Authentication methods section, choose which methods to use for authentication. For this design guide, only Duo Push will be enabled.
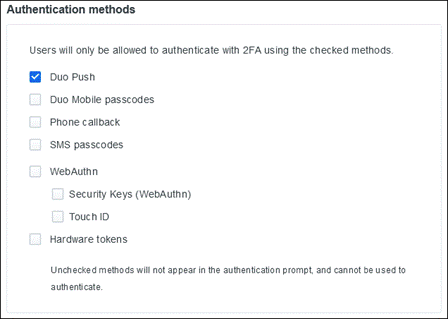
Step 15. Leave the remaining sections as at their default values. Click Save Policy. For more information on configuring these policies, see Policy & Control.
Custom Policies
If certain applications require policy and controls that differ from the Global policy, you can create a Custom Policy and assign it to those applications. In this design guide, the ZT WordPress Contractor custom policy will be created to allow contractors to authenticate despite having unmanaged devices that do not have Duo Device Health and Secure Endpoint Connector installed. This custom policy will be applied to users within the ZT Contractors group only.
Step 1. In the Duo Admin Panel, navigate to Policies.
Note: Custom Policies can also be created when adding a new application in Duo.
Step 2. Click New Policy in the section Custom Policies.

Step 3. Configure the policy to meet the security requirements for each application. The following custom policy is created in this design guide:
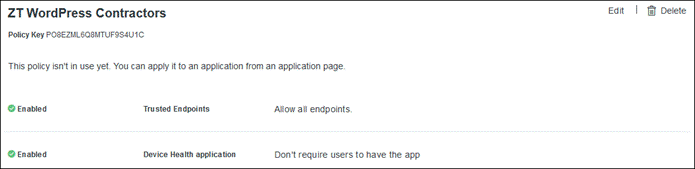
Application Protection with Duo SSO
Duo Single Sign-On is a cloud hosted SAML identity provider that adds two-factor authentication to popular cloud services like Salesforce and Microsoft 365 as well as supported on-premises applications using SAML 2.0 federation. In this design guide, both WordPress and Microsoft 365 will be protected by Duo SSO.
Private Application (On-prem/IaaS)
WordPress is the private application used in this design guide. It has been installed on an Ubuntu virtual machine and configured to use HTTPS. The WP SAML Auth plugin has been installed to add SAML 2.0 support, and employee and contractor accounts have been setup within WordPress. Duo has documentation for integration with WordPress to enable 2FA, however this does not add enable SAML and SSO functionality. The following steps go over enabling Duo SSO authentication in WordPress with the WP SAML Auth Plugin. For a general guide on setting up applications with Duo SSO, see Duo Single Sign-On for Generic SAML Service Providers.
Step 1. In the Duo Admin Panel, navigate to Applications.
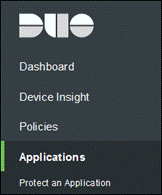
Step 2. Click Protect an Application.
Step 3. Search for Generic Service Provider and click Protect next to Generic Service Provider 2FA with SSO hosted by Duo.

Step 4. Make note of the information within the Metadata, Certificate Fingerprints, and Downloads sections as these contain information needed by the Service Provider (WordPress).
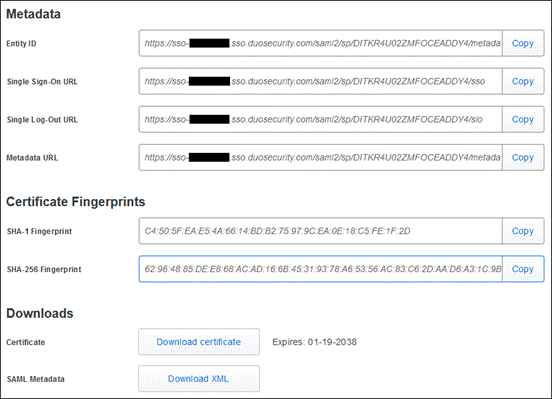
Step 5. Login to WordPress with an admin account. In WordPress, navigate to Plugins.
Step 6. If WP SAML Auth is not already activated, activate it then click Settings.

Step 7. Within the Identity Provider Settings section, add the information provided by Duo in Step 4. At minimum, service providers typically require the Duo SSO Entity ID, Single Sign-On URL, and Certificate or Certificate Fingerprint. In this design guide, the Certificate Fingerprint was used instead of the Certificate. Click Save Changes at the bottom of the page when done.
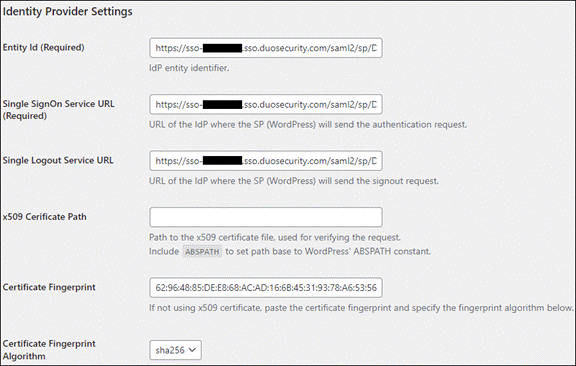
Step 8. In the WP SAML Auth plugin settings, make note of the information within the Service Provider Settings section as this contains information needed by the Identity Provider (Duo SSO).
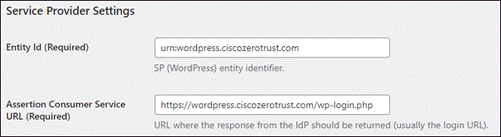
Step 9. Pivot back to the Duo Generic Service Provider application created previously and under the Service Provider section add the information acquired in Step 8. The fields Single Logout URL, Service Provider Login URL, and Default Relay State are left blank because this information is not provided by the WP SAML Auth plugin.
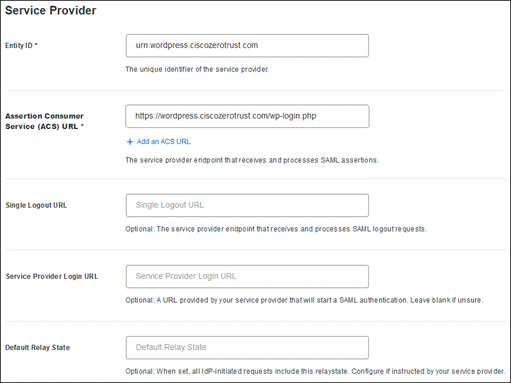
Step 10. The WP SAML Auth plugin does not map users to accounts using the SAML NameID field like some other applications do. By default, the plugin uses an email SAML attribute to match SAML requests to WordPress users.
![]()
Because of this, Duo SSO must pass the user’s Active Directory email address value within a SAML attribute that has the same attribute name as configured on WordPress. Otherwise, WordPress will not be able to map the user to the correct preconfigured account. The plugin maps the user_email attribute to email. Make note of this for Duo.
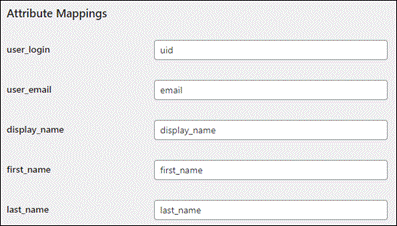
Step 11. In the Duo Generic Service Provider application within the SAML Response section, map the <Email Address> attribute to email so that it matches WordPress.
Note: This step is application dependent and may not be necessary for all your SAML 2.0 enabled applications.

Step 12. Within the Policy section, click Apply a policy to groups of users.

Step 13. Select the custom policy created earlier and the Groups that the custom policy will apply to. Click Apply Policy.
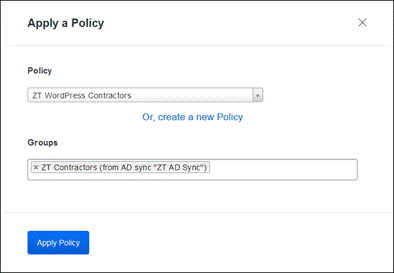
Step 14. Verify the policy has the correct settings.
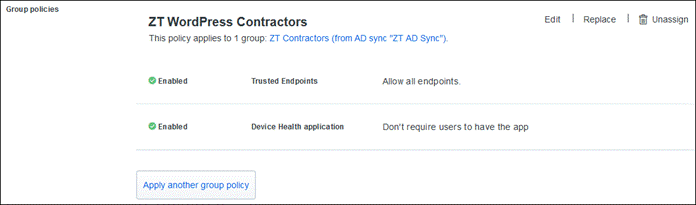
Step 15. In the Name field within the Settings section, give the application an appropriate name.

Step 16. Click Save.
Step 17. (Optional) After testing and verifying that users can login using SAML authentication with Duo SSO, you can go back to WordPress and within the WP SAML Auth Settings section, uncheck the box next to Permit WordPress login. This forces users to authenticate using Duo SSO only and prevents users from bypassing Duo security policies. Ensure that users can login successfully with Duo SSO before enabling this feature as it can potentially lock them out of the application. Click Save Changes when done.
![]()
Public Application (SaaS)
Microsoft 365 is the public application used in this design guide. See Duo SSO for Microsoft 365 for a step-by-step guide on protecting Microsoft 365 with Duo SSO. In this design guide, the application is given the name ZT Microsoft 365.

The domain name ciscozerotrust.com is configured. This custom domain is verified in Microsoft 365 and is the domain at the end of the test users' email addresses.

Finally, only users apart of the group ZT Employees are allowed to access the application.

Private Application Protection with DNG
DNG will be configured to allow access the same WordPress private application when users are remote. Apart from preventing contractor access, the same policies and settings will be applied to authenticating users as if they were at the branch or campus and the user experience will be similar. Because WordPress has been configured with Duo SSO in previous steps, users will not be required to enter their Active Directory credentials again. Additionally, the Remembered Devices setting previously configured in the Global Policy will allow users to skip subsequent Duo 2FA requests after the first 2FA check.
Step 1. In the Duo Admin Panel, navigate to Applications.
Step 2. Click Protect an Application.
Step 3. Search for Duo Network Gateway and click Protect next to Duo Network Gateway – Web Application 2FA.
![]()
Step 4. Copy the Client ID, Client secret, and API hostname values within the Details section.
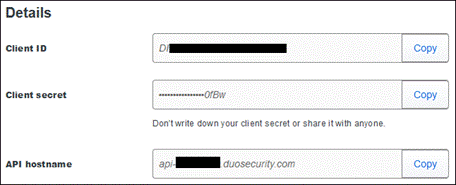
Step 5. Within the Policy section, click Apply a policy to groups of users.

Step 6. Select the custom policy created earlier and the Groups that the policy will apply to. Click Apply Policy.

Step 7. Verify the policy has the correct settings.
Step 8. Give the application an appropriate name within the Name field within the Settings section.

Step 9. Click the Only allow authentication from users in certain groups checkbox next to Permitted groups and add the groups allowed to access the application.

Step 10. Click Save.
Step 11. Pivot to the DNG admin console by navigating to https://<URL-of-DNG>:8443.
Step 12. Navigate to Applications.
Step 13. Click the drop down next to Add new… and click Web App.
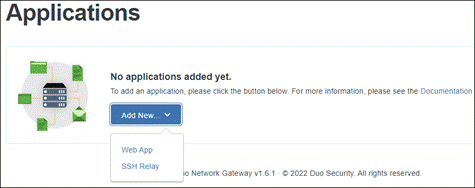
Step 14. Within the Configure 2FA section, paste the Client ID, Client secret, and API hostname obtained in Step 4. Click the check box next to Enable Frameless so the Duo universal prompt is supported.
Step 15. Within the External Website Settings section, add the public facing URL users will type in their browser to access the application remotely. This design guide uses the same URL externally and internally for user convenience.

Make sure to create a CNAME DNS record for the public facing URL added and give it the value of DNG’s external URL created earlier.
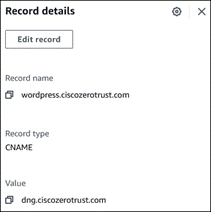
Step 16. Determine if you want to provide your own certificate and private key or use the Let’s Encrypt to generate a certificate.
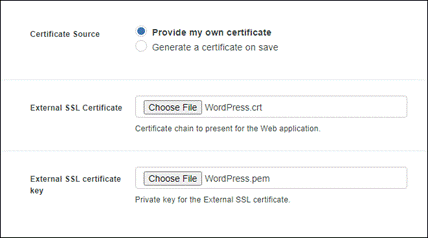
Step 17. Within the Internal Website Settings section, add the internal URL or IP address of the application. If a URL is used, make sure that the host has a DNS server that can resolve the Internal URL to the application’s IP address.

Step 18. Specify if the application uses a certificate signed by public or private CA. If it uses a private (internal) CA, add the certificate chain so DNG can validate the private application.
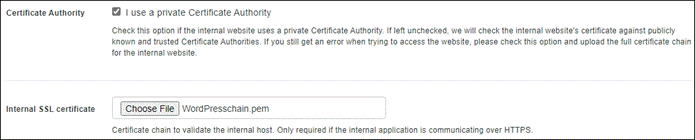
Step 19. Add the Internal HTTP Host header name and the Internal SSL validation name. The default values are used for the remaining fields.
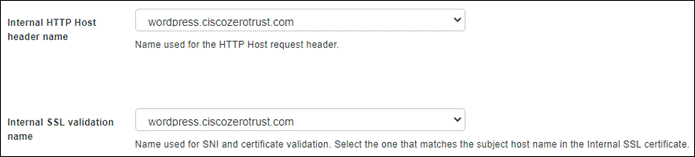
Step 20. Click Add Application.
Validation Test #1: Successful Windows enrollment and software/certificates installed

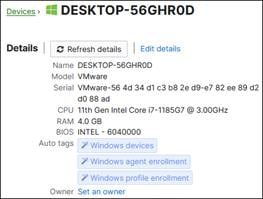
Step 2. Click the device name and verify applications are pushed to device successfully after enrollment and selecting the custom apps to be pushed.

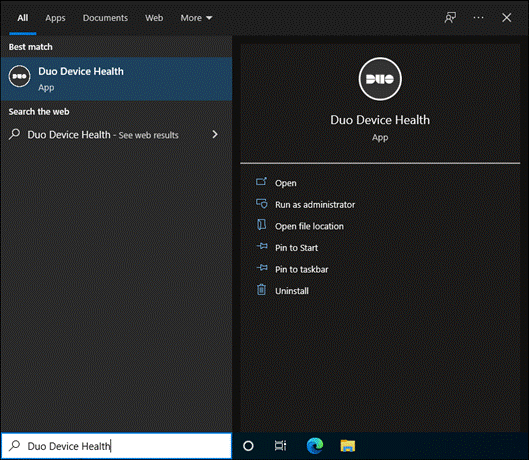
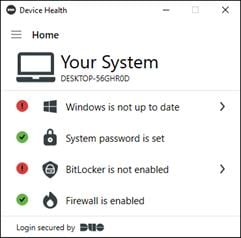
Step 4. Verify Cisco Secure Client and associated modules are installed and working by typing Cisco Secure Client in the Windows search box and opening the application.
Note: The VPN UI is disabled based on steps done within the guide. The NAM module will be validated within the Zero Trust: Network and Cloud Security Design Guide.
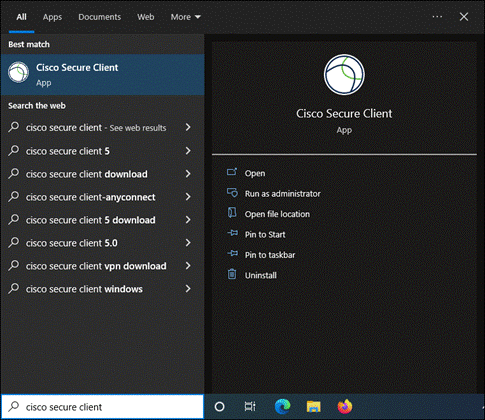
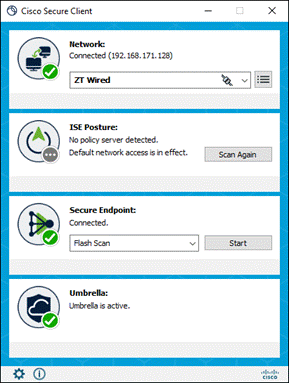
Step 5. In the Cisco Secure Endpoint admin console, navigate to Management > Computers and ensure the device is in the list.
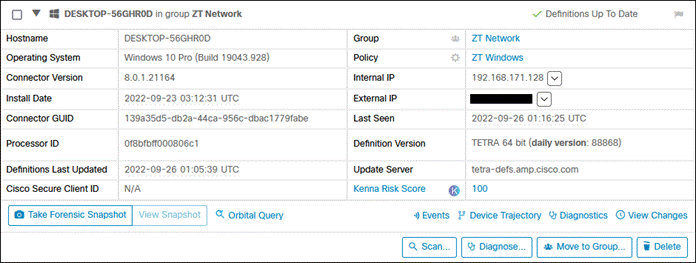

Step 7. Verify that the Umbrella root certificate is trusted by typing Manage computer certificates in the Windows search box and opening the Control Panel application. Navigate to Trusted Root Certification Authorities > Certificates and find Cisco Umbrella Root CA.
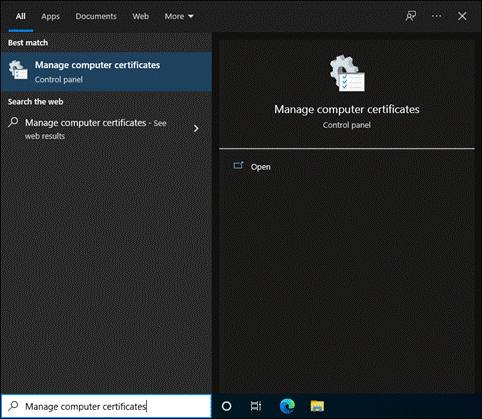
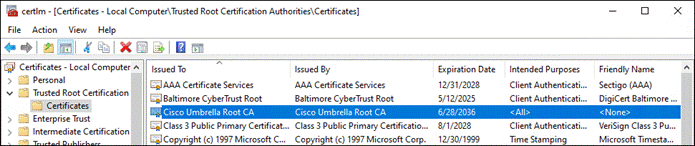
Validation Test #2: Verify Secure Malware Analytics sandbox feature within Secure Endpoint
Step 1. In the Cisco Secure Endpoint Admin console, navigate to Analysis > File Analysis.
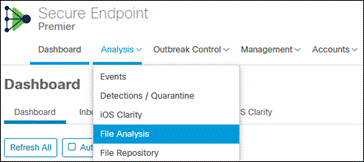
Step 2. Click Submit File.

Step 3. Click Browse and select the file you want to analyze. It must be a supported file type. Click Upload.
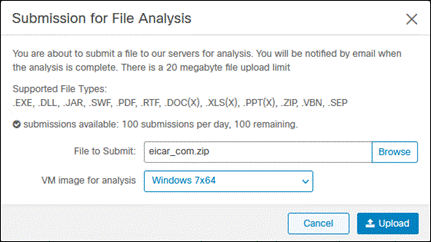
Step 4. The file will be submitted and take some time for analysis.
![]()
Step 5. After some time, the analysis will be ready and provide details on the file. Click Report for more details.
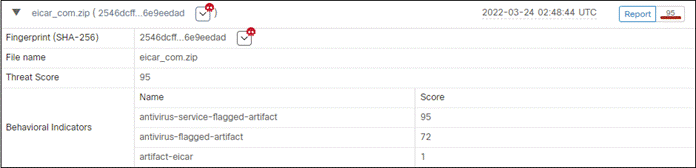
Validation Test #3: Verify Cisco Orbital Functionality
Step 1. In the Cisco Secure Endpoint admin console, navigate to Management > Computers, find a computer that has Cisco Orbital installed and click on it. Click on the link to Query Orbital.
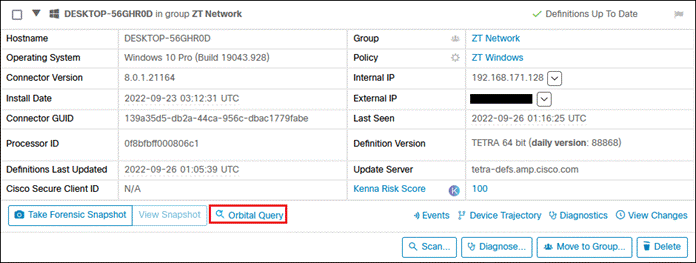
Step 2. In the Search Query Catalog section, search for an available query. Installed Programs Search was used in this example.
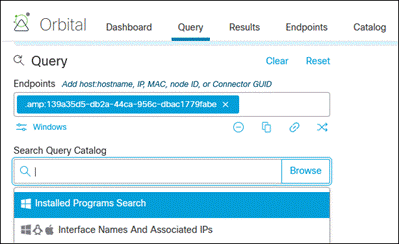
Step 3. Click Live Query after selecting the query.
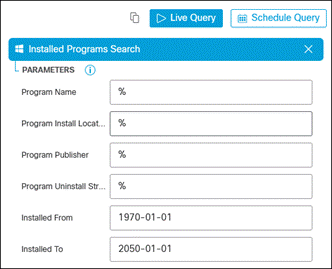
Step 4. The right section will populate with the results of the query.
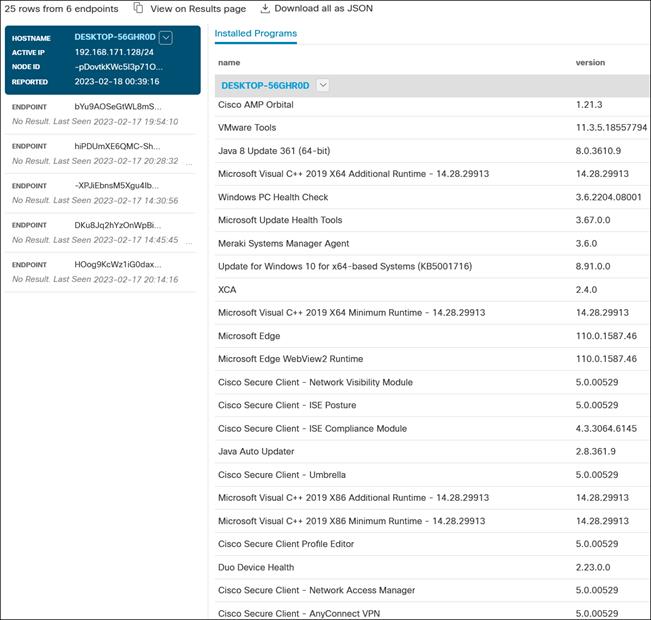
Validation Test #4: Verify Umbrella Roaming Security Module is disabled on a protected Network
Step 1. In any browser, navigate to https://welcome.umbrella.com to verify that you are using Umbrella DNS.
Note: All other Umbrella validation tests have been done within the Cisco Secure Access Service Edge (SASE) with Meraki SD-WAN Design Guide.
Private Application (DC/IaaS) Protection
Validation Test #1: Verify contractor can access private application with an unmanaged device
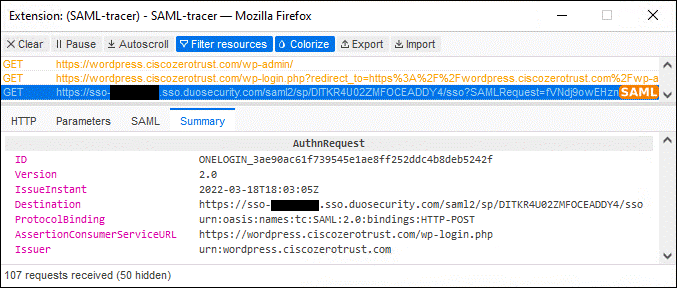


Step 3. After clicking Log in, the contractor’s credentials are validated against Active Directory. On successful device posture, Duo sends a Duo Push to the contractor’s phone.
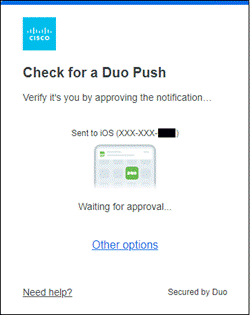
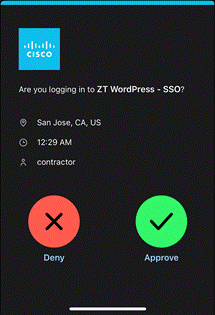
Step 4. Because the Remembered devices setting is enabled in the Duo global policy and because this is the first time the contractor logins with this browser, the contractor is given the option to trust their browser and login less frequently from the browser they are using.
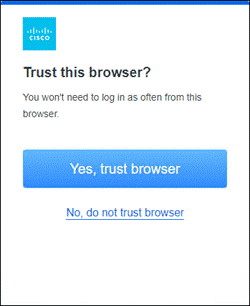
Step 5. The contractor successfully logs into the private application.

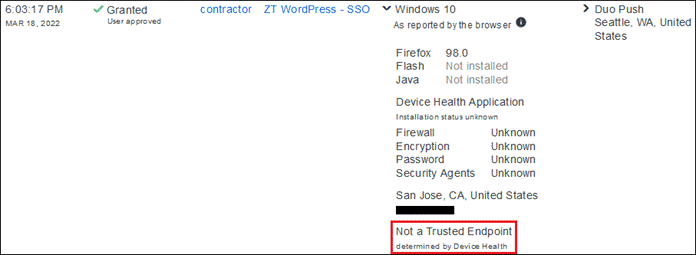
Validation Test #2: Verify contractor cannot access private application when connecting from an out-of-date browser
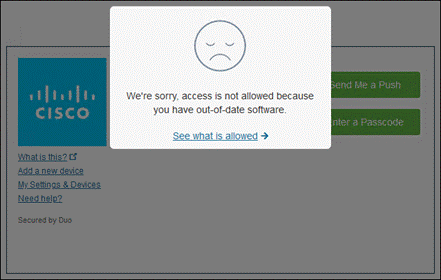
Step 2. Clicking See what is allowed, the contractor is shown their browser is out of date.

Step 3. In the Duo Admin Console, navigate to Reports to verify Duo denied the contractor’s access with an out-of-date browser as configured within the global policy.
![]()
Validation Test #3: Verify on-prem employees can access private application with a managed device
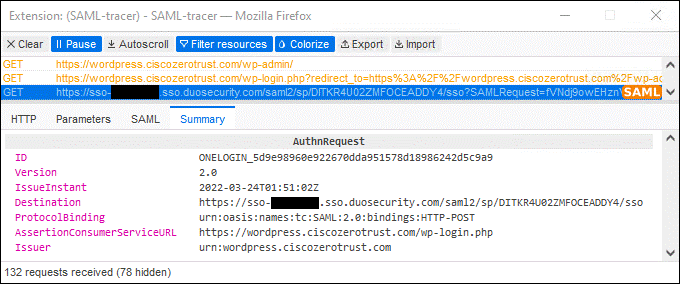
Step 2. The employee must provide their username followed by a Duo request for their password after clicking Next.
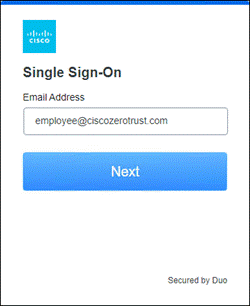
Step 3. After clicking Log in, the user’s credentials are validated against Active Directory. On successful device posture, Duo sends a Duo Push to the user’s phone.
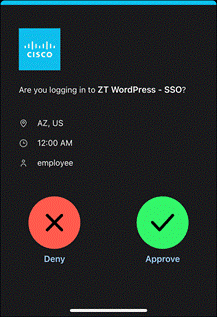
Step 4. Because the Remembered devices setting is enabled in the Duo global policy and because this is the first time the employee logins with this browser, the employee is given the option to trust their browser and login less frequently from the browser they are using.
Step 5. The employee successfully logs into the private application.
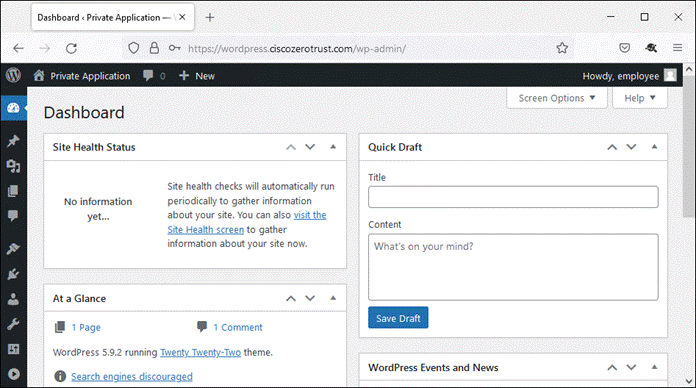
Step 6. In the Duo Admin Console, navigate to Reports to verify Duo approved the employee’s access with a managed device as configured within the global policy.
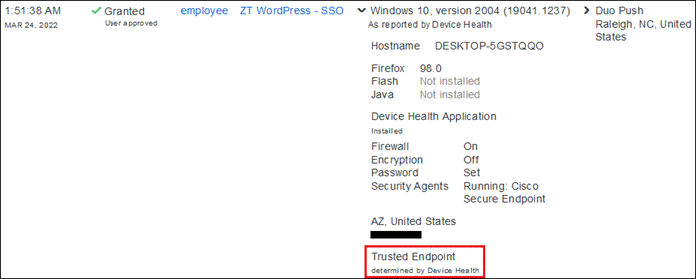
Validation Test #4: Verify on-prem employees cannot access private application with an unmanaged device
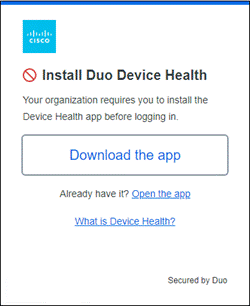
Step 2. Duo reports the employee is not allowed to login due to not having Duo Device Health installed
![]()
Step 3. After downloading and installing Duo Device Health, the user can click Open the app to continue.
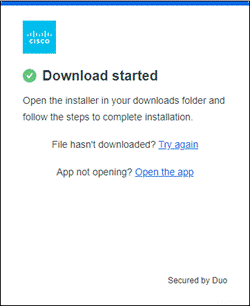
Step 4. Duo Device Health verifies that the employee’s device is not managed and prevents access.
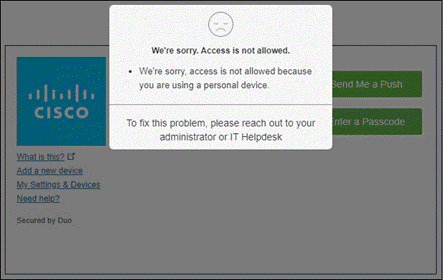
Step 5. In the Duo Admin Console, navigate to Reports to verify Duo denied the employee’s access with a personal device as configured within the global policy.
![]()
Validation Test #5: Verify private application access is denied from device that triggers IoC in Secure Endpoint
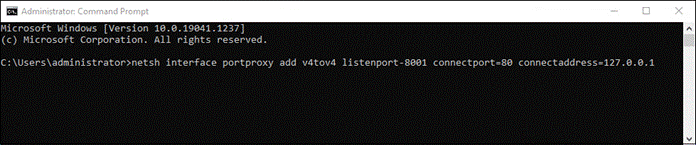
Step 2. In the Cisco Secure Endpoint Admin console, navigate to Events.
Step 3. Verify that an Indication of Compromise (IoC) has occurred on the device.
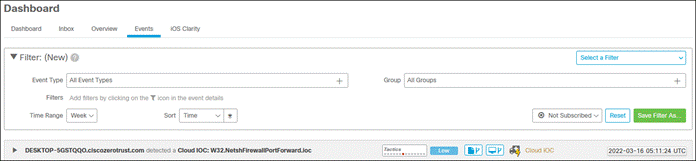
Step 4. On the managed device, have the employee attempt to login to the private application.
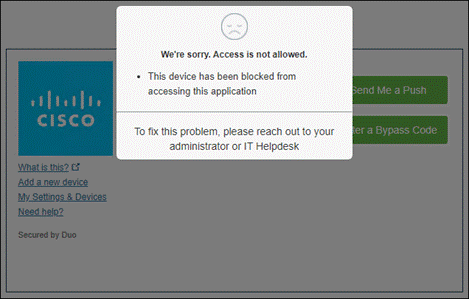
Step 5. In the Duo Admin Console, navigate to Reports to verify Duo denied the employee’s access with a device where an IoC has occurred as configured within the global policy.

Validation Test #6: Verify private application access is denied when Secure Endpoint is not installed
Step 1. On the managed device uninstall Cisco Secure Endpoint.
Step 2. The employee attempts to access the private application. After entering their credentials, Duo presents the following message:
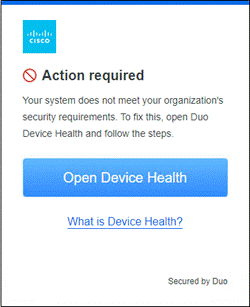
Step 3. After opening Duo Device Health, the following message is seen:
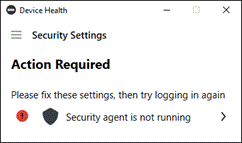
Step 4. In the Duo Admin Console, navigate to Reports to verify Duo denied the employee’s access with a device that does not have Secure Endpoint installed as configured within the global policy.
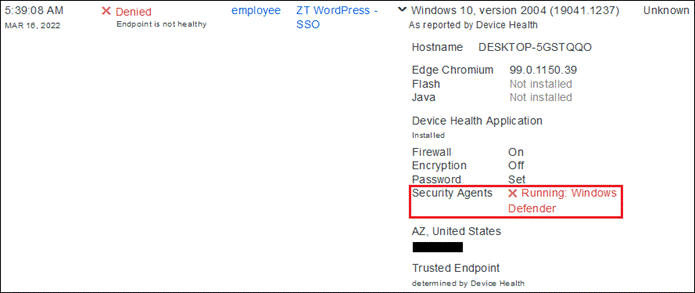
Validation Test #7: Verify remote employees can access private application through DNG with a managed device
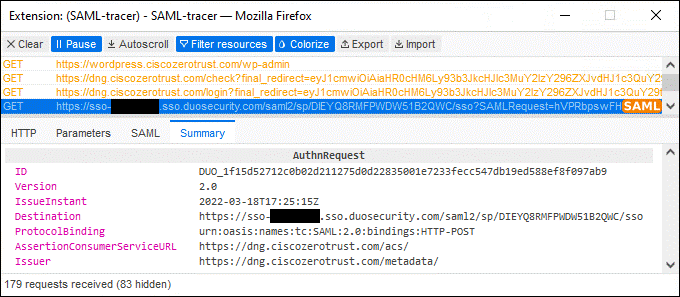
Step 2. If the employee does not already have an active SSO session, they will need to enter their credentials and will be prompted to approve a Duo Push.
Step 3. After approving the Duo Push, the employee is directed to the login page for the private application, facilitated by a reverse proxy created by DNG. In this design guide, the login page for WordPress has been configured to immediately redirect the user to Duo SSO for authentication so the employee is directed to Duo SSO again.
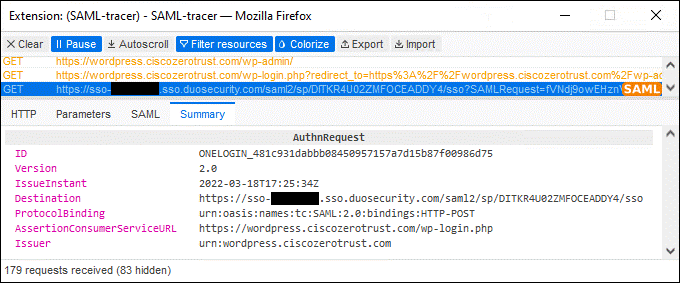
Step 4. The user now has an active SSO session because SAML authentication has already been completed through DNG and the employee’s browser is remembered. The employee is not requested to provide their credentials or do 2FA again and successfully logs into the private application.
Step 5. In the Duo Admin Console, navigate to Reports to verify Duo allowed the employee’s access to the private application through DNG. There are two reports because the user had to authenticate twice – once for DNG and another for the private application. Because SAML is used for authentication and the Remembered Devices setting is enabled under the global policy, the user only needed to provide AD credentials and do a 2FA check once.

Validation Test #8: Verify private application access through DNG is denied based on location
Step 1. Have the employee attempt to access the private application remotely through DNG from a location not allowed within the Duo policy. After providing their credentials Duo prevents the employee from proceeding further.
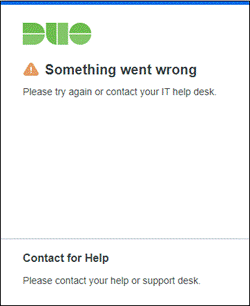
Step 2. In the Duo Admin Console, navigate to Reports to verify Duo denied the employee’s access to the private application through DNG based on their location as configured within the global policy.
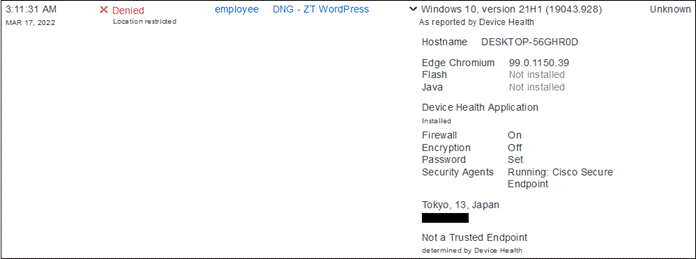
Validation Test #9: Verify contractor cannot access private application remotely using DNG
Step 1. From any location using any browser on their device, have the contractor attempt to access the private application through DNG using the external URL of the application. The contractor should be directed to the Duo SSO for authentication. After the contractor enters their username, Duo should prevent access.
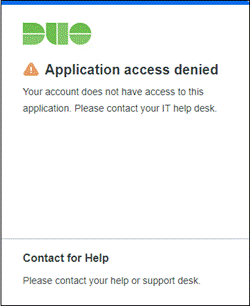
Step 2. In the Duo Admin Console, navigate to Reports to verify Duo denied the contractor’s access to DNG as configured within the Permitted Groups for the DNG application.

Public Application (SaaS) Protection
Validation Test #1: Verify employees can only access public application with a managed device
Step 1. From any acceptable location, have the employee login to the public application from any browser on their managed device. In this design guide, Microsoft 365 was tested using the URL https://login.microsoftonline.com/.
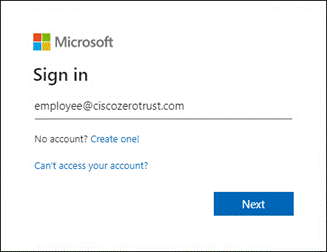
Step 2. The user is directed to the Duo SSO for SAML authentication. After successful authentication, the user successfully logs into the private application.
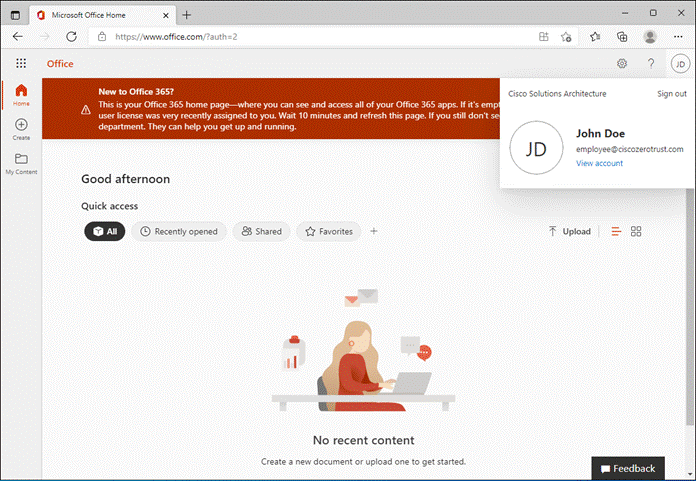
Step 3. In the Duo Admin Console, navigate to Reports to verify Duo allowed the employee’s access to the public application.
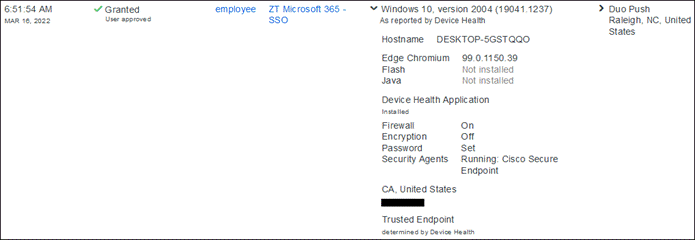
Validation Test #2: Verify contractor cannot access public application
Step 1. From any location using any browser of their device, have the contractor attempt to login to the public application.
Step 3. In the Duo Admin Console, navigate to Reports to verify Duo denied the contractor’s access to the public application.

Note: All other Duo policy tests work for the public application as they have in the private application validation tests.
Appendix A – Cisco Secure Client Profile Creation
Cisco Secure Client modules use profiles to determine what features are enabled when running on a managed device. SecureX Cloud Management provides methods for creating profiles for certain modules, however some profiles will still need to be created externally using the Cisco Secure Client Profile Editor. This section details the creation of profiles for the following modules:
● Network Access Manager
● AnyConnect VPN (excluding the VPN local policy and VPN management tunnel profile)
● ISE Posture
● Network Visibility Module
Download & install Cisco Secure Client Profile Editor
To download the Cisco Secure Client Profile Editor for Windows, go to the Cisco Software Download page.
![]()
Once the file has been downloaded, execute the MSI file and choose the setup type for your environment. In the lab environment, the Custom option was chosen to install the following editors:
● Network Access Manager Profile Editor
● VPN Profile Editor
● ISE Posture Profile Editor
● Network Visibility Module Profile Editor
Network Access Manager Profile
The NAM profile controls Windows supplicant behavior. Within the Zero Trust: Network and Cloud Security Design Guide, EAP-FAST is configured to authenticate and authorize both the user and their machine before they are able to join the network. The following steps provide configuration details for setting up EAP-FAST. Additional details about modifying the NAM profile can be found here. For information on setting up ISE and the network for 802.1x authentication, review the Cisco Zero Trust: Network and Cloud Security Design Guide.
Step 1. Type Network Access Manager Profile Editor in the Windows search box and open the application.
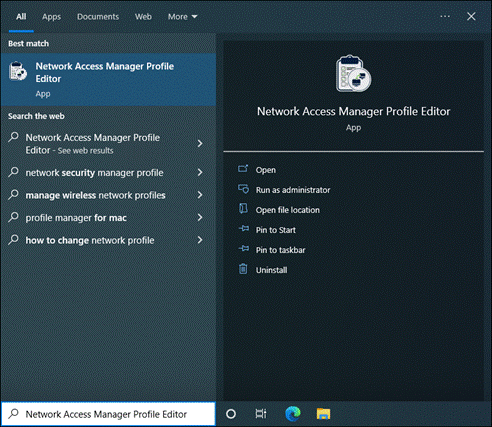
Step 2. Under Client Policy, the defaults are used.
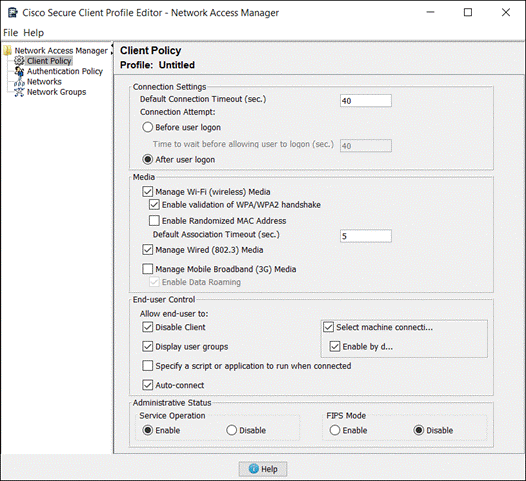
Step 3. Under Authentication Policy, the only Allowed Authentication Modes enabled are EAP-FAST and the sub-categories EAP-MSCHAPv2 and EAP-TLS. This is for verification of the machine and the user done within the Cisco Zero Trust: Network and Cloud Security Design Guide.
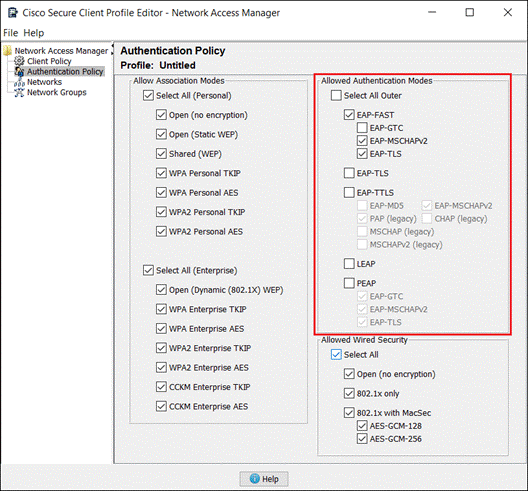
Step 4. Under Networks, select the default network and click Edit.
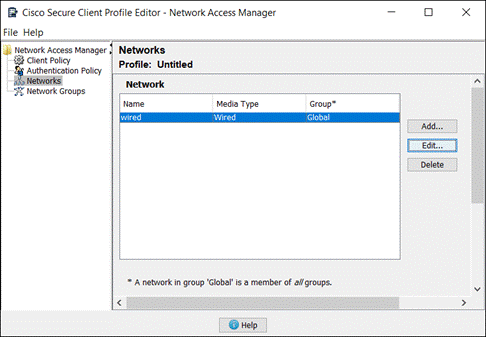
Step 5. With the Media Type section, create a Name for the network. You can also specify the Network Media. For this example, Wired (802.3) Network is used. Click Next.
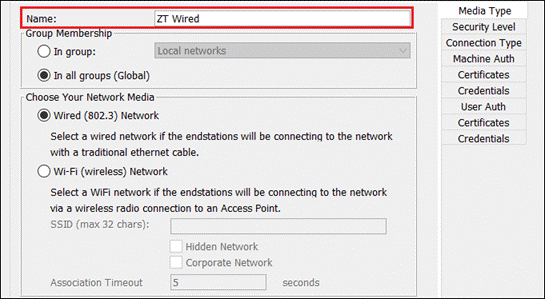
Step 6. Under the Security Level section, select Authenticating Network. Click Next.
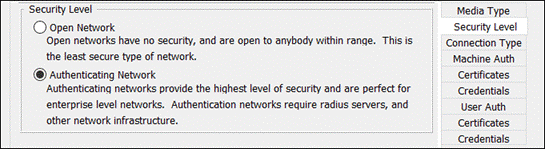
Step 7. Under the Connection Type section, select Machine and User Connection. Click Next.
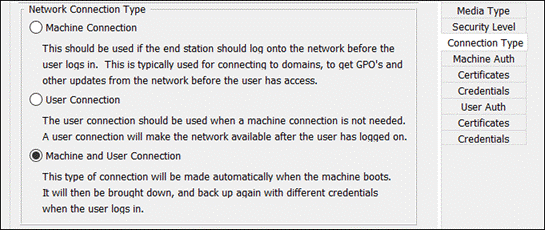
Step 8. Under the Machine Auth section, select EAP-FAST under EAP Methods and Authenticate using a Certificate under Inner Methods based on Credentials Source. Click Next.
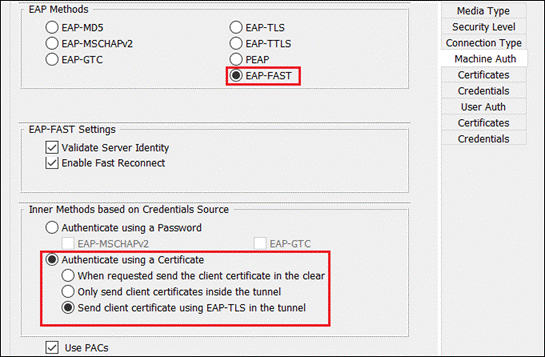
Step 9. Under the Certificates section, the defaults are used however rules can be created to restrict the server certificate used for machine authentication. Click Next.

Step 10. Under the Credentials section, the defaults are used. Click Next.
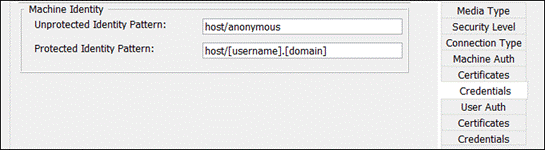
Step 11. Under the User Auth section, select EAP-FAST under EAP Methods and Authenticate using a Password under Inner Methods based on Credentials Source. Click Next.
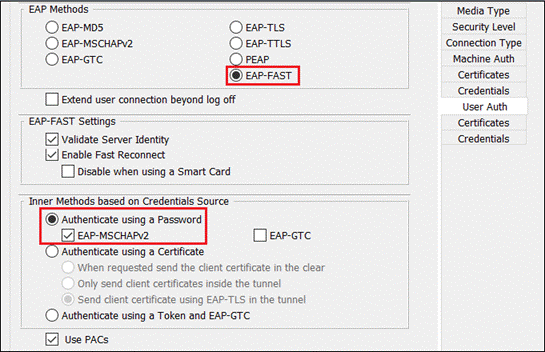
Step 12. Under the Certificates section, the defaults are used however rules can be created to restrict the server certificate used for user authentication. Click Next.
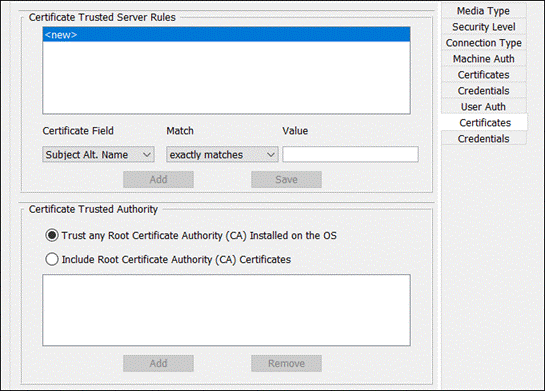
Step 13. Under the Credentials section, select Use Single Sign On Credentials under User Credentials. Click Done.
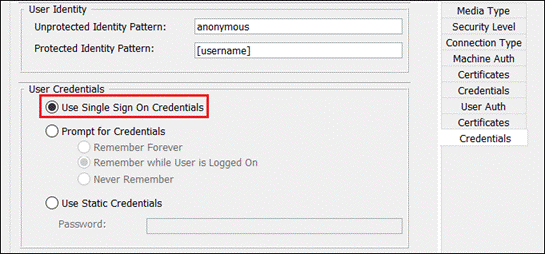
Step 14. Navigate to File > Save As. Save the file as configuration.xml.
Note: CSC will not accept another name for the NAM profile.
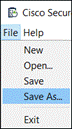
VPN Profile
The AnyConnect VPN profile provides VPN server information so the client knows where to establish the VPN. It also provides additional services to control and enhance VPN functionality and behavior such as Trusted Network Detection, Start before logon, and certificate selection. The following steps provide basic steps for creating an AnyConnect VPN profile. Additional details about modifying the VPN profile can be found here. Information on setting up an Cisco Secure Firewall as a VPN server can be found within the Cisco Secure Remote Worker for On-Prem Design Guide.
Step 1. Type VPN Profile Editor in the Windows search box and open the application.
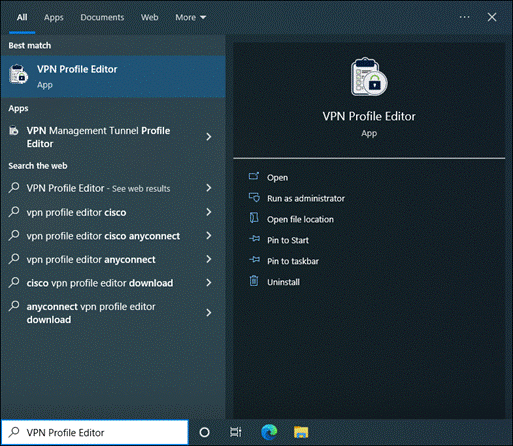
Step 2. Under Server List, click Add.
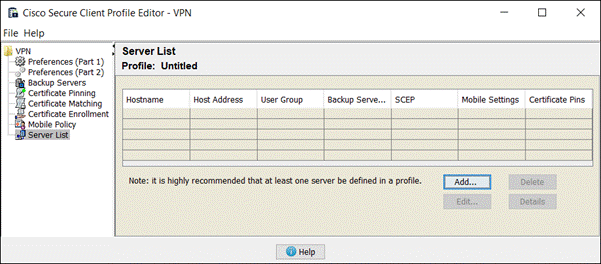
Step 3. Within the Server tab, add a unique Display Name recognizable by users and the FQDN or IP Address of the VPN concentrator. You can add a User Group if used on the VPN concentrator as well as modify the Primary Protocol to SSL or IPsec. Click Ok when done.
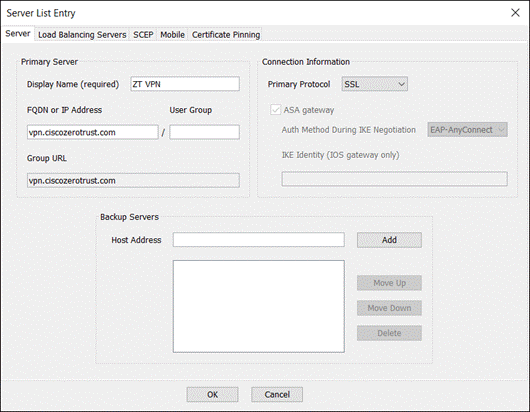
Verify the VPN server has been added.
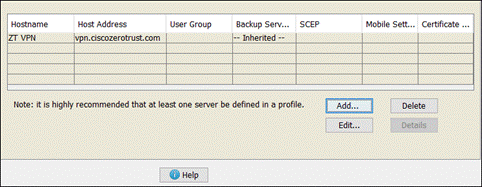
Step 4. Navigate to File > Save As. Save the file with a unique name.
Note: CSC will accept multiple names for the xml file as there can be multiple VPN profiles within the VPN Profile directory.

The ISE Posture Profile controls agent behavior during posture assessment such as timers and the mode the agent should run in. This posture assessment is done before the device accesses the network. The following steps provide basic steps for creating an ISE Posture profile. Additional details about modifying the ISE Posture profile can be found here. A future version of the Cisco Zero Trust: Network and Cloud Security Design Guide will include ISE side configuration for setting up posture.
Step 1. Type ISE Posture Profile Editor in the Windows search box and open the application.
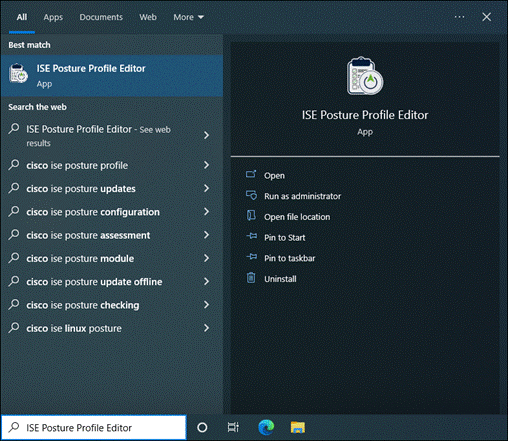
Step 2. Under Preferences, there are multiple options that can be chosen here. Scroll down to the Posture Protocol section and enter a valid Discovery host and Server name rules at minimum.
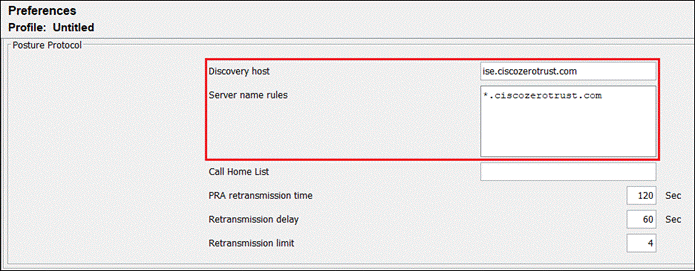
Step 3. Navigate to File > Save As. Save the file as ISEPostureCFG.xml.
Note: CSC will not accept another name for the ISE Posture profile.

Network Visibility Module Profile
The NVM profile provides collector information so the module knows where to send telemetry data. There are also additional controls such as caching data obtained while on an untrusted network, controlling which data is sent and anonymization of that data, and Trusted Network Detection settings to determine when the client is on a trusted network. The following steps provide basic steps for creating an NVM profile. Additional details about modifying the NVM profile can be found here. NVM can be configured to forward telemetry to analytics platforms such as Cisco Secure Network Analytics, Splunk, and Splunk for CESA (Cisco Endpoint Security Analytics). Information on setting up NVM with Splunk for CESA can be found here.
Step 1. Type Network Visibility Module Profile Editor in the Windows search box and open the application.
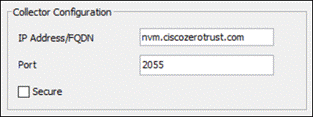
Step 3. In the middle section, click Add next to Data Collect Policy. NVM will not collect data without a policy being created first.
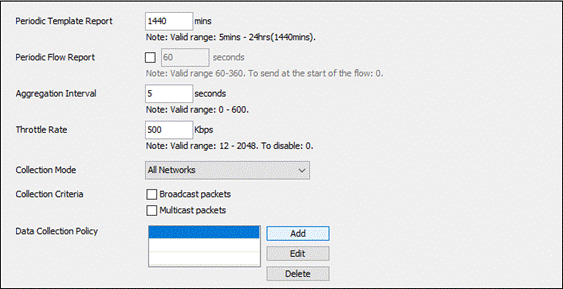
Step 4. Create a Name for the Data Collection Policy. Select the Network Types the policy should apply to. Under the Include/Exclude section, specify whether to Include or Exclude certain fields and specify the Fields. Click Save.
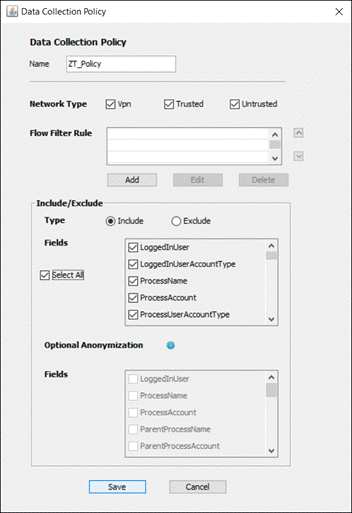
Step 5. Near the bottom of the editor, click Configure next to Trusted Network Detection. NVM uses Trusted Network Detection to determine if the device is on a trusted network or not. On a trusted network, NVM can immediately send telemetry to the collector. On an untrusted network, NVM can cache the data to send it later when on a trusted network.
![]()
Step 6. Enter the IP address or FQDN of the trusted server, along with the port if it uses something other than 443. Click Add. The NVM Profile Editor will attempt to reach out to the trusted server and automatically populate the Certificate Hash (SHA-256) section.
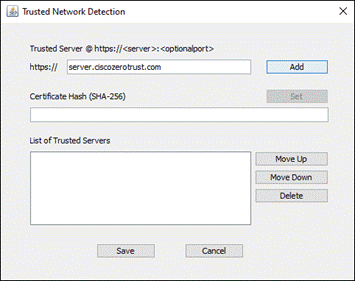
If it is unable to reach the trusted server, a warning will pop up. Click Ok if you receive this warning.
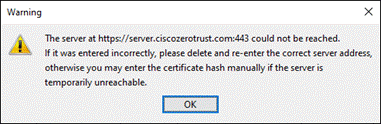
While the Trusted Server is highlighted in the lower section, manually add the SHA-256 hash in the Certificate Hash section and click Set. The SHA-256 Hash can be obtained through a browser while accessing the server, typically by clicking the lock next to the URL then clicking to find more information on the secure connection. Alternatively, if you have the trusted server certificate you can use the following openssl command to obtain the hash from a PEM format certificate: openssl x509 -noout -fingerprint -sha256 -inform pem -in [certificate]. In either case, make sure to remove the colons before adding it to the Certificate Hash field.
Click Save when done.
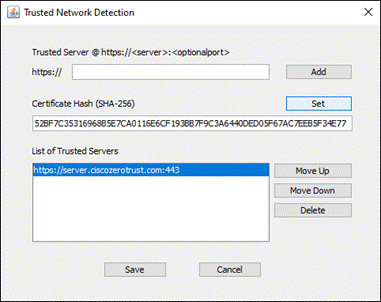
Step 7. Navigate to File > Save As. Save the file as NVM_ServiceProfile.xml.
Note: CSC will not accept another name for the Network Visibility Module profile.
Appendix B – Cisco Secure Client Pre-Deployment
Deploying Cisco Secure Client using the cloud management profile may not be preferred or possible. For example, you may require more customization of the secure client modules than is currently allowed within the SecureX deployment method. For more information on some of the customizations available, click here. Pre-deployment allows for more granular control of the Secure Client package. Using Meraki MDM, the following steps will cover pre-deployment of the following modules:
● Cloud Management module
● Umbrella Roaming Security module
● Secure Endpoint module
● AnyConnect VPN (The UI will be disabled)
● Network Access Manager module
While not directly covered, the script covered in later steps provides lines for installing the following modules as well. These lines are commented out but can be uncommented and modified based on the needs of your environment.
● ISE Posture module
● ISE Compliance module
● Network Visibility module
The Network Access Manager module will not be validated within this design guide but will be validated within the Cisco Zero Trust: Network and Cloud Design Guide.
Download Cisco Secure Client MSI package
To download the Cisco Secure Client pre-deployment package for the appropriate operating systems, go to the Cisco Software Download page. These packages can be pre-deployed by the end user or an enterprise software management system.
Note: Your account must be entitled for the Cisco Secure Client Advantage, Premier, or VPN Only (or AnyConnect Apex, Plus, or VPN Only) term/contracts. See the Ordering Guide for options. Licensing FAQ.

If you are deploying the ISE Posture module and profile to the device, you may consider also deploying the ISE Compliance module to the device as well. This file can be found here.

Download Secure Endpoint
Step 1. In the Secure Endpoint admin console, navigate to Management > Download Connector.

Step 2. Find and select the Group created for the endpoints to use.
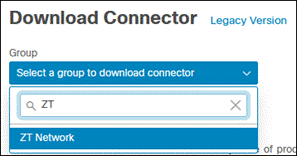
Step 3. Find the Windows section and click Download.
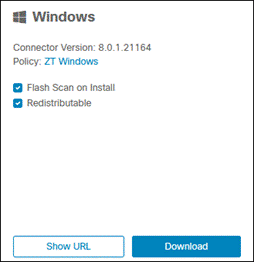
Create Custom Windows EXE
When pre-deploying Cisco Secure Client, there is an order in which certain modules must be installed. For example, before the Umbrella Roaming Security module can be installed, the AnyConnect VPN module must be installed. This is regardless of whether VPN will be used. While the VPN module UI can be disabled, it must still be deployed before certain modules.
To allow Meraki to successfully install these components at once, a script must be created and converted into an executable. While there are multiple ways of accomplishing this, the following steps describe a method that should not require additional software to be installed on a Windows 10 computer.
Step 1. Create a folder to store the executables and other files. In this lab, the folder Temp was created under the C:\ drive.
Step 2. Unzip the Windows Cisco Secure Client package to extract the individual MSI files. Move the extracted and downloaded files to the created folder.
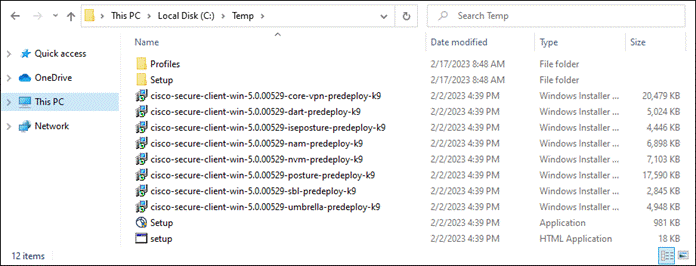
Delete any unnecessary files or folders.
Note: In this lab, the Diagnostics and Reporting Tool (DART), Firewall posture, and Start Before Login (SBL) modules were removed, however for your environment, you may consider using them.
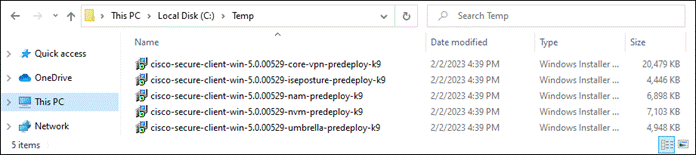
Step 3. Add any profiles for the modules that will be installed as well as other executables or files to the folder that will be installed. In this example, the secure endpoint executable and ISE Compliance module executable are added along with the OrgInfo.json, configuration.xml, ISEPostureCFG.xml, and NVM_ServiceProfile.xml profiles for the Umbrella Roaming Security module, NAM module, ISE Posture module, and NVM respectively. Because there is an argument that can be used to disable the VPN UI, the VPNDisable_ServiceProfile.xml file is not added.
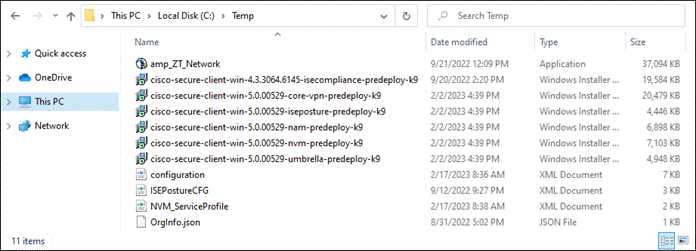
In a text editor of your choice, such as Notepad, copy, paste, and modify the following PowerShell code.
Note: This is an example script which should be tailored to your environment.
#Variables
$CSCCoreVPN = "cisco-secure-client-win-5.0.00529-core-vpn-predeploy-k9.msi"
$CSCUmbrella = "cisco-secure-client-win-5.0.00529-umbrella-predeploy-k9.msi"
$CSCNetworkAccessManager = "cisco-secure-client-win-5.0.00529-nam-predeploy-k9.msi"
$CSCNetworkVisibility = "cisco-secure-client-win-5.0.00529-nvm-predeploy-k9.msi"
$CSCISEPosture = "cisco-secure-client-win-5.0.00529-iseposture-predeploy-k9.msi"
$CSCISECompliance = "cisco-secure-client-win-4.3.3064.6145-isecompliance-predeploy-k9.msi"
$CSCEndpoint = "amp_ZT_Network.exe"
$CSCCoreVPNProfile = "vpn.xml"
$CSCUmbrellaProfile = "OrgInfo.json"
$CSCNetworkAccessManagerProfile = "configuration.xml"
$CSCNetworkVisibilityProfile = "NVM_ServiceProfile.xml"
$CSCISEPostureProfile = "ISEPostureCFG.xml"
#Create temporary Profiles directory for installation
'iseposture','nam','nvm','umbrella','vpn' | % {New-Item -ItemType 'Directory' -Force -Path $env:TEMP\Deploy-CSC\Profiles\$_}
xcopy . $env:TEMP\Deploy-CSC /S /E /Y
cd $env:TEMP\Deploy-CSC
#Install CSC GUI and Core VPN module. Remove 'PRE_DEPLOY_DISABLE_VPN=1' to enable VPN UI. If enabling VPN, you can also uncomment the xcopy line to import a vpn profile
$CSCCoreVPNArgs = "/I " + $CSCCoreVPN + " /quiet /norestart /passive PRE_DEPLOY_DISABLE_VPN=1"
#copy $CSCCoreVPNProfile $env:TEMP\Deploy-CSC\Profiles\vpn\ /Y
Start-Process msiexec.exe -Wait -ArgumentList $CSCCoreVPNArgs
#Install Umbrella Roaming Security module
copy $CSCUmbrellaProfile $env:TEMP\Deploy-CSC\Profiles\umbrella\OrgInfo.json
$CSCUmbrellaArgs = "/I " + $CSCUmbrella + " /quiet /norestart /passive"
Start-Process msiexec.exe -Wait -ArgumentList $CSCUmbrellaArgs
#Install Network Access Manager module
copy $CSCNetworkAccessManagerProfile $env:TEMP\Deploy-CSC\Profiles\nam\configuration.xml
$CSCNetworkAccessManagerArgs = "/I " + $CSCNetworkAccessManager + " /quiet /norestart /passive"
Start-Process msiexec.exe -Wait -ArgumentList $CSCNetworkAccessManagerArgs
#Install Network Visibility module. Uncomment the lines below to enable
copy $CSCNetworkVisibilityProfile $env:TEMP\Deploy-CSC\Profiles\nvm\NVM_ServiceProfile.xml
$CSCNetworkVisibilityArgs = "/I " + $CSCNetworkVisibility + " /quiet /norestart /passive"
Start-Process msiexec.exe -Wait -ArgumentList $CSCNetworkVisibilityArgs
#Install ISE Posture module and ISE Compliance module. Uncomment the lines below to enable
copy $CSCISEPostureProfile $env:TEMP\Deploy-CSC\Profiles\iseposture\ISEPostureCFG.xml
$CSCISEPostureArgs = "/I " + $CSCISEPosture + " /quiet /norestart /passive"
$CSCISEComplianceArgs = "/I " + $CSCISECompliance + " /quiet /norestart /passive"
Start-Process msiexec.exe -Wait -ArgumentList $CSCISEPostureArgs
Start-Process msiexec.exe -Wait -ArgumentList $CSCISEComplianceArgs
#Install Secure Endpoint module
$CSCEndpointInstall = Start-Process $CSCEndpoint -ArgumentList "/R /S" -PassThru
$CSCEndpointInstall.WaitForExit()
#Delete temp installation directory
cd $env:TEMP
Remove-Item $env:TEMP\Deploy-CSC -Recurse
Under Variables, you will need to modify each variable to match your environment:
● $CSC[Name] should match the name of the module file extracted from the Windows CSC pre-deploy package downloaded from the Cisco software site. Make sure the file extension (.msi/.exe) is added at the end.
◦ $CSCCoreVPN – AnyConnect VPN module
◦ $CSCUmbrella – Umbrella Roaming Security module
◦ $CSCISEPosture – ISE Posture module
◦ $CSCISECompliance – ISE Posture Compliance module
◦ $CSCNetworkAccessManager – Network Access Manager module
◦ $CSCNetworkVisibility – Network Visibility module
◦ $CSCEndpoint – Secure Endpoint module
● $CSC[Name]Profile should match the name of the profile created for the modules.
Note: Profiles for the Umbrella, NAM, NVM, and ISE Posture modules must use specific names to be recognized by CSC. The script is written to correct any deviations from the expected names.
◦ $CSCCoreVPNProfile - AnyConnect VPN XML Profile
◦ $CSCUmbrellaProfile - Umbrella Roaming Security JSON Profile
◦ $CSCNetworkAccessManagerProfile - Network Access Manager XML Profile
◦ $CSCNetworkVisibilityProfile - Network Visibility module XML Profile
◦ $CSCISEPostureProfile – ISE Posture XML Profile
Save this file as a .ps1 file (for example, “DeployCSCWin.ps1”) and add it to the created folder.
Step 4. Verify all the necessary files are added to the folder create in step 1.
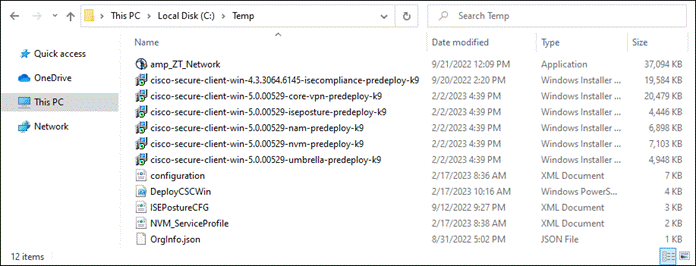
Step 5. Steps 7 – 22 in the earlier Create Custom Cisco Secure Client EXE (Windows) subsection within the Provisioning section can be executed to finish creating the custom Windows EXE.
| Definition |
|
| 2FA |
Two-Factor Authentication |
| AD |
Active Directory |
| AMP |
Advanced Malware Protection |
| AP |
Access Point |
| API |
Application Programming Interface |
| APNS |
Apple Push Notification Service |
| ASA |
Adaptive Security Appliance |
| BYOD |
Bring Your Own Device |
| CA |
Certificate Authority |
| CASB |
Cloud Access Security Broker |
| CDFW |
Cloud Delivered Firewall |
| CISA |
Cybersecurity and Infrastructure Security Agency |
| CNAME |
Canonical Name |
| CSC |
Cisco Secure Client |
| DC |
Data Center |
| DEP |
Device Enrollment Program |
| DIA |
Direct Internet Access |
| DLP |
Data Loss Prevention |
| DMZ |
Demilitarized Zone |
| DNG |
Duo Network Gateway |
| DNS |
Domain Name System |
| DTLS |
Datagram Transport Layer Security |
| EAP |
Extensible Authentication Protocol |
| EMM |
Enterprise Mobility Management |
| FAST |
Flexible Authentication via Secure Tunneling |
| FMC |
Firewall Management Center |
| FTD |
Firepower Threat Defense |
| GUI |
Graphical User Interface |
| HTTP |
Hypertext Transfer Protocol |
| HTTPS |
Hypertext Transfer Protocol Secure |
| I2P |
Invisible Internet Project |
| IaaS |
Infrastructure as a Service |
| IdP |
Identity Provider |
| IKEv2 |
Internet Key Exchange version 2 |
| IoC |
Indicator of Compromise |
| IoT |
Internet of Things |
| ISE |
Identity Services Engine |
| LDAP |
Lightweight Directory Access Protocol |
| MDM |
Mobile Device Management |
| MFA |
Multi-Factor Authentication |
| MPLS |
Multiprotocol Label Switching |
| MSCHAPv2 |
Microsoft Challenge Handshake Authentication Protocol version 2 |
| NIST |
National Institute of Standards and Technology |
| NVM |
Network Visibility Module |
| OS |
Operating System |
| OU |
Organizational Unit |
| P2P |
Peer-to-Peer |
| PEM |
Privacy Enhanced Mail |
| RADIUS |
Remote Authentication Dial-In User Service |
| RBI |
Remote Browser Isolation |
| Remote Desktop Protocol |
|
| SaaS |
Software as a Service |
| SAML |
Security Assertion Markup Language |
| SASE |
Secure Access Service Edge |
| SD-WAN |
Software Defined Wide Area Network |
| SIG |
Secure Internet Gateway |
| SM |
Systems Manager |
| SOAR |
Security Orchestration, Automation, and Response |
| SP |
Service Provider |
| SSH |
Secure Shell |
| SSID |
Service Set Identifier |
| SSL |
Secure Sockets Layer |
| SSO |
Single Sign-On |
| SWG |
Secure Web Gateway |
| TLS |
Transport Layer Security |
| TND |
Trusted Network Detection |
| U2F |
Universal 2nd Factor |
| UI |
User Interface |
| URL |
Uniform Resource Locator |
| VPN |
Virtual Private Network |
| WP |
WordPress |
| XML |
Extensible Markup Language |
Appendix D – Software Versions
| Product |
Platform |
Version |
| Cisco Orbital |
Software Agent |
1.21.3 |
| CSC AnyConnect VPN Module |
Software Agent |
5.0.00529 |
| CSC Cloud Management Module |
Software Agent |
1.0.1.400 |
| CSC ISE Posture Module |
Software Agent |
5.0.00529 |
| CSC ISE Compliance Module |
Software Agent |
4.3.3064.6145 |
| CSC Network Access Manager Module |
Software Agent |
5.0.00529 |
| CSC Network Visibility Module |
Software Agent |
5.0.00529 |
| CSC Secure Endpoint Module (Windows) |
Software Agent |
8.0.1.21164 |
| CSC Umbrella Roaming Security Module |
Software Agent |
5.0.00529 |
| Duo Authentication Proxy |
Software |
5.6.0 |
| Duo Device Health |
Software Agent |
2.23.0 |
| Duo Network Gateway |
Software |
1.6.1 |
| Linux host for Duo Authentication Proxy, DNG, and WordPress |
Ubuntu |
20.04.4 |
| Meraki Agent |
Software Agent |
3.6.0 |
| Microsoft 365 |
Cloud Offering |
SaaS |
| WordPress |
Software |
5.9.2 |
| WP SAML Auth Plugin |
Software Plugin |
2.0.1 |
● Cisco Secure Client 5 Documentation
● Cisco Breach Defense Design Guide
● Cisco Meraki SD-WAN Design Guide
● Cisco Secure Endpoint Documentation
● Cisco Secure Remote Worker for On-Prem Design Guide
● Cisco Umbrella Documentation
● Cisco Umbrella Knowledge Base
● Cisco Umbrella User Documentation
● Cisco Zero Trust Architecture Guide
● Cisco Zero Trust Network and Cloud Security Design Guide
If you have feedback on this design guide or any of the Cisco Security design guides, please send an email to ask-security-cvd@cisco.com.