Catalyst Programmability and Automation
Available Languages
Bias-Free Language
The documentation set for this product strives to use bias-free language. For the purposes of this documentation set, bias-free is defined as language that does not imply discrimination based on age, disability, gender, racial identity, ethnic identity, sexual orientation, socioeconomic status, and intersectionality. Exceptions may be present in the documentation due to language that is hardcoded in the user interfaces of the product software, language used based on RFP documentation, or language that is used by a referenced third-party product. Learn more about how Cisco is using Inclusive Language.
Programmability and automation overview
The world of programmability has been evolving for years, and with the latest Cisco IOS XE releases, we've included new Yet Another Next Generation (YANG) models to bring additional automation to wireless technology. With the use of APIs, interacting with devices and retrieving data has gotten much easier. Back in the day, we used many commands sent from command-line interfaces (CLIs) to communicate with the software. In addition, the Simple Network Management Protocol (SNMP) was frequently used for network management. Fast forward to today: We now have a new way to interact with software, commonly called an application programming interface, or API. Even though CLIs and SNMP are widely used, they are not as efficient and scalable as APIs.
This document dives into the different programmable interfaces used to communicate with the various Cisco IOS XE devices, specifically the Cisco Catalyst 9300 Series Switches but also the Catalyst 9800 Series Wireless Controllers and the Catalyst 8000 Edge Platforms Family. We discuss the pros and cons of using Network Configuration Protocol (NETCONF), Representational State Transfer Configuration (RESTCONF), and the gRPC network management interface/Google remote procedure call (gNMI/gRPC) protocols, and the main differences between them.
Programmability and automation overview
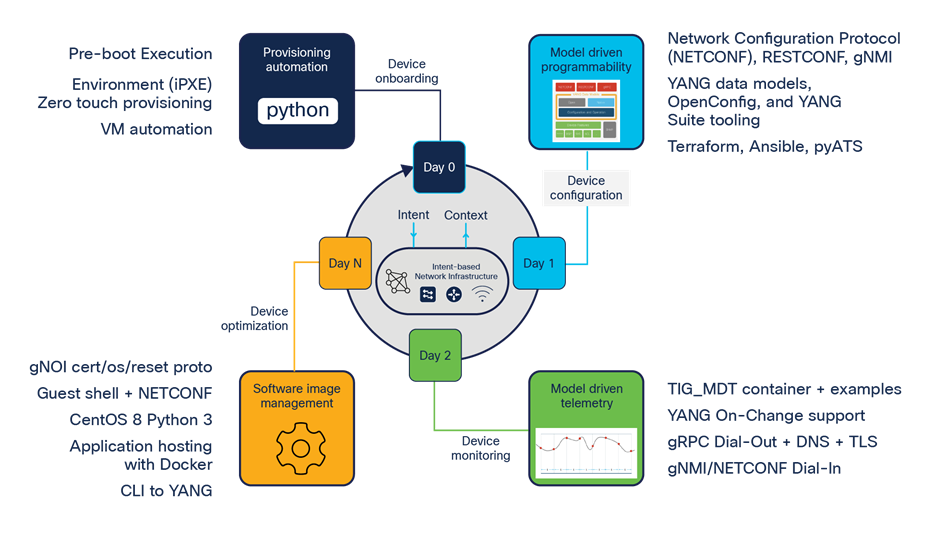
Day 0: Provisioning automation
Day 0 provisioning automation features include zero-touch provisioning (ZTP) and the Pre-Boot Execution Environment (PXE), as well as a variety of options for deployment of virtual machines. These day 0 features can be used with a variety of other day 1, day 2, or day N features to achieve provisioning automation in order to successfully configure and deploy new network devices in various campus and enterprise environments.
Day 1: Model-driven programmability
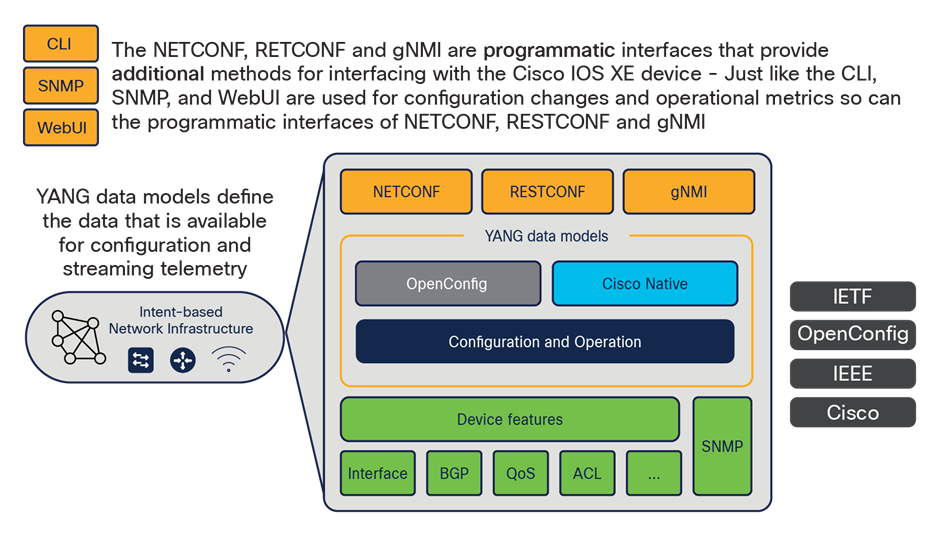
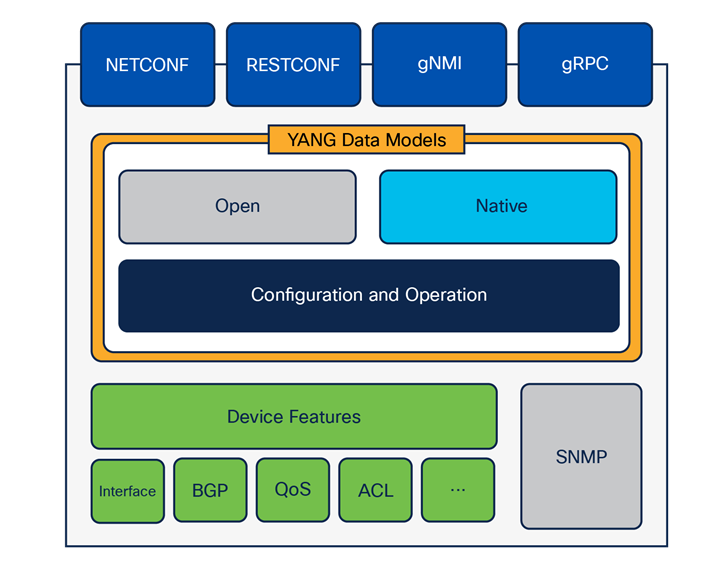
Cisco IOS XE for the Catalyst hardware has several options for programmatic configuration. Traditional methods for configuring include the CLI, SNMP, or the WebUI, but these have now been expanded to include the programmatic interfaces, such as NETCONF, RESTCONF, and the gNMI programmatic interfaces and protocols. YANG data models define what data is accessible over the programmatic interfaces, and they come in several varieties, including Cisco IOS XE features. They are defined within the native data models, while standard and vendor-agnostic features are defined within the open data models. Either model can be used for many tasks. However, features specific to Cisco IOS XE are available only in the native models, which are models created by Cisco specifically for devices and software. The native data models provide the most comprehensive and operational coverage for device functionality.
Model-driven programmable interfaces
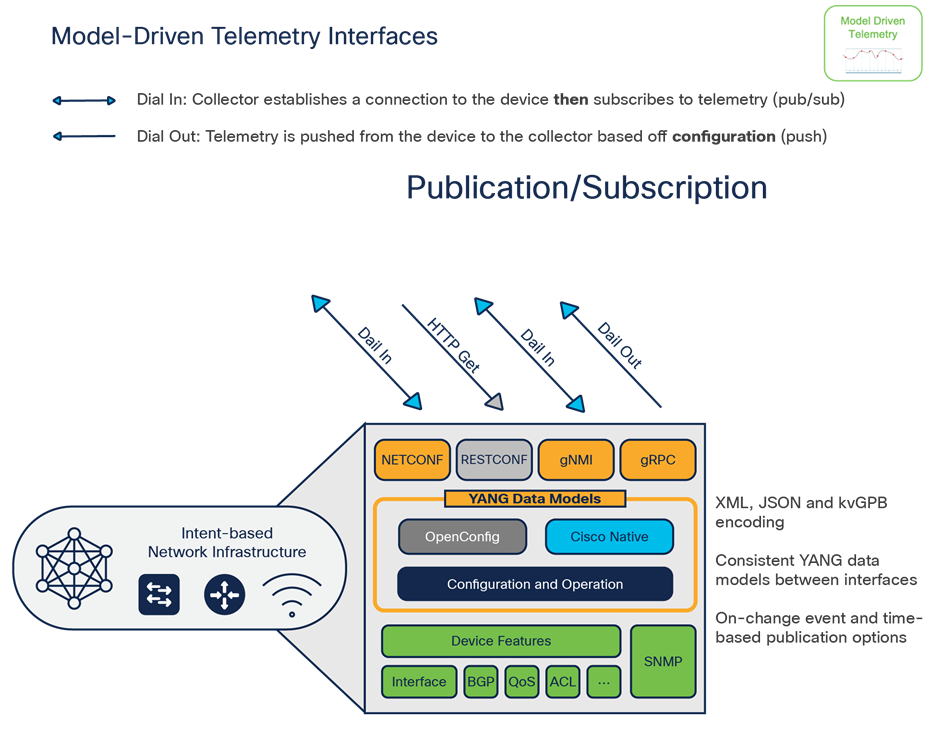
Model-driven telemetry or “streaming telemetry” is a day 2 feature using NETCONF and gNMI “dial-in” and gRPC “dial-out” telemetry interfaces. These telemetry interfaces provide a variety of options for publishing network telemetry data to third-party collectors for event processing, analysis, and alerting.

Model-driven telemetry interfaces
The day N device optimization features help with operational efficiency, including support for third-party services and integrations within the embedded Guest Shell Linux operating system, the On-Box Python interpreter, and API to Cisco IOS XE. Additionally, device optimization features provide a variety of gNOI workflow APIs that support single call operations for certificate management, operating system software management, and factory reset operations.
Cisco IOS XE operational consistency
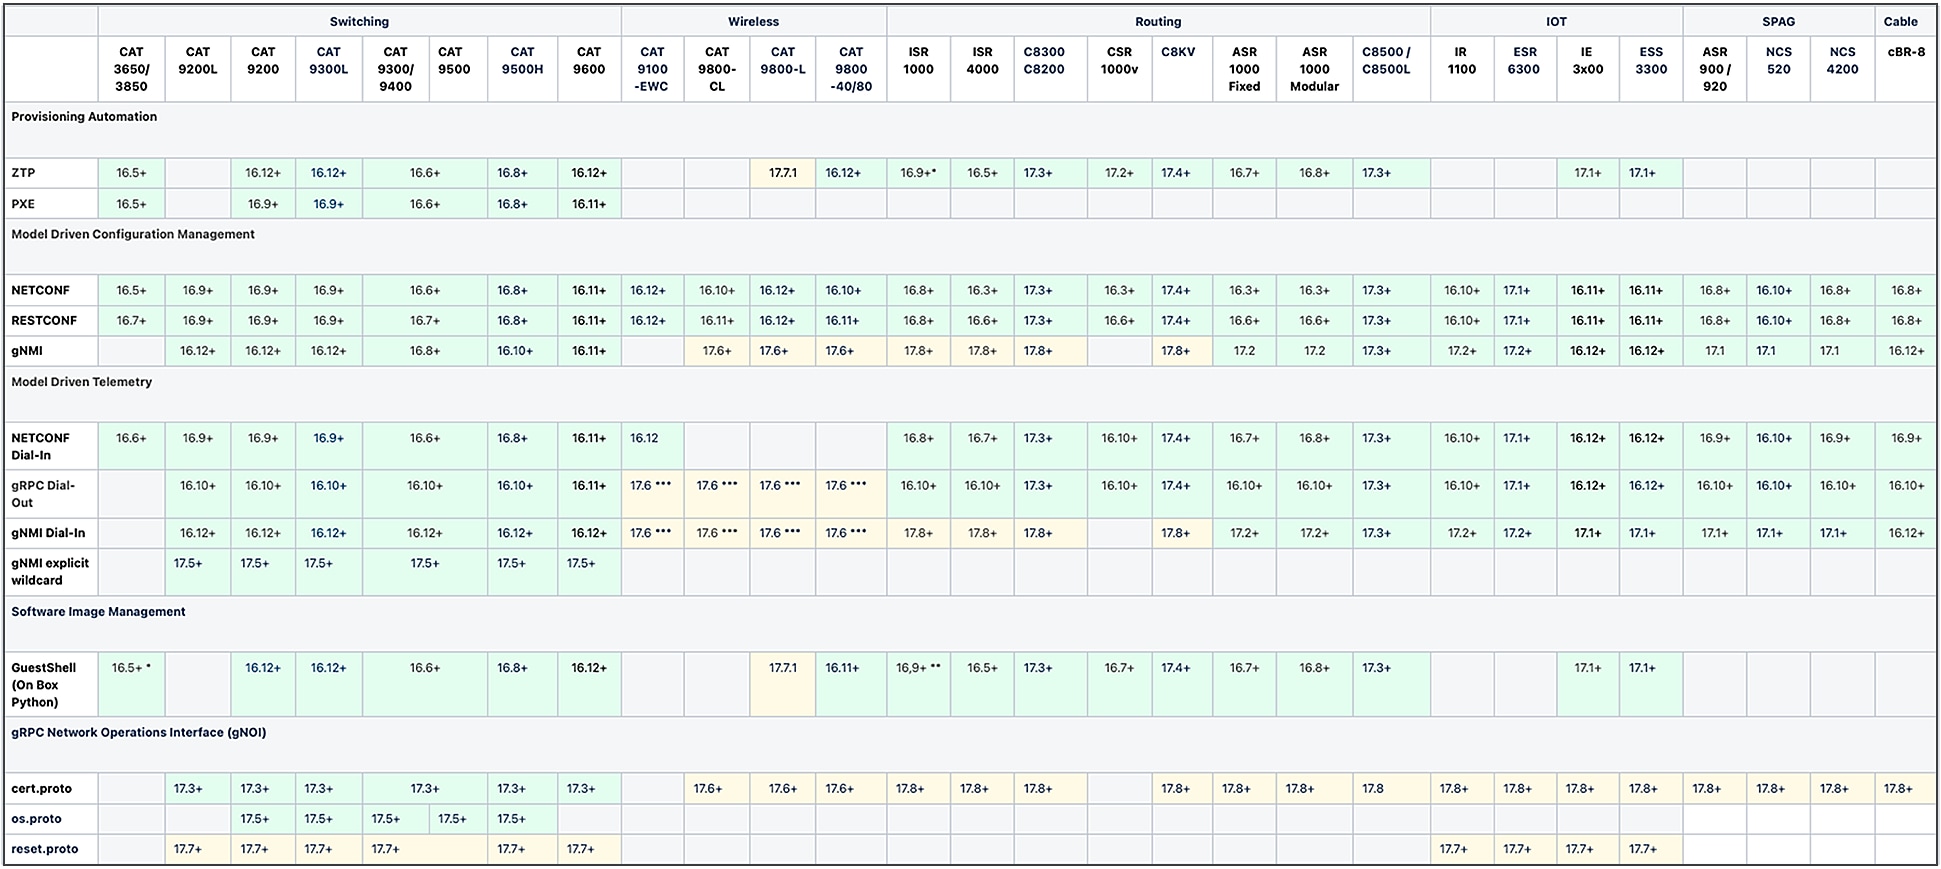
Cisco IOS XE software runs on a large variety of hardware solutions, including virtual machines, and the cross-reference of which feature is supported on which platform and the version supported are detailed in the chart below. Additional details for each feature, including the supported hardware and software platforms, are also described in the Programmability Configuration Guide listed in the resources at the end of this document.
Cisco IOS XE operational consistency
Yet Another Next Generation (YANG) data modeling language (RFC 6020, RFC 7950)
YANG is a standards-based data modeling language used to create device configuration requests and retrieve operational (show command) data. It has a structured format similar to that of a human-readable computer program. Several applications are available that can be run on a centralized management platform (for example, a laptop) to create these configuration and operational data requests.
There are both standard (common) YANG data models that apply to all vendors (for example, a request to disable or shut down an Ethernet interface should be identical for both Cisco and third-party devices) as well as device (native, vendor-specific) data models that facilitate configuring or collecting operational data associated with proprietary vendor features.
YANG is a data modelling language for NETCONF, RESTCONF, and gNMI. YANG models within a Cisco IOS XE device have been defined to describe how to structure the data to send or receive. The YANG standard was defined in RFC 6020 and has been updated in RFC 7950. Two main types of YANG models are in use: native and open. The models are further categorized as either configuration or operational models. The configuration models can be used for programmatic configuration, while the operational models can be used with telemetry to show real-time operational data.
Who defines the YANG models?
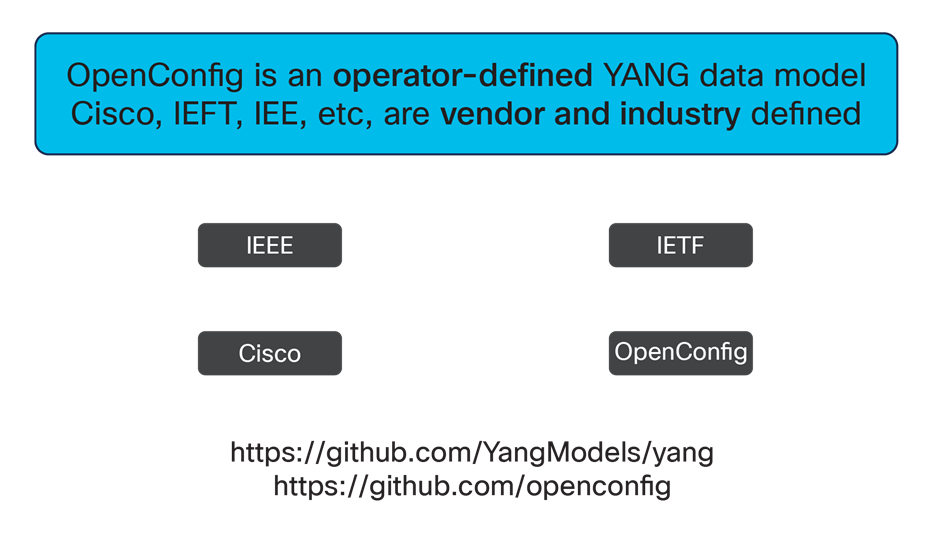
There are a variety of YANG modules that can be used for different configuration, operational, and RPC operations, for both programmability and telemetry use cases. The Cisco native data models are the most feature-rich and include support for Cisco features and configurations. IETF and IEEE data models are RFC-defined and ratified YANG standards that have also been implemented. These RFC models support a variety of use cases, from the base streaming telemetry implementation to the listing of support data models, datastores, and streams. OpenConfig is a network operator-driven YANG data model group that also has support for configuration and telemetry use cases.
Deviations to YANG are allowed when the server is not able or designed to implement a model as written, and these are specified in the “-deviation.YANG” files provided by the YANG interfaces. These deviations allow the network management station to easily understand which nodes within a particular YANG module are not supported.
The data models are published for each Cisco IOS XE release in the Yang Models repository on GitHub.com at https://github.com/YangModels/yang/tree/master/vendor/cisco/xe. The supported YANG modules or capabilities for each of the Cisco IOS XE hardware platforms are also published on GitHub, along with an extensive README, notes on backward-incompatible changes or breaking changes, and a variety of other resources, including both YANG version 1.0 and YANG 1.1 version definitions.
The data models can also be retrieved from the running device over any of the programmatic interfaces by retrieving the contents of the IETF-YANG-Library data model. This will list only the data models supported on the device and can be used programmatically by tooling and systems and network controllers to understand which YANG models are supported on the network device.
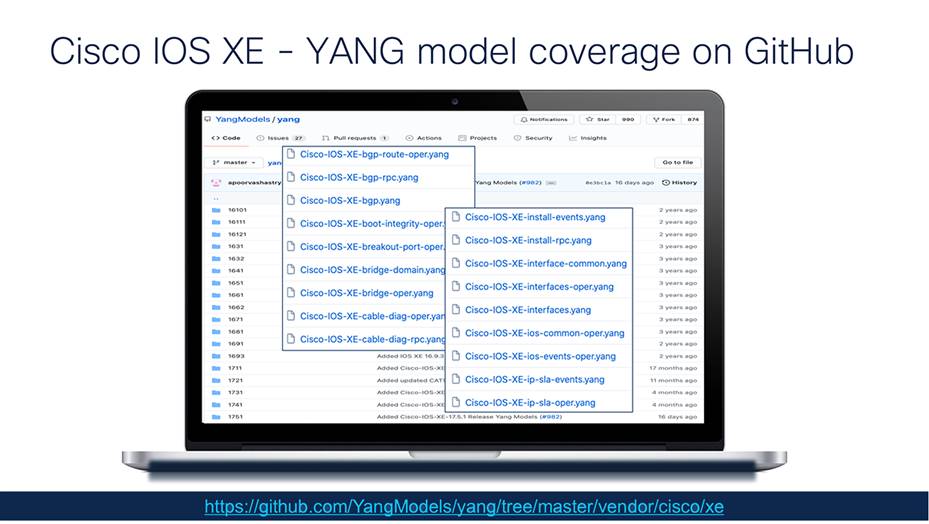
YANG on GitHub
When initially connecting to NETCONF, the “hello” operation returns all supported YANG 1.0 capabilities. However, a GET operation for a data model lists the YANG library or list of supported YANG data models. If the desired application previously parsed the NETCONF "hello" message to retrieve the supported YANG models, the parsing must be modified to reflect how version 1.1 advertises via "ietf-yang-library" instead of the NETCONF "hello" message. This is similar to how RESTCONF behaves, where an HTTP GET to the YANG library data model URI is made to retrieve the list of supported data models.
Cisco native YANG will use YANG 1.0 until Release 17.10, when it will change to YANG 1.1. Customers using YANG 1.0 tooling will need to upgrade to YANG 1.1-compliant tooling—YANG Suite, pyATS, Python, Ansible, and more have a long history of YANG 1.1 support. A simple script has been provided in GitHub to convert models to YANG 1.1 for testing and validation within third-party tooling and integrations. YANG 1.1 is backward compatible with YANG 1.0. (Learn more from IETF here: https://datatracker.ietf.org/doc/html/rfc7950)
YANG Suite is a tool to easily visualize data models. It can be used to read operational data and configure devices using NETCONF, RESTCONF, gNxI, gRPC, etc.

The Cisco native models are grouped into two main categories: configuration and operational. The configuration modules contain configuration information for the related features, while the operational models provide run-time and operational data about the feature.
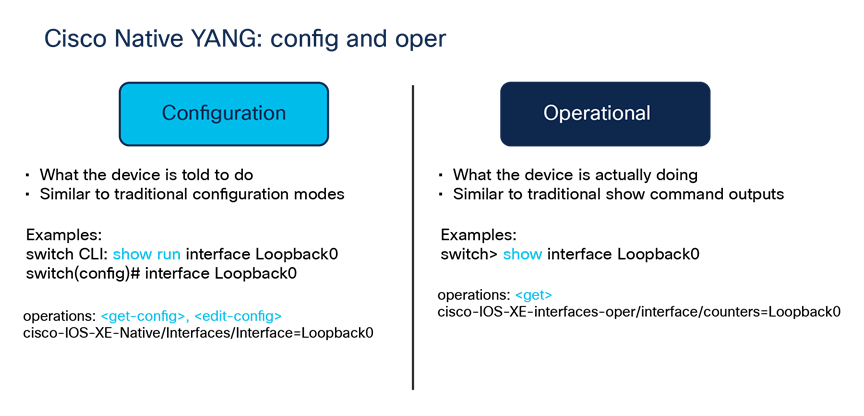
Cisco native YANG: Configuration and operational models
Cisco native configuration YANG
The Cisco-IOS-XE-native.YANG module is the main native data model for the Cisco IOS XE configuration. This data model has the majority of the “show running configuration” mapped within it. The most commonly used features will have their configuration mapped and modeled here. Common examples include interfaces, VLANs, lines, AAA, and crypto, to name just a few.
The device’s running configuration can be retrieved using this data model, via any of the supported programmable interfaces of NETCONF, RESTCONF, or gNMI. Model-driven telemetry use cases also support this data model, so a subscription to all or some part of this data model results in any changes being streamed or pushed to the remote receiver to support third-party analytics and alerting use cases.
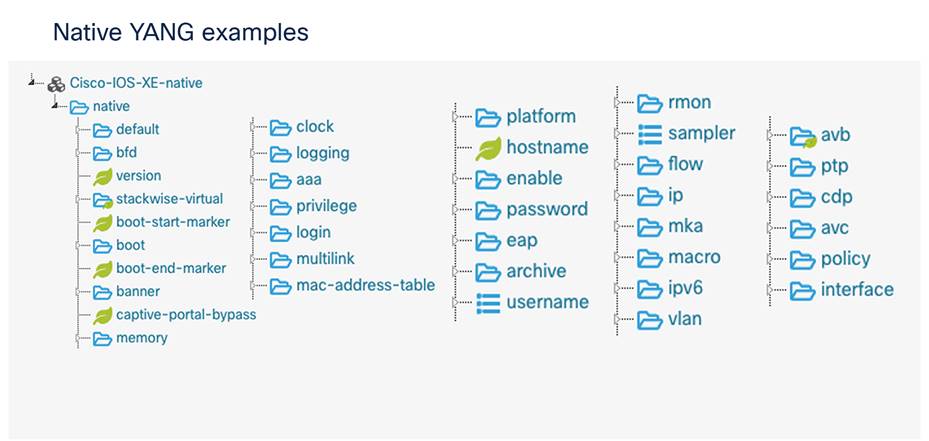
Native YANG examples
Cisco native operational YANG
Nearly 150 operational or “oper” YANG modules are currently defined, and more are being added with each release, to align with new features and new data that is being mapped and exposed.
The operational models are equivalent to the “show <feature>” command. These do not have configuration data and instead have only operational or run-time data about the feature.

Cisco-IOS-XE-feature-oper.YANG examples
Cisco native RPC actions YANG
The Cisco-IOS-XE-rpc.yang is one of the data models that can be used with “Other RPC” action within YANG Suite for RPC operations. This data model supports operations for managing files on the flash with “copy” and “delete,” supports license operations, enables reload to be called, and supports release for Dynamic Host Configuration Protocol (DHCP) addresses, among other support actions. These RPC actions are supported on the RFC API interfaces of NETCONF and RESTCONF but are implemented differently on the gRPC interfaces, as described next with gNOI.
Operations supported by the YANG RPCs are similar to those described within the gNOI section: Installing and upgrading operating system software, performing crypto management operations, and doing a factory reset of the device are just a few of the RPC actions that have been modeled. Working with files, the file system, clearing and defaulting features, and debugging and monitoring are also possible with these powerful YANG data models.
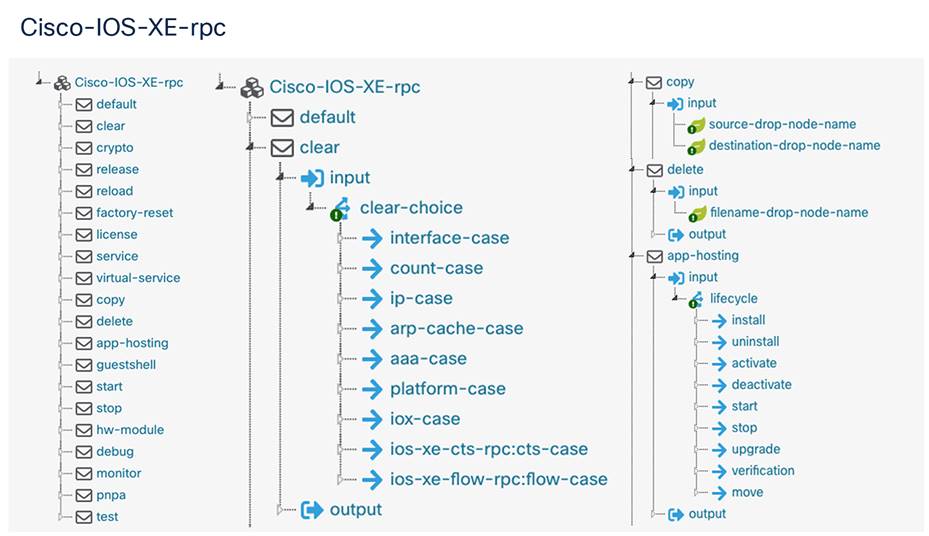
RPC data model examples
Cisco native “cisco-ia” YANG
Another notable YANG model is “cisco-ia.yang,” short for “Cisco Interface Application,” which enables common RPCs for managing device configuration, specifically “save-config,” which is the programmatic equivalent of the “write memory” or “wr mem” command. Working with NETCONF, time, status of the datastores sync, and actions for configuration revert and rollback are also modeled here.
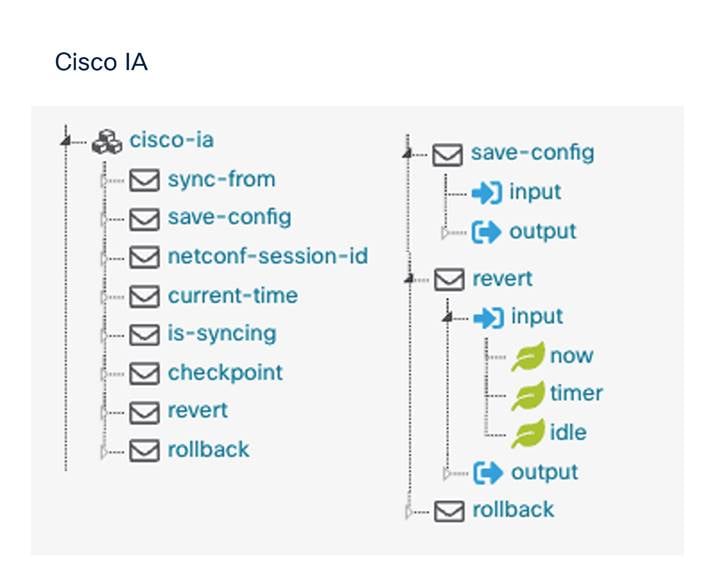
Cisco IA YANG examples
SNMP MIBs and syslog
The legacy SNMP service and the associated MIBs have been extended to be accessible within the YANG-based APIs. This enables seamless migration from SNMP to YANG by allowing legacy data points to be instrumented using the current YANG APIs. This approach still processes the legacy SNMP objects through the SNMP service and is susceptible to the limitations of this service; therefore, it is not recommended to consume MIBs via YANG interfaces unless necessary. Instead, the YANG data models should be used, which provide more data points and more granular updates.
Programmatic interfaces including SNMP
The syslog extension to SNMP can also be leveraged, which enables syslog messages to be collected from the YANG interfaces. Ensure that the netconf-yang services have the correct SNMP community string so that they can query the SNMP service correctly, as seen in the example below. Creating a subscription using the ietf-event-notifications.YANG model and specifying the stream of “snmpevents” will enable publication of the syslog and other configured events within the NETCONF session.
| snmp-server community <string> RW snmp-server enable traps syslog snmp-server manager logging history debugging logging snmp-trap debugging
netconf-yang cisco-ia snmp-community-string <string> |
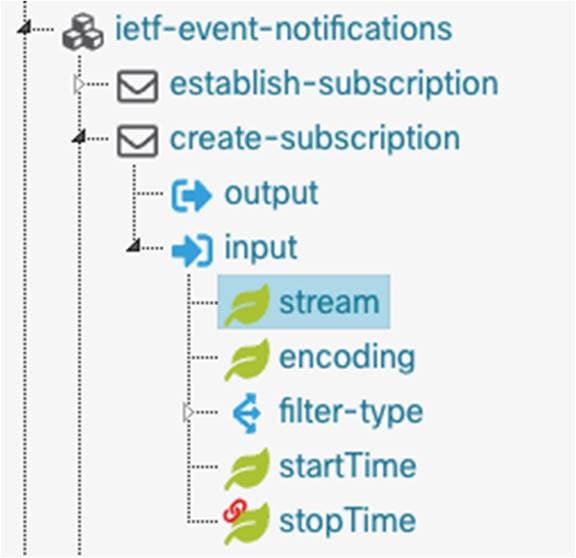
ietf-event-notifications.YANG tree
Standards-based and third-party YANG
In addition to the Cisco native configuration and operational models, several additional YANG models are supported on the device. The capabilities exchange can be accessed via the YANG interface. There are models for SNMP MIBs, IETF, and OpenConfig. These models can be used in the same way as the native models; however, they offer a limited or subset of the capabilities available on the device.
OpenConfig
OpenConfig is a network operator-driven YANG data model ecosystem that also has support for configuration and telemetry use cases. Unlike the IETF and Cisco native YANG, the OpenConfig (OC) YANG is defined primarily by a working group of network operators and does not include representation from network vendors. As such there are typically no vendor-specific configurations or extensions modeled within OpenConfig, in an effort to make the data model consumable regardless of networking equipment vendor.
The gNMI model-driven programmability and telemetry interface and OpenConfig have a long history, and many network operators who consume OpenConfig YANG may also prefer to leverage the gNMI interface. However, since all YANG data models are advertised for each of the API interfaces of NETCONF, RESTCONF, and gRPC dial-out, the OpenConfig YANG can be used here as well.
IETF
The Internet Engineering Task Force (IETF) YANG data models are the RFC standards that been ratified and implemented. These include the IETF-yang-push.YANG that is used for telemetry, as well as all other options of NETCONF, such as edit-config; these are defined within the IETF data models as well. There are also some user-facing data models for interface configuration and operational data. While the IETF-interfaces data model can be used to configure and monitor interfaces, Cisco native YANG provides more options and insight into the configuration.
There are also IETF data models related to the NETCONF Access Control Module (NACM), which performs role- and model-based access control (RBAC), and a variety of other RFC standards that are available for use.
YANG data models provide a variety of options to configure, manage, and understand the operational state of the network device. A variety of YANG modules are available, and there is also overlap in coverage between Cisco native, IETF, and OpenConfig, depending on the complexity of the features in use. Cisco native YANG offers the complete range of Cisco IOS XE features that can be managed, while OpenConfig offers a subset of that configuration and contains nothing specific to the vendor or features available in Cisco IOS XE, so it is more of a vendor-neutral model. Regardless of the YANG modules in use, it is common to see a wide variety of YANG types, including Cisco native, OpenConfig, and IETF, all being leveraged as needed to fulfill use cases and business requirements.
Day 1: Model-driven programmability
Day 1 model-driven programmability (MDP or just “programmability”) consists of the various APIs that are available for configuration management, device actions, and operational data retrieval. These APIs use the YANG data modeling language and support a variety of encoding and transportation options, some of which are RFC standards, like NETCONF and RESTCONF, but they also include gNMI.
There are many considerations when leveraging APIs, and security and authentication are often a major factor in deciding which interface to use and how to securely communicate with it. The Cisco IOS XE APIs support a variety of security and authentication options, including the public key infrastructure (PKI) and SSL/TLS certificates, a combination of username/password and certificate or key-based authentication, and they also support options such as mutual authentication for zero-trust environments where both the client and the server are untrusted and must be validated both ways using certificates.
Support for role-based access control (RBAC), as well as for the RFC6536 NETCONF Access Control Module, enables network operators to secure access to the APIs based on username and user role, and can even be extended to define which YANG data models and which API operations are permitted or denied. This capability gives the API very extensible and granular controls when needed.
Authentication and authorization from upstream TACACS or RADIUS authentication, authorization, and accounting (AAA) services are also supported so that organizations can more centrally manage the users, groups, and roles that are permitted to use the APIs.
NETCONF is the most mature of the programmatic interfaces as it, like RESTCONF, is standards based and has a long history of feature innovation that has been implemented since as early as Cisco IOS XE Release 16.6. NETCONF is the only interface to support the concept of “sessions” that permit the notion of networkwide transactions, including lock/unlock, confirm commit, validate, and a variety of other useful features to ensure that networks are programmed and configured as intended.

Model-driven programmability interface comparison
AAA configuration example
The most basic and common example, in which the default locally defined users are used for authentication and authorization, is given below. Extending this to RADIUS or TACACS is also a common configuration when a remote authentication and authorization service is used.
| configure terminal aaa new-model aaa authentication login default local aaa authorization exec default local exit |
Username requirements
A user account is required to access the programmatic interfaces. This could take the form of an existing or preconfigured “username” account because a dedicated NETCONF or RESTCONF account is not required. Alternatively, an existing or preconfigured “admin” account can be used. Authentication via TACACS+ or RADIUS is also supported if the user is granted full or privilege Level 15 rights upon login. To create an additional user account with username “netconf” or “restconf” and password “netconf” or “restconf,” use the following commands when using local authentication:
| Device(config)# username netconf privilege 15 password 0 netconf Device(config)# username restconf privilege 15 password 0 restconf |
NETCONF Access Control Module (NACM) and model-based AAA
The programmatic interfaces support NACM, which is a form of RBAC that is defined in RFC6536. This is commonly referred to as model-based AAA. Use this feature to create rules for users that are logging in over the programmatic interfaces so that access to certain models or functions can be permitted or denied as needed. The YANG-based NACM rules are used instead of how TACACS is used with CLI command authorization.
More details can be found in the “Model-Based AAA” chapter of the Cisco IOS XE Programmability User Guide, here:https://www.cisco.com/c/en/us/td/docs/iosxml/ios/prog/configuration/179/b_179_programmability_cg/m_178_prog_model_based_aaa.html
Read-only RBAC example
Prior to Release 17.5, a user with privilege Level 15 was required for any NETCONF operation. Releases 17.5 and later introduced support for lower-privileged and read-only users. Whenever a lower-privileged user attempts to access information such as username or password, that sensitive data gets masked and is not visible to the user.
To enable the API RBAC, enter the following commands:
| C9300(config)# username priv1 privilege 1 password netconf C9300(config)# end C9300# request platform software yang-management nacm populate-read-rules privilege 1 |
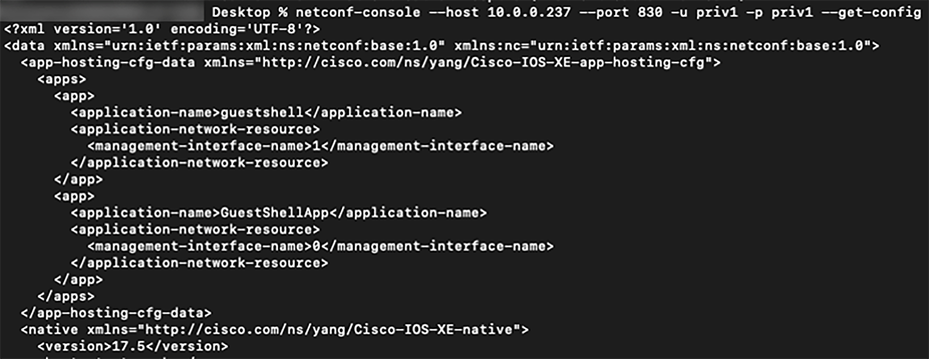
To get configurations as a priv1 user when the NACM rules are populated, use the following command:
| netconf-console --host 10.0.0.237 --port 830 -u priv1 -p netconf --get-config |
When specifying the NETCONF read-only privilege level:
● Allowed RPCs are set as: get, get-config, get-schema.
● Sensitive information is masked: Native/enable, native/aaa, native/username.
● Read-only access to all models is provided.
NETCONF is a protocol defined by the IETF to “install, manipulate, and delete the configuration of network devices.” NETCONF operations are realized on top of a remote procedure call (RPC) layer using XML encoding and provide a basic set of operations to edit and query the configuration and operational state on a network device.
NETCONF-YANG uses the Cisco IOS Secure Shell (SSH) and can be configured to use Rivest, Shamir, and Adelman (RSA) public keys to authenticate users as an alternative to password-based authentication.
For public-key authentication to work on NETCONF-YANG, the Cisco IOS SSH server must be configured. To authenticate users to the SSH server, use one of the RSA keys configured, by using the “ip ssh pubkey-chain” and user commands.
NACM is a group-based access control mechanism. When users are authenticated, they are automatically placed in an NACM privilege group based on their configured privilege level. Users can also be manually placed in other user-defined groups. The default privilege level is 1. There are 16 privilege levels, PRIV00 to PRIV15.
If a user authenticates via the public key but does not have a corresponding AAA configuration, the user is rejected. If a user authenticates via a public key but the AAA configuration for NETCONF is using an AAA source other than the local one, the user is also rejected. Local and TACACS+ AAA authorization is supported.
An example of how to allow local login in the console line, and to allow NETCONF to authenticate and get authorization from TACACS, can be found here: https://github.com/jeremycohoe/netconf-tacacs-aaa
NETCONF feature enablement
To enable the NETCONF interface, enter the following commands:
| C9300# configure terminal Device(config)# netconf-yang Device(config)# exit |
NETCONF feature status
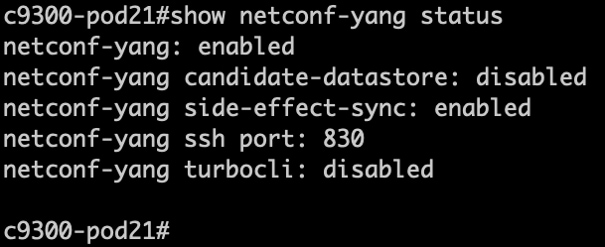
To verify that the NETCONF interface is operational, the following commands can be used:
| C9300# show netconf-yang status |
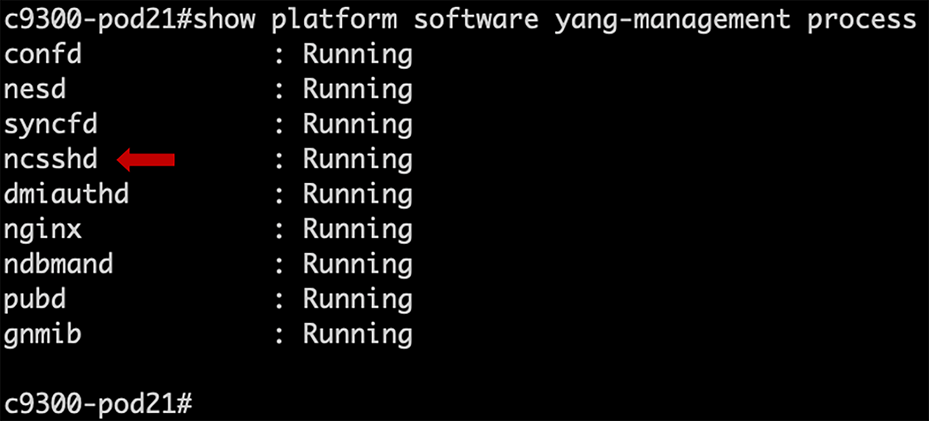
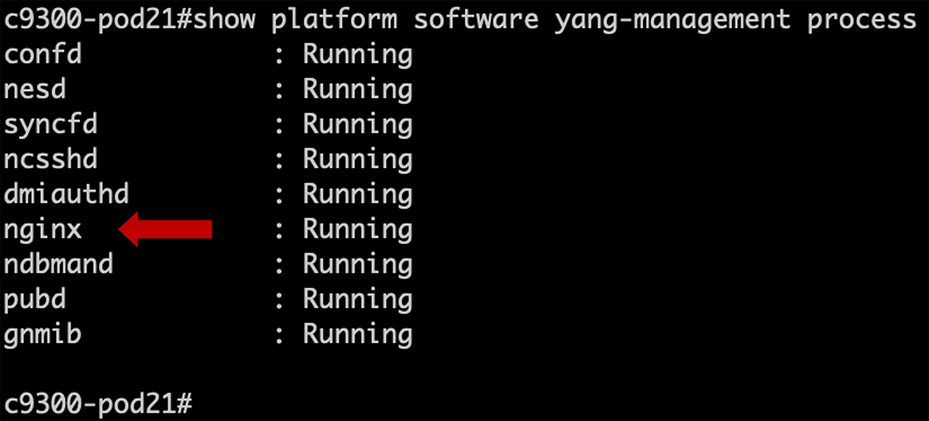
| C9300# show platform software yang-management process |
Ensure that the NETCONF SSHD “ncsshd” process is running.
NETCONF API verification and capabilities exchange
Use SSH to verify that the NETCONF-YANG SSH service is operational when connecting with a SSH client. The capabilities exchange is returned with a list of all supported YANG data models and API capabilities when YANG 1.0 is used. The YANG library is upgraded to version 1.1 starting with Release 17.10.
| ssh admin@c9300 -p 830 |
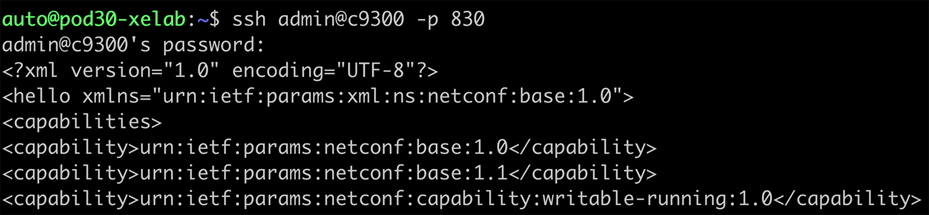
The NETCONF capabilities exchange can be retrieved by connecting to the device on the default port TCP 830 using SSH. The capabilities exchange lists all available YANG data models supported by the device. Using tools such as YANG Suite, which is detailed in later sections, these YANG modules can be downloaded from the device and analyzed further.
In addition to the capabilities exchange, the ietf-yang-library can be used to retrieve the list of supported YANG version 1.0 and YANG version 1.1 data models.
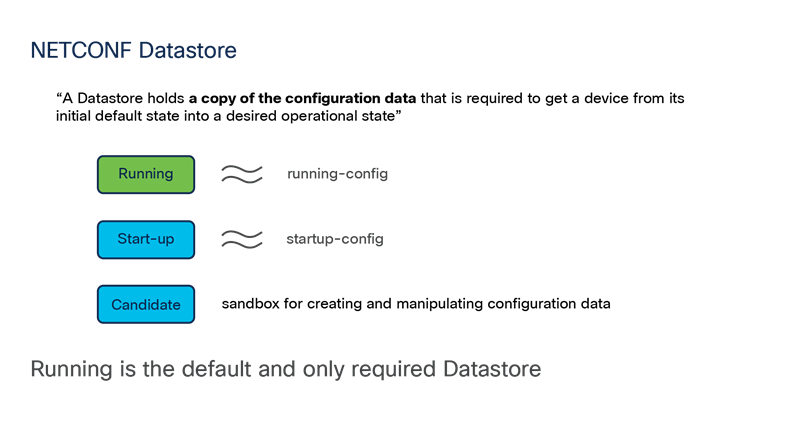
NETCONF datastores
NETCONF has three datastores: running, start, and candidate. The running datastore is the only one required because it contains the current configuration for the device. The start datastore contains the configurations that will be applied to a device on startup. The candidate datastore acts as a sandbox to create configurations before committing them to the running datastore. These datastores follow RFC 8526.
NETCONF datastore
NETCONF XML RPC payload examples
The XML RPC payloads below can be generated, modified, and sent from within the Cisco YANG Suite or any other tool that can send XML payloads over the NETCONF interface, such as a Python script. Examples for creating, verifying, and removing a model-driven telemetry (MDT) subscription are listed below. These can be used to create, verify, and remove a WLAN over the NETCONF interface quickly and easily.
Add MDT subscription using XML:
| <mdt-config-data xmlns="http://cisco.com/ns/yang/Cisco-IOS-XE-mdt-cfg"> <mdt-subscription> <subscription-id>501</subscription-id> <base> <stream>yang-push</stream> <encoding>encode-kvgpb</encoding> <source-address>10.60.0.19</source-address> <source-vrf>Mgmt-vrf</source-vrf> <period>2000</period> <xpath>/process-cpu-ios-xe-oper:cpu-usage/cpu-utilization/five-seconds</xpath> </base> <mdt-receivers> <address>10.12.252.224</address> <port>57500</port> <protocol>grpc-tcp</protocol> </mdt-receivers> </mdt-subscription> </mdt-config-data> |
Get MDT subscription using XML:
| <mdt-config-data xmlns="http://cisco.com/ns/yang/Cisco-IOS-XE-mdt-cfg"> <mdt-subscription> <subscription-id>501</subscription-id> </mdt-subscription> </mdt-config-data> |
Delete MDT subscription using XML:
| <mdt-config-data xmlns="http://cisco.com/ns/yang/Cisco-IOS-XE-mdt-cfg"> <mdt-subscription xmlns:nc="urn:ietf:params:xml:ns:netconf:base:1.0" nc:operation="delete"> <subscription-id>501</subscription-id> </mdt-subscription> </mdt-config-data> |
RESTCONF stands for the HTTP-based Representational State Configuration Protocol (RFC 8040). It is a stateless protocol that uses the secure HTTP method. RESTCONF uses structured XML or JavaScript Object Notation (JSON) and YANG data models to provide a REST-like API that enables programmatic access to the network device. The RESTCONF API uses the HTTP method and commands such as PUT and GET to send information to and from the Cisco devices. The Catalyst Cisco IOS XE implementation supports the following RESTCONF operations: GET, PATCH, PUT, POST, DELETE, and HEAD.
RESTCONF feature enablement
To enable the RESTCONF interface on the device, enter the following commands:
| C9300# configure terminal Device(config)# ip http secure-server Device(config)# restconf Device(config)# exit |
RESTCONF feature status
To verify that the RESTCONF interface is operational, run the command:
| C9300# show platform software yang-management process |
Ensure that the “nginx” process is running:
RESTCONF verification and encoding
Verify that RESTCONF is running by sending a GET request to the device:
| auto@pod21-xelab:~$ curl -k -u "developer:C1sco12345" https://sandbox-iosxe-latest-1/restconf/ |
The result will list details from the RESTCONF API in the default encoding of XML. JSON can also be returned by specifying “Accept: application/yang-data+json” in the HTTP headers.
The following example uses the publicly available Cisco IOS XE sandbox:

| curl -k -u "developer:C1sco12345" https://sandbox-iosxe-latest-1/restconf/ <restconf xmlns="urn:ietf:params:xml:ns:yang:ietf-restconf"> <data/> <operations/> <yang-library-version>2016-06-21</yang-library-version> </restconf> |
RESTCONF feature verification with JSON
| curl -H “Accept: application/yang-data+json” -k -u "developer:C1sco12345" https://sandbox-iosxe-latest-1/restconf/ |
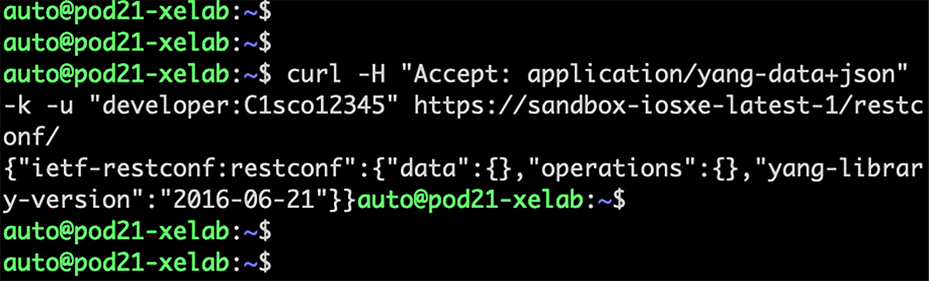
Results in JSON:
| {"ietf-restconf:restconf":{"data":{},"operations":{},"yang-library-version":"2016-06-21"}} |
gNMI is a gRPC network management interface. gNMI provides a mechanism to install, manipulate, and delete the configuration of network devices, and to view operational data. The content provided through gNMI can be modeled using YANG. gRPC is a remote procedure call developed by Google for low-latency, scalable distributions with mobile clients communicating to a cloud server. gRPC carries gNMI and provides the means to formulate and transmit data and operation requests.
gNMI feature enablement
To enable the gNMI interface, enter the following commands:
| configure terminal gnxi gnxi server gnxi port 50052 exit write memory |
gNMI feature enablement: secure
The following example shows how to enable the gNxI server secure mode.
| configure terminal gnxi gnxi secure-trustpoint trustpoint1 gnxi secure-server gnxi secure-client-auth gnxi secure-port 9339 exit write memory |
gNMI process status
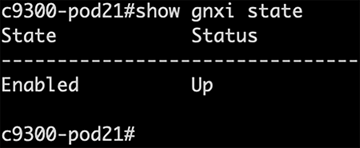
To verify that the gNMI interface is operational, run the following command:
| C9300# show gnxi state |
Ensure that the state is Enabled and the status is Up.
More details are available with the “show gnxi state detail” command:
| C9300# show gnxi state detail |
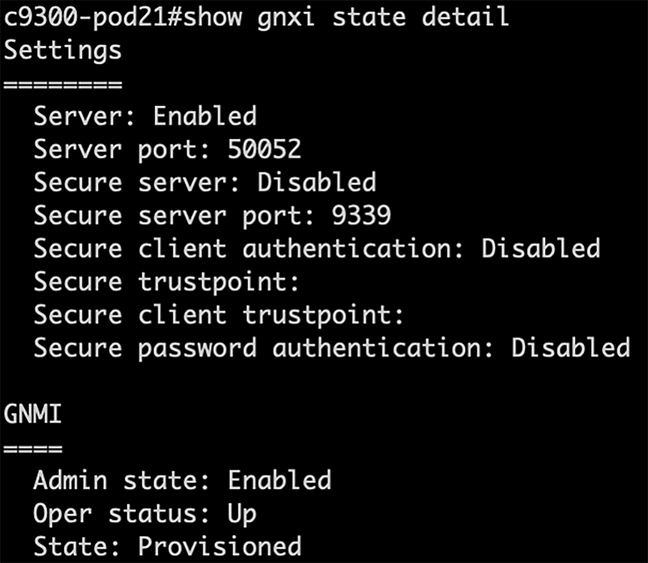
Full details of the various gNxI microservices are listed with the detail command:

gNMI verification
The YANG Suite tooling can be used to verify and test the gNMI API. This tooling has a gNMI plugin that supports all gNMI operations, including capabilities, get, set, and subscribe. An example of the capabilities operation from the YANG Suite shows that JSON-IETF is supported and provides the gNMI version and a list of the YANG modules that are supported.

gNMI capabilities
gNMI operations
The following operations are supported by the gNMI interface:
● Capabilities
● gNMI GetRequest
● gNMI SetRequest
● gNMI Subscribe
Also, there are gNOI and gRPC network operations interface workflows that are supported within the gNMI interface and defined in protobuf. These are the certificate management service, the operating system install and upgrade service, and the factory reset service.
gRPC network operations interface (gNOI)
gNMI encoding
JSON-IETF is the supported encoding for the gNMI interface, and RFC 7951 defines JSON encoding for YANG data trees and their subtrees. gNMI uses JSON for encoding data in its content layer. The JSON type indicates that the value is encoded as a JSON string. JSON-encoded data must conform to the rules for JSON serialization described in RFC 7951. Both the client and target must support JSON encoding.
Instances of YANG data nodes (leaves, containers, leaf-lists, lists, anydata nodes, and anyxml nodes) are encoded as members of a JSON object or name/value pairs. Encoding rules are identical for all types of data trees, such as configuration data, state data, parameters of RPC operations, actions, and notifications. Every data node instance is encoded as a name/value pair, where the name is formed from the data node identifier. The value depends on the category of the data node. A leaf node has a value, but no children, in a data tree. A leaf instance is encoded as a name/value pair. The value can be a string, number, literal true or false, or the special array [null], depending on the type of the leaf. When the data item at the specified path is a leaf node (which means it has no children and has an associated value), the value of that leaf is encoded directly. (A bare JSON value is included; it does not require a JSON object.) The following example shows a leaf node definition:
| leaf foo { type uint8; }
The following is a valid JSON-encoded instance: "foo": 123 |
gNMI wildcard
A gNMI wildcard has been introduced in Release 17.5. Wildcarding is the ability to use a star or wildcard character in a path to match multiple elements. Now it is easier to know which variables are used, instead of having to perform a separate GET request.
There are two types of wildcards, implicit and explicit, and both are supported. GET paths support all types and combinations of path wildcards.
Implicit wildcards: These expand a list of elements in an element tree. An implicit wildcard occurs when a key value is not provided for elements of a list.
Explicit wildcards: These wildcards are directly defined.
YANG Suite is a tool used for testing and validating the YANG-based APIs on Cisco IOS XE, XR, and NX-OS. YANG Suite was publicly released on GitHub in 2020, and it can be used to generate and send XML payloads to the device over NETCONF, with JSON and RESTCONF, or with gNMI, as well as act as the dial-in and dial-out telemetry receiver. YANG Suite is used extensively by Cisco feature engineering teams and internal and external testing, development and is also widely deployed within campus and enterprise networks as customer tooling.
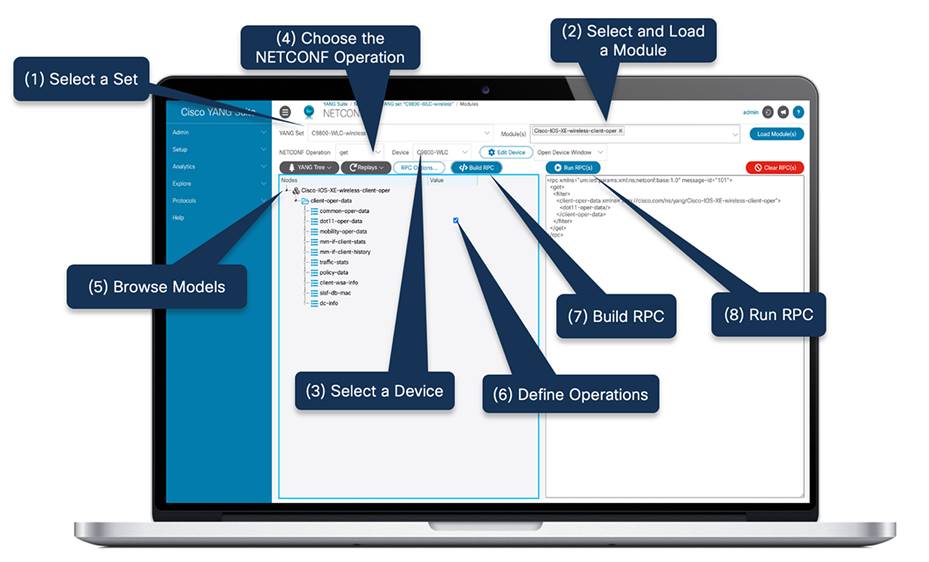
Example of NETCONF operation in Cisco YANG Suite
YANG Suite installation
Follow the instructions from the GitHub site at https://github.com/CiscoDevNet/yangsuite to complete the installation. Detailed instructions are available for Mac, Windows, and Linux. YANG Suite can be installed as a Docker container or through Python package management. Installing YANG Suite as a Docker container is the recommended method. Additionally, YANG Suite can be installed using pip install.
YANG Suite resources
DevNet landing page: developer.cisco.com/yangsuite
Documentation: developer.cisco.com/docs/yangsuite
Quick start
1. Clone the repository: https://github.com/CiscoDevNet/yangsuite
2. Run start_yang_suite.sh, or
Run docker-compose up if you have already run start_yang_suite.sh
3. Access the YANG Suite tool at https://localhost:8443
| git clone https://github.com/CiscoDevNet/yangsuite cd yangsuite/docker/ ; ./start_yang_suite.sh or cd yangsuite/docker/ ; docker compose up |
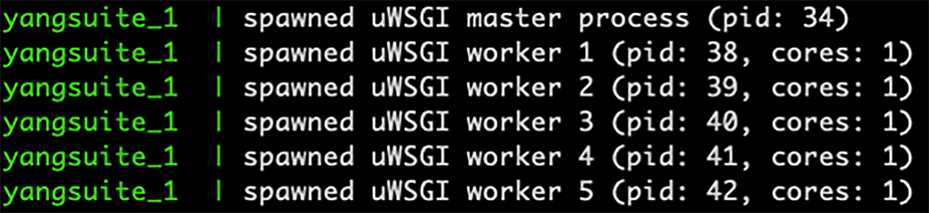
When the YANG Suite is ready for use, you will see the following:
YANG Suite day 0 configuration
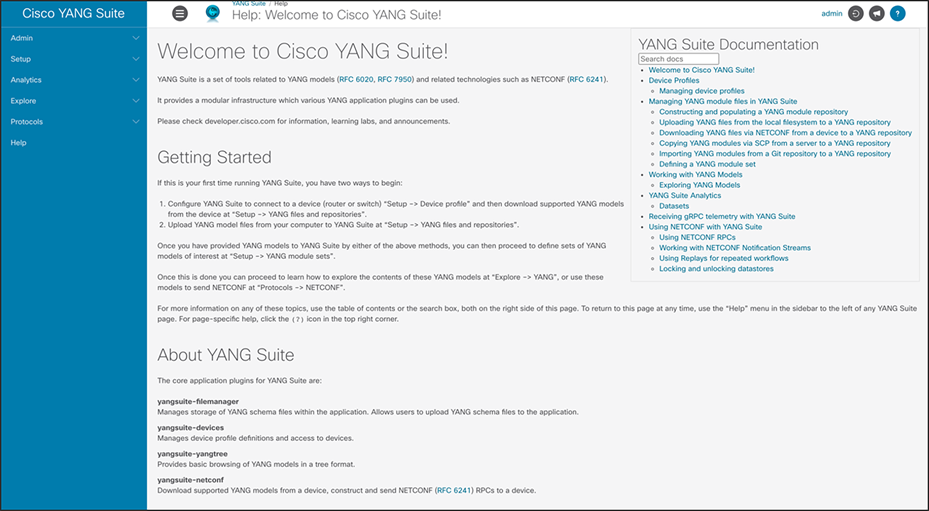
When YANG Suite is installed and running, you must complete a few tasks before interacting with the device. Navigate to the Google/Firefox web browser and access YANG Suite at http://localhost:8443. Log in using the credentials configured during the installation process. Once logged in, you’ll end up at the main YANG Suite application window.
Navigate to the Setup > Device profiles menu. Click “Create new device.”
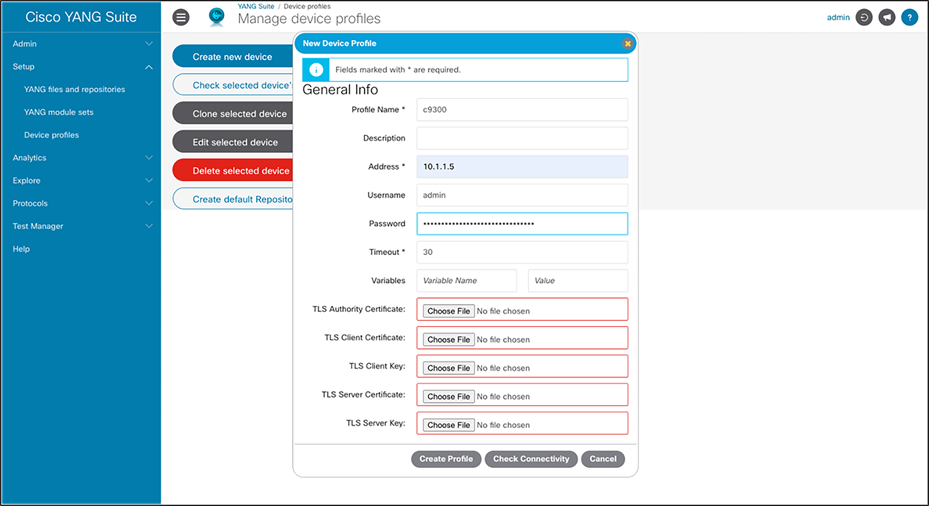
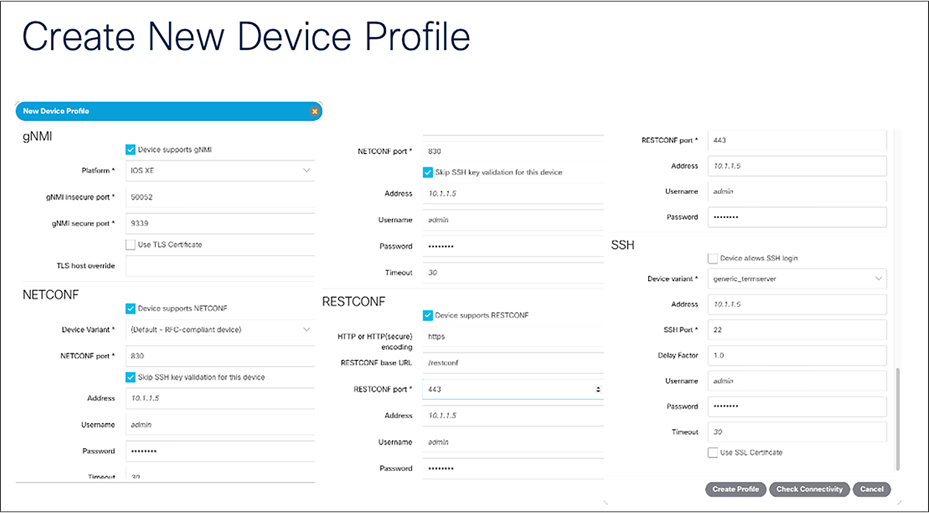
The New Device Profile window will pop up, where you must add information about the device. Enter the profile name, address, username, and password. Since YANG Suite now supports gNMI, check the Device supports gNMI box. Check the “Device supports NETCONF,” “Skip SSH key validation for this device,” and “Device supports RESTCONF” boxes. Make sure to enter a username and password for both NETCONF and RESTCONF, if you have configured a separate authentication. Click “Create Profile” to add the device to YANG Suite.
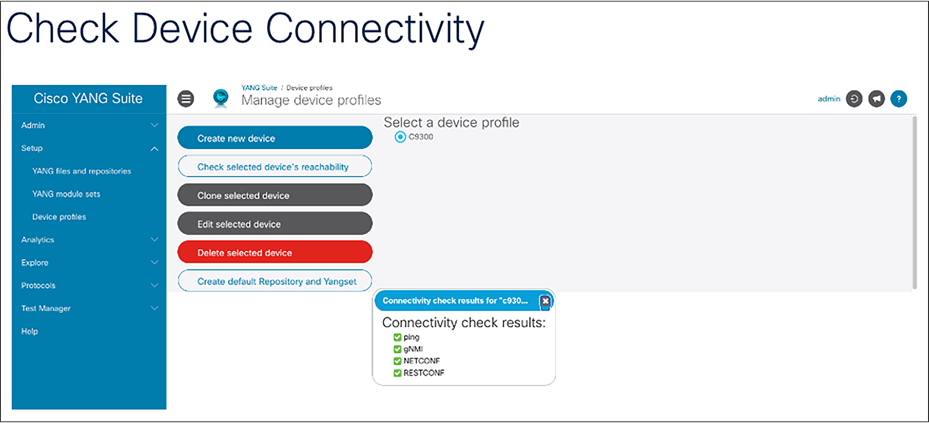
Once the device is added, check the device reachability by clicking “Check selected device’s reachability.” Make sure you see the green checkmark for ping, gNMI, NETCONF, and RESTCONF.
Creating default repository and YANG set
From within YANG Suite, the YANG modules can be downloaded from the device. The YANG repository can be created automatically from the Manage Device Profiles page. The YANG set is a subset of a YANG repository that consists of a set of modules and any other necessary dependencies. A YANG set could store an entire repository, but it’s more efficient to narrow the set down to only the models we are interested in. A YANG set needs to be created to build and run RPC(s).
Follow the steps to download the models
On the Manage Device Profiles page, click “Create default Repository and Yangset.” This option will automatically create a default repository and YANG set.
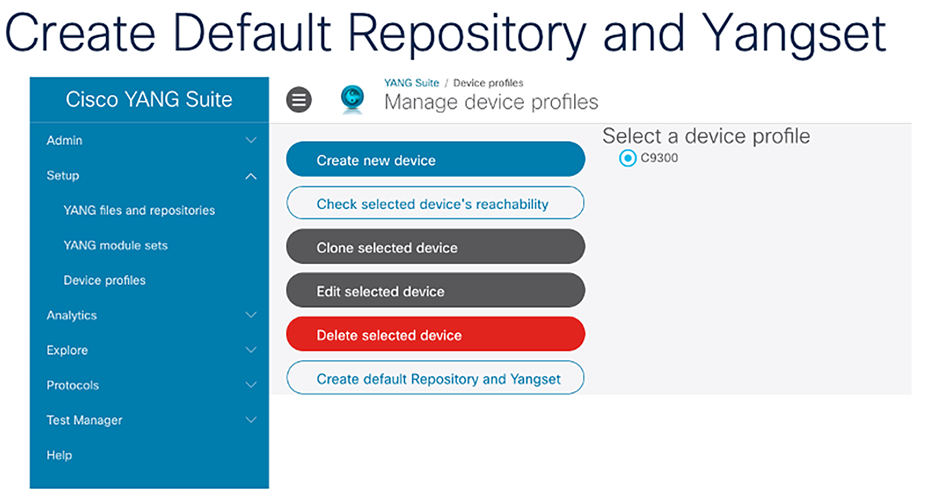
When the download is completed, the desired modules will appear in the repository and set boxes.
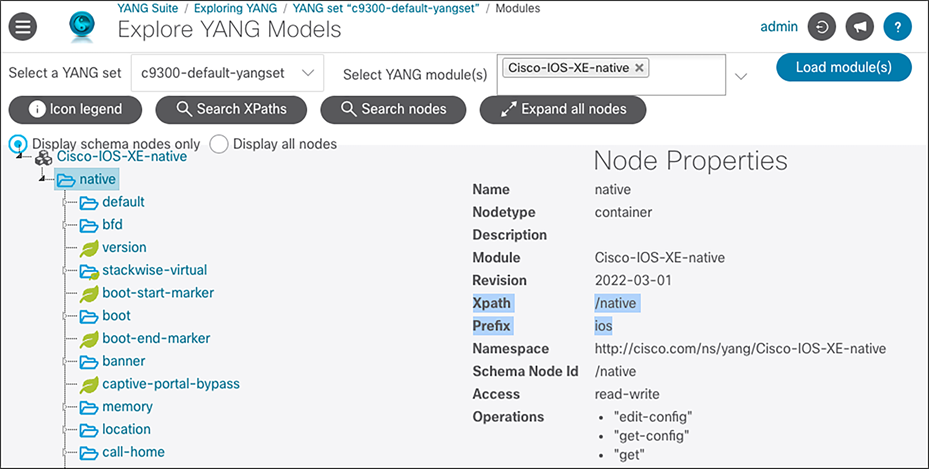
Explore YANG models
1. With the created YANG set, we can easily explore the YANG data models. From the menu on the left side of the page, select Explore > YANG.
2. From the “Select a YANG set” drop-down menu, select a newly created set.
3. In the “Select YANG module(s)” box, enter any data model of choice. In this example, we explore the Cisco-IOS-XE-interfaces-oper module. To find this in the drop-down list, you can start typing keywords such as “native” or “interfaces” to quickly find the correct YANG module.
4. Click the “Load module(s)” button. After a moment, the left column will be populated with a tree view of the contents of the module. Initially the tree view shows only the module itself, but you can click the triangle icon next to it to expand the tree.
5. Refer to the screenshot to examine the structure of the model and its contents.
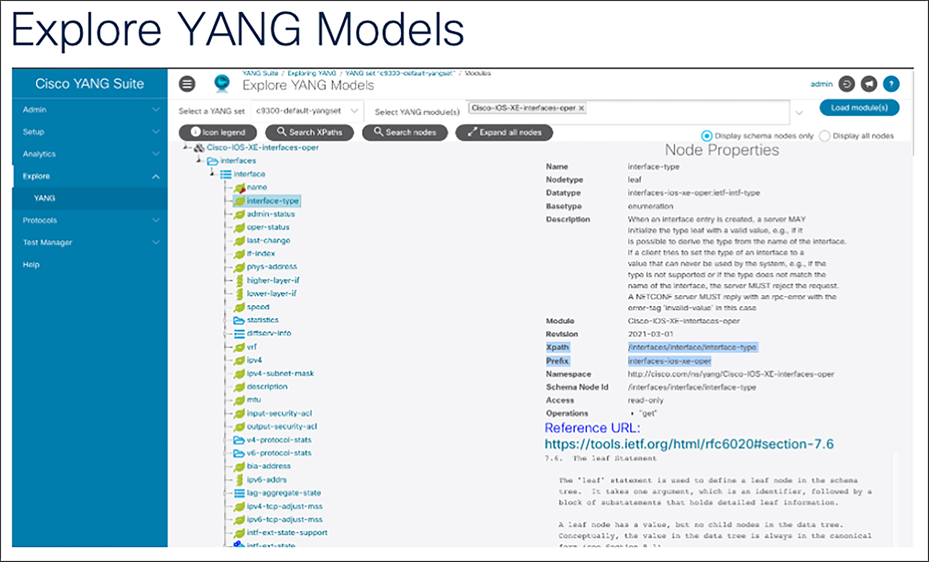
Two important pieces of YANG model metadata are the xpath and the prefix. These fields are used with streaming telemetry to retrieve information. If a telemetry subscription was to be created based on the Cisco IOS XE interfaces YANG data model, the xpath of “/interfaces/interface/interface-type” and “interfaces-ios-xe-oper” would be used to retrieve and publish information from those models. Learn more about streaming telemetry in the MDT section below.
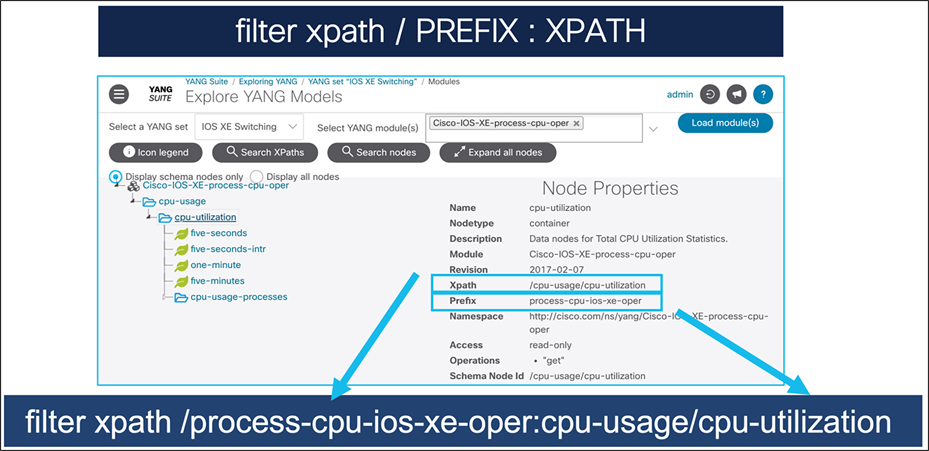
Note: For Cisco IOS XE native models, we can simply use the xpath, in this case “/cpu-usage/cpu-utilization”.
YANG Suite: NETCONF
YANG Suite enables interaction with the devices using most of the programmatic interfaces: NETCONF, RESTCONF, gNMI, and gRPC. With the help of the NETCONF operation get-config, it is easy to retrieve all or part of the specified configuration datastore as seen in the screenshot below. Also, the NETCONF operation edit-config loads a specified configuration to a specified target configuration.
Steps to access the NETCONF plugin using YANG Suite
Set hostname on Catalyst 9300 Series switch
1. Protocol: NETCONF
2. YANG set: c9300-default-yangset
3. Modules: Cisco-IOS-XE-native (Note: Start typing "native" to filter through the options in the drop-down menu.)
4. Click the blue “Load Modules” button.
5. NETCONF operation: edit-config
6. Device: C9300
7. Wait for the tree to appear in the gray box on the left. (Note: If you get an Error 500 popup, just ignore it and close the popup.)
8. Once the YANG tree is created, select "hostname." (Note: Select CONTROL + F or COMMAND + F to find “hostname” on the page.)
9. Select the word “hostname” and add a string to the text field such as “configured-by-a-panda-pro.”
10. Click the red “Clear RPCs” button for a fresh start for the next NETCONF payload.
11. Click the blue “Build RPC” button to generate the XML RPC that is based on the YANG model and inputs provided. The XML can be reviewed, edited, or used in other tooling or orchestration systems as needed.
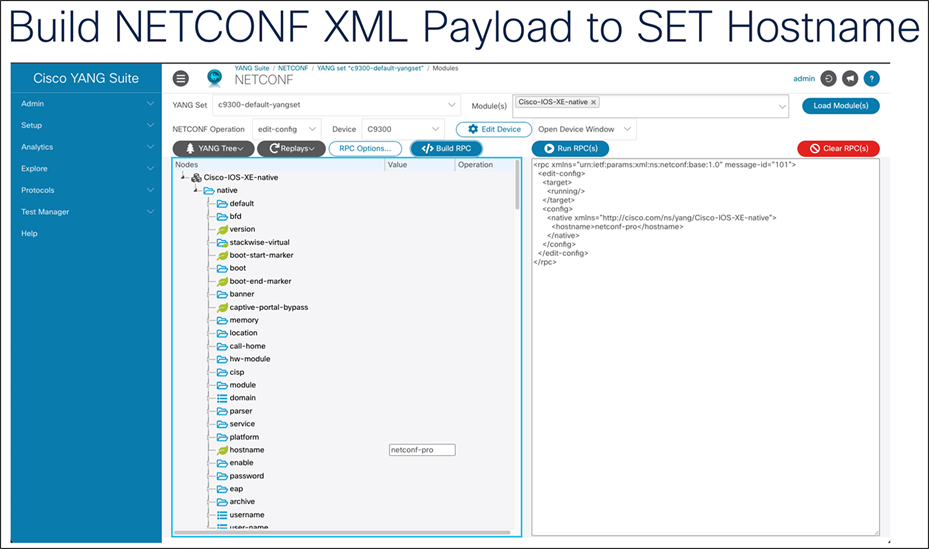
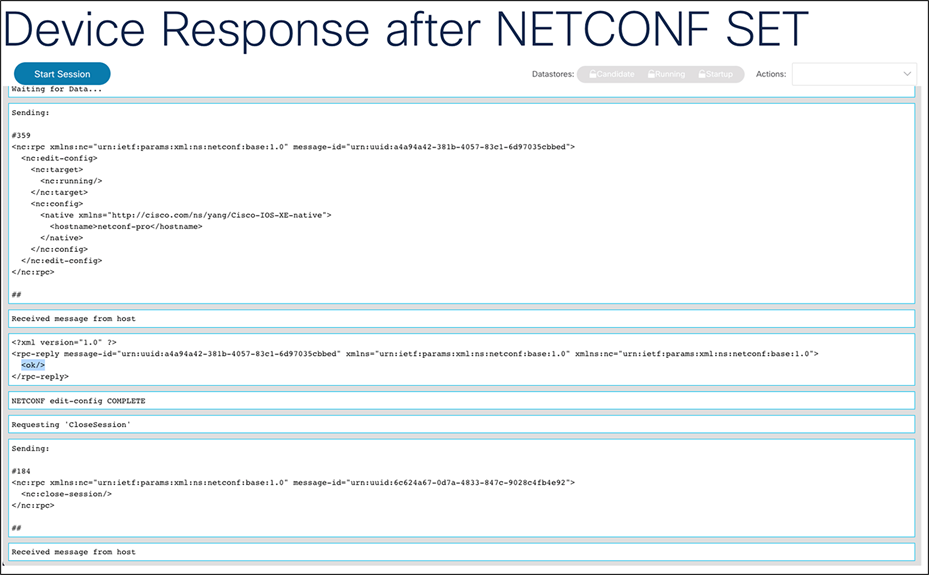
12. Click the blue “Run RPC(s)” button to send the XML RPC to the switch’s NETCONF interface in order to retrieve the configuration as requested.
13. In the new tab that opens, notice the hostname in the response. The device will respond with “<ok/>” if the configuration was applied properly and there were no errors. (Note: You may need to scroll to the bottom of the page.)
Get hostname on Catalyst 9300 Series switch
1. Protocol: NETCONF
2. YANG set: c9300-default-yangset
3. Modules: Cisco-IOS-XE-native (Note: Start typing “native” to filter through the options in the drop-down menu.)
4. Click the blue “Load Modules” button.
5. NETCONF operation: get-config
6. Device: C9300
7. Wait for the tree to appear in the gray box on the left. (Note: If you get an Error 500 popup, just ignore it and close the popup.)
8. Once the YANG tree is created, select "hostname." (Note: Select CONTROL + F or COMMAND + F to find "hostname" on the page.)
9. Select the word "hostname," but there’s no need to add anything to the text box (leave it blank for the “get” request).
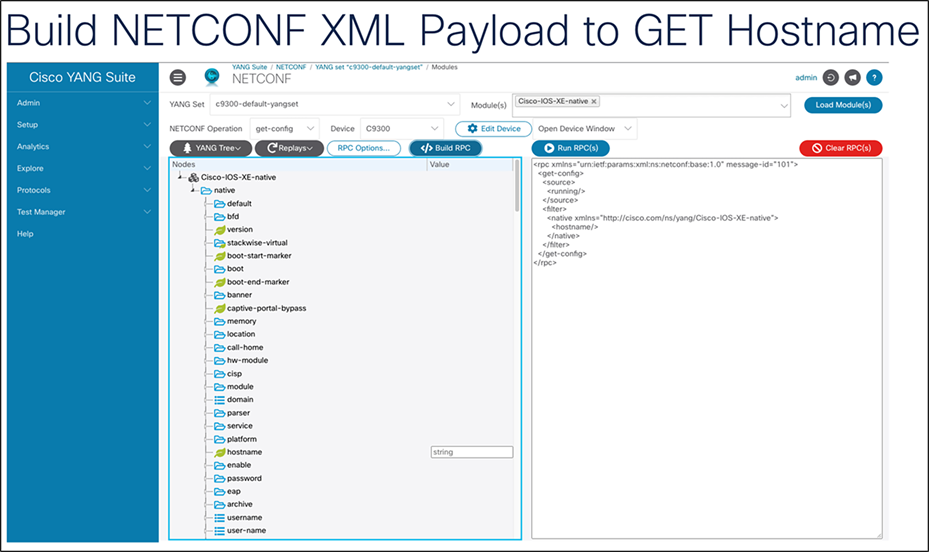
10. Click the blue “Run RPC(s)” button to send the XML RPC to the switch’s NETCONF interface in order to retrieve the configuration as requested.
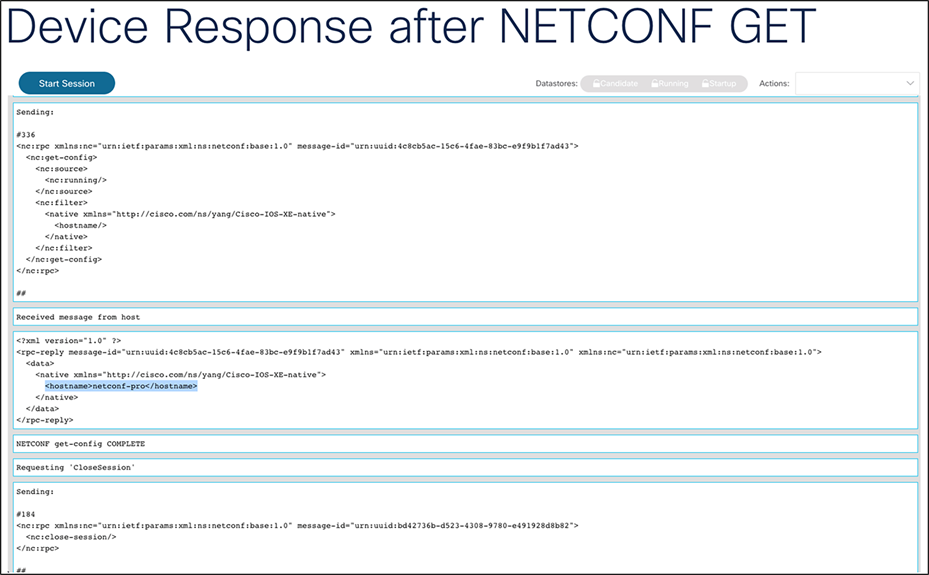
11. In the new tab that opens, notice the hostname in the response. (Note: You may need to scroll to the bottom of the page.)
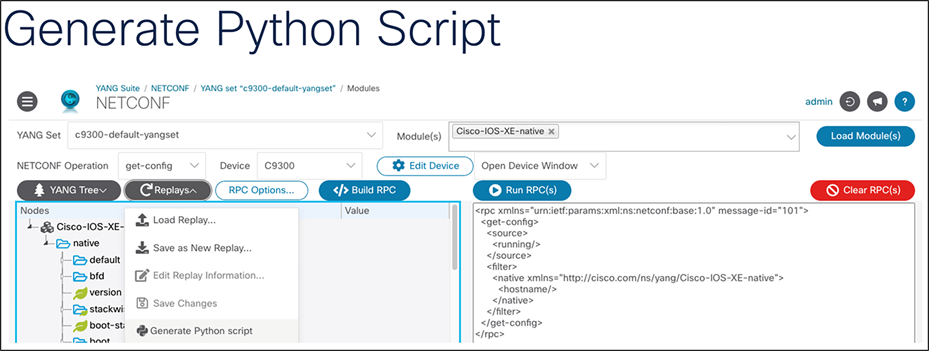
Download a Python script
YANG Suite offers the option to download a Python script to replay a specific operation to view or set configurations on the device. To download a script, build a payload (see examples in “Get Hostname on Catalyst 9300 Series Switch” or “Set Hostname on Catalyst 9300 Series Switch” above). Then click the “Replays” button. In the drop-down menu, select “Generate Python script” and the file will automatically download on the device running YANG Suite, as in the example below.
YANG Suite: RESTCONF
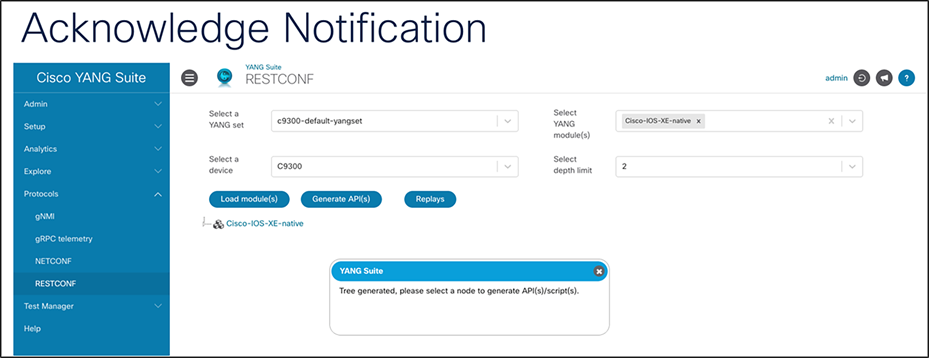
To access the RESTCONF plugin using YANG Suite, navigate to Protocols > RESTCONF in the left pane of the YANG Suite application. Make sure to fill out all the necessary fields to load the YANG modules from the device and generate API(s). For the YANG module, we used the Cisco-IOS-XE-native to get all the information about the configured features on the Catalyst 9300 device.
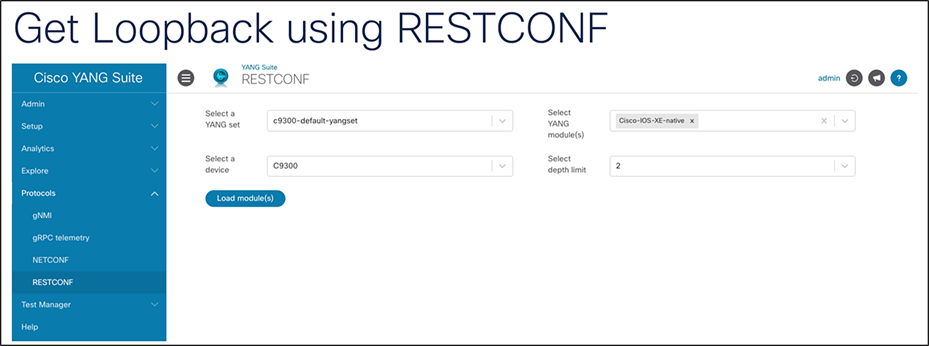
Get hostname on Catalyst 9300 Series switch
1. Protocol: RESTCONF
2. Select a YANG set: c9300-default-yangset
3. Select a device: C9300
4. Select YANG modules: Cisco-IOS-XE-native
5. Select depth limit: 2
6. Click the “Load Module(s)” button.
7. Once the tree loads, close the popup that says “Tree generated, please select node(s) to generate API(s).”
8. Expand the tree by selecting the arrow next to “Cisco-IOS-XE-native.”
9. Search for “interface” in the expanded tree. (Note: Select CONTROL + F to find "interface" on the page.)
10. Expand “interface” and search for “Loopback." (Note: Select CONTROL + F to find “Loopback” on the page.)
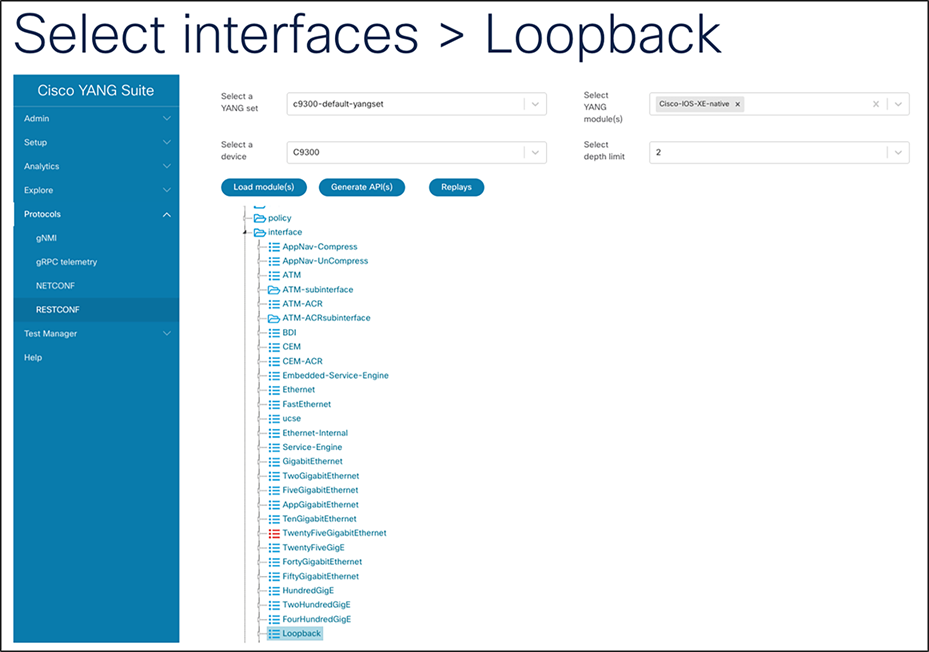
11. Click the blue “Generate API(s)” button. (Note: It may take a few moments to load the APIs)
12. Click the blue “Show API(s)” button.
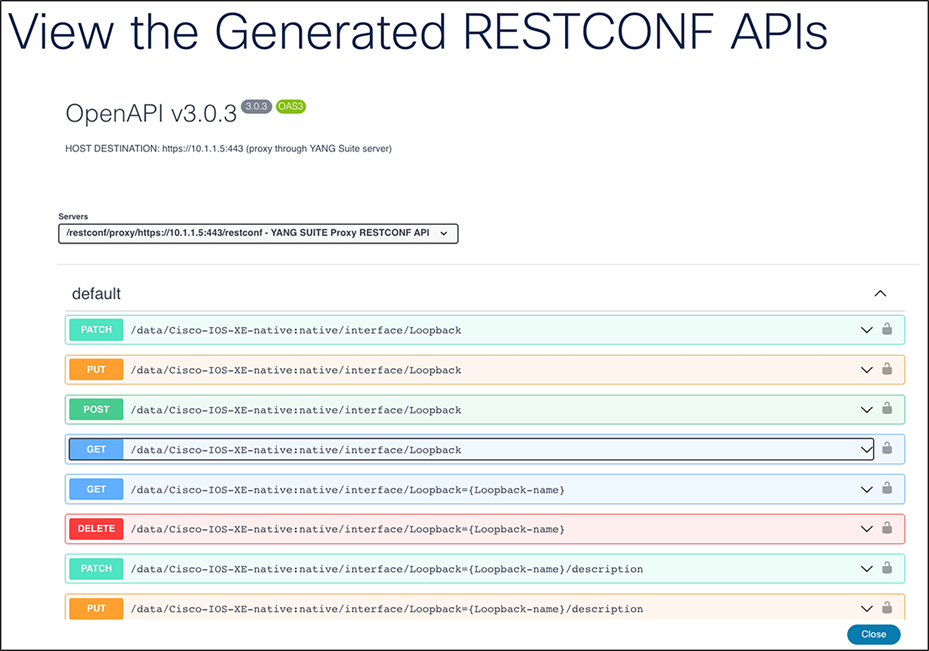
13. Select the link next to the GET operation corresponding to the API call “/data/Cisco-IOS-XE-native:native/interface/Loopback.”
14. Click the "Try it out" button.
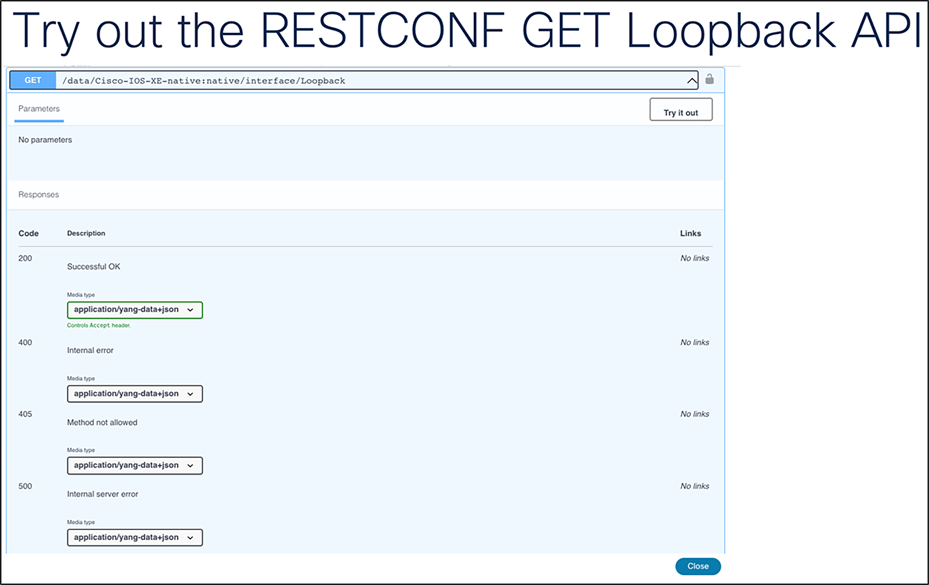
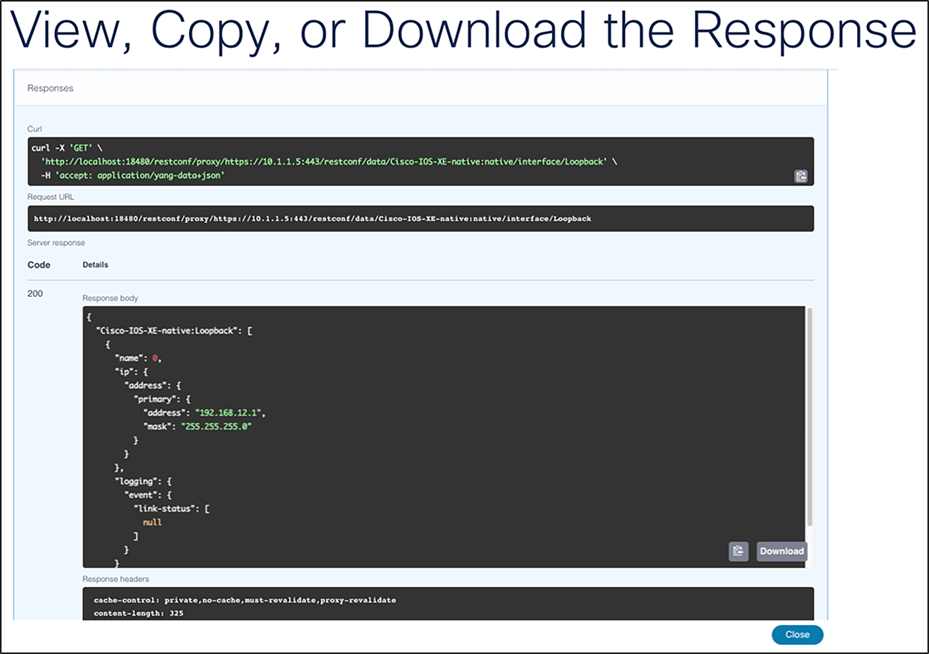
15. Click the “Execute” button to send the RESTCONF payload and view the reply, including the Loopback netmask.
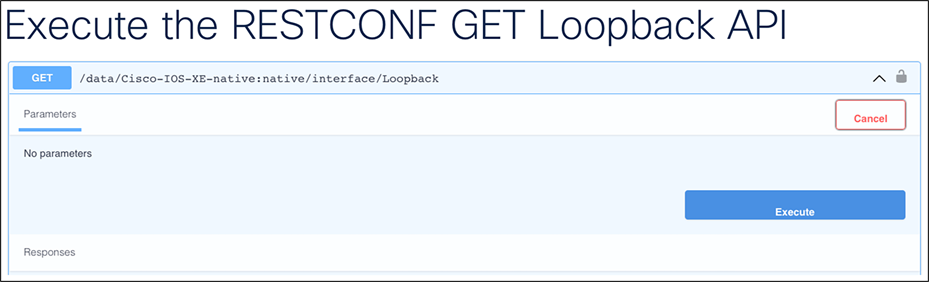
16. Find the response within YANG Suite. If the request is successful, a response of 200 will be returned with the JSON response body. If the response body doesn’t contain any information, a response of 204 will be returned, indicating a successful request with no data for that request found.
YANG Suite: gNMI
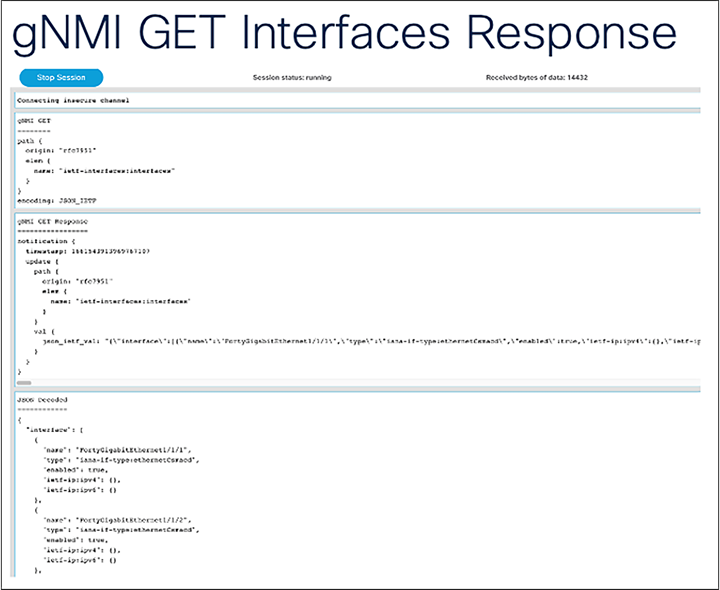
The gNMI tooling can be used to retrieve information from the device. With the help of programmatic interfaces and YANG Suite, it has become easier to retrieve operational information from Cisco IOS XE devices. YANG Suite provides a YANG API testing and validation environment that supports gNMI. The gNMI tooling uses JSON_IETF to encode data in its content layer. In this example, we run RPC for one of the wireless modules, Cisco-IOS-XE-wireless-access-point-oper.
Steps to access the gNMI plugin using YANG Suite
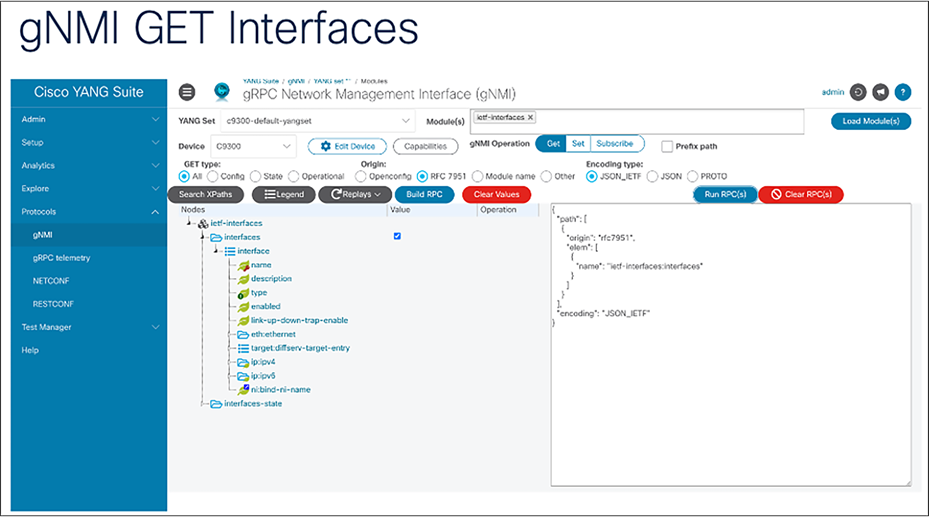
1. From the left navigation pane, select Protocols > gNMI.
2. Select the created YANG set.
3. Select the Module(s): ieft-interfaces.
4. Click “Load Modules.”
5. From the drop-down list, select the device.
6. For Origin, select RFC7951.
7. In the Nodes section, make sure to expand the loaded YANG data model. Click the Value column next to the interfaces row. To narrow down the search, each individual node can be selected from the list.
8. To generate the payload, click the blue “Build RPC” button.
9. Once the payload is generated, it is ready to run by clicking “Run RPC(s).”
The gNMI GET, gNMI GET Response, and gNMI Response values decoded will show up in a separate browser window.
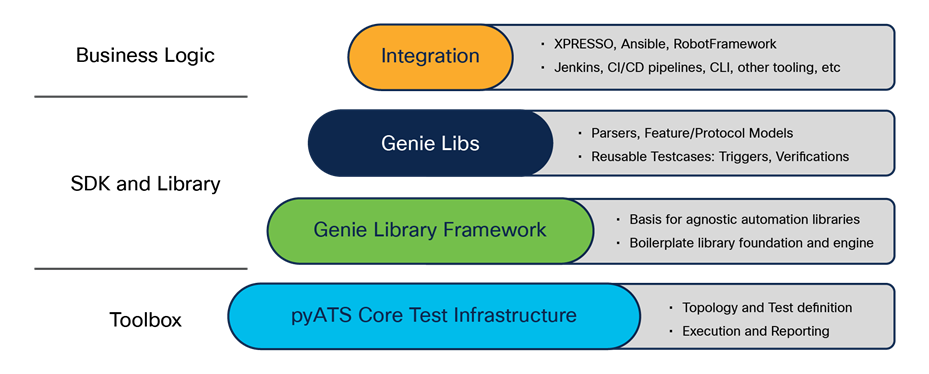
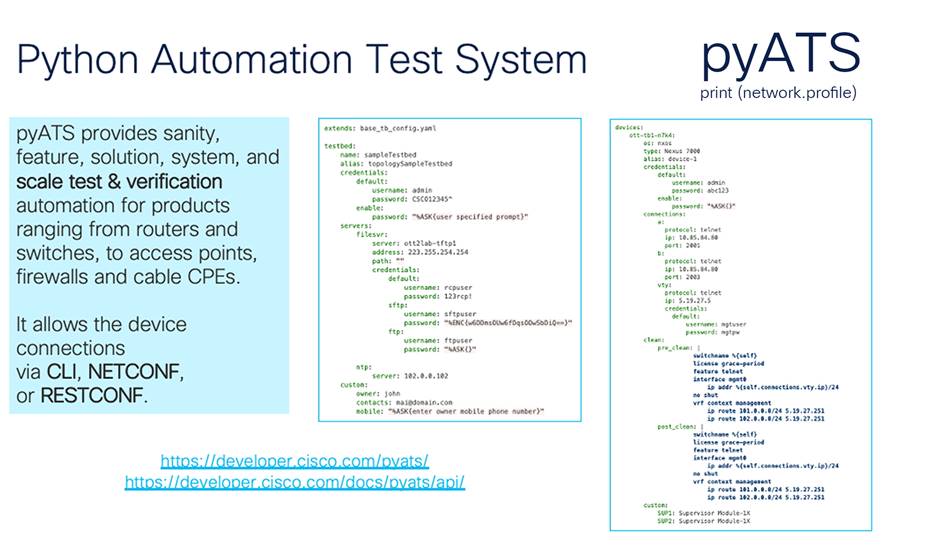
Cisco pyATS structure
pyATS (pronounced “pie” and the individual letters “A,” “T,” “S”) is an end-to-end DevOps automation ecosystem publicly introduced in 2017. pyATS is agnostic by design, and it enables network engineers to automate their day-to-day DevOps activities, perform stateful validation of their device operational status, build a safety net of scalable, data-driven, reusable tests around their network, and visualize everything in a modern, easy-to-use dashboard. pyATS has a long history within Cisco, where it has been used as a consolidated test harness to run hundreds of thousands of tests against a variety of hardware and software features. It supports thousands of parsers and is customizable in the sense that new parsers can be submitted in addition to the currently available parsers. It is a consistent test harness for multiplatform and multivendor test activities and can be used with any of the programmatic interfaces and more.
pyATS has integrations for Cisco IOS XE’s programmatic interfaces as well as the legacy SSH CLI, which enables a very powerful combination of tooling options. pyATS works with the CLI and REST APIs using the REST connector. One common misconception about pyATS is that it is limited to just testing; actually, it also supports device configuration. Blitz is the pyATS YAML-abstracted implementation, which does not require Python.
Benefits of Cisco pyATS
Learn more about pyATS:
● Explore pyATS: https://developer.cisco.com/pyats
● Read the docs: https://developer.cisco.com/docs/pyats/api/
Tooling: Cisco Network Services Orchestrator (NSO)
The Cisco NSO is another powerful controller solution that abstracts network intent and maintains configuration state. Additional details are available from developer.cisco.com/site/nso/.
Ansible is a popular and easy-to-use open-source software suite that automates software provisioning, configuration, and management. It connects to and controls devices via SSH, NETCONF, and a variety of other protocols as well. Ansible is agentless, meaning there is no installation and no requirements on the target device, other than having an accessible API or interface. It is minimal in nature and provides a secure and reliable way to interact with remote devices. Ansible is highly adaptable and commonly used with other automation tools to accomplish complex workflows. Below are some examples of using Ansible to complete basic day 0 configuration tasks.
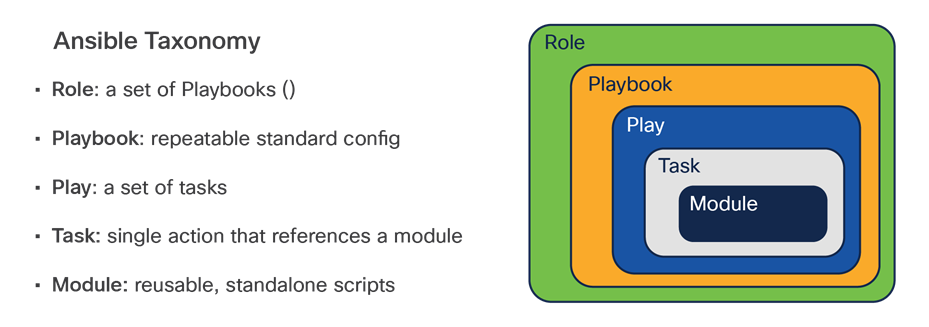
Ansible taxonomy
Ansible has several components that work together to provide a holistic solution. Modules are reusable, standalone scripts. Tasks call upon modules to perform an action. When there are multiple tasks, a play can be used to call the tasks in a particular order. A playbook is then used when there are multiple plays. Finally, a role is a set of playbooks.
CLI example to enable APIs
The hosts file has connection details and device-specific information, including credentials. In this example, it is assumed that the device has already been configured to allow SSH logins, and the enable password has been set. The hosts files and YAML file are used together to accomplish a task. In this case, the tasks are to connect to the CLI over SSH, enter enable mode, and execute the required Cisco IOS commands to enable netconf-yang and set up the AAA requirements.
Ansible hosts file for day 0 configuration
Create the default config file ansible.cfg
| [defaults] inventory = ./host host_key_checking = False remote_user = admin |
This example hosts file contains the variables needed to successfully establish a connection to the device. Note: In the example below, replace “admin” with the device’s SSH username and “<DEVICE_PASSWORD>” with the device’s SSH password.
host
| # hosts [C9300] 10.1.1.5
[all:vars] ansible_connection=network_cli ansible_network_os=ios ansible_ssh_user=admin ansible_ssh_pass=<DEVICE PASSWORD> |
Ansible YAML configuration file to enable NETCONF and RESTCONF
The following example YAML file enable_netconf_yang.yaml can be used to enable the NETCONF interface on the device and configure the authentication prerequisites, including adding a user.
| - hosts: C9300 gather_facts: no
tasks: - ios_config: commands: - aaa new-model - aaa authorization exec default local - aaa authentication login default local - username netconf privilege 15 password 0 netconf - netconf-yang - ip http secure-server - restconf save_when: modified |
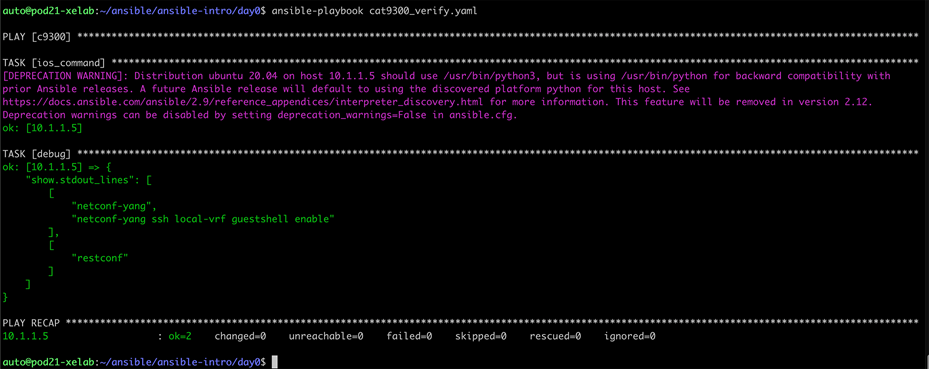
CLI example to show API status
This example cat9300_verify.yaml YAML file will run two Cisco IOS XE show commands to verify that netconf-yang and restconf are enabled, and the output will be registered and displayed on the screen when executed.
| - hosts: C9300 gather_facts: no
tasks: - ios_command: commands: - show run | i netconf-yang - show run | i restconf register: show - debug: var=show.stdout_lines |
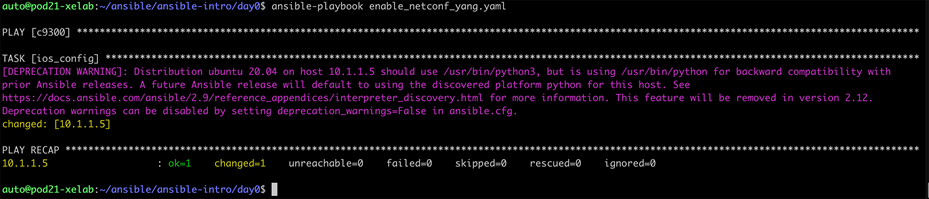
Executing the task to enable and verify NETCONF and RESTCONF
The ansible-playbook command can be used to execute the task that we define above to enable the NETCONF-YANG interface on the device. In this example, we define a variable to set Host Key Checking to false, so that the SSH host key is not validated. In production environments, it is important to verify the authenticity of the device being accessed. However, in this example, the check is set to false for ease of use.
From the command line, execute the following command to run the enable_netconf_yang.yaml configuration:
| $ ansible-playbook enable_netconf_yang.yaml |
From the command line, execute the following command to run the cat9300_verify.yaml configuration:
| $ ansible-playbook cat9300_verify.yaml |
NETCONF XML example
Create a subscription to CPU utilization on our device using Ansible plus NETCONF. This example sends XML into the NETCONF interface to add the subscription. Create three files in a “day1” folder: host, ansible.cfg, and add_sub.yaml. The content for each file is listed below. Make sure to change the IP address, username, and password.
Modify the host file from the example above to the following:
| [c9300] 10.1.1.5
[all:vars] ansible_connection=netconf ansible_network_os=ios ansible_password=<DEVICE_PASSWORD>
ansible.cfg [defaults] inventory = ./host host_key_checking = False remote_user = <USERNAME>
|
add_sub.yaml
| --- - hosts: c9300 gather_facts: no connection: netconf remote_user: admin
tasks: - name: establish subscription netconf_config: xml: | <nc:config xmlns:nc="urn:ietf:params:xml:ns:netconf:base:1.0"> <mdt-config-data xmlns="http://cisco.com/ns/yang/Cisco-IOS-XE-mdt-cfg"> <mdt-subscription> <subscription-id>501</subscription-id> <base> <stream>yang-push</stream> <encoding>encode-kvgpb</encoding> <source-address>10.60.0.19</source-address> <source-vrf>Mgmt-vrf</source-vrf> <period>2000</period> <xpath>/process-cpu-ios-xe-oper:cpu-usage/cpu-utilization/five-seconds</xpath> </base> <mdt-receivers> <address>10.12.252.224</address> <port>57500</port> <protocol>grpc-tcp</protocol> </mdt-receivers> </mdt-subscription> </mdt-config-data> </nc:config> |
From the command line, execute the following command to run the add_sub.yaml configuration:
| $ ansible-playbook add_sub.yaml |

Additional examples and resources for Ansible can be found at https://github.com/jeremycohoe/ansible-config-samples.
RESTCONF JSON example
Ansible also has a rich history of integration with REST, which includes the RESTCONF interface. YANG Suite can be used to work with the RESTCONF interface and has optional features to export an Ansible playbook based on the YANG payload that was built within YANG Suite.
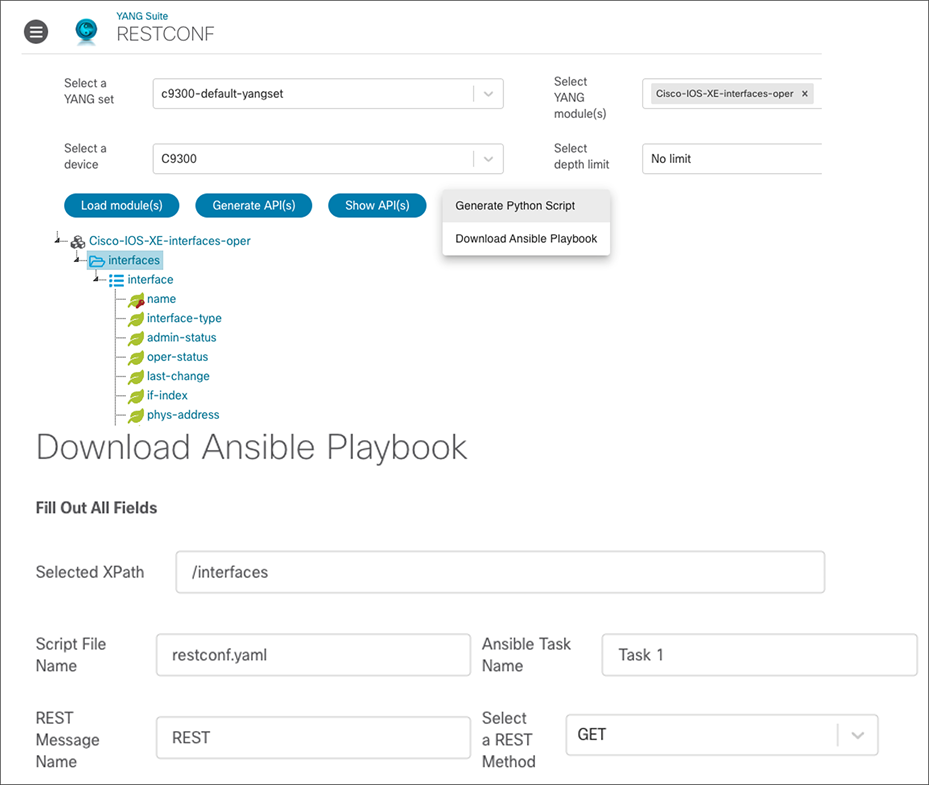
A YAML payload is generated that can be run directly within Ansible after ensuring that the hosts, inventory, and configuration defaults are set accordingly:
| # Example of basic ansible_host file referred to in # ansible.cfg inventory: # #[HOST_NAME_HERE] #IP_ADDRESS_HERE # #[HOST_NAME_HERE:vars] # ansible_connection: httpapi # ansible_network_os: restconf # ansible_httpapi_use_ssl: true # ansible_httpapi_validate_certs: false # ansible_httpapi_port: 443 # ansible_httpapi_restconf_root: /restconf/data/ # ansible_user: USERNAME_HERE # ansible_password: PASSWORD_HERE #
- name: REST hosts: HOST_NAME_HERE gather_facts: no tasks: - name: Task 1 ansible.netcommon.restconf_get: # Output can either be json or xml output: json path: Cisco-IOS-XE-interfaces-oper:interfaces |
Terraform is an Infrastructure-as-Code (IaC) tooling that allows network operators to easily view operational data, configure devices, and manage network resources. Since Terraform is cloud native, it works well with Cisco IOS XE cloud-native solutions for routing, switching, and wireless platforms, including the Cisco Catalyst 9000 switch family, the Cisco Catalyst 8000V (virtual) router, and the Cisco Catalyst 9800-CL Wireless Controller for Cloud. In addition to easily managing cloud-native solutions, Terraform can configure campus solutions. With Cisco IOS XE, we can automate with any tooling on any interface.
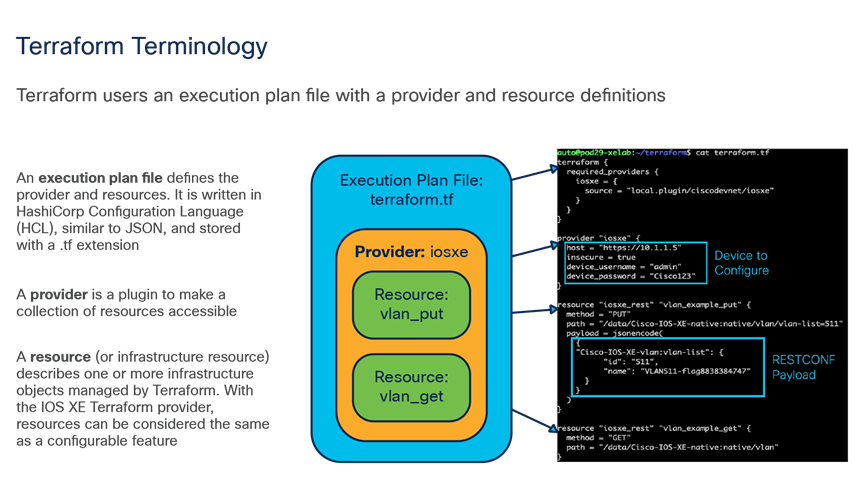
Terraform terminology
Getting started with the Terraform Cisco IOS XE provider
1. Install Terraform: https://learn.hashicorp.com/tutorials/terraform/install-cli.
2. Clone the Cisco IOS XE Terraform provider: https://github.com/CiscoDevNet/terraform-provider-iosxe/.
3. Create a. tf file.
4. Run Terraform using “terraform init; terraform apply.”
Add an ACL to a Catalyst 9300X using Terraform
Create a Terraform file using the CiscoDevNet/iosxe Terraform provider as in the following example.
add_acl.tf
| terraform { required_providers { iosxe = { version = "0.1.1" source = "CiscoDevNet/iosxe" } } }
provider "iosxe" { request_timeout = 30 insecure = true }
# Adding extended ACL resource "iosxe_rest" "acl_example_post" { method = "POST" path = "/data/Cisco-IOS-XE-native:native/ip/access-list" payload = jsonencode( { "Cisco-IOS-XE-acl:extended": [ { "name": 102, "access-list-seq-rule": [ { "sequence": "10", "ace-rule": { "action": "permit", "protocol": "ip", "host-address": "10.1.1.3", "dst-any": [ null ], "precedence": "routine", "tos": "normal", "log": [ null ] } }, { "sequence": "20", "ace-rule": { "action": "permit", "protocol": "tcp", "any": [ null ], "dst-any": [ null ], "dst-eq": 600 } }, { "sequence": "30", "ace-rule": { "action": "permit", "protocol": "udp", "any": [ null ], "dst-any": [ null ], "dst-eq": 200 } }, { "sequence": "40", "ace-rule": { "action": "permit", "protocol": "icmp", "any": [ null ], "dst-any": [ null ], "dst-eq-port2": 250 } }, { "sequence": "50", "ace-rule": { "action": "permit", "protocol": "igmp", "any": [ null ], "dst-any": [ null ], "dst-eq-port2": 15 } } ] } ] } ) }
|
Next, run the Terraform file using the following commands:
| terraform init terraform apply -auto-approve |
The device is now configured with an ACL as specified in the add_acl.tf file.
Learn more about Terraform
● GitHub provider examples: https://github.com/CiscoDevNet/terraform-provider-iosxe/
● Provider binary: https://registry.terraform.io/search/providers?namespace=CiscoDevNet
● Go client: https://github.com/CiscoDevNet/iosxe-go-client
● Blogs: https://blogs.cisco.com/tag/terraform
● Intro to Terraform video: https://www.youtube.com/watch?v=GEY_hyXimbA
● Configure an IPsec tunnel with Terraform: https://www.youtube.com/watch?v=bPS0bhPacDw
● Now that the go client has been released, individuals are contributing their own Terraform providers, such as this BGP EVPN provider: https://github.com/robertcsapo/terraform-provider-ciscoevpn
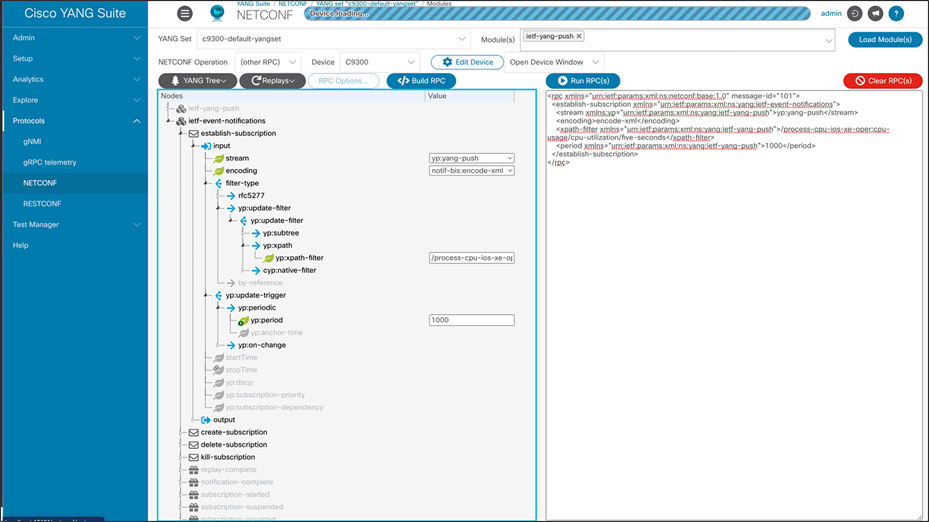
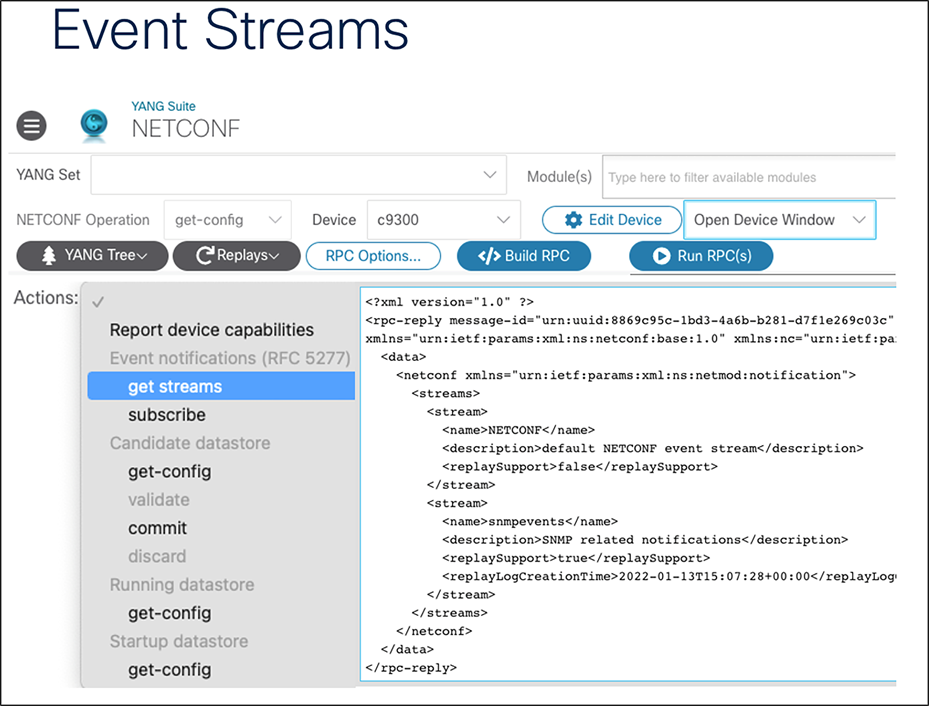
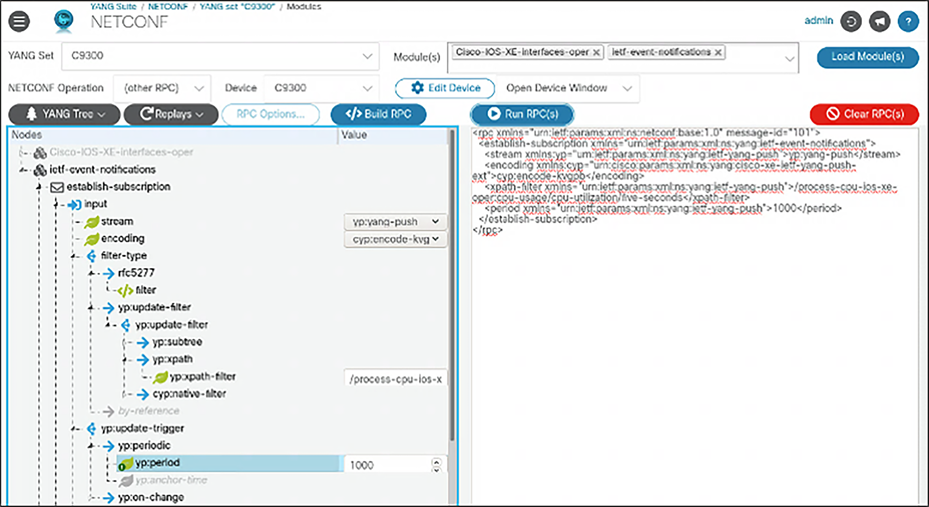
The ietf-yang-push model is used for NETCONF streaming telemetry. In the following example, a NETCONF subscription is created using NETCONF in YANG Suite. To create this subscription, the stream is set to “ys:yang-push,” the encoding is “notif-bis:encode-xml,” the filter is a specific xpath “/process-cpu-ios-xe-oper:cpu-usage/cpu-utilization/five-seconds,” and yp:periodic updates every 1000 centiseconds (10 seconds). Once each of the leaves is created in YANG Suite, click the blue “Build RPC” button and then click the blue “Run RPC(s)” button.
NETCONF and SNMP event streams
Two main event streams are used for model-driven telemetry, “yang-push” and “yang-notif-native," which handle publication of the periodic as well as the event-based telemetry. In addition to the NETCONF streams, there is also a stream from the SNMP events. This stream is used when collecting SNMP traps or events over the NETCONF interface.
SNMP and screen scraping from the CLI have been used as traditional network monitoring interfaces for years. Since the technology is widely popular in network management for network monitoring, network engineers still actively use it. The SNMP messages are transported via User Datagram Protocol (UDP) and always require active polling by the collector, which is not always reliable. The read-write mode can make a network vulnerable to attacks. Other limitations include the security concerns of SNMP, lack of information about the source IP address, what type of traffic is sent, and information about the destination IP address. In other words, the data is mainly unstructured, and the format frequently changes between software releases. Nevertheless, more recent versions of SNMP bring improvements in security, performance, and flexibility.
In contrast to SNMP, NetFlow was designed for network monitoring. It brings more visibility into the network and explicitly gives information about the source IP address, application protocol, and destination IP address, which SNMP lacks. NetFlow works in the same way as SNMP: It sends records from a cache to a collector, and all the records are being pushed to the collector without being requested each time. However, NetFlow is not used for collecting information about bandwidth, CPU utilization, memory, and/or the temperature of the device.
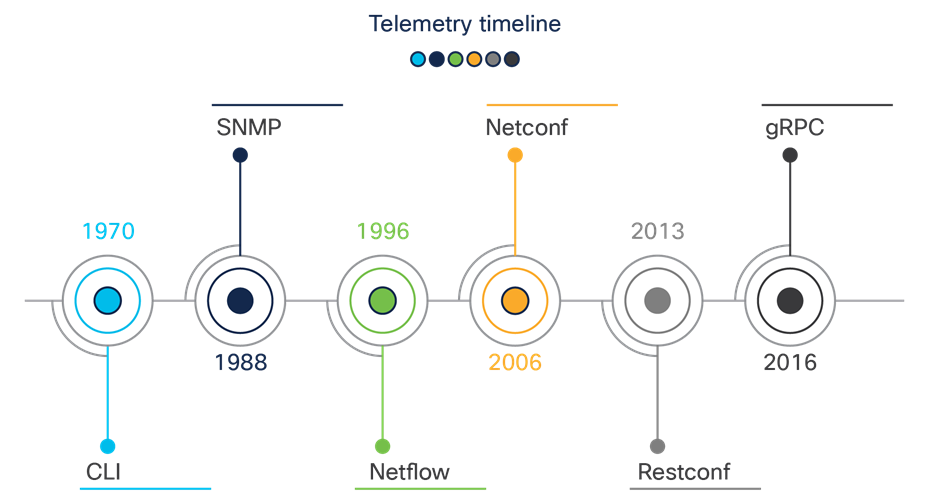
Telemetry standards timeline
Over the past couple of years, we have adopted new technologies that have helped us solve some, but not all of the predecessors’ flaws in the modern world. Cisco IOS XE supports the YANG data modeling language, which can be used with NETCONF to deliver the desired programmable and automated network operations. NETCONF is an XML-based protocol used to install, manipulate, and delete the configuration of network devices via SSH as the transport layer. It is based on an RPC mechanism to provide communication between a client and a server. In our case, the server is the network device and the controller is the client.
The web is progressing at an exponential speed, and we’ve started seeing quick adoption of RESTCONF in the web-based monitoring stack. RESTCONF uses HTTP methods to implement similar NETCONF operations for accessing data defined in YANG. In comparison to NETCONF, RESTCONF supports both XML and JSON encodings. But it’s important to clarify that RESTCONF is not a NETCONF replacement and was never intended to be one. From a capabilities standpoint, RESTCONF has its limitations, like any other network automation tool. It lacks any type of validation and also lacks the “lock” concept found in NETCONF.
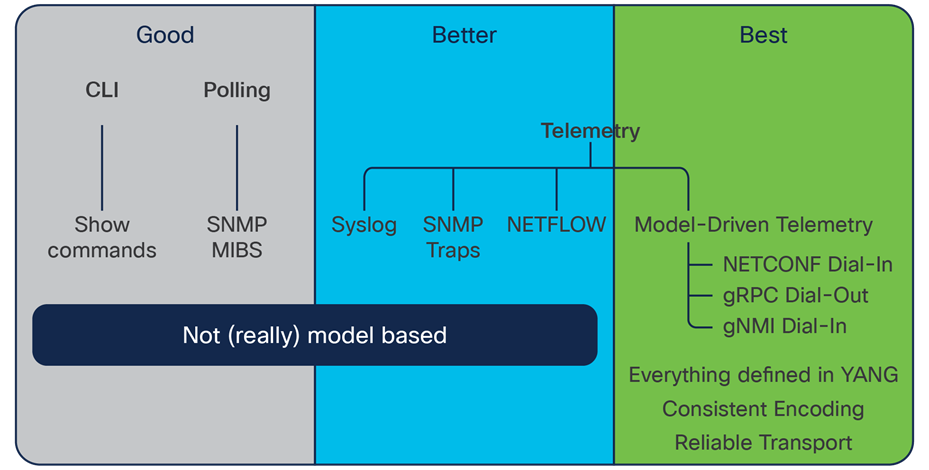
Comparison chart: CLI, polling, and telemetry monitoring
In addition, we have gRPC, a modern open-source RPC using HTTP for APIs. Model-driven telemetry with gRPC addresses many of the shortfalls of the legacy monitoring capabilities and provides an additional interface from which telemetry is now available to be published. gRPC is a YANG model using JSON and protobuf encodings. Unlike the NETCONF telemetry interface, which is “dial-in” and session-based, the gRPC interface is “dial out” and based on configuration within the device. gRPC is push-based, meaning that once it is configured, it will send the requested telemetry data regularly to the provided recipient(s) without them needing to request the data. Now you can decide what data is needed, how often, and where to send it. Once the configuration is in place, the Cisco IOS XE device easily publishes the telemetry data to third-party collectors, your monitoring tools, extensive data search and visualization engines such as Splunk and Elastic, or even a simple text file.
Finally, while the CLI and SNMP aren’t going away anytime soon, automation is a big part of where networks are headed. Protocols such as YANG, NETCONF, RESTCONF, and gRPC were designed with this in mind. That's why Cisco uses them within its platforms.
NETCONF dial-in model-driven telemetry
NETCONF can also be used as a dial-in model-driven telemetry interface that uses dynamic telemetry subscriptions.
Dynamic telemetry subscription with Python NCC
Dial-in telemetry subscriptions can be easily created by using the NCC tools available from CiscoDevNet at https://github.com/CiscoDevNet/ncc. The repository can simply be cloned from GitHub with the “git clone” command. An additional requirement is to use a patched ncclient tool that works with the ncc-establish-subscription.py tool. This can be installed by following the directions on the ncc GitHub page or by executing the two commands below:
| git clone https://github.com/CiscoDevNet/ncc sudo pip install --upgrade git+https://github.com/CiscoDevNet/ncclient.git |
Once downloaded, a subscription can be established by running the following command:
| python3 ncc-establish-subscription.py --host 10.1.1.5 --port 830 -u admin -p Cisco123 --period 1000 -x "/ios:native" |
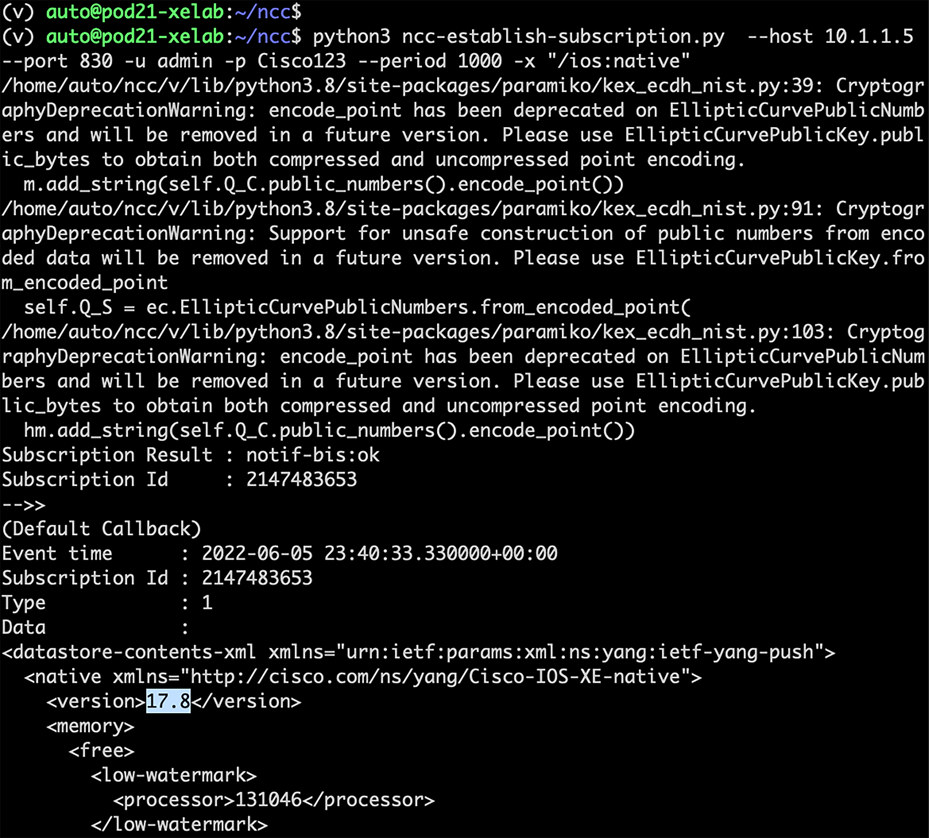
In the example above, a telemetry subscription has been created using the Cisco-IOS-XE-native YANG model, which has a prefix of “IOS” and an xpath of “native.” YANG Suite is used to determine the correct xpath filter for this YANG model, as seen in the screenshot below:
gNMI dial-in model-driven telemetry
gNMI is a gRPC network management interface. It provides the mechanism to install, manipulate, and delete the configuration of network devices, and to view operational data. The content provided through gNMI can be modeled using YANG. gRPC is an RPC developed by Google for low-latency, scalable distributions with mobile clients communicating to a cloud server. It carries gNMI and provides the means to formulate and transmit data and operation requests.
gRPC dial-out model-driven telemetry
gRPC is an RPC dial-out model-driven telemetry interface. gRPC dial-out telemetry is an automated communications process by which measurements and other data are collected and transmitted to the remote receiving equipment for monitoring. Model-driven telemetry provides a mechanism to stream YANG-modeled data to a data collector over the network.
Dial-in dynamic vs. dial-out configured MDT subscriptions
With a dial-in or “dynamic” subscription, the subscriber must first establish a session with a connection to the device and then subscribe to the data models. The NETCONF session must remain established for telemetry data to continue streaming. If the session is disconnected, the telemetry subscription must be manually reestablished.
With dial-out or “configured” subscriptions, once the configuration is set up by the user, the device will maintain the subscription configuration and send telemetry to the subscriber without needing an active session to the collector.
Model-driven telemetry interfaces
gRPC dial-out model-driven telemetry configuration
gRPC dial-out subscriptions support encoding with key-value Google protocol buffers (kv-gpb) over a TCP connection. The following configuration can be used to establish a gRPC dial-out with FQDN DNS support telemetry subscription. Additionally, gRPC can be configured with TLS and mTLS to support high security and geographically dispersed collection use cases.
The following is an example of a dial-out configuration using the DNS named receiver to publish telemetry data about interface utilization every 10 seconds:
| telemetry ietf subscription 101 encoding encode-kvgpb filter xpath /interfaces-ios-xe-oper:interfaces/interface source-address 10.85.134.65 stream yang-push update-policy periodic 1000 receiver-type protocol receiver name yangsuite
telemetry receiver protocol yangsuite host name yangsuite-telemetry.cisco.com 57500 protocol grpc-tcp |
This configuration creates a new subscription with an ID of 101. The encoding is set to kv-gpb, and the xpath filter defines the API to subscribe to, in this case dot11-oper-data. The xpath filter is defined within the YANG model, and YANG Suite is used to determine the exact xpath and prefix for this model. The source address and Virtual Routing and Forwarding (VRF) to use from the device is set, as well as the receiver IP, port, and protocol. The yang-push stream defines how often to publish data in centiseconds. In this case it is set to 2000, which means data will be published every 20 seconds.
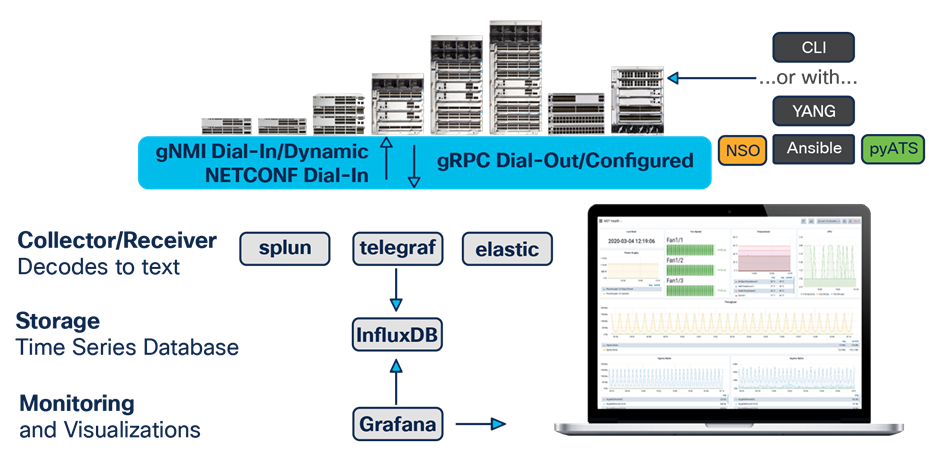
Receiving gRPC model-driven telemetry with Telegraf
The kv-gpb telemetry data that is sent over the gRPC interface can be received with many tools and in many different configurations, depending on the business needs and use cases. Telegraf is an open-source tool that can be used to receive the data and is available on GitHub at https://github.com/influxdata/telegraf. Telegraf works by acting as the gRPC server and receiver, where it processes the Google protocol buffers’ encoded data and sends the text data into the time series database InfluxDB. From there, Grafana can be used to visualize the data. Telegraf and Grafana are highly configurable and can receive and visualize a variety of telemetry sources as well as output data to a variety of data sources, including Kafka, InfluxDB, Elasticsearch, and Prometheus.
gRPC workflow example
Verify telemetry subscriptions
Several show commands are available to verify the status of the telemetry subscription configurations.
Examples of each are below:
| show telemetry ietf subscription all |
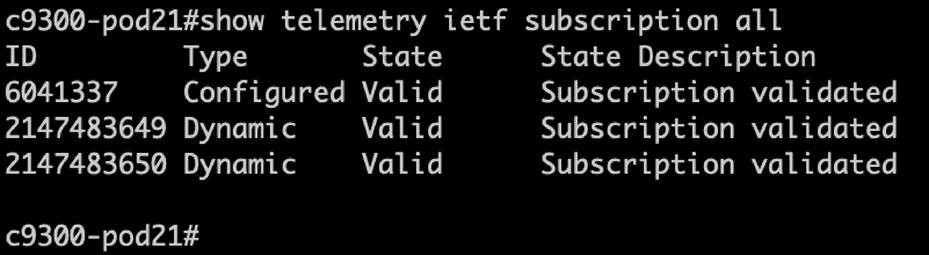
| show telemetry ietf subscription <ID> detail |
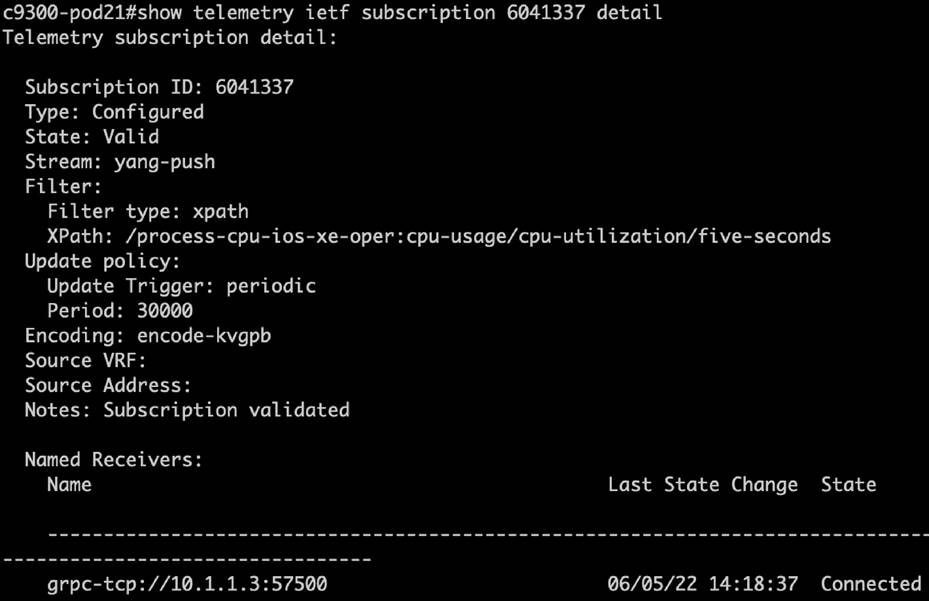
| show telemetry ietf subscription <ID> receiver |

YANG Suite can be used for streaming telemetry using NETCONF, gNMI, or gRPC.
NETCONF dial-in telemetry plugin
YANG Suite can be used to dial in to the NETCONF interface and to configure the dynamic telemetry subscription against the “ietf-event-notifications" YANG data model. Once the required fields and settings are set for the stream, encoding type, xpath, and update period, the XML payload can be sent to the device, which will start sending the requested telemetry data within the NETCONF session.
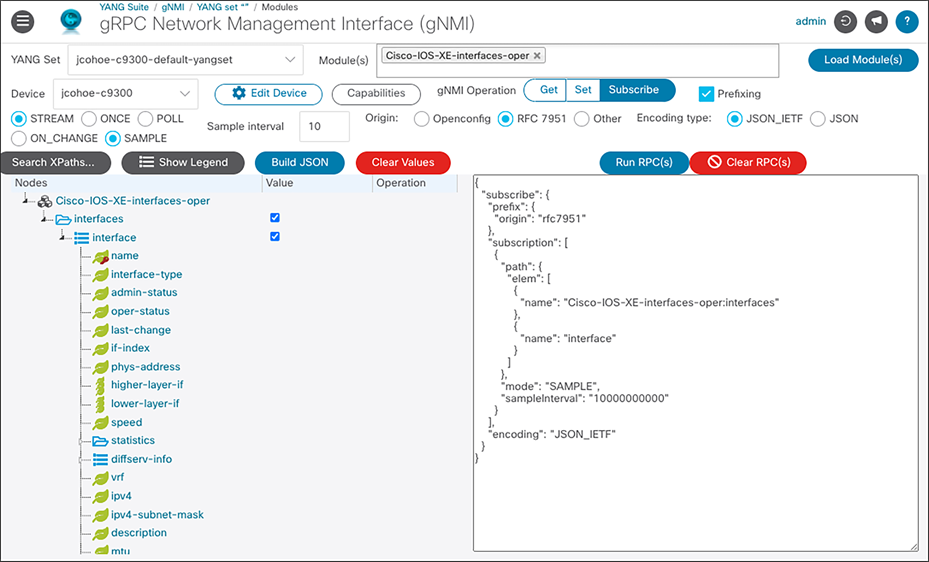
gNMI dial-in telemetry plugin
Similar to NETCONF, the gNMI plugin to YANG Suite can be used to create and receive the telemetry data within the gNMI session.
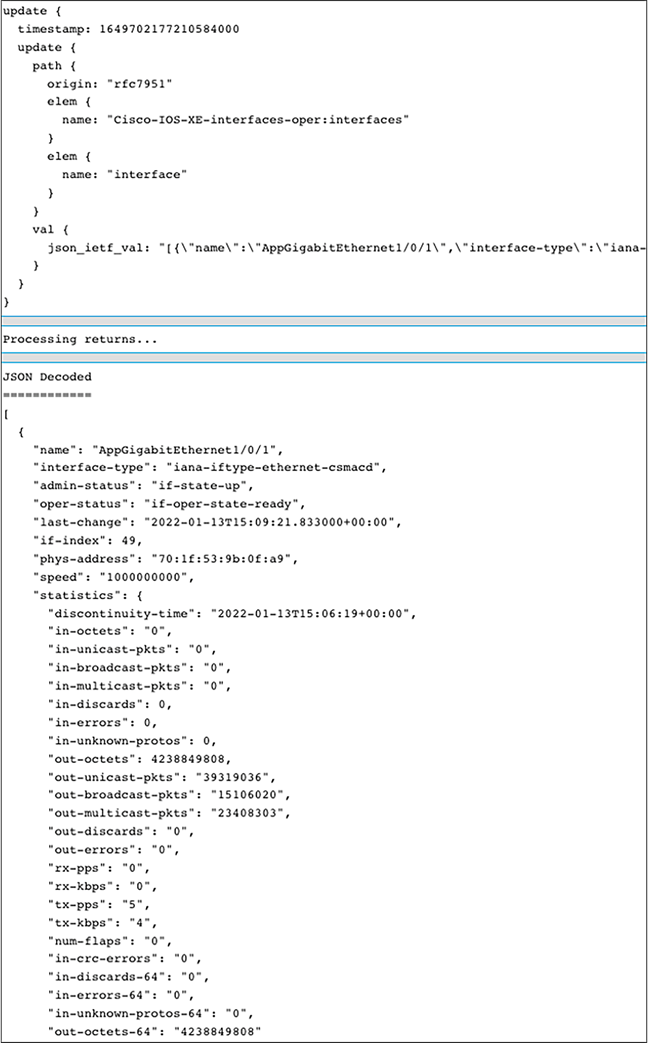
Once the JSON RPC has been sent, the device window shows the requested telemetry.
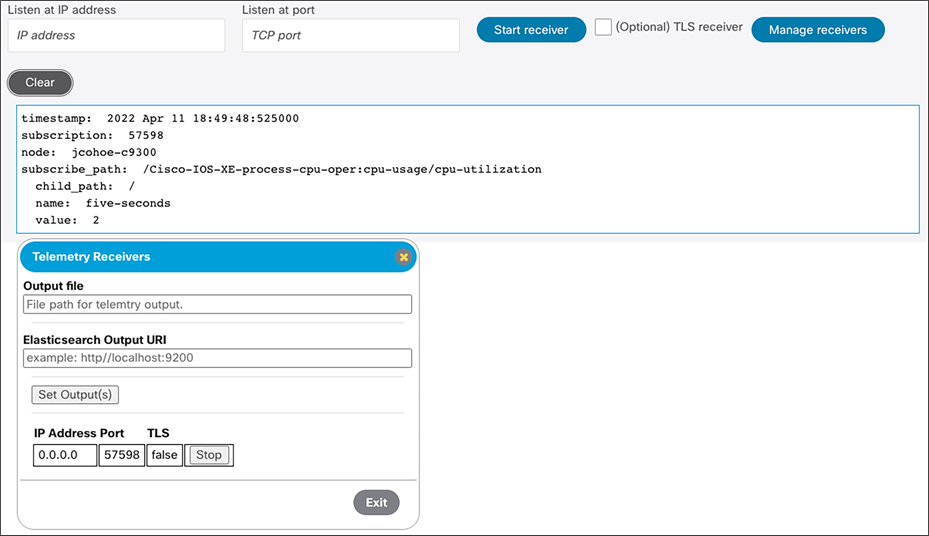
gRPC dial-out telemetry receiver plugin
YANG Suite also has a gRPC receiver plugin that can be used to receive the telemetry data and display it in the GUI. The data can also be sent to a log file on the disk as well as to the Elasticsearch database, where it can be stored and later used for visualizations and alerting.
Cisco Crosswork Suite
Cisco Crosswork is designed with modern low-touch and no-touch operations in mind. It is multivendor and multidomain, centered on both programmatic infrastructure control and access to operational and state data, and spans both cloud/SaaS and on-premises tooling. The tools in the portfolio encompass the full-service lifecycle and deliver a closed operational loop that includes planning and design, implementation, and ongoing monitoring and assurance.
While elements of the Crosswork portfolio can be licensed individually, Crosswork is also available packaged in two suite options. These suites group tools that share a common purpose and also provide the advantage of lower licensing costs than if you purchased the tools individually.
Learn more about the entire Crosswork Suite options here: https://www.cisco.com/c/en/us/products/collateral/cloud-systems-management/crosswork-network-automation/crosswork-essentials-adv-suites-ds.html
Cisco Crosswork Data Gateway
Cisco Crosswork Data Gateway has been developed for real-time data collection from multivendor network devices. This application simplifies the collection challenges of all this network traffic.
Cisco Crosswork Data Gateway is an on-premises application deployed close to network devices, enabling multiple data collection methods—model-driven telemetry, SNMP, CLI, etc. The collected data is delivered securely and consumed by on-premises and cloud analytics applications. Cisco Crosswork Data Gateway enables a critical and important tenet of data collection: the collection process should be an efficient and centralized step.
Cisco Crosswork Data Gateway assumes the job of connecting to devices, collecting the data, and publishing it. Pushing a first-stage processing function closer to the source data, Crosswork Data Gateway can reduce the amount of data sent to the application and the stress on the devices, abstracting the network complexity and reducing application vendor dependencies. If the use case dictates, Cisco Crosswork Data Gateway can send the raw data for direct consumption by the registered application.
Instances of Cisco Crosswork Data Gateway can be distributed to support large-scale networks. Crosswork applications scale better by offloading data collection and processing to distributed Data Gateway instances closer to the devices.
Learn more about Cisco Crosswork Data Gateway here: https://www.cisco.com/c/en/us/products/collateral/cloud-systems-management/crosswork-network-automation/datasheet-c78-743287.html
Tooling: Cisco Telemetry Broker
Cisco Telemetry Broker has roots in the Stealthwatch UDP Director (UDPD), which simply replicated UDP traffic to multiple destinations. The Cisco Telemetry Broker builds upon the successes of the UDPD while also creating a new Telemetry Broker market. Cisco Telemetry Broker optimizes telemetry pipelines for the hybrid cloud. It vastly simplifies the consumption of telemetry data for customers’ business-critical tools by brokering hybrid cloud data, filtering unneeded data, and transforming data to a usable format.
The benefits of Cisco Telemetry Broker include brokering, filtering, and transforming data. This provides the ability to route and replicate telemetry data from a source location to multiple destination consumers, to filter data that is being replicated to consumers for fine-grained control over what consumers are able to see and analyze, and to transform data protocols from the exporter to the consumer’s protocol of choice.
Learn more about Cisco Telemetry Broker here:
● Cisco Telemetry Broker https://cs.co/telemetrybroker
● Read more in the blog: https://blogs.cisco.com/security/taking-full-control-of-your-telemetry-with-the-intelligent-telemetry-plane
Telegraf, InfluxDB, and Grafana (TIG) make up the TIG stack, which is an open-source set of software that can be used to receive, store, and visualize model-driven telemetry data. Each software component can scale horizontally to enable distributed collection and storage as well as centralized analysis, processing, and alerting. Many integrations and plugins are available with this set of software for flexible deployments and unique use cases and requirements.
Telegraf, InfluxDB, and Grafana stack
Telegraf is tooling that handles data collection and processing. It is responsible for dialing into or receiving data from the model-driven telemetry interfaces on Cisco IOS XE. Telegraf has a rich ecosystem of plugins that allow it to receive and process data from a variety of places, as well as to send the data out to an equally rich ecosystem of plugins.
InfluxDB is used as the data storage or database layer. Telegraf pushes the telemetry data it receives into the API of Influx, where the data eventually resides. Once the data is within InfluxDB, it can be queried, visualized, and made sense of by network analysts and operators.
Grafana is used for data visualizations—it makes API calls into Influx where the data is in order to visualize some of the time series data into charts, graphs, panels, and other visually pleasing methods of representing complex or raw data points.
Together Telegraf, InfluxDB, and Grafana make a simple yet powerful stack of software components that is used to receive, process, store, and visualize telemetry data. TIG is just one example; there are many other tools, both commercial and open source, that can be leveraged for the same purposes. Often Telegraf is integrated into existing telemetry and data lake collection systems to receive network telemetry and pass it into existing systems like Splunk or PowerBI.
TIG stack with Docker
In production scenarios, the components of the TIG stack are deployed in a custom configuration tailored to the use cases and requirements of the business and network. An example configuration has been provided within the Docker container. This container is easy to deploy to get started with the TIG stack components using the various model-driven telemetry interfaces.
● TIG Stack with Docker example: https://github.com/jeremycohoe/cisco-ios-xe-mdt
Grafana dashboard examples
The example Grafana dashboards are available to show end-to-end use cases for visualizing the telemetry data over time.
Device health monitoring: https://grafana.com/grafana/dashboards/13462

Wireless client stats: https://grafana.com/grafana/dashboards/12468

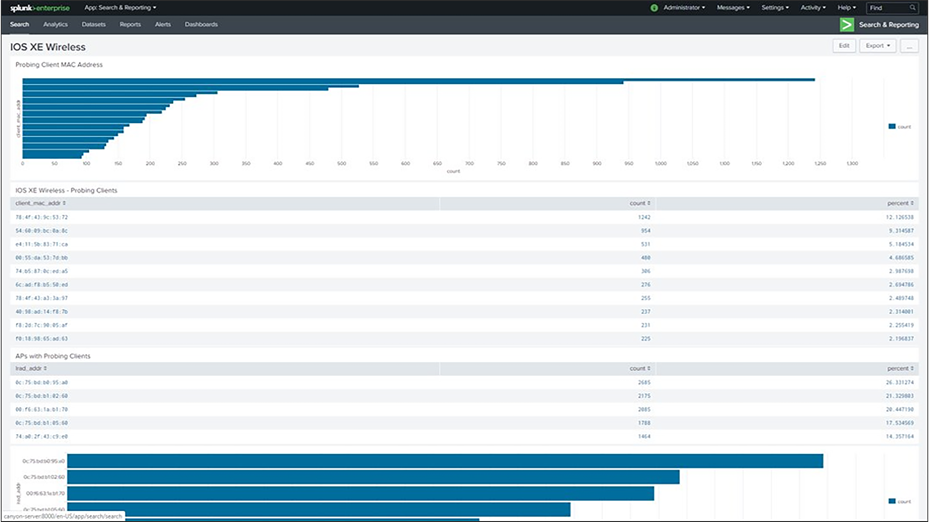
Splunk integration
While YANG Suite is often used for validation of telemetry, when it becomes time to move into production, several options are available to process, store, and act on the telemetry data that is received. Splunk is software that is commonly used for this purpose and is seen in many environments for many different use cases, from applications to networks.
Examples for integrating model-driven telemetry with Splunk are available from the GitHub and Splunk links:
● https://github.com/jeremycohoe/cisco-ios-xe-mdt/blob/master/telegraf-splunk.conf
There are many features as part of the device optimization capabilities, including Guest Shell and gNOI integrations to ensure that day N device optimization can be completed as needed, which ensures that the various customizations and optimizations can be performed.
Guest Shell is a virtualized CentOS Linux-based environment that is designed to run custom scripts and applications, including Python, for increased automation, control, and management capabilities. It can be used to install, update, and operate third-party Linux applications and custom scripts. Guest Shell is bundled with the system image and can be enabled and configured as required. It has integrations to the Cisco IOS XE CLI and NETCONF/YANG API and can also be used programmatically and automatically when integrated with the Cisco IOS Embedded Event Manager (EEM) feature.
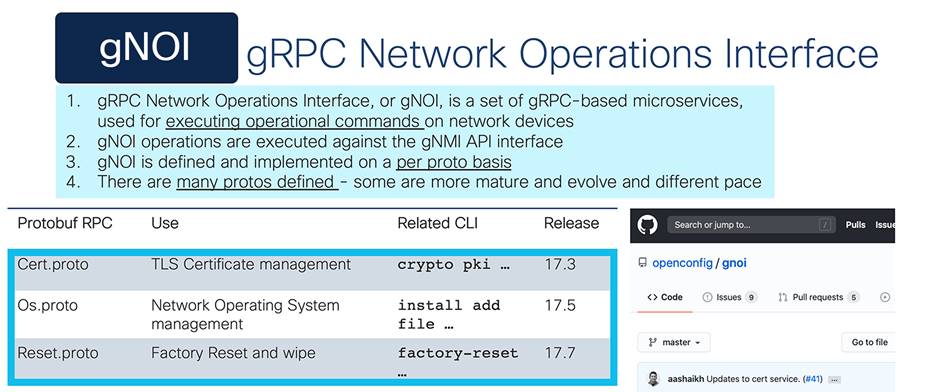
gNOI is a workflow API that is part of the gNMI programmatic interface. It uses protocol buffers, or protobuf for short, and there are several “.proto” definitions for various workflows that have been defined within the openconfig/gnoi repository on GitHub. Several of these.proto workflows have been implemented, including the certificate management API service (cert.proto), the operating system software management API service (OS.proto), and the reset to factory API service (reset.proto), and several more are being considered. Tooling for each of these gNOI implementations is available from the google/gnxi repository on GitHub and include gnoi_cert for cert.proto, gnoi_os for os.proto, and gnoi_reset for reset.proto, among others.
Learn more:
● https://github.com/openconfig/gnoi
● https://github.com/google/gnxi
The CLI to YANG feature helps convert the running config command into YANG format for the programmatic interfaces. In addition to reading the Cisco-IOS-XE-native.yang configuration from the API, this command can be used to easily retrieve the running config in either XML for NETCONF or for RESTCONF formatted in JSON. This is an easy way, when on the command line, to see the YANG configuration that is in the show running config command. This XML or JSON formatted code can more easily be used within third-party automation and orchestration tooling systems and controllers.
gNOI is a workflow API that is part of the gNMI programmatic interface. Once gNMI is enabled, the gNOI workflows also become available and are accessed through the same API service. Protobufs are an encoding technique used to structure the data. Several protobufs are implemented and many more defined within the OpenConfig/gnoi Github repository. Refer to the section “Cisco Native RPC Actions YANG” for additional information about operations and workflows.
The. proto workflows that have been implemented include:
● The certificate management API service (cert.proto)
● The operating system software management API service (OS.proto)
● The reset to factory API service (reset.proto)
Tooling for each of these gNOI implementations includes:
● gnoi_cert for cert.proto
● gnoi_os for os.proto
● gnoi_reset for reset.proto
gNOI certificate management service
The gNOI cert.proto certificate management service can be used to install cryptographic certificates into the trustpoint for use within services and applications on Cisco IOS XE. The trustpoint is an abstract container that is used to store certificates used for secure communications between a client and a server. The gnoi_cert client tooling is used to install or revoke certificates on Cisco IOS XE from third-party controllers, scripts, and orchestration systems.
gNOI certificate bootstrapping is a feature within cert.proto for when a target device does not have any preexisting certificates. The certificate bootstrapping feature allows the installation of certificates for the purpose of establishing subsequent secure gNMI and thus secure gNOI connections.
Essentially, when gNMI is enabled with the bootstrapping “secure-init” command, the first certificate that gNOI cert.proto receives is installed into the trustpoint and is also applied to the gNMI service. As part of this operation, the gNMI service is restarted with the newly installed certificate to accept subsequent secure connections with signed certificates.
The following gNOI cert.proto operations allow complete certificate management services:
● Install
● Rotate
● Revoke
● Get
● GenerateCSR
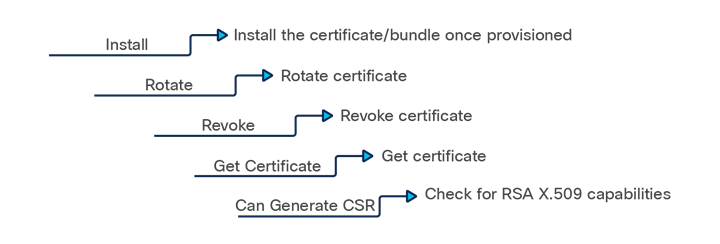
gNOI cert.proto operations
The certificate management service has been defined in the OpenConfig consortium’s gNOI repository in GitHub at https://github.com/openconfig/gnoi/blob/master/cert/cert. proto and has tooling available from Google’s gNxI repository on GitHub at https://github.com/google/gnxi/tree/master/gnoi_cert
gNOI operating system installation service
The gNOI OS.proto operating system service is used to manage the currently running operating system version and has operations that include install, activate, and verify. Together these operations are used to programmatically upgrade or downgrade the Cisco IOS XE between releases, for example, to upgrade from 17.5 to 17.6, from 17.6.1 to 17.6.2, or even downgrades such as moving from 17.8 to 16.8 if needed.
Bundle mode or install mode can be configured when booting software images, and OS.proto works regardless of which boot mode was configured. However, when the Cisco IOS XE device is booted in bundle mode, it will be converted to install mode as part of the programmatic gNOI OS install and activate operations. Install mode has several advantages over bundle mode for high availability, device boot, and reload times.
The operating system installation service has been defined in the OpenConfig consortium’s gNOI repository in GitHub at https://github.com/openconfig/gnoi/blob/master/os/os. proto and has tooling available from Google’s gNxI repository on GitHub at https://github.com/google/gnxi/tree/master/gnoi_os.
Details about the gNOI operating system installation service can be retrieved using the verify operation, but are also available from a traditional show command.
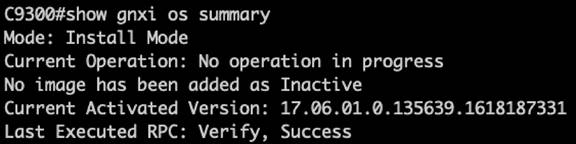
gNOI factory reset service
The gNOI reset.proto factory reset service is used to perform factory reset operations to bring devices back to a new state as if just received from the factory. The primary operation is the “start” RPC, which starts the “factory-reset all” or “factory-reset switch all all” operations against the target device. There is one additional option as part of this RPC, which is zero fill.
The factory reset service is supported in install mode but not in bundle mode. If bundle mode is in use, the start API call will be rejected and will not complete. The gNOI OS.proto operating system installation service can be used in this case when bundle mode is used to upgrade and reboot into install mode.
The factory reset service has been defined in the OpenConfig consortium’s gNOI repository at https://github.com/openconfig/gnoi/blob/master/factory_reset/factory_reset.proto. and has tooling available from Google gNxI repository on GitHub at https://github.com/google/gnxi/tree/master/gnoi_reset.
Details about the gNOI factory reset service can be retrieved with the show gNxI command.
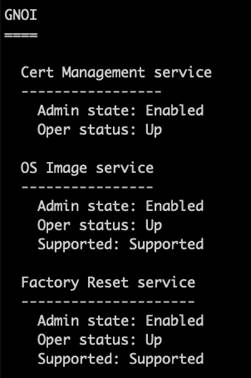
The gNOI microservices enable much easier management of certificates, operating systems, and the factory reset process.
The CLI to YANG feature helps convert the running config command into YANG format, either for NETCONF with XML or RESTCONF with JSON. CLI to YANG requires the netconf-yang data model interfaces to be enabled starting with Release 17.7. Commands with corresponding native YANG and modeled in show run are returned.
Format for NETCONF with XML encoding
Convert commands to NETCONF XML as well as for RESTCONF with XML encoding.
| show run | format netconf-xml
|
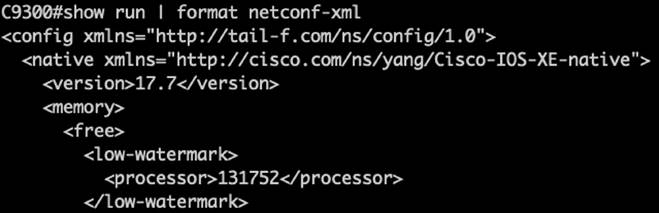
Format for RESTCONF with JSON encoding
Convert commands to RESTCONF JSON:
| show run | format restconf-json |
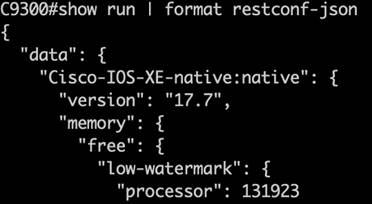
Additionally, we can filter for specific portions of the running config using either Netconf-xml or restconf-json:
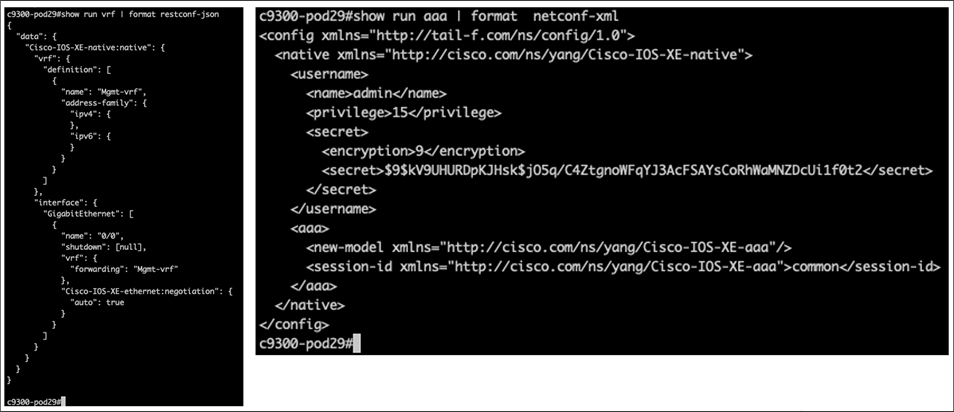
Guest Shell is a virtualized Linux-based environment, designed to run custom Linux applications, including Python, for automated control and management of Cisco devices. Using Guest Shell, you can also install, update, and operate third-party Linux applications. Guest Shell is bundled with the system image and can be installed using the “guestshell enable” Cisco IOS command. This container shell provides a secure environment, decoupled from the host device, in which users can install scripts or software packages and run them. The existing network hardware is used to deliver the scalability, high availability, and flexibility required, with no requirements for dedicated or separate compute. The Guest Shell environment is intended for tools, Linux utilities, and manageability rather than networking.
Guest Shell and application hosting
Guest Shell is a built-in CentOS container that has APIs into Cisco IOS XE via Python and NETCONF, which uses the Cisco IOx infrastructure. The same IOx infrastructure is used for Docker-based application hosting, which enables an even wider range of Linux features that can be used. Application hosting, like Guest Shell, can be completely managed with the YANG APIs. The configuration of the feature and the operational state of the containers can be managed with the YANG model. Controller solutions with Cisco DNA Center also enable management and integration of the ThousandEyes performance monitoring solution. Refer to the Application Hosting White Paper and DevNet resources at https://developer.cisco.com/docs/app-hosting/ for more details on application hosting.
Guest Shell feature enablement
Before enabling Guest Shell, IOx must be configured. If IOx is not configured, a message to configure IOx is displayed. Removing IOx removes access to Guest Shell. To enable and operate Guest Shell, the management interface needs to be configured on the device. To enable IOx, enter the following commands:
| configure terminal iox exit |
Enabling Guest Shell on the management interface:
| configure terminal app-hosting appid <name> app-vnic management guest-interface <interface number> end show app-hosting list |
Once the prerequisite configuration is set up, enable and enter the Guest Shell container:
| guestshell enable |
The output will look like the following:
| C9300# conf t Enter configuration commands, one per line. End with CNTL/Z. Device(config)# app-hosting appid guestshell Device(config-app-hosting)# app-vnic management guest-interface 1 Device(config-app-hosting-mgmt-gateway)# end C9300# show app-hosting list App id State --------------------------------------------------------- guestshell DEPLOYED
C9300# guestshell enable Interface will be selected if configured in app-hosting Please wait for completion guestshell activated successfully Current state is: ACTIVATED guestshell started successfully Current state is: RUNNING Guestshell enabled successfully
C9300#show app-hosting list App id State --------------------------------------------------------- guestshell RUNNING |
Guest Shell resources
Resources used by the Guest Shell container can be checked with the following CLI command. The hardware resource allocations for CPU, memory, and disk are displayed. Persistent disk space can also be increased as needed.
| C9300# show app-hosting utilization appid guestshell |
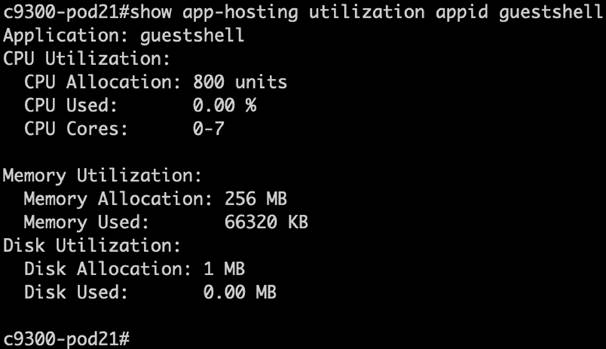
Verifying Guest Shell
To confirm that the IOx service has been enabled, enter the show iox-service command and ensure that the IOx Cisco application hosting framework (CAF), IOx service (IOxman), and Libvirtd are in the running state.
| C9300# show iox-service
IOx Infrastructure Summary: --------------------------- IOx service (CAF) : Running IOx service (HA) : Running IOx service (IOxman) : Running IOx service (Sec storage) : Running Libvirtd 5.5.0 : Running Dockerd v19.03.13-ce : Running Sync Status : Disabled
C9300# show app-hosting list
App id State --------------------------------------------------------- guestshell RUNNING |
Accessing and using Guest Shell
Linux commands can be run directly from the IOS CLI. The guestshell run Bash command opens the Guest Shell Bash prompt. To log into Guest Shell, run the following command:
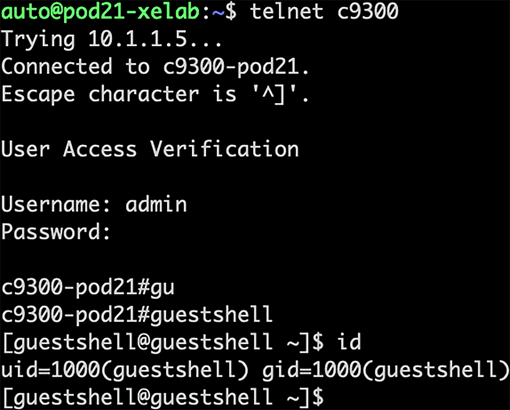
|
C9300# guestshell [guestshell@guestshell ~]$ pwd /home/guestshell [guestshell@guestshell ~]$ whoami guestshell [guestshell@guestshell ~]$ uname -a Linux guestshell 5.4.69 #1 SMP Fri Mar 19 21:47:56 UTC 2021 x86_64 x86_64 x86_64 GNU/Linux |
Guest Shell with Python API
Python scripts can be run in Guest Shell. The “guestshell run python3” commands launch the Python interpreter.
| C9300# guestshell run python3 |
Once the interactive shell is entered, the “clip” Python module can be used to execute commands as needed.
Cisco IOS CLI commands:
| >>> from cli import clip >>> clip(“show ip int brief | exclude unassigned”) |
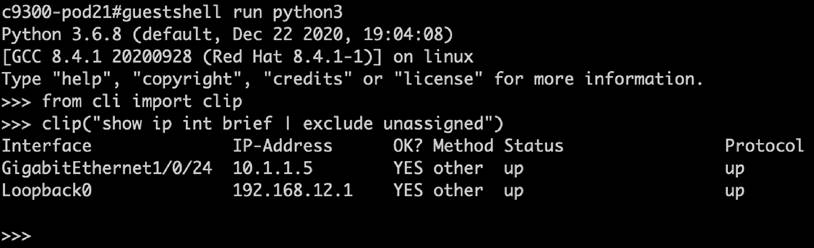
Noninteractive Python
Guest Shell can execute Python scripts in a noninteractive environment. Files can be placed on the device bootflash at day 0 during ZTP provisioning or at any other time during the device lifecycle. Scripts can be copied from a network TFTP service or created manually when required using common tooling and editors like “vi.” The script can be executed using the “guestshell run python3 show.py” command, which can be used in other integrations, including EEM, the Embedded Event Manager.
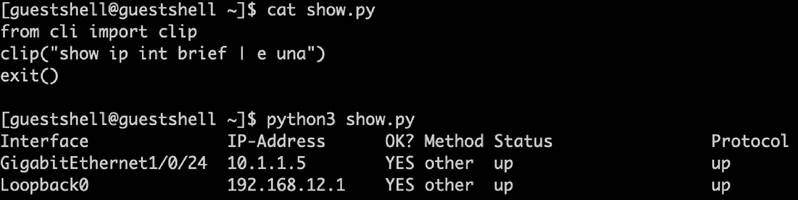
| #!/usr/bin/python
from cli import clip clip("show ip int brief | exclude unassigned") exit() |
The command to execute the Python script is:
| guestshell run python3 /home/guestshell/show.py |

Guest Shell with the Cisco IOS CLI
The dohost command is built into Guest Shell and will send the command directly to the device. The command is limited to exec privilege mode and is not for the config mode.

Guest Shell with NETCONF API
Guest Shell Python runs in an LXC container. This container is managed by IOx, which is a container, similar in function to Docker, managed specifically for Cisco IOS XE.
Before using Guest Shell, enable IOx and then enable Guest Shell. Additionally, ensure that the following is configured to open the bridge between Guest Shell and Cisco IOS XE:
| netconf-yang ssh local-vrf guestshell enable |
Passwordless authentication using keys can easily be set up using the following Bash commands or the Python API "netconf_enable_guestshell”
|
[guestshell@guestshell iosp_client -f netconf_enable guestshell 830 [guestshell@guestshell iosp_client -f netconf_enable_passwordless guestshell guestshell |
The following Python script was generated using YANG Suite and returns the hostname of the given device.
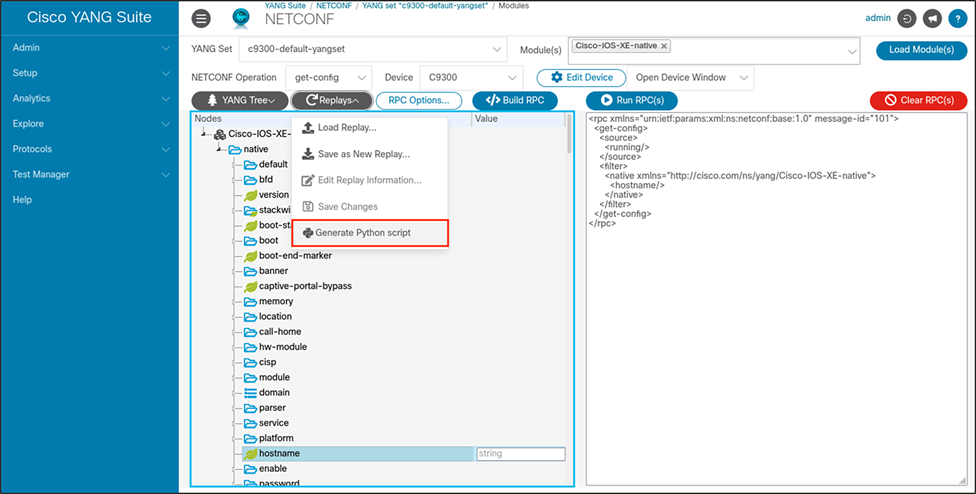
get_hostname.py
| #! /usr/bin/env python
from ncclient import manager import sys import xml.dom.minidom
HOST = '127.0.0.1' # use the NETCONF port for your device PORT = 830 # use the user credentials for your device USER = 'guestshell' PASS = 'it will use the key specified and does not use this one here ok'
FILTER = ''' <filter xmlns="urn:ietf:params:xml:ns:netconf:base:1.0"> <native xmlns="http://cisco.com/ns/yang/Cisco-IOS-XE-native"> <hostname></hostname> </native> </filter> '''
def main(): """ Main method that prints netconf capabilities of remote device. """ # Create a NETCONF session to the router with ncclient with manager.connect(host=HOST, port=PORT, username=USER, password=PASS, hostkey_verify=False, device_params={'name': 'default'}, key_filename="/home/guestshell/.ssh/id_rsa_netconf", allow_agent=False, look_for_keys=True) as m:
# Retrieve the configuration results = m.get_config('running', FILTER) # Print the output in a readable format print(xml.dom.minidom.parseString(results.xml).toprettyxml())
if __name__ == '__main__': sys.exit(main())
print("\n\n *** Finished NETCONF example... *** \n\n") |
Run this script from Guest Shell using the following command. Any block of XML that is generated from YANG Suite can easily be used in place of the simple “get hostname” example above.
| c9300-pod21# guestshell run python3 netconf.py |
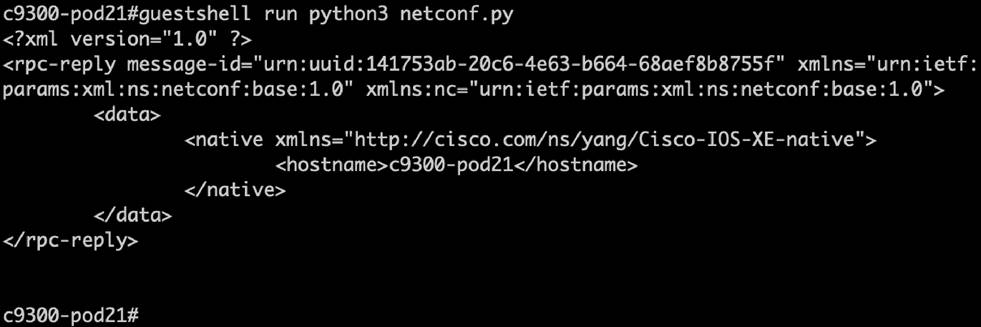
The above example shows that Guest Shell has made a connection to the localhost 127.0.0.1 on port 830, which is connected to Cisco IOS XE’s NETCONF interface for management and operation data use cases.
Guest Shell integration with EEM
Embedded Event Manager (EEM) is a distributed and customized approach to event detection and recovery offered directly in a Cisco IOS device. EEM offers the ability to monitor events and take informational, corrective, or any desired EEM action when the monitored events occur or when a threshold is reached. An EEM policy is an entity that defines an event and the actions to be taken when that event occurs.
EEM can be used to execute Python scripts within the Guest Shell environment. In this example, whenever a syslog message is generated indicating that an interface has changed state from up to down or into a disabled state, the guestshell_script.py Python script will run. This script runs some CLI commands and saves the output to a log file.
The example EEM applet below is used to log messages from the CLI and YANG interfaces to syslog. This helps in debugging and logging and can be shipped off-box if necessary for security and auditing use cases.
| enable configure terminal event manager applet catchall event cli pattern ".*" sync no skip no action 1 syslog msg "$_cli_msg" end |
Disabling and destroying Guest Shell
The “guestshell disable” command shuts down and disables Guest Shell.
The “guestshell destroy” command removes the rootfs from the flash filesystem.
Guest Shell conclusion
As described in this section, Guest Shell is a very powerful integration option when used in conjunction with other features and technologies like EEM, Python3, the CLI, NETCONF APIs, and more.
The Cisco IOS XE network OS delivers an innovative level of programmability and automation, decreasing the complexity of the business and network. This white paper has described the need for programmable interfaces and the differences between them for the full device lifecycle, including device onboarding, configuring, monitoring and optimization. The programmatic interfaces NETCONF, RESTCONF, and gRPC can be enabled and configured for communicating with Cisco devices. Configured and dynamic telemetry subscriptions can be established using open-source tools. Example payloads can be used to create, verify, and remove a feature programmatically using the YANG Suite, Ansible, and Terraform tooling. We have learned the various ways to work with Cisco IOS XE YANG models programmatically. We can automate any Cisco IOS XE device using any interface. As the needs of network engineers are ever evolving, we at Cisco will also continue to provide the cutting-edge technologies needed to shape the future.
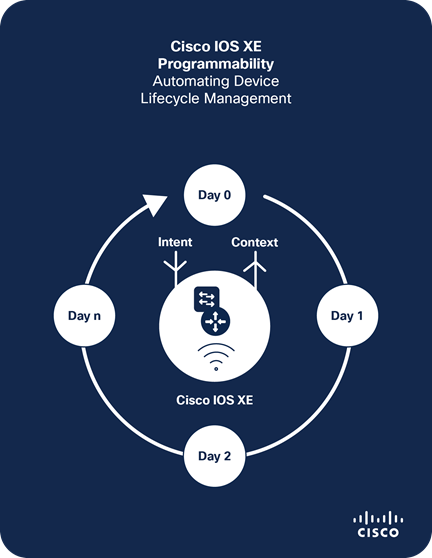
● Cisco IOS XE Programmability Book:https://www.cisco.com/c/dam/en/us/products/collateral/enterprise-networks/nb-06-ios-xe-prog-ebook-cte-en.pdf
● Cisco IOS XE Programmability Configuration Guide: https://www.cisco.com/c/en/us/td/docs/ios-xml/ios/prog/configuration/176/b_176_programmability_cg.html?dtid=osscdc000283
● YANG Suite: https://developer.cisco.com/yangsuite/
● NCC: https://github.com/CiscoDevNet/ncc
● Embedded Event Manager: https://www.cisco.com/c/en/us/td/docs/ios-xml/ios/eem/configuration/xe-17/eem-xe-17-book.html?dtid=osscdc000283
● NETCONG YANG Configuration and Validation: https://www.cisco.com/c/en/us/support/docs/storage-networking/management/200933-YANG-NETCONF-Configuration-Validation.html
Developer community and feedback
● Cisco DevNet: https://developer.cisco.com/
● Cisco Communities: https://community.cisco.com
● Cisco DevNet for Cisco IOS XE: https://developer.cisco.com/site/ios-xe/
● Cisco IOS XE model-based management docs: https://developer.cisco.com/docs/ios-xe/#!model-based-management-introduction
● MDT Learning Lab: https://developer.cisco.com/learning/modules/iosxe_telemetryMDT Learning Lab: https://developer.cisco.com/learning/modules/iosxe_telemetry
● Automation Exchange: https://developer.cisco.com/network-automation/
● Zero-touch provisioning: https://blogs.cisco.com/developer/device-provisioning-with-ios-xe-zero-touch-provisioning
● Model-driven telemetry: https://blogs.cisco.com/developer/getting-started-with-model-driven-telemetry
● Cisco IOS XE automation: https://blogs.cisco.com/ciscoit/b-en-04162014-look-ma-no-hands?dtid=osscdc000283
● SNMP to model-driven telemetry: https://blogs.cisco.com/developer/its-time-to-move-away-from-snmp-and-cli-and-use-model-driven-telemetry
● Terraform Cisco IOS XE provider: https://blogs.cisco.com/developer/terraformiosxe01