Prepare the Appliance for Configuration
Preparation for Appliance Configuration Overview
Before you can successfully configure your Cisco DNA Center appliance, first complete the following tasks:
-
Enable browser access to the appliance's Cisco IMC (see Enable Browser Access to Cisco Integrated Management Controller).
-
Use Cisco IMC to check and adjust important hardware and switch settings (see Execute Preconfiguration Checks).
-
If the Intel X710-DA4 network interface card (NIC) that shipped with your appliance is currently disabled, you need to enable it in order to make use of NIC bonding (see Enable NIC on an Upgraded Appliance).
-
Cisco DNA Center software is preinstalled on your appliance, but you may need to reinstall the software in certain situations (such as before you change the current cluster link configuration). If this is the case, you must also complete the tasks described in Reimage the Appliance.

Note
If you do not need to reimage your appliance, proceed to the "Appliance Configuration Overview" topic specific to the configuration wizard you want to use:
Enable Browser Access to the Cisco Integrated Management Controller
After installing the appliance, as described in Appliance Installation Workflow, use the Cisco IMC configuration utility to assign an IP address and gateway to the appliance's CIMC port. This gives you access to the Cisco IMC GUI, which you should use to configure the appliance.
After you complete the Cisco IMC setup, log in to Cisco IMC and run the tasks listed in Execute Preconfiguration Checks to ensure correct configuration.
 Tip |
To help ensure the security of your deployment, Cisco IMC prompts you to change the Cisco IMC user's default password when you boot the appliance for the first time. To change the Cisco IMC user password later, use the Cisco IMC GUI, as follows:
|
Procedure
|
Step 1 |
Access the appliance console by attaching either of the following:
|
|
Step 2 |
Make sure that the appliance's power cord is plugged in and the power is on. |
|
Step 3 |
Press the Power button on the front panel to boot the appliance. 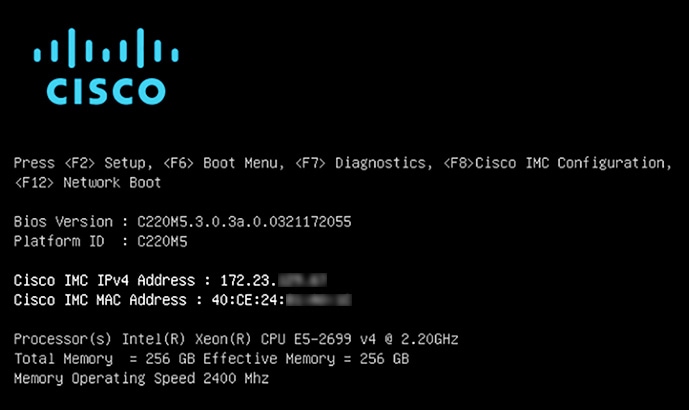
The Cisco IMC configuration utility boot screen should be displayed, as shown below. |
|
Step 4 |
As soon as the boot screen is displayed, press F8 to perform Cisco IMC configuration. The CIMC configuration utility displays the CIMC User Details screen, as shown below. 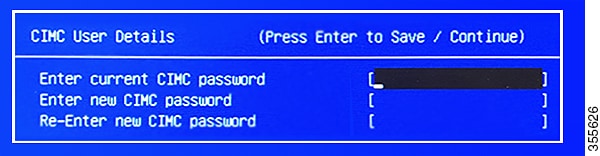 |
|
Step 5 |
Enter the default CIMC user password (the default on a new appliance is password) in the Enter current CIMC Password field. |
|
Step 6 |
Enter and confirm the new CIMC user password in the Enter new CIMC password and Re-Enter new CIMC password fields. When you press Enter after entering the new password in the Re-Enter new CIMC password field, the Cisco IMC configuration utility displays the NIC Properties screen, as shown below.  |
|
Step 7 |
Perform the following actions:
|
|
Step 8 |
Press F1 to specify Additional settings. The Cisco IMC configuration utility displays the Common Properties screen, as shown below. 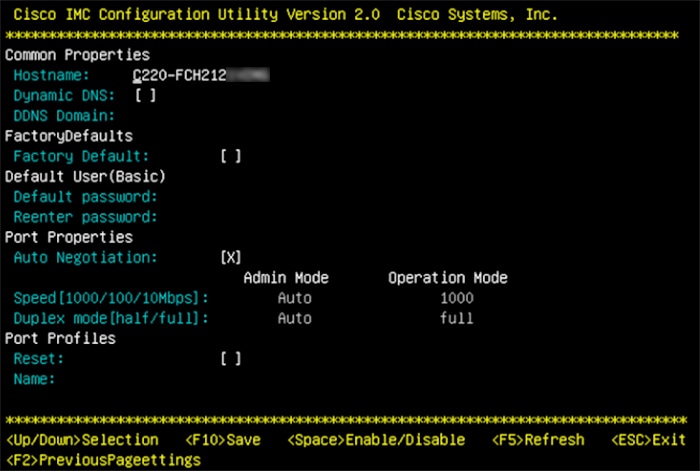
|
|
Step 9 |
Perform the following actions:
|
|
Step 10 |
Press F10 to save the settings. |
|
Step 11 |
Press Escape to exit and reboot the appliance. |
|
Step 12 |
After the settings are saved and the appliance finishes rebooting, open a compatible browser on a client machine with access to the subnet on which the appliance is installed, and enter the following URL: https://CIMC_ip_address, where CIMC_ip_address is the Cisco IMC port IP address that you entered in Step 7. Your browser displays a main Cisco IMC GUI login window similar to the one shown below. 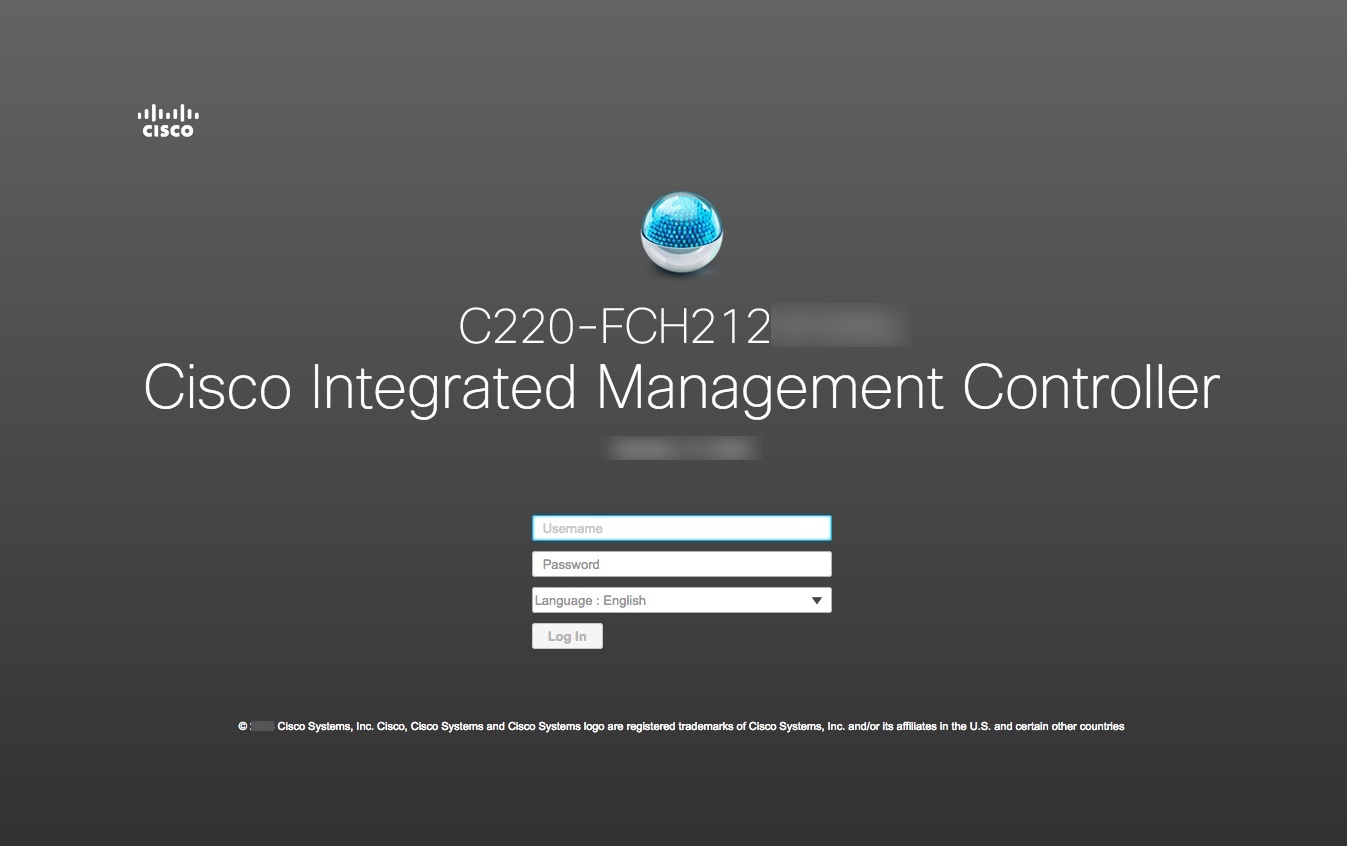 |
|
Step 13 |
Log in using the Cisco IMC user ID and password you set in Step 5. If the login is successful, your browser displays a Cisco Integrated Management Controller Chassis Summary window similar to the one shown below. 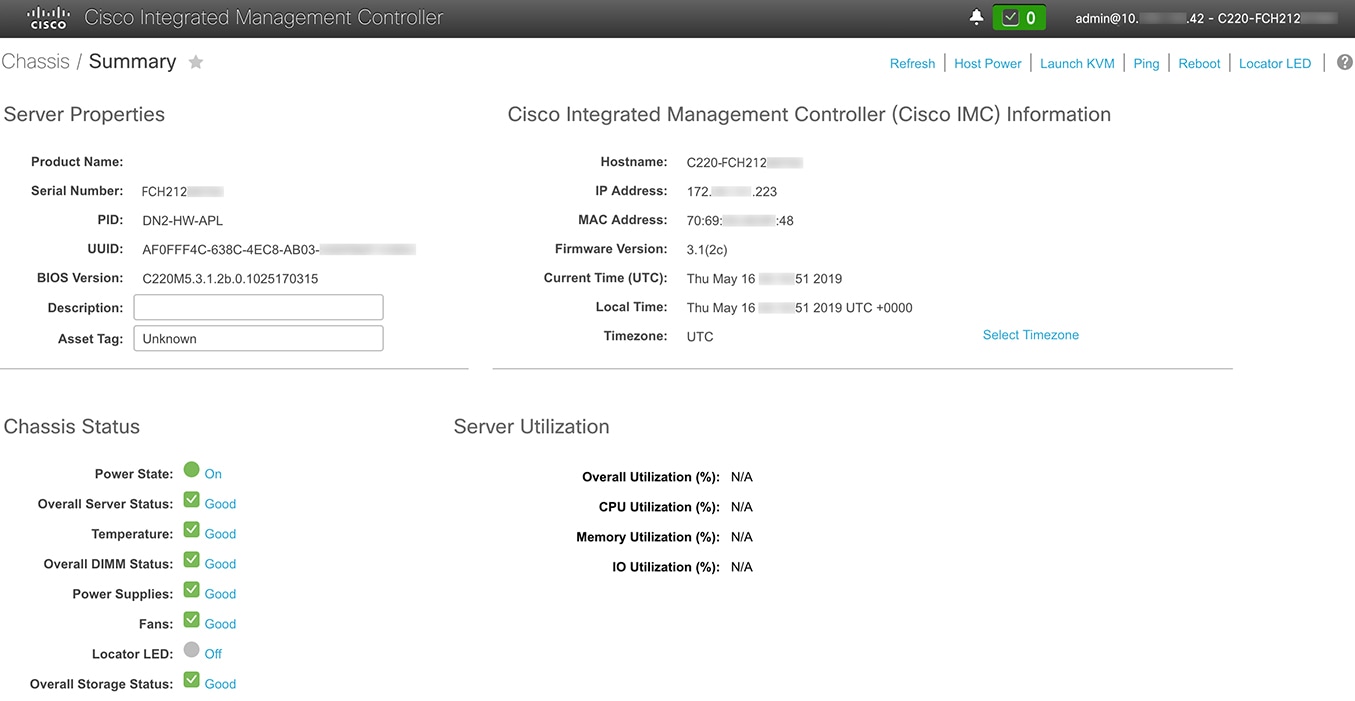 |
|
Step 14 |
Confirm that this version of Cisco IMC is supported by the Cisco DNA Center release you're going to install: |
Execute Preconfiguration Tasks
After installing the appliance (as described in Appliance Installation Workflow) and setting up access to the Cisco IMC GUI (as described in Enable Browser Access to Cisco Integrated Management Controller), use Cisco IMC to perform the following preconfiguration tasks, which help ensure correct configuration and deployment:
-
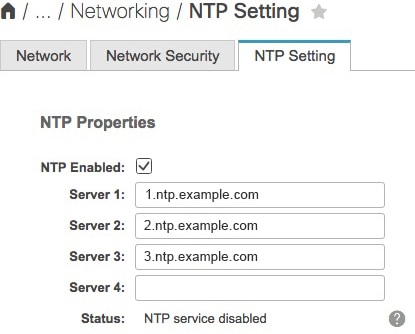
Synchronize the appliance hardware with the Network Time Protocol (NTP) servers you use to manage your network. These must be the same NTP servers whose hostnames or IPs you gathered for use when planning your implementation, as explained in Required IP Addresses and Subnets. This is a critical task that ensures that your Cisco DNA Center data is synchronized properly across the network.
-
Reconfigure the switches connected to the 10-Gbps appliance ports to support higher throughput settings.
Procedure
|
Step 1 |
Log in to the appliance's Cisco IMC using the Cisco IMC IP address, user ID, and password you set in Enable Browser Access to Cisco Integrated Management Controller. If the login is successful, your browser displays the Cisco Integrated Management Controller Chassis Summary window, as shown below. |
|
Step 2 |
Synchronize the appliance's hardware with the Network Time Protocol (NTP) servers you use to manage your network, as follows:
|
|
Step 3 |
Reconfigure your switches to match the high-throughput settings on the appliance, as follows: |
|
Step 4 |
In the Configured Boot Mode drop-down list, confirm that Legacy (the default mode) is set. 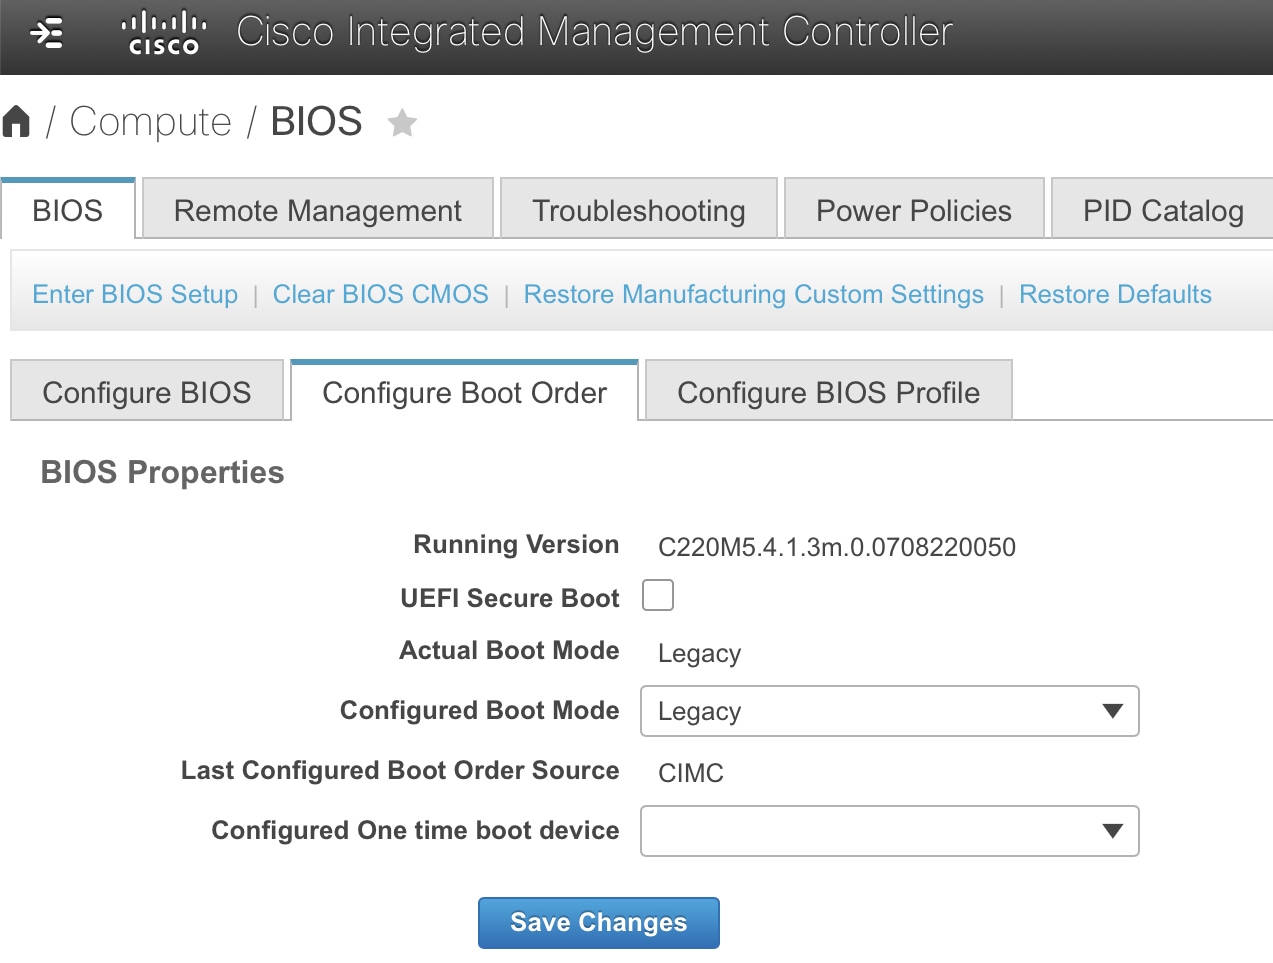 To access the Configure Boot Order tab, do the following:
Do not change the boot mode to UEFI. When this mode is set, your Cisco DNA Center appliance's interfaces may not be pingable. |
What to do next
When this task is complete, do one of the following:
-
If you need to reinstall Cisco DNA Center software before you configure your appliance, see Reimage the Appliance.
-
If you are ready to configure your appliance, proceed to the "Appliance Configuration Overview" topic specific to the configuration wizard you want to use:
NIC Bonding Overview
On any given Cisco DNA Center appliance, you can configure the Enterprise, Intracluster, Management, and Internet interface. If you enable network interface controller (NIC) bonding on an appliance, each of these interfaces has two instances: The primary instance (located on either your appliance's motherboard or Intel X710-DA2 NIC) is connected to one switch, and the secondary instance (located on your appliance's Intel X710-DA4 NIC) is connected to a different switch. NIC bonding consolidates the two instances of each interface into a single logical interface, appearing as a single device with one MAC address. Depending on the bonding mode that you choose when configuring the interfaces on your appliance, this feature provides the following benefits when enabled:
Note |
Both single-node and three-node Cisco DNA Center clusters support NIC bonding. |
-
Active-Backup mode: By default, this is the bonding mode that's configured for your appliance's interfaces when this feature is enabled on your appliance. It enables high availability (HA) for the two interfaces that Cisco DNA Center has grouped together. When the interface that's currently active goes down, the other interface takes its place and becomes active.
Note
When this mode is enabled on an interface that supports both 1-Gbps and 10-Gbps throughput, Cisco DNA Center automatically sets the throughput to 1-Gbps.
-
LACP mode: When selected, the two interfaces that Cisco DNA Center has grouped together share the same speed and duplex settings. This provides load balancing and higher bandwidth for the interfaces. In order to enable this mode, the following items must first be in place:
-
The Linux utility ethtool must support the base drivers that are used to retrieve the speed and duplex mode of each interface.
-
The switch that is connected to the Enterprise port must support dynamic interface aggregation.
-
After you enable LACP on the switch, ensure that you have set the LACP mode to active (which places the switch port connected to your appliance into an active negotiating state, in which the port initiates negotiations with remote ports by sending LACP packets) and the LACP rate to fast (which changes the rate at which the LACP control packets are sent to an LACP-supported interface from the default every 30 seconds to once every second).
Note
-
You can only enable LACP mode on your appliance's Enterprise and Intracluster interfaces. The Management and Internet Access interfaces only support Active-Backup mode.
-
You can only enable LACP mode on your appliance's Intracluster interface during the initial configuration of your appliance.
-
Before you use NIC bonding in your production environment, you should do the following:
-
Confirm that your appliance supports this feature. See Appliance Support.
-
If the Intel X710-DA4 NIC that shipped with your appliance is currently disabled, you need to enable it in order to make use of NIC bonding (see Enable NIC on an Upgraded Appliance).
-
Determine where the secondary ports are located on your appliance's rear panel. See Front and Rear Panels.
-
View the recommended appliance–switch cabling. See Interface Cable Connections.
Appliance Support
All second-generation Cisco DNA Center appliances support NIC bonding:
-
44-core appliance: Cisco part number DN2-HW-APL
-
44-core promotional appliance: Cisco part number DN2-HW-APL-U
-
56-core appliance: Cisco part number DN2-HW-APL-L
-
56-core promotional appliance: Cisco part number DN2-HW-APL-L-U
-
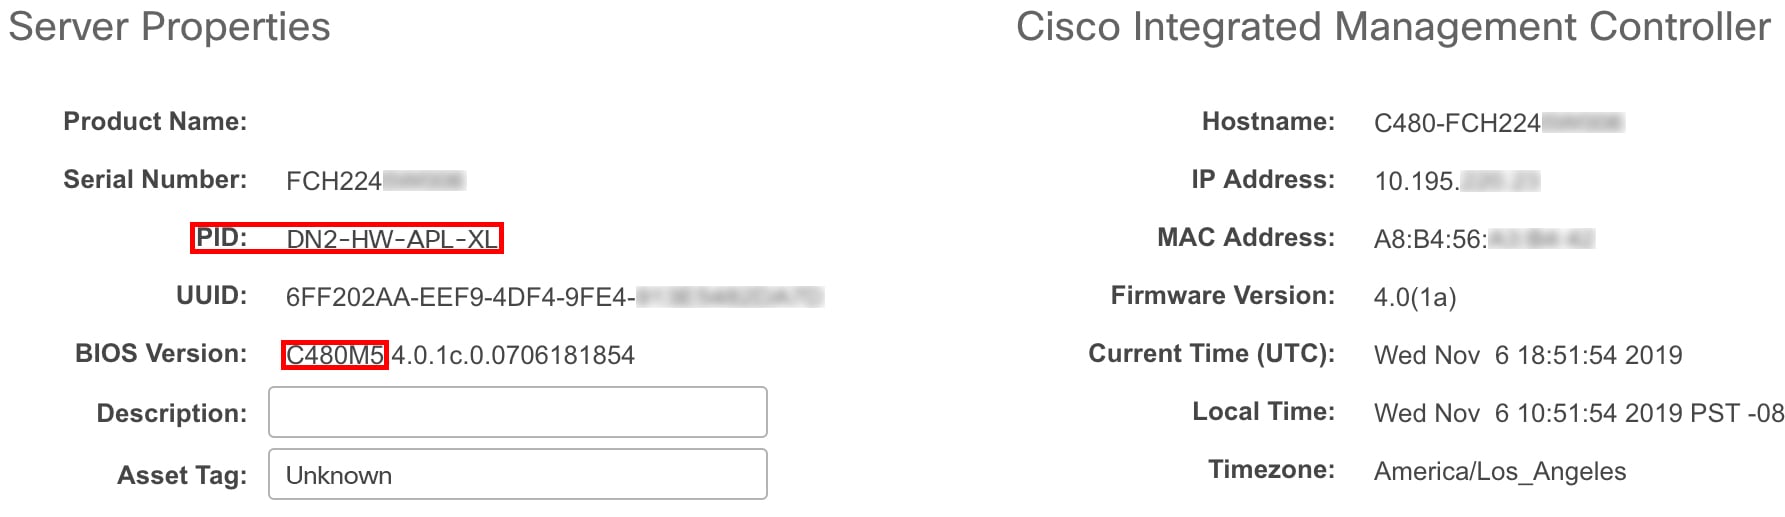
112-core appliance: Cisco part number DN2-HW-APL-XL
-
112-core promotional appliance: Cisco part number DN2-HW-APL-XL-U
Enable NIC on an Upgraded Appliance
If you plan to upgrade to Cisco DNA Center 2.3.5 from a previous version and want to enable the Intel X710-DA4 NIC, complete the following procedure.
Procedure
|
Step 1 |
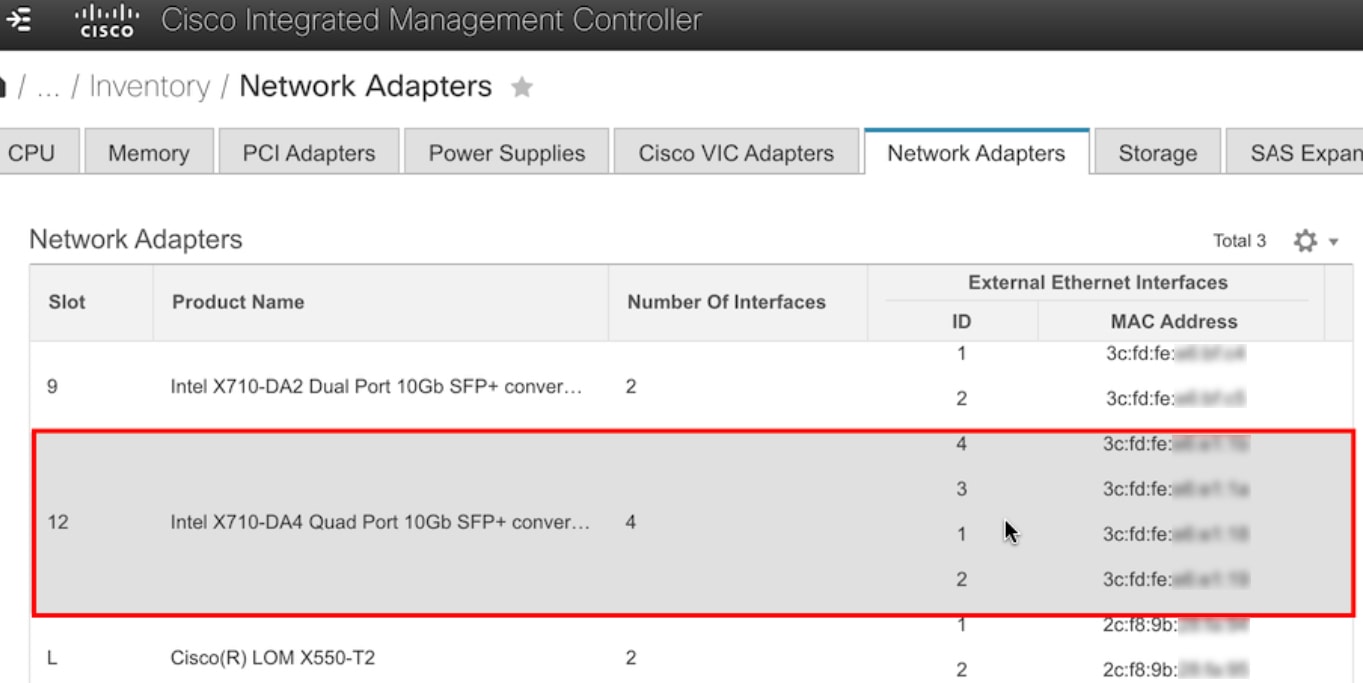
Confirm that your appliance has the Intel X710-DA4 NIC installed.
|
||
|
Step 2 |
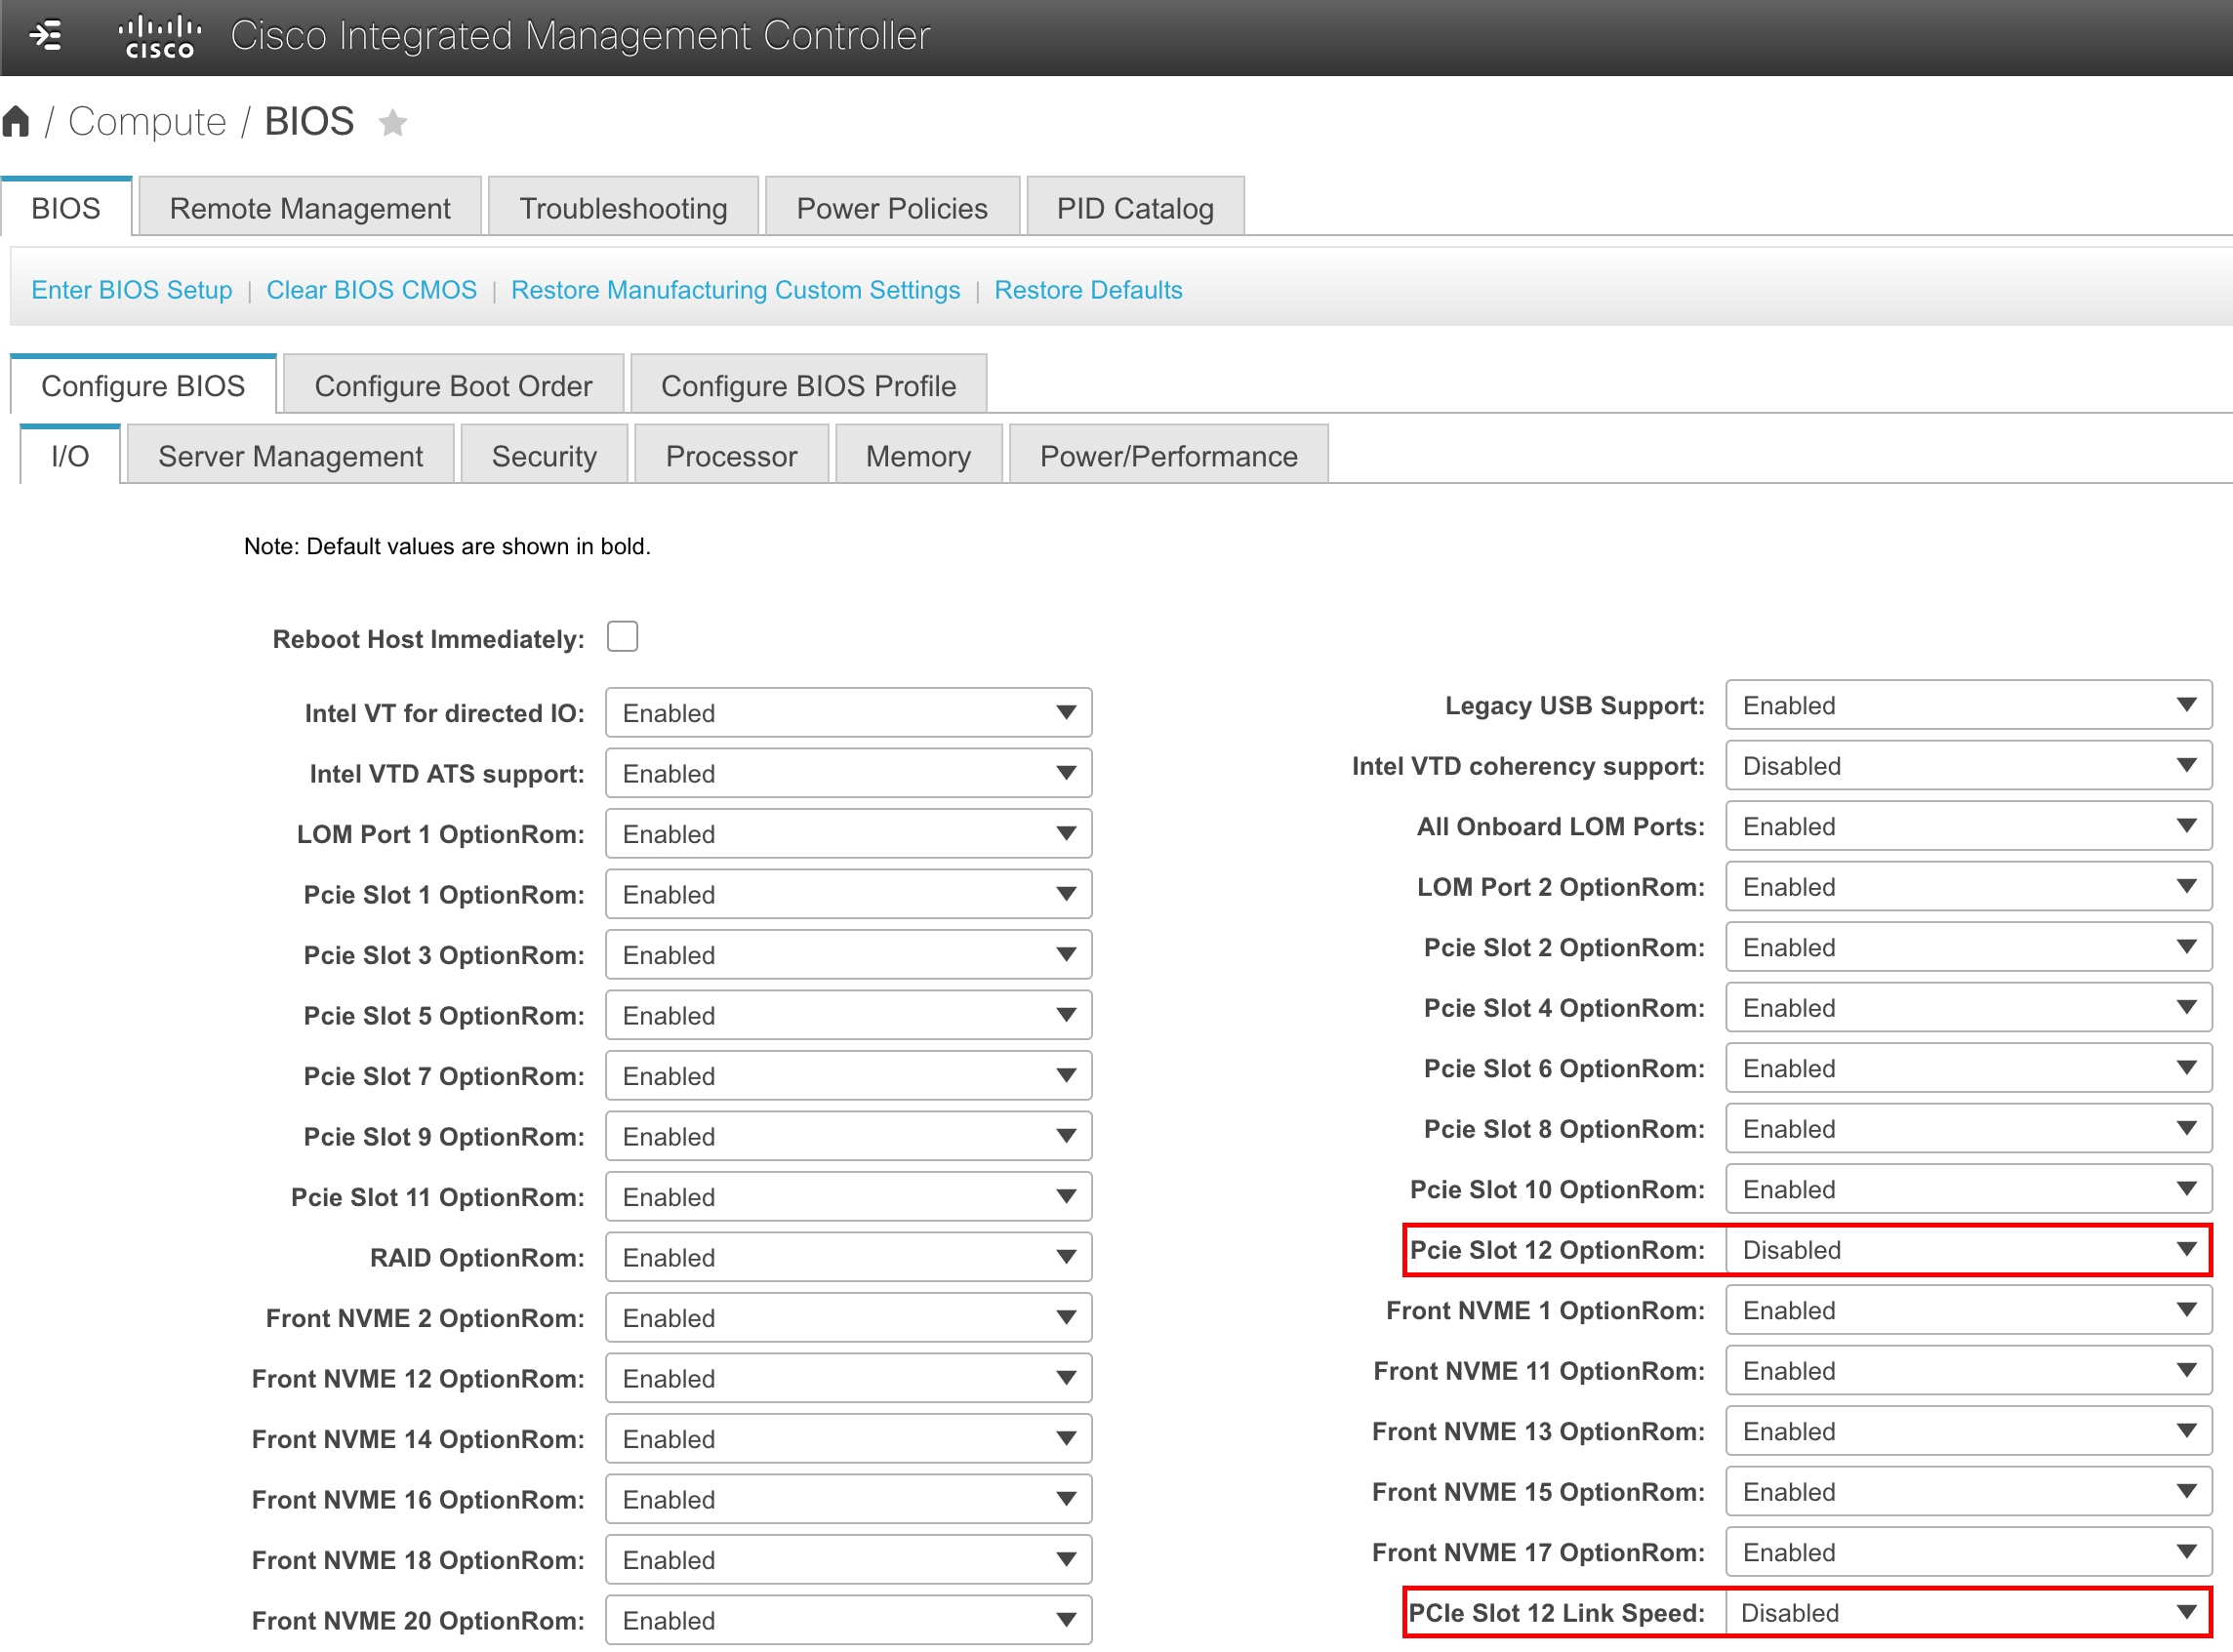
Confirm that the your appliance's PCIe card is enabled:
|
||
|
Step 3 |
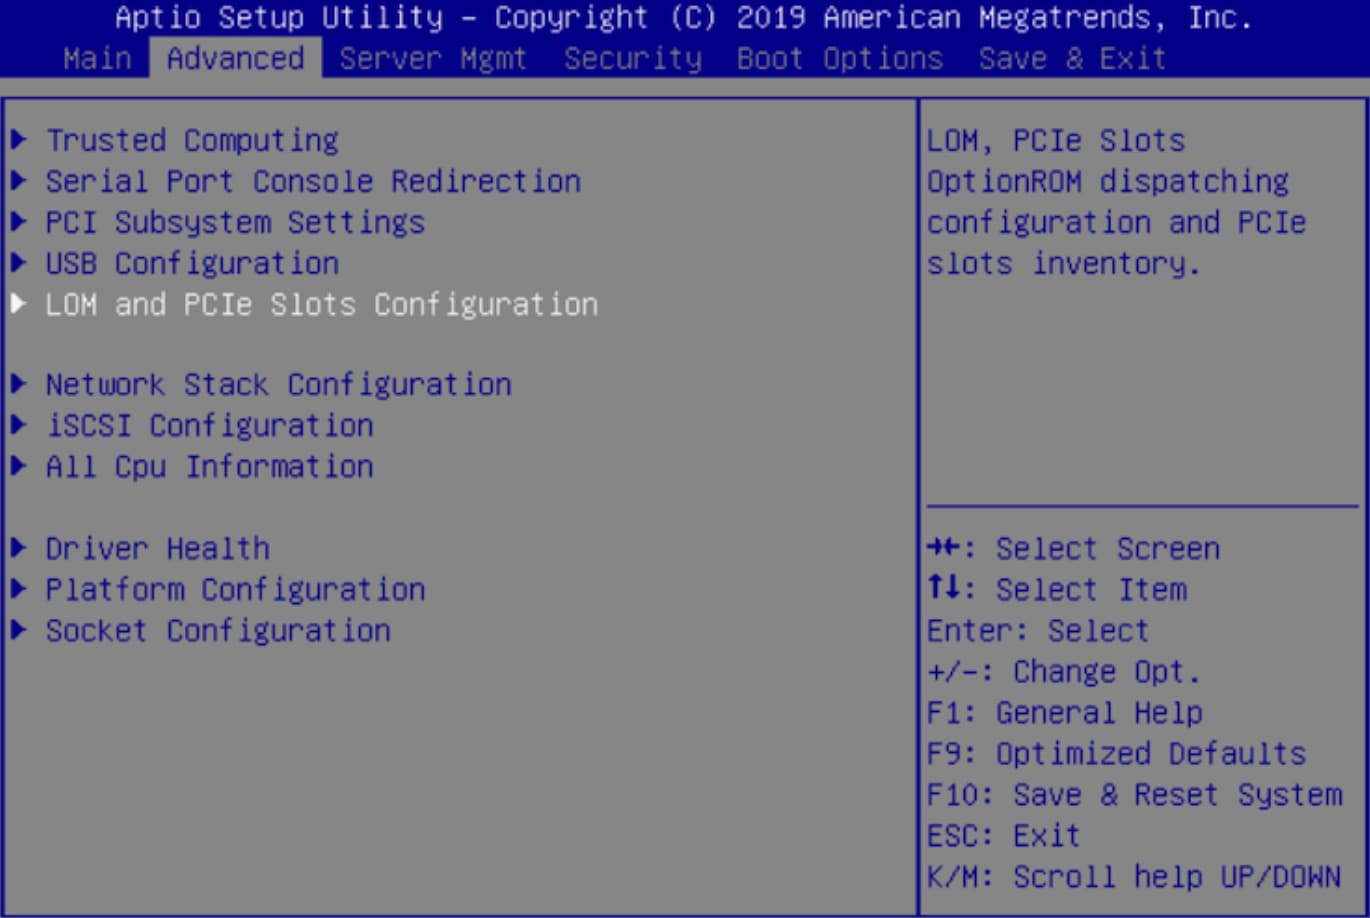
Boot into your appliance's BIOS:
|
||
|
Step 4 |
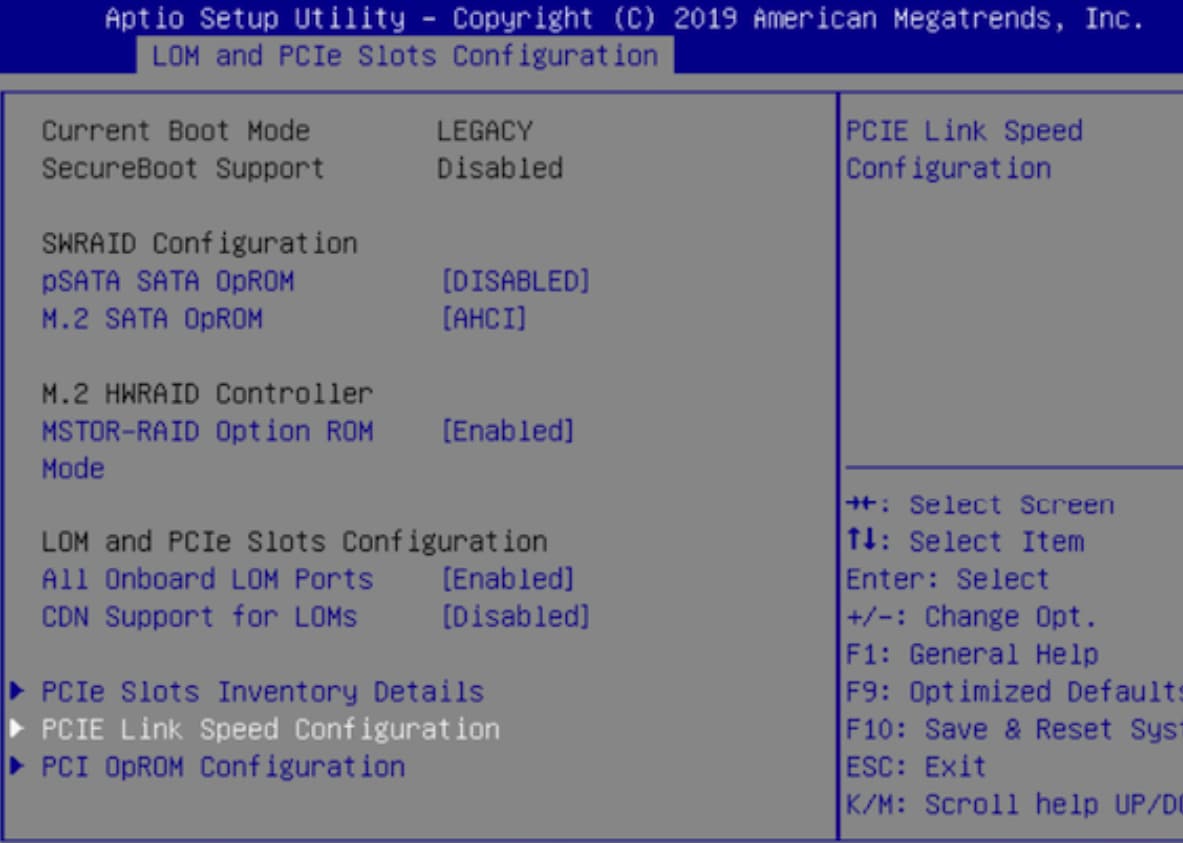
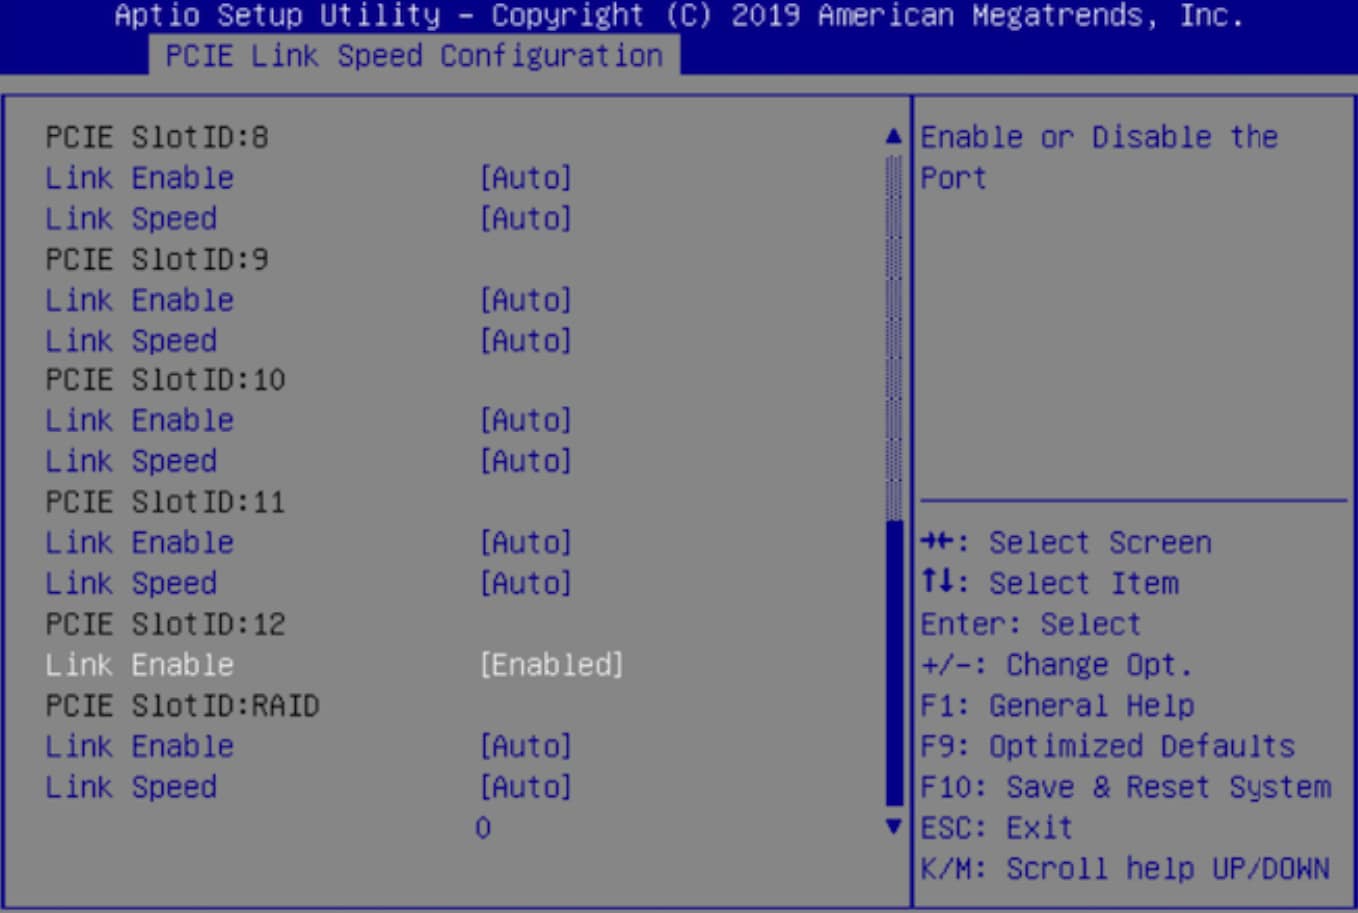
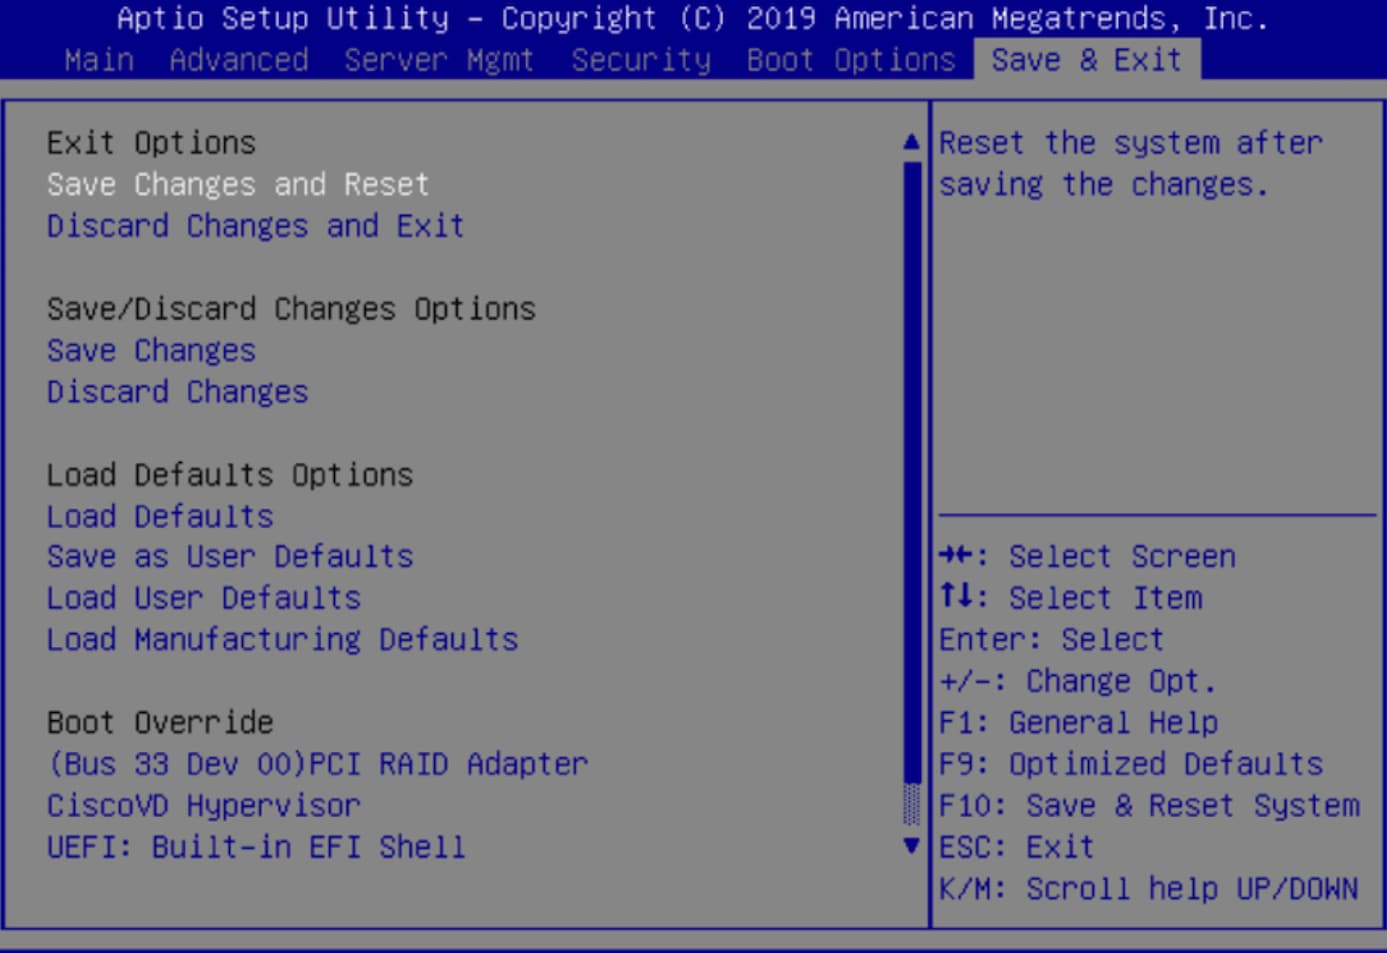
Enable the PCIe card:
|
||
|
Step 5 |
Upgrade to Cisco DNA Center 2.3.5. In the Cisco DNA Center Upgrade Guide, complete the upgrade procedure specific to your current version. During the upgrade, Cisco DNA Center will prepare your appliance to use the Intel X710-DA4 NIC. After the upgrade completes and your appliance reboots, Cisco IMC recognizes this NIC and the four interfaces that reside on it. Counting the four interfaces located on the Intel X710-DA2 NIC and appliance motherboard, that makes a total of eight interfaces on your appliance. |
||
|
Step 6 |
Complete the configuration wizard to finalize the use of the Intel X710-DA4 NIC on your appliance, as described in Reconfigure the Appliance Using the Configuration Wizard. |

Reimage the Appliance
Situations that require you to reimage your Cisco DNA Center appliance, such as recovering from a backup or changing your cluster link configuration, might arise. To do so, complete the following procedure.
Procedure
|
Step 1 |
Download the Cisco DNA Center ISO image and verify that it is a genuine Cisco image. |
|
Step 2 |
Create a bootable USB drive that contains the Cisco DNA Center ISO image. |
|
Step 3 |
Reinitialize the virtual drives that are managed by your appliance’s RAID controller: Reinitialize the Virtual Drives on a Cisco DNA Center Appliance. |
|
Step 4 |
Reinstall Cisco DNA Center onto your appliance. |
Verify the Cisco DNA Center Image
Before deploying Cisco DNA Center, we strongly recommend that you verify that the image you downloaded is a genuine Cisco image.
Before you begin
Obtain the location of the Cisco DNA Center image (through email or by contacting the Cisco support team).
Procedure
|
Step 1 |
Download the Cisco DNA Center image (.iso, .bin, .zip) from the location specified by Cisco. |
||
|
Step 2 |
Download the Cisco public key (cisco_image_verification_key.pub) for signature verification from the location specified by Cisco. |
||
|
Step 3 |
Download the secure hash algorithm (SHA512) checksum file for the image from the location specified by Cisco. |
||
|
Step 4 |
Obtain the image's signature file (.sig) from Cisco support through email or by download from the secure Cisco website (if available). |
||
|
Step 5 |
(Optional) Perform an SHA verification to determine whether the image is corrupted due to a partial download. Depending on your operating system, enter one of the following commands:
Microsoft Windows does not include a built-in checksum utility, but you can use the certutil tool: For example: On Windows, you can also use the Windows PowerShell to generate the digest. For example: Compare the command output to the SHA512 checksum file that you downloaded. If the command output does not match, download the image again and run the appropriate command a second time. If the output still does not match, contact Cisco support. |
||
|
Step 6 |
Verify that the image is genuine and from Cisco by verifying its signature: openssl dgst -sha512 -verify cisco_image_verification_key.pub -signature signature-filename image-filename
If the image is genuine, running this command displays a |
||
|
Step 7 |
After confirming that you have downloaded a Cisco image, create a bootable USB drive that contains the Cisco DNA Center image. See Create a Bootable USB Drive. |
Create a Bootable USB Flash Drive
Complete one of the following procedures to create a bootable USB flash drive from which you can install the Cisco DNA Center ISO image.
Before you begin:
-
Download and verify your copy of the Cisco DNA Center ISO image. See Verify the Cisco DNA Center ISO Image.
-
Confirm that the USB flash drive you are using:
-
Is USB 3.0 or later.
-
Has a capacity of at least 64 GB.
-
Is unencrypted.
-
Note |
Do not use the Rufus utility to burn the Cisco DNA Center ISO image. Use only Etcher, the Linux CLI, or the Mac CLI. |
Using Etcher
Procedure
|
Step 1 |
Download and install Etcher (Version 1.3.1 or later), an open-source freeware utility that allows you to create a bootable USB drive on your laptop or desktop. Linux, macOS, and Windows versions of Etcher are currently available. You can download a copy at https://www.balena.io/etcher/.
|
||
|
Step 2 |
From the machine on which you installed Etcher, connect a USB drive and then start Etcher. |
||
|
Step 3 |
In the top-right corner of the window, click
|
||
|
Step 4 |
Click Back to return to the main Etcher window. |
||
|
Step 5 |
Click Select Image. |
||
|
Step 6 |
Navigate to the Cisco DNA Center ISO image you downloaded previously, select it, and then click Open. The name of the USB drive you connected should be listed under the drive icon (
|
||
|
Step 7 |
Click Flash! to copy the ISO image to the USB drive. Etcher configures the USB drive as a bootable drive with the Cisco DNA Center ISO image installed. |
Using the Linux CLI
Procedure
|
Step 1 |
Verify that your USB flash drive is recognized by your machine: |
|
Step 2 |
Burn the Cisco DNA Center ISO image you downloaded previously onto your USB flash drive: time sudo dd if=/data/tmp/ISO-image-filename of=/dev/flash-drive-partition bs=4M && sync status=progress For example, to create a bootable USB drive using an ISO image named |
Using the Mac CLI
Procedure
|
Step 1 |
Determine the disk partition associated with your USB flash drive: |
||
|
Step 2 |
Unmount the flash drive's partition: diskutil unmountDisk flash-drive-partition Continuing our example, you would enter diskutil unmountDisk /dev/disk2 |
||
|
Step 3 |
Using the Cisco DNA Center ISO image you downloaded previously, create a disk image: hdiutil convert -format UDRW -o Cisco-DNA-Center-version ISO-image-filename Continuing our example, let's assume that you are working with a Cisco DNA Center ISO image named
|
||
|
Step 4 |
Create a bootable USB drive: sudo dd if=macOS-disk-image-filename of=flash-drive-partition bs=1m status=progress Continuing our example, you would run the following command: sudo dd if=CDNAC-1.330.dmg of=/dev/disk2 bs=1m status=progress The ISO image is about 18 GB in size, so this can take around an hour to complete. |
Reinitialize the Virtual Drives on a Cisco DNA Center Appliance
Complete the following procedure to reinitialize the virtual drives on your Cisco DNA Center appliance.
Procedure
|
Step 1 |
Log in to the appliance's Cisco IMC using the Cisco IMC IP address, user ID, and password you set in Enable Browser Access to Cisco Integrated Management Controller. |
|
Step 2 |
From the top-left corner of the Cisco IMC GUI, click the Toggle Navigation icon ( |
|
Step 3 |
From the Cisco IMC menu, choose . |
|
Step 4 |
Click the Virtual Drive Info tab. |
|
Step 5 |
Check the check box for the first virtual drive that's listed (drive number 0), then click Initialize. |
|
Step 6 |
From the Initialize Type drop-down list, choose Full Initialize. |
|
Step 7 |
Click Initialize VD. |
|
Step 8 |
Repeat Step 5 through Step 7 for the appliance’s other virtual drives, but choose Fast Initialize. (Only the first virtual drive requires full initialization. The second and third virtual drives don’t require full initialization.) |
Install the Cisco DNA Center ISO Image
Complete the following procedure to install the Cisco DNA Center ISO image onto your appliance.
Before you begin
Create the bootable USB drive from which you will install the Cisco DNA Center ISO image. See Create a Bootable USB Drive.
Procedure
|
Step 1 |
Connect the bootable USB drive with the Cisco DNA Center ISO image to the appliance. |
||
|
Step 2 |
Log in to Cisco IMC and start a KVM session. |
||
|
Step 3 |
Power on or power cycle the appliance:
|
||
|
Step 4 |
In the resulting pop-up window, click Yes to acknowledge that you are about to execute a server control action. |
||
|
Step 5 |
When the Cisco logo appears, either press the F6 key or choose from the KVM menu. The boot device selection menu appears. |
||
|
Step 6 |
Select your USB drive and then press Enter. |
||
|
Step 7 |
In the GNU GRUB bootloader window, choose Cisco DNA Center Installer and then press Enter.
The installer reboots and opens the wizard's welcome screen. Depending on whether you are going to configure a primary or secondary cluster node, proceed to Step 4 in either Configure the Primary Node Using the Maglev Wizard or Configure a Secondary Node Using the Maglev Wizard. |
Cisco DNA Center Appliance Configuration
When installation of the Cisco DNA Center ISO image completes, the installer reboots and opens the Maglev Configuration wizard's welcome screen. To complete the reimaging of your appliance, complete the steps described in Configure the Appliance Using the Maglev Wizard.