Configure the 44/56-Core Appliance Using the Browser-Based Wizard
Appliance Configuration Overview
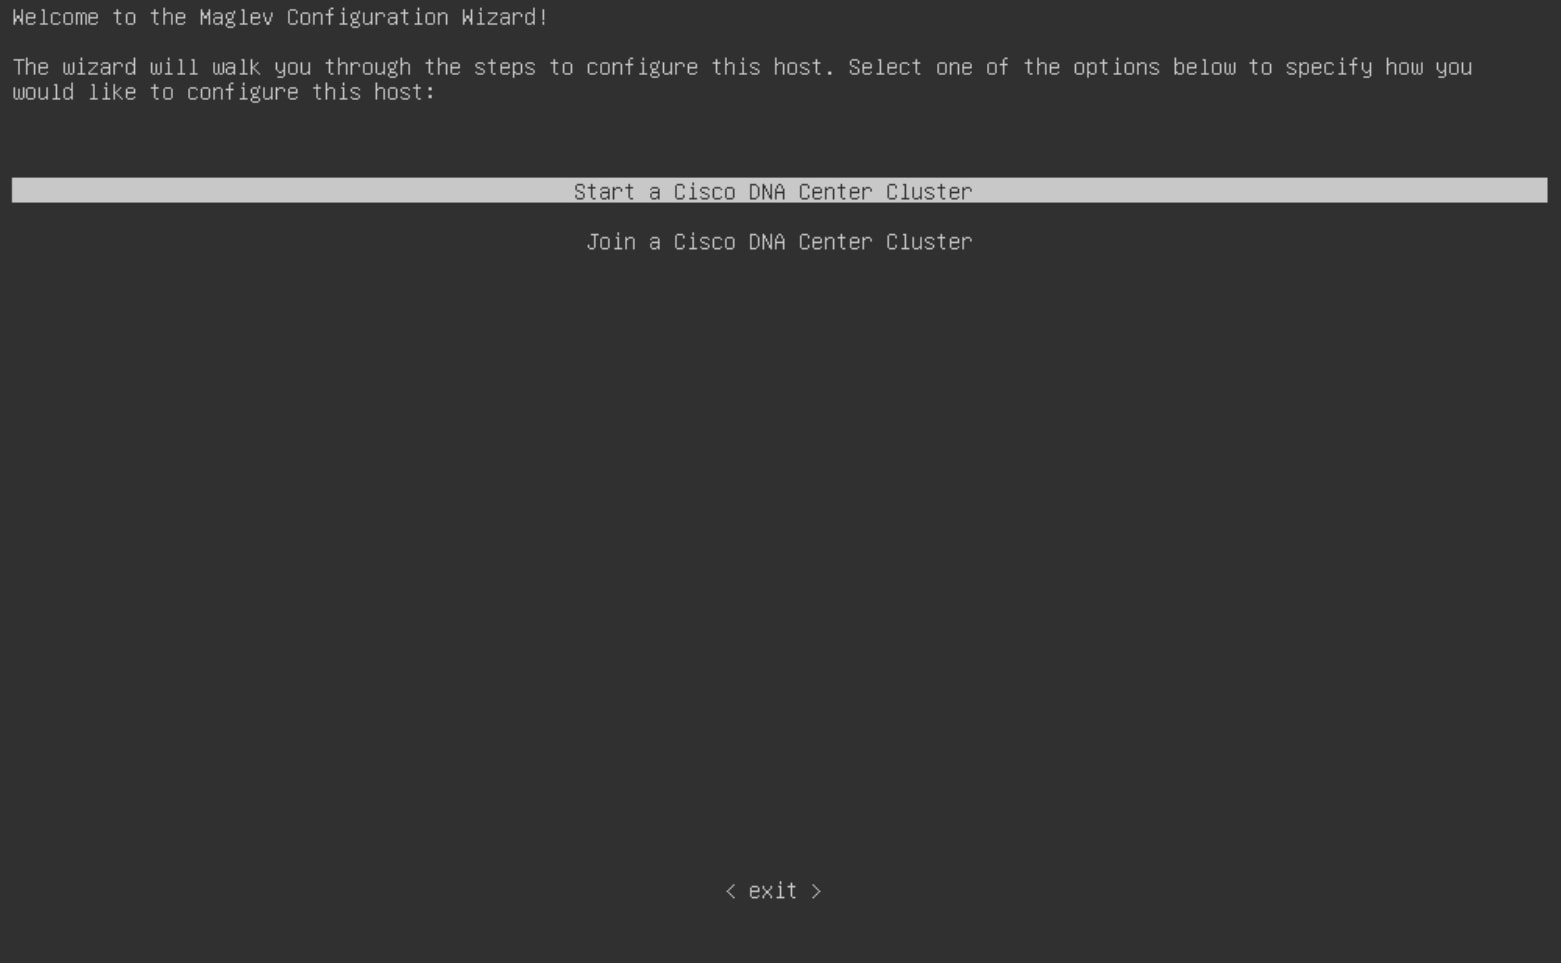
You can deploy the 44- or 56-core appliance in your network in one of the following modes:
-
Standalone: As a single node offering all the functions. This option is usually preferred for initial or test deployments and in smaller network environments. If you choose the Standalone mode for your initial deployment, this will be your first, or primary, node. Note that you can add more appliances later to form a cluster.
-
Cluster: As a node that belongs to a three-node cluster. In this mode, all the services and data are shared among the hosts. This is the preferred option for large deployments. If you choose the Cluster mode for your initial deployment, be sure to finish configuring the primary node before configuring the secondary nodes.
To proceed, first configure the primary node in your cluster. Then, if you have installed three appliances and want to add the second and third nodes to your cluster, configure the secondary nodes.
Browser-Based Configuration Wizards
Cisco DNA Center offers two browser-based wizards that you can use to configure your appliance. Read their descriptions to determine which of these wizards you should complete.
 Important |
These wizards are available for use if you are configuring a new appliance that came with Cisco DNA Center 2.3.5 already installed. If you upgraded from a previous version and want to use these wizards, contact Cisco TAC for assistance. |
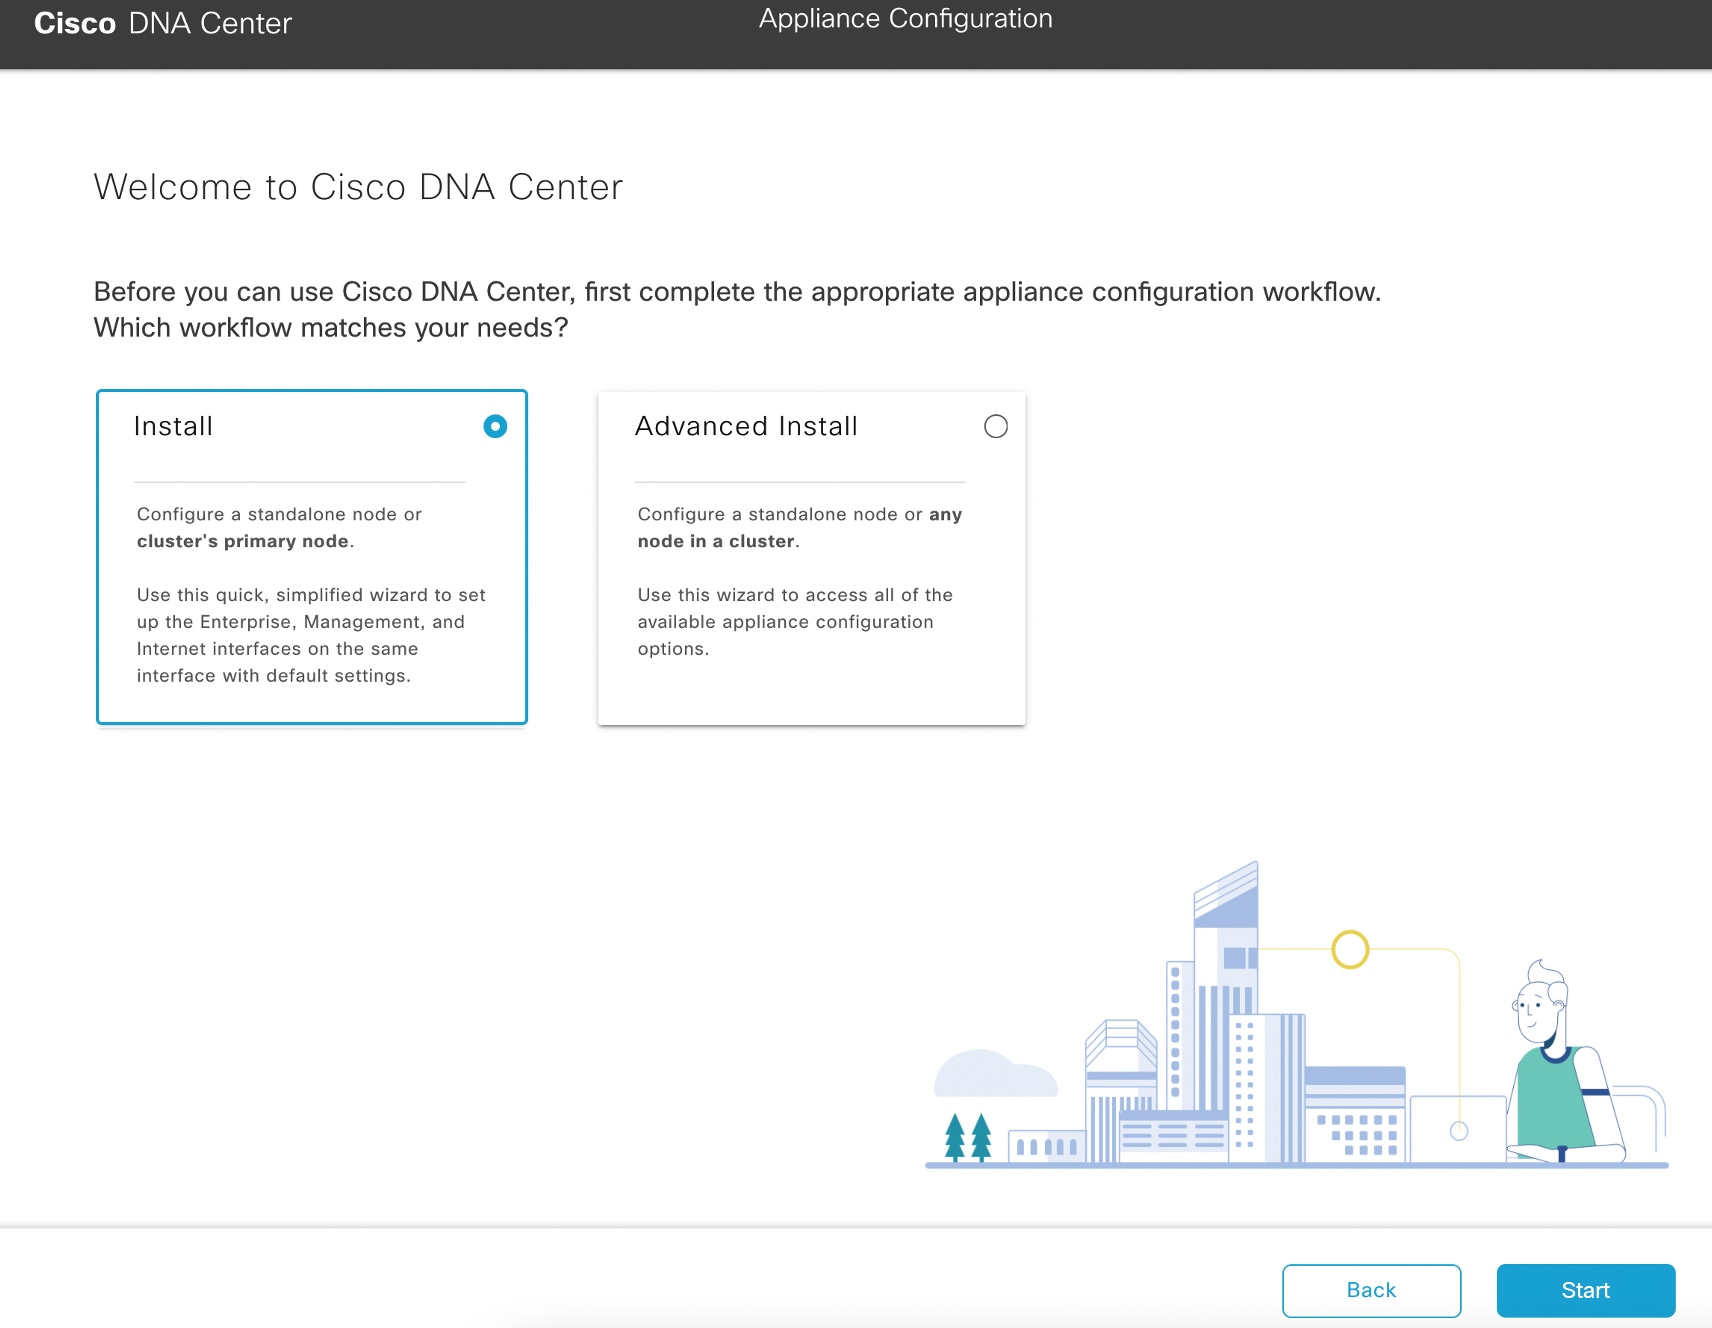
Install Configuration Wizard
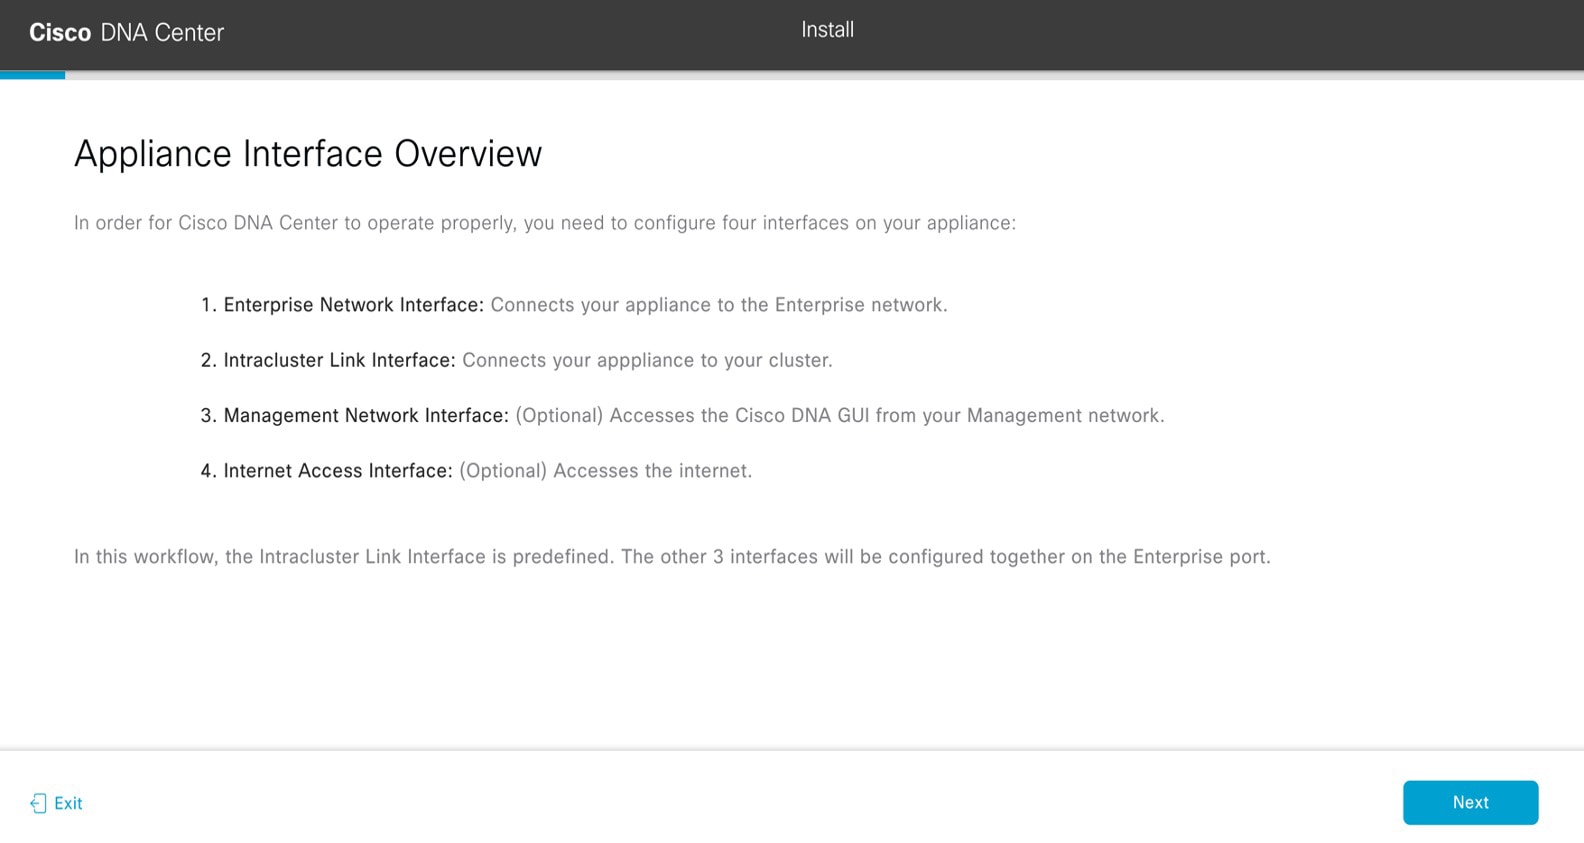
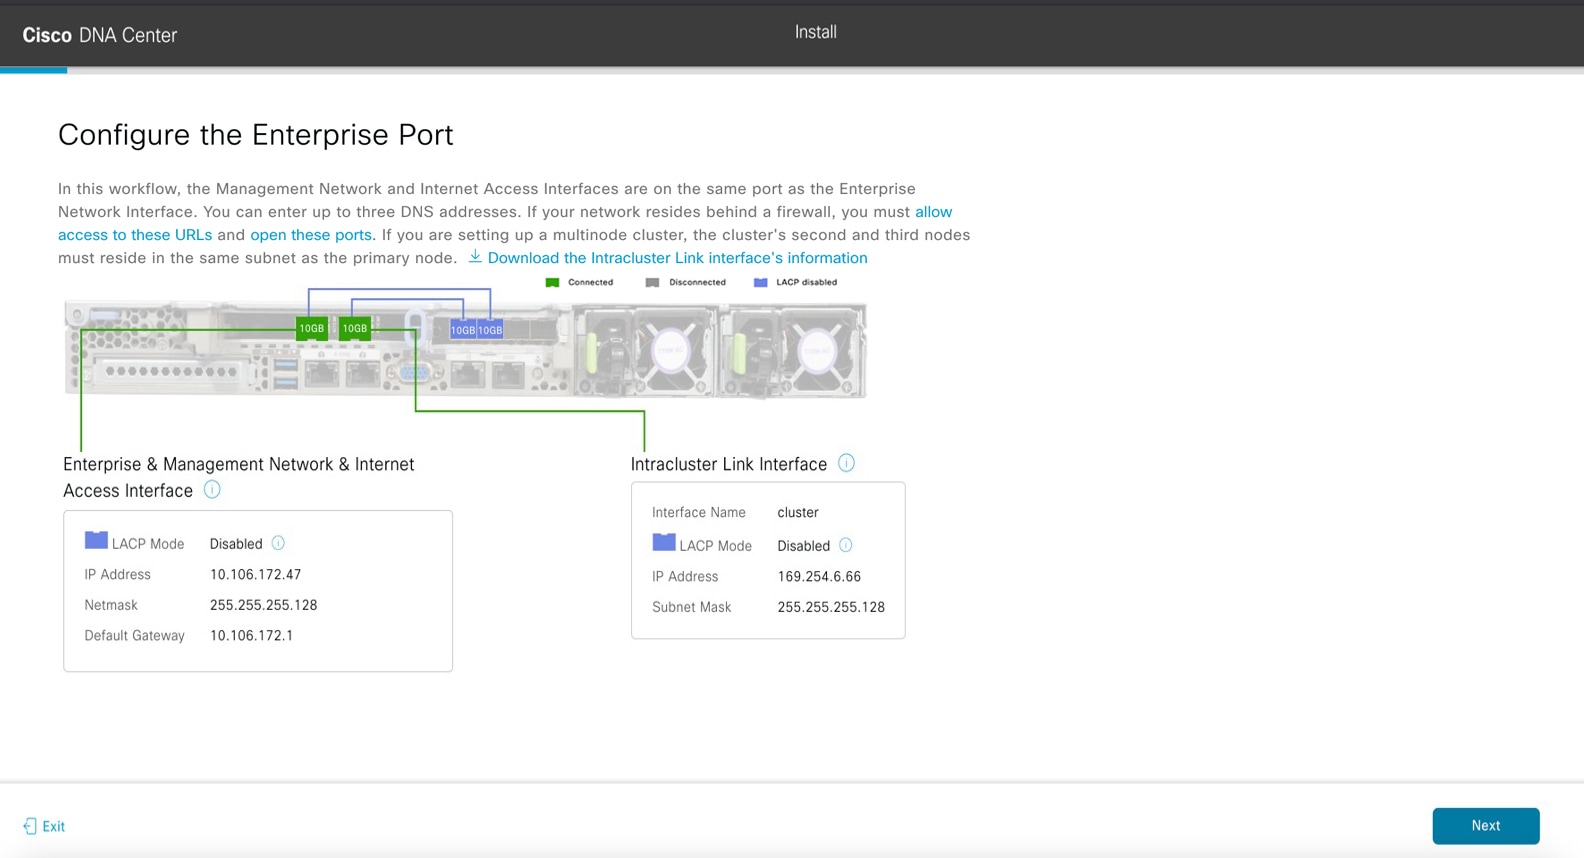
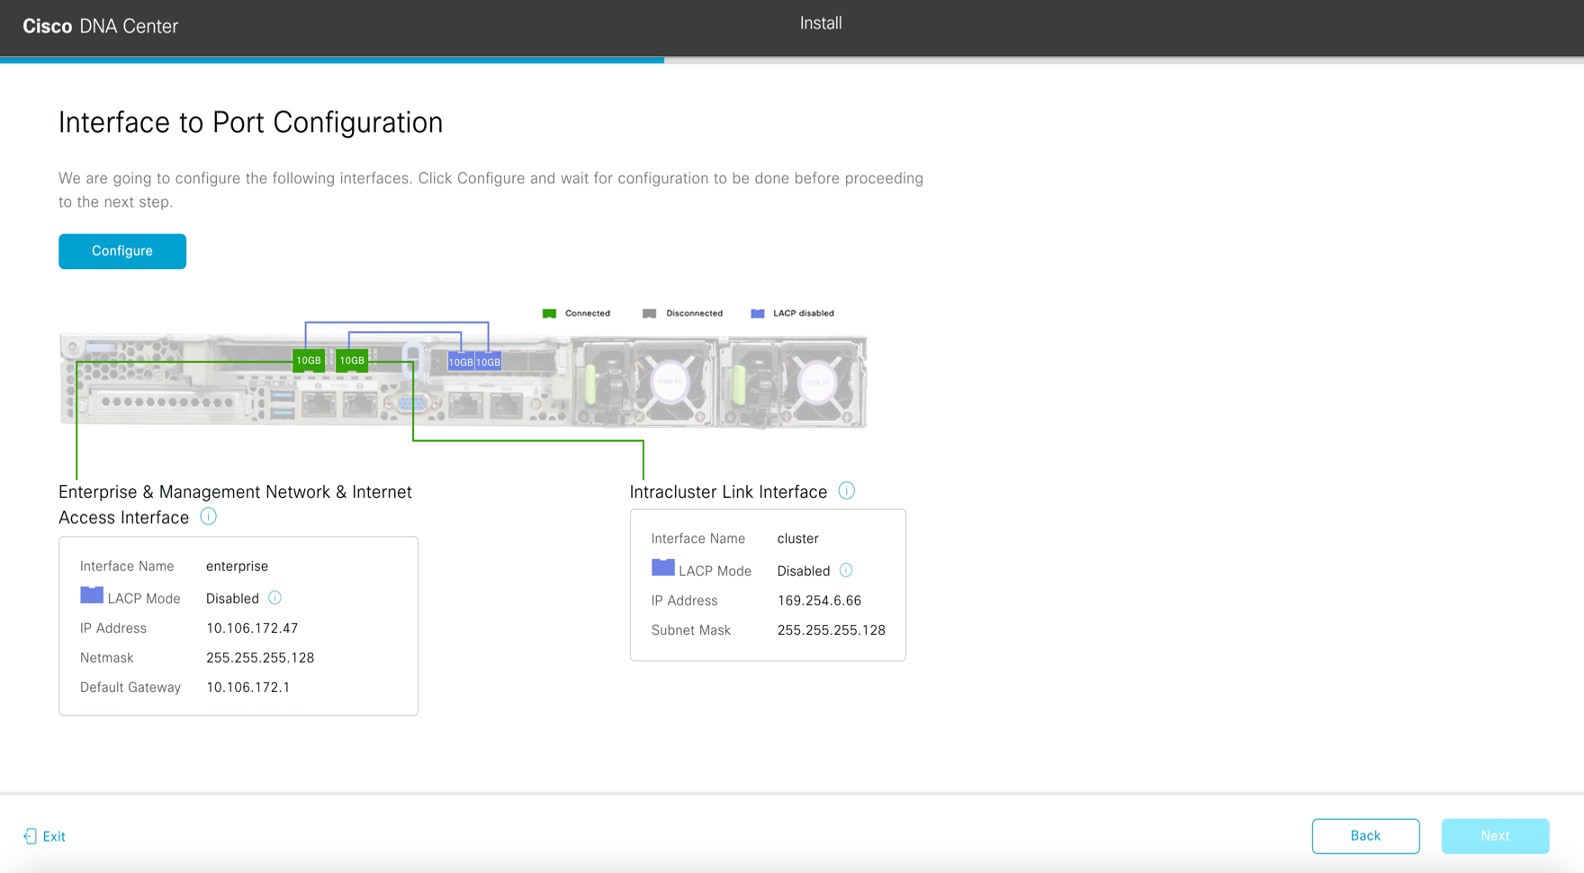
This wizard streamlines the appliance configuration process by setting default values for the Enterprise, Management, and Internet Access interfaces (which all reside on the appliance’s Enterprise port) as well as the Intracluster interface. Use this wizard if you are okay with using the default interface settings and want to get your appliance up and running as quickly as possible. Note that you cannot use this wizard to do the following:
-
To configure a cluster’s secondary nodes.
-
To configure a first-generation 44-core Cisco DNA Center appliance.
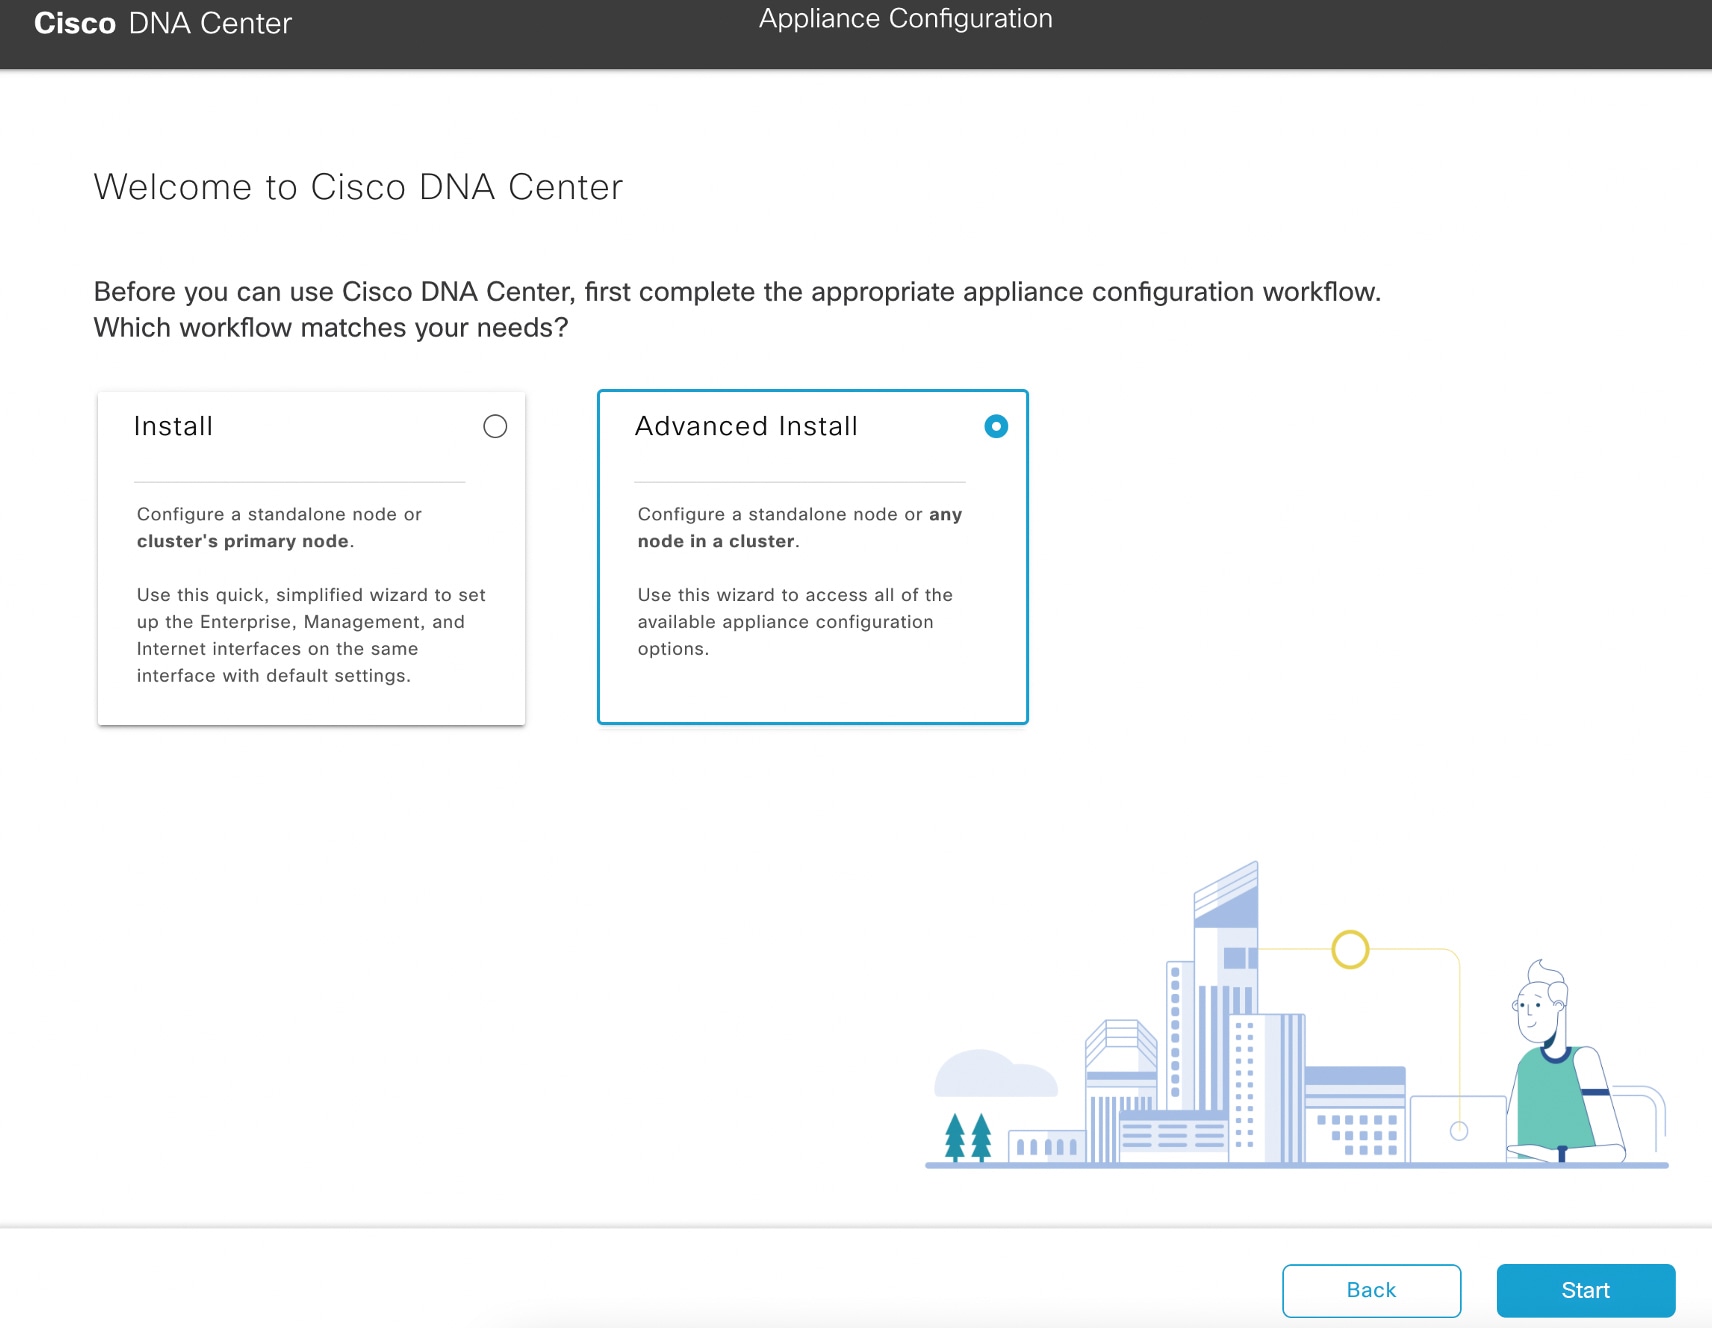
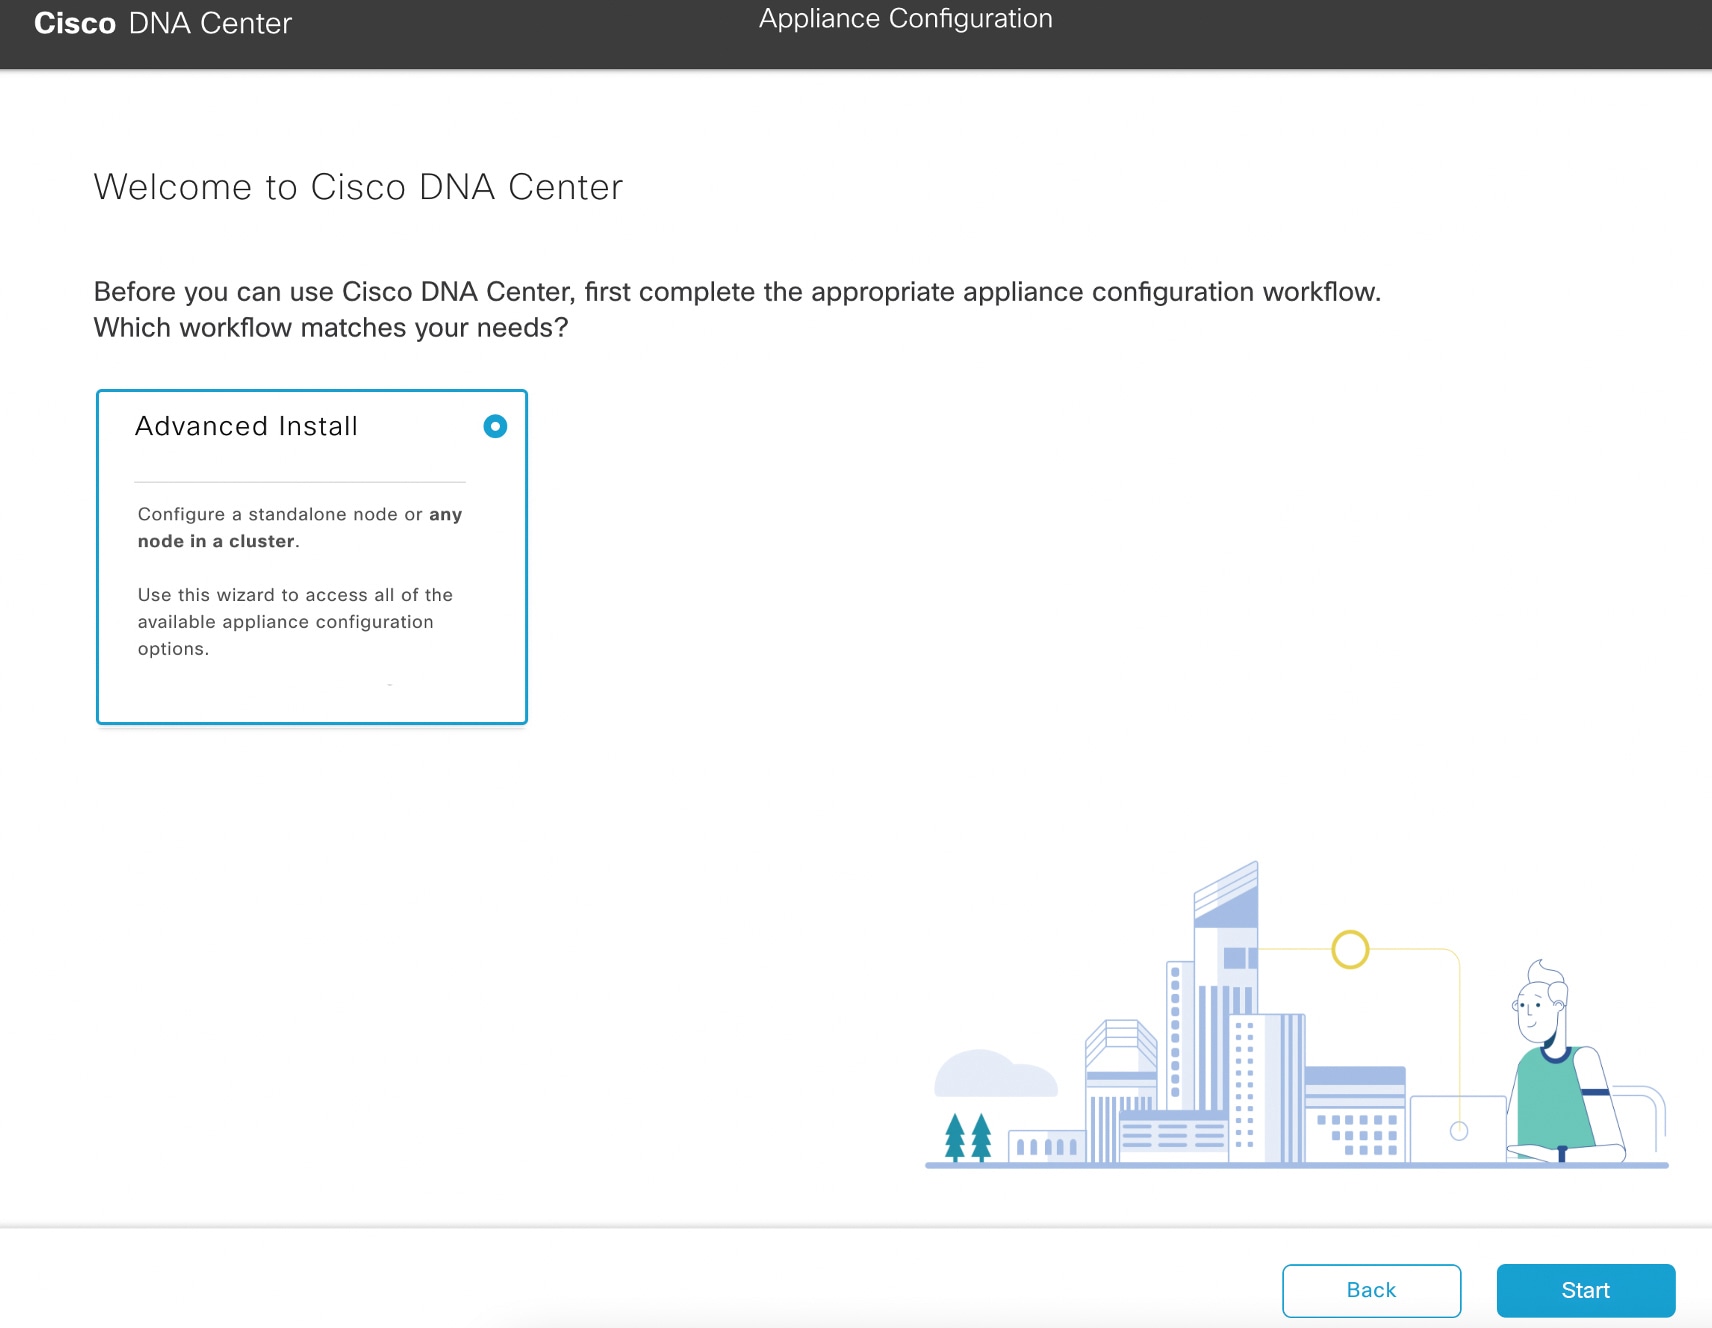
Advanced Install Configuration Wizard
This wizard provides access to all of the available appliance settings that you can modify. Use this wizard if you want to specify interface settings that are different from the default settings. Also use this wizard if you are configuring the second or third node in your cluster.
Browser-Based Wizard Prerequisites
To use either of the browser-based wizards and ensure that it configures your appliance properly, complete the following tasks:
-
Designate the Enterprise interface on your appliance to use the IP address, subnet mask, and default gateway that a DHCP server assigns to it. When you configure this interface in the wizard, you will not be able to change the IP address or subnet mask that have been assigned to it. You will only be able to change its default gateway. The topics in this chapter assume that the Enterprise interface was chosen for this purpose.
-
Confirm that the IP address assigned by the DHCP server is reachable by the machine from which you will complete the wizard.
-
For the Enterprise and Intracluster interfaces, verify that both interfaces are connected and in the UP state.
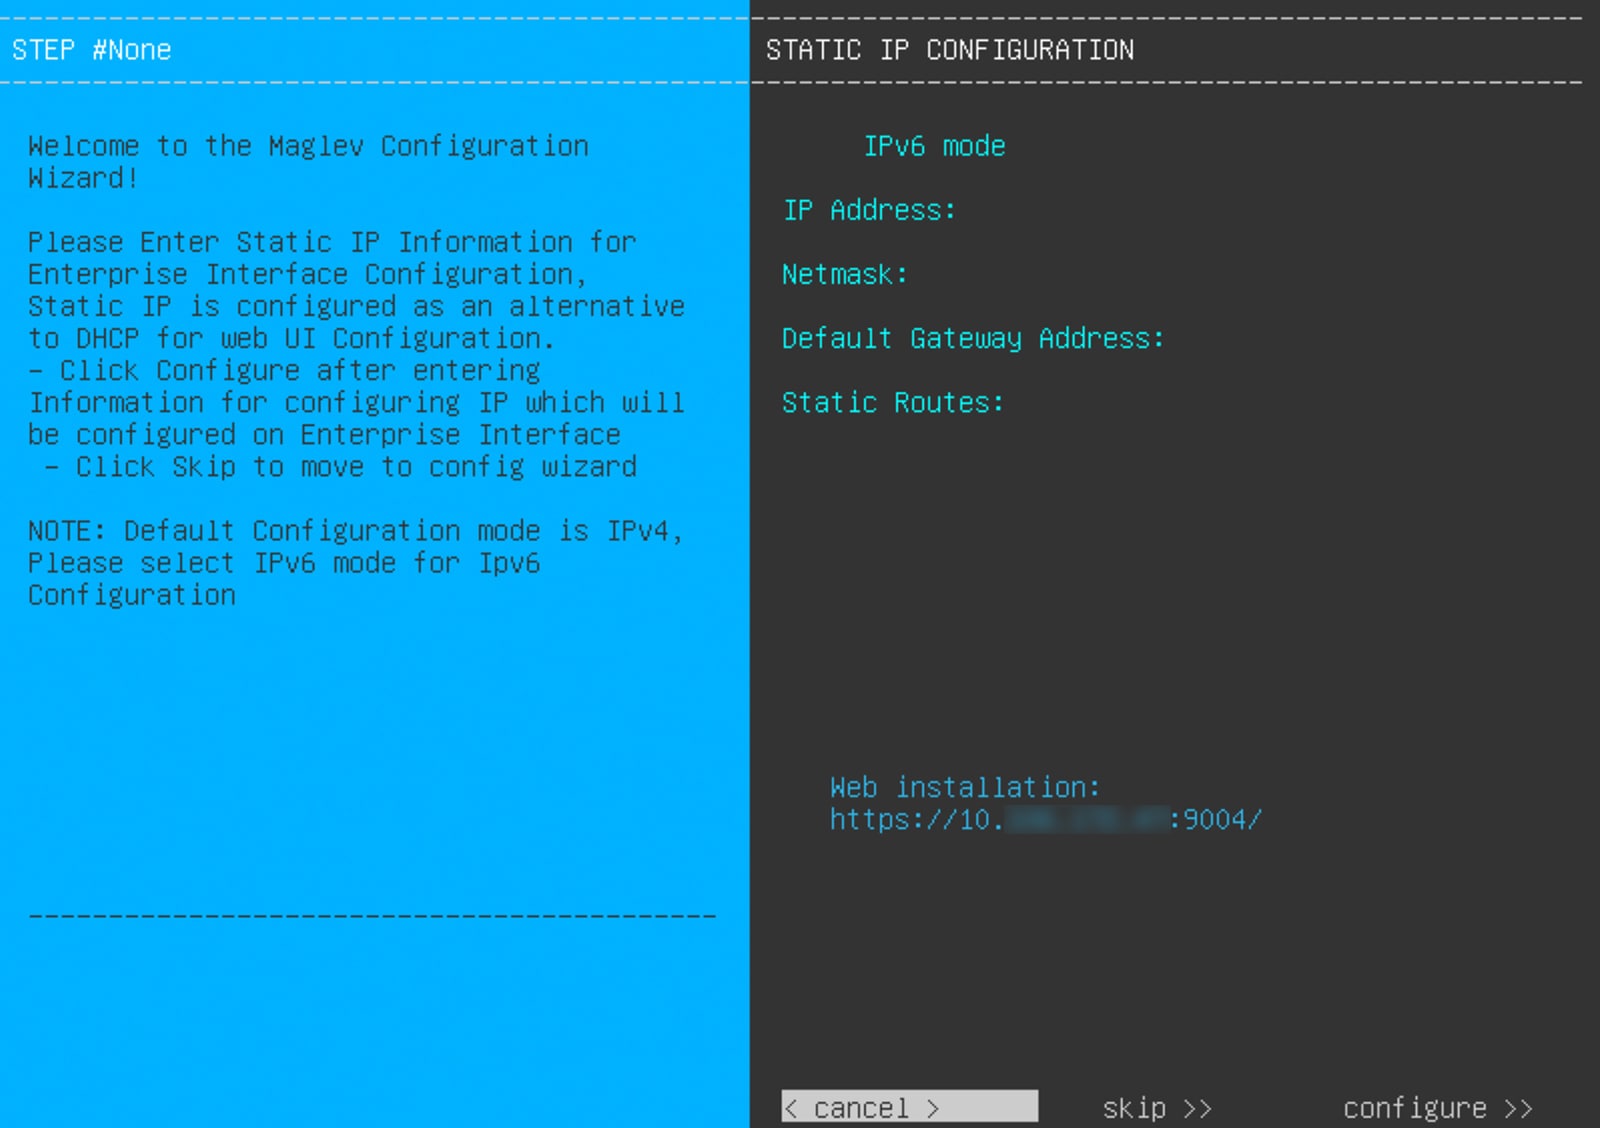
If you want to specify your own IP address, subnet mask, and default gateway for your appliance's Enterprise interface (and not use the values assigned by a DHCP server), ensure that you complete the Static IP Address Settings screen.
VLAN Mode Considerations
Note these points regarding VLAN Mode:
-
For a description of VLAN Mode, see Steps 7 and 8 in Configure the Primary Node Using the Maglev Wizard.
-
VLAN Mode:
-
Can only be enabled when you configure a Cisco DNA Center appliance using the Maglev Configuration wizard.
-
Can't be enabled using any of the browser-based configuration wizards.
-
Can't be disabled without reimaging the appliance.
-
-
Disaster recovery is not supported by Cisco DNA Center deployments that have VLAN Mode enabled.
Configure an Appliance Using the Install Configuration Wizard
Perform this procedure to configure either a three-node cluster's primary node or a standalone node using the Install configuration wizard. The wizard simplifies the configuration process by setting up the Enterprise, Management, and Internet interfaces on the same port using default settings. The following second-generation Cisco DNA Center appliances support configuration using this wizard:
-
44-core appliance: Cisco part number DN2-HW-APL
-
44-core promotional appliance: Cisco part number DN2-HW-APL-U
-
56-core appliance: Cisco part number DN2-HW-APL-L
-
56-core promotional appliance: Cisco part number DN2-HW-APL-L-U
The first-generation 44-core Cisco DNA Center appliance (Cisco part number DN1-HW-APL) cannot be configured using this wizard.
Important |
|
Before you begin
Ensure that you:
-
Installed the Cisco DNA Center software image onto your appliance, as described in Reimage the Appliance.
Important
This is only applicable if you are going to configure a promotional appliance because the Cisco DNA Center software image is not preinstalled on the following appliances:
-
44-core promotional appliance (Cisco part number DN2-HW-APL-U)
-
56-core promotional appliance: (Cisco part number DN2-HW-APL-L-U)
-
-
Collected all of the information called for in Required IP Addresses and Subnets and Required Configuration Information.
-
Installed the appliance, as described in Appliance Installation Workflow.
-
Configured Cisco IMC browser access on this appliance, as described in Enable Browser Access to Cisco Integrated Management Controller.
-
Checked that the appliance's ports and the switches it uses are properly configured, as described in Execute Preconfiguration Checks.
-
Are using a browser that is compatible with Cisco IMC and Cisco DNA Center. For a list of compatible browsers, see the Release Notes for the version of Cisco DNA Center that you are installing.
-
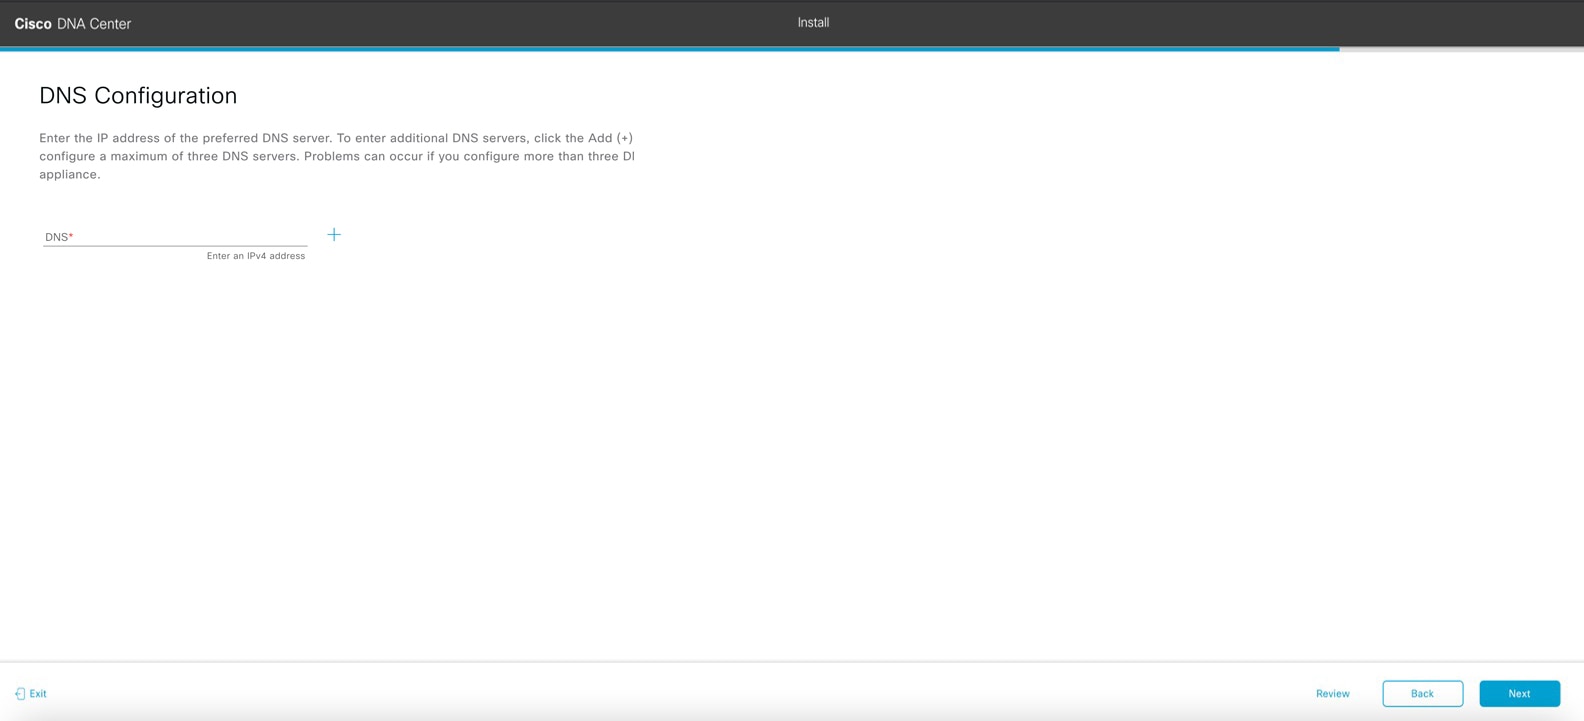
Enabled ICMP on the firewall between Cisco DNA Center and the DNS servers you will specify in the following procedure. This wizard uses Ping to verify the DNS server you specify. This ping can be blocked if there is a firewall between Cisco DNA Center and the DNS server and ICMP is not enabled on that firewall. When this happens, you will not be able to complete the wizard.
Procedure
|
Step 1 |
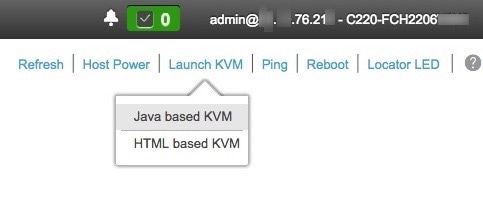
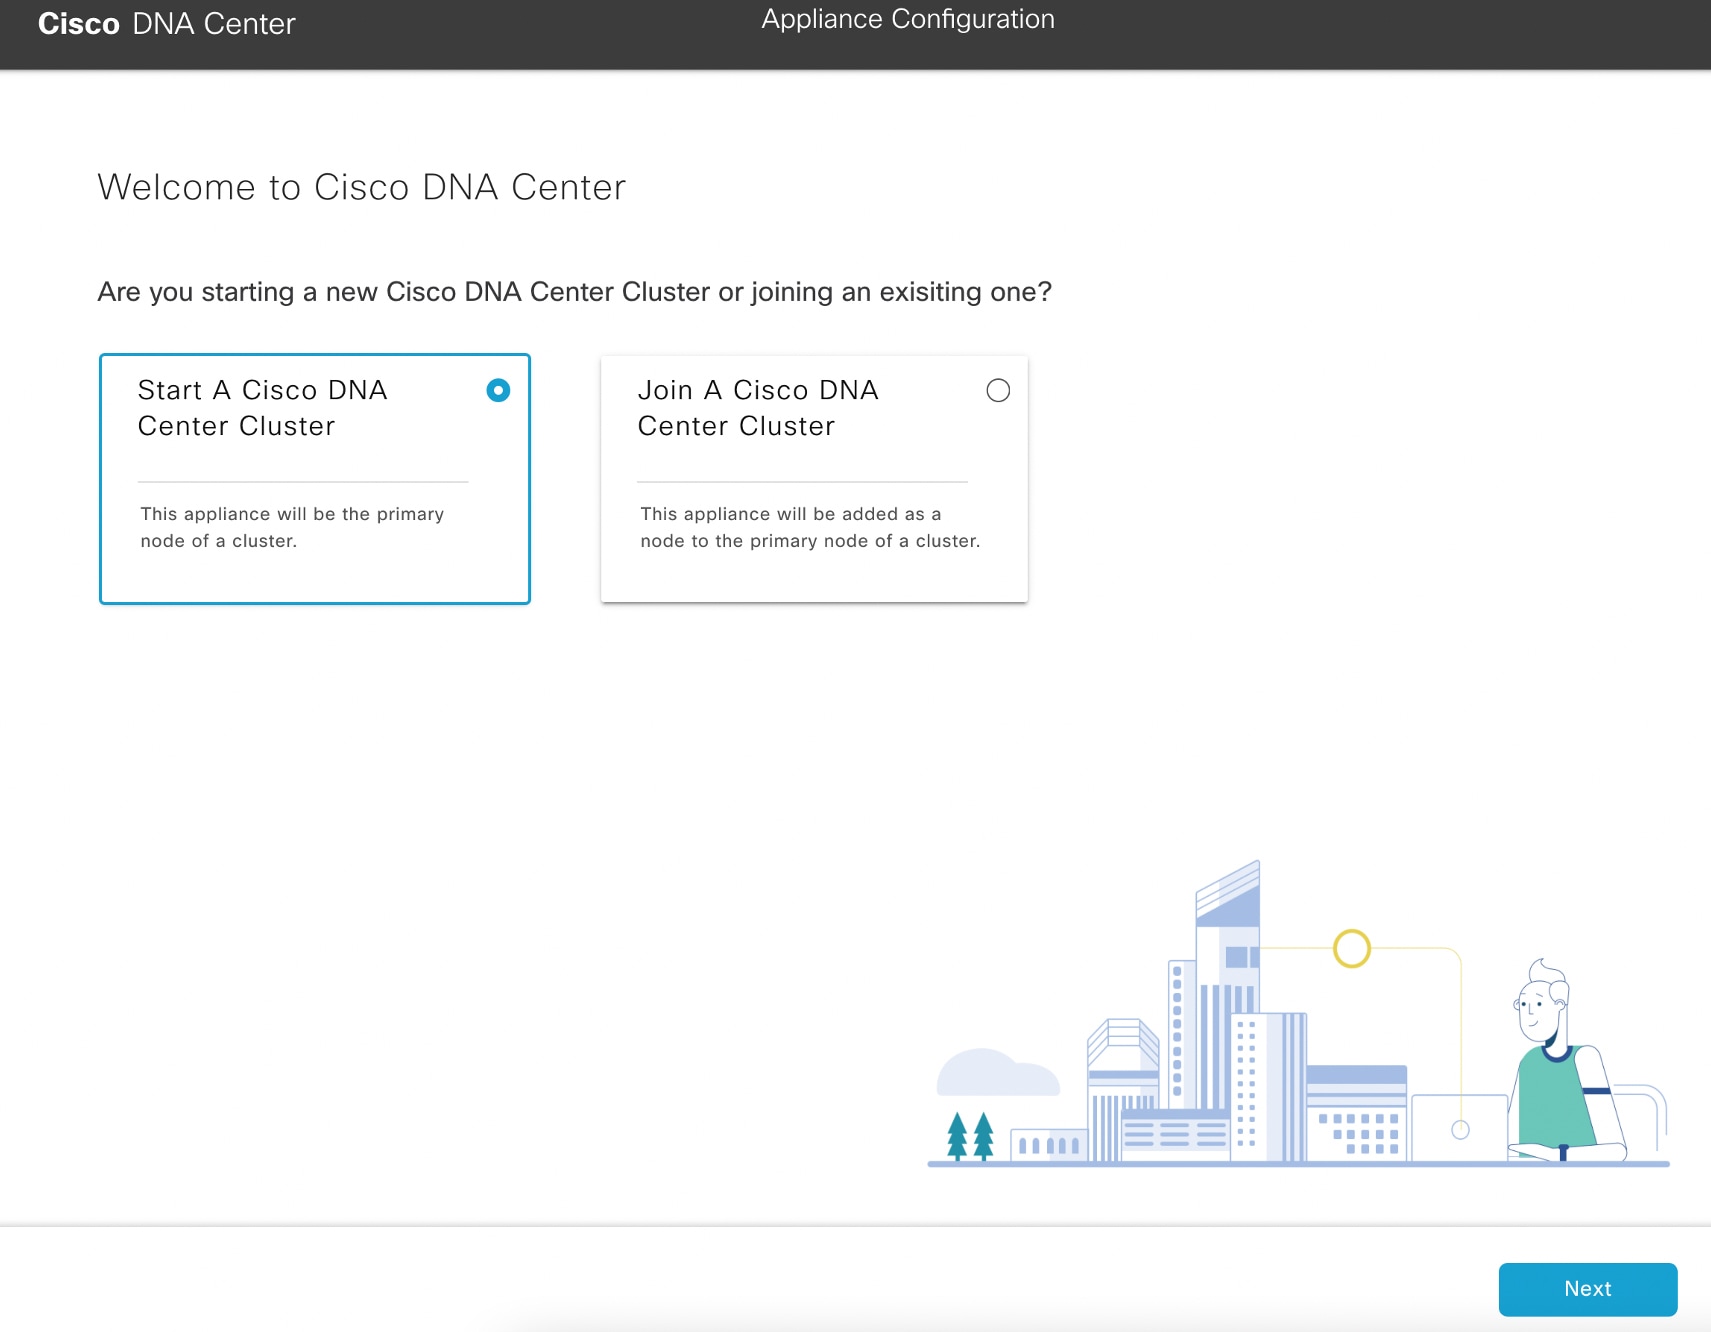
Start the Install configuration wizard:
|
||||||||||||||||||||||||||||||
|
Step 2 |
Complete the Install configuration wizard:
|
||||||||||||||||||||||||||||||
|
Step 3 |
After appliance configuration completes, click the copy icon in the Cisco DNA Center - Admin Credential area to copy the default admin superuser password. 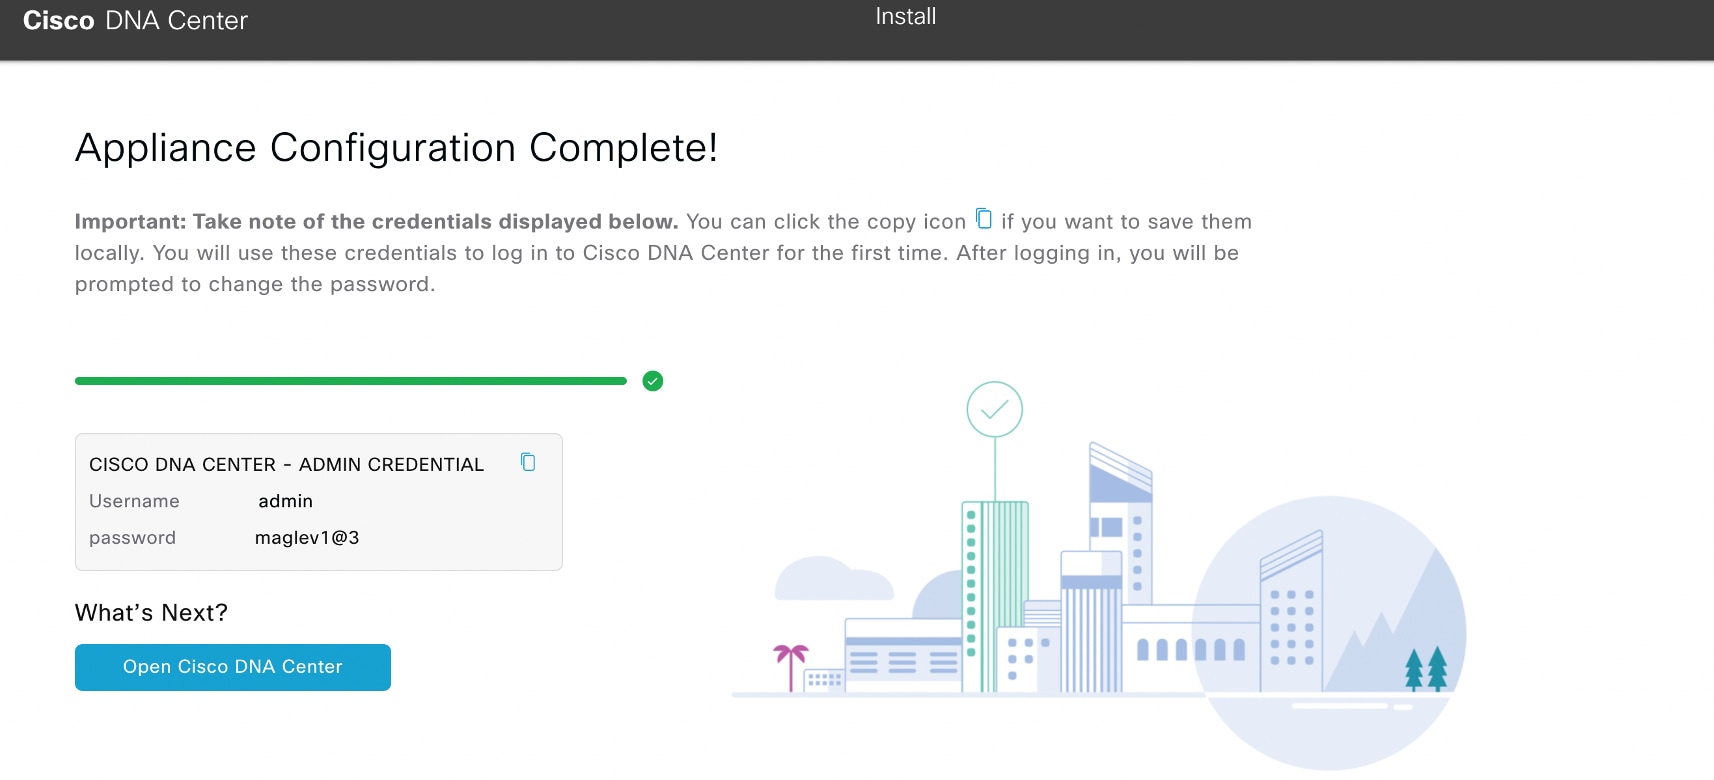
|
||||||||||||||||||||||||||||||
What to do next
As you are deploying this appliance in standalone mode, continue by performing the first-time setup: First-Time Setup Workflow.
Configure the Primary Node Using the Advanced Install Configuration Wizard
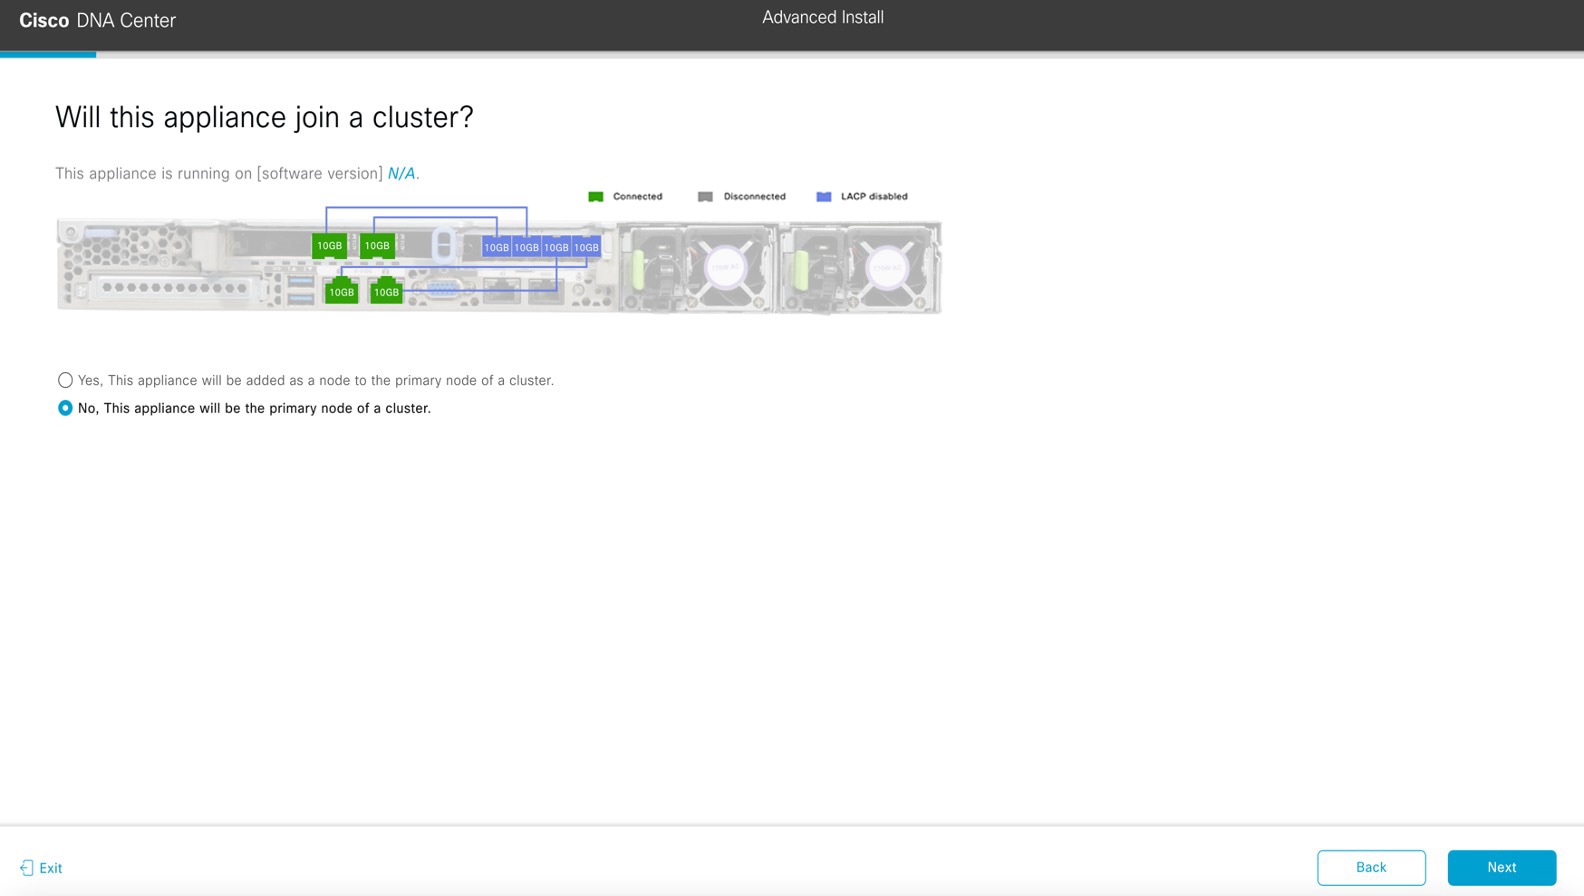
Perform the following steps to configure the first installed appliance as the primary node using the Advanced Install configuration wizard. You must always configure the first appliance as the primary node, whether it will operate standalone or as part of a cluster.
Important |
|
If you are configuring the installed appliance as a secondary node for an existing cluster that already has a primary node, follow the steps in Configure a Secondary Node Using the Advanced Install Configuration Wizard instead.
Before you begin
Ensure that you:
-
Installed the Cisco DNA Center software image onto your appliance, as described in Reimage the Appliance.
Important
This is only applicable if you are going to configure a promotional appliance because the Cisco DNA Center software image is not preinstalled on the following appliances:
-
44-core promotional appliance (Cisco part number DN2-HW-APL-U)
-
56-core promotional appliance: (Cisco part number DN2-HW-APL-L-U)
-
-
Collected all of the information called for in Required IP Addresses and Subnets and Required Configuration Information.
-
Installed the first appliance, as described in Appliance Installation Workflow.
-
Configured Cisco IMC browser access on the primary node, as described in Enable Browser Access to Cisco Integrated Management Controller.
-
Checked that the primary node's ports and the switches it uses are properly configured, as described in Execute Preconfiguration Checks.
-
Are using a browser that is compatible with Cisco IMC and Cisco DNA Center. For a list of compatible browsers, see the Release Notes for the version of Cisco DNA Center you are installing.
-
Enabled ICMP on the firewall between Cisco DNA Center and both the default gateway and the DNS server you specify in the following procedure. The wizard uses ping to verify the gateway and DNS server you specify. This ping might get blocked if a firewall is in place and ICMP is not enabled on that firewall. When this happens, you will not be able to complete the wizard.
Procedure
|
Step 1 |
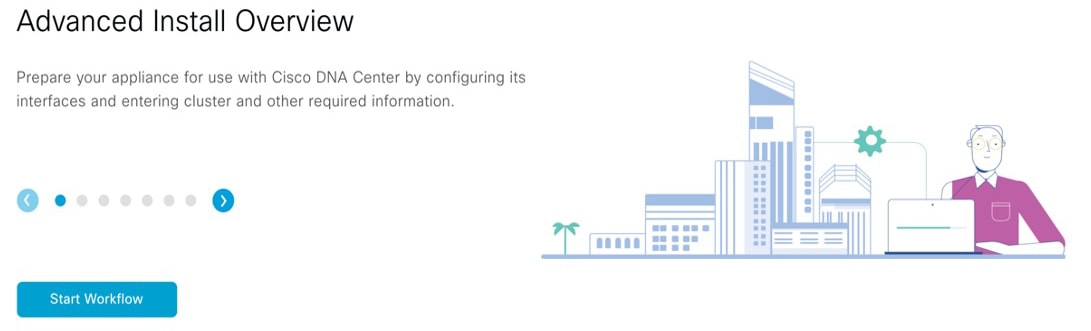
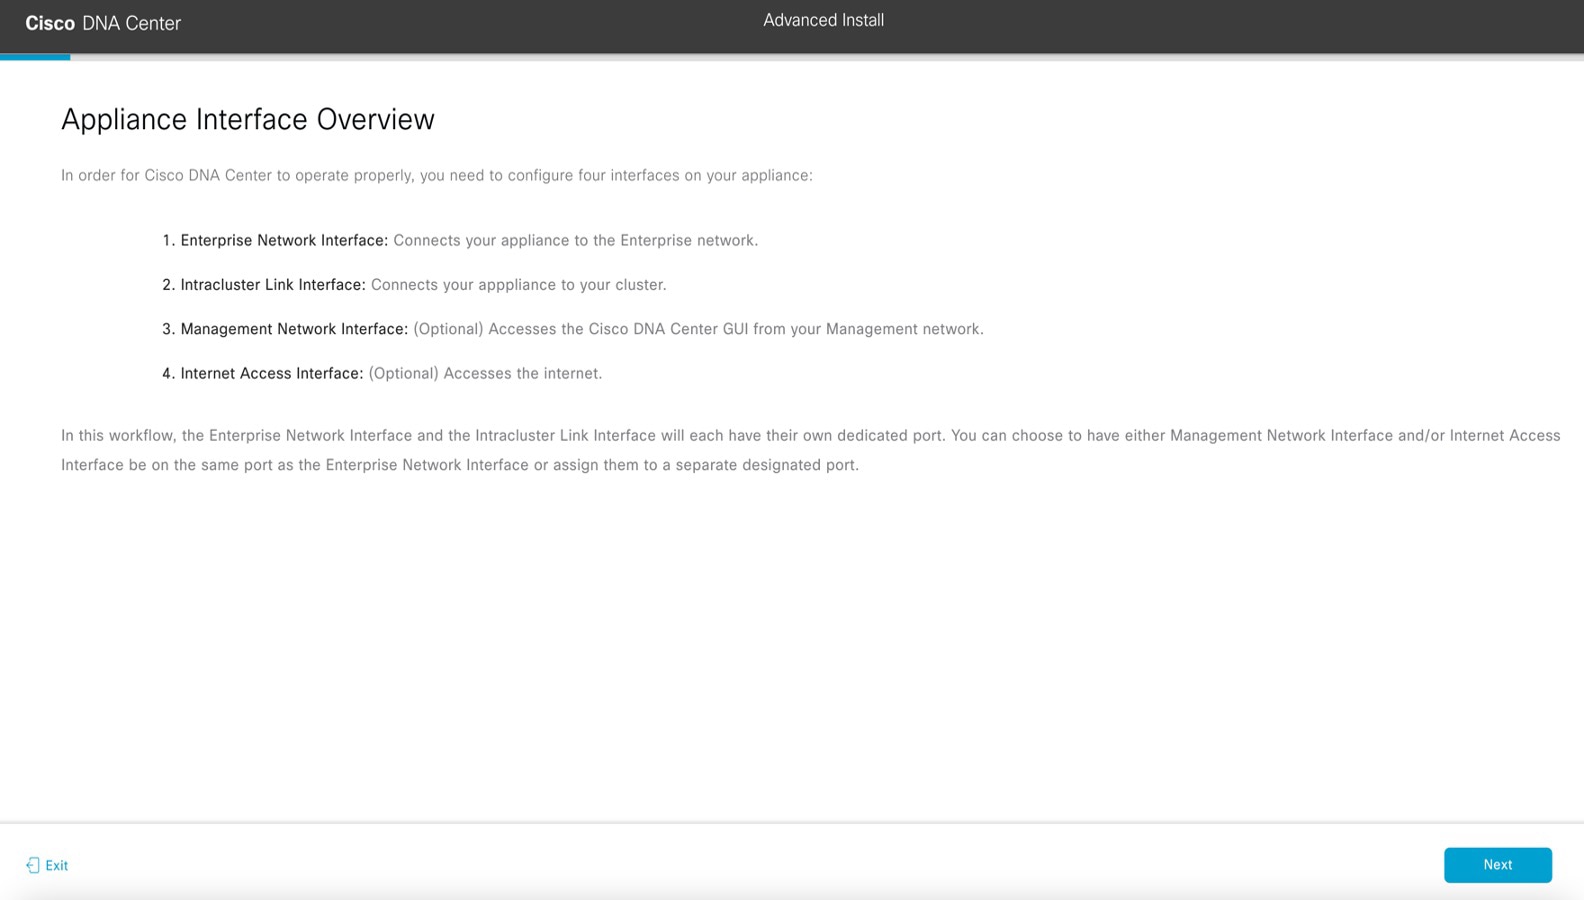
Start the Advanced Install configuration wizard:
|
||||||||||||||||||||||||||||||||||||||||||||||||||||||||||||||||||||||||||||||
|
Step 2 |
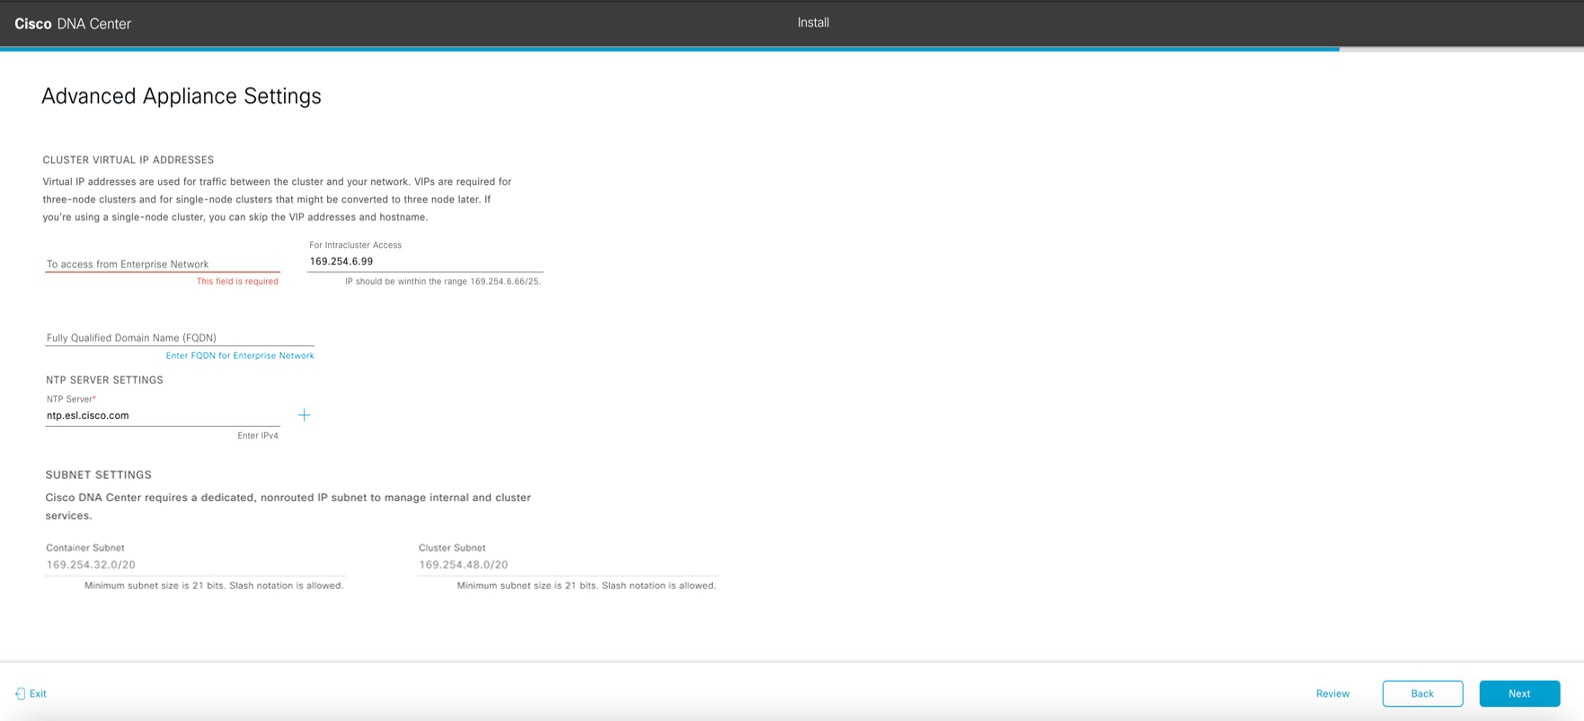
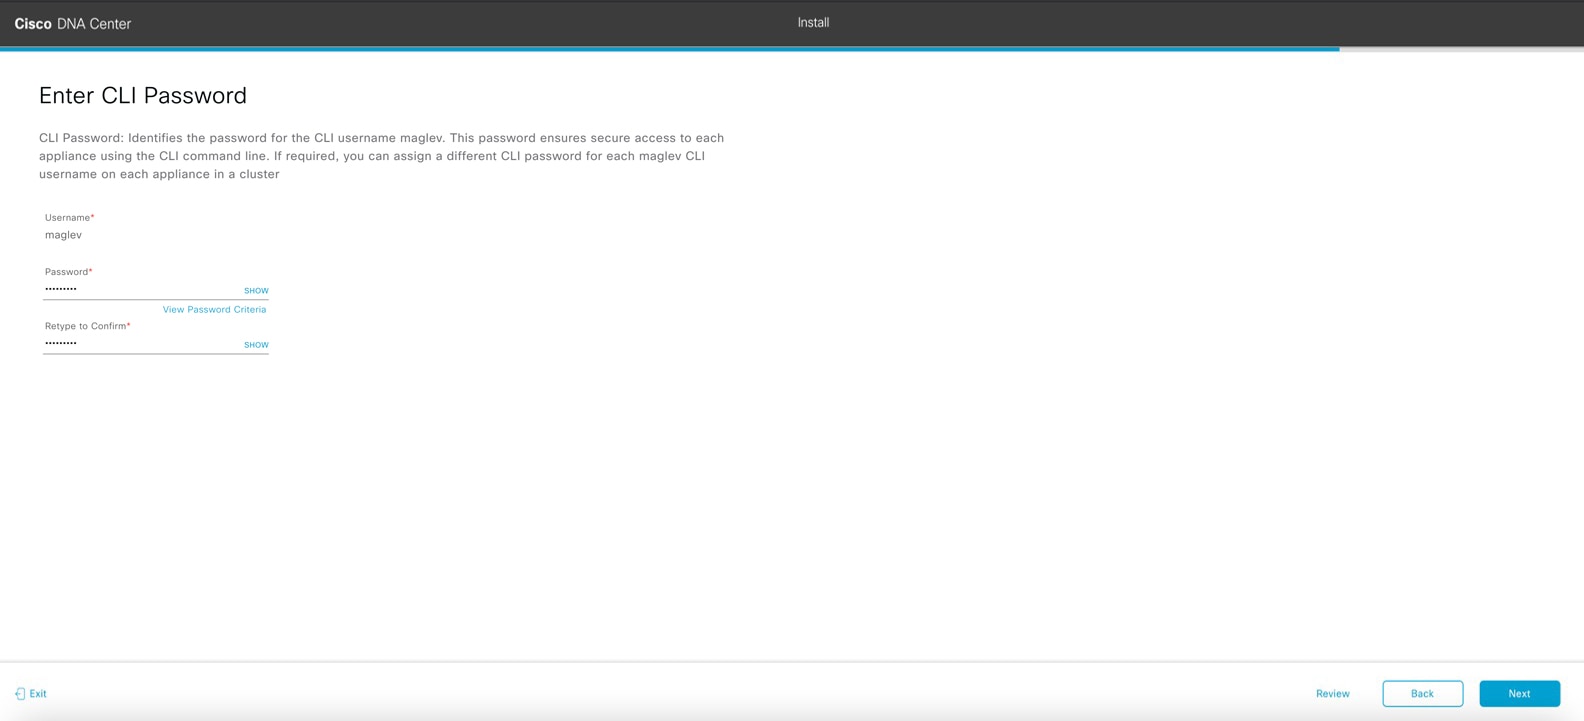
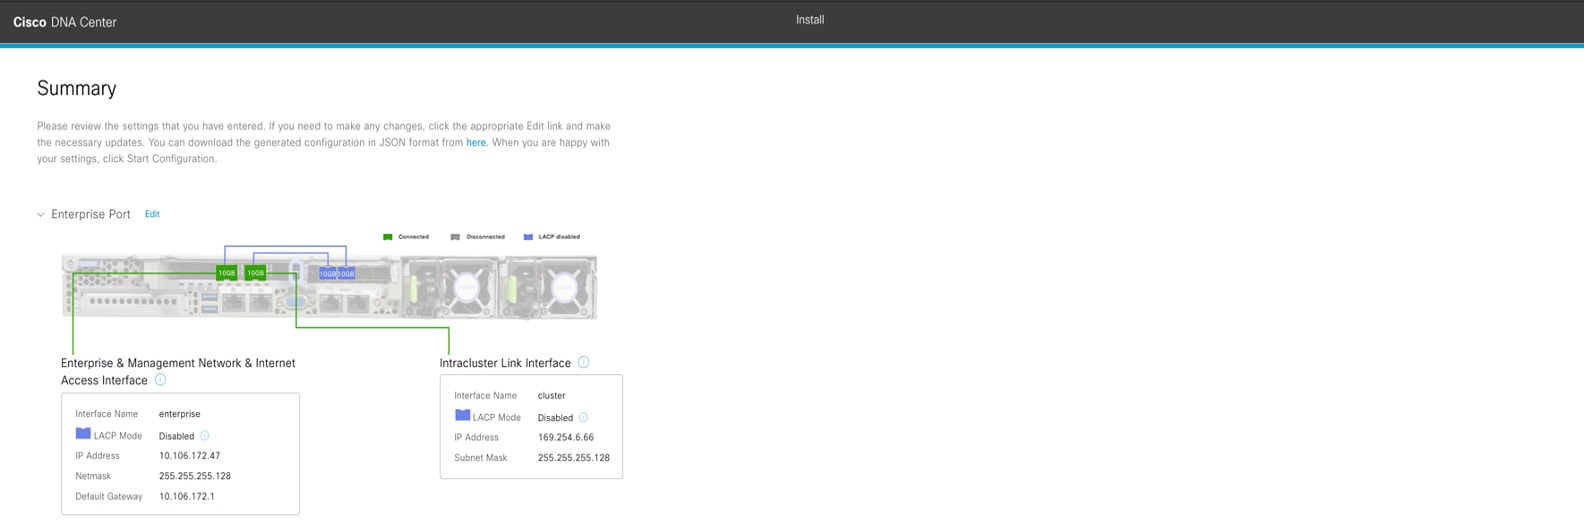
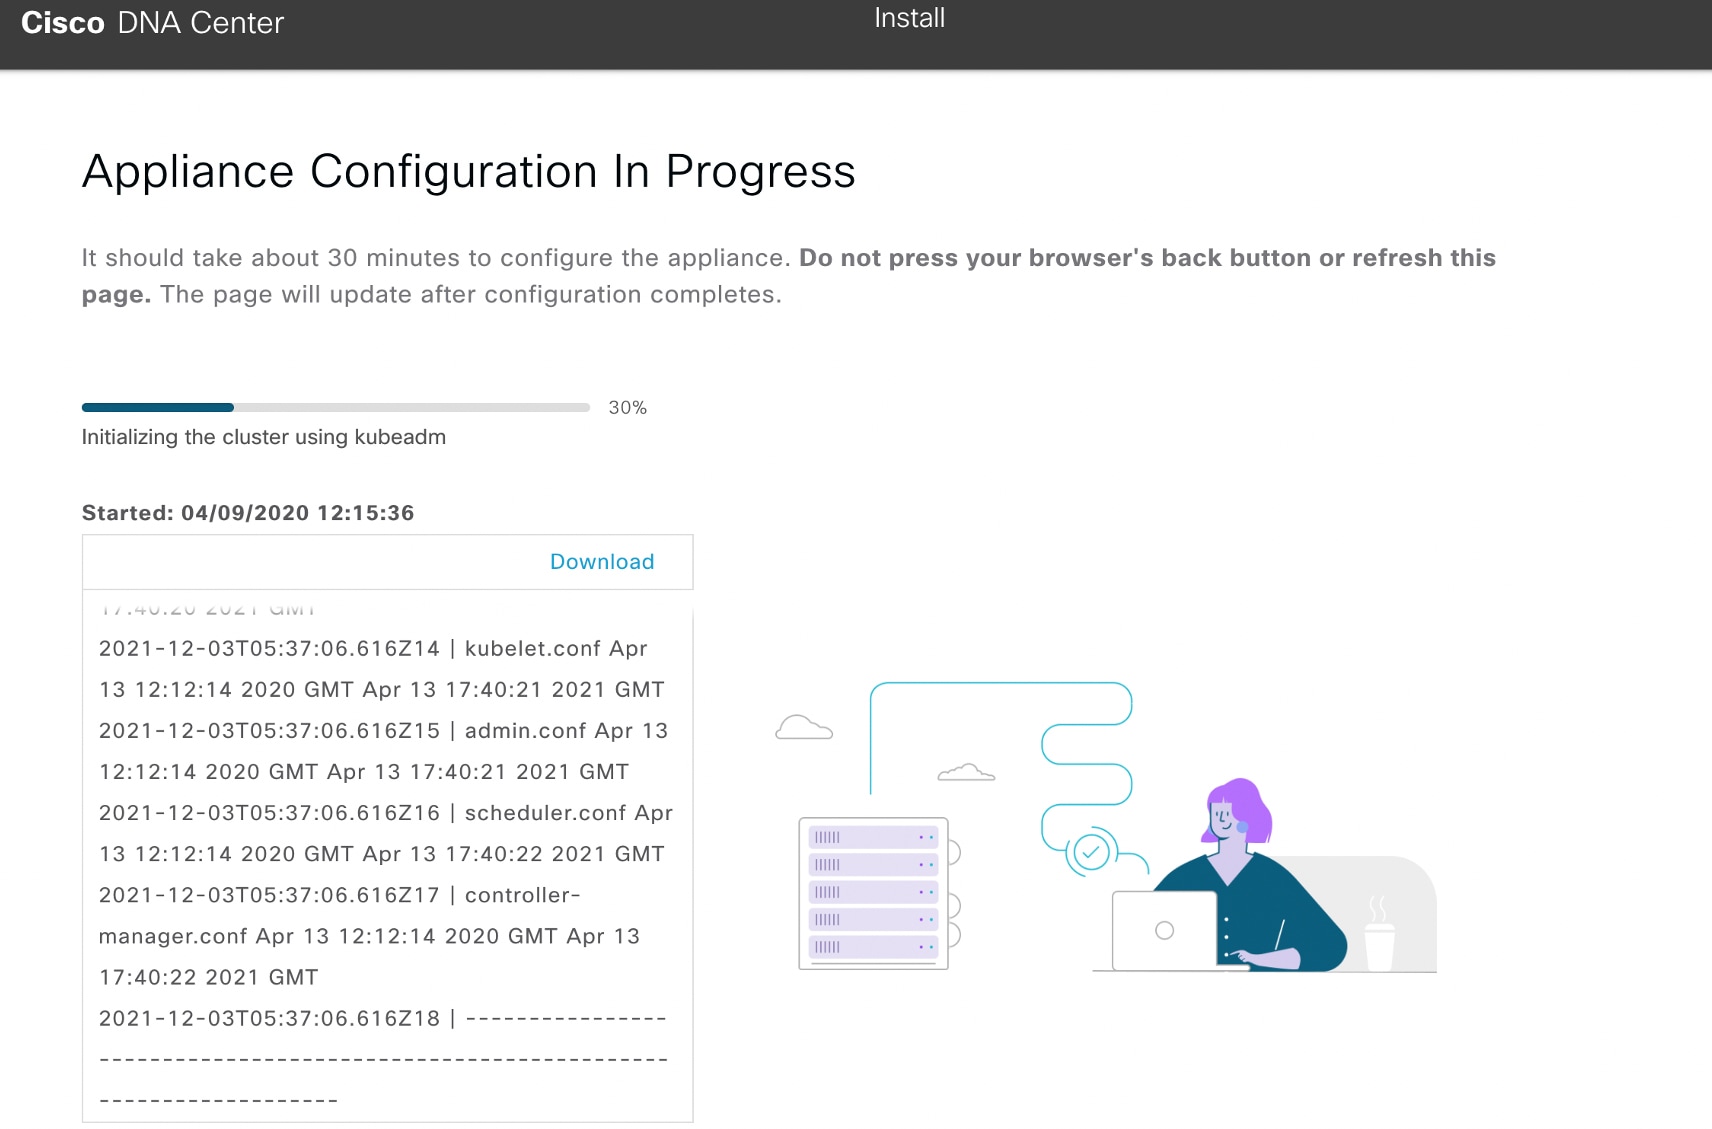
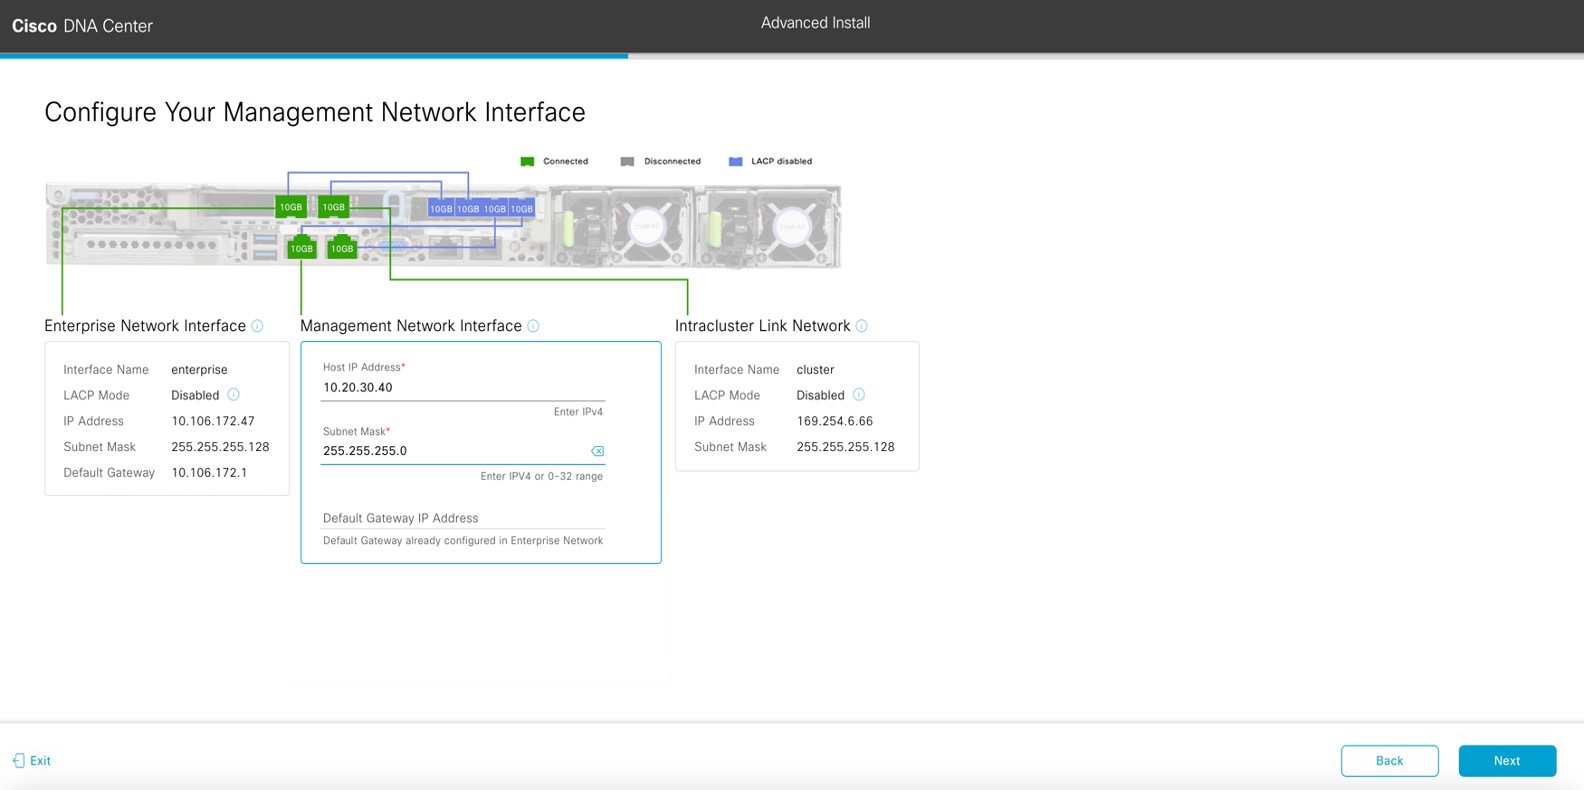
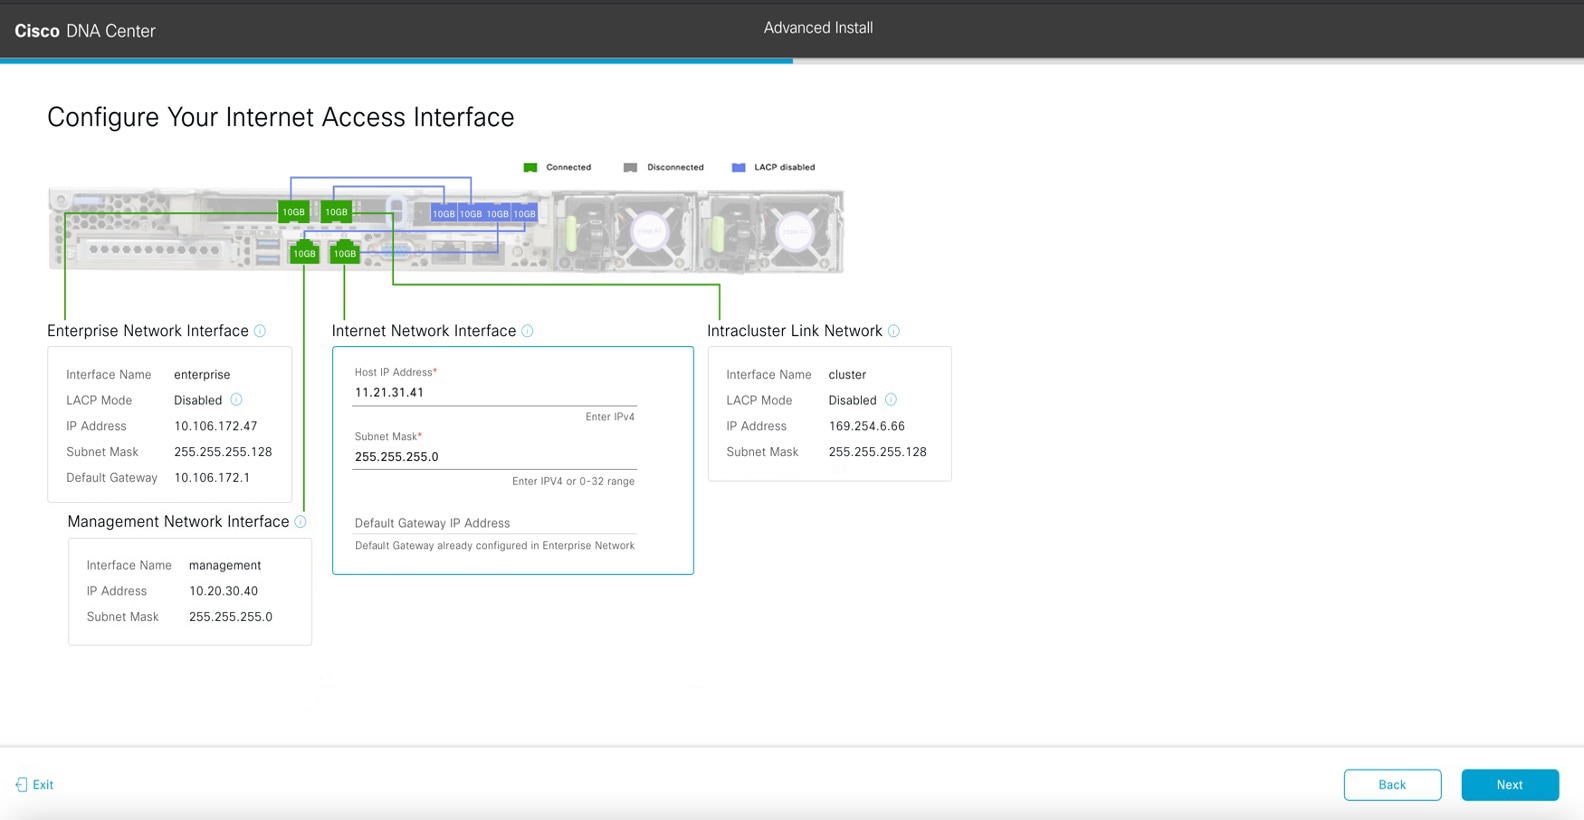
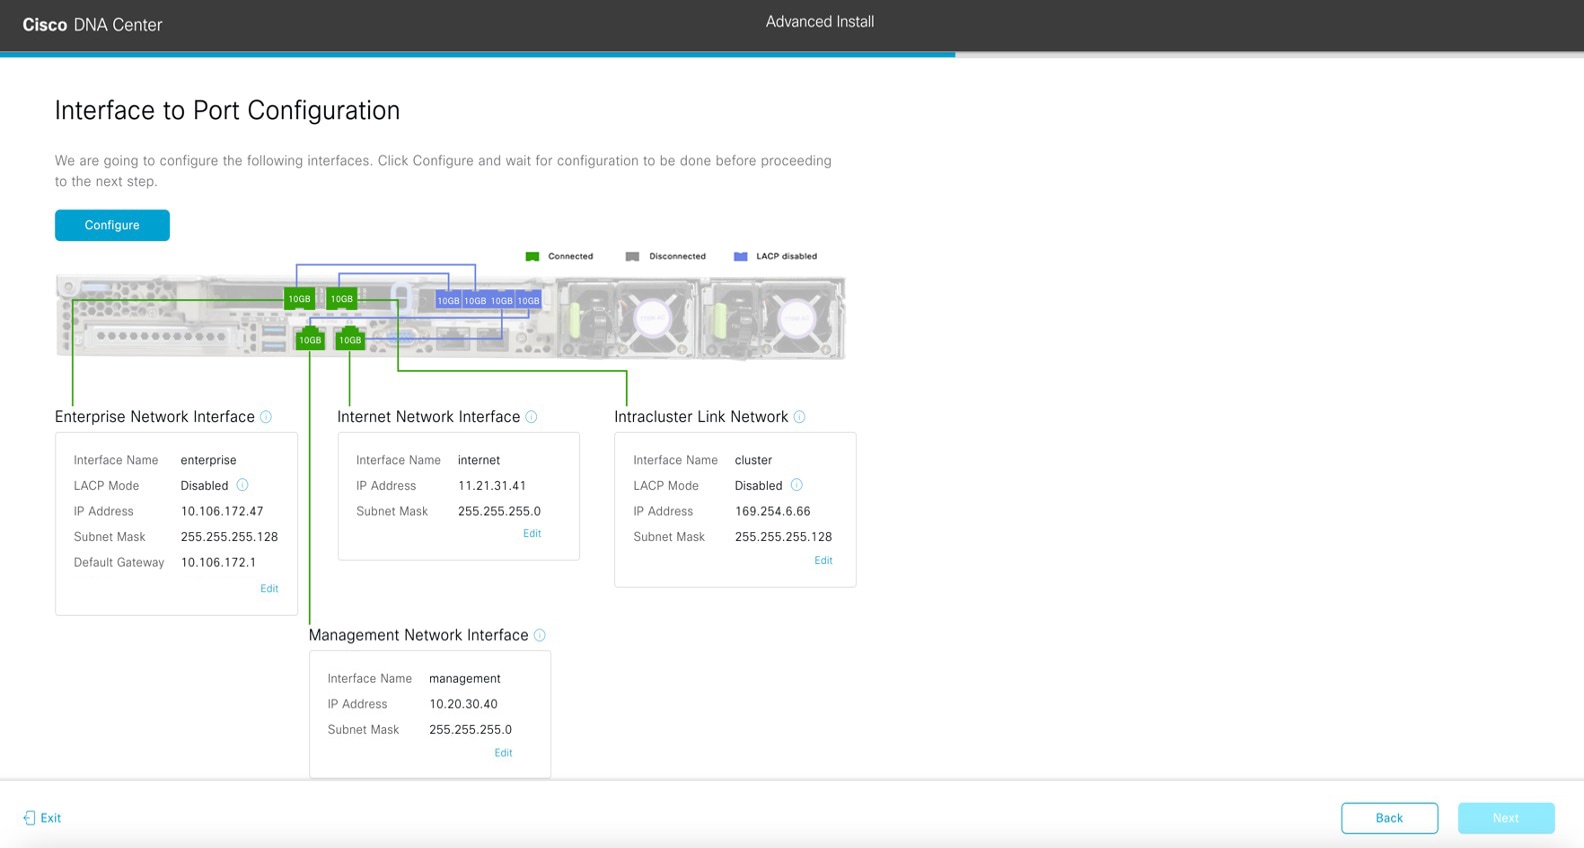
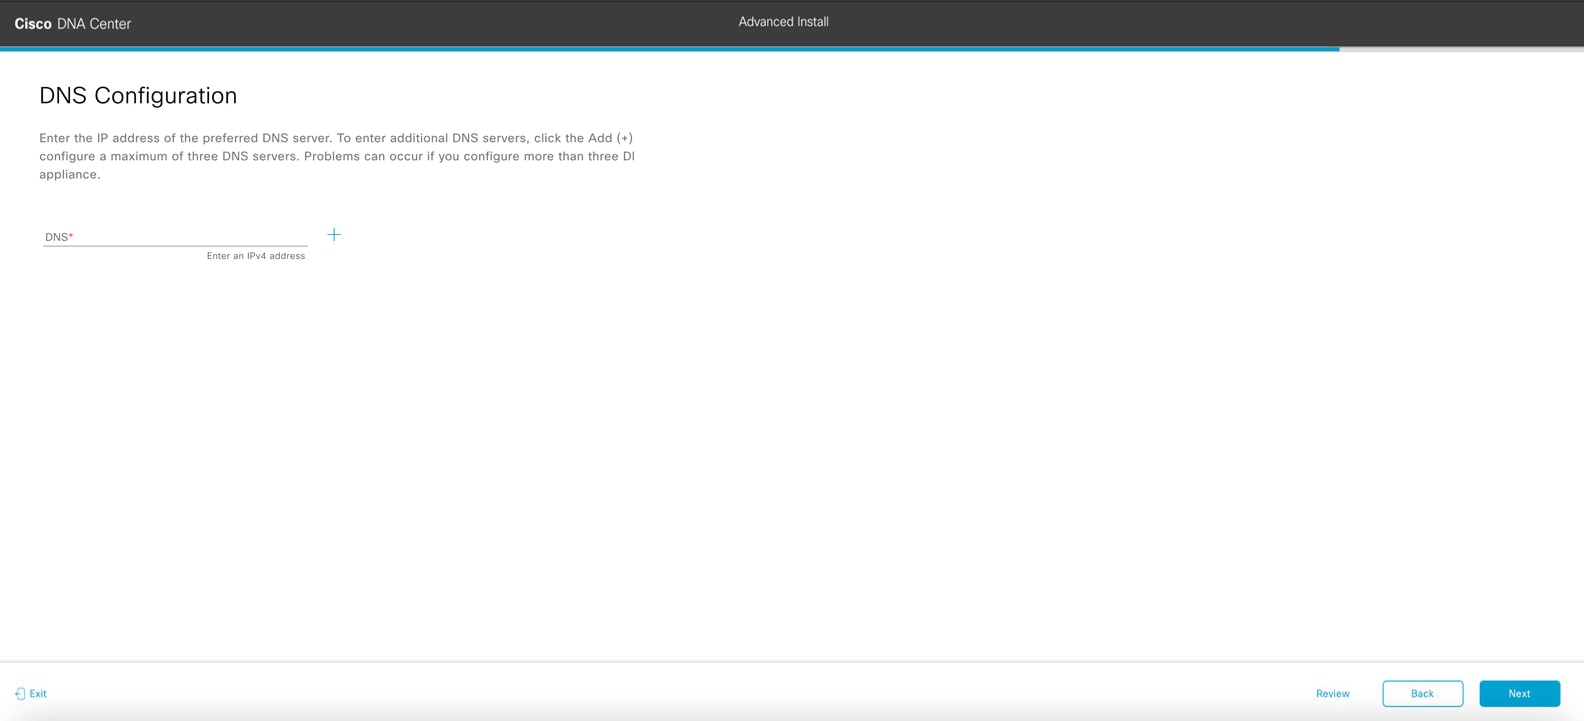
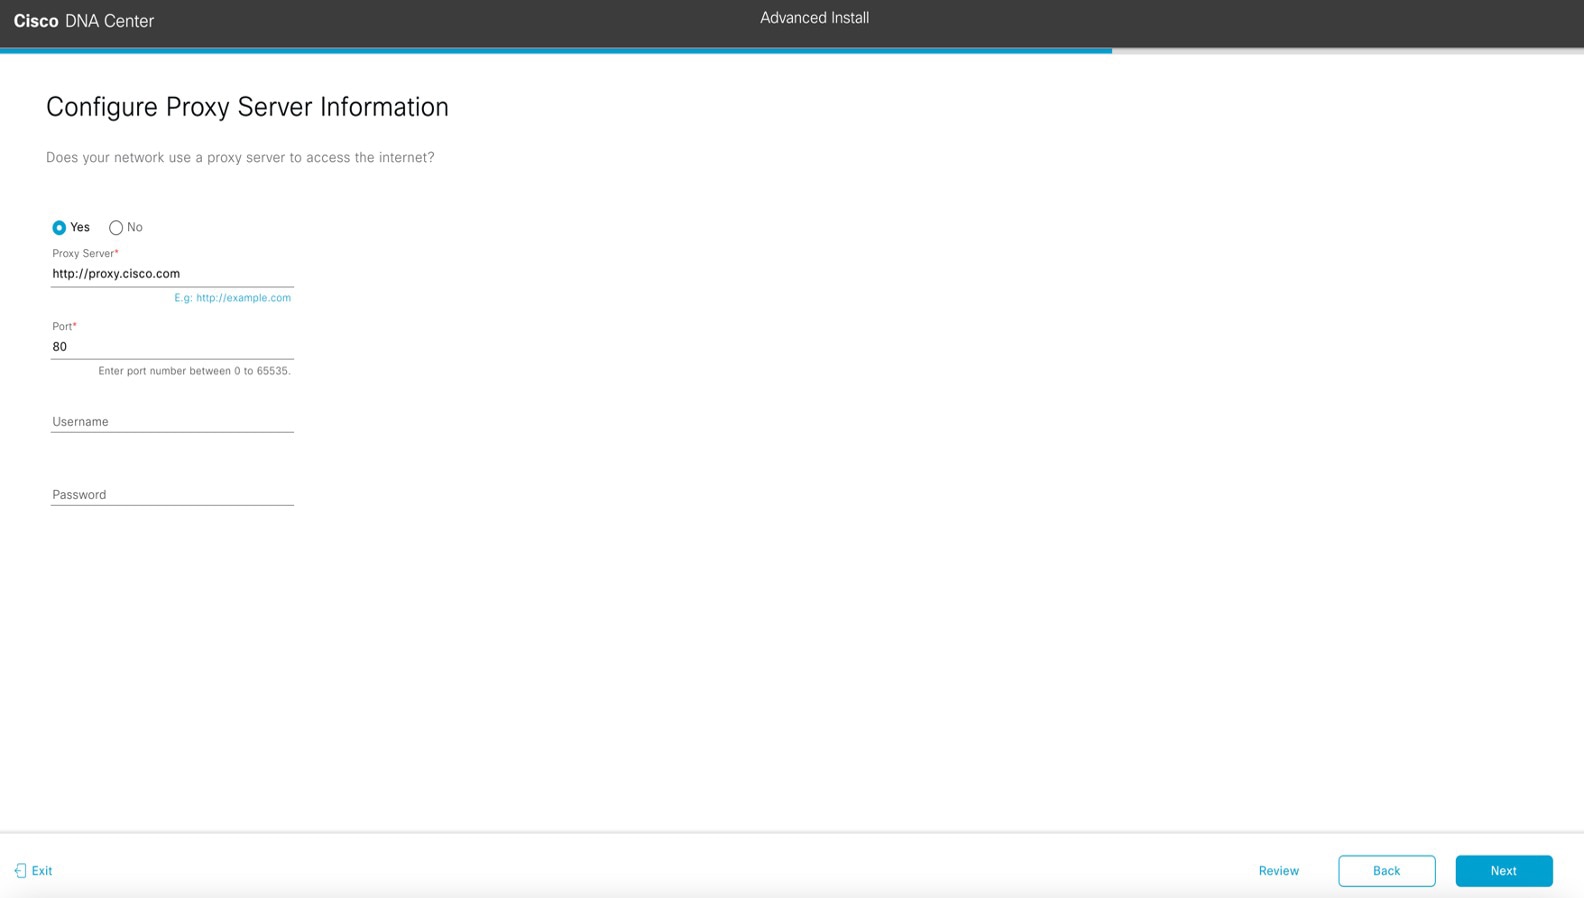
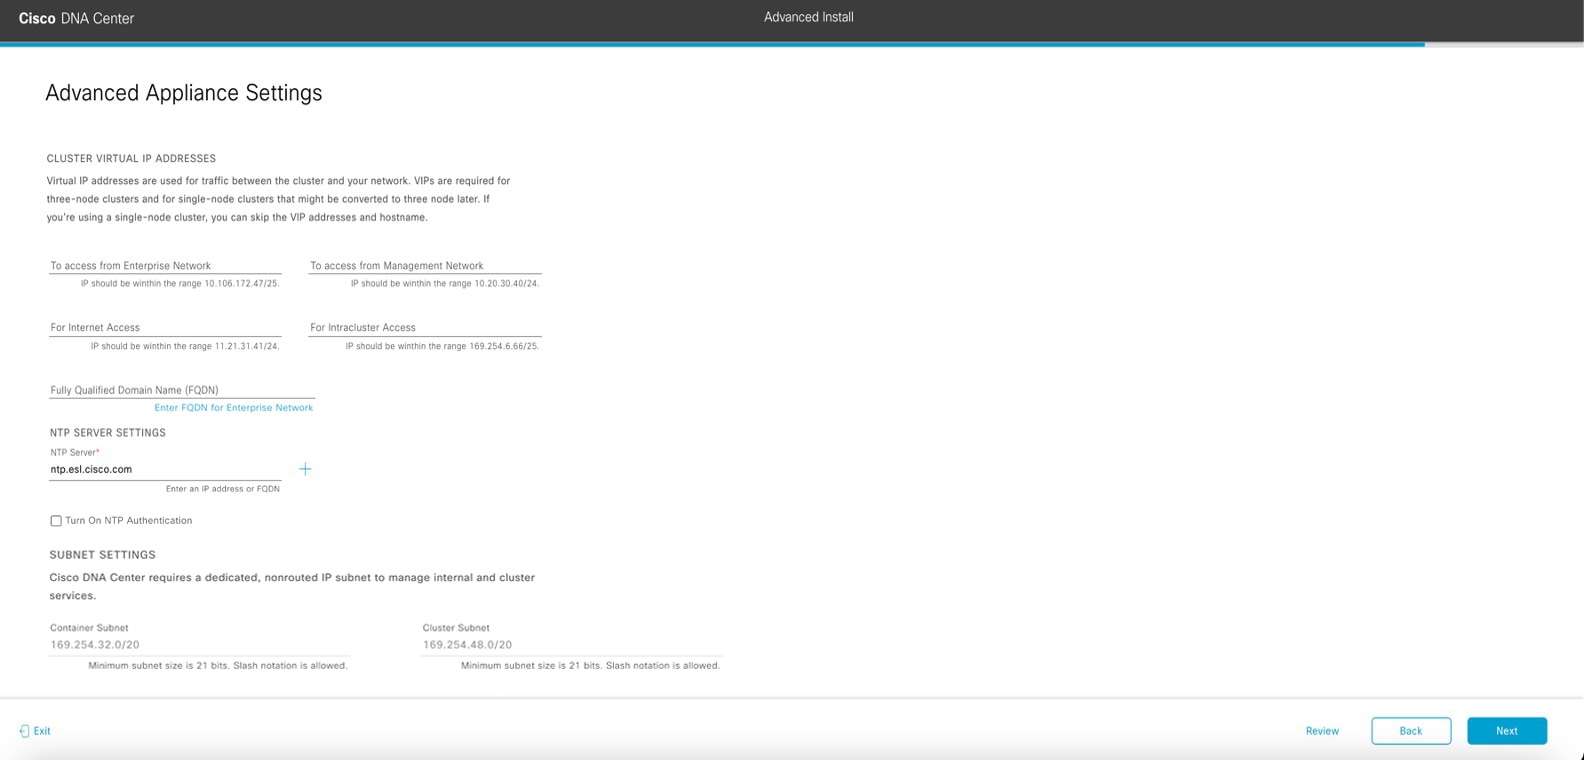
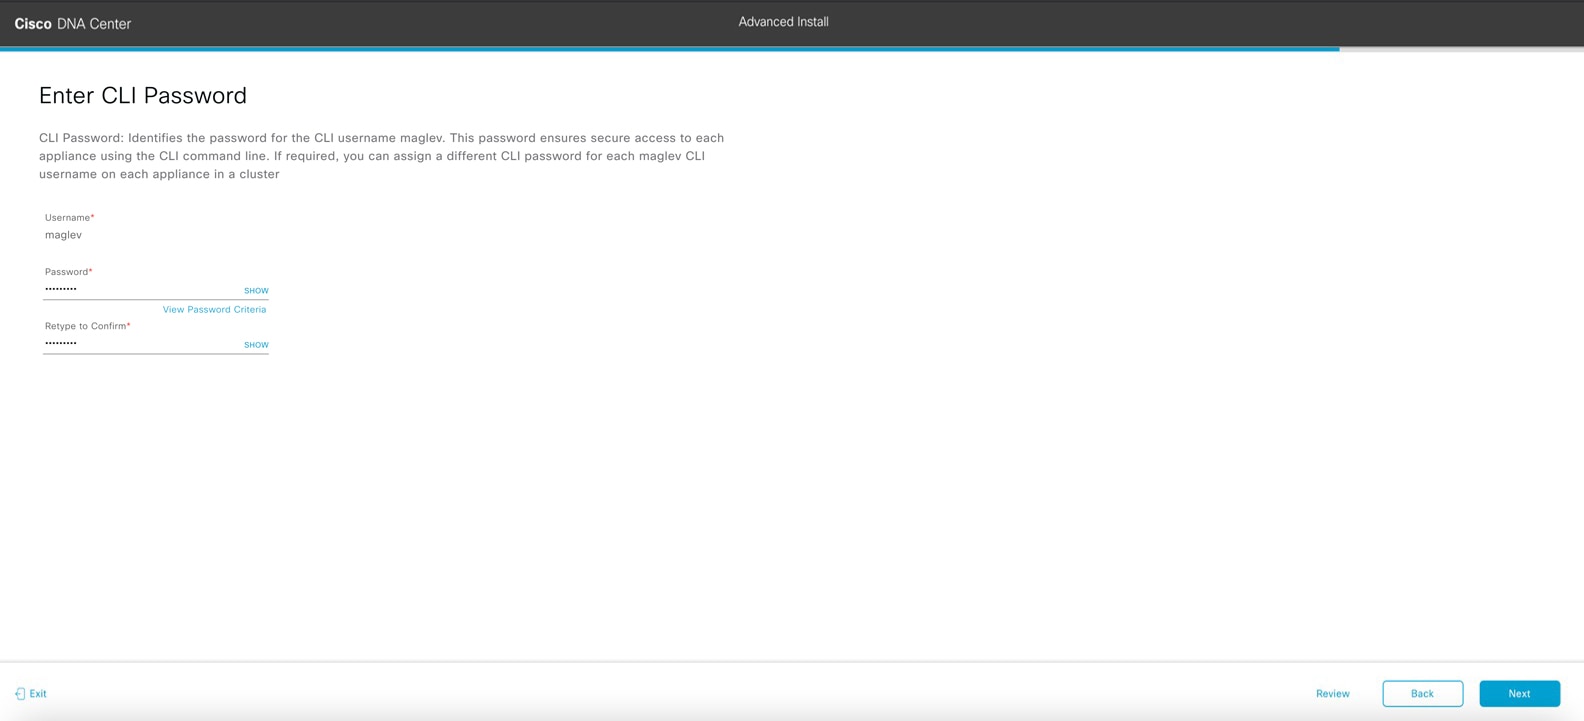
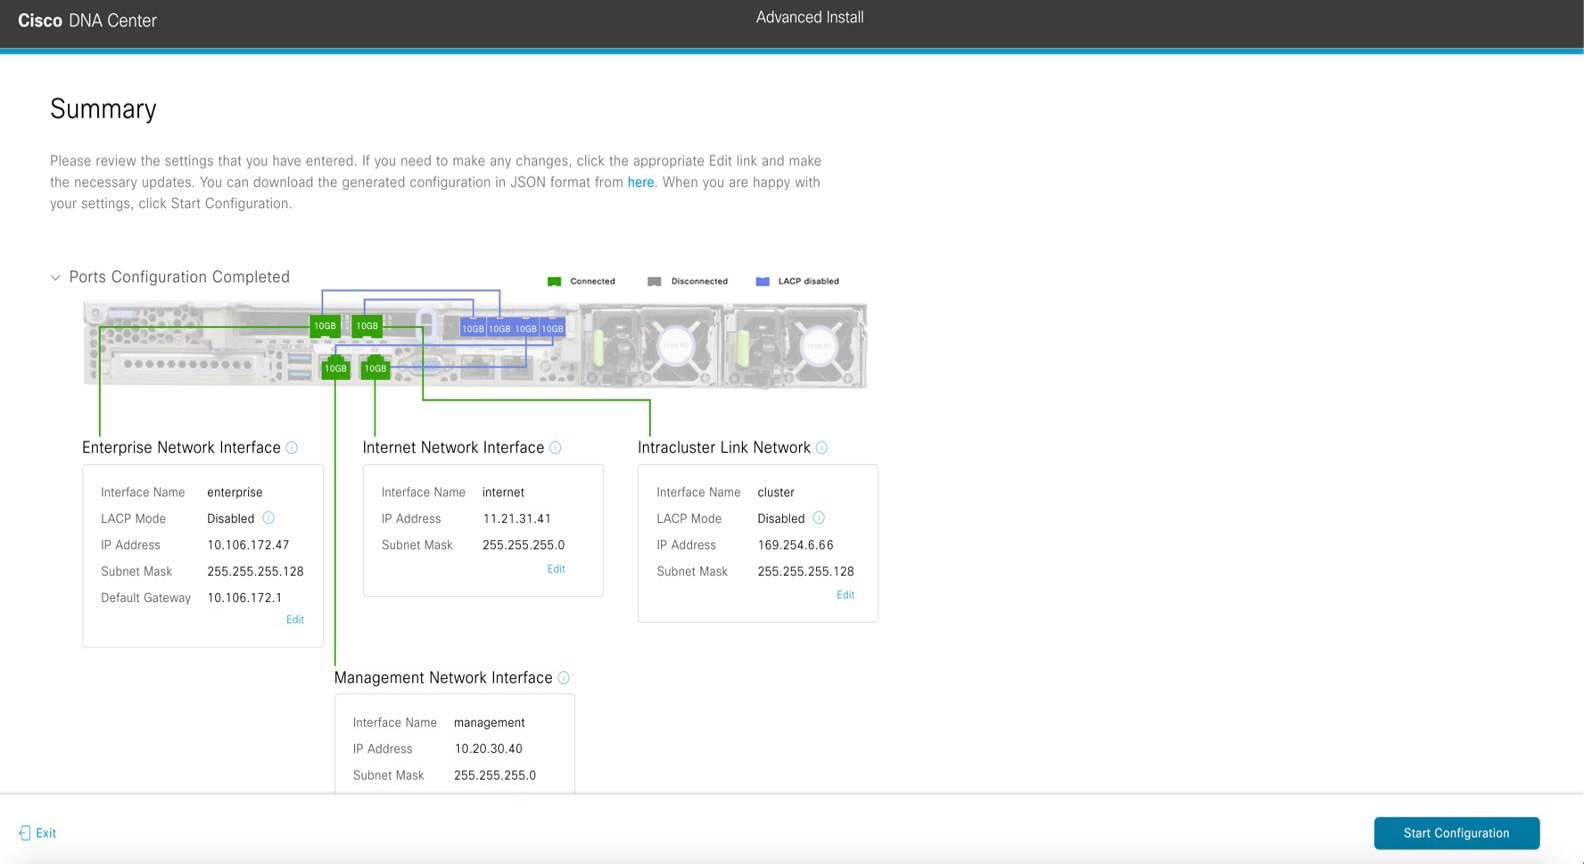
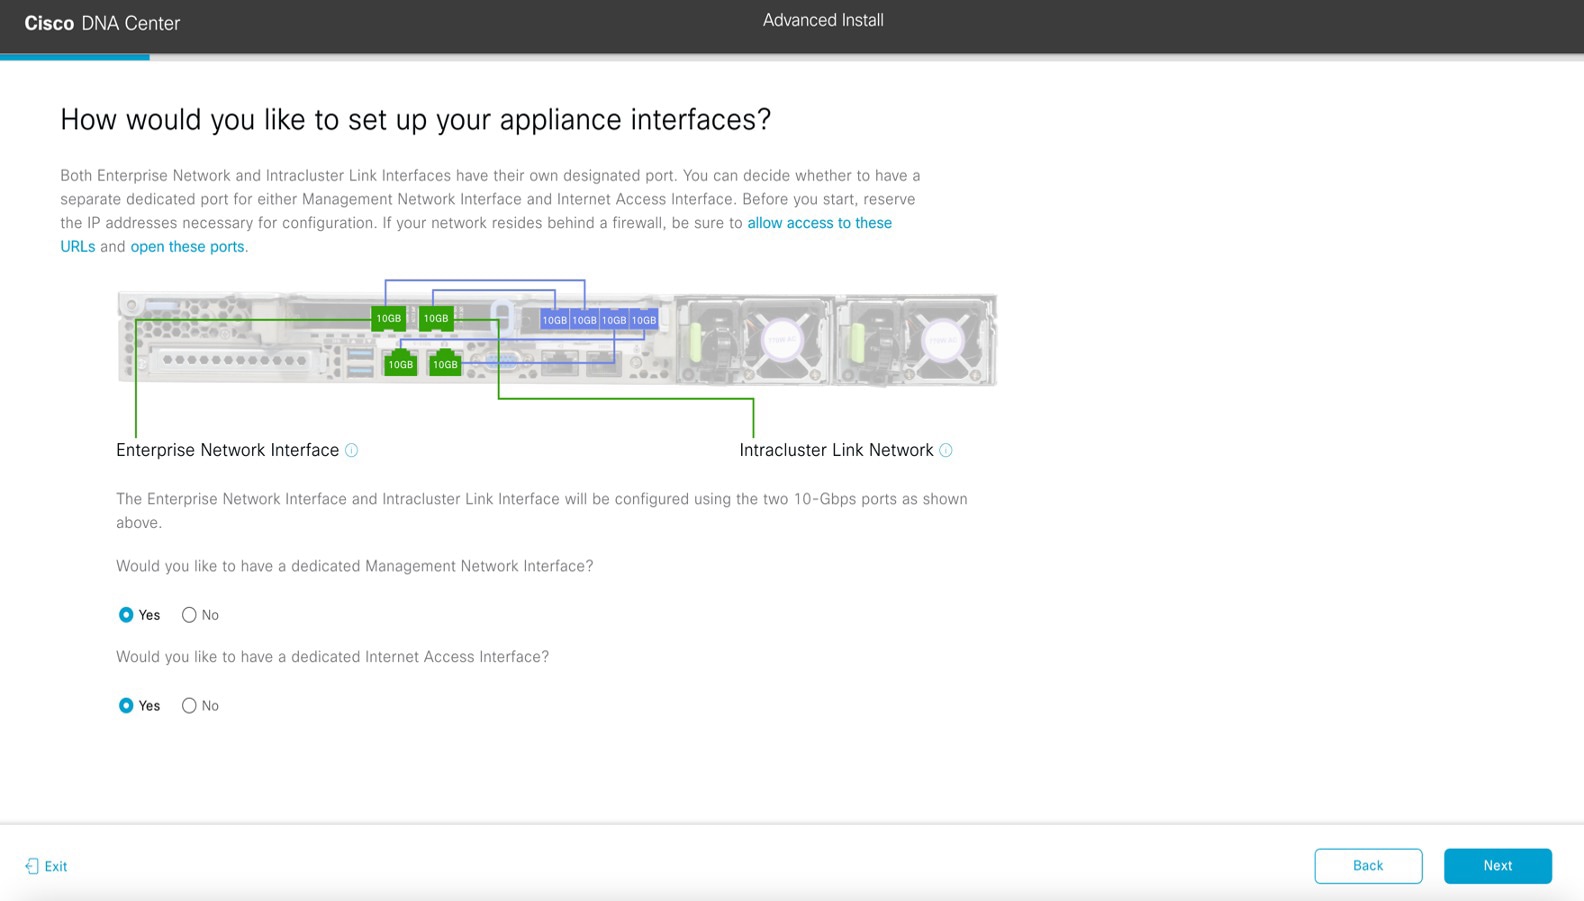
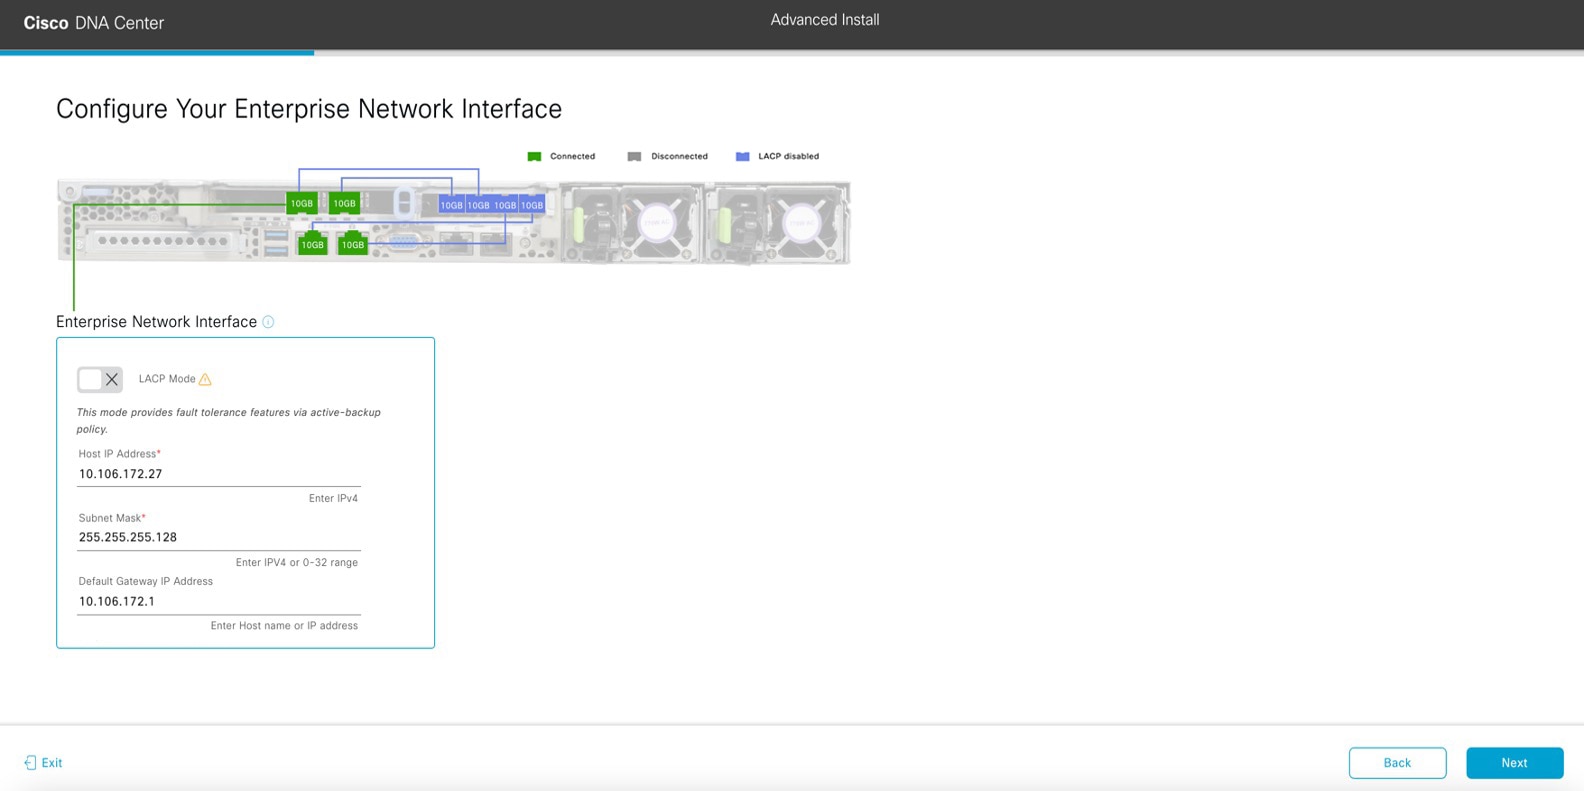
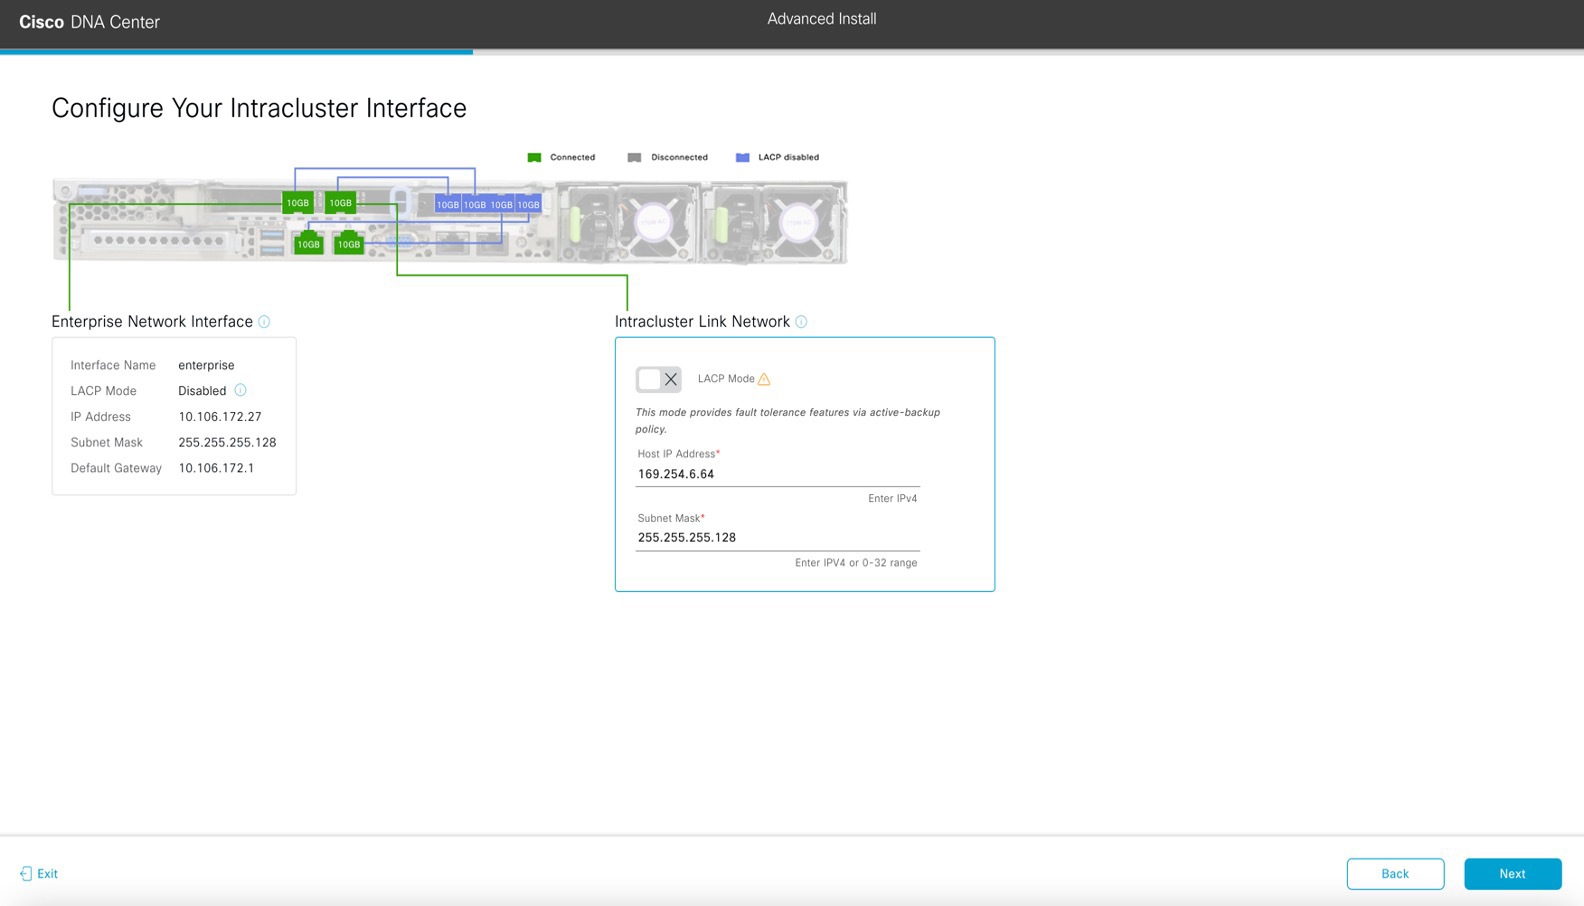
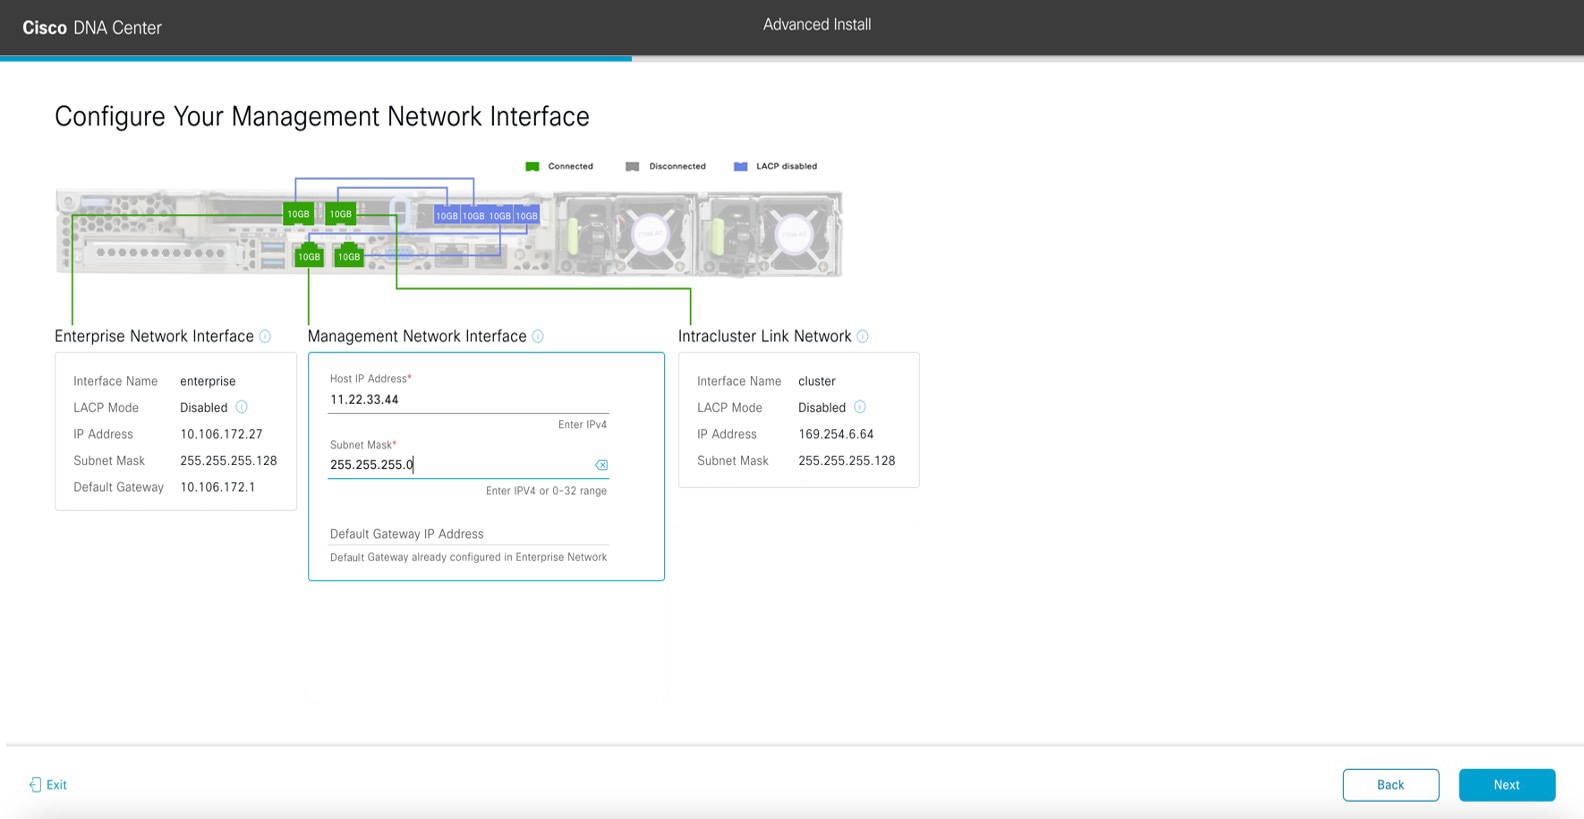
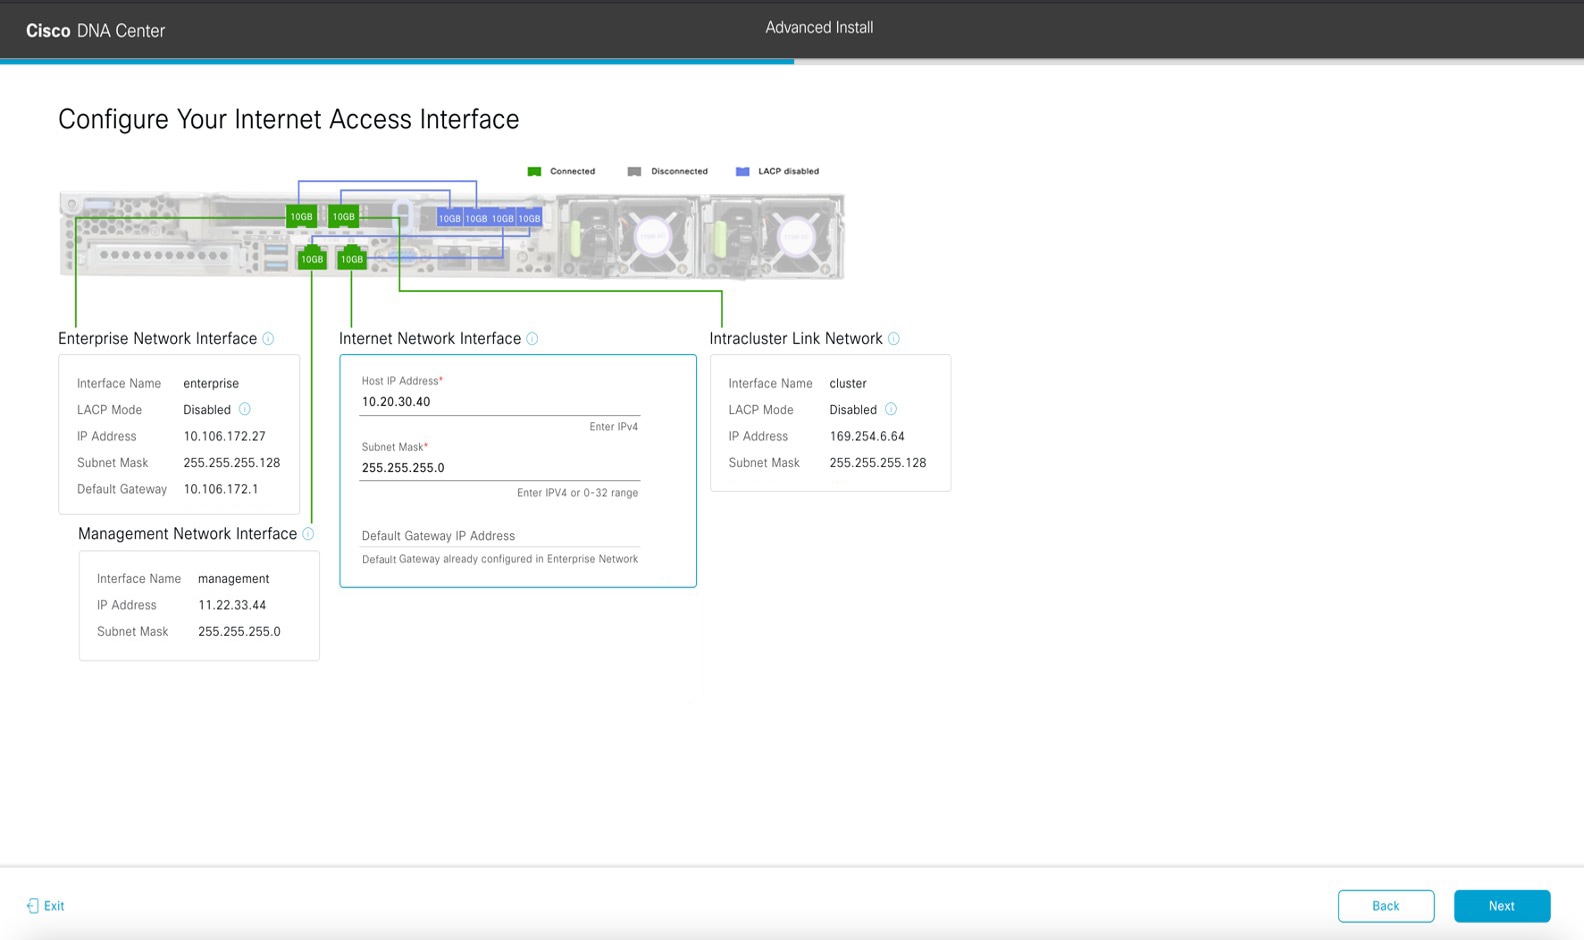
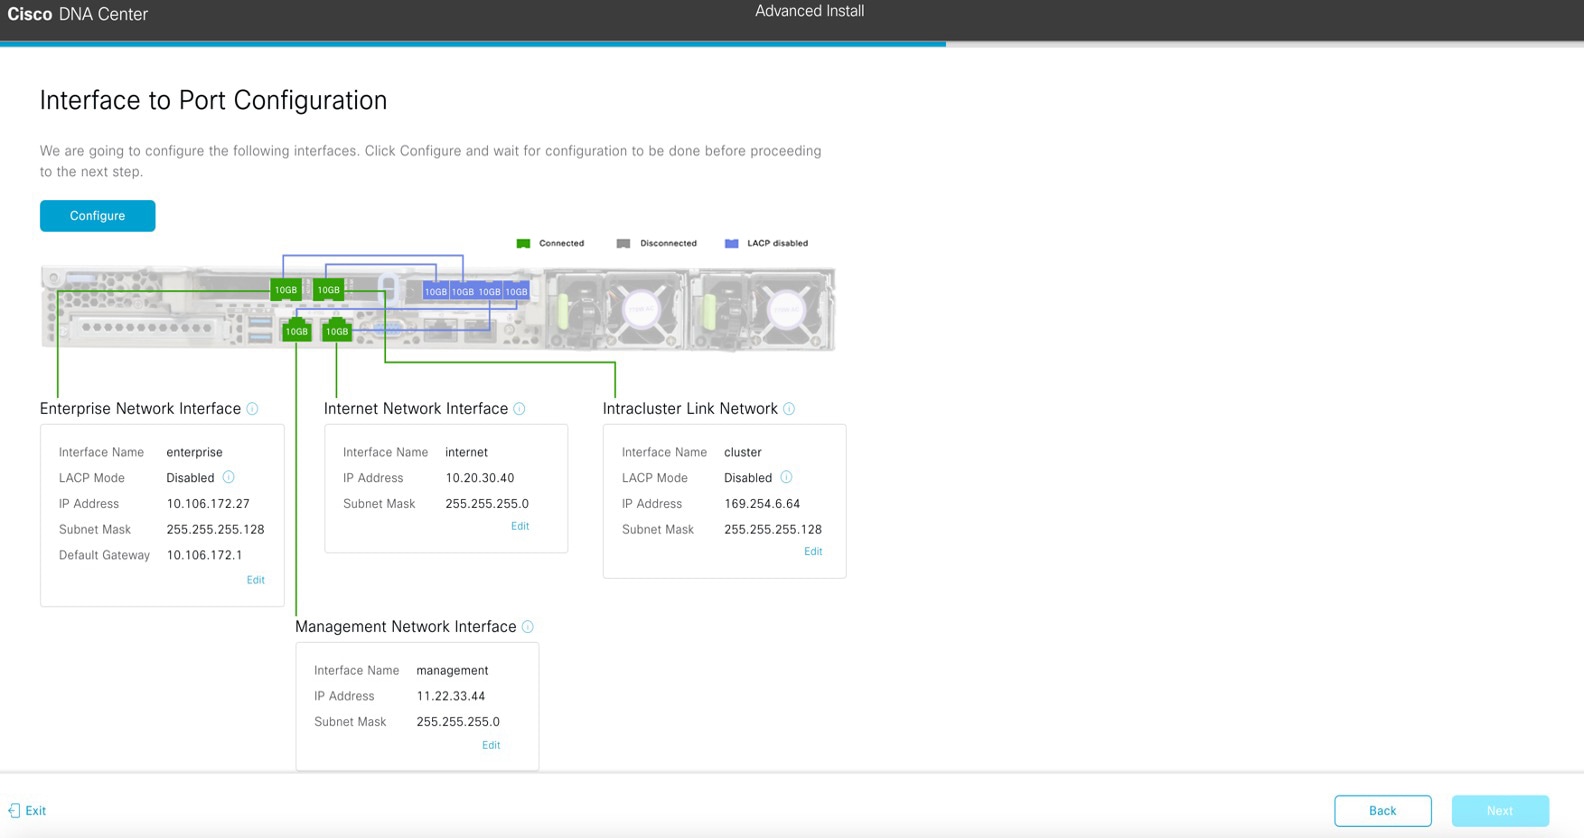
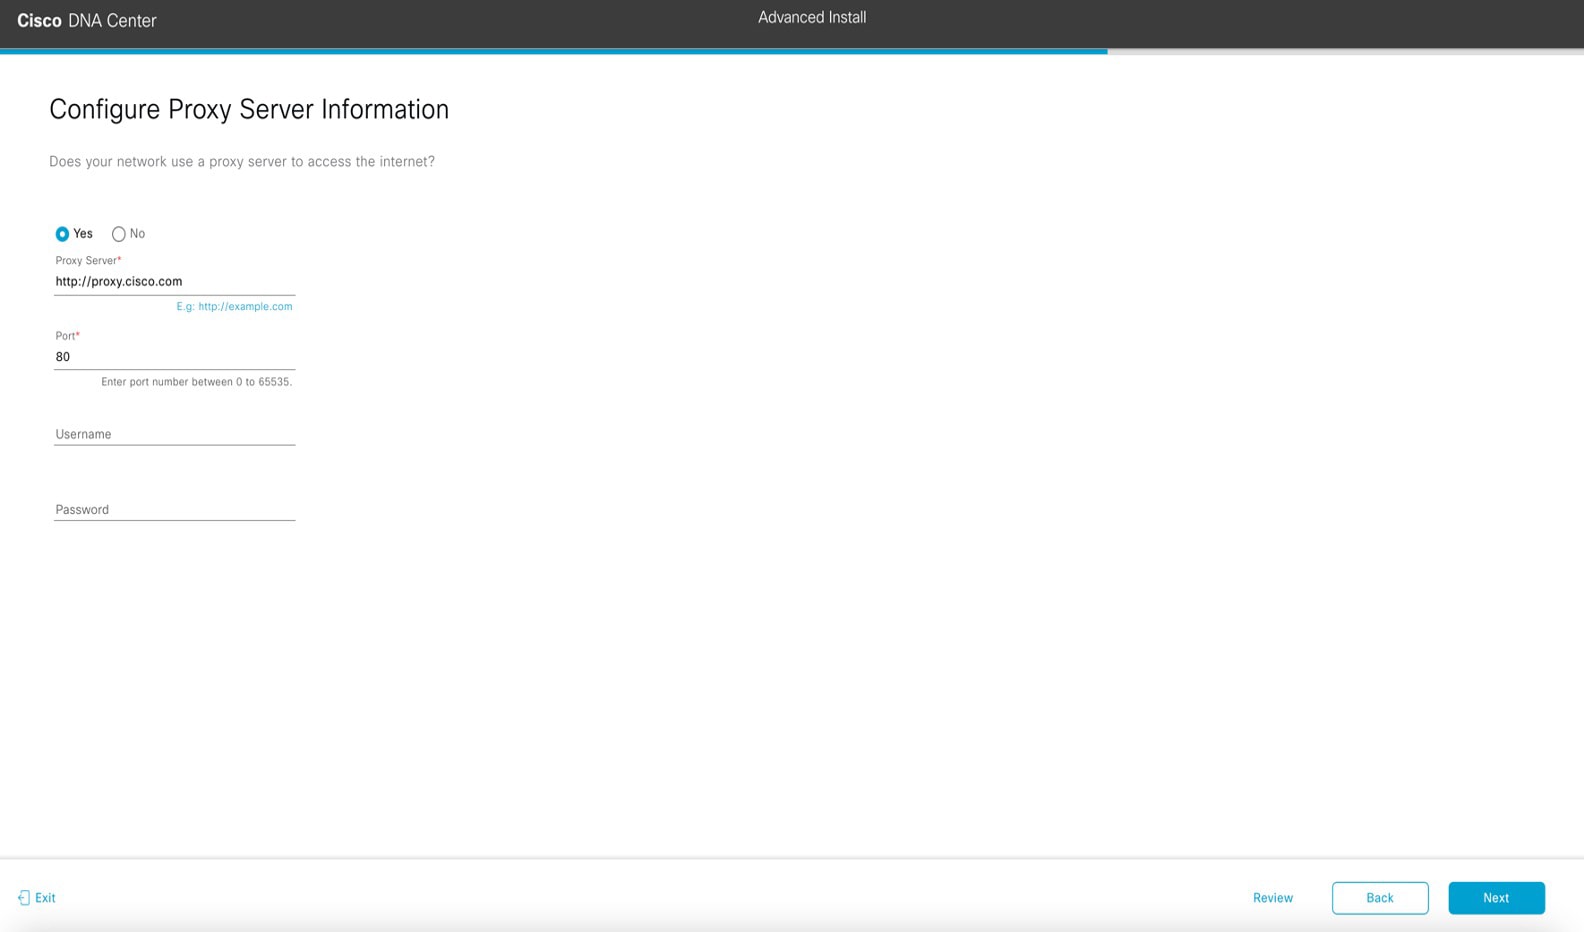
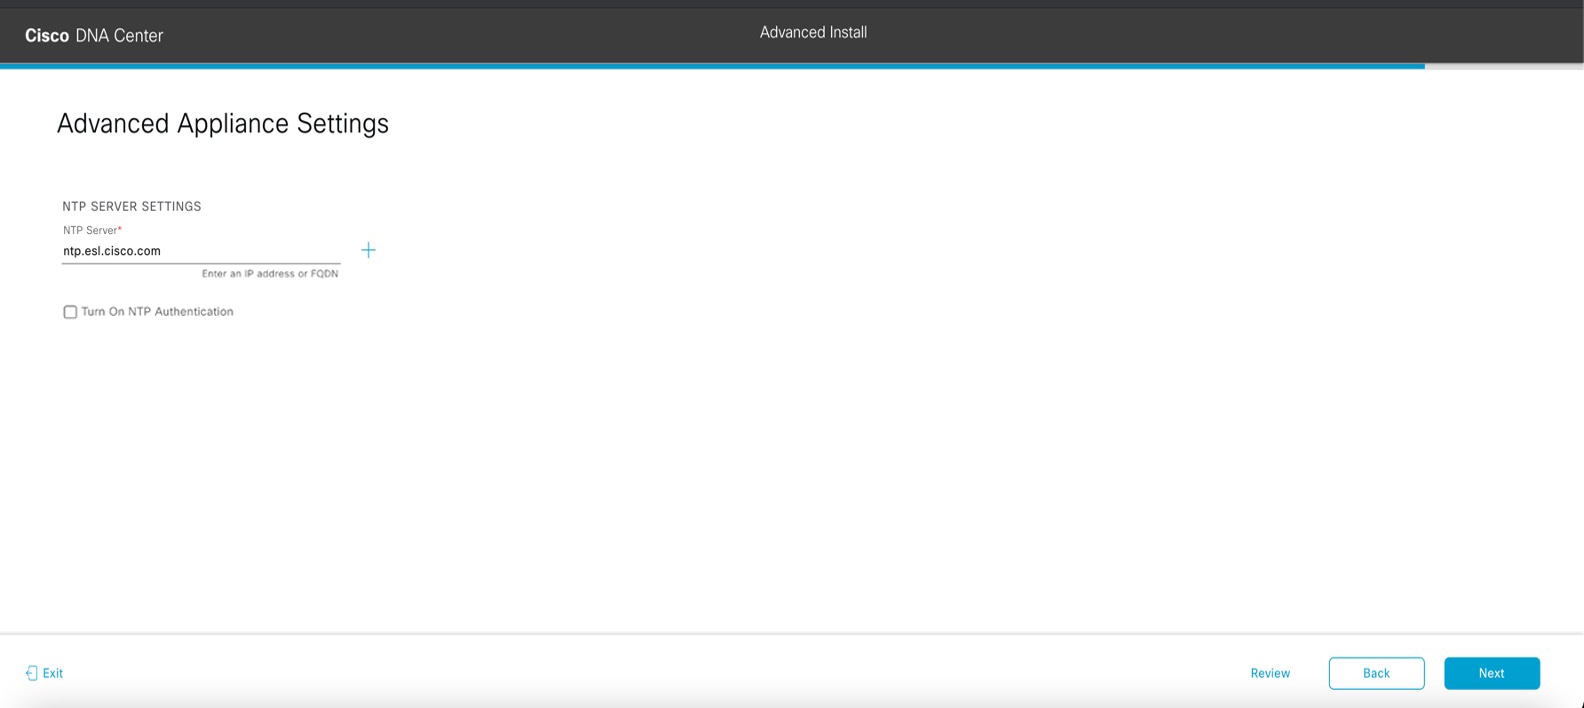
Complete the Advanced Install configuration wizard:
|
||||||||||||||||||||||||||||||||||||||||||||||||||||||||||||||||||||||||||||||


What to do next
When this task is complete:
-
If you are deploying this appliance in standalone mode only, continue by performing first-time setup: First-Time Setup Workflow.
-
If you are deploying this appliance as the primary node in a cluster, configure the second and third installed appliances in the cluster: Configure a Secondary Node Using the Advanced Install Configuration Wizard.
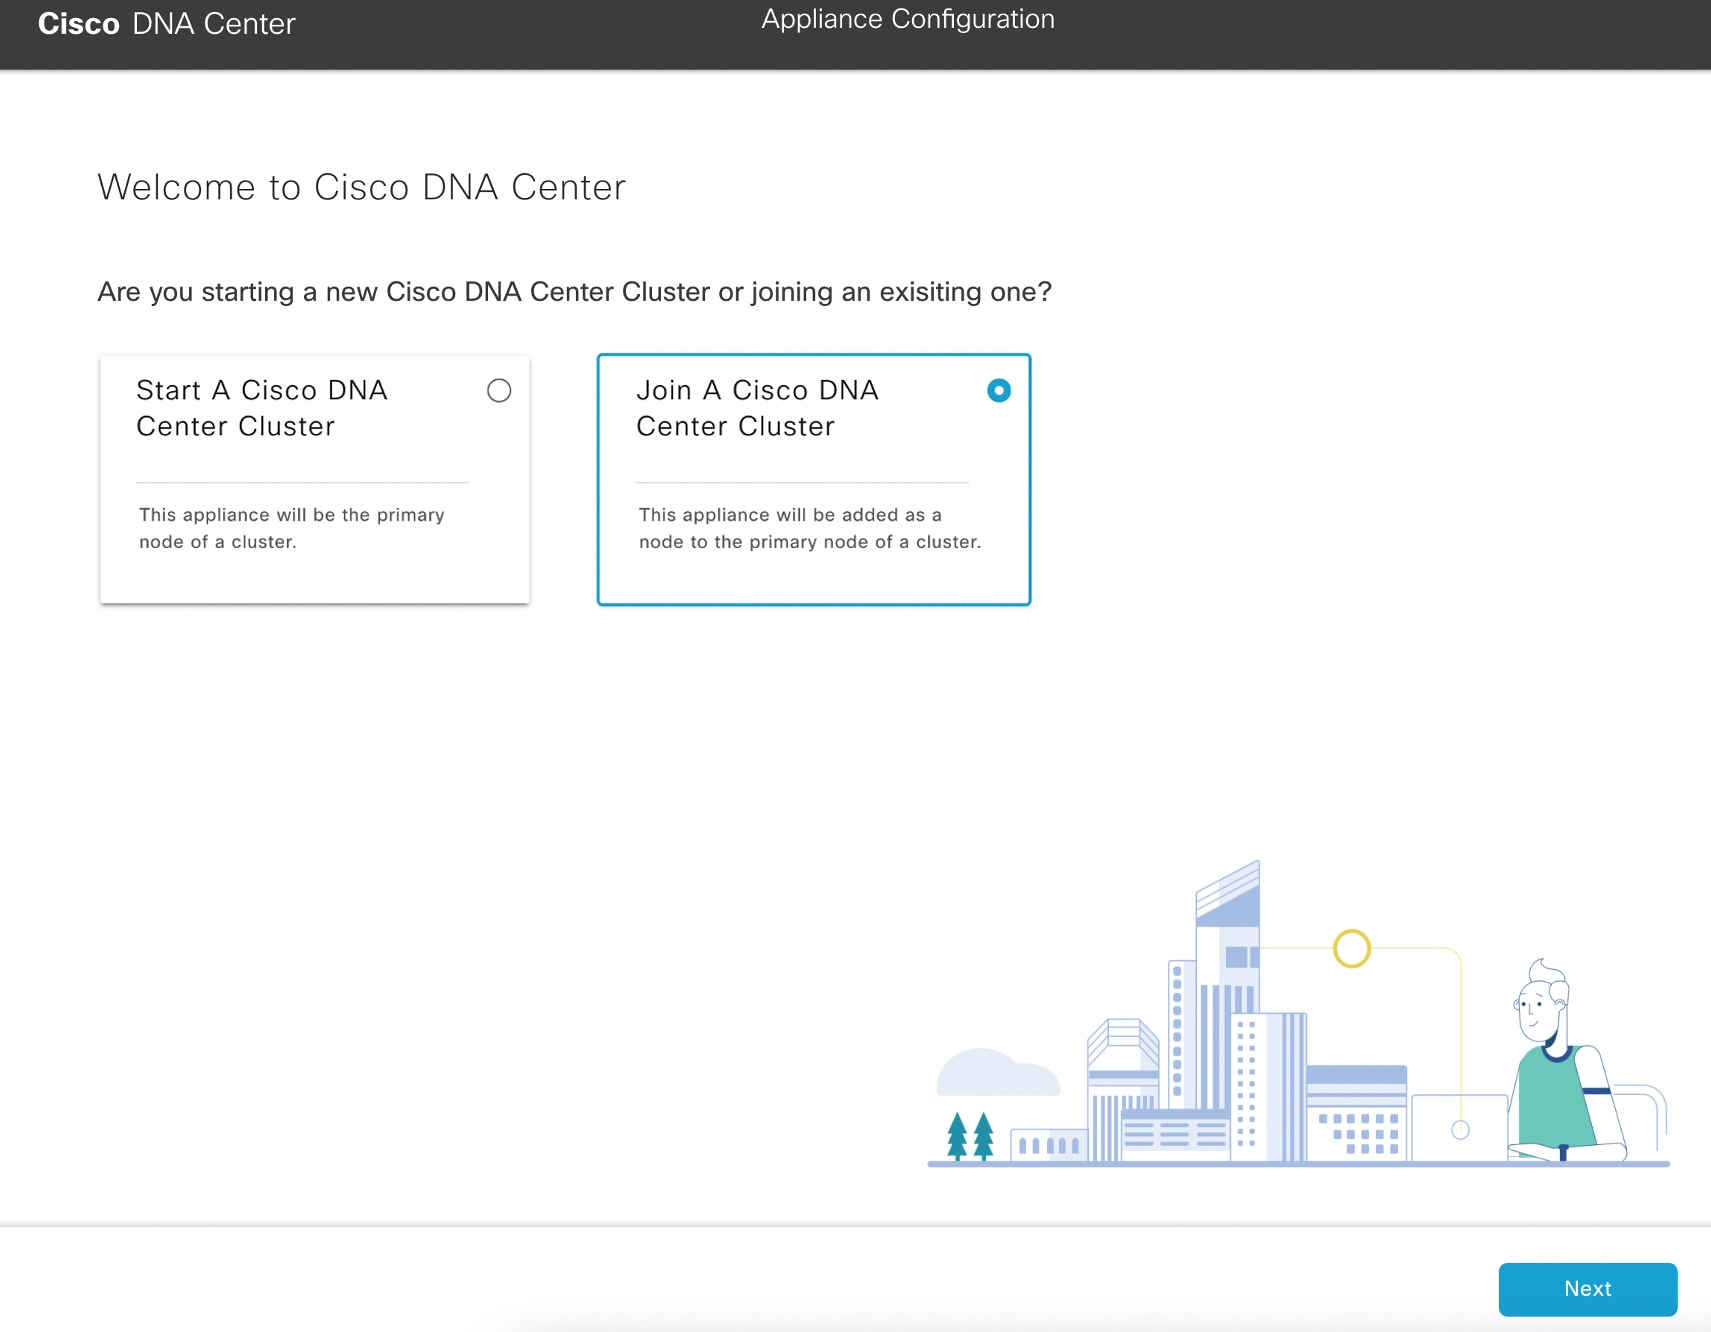
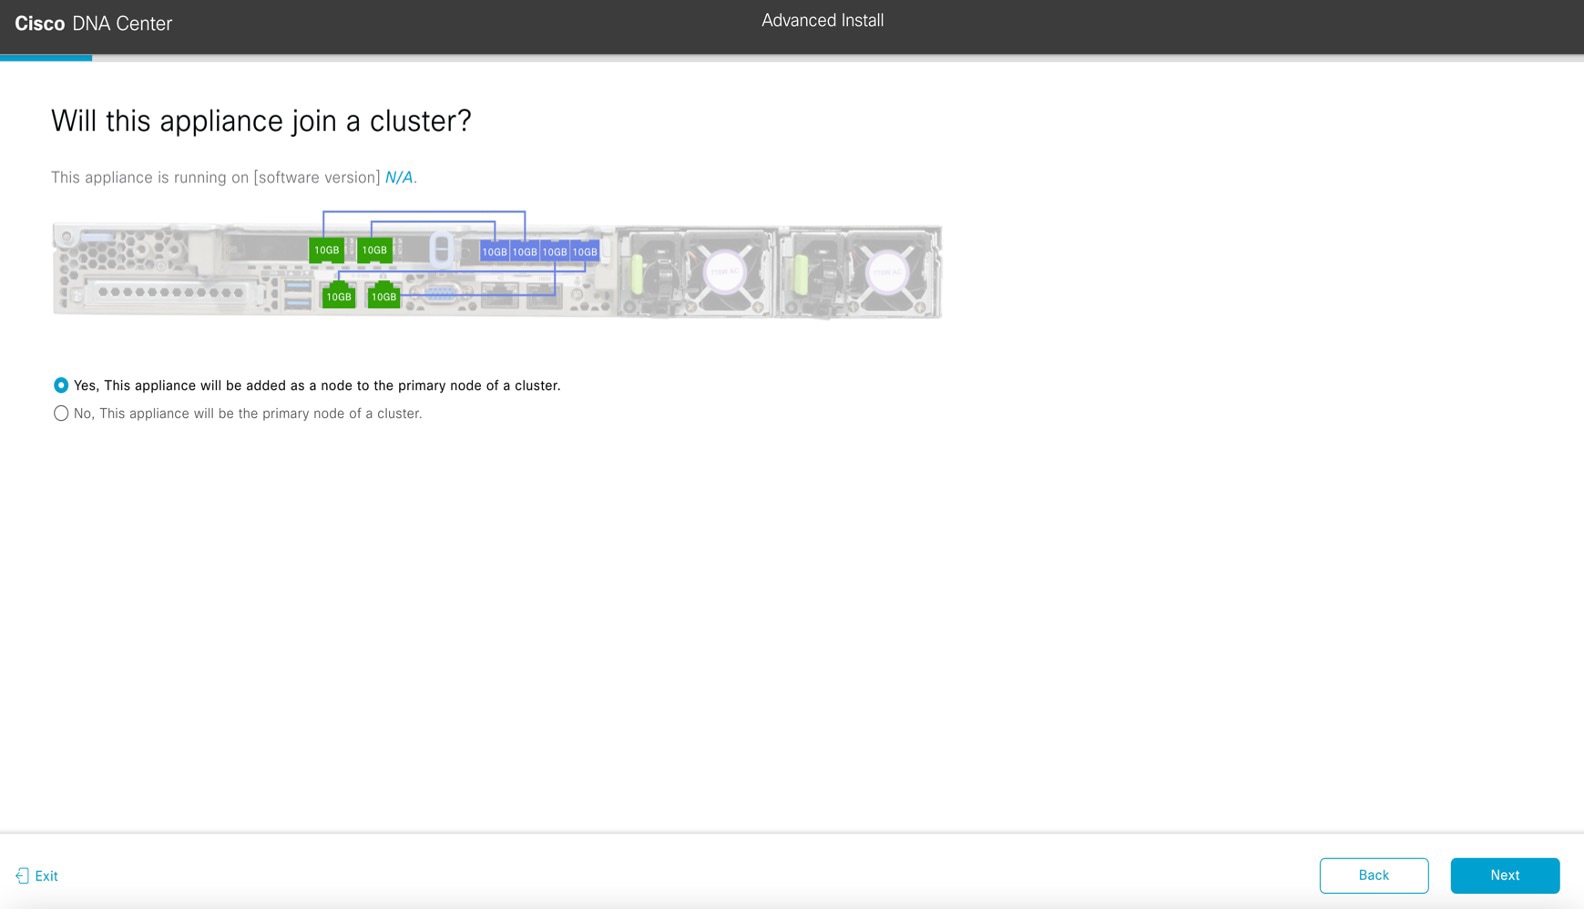
Configure a Secondary Node Using the Advanced Install Configuration Wizard
Perform the following steps to configure the second and third nodes in the cluster using the Advanced Install configuration wizard.
Important |
|
When joining each new secondary nodes to the cluster, you must specify the first appliance in the cluster as the primary node. Note the following when joining secondary nodes to a cluster:
-
Before adding a new node to the cluster, be sure that all installed packages are deployed on the primary node. You can check this by using Secure Shell to log in to the primary node's Cisco DNA Center Management port as the Linux User (maglev) and then running the command
maglev package status. All installed packages should appear in the command output asDEPLOYED.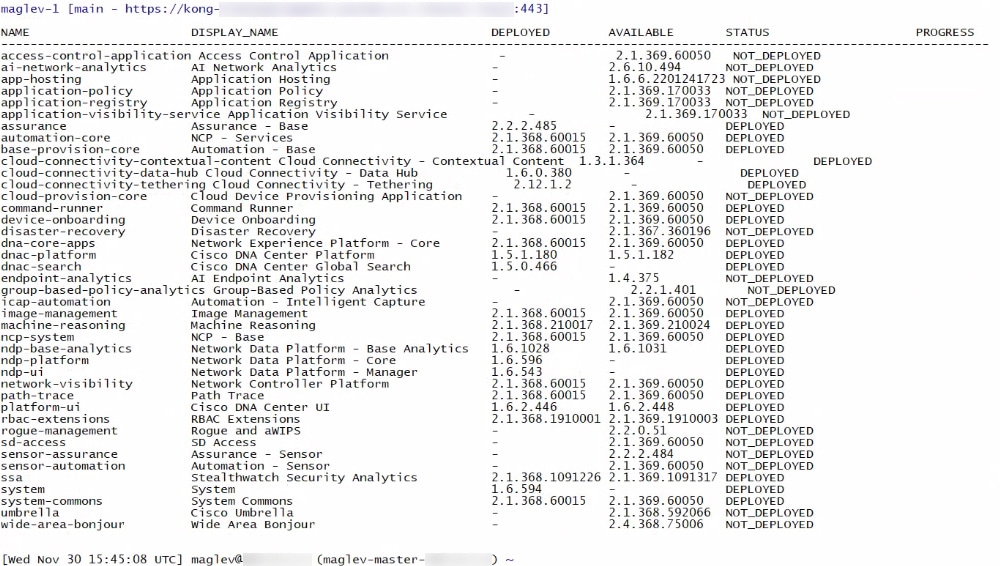
-
Be sure to join only a single node to the cluster at a time. Do not attempt to add multiple nodes at the same time, as doing so will result in unpredictable behavior.
-
Expect some service downtime during the cluster attachment process for each secondary node. Services will need to be redistributed across the nodes and the cluster will be down for periods of time during that process.
Before you begin
Ensure that you:
-
Installed the Cisco DNA Center software image onto your appliance, as described in Reimage the Appliance.
Important
This is only applicable if you are going to configure a promotional appliance because the Cisco DNA Center software image is not preinstalled on the following appliances:
-
44-core promotional appliance (Cisco part number DN2-HW-APL-U)
-
56-core promotional appliance: (Cisco part number DN2-HW-APL-L-U)
-
-
Configured the first appliance in the cluster, following the steps in Configure the Primary Node Using the Advanced Install Configuration Wizard.
-
Collected all of the information called for in Required IP Addresses and Subnets and Required Configuration Information.
-
Installed the second and third appliances, as described in Appliance Installation Workflow.
-
Have done the following:
-
Ran the maglev package status command on the first appliance.
You can also access this information from the Cisco DNA Center GUI by clicking the Help icon (
 ) and choosing .
-
Contacted the Cisco TAC, gave them the output of this command, and asked them to point you to the ISO that you should install on your second and third appliances.
-
-
Configured Cisco IMC browser access on both secondary nodes, as described in Enable Browser Access to Cisco IMC.
-
Checked that both secondary nodes' ports and the switches they use are properly configured, as described in Execute Preconfiguration Checks.
-
Are using a compatible browser. For a list of compatible browsers, see the Release Notes for the version of Cisco DNA Center you are installing.
-
Enabled ICMP on the firewall between Cisco DNA Center and both the default gateway and the DNS server you specify in the following procedure. The wizard uses ping to verify the gateway and DNS server you specify. This ping might get blocked if a firewall is in place and ICMP is not enabled on that firewall. When this happens, you will not be able to complete the wizard.
Procedure
|
Step 1 |
Start the Advanced Install configuration wizard:
|
||||||||||||||||||||||||||||||||||||||||||||||||||||||||||||||
|
Step 2 |
Complete the Advanced Install configuration wizard:
|
||||||||||||||||||||||||||||||||||||||||||||||||||||||||||||||


What to do next
When this task is complete:
-
If you have an additional appliance to deploy as the third and final node in the cluster, repeat this procedure.
-
If you are finished adding nodes to the cluster, continue by performing first-time setup: First-Time Setup Workflow.
Upgrade to the Latest Cisco DNA Center Release
For information about upgrading your current release of Cisco DNA Center, see the Cisco DNA Center Upgrade Guide.