Cisco Unity Troubleshooting Guide (With Microsoft Exchange), Release 4.0
Messages

Table Of Contents

Messages

About Problems with Messages

Messages Appear to Be Delayed

Task List for Troubleshooting Delay in Appearance of Messages

Cisco Unity Primary Exchange Server Is Down or Is Disconnected

Subscriber Misunderstandings

AMIS Messages Are Unable to Be Delivered Promptly

Some Messages Seem to Disappear

Task List for Troubleshooting the Disappearance of Some Messages

Network or Home Exchange Server Is Down

A Mailbox Is Full

Undeliverable Messages Have Not Been Forwarded to Recipients

Subscribers Assigned to Cisco Unity Entities Were Deleted and No Replacements Were Assigned

Unity Messaging System, UAmis, or UOmni Mailboxes Have Been Moved Incorrectly in Exchange

Troubleshooting Problems with Outbound AMIS Messages

Messages Are Not Delivered to the UAmis Mailbox

Messages Are Stuck in the UAmis Mailbox

Messages Leave the UAmis Mailbox But Are Not Delivered

Troubleshooting Problems with Inbound AMIS Messages

AMIS Troubleshooting Procedures

"C" and "D" DTMF Hang-Up Tones Cause AMIS Calls To Fail

Cisco Unity Stops Recording Before a Caller Has Finished Leaving a Message

Task List for Troubleshooting Recordings Being Cut Off

Dialogic Quiet Parameter Is Incorrect

Cisco Unity, the Phone System, or the Central Office Disconnected the Call

Dial Tone or Reorder Tone Is Present at the End of a Message


Messages


About Problems with Messages

Message problems fall into four categories:

Messages appear to be delayed

Some subscriber errors or misconceptions can lead to the impression that Cisco Unity is delaying messages. See the "Messages Appear to Be Delayed" section.

Messages seem to disappear

Some Exchange and Cisco Unity situations can affect message delivery. See the "Some Messages Seem to Disappear" section.

Outbound AMIS messages are not delivered

See the "Troubleshooting Problems with Outbound AMIS Messages" section

Inbound AMIS messages are not delivered

See the "Troubleshooting Problems with Inbound AMIS Messages" section.

Messages are incomplete

A setup problem may cause callers to be cut off when they try to leave a message. See the "Cisco Unity Stops Recording Before a Caller Has Finished Leaving a Message" section.

Messages include dial tone or reorder tone

See the "Dial Tone or Reorder Tone Is Present at the End of a Message" section.


.

Begin your troubleshooting by gathering information about the message problem. By discussing the problem with the subscriber, sometimes you can determine whether a problem is due to a misunderstanding of how Cisco Unity works. If you encounter a message problem that is not described in this section, contact the Cisco Technical Assistance Center (TAC).

Messages Appear to Be Delayed

The following sections describe possible reasons that messages may appear to be delayed. Use the Task List for Troubleshooting Delay in Appearance of Messages to troubleshoot the possible causes.

Task List for Troubleshooting Delay in Appearance of Messages

1. Check to see if the Exchange server is down or disconnected. See the "Cisco Unity Primary Exchange Server Is Down or Is Disconnected" section.

2. Investigate whether the subscriber misunderstands how Cisco Unity delivers messages. See the "Subscriber Misunderstandings" section.

3. If the messages in question are AMIS messages, see the "AMIS Messages Are Unable to Be Delivered Promptly" section.


Note To confirm the arrival times of messages, generate a subscriber message activity report for the subscriber. For more information, refer to the "Subscriber Message Activity Report" section in the "Reports" chapter of the Cisco Unity System Administration Guide, available on Cisco.com at http://www.cisco.com/en/US/products/sw/voicesw/ps2237/products_administration_guide_books_list.html.


Cisco Unity Primary Exchange Server Is Down or Is Disconnected

Messages recorded while the primary Exchange server is down or disconnected are stored in the Unity Messaging Repository (UMR) until the server is brought back up. Because calls for message notification and MWIs are not made until a message is actually delivered to a subscriber, the delay experienced between the time a message is recorded and its delivery is dependent on the amount of time that the primary Exchange server was down or disconnected.

Subscriber Misunderstandings

A subscriber misunderstands the use of the # key—When a subscriber presses the # key while listening to a message, Cisco Unity saves the message as a new message and skips to the next message. Later, the subscriber checks messages again, hears the same message, and believes the message arrived after a delay.

Explain to the subscriber that pressing the # key while a message plays saves it as a new message.

System clock time is incorrect—When the system clock is slow or when a desk clock is fast, the subscriber may believe messages were delayed.

Confirm that the system clock on the Cisco Unity server is reporting the correct time.

Exchange settings were updated—When settings are changed for a subscriber in Exchange, the new values may not be reflected immediately in Cisco Unity.

Explain to the subscriber that the settings may take a few minutes to synchronize, causing a delay in receipt of messages.

AMIS Messages Are Unable to Be Delivered Promptly

There are a number of reasons why AMIS messages may not be delivered promptly (or why they may be perceived as not being delivered promptly):

Outbound AMIS messages can be restricted to use only certain voice messaging ports. If the ports designated to handle AMIS messages are busy with other calls, outbound AMIS messages can be delayed. The AMIS Out Traffic report shows AMIS outbound traffic and total transmission time used. If the total transmission time approaches the limit of the ports dedicated to AMIS deliveries, review the AMIS schedule and port assignments to determine if additional resources (time and/or ports) should be dedicated to AMIS message traffic.

AMIS delivery of non-urgent messages can be restricted to occur only at scheduled delivery times. This may cause the recipient to believe message delivery was delayed.

Some AMIS messages may be undeliverable. An undeliverable message is returned to the sender with a non-delivery receipt (NDR) status; the sender or the administrator can make corrections and resend the message. This may also appear to the recipient as a delayed delivery.

For more information, see the "Troubleshooting Problems with Outbound AMIS Messages" section.

Some Messages Seem to Disappear

The following sections describe possible reasons that messages may not be delivered to the intended recipients. Use the Task List for Troubleshooting the Disappearance of Some Messages to troubleshoot the possible causes.

Task List for Troubleshooting the Disappearance of Some Messages

1. Check to see if the Exchange server or network are down. See the "Network or Home Exchange Server Is Down" section.

2. Verify that the subscriber mailbox is not full. See the "A Mailbox Is Full" section.

3. Verify that subscribers who are assigned to the Unaddressed Messages distribution list have been forwarding messages to the intended recipients. See the "Undeliverable Messages Have Not Been Forwarded to Recipients" section.

4. Confirm that you or another administrator did not inadvertently delete a subscriber who was assigned to review the messages for Cisco Unity entities. See the "Subscribers Assigned to Cisco Unity Entities Were Deleted and No Replacements Were Assigned" section.

5. Certain messages may get stuck in the UAmis, UOmni, or Unity Messaging System mailboxes. See the "Unity Messaging System, UAmis, or UOmni Mailboxes Have Been Moved Incorrectly in Exchange" section.

Network or Home Exchange Server Is Down

This applies only if there are multiple Exchange servers. Increasing the Max Open Retries value and decreasing the Open Interval value will increase the number of tries and decrease the wait time Exchange uses when it tries to deliver a message after the network or server comes back up.

Change these message transfer agent (MTA) site configuration values, if needed, in the Exchange Administrator.

A Mailbox Is Full

By default, Cisco Unity does not check if a subscriber mailbox has exceeded the Prohibit Send and Receive limit before allowing a caller to leave a message, although Cisco Unity does check before sending the message to the subscriber mailbox. If the subscriber mailbox is no longer allowed to receive messages, then Cisco Unity handles the message accordingly:

If the message was left by an unidentified caller—an outside caller or a caller from inside the organization calling from a phone that is not associated with a subscriber account (such as a conference room), Cisco Unity sends the message to the Unaddressed Messages distribution list, which should be monitored by the Cisco Unity system administrator or another subscriber.

If the message was left by another subscriber, Cisco Unity sends a non-delivery receipt (NDR) message to the subscriber who left the message.

Encourage the subscriber to dispose of messages promptly so that the Exchange mailbox does not fill up, and explain to subscribers on the Unaddressed Messages distribution list the importance of regularly checking for and forwarding undeliverable messages. (Note that if the mailbox(es) of the subscriber(s) who are assigned to check the Unaddressed Messages list exceed the Prohibit Send and Receive storage limit that is specified in Exchange, the messages sent to the Unaddressed Messages distribution list are lost. To avoid this problem, specify a generous value for the Prohibit Send and Receive storage limit for the mailbox of at least one subscriber who is a member of the Unaddressed Messages list.)

Cisco Unity can be set to check if a subscriber mailbox is full when an outside caller tries to leave a message for the subscriber. To do so, refer to the "Message Handling" section in the "Default Accounts and Message Handling" chapter of the Cisco Unity System Administration Guide.

For more information on Exchange 5.5 and Exchange 2000 storage limits, see the "Setting a Maximum Size for Exchange Mailboxes" section in the "Maintaining Cisco Unity" chapter of the Cisco Unity System Administration Guide, or refer to the Microsoft Exchange documentation. The Cisco Unity System Administration Guide is available on Cisco.com at http://www.cisco.com/en/US/products/sw/voicesw/ps2237/products_administration_guide_books_list.html.

You can also review the "White Paper: Understanding How Exchange 2000 Storage Limits Work with Cisco Unity," available on Cisco.com at http://www.cisco.com/en/US/products/sw/voicesw/ps2237/prod_technical_reference_list.html.

Undeliverable Messages Have Not Been Forwarded to Recipients

Messages returned to the Unity Messaging System mailbox are forwarded automatically to subscribers whose names appear on the Unaddressed Messages public distribution list. The messages then must be forwarded to the intended recipients. Explain to subscribers on the Unaddressed Messages public distribution list the importance of regularly checking for and forwarding undeliverable messages.

Note that if the mailbox(es) of the subscriber(s) who are assigned to check the Unaddressed Messages list exceed the Prohibit Send and Receive storage limit that is specified in Exchange, the messages sent to the Unaddressed Messages distribution list are lost. To avoid this problem, specify a generous value for the Prohibit Send and Receive storage limit for the mailbox of at least one subscriber who is a member of the Unaddressed Messages list and encourage the subscriber to dispose of messages promptly so that the Exchange mailbox does not fill up.

Subscribers Assigned to Cisco Unity Entities Were Deleted and No Replacements Were Assigned

When you delete a subscriber who was assigned to review the messages sent to any of the following Cisco Unity entities, make sure that you assign another subscriber or a public distribution list to replace the deleted subscriber; otherwise, messages may be "lost."

Unaddressed Messages distribution list

System Event Messages distribution list (because the Example Administrator is the only member of this distribution list by default)

Operator call handler (because the Example Administrator is the only member of this distribution list by default)

Opening Greeting call handler

Good-Bye call handler

Example Interview call handler

To identify call handlers that are associated with improperly deleted accounts, run the Unresolved References report. See the "Unresolved References Report" section on page 26-26 for more information.

Unity Messaging System, UAmis, or UOmni Mailboxes Have Been Moved Incorrectly in Exchange

The Unity Messaging System, UAmis, and UOmni mailboxes are special Exchange mailboxes with specific functions. Each requires special care if you move them in Exchange. If you recently moved a group of subscriber mailboxes, you may have inadvertently moved the Unity Messaging System, UAmis, or UOmni mailboxes at the same time if:

Messages from unidentified callers—outside callers or callers from inside the organization calling from a phone that is not associated with a subscriber account, such as a conference room—are stuck in the Unity Messaging Repository (UMR).

Messages are stuck in the UAmis mailbox.

Messages are stuck in the UOmni mailbox.

Refer to the "Moving the Unity Messaging System, UAmis, and UOmni Exchange Mailboxes" section in the "Maintaining Cisco Unity" chapter of the Cisco Unity System Administration Guide, available on Cisco.com at http://www.cisco.com/en/US/products/sw/voicesw/ps2237/products_administration_guide_books_list.html.

Troubleshooting Problems with Outbound AMIS Messages

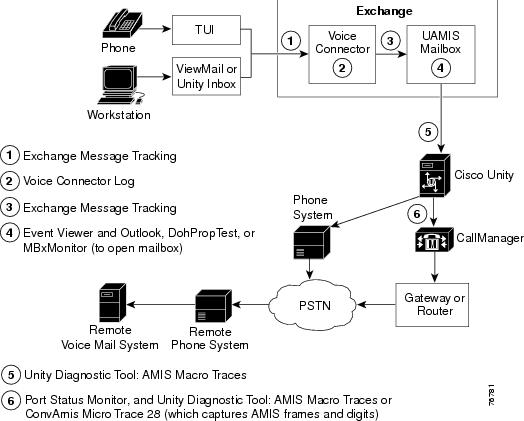
Figure 5-1 shows at a high level the flow of outbound AMIS messages through Cisco Unity to the remote voice messaging system, and the logs and other tools that you can use to troubleshoot problems along the path (after checking the Windows Event log).

Figure 5-1 Outbound AMIS Message Flow and Troubleshooting Tools

Use the following list to troubleshoot problems with outbound AMIS messages:

Confirm that the other voice messaging system is supported by Cisco Unity for AMIS messaging. Refer to the "AMIS Support" section of the Cisco Unity 3.1 System Requirements, and Supported Hardware and Software, available on Cisco.com at http://www.cisco.com/en/US/products/sw/voicesw/ps2237/prod_pre_installation_guides_list.html.

Check the Windows Application Event log. If there are AMIS-related errors in the Event log, check http://www.CiscoUnitySupport.com to see if troubleshooting information about the error is available.

Determine if the Voice Connector delivered the messages to the UAmis mailbox, by using one of the following methods:

See the procedure, To confirm that messages are being delivered to the UAmis mailbox.

Use Exchange Message Tracking. Refer to your Microsoft Exchange documentation for more information.

If you determine that the messages are not being delivered to the UAmis mailbox, see the "Messages Are Not Delivered to the UAmis Mailbox" section for information on how to troubleshoot this problem.

If messages are being delivered to the UAmis mailbox, but are not being sent on from there, see the "Messages Are Stuck in the UAmis Mailbox" section for information on how to troubleshoot this problem.

If messages are leaving the UAmis mailbox, but are not delivered to users on the other voice messaging system, see the "Messages Leave the UAmis Mailbox But Are Not Delivered" section for information on how to troubleshoot this problem.

Detailed procedures for troubleshooting the above AMIS problems, and information about AMIS diagnostic traces, can be found in the following sections:

AMIS Troubleshooting Procedures

AMIS Diagnostic Traces

Messages Are Not Delivered to the UAmis Mailbox

When subscribers address messages to an AMIS recipient, the Voice Connector is responsible for delivering the messages to the UAmis mailbox. If messages are not showing up in the UAmis mailbox, then more than likely there is a problem with the Voice Connector. When there is a problem with the Voice Connector, no AMIS-related errors are logged to the Windows Application Event log.

If you are not sure whether messages are being delivered to the UAmis mailbox, do the procedure, To confirm that messages are being delivered to the UAmis mailbox.

To troubleshoot problems with the Voice Connector

Confirm that the Exchange server on which the Voice Connector is installed has not gone down.

Confirm that the Voice Connector service is running. If the service is not running, then start it. The messages will be delivered from the Voice Connector MTS-OUT queue to the UAmis mailbox.

For detailed instructions, see the following procedures: To confirm that the Voice Connector service is running; To view the Voice Connector MTS-OUT queue in Exchange 2000; and, To view the Voice Connector MTS out queue in Exchange 5.5.

View the Voice Connector log files in the <ExchangeServerPath>\VoiceGateway\logFiles folder on the Exchange server on which the Voice Connector is installed. For more information about the Voice Connector log files, see the "Cisco Unity Voice Connector Logs" section.

Use the Unity Diagnostic Tool to set the macro trace called "General Outgoing AMIS Message Trace." For information on using the Unity Diagnostic tool, see "To set and retrieve traces for AMIS messages" section.

Messages Are Stuck in the UAmis Mailbox

After the Voice Connector has delivered a message to the UAmis mailbox, the AMIS schedule and the AMIS restriction table will determine when the message will be sent. When an AMIS delivery number is allowed by the restriction table, messages to this number are sent immediately from the UAmis mailbox—the schedule settings do not matter. When the delivery number is disallowed by the restriction table, messages to this number are queued in the UAmis mailbox until the active hours of the AMIS schedule.

An error is logged in the Windows Application Event log when messages remain in the UAmis mailbox for more than 24 hours. Only one error is logged in the Event log, no matter how many messages remain in the UAmis mailbox. An additional error is logged daily until the messages are either sent or deleted from the UAmis mailbox.

If necessary, you can delete messages that are stuck in the UAmis mailbox by using Outlook or DohPropTest. See the procedure, To view or remove messages in the UAmis mailbox by using DohPropTest, for detailed steps.

To determine why messages are stuck in the UAmis mailbox

In the Cisco Unity Administrator, review the settings for the AMIS restriction table. If any delivery numbers are disallowed, messages addressed to these numbers will be queued in the UAmis mailbox. This may not be what you intended. To send the messages immediately, change the AMIS schedule so that it is active during the time that you are troubleshooting. After the messages are sent from the UAmis mailbox, reset the AMIS schedule and adjust the AMIS restriction table as needed.

Review the AMIS schedule. Confirm that the schedule has sufficient Active hours set for sending all the messages.

Go to the System > Ports page, and confirm that there is at least one port configured for outbound AMIS messages.

Go to the Reports > System > AMIS Out Traffic page, and run the report.

If the total transmission time (listed at the bottom of the transmission duration column, and reported in seconds) is approaching the limit of the ports dedicated to AMIS deliveries, all of the port resources available are being used. Review the AMIS schedule and port assignments again to determine if additional resources (time and/or ports) should be dedicated to AMIS message traffic.

Confirm that the delivery phone numbers on all AMIS delivery locations are valid. To confirm that the delivery phone numbers are valid, do one of the following:

If there are few AMIS delivery locations, in the Cisco Unity Administrator, go to the Network > Delivery Locations > Profile page of each AMIS delivery location to confirm the delivery phone number.

Alternatively, you can run DohPropTest to view the delivery phone number and other attributes about the messages that are stuck in the UAmis mailbox. See the procedure, To view or remove messages in the UAmis mailbox by using DohPropTest for more information.

In Outlook, confirm that the messages are marked as Unread. Messages that have been manually marked as Read will not be sent from the UAmis mailbox. For example, if someone has been monitoring the UAmis mailbox and has opened a message, that message will not be sent.

Use the Unity Diagnostic Tool to set the macro trace called "General Outgoing AMIS Message Trace." For information on using the Unity Diagnostic tool, see the procedure, To set and retrieve traces for AMIS messages.

Messages Leave the UAmis Mailbox But Are Not Delivered

Use the following steps to troubleshoot problems with messages that leave the UAmis mailbox but are not delivered to users of the remote voice messaging system.

To troubleshoot undelivered messages

Check the Event log.

If there are AMIS-related errors in the Event log, check http://www.CiscoUnitySupport.com to see if troubleshooting information about the error is available.

Double-check the AMIS configuration in Cisco Unity, as follows:

In the Cisco Unity Administrator, go to the Network > AMIS Options > Delivery Options page. Review the settings for If The Remote System Does Not Answer and If The Remote System Is Busy. These settings should be set to at least the default values (Hang Up After 4 Rings; Try Calling 4 Times; Retry Every 5 Minutes). Otherwise, the remote voice messaging system may not be given enough time to answer.

Go to the Network > Delivery Options > Profile page of each of the AMIS delivery locations. If the Disable Outbound Messages To This AMIS Location check box is checked, change the Delivery Phone Number as needed, and then uncheck the check box.

Go to the Network > Primary Location > Profile page. Confirm that the Node ID is accepted by the remote voice messaging system.

Confirm that the extension addresses listed in Exchange for AMIS subscribers are correct. If the Dial ID for an AMIS delivery location has changed, or if the remote mailbox number for an AMIS subscriber has changed, you need to run the Extension Address utility to update the extension addresses. See the procedures, To view AMIS subscriber extension addresses, and To run the Extension Address utility for more information.

Determine whether the calls to an AMIS location are actually being made or whether there is something unexpected happening during the AMIS transmission. You can use the StatusMonitor utility (located in \CommServer\TechTools) to observe call progress. See the procedure, To use the StatusMonitor utility to watch details of an AMIS transmission.

If the outgoing AMIS calls are to a long distance number, check the phone system to see if there are restrictions for placing long distance calls.

Use the Unity Diagnostic Tool to set the macro trace called "Extensive Outgoing AMIS Message Trace." For information on using the Unity Diagnostic tool, see the procedure, To set and retrieve traces for AMIS messages.

See the ""C" and "D" DTMF Hang-Up Tones Cause AMIS Calls To Fail" section to determine if this could be the source of the problem.

Troubleshooting Problems with Inbound AMIS Messages

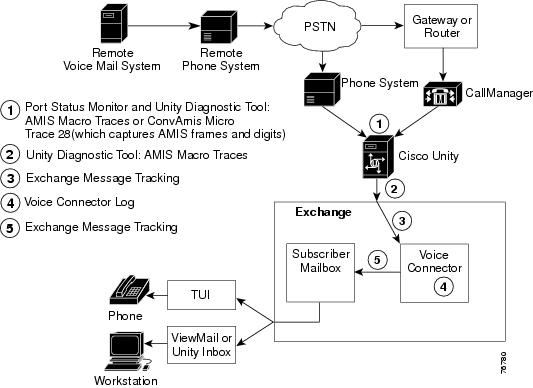
Figure 5-2 shows at a high level the flow of inbound AMIS messages from the remote voice messaging system to Cisco Unity, and the logs and other tools that you can use to troubleshoot problems along the path (after checking the Windows Event log).

Figure 5-2 Inbound AMIS Message Flow and Troubleshooting Tools

Use the following list to troubleshoot problems with inbound AMIS messages:

Confirm that the other voice messaging system is supported by Cisco Unity for AMIS messaging. Refer to the "AMIS Support" section of the Cisco Unity 3.1 System Requirements, and Supported Hardware and Software, available on Cisco.com at http://www.cisco.com/en/US/products/sw/voicesw/ps2237/prod_pre_installation_guides_list.html.

Check the Windows Application Event log. If there are AMIS-related errors in the Event log, check http://www.CiscoUnitySupport.com to see if troubleshooting information about the error is available.

Go to the Network > Delivery Options > Profile page of each of the AMIS delivery locations. Confirm that the Node ID entered on the page exactly matches the node ID that the remote voice messaging system transmits.

If you have not determined why the messages are not being delivered, use the Cisco Unity Diagnostic Tool to set diagnostic traces and send a test message. See the "AMIS Diagnostic Traces" section for information on the appropriate traces to set.

See the ""C" and "D" DTMF Hang-Up Tones Cause AMIS Calls To Fail" section to determine if this could be the source of the problem.

Detailed procedures for troubleshooting the above AMIS problems, and information about AMIS diagnostic traces, can be found in the following sections:

AMIS Troubleshooting Procedures

AMIS Diagnostic Traces

AMIS Troubleshooting Procedures

Use the following procedures as needed to troubleshoot problems with AMIS message delivery. For discussion of when to use the following procedures, and the correct order in which to do the procedures, see the preceding topics:

Troubleshooting Problems with Outbound AMIS Messages

Troubleshooting Problems with Inbound AMIS Messages

To confirm that messages are being delivered to the UAmis mailbox


Step 1 In the Cisco Unity Administrator, change the AMIS restriction table to disallow all numbers. This causes all AMIS messages to be queued in the UAmis mailbox until the AMIS schedule becomes active.

For detailed instructions on changing the restriction table, see the procedure, To change the AMIS restriction table to disallow all delivery numbers.

Step 2 Change the AMIS schedule so that it is inactive during the time that you are troubleshooting. This way, the messages (if they arrive) stay in the UAmis mailbox long enough for you to see them.

For detailed instructions on changing the schedule, see the procedure, To change the AMIS schedule so that it is inactive while troubleshooting.

Step 3 Open the UAmis mailbox by using one of the following methods:

If you have access to Outlook, set up a user profile for the UAmis mailbox just like you would for any Exchange mail user, and then use Outlook to determine if messages are in the UAmis mailbox. Refer to your Outlook documentation for information about setting up user profiles.


Note When a message is addressed to an AMIS recipient by using the phone, a copy of the message is not saved in the Outlook Sent Items folder after the message leaves the UAmis mailbox. However, when a message is addressed to an AMIS recipient by using Outlook, a copy of the message is saved in the Sent Items folder of the UAmis mailbox.


Use DohPropTest to open the UAmis mailbox. See the procedure, To view or remove messages in the UAmis mailbox by using DohPropTest.

Use MbxMonitor.exe to monitor the UAmis mailbox.

Step 4 Send a test message to see if it is delivered to the UAmis Inbox. If using blind addressing, be sure to verify that you are using a valid Dial ID number from a Delivery Location.

Step 5 After testing, be sure to reset the AMIS restriction table and schedule.


To change the AMIS restriction table to disallow all delivery numbers


Step 1 In the Cisco Unity Administrator, go to the Network > AMIS Options > Delivery Options page.

Step 2 Click the View button next to Local Dial Restriction Table to display the AMIS restriction table.

Step 3 On the AMIS restriction table page, click Add Dial String.

Step 4 In the Call Pattern box, enter *.

Step 5 In the Allow This String box, click No.

Step 6 Click the Save icon.


To change the AMIS schedule so that it is inactive while troubleshooting


Step 1 In the Cisco Unity Administrator, go to the Network > AMIS Options > Schedule page.

Step 2 Click the appropriate blocks so that the schedule is inactive while you are troubleshooting.

Step 3 Click the Save icon.


To confirm that the Voice Connector service is running


Step 1 Log on to the Exchange server on which the Voice Connector is installed.

Step 2 Open Windows Services (on the Windows Start menu, click Programs > Administrative Tools > Services).

Step 3 Locate the Voice Connector service in the Name column. In Exchange 2000, the display name for the service is "Exchange 2000 Voice Connector," and in Exchange 5.5, the display name is "Internet Voice Connector."

Step 4 If the Status column indicates that the Voice Connector service is not running, right-click the service and click Start.


To set access permissions on the Exchange 2000 mailbox store

Do this procedure if you need to gain access to the MTS-IN and MTS-OUT queues on the Exchange server on which the Voice Connector is installed.


Step 1 On the Exchange server on which the Voice Connector is installed, start the Exchange System Manager (on the Windows Start menu, click Programs > Microsoft Exchange > System Manager).

Step 2 Expand Servers.

Step 3 Expand the node for your Exchange 2000 Server.

Step 4 Expand the First Storage Group node.

Step 5 Right-click the Mailbox Store.

Step 6 Select Properties to bring up the Mailbox Store Properties sheet.

Step 7 Click the Security tab.

Step 8 Click Add, and add the current administrator to the list.

Step 9 Click OK twice and close the Exchange System Manager.


To view the Voice Connector MTS-OUT queue in Exchange 2000


Step 1 Log on to the Exchange server on which the Voice Connector is installed.

Step 2 Start the Exchange System Manager (on the Windows Start menu, click Programs > Microsoft Exchange > System Manager).

Step 3 Browse to Connectors\ Exchange 2000 Voice Connector\Queues.

Step 4 Click MTS-OUT.


To view the Voice Connector MTS out queue in Exchange 5.5


Step 1 Log on to the Exchange server on which the Voice Connector is installed.

Step 2 Start the Exchange Administrator (on the Windows Start menu, click Programs > Microsoft Exchange > Exchange Administrator).

Step 3 Browse to Connectors\ Internet Voice Connector.

Step 4 Double-click Internet Voice Connector to display the properties.

Step 5 Click the Queues tab.

Step 6 Select MTS-OUT from the Queue Name list.


To view or remove messages in the UAmis mailbox by using DohPropTest


Step 1 On the Cisco Unity server, browse to the location where Cisco Unity is installed (the default is C:\CommServer), and then browse to the TechTools folder.

Step 2 Run DohPropTest.exe.

Although DohPropTest is password protected, it can be run in read-only mode. However, in read-only mode, you cannot remove messages from the UAmis mailbox.

Step 3 In the DohPropTest Logon dialog box, leave the Password box empty, and click OK.

Step 4 On the warning dialog box, click Ignore to start the read-only mode of DohPropTest.

Step 5 In the list on the left side of the window, click MailUsers.

Step 6 In the middle list, click the UAmis_<server name> mailbox.

Step 7 Click Get User's Mailbox, which displays a dialog box.

Step 8 Click OK. A dialog box with all the messages appears.

Step 9 Click a message. The message plays, and the message properties are displayed. Select a property to check the values. The following properties should be checked:

AVP_AMIS_Destination_NODE—The AMIS delivery location Dial ID.

AVP_AMIS_Recipient—The remote mailbox number of the recipient.

AVP_AMIS_SENDER_ADDRESS—The message sender.

AVP_SUBMIT_TIME—The time the message was submitted. Note that the timestamp is in GMT.


To set and retrieve traces for AMIS messages

See the"AMIS Diagnostic Traces" section for information about the diagnostic traces to set for troubleshooting AMIS message delivery problems.


Step 1 On the Windows Start menu, click Programs > Unity > Unity Diagnostic Tool.

Step 2 On the Cisco Unity Diagnostic Tasks screen, click Configure Macro Traces. The Configure Macro Traces Wizard displays.

Step 3 Click Next to select the traces to enable.

Step 4 After selecting the appropriate traces, click Finish.

Step 5 On the Cisco Unity Diagnostic Tasks screen, click Start New Log Files.

Step 6 After the problem reoccurs, or sufficient time has passed to gather AMIS message data, in the tree in the left pane of the Unity Diagnostic Tool, click Processes > AvCsMgr, and then click the Current log file to view it.

The selected log file is formatted and displayed in the right pane.

Step 7 To export or save a copy of the log file, click Action > Export List.

Step 8 Name the file and save it to a location of your choice in .txt or .csv format.

Step 9 Disable all diagnostic traces that were activated in Step 3.

Step 10 If you need assistance in interpreting the diagnostic logs, or are unable to resolve an AMIS message problem, contact Cisco TAC.


To view AMIS subscriber extension addresses


Step 1 Open Active Directory Users and Computers (on the Windows Start menu, click Programs > Administrative Tools > Active Directory Users and Computers).

Step 2 Open the properties page for an AMIS subscriber.

Step 3 Click the E-mail Addresses tab. You should see an address with the type "amis" and an address in the form <Location Dial ID>_<Remote Mailbox Number>.

Step 4 Confirm that this is the correct address.


To run the Extension Address utility


Step 1 On the Cisco Unity server, on the Windows Start menu, click Programs > Unity > Extension Address Utility.

Step 2 Click Update.

Step 3 When the utility has finished updating extension addresses, click Close.


To use the StatusMonitor utility to watch details of an AMIS transmission


Step 1 In the Cisco Unity Administrator, go to the System > Ports page, and change the settings as needed so that only one port is enabled for outbound AMIS calls, and that all other functions (such as Message Notification and Dialout MWIs) on the port are disabled. This makes it easier to observe the call progress information in the StatusMonitor.

For any outgoing call troubleshooting—be it AMIS, MWI, message notification, or TRAP—it is best to use one of the last ports because the higher-numbered ports are most likely being used for outgoing tasks anyway. Cisco Unity searches for available ports for outgoing tasks starting with the last port.

Step 2 On the Cisco Unity server, browse to the location in which Cisco Unity is installed (the default is C:\CommServer), and then browse to the TechTools folder.

Step 3 Run StatusMonitor.exe.

Step 4 Click Display and Conversation in the Monitor Settings When Started section.

Step 5 In the Ports list, confirm that the port selected on the System > Ports page for outbound AMIS calls (the port you selected in Step 1) is selected for monitoring.

Step 6 Click Start Monitor.

Step 7 Use the phone to dial into Cisco Unity on a port other than the one configured for outbound AMIS calls, and send a test message to someone on the remote voice messaging system.

Step 8 Observe the information in the StatusMonitor.

In the Display State pane in the StatusMonitor window, you should see the dialout information. In the Conversation State pane, you should see the states that the AMIS call goes through. An AMIS call goes through a finite number of states during an AMIS transmission. As the AMIS call progresses, you should see the descriptive name of each state in the Conversation State pane. For detailed information about the AMIS transmission states, refer to White Paper: AMIS Analog Networking Definitions, available on Cisco.com at http://www.cisco.com/en/US/products/sw/voicesw/ps2237/prod_technical_reference_list.html.


"C" and "D" DTMF Hang-Up Tones Cause AMIS Calls To Fail

"C" and "D" DTMF tones, also known as fourth-column tones, are just like the twelve other DTMF tones ("0"-"9," "*," and "#") found on a regular analog phone. They are commonly used for in-band analog integrations and other "non-human" tasks.

The first action of an AMIS call is the handshake between the originating and receiving voice messaging systems. The originating system dials the number of the destination system. When the originating system detects that the destination system has answered the call, the originating system transmits a "C" tone to the destination. If the destination system answers the call and detects the "C" tone, it should respond with a "D" tone within 10 seconds. After transmitting the "D" tone, the destination system expects a Start Session frame.

(For more information on the details of an AMIS call, refer to White Paper: AMIS Analog Networking Definitions, available on Cisco.com at http://www.cisco.com/en/US/products/sw/voicesw/ps2237/prod_technical_reference_list.html.)

Many Toshiba phone systems use the "D" tone to indicate to voice messaging systems that a disconnect has occurred. Other phone systems may also use the "C" or "D" tones to indicate that a disconnect has occurred. When this is the case, a parameter of "HangUpTone=C" or "HangUpTone=D" will be defined in the active switch configuration file on the Cisco Unity server.

If "HangUpTone=C" is defined, the AMIS feature cannot be used on that system. When a remote voice messaging system dials Cisco Unity and sends the "C" tone to initiate the AMIS handshake, Cisco Unity interprets it as a disconnect signal from the phone system and hangs up on the call.

Similarly, if "HangUpTone=D" is defined, the AMIS feature cannot be used on that system. When Cisco Unity dials the remote voice messaging system and sends the "C" tone to initiate the AMIS handshake, and the remote system responds with the "D" tone, Cisco Unity interprets it as a disconnect signal from the phone system and hangs up on the call.

To fix this problem, configure the phone system to use another type of disconnect indication (such as the reorder tone, dial tone, or loop current reversal), then remove the HangUpTone parameter from the active switch file. This is the best option.

If this is not possible, configure the phone system to use "A" or "B" as a hang-up tone, then modify the HangUpTone parameter in the active switch file to match this new value.

The default values for the hang-up packets expected by Cisco Unity (defined in avanaglog.avd) have been chosen to work with AMIS. Changing these values may cause AMIS calls to fail.

To obtain the name(s) of the active switch file(s)


Step 1 On the Cisco Unity server, start Regedit.


Caution Changing the wrong registry key or entering an incorrect value can cause the server to malfunction. Before you edit the registry, confirm that you know how to restore it if a problem occurs. (Refer to the "Restoring" topics in Registry Editor Help.) Note that a typical backup of the Cisco Unity server does not back up the registry. Also note that for Cisco Unity failover, registry changes on one Cisco Unity server must be made manually on the other Cisco Unity server, because registry changes are not replicated.

Step 2 If you do not have a current backup of the registry, click Registry > Export Registry File, and save the registry settings to a file.

Step 3 Expand the following key:

HKEY_LOCAL_MACHINE\Software\Active Voice\Miu\1.0\Initialization
\Switch 0

For dual-switch integrations, also expand the key:

HKEY_LOCAL_MACHINE\Software\Active Voice\Miu\1.0\Initialization
\Switch 1

Step 4 View the Switch Configuration File value under the ...\Switch 0 key to obtain the name of the active switch file, and then click Cancel. For dual-switch integrations, also view the Switch Configuration File value under the ...\Switch 1 key to obtain the name of the second active switch file, and then click Cancel.

Step 5 Close Regedit.


To edit the active switch file(s)


Step 1 On the Cisco Unity server, browse to the \CommServer\IntLib folder. (C:\CommServer is the default folder in which Cisco Unity is installed. If Cisco Unity is installed in another folder, use that path instead.)

Step 2 Open the active switch file with a text editor.

Step 3 In the [Configuration] section, if "HangUpTone=" does not exist, or if it is set to any value other than "C" or "D," then do not change anything in the file, because the parameter does not conflict with AMIS. Close the file, and skip to Step 5.

Step 4 If "HangUpTone=" is set to either the "C" or "D" DTMF tone, then the action you take depends on the new disconnect indication that you configured on the phone system, as follows:

If the phone system uses some other type of disconnect indication, such as the reorder tone, dial tone, or loop current reversal, then remove the HangUpTone parameter from the active switch file. Save and close the file.

If the phone system uses either the "A" or "B" DTMF tone as a hang-up tone, then modify the "HangUpTone=" to match this new value. Save and close the file.

Step 5 For dual-switch integrations, repeat Step 1 through Step 4 to edit the second active switch file.

Step 6 Stop and restart Cisco Unity to activate the changes to the active switch file.


Cisco Unity Stops Recording Before a Caller Has Finished Leaving a Message

The following sections describe possible reasons that Cisco Unity may stop recording before a caller has finished leaving a message. Use the Task List for Troubleshooting Recordings Being Cut Off to troubleshoot the possible causes.

Task List for Troubleshooting Recordings Being Cut Off

1. Check to see if the quiet parameter is set to recognize low voice volume. See the "Dialogic Quiet Parameter Is Incorrect" section.

2. Calls may be cut off by Cisco Unity, the phone system, or the central office. See the "Cisco Unity, the Phone System, or the Central Office Disconnected the Call" section.

Dialogic Quiet Parameter Is Incorrect

A caller may report hearing a prompt and being prevented from completing a message, or a subscriber may report this problem after noticing that a recording ends before the caller finished leaving a message. This can happen when the quiet parameter is not set to recognize low voice volume. It also can happen when a changed quiet parameter is not retained after a Cisco Unity upgrade.

To change the Dialogic quiet parameter (systems equipped with Dialogic voice cards only)


Step 1 Shut down the Cisco Unity software.

Step 2 On the Windows Start menu, click Programs > Dialogic System Software > Dialogic Configuration Manager-DCM.

Step 3 On the Service menu, click Stop Service. A second Dialogic Configuration Manager window appears.

Step 4 When the message "Success: Dialogic service stopped" appears, click Close.

Step 5 In the Service window, select a Dialogic voice card.

Step 6 In the DCM-Properties dialog box for the card, click Misc.

Step 7 Click ParameterFile.

Step 8 Under Edit in the Value field, enter quiet50.prm, and click OK.


Note If spandti.prm or any other values exist in the Value field, enter a space at the end of the existing value, and enter quiet50.prm. The space ensures that both .prm entries exist in the field.


Step 9 Repeat Step 5 through Step 8 for each additional Dialogic voice card.

Step 10 On the Service menu, click Start Service. A second Dialogic Configuration Manager window appears.

Step 11 When the message "Success: Dialogic service started" appears, click Close.

Step 12 Restart the Cisco Unity server.


Cisco Unity, the Phone System, or the Central Office Disconnected the Call

If a caller reports being cut off while leaving a message and if the caller did not hear a prompt prior to the disconnect, Cisco Unity, the phone system, or the central office may have disconnected the call.

To determine why the call was disconnected


Step 1 On the Windows Start menu, click Programs > Administrative Tools > Event Viewer.

Step 2 On the Log menu, click System.

Step 3 In the System Event log, look for an error that occurred at the time of the reported disconnected call.

If an error appears, double-click the error and skip to Step 6.

If no error appears for the date and time of the disconnected call, continue with Step 4.

Step 4 On the Log menu, click Application.

Step 5 In the Application Event log, look for an error that occurred at the time of the reported disconnected call. Double-click the error.

Step 6 In the Event Detail dialog box, review the contents of the Description box.

If you need assistance interpreting or resolving the error, or if no error appears in the Application Event log that matches the date and time of the reported disconnected call, contact Cisco TAC.


Dial Tone or Reorder Tone Is Present at the End of a Message

A possible cause may be that the switch disconnect tone and/or the PSTN disconnect tone are incorrect in the Switch.ini file (for circuit-switched phone systems only).

To run the Learn Tones utility


Step 1 Run the Learn Tones utility. See the "Learn Tones" section on page 11-5 for detailed instructions.

Step 2 If running the Learn Tones utility does not resolve the problem, contact Cisco TAC.