Administrator Guide for Cisco Unified MeetingPlace Audio Server Release 5.3
Managing and Maintaining Cisco Unified MeetingPlace Audio Server

Table Of Contents

Managing and Maintaining Cisco Unified MeetingPlace

About Managing Ports

Designating Port Types

Designating Overbook Ports

Configuring Ports and Port Groups to Improve Performance

Configuring Individual Ports

Configuring Port Groups

Managing Port Scheduling with Guard Times

Setting Guard Time Parameters

Managing Port Scheduling with Run Times

Setting Immediate Meeting Parameters

About Managing Capacity

Using Capacity Management Tools

About Daily Analysis Tools

Meeting List Tool

Port Utilization Tool

Unattended Ports Tool

Summary Port Usage Tool

About Monthly Trending Tools

Creating an Historical File

Updating an Historical File

Conferencing Minutes Tool

Recommendations for Managing Capacity

Uncaptured Conferencing Traffic Tool

Opportunity Cost Tool

Scheduling Failures Tool

Determining System Service Levels

About Optimizing Disk Space Usage

Viewing Disk Usage Statistics

Assigning System-Wide Parameters

Recording and Message Parameters

How Permanent Meetings Affect Disk Space Resources

About Managing User Access

About Managing Notifications

How Server Notifications are Sent

Viewing Server Notification Status

Viewing Meeting Notification Status

Canceling Server Notifications

Managing Workstation Connections

About System Manager Agents

Configuring System Manager Agents

About Backing Up Information

Performing a Network Backup

Starting a Network Backup

Viewing Network Backup Results

About Planning for Outages

Preparing for a System Shutdown

Understanding System Shutdown Levels

Initiating a Shutdown

Starting the Cisco Unified MeetingPlace 8106 Server

Starting the Cisco Unified MeetingPlace 8112 Server

Monitoring Cisco Unified MeetingPlace 8112 Startup Progress

About Maintaining the Cisco Unified MeetingPlace Server

About Maintaining the User Database

Deactivating Single User Profiles or Groups

Deactivating Multiple Profiles

Deactivating Groups by Importing

Deleting a Single Group or Profile

Deleting Multiple Profiles by Importing

Deleting Groups by Importing

Changing User Group Information Manually

Changing User Profile Information Manually

Changing User Profiles by Exporting and Importing Manually

Importing and Exporting Encrypted Passwords

About Maintaining Configuration Records

About Loading Cisco Unified MeetingPlace License Keys

Loading All License Keys

Loading License Keys Individually


Managing and Maintaining Cisco Unified MeetingPlace


This chapter describes the following topics:

About Managing Ports

About Managing Capacity

About Optimizing Disk Space Usage

About Managing User Access

About Managing Notifications

About System Manager Agents

About Backing Up Information

About Planning for Outages

About Maintaining the Cisco Unified MeetingPlace Server

About Maintaining the User Database

About Maintaining Configuration Records

About Loading Cisco Unified MeetingPlace License Keys

About Managing Ports

You can optimize resource usage by the way you designate port types and manage port scheduling. The following sections describe managing ports.

Designating Port Types

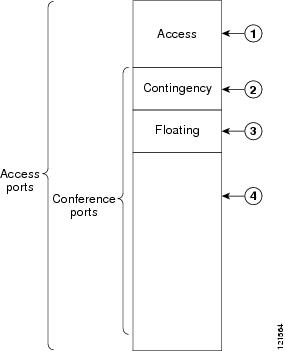
The connection between Cisco Unified MeetingPlace and the telephone network is called a port.The ports that connect Cisco Unified MeetingPlace to the telephone network are classified as access ports. Access ports are the total number of possible simultaneous connections to Cisco Unified MeetingPlace. All ports are automatically designated as access ports.

A subset of your access ports are pre-configured as conference ports. There is no difference between an access port and a conference port. Access ports that are not configured as conference ports are used for scheduling meetings and listening to recorded meetings.

Video ports reside physically on the Cisco IPVC MCU, but they are a resource that can be scheduled in advanced within Cisco Unified MeetingPlace. Unlike access and conference ports, video ports are not licensed individually. Instead, they are all enabled when the Cisco Unified MeetingPlace Video license is enabled.

Figure 5-1 shows the following:

All access ports are not necessarily pre-configured as conference ports. The number of conference port licenses you acquire (as listed on your sales order) is the total number of conference ports in your system.

Distribution of port types illustrates the distribution of ports in a Cisco Unified MeetingPlace system.

You can reserve some conference ports to handle call transfers. These are contingency ports. Contingency ports are ports that the system keeps in reserve, making it possible for meeting participants to reach a contact or attendant for assistance during a meeting and for the system administrator to dial in to meetings. The values entered in the Number of Contingency Ports field (Configure tab, Server Configuration topic) determine the number of contingency ports in your system.

The remaining conference ports, called floater ports, are for unexpected port needs. Floater ports can float between meetings, taking up the slack when an extra person attends a meeting that is already full and when ports that can be scheduled in advance are not available. For example, if someone joins a meeting that is already full, the server tries to reschedule the meeting for an additional port. If all ports are reserved for other meetings, the server tries to find a floater port for the person joining the meeting. The values entered in the Number of Floating Ports field (in the Configure tab, Server Configuration topic) determine how many ports are floater ports.

Figure 5-1 Distribution of Port Types

1

Access ports reserved to schedule and listen to recorded meetings

3

Floater ports, reserved to handle unexpected meeting attendance

2

Contingency ports reserved to handle call transfers to contacts for attendant

4

Ports in use or reserved for meetings


We recommend that you dedicate 1-2 conference ports as contingency ports and 15% of the total number of conference ports as floater ports.

For reservationless meetings floater point recommendations, see the "About Reservationless Meetings" section on page 2-56.

Video ports behave exactly like conference ports when scheduling. There are separate settings for video floater ports and video overbook ports; however, there is no setting for video contingency ports. As with conference ports, the video floater and overbook ports are specified in the Configure tab, Server Configuration topic.

Designating Overbook Ports

You designate overbook ports for audio and video conference needs separately. The values entered in the Overbook Ports field and Video Overbook Ports field (which are both in the Configure tab, Server Configuration topic) allow the system to schedule more ports than are actually available. Suppose you have 96 conference ports and all 96 are booked for a meeting. If you set Overbook to 2, a user can still schedule another two-person meeting at the same time.

Overbooking assumes that all users who are scheduled to attend often do not attend, which usually leaves unused ports available. In the rare case that all ports are scheduled and all people attend the meeting—including those who are overbooked—the last people to call into any meeting would not be able to get through. If such a meeting were critical, the system administrator or attendant could ask the overbooked participants to reschedule for later.

For reservationless meetings overbook ports recommendations, see the "About Reservationless Meetings" section on page 2-56. For information about calculating these values, see the Administrator Guide for Cisco Unified MeetingPlace Video Integration Release 5.3.

Configuring Ports and Port Groups to Improve Performance

Cisco Unified MeetingPlace provides several parameters with which you control the port configuration to maximize users' access to the system. In most cases the default parameters (or the parameters set by a Cisco Network Consulting Engineer (NCE) during installation) will suffice. However, as users increase their interest in the system, you may want to alter the port configuration to improve performance.

The Cisco Unified MeetingPlace database includes individual ports and port groups. By organizing ports into groups, you can configure multiple ports at one time.

Configuring Individual Ports

Port configuration information includes a default port access type. When the system receives dialed number information (DID/DNIS or DDI), the DID access plan determines which port access type is assigned to a call.

With DID access, the number that the user dials causes a particular set of digits to pass to the Cisco Unified MeetingPlace server. Each digit set is assigned to one of the service types (scheduling, profile access, access to recorded meetings, participation in a meeting). The call can come in on any port, so that the ports are dynamically allocated. If, for example, all users call the number that corresponds to recorded meetings access, then all unscheduled ports are allocated to recorded meetings, and no new meetings can be scheduled.

With direct access, ports are assigned to a particular service type. For example, ports 1-3 to scheduling, 4-5 to recorded meetings, and 6-12 to meetings. The number that users dial determines which ports they access, and thus which service they receive.

When the system does not receive dialed number information, the default port access type assigned to a call is the type assigned in the Ports topic (Configure tab) to the port that is handling the call. If your system does not receive dialed number information, you may want to map out the connections between Cisco Unified MeetingPlace and the telephone network. Then, either decide which access type to assign to each line or group of lines that connects to Cisco Unified MeetingPlace, or choose to use all ports universally with combined access.

If users cannot access a particular service, you can reconfigure the number of ports assigned to each Cisco Unified MeetingPlace service using the Ports topic.

Remember the following information:

If you assign an individual port to a port group, you do not have to re-enter data that is already provided for the port group.

You can configure ports to allow or disallow outdialing. Make sure that the trunk is configured in Cisco Unified MeetingPlace the same way your telephony provider has configured it (it can either make outgoing calls or cannot make outgoing calls). The system can block certain numbers and dialing patterns system-wide, by group, or by individual user. Call blocking is controlled by an internal Cisco Unified MeetingPlace table. For assistance in configuring this table, see "Obtaining Technical Assistance" in the Guide to Cisco Conferencing Documentation and Support.

You can limit the number of ports for scheduled meetings; however, you cannot limit the number of ports for reservationless meetings.

Configuring Port Groups

Because multiple ports may use identical settings, the Cisco Unified MeetingPlace database uses port groups to define the settings for multiple ports simultaneously. You define a port group by selecting the Port Groups topic in the Configure tab.

Some information for individual ports is included in the port group definition. You do not have to provide this information twice when a port is a member of a port group. (Group information has precedence over individual port information.)

The configuration information you enter to define a port group, which includes a port access type, applies by default to all ports that are assigned to the group in the absence of individual port configuration information or a DID access plan. Table 5-1 describes the port groups.

Table 5-1 Configuring Port Groups

Attribute  
Description
Choices and Recommendations

ID number

A number from 0 to 31 that identifies this port group. This number is predefined.

Assign every line coming into Cisco Unified MeetingPlace to a port group. The port group ID number is your choice.

Active

Whether to use this port group definition. You may want to define port groups now for later use.

Yes or No

Most likely, port groups are always active. You may wish to make port groups inactive during servicing.

Provider

An abbreviation that identifies the service provider.

Alpha, Numeric, or Both

Circuit ID

A number that identifies the circuit.

Assigned by the circuit provider

Card type

Whether this trunk is a digital T1, IP, or unassigned.

T1, IP, or None (unassigned)

Signaling protocol

The signaling type used by this trunk.

Loop start, ground start, E&M wink start, immediate start, DID/DDI, clear channel, IP, protocol table, any E1

Protocol table

Contains the configuration information for the type of signaling used.

All T1 PRI systems are shipped from the factory with protocol table 2 set to use the default setting of ATT PRI protocol; protocol 3 to use Nortel PRI; and table 4 to use Bell PRI.

# of DID digits expected

Indicates the number of digits sent by the PBX or network.

Your choice (0 or a number from 2 to 6; 1 is not valid)

Mtg. ID for direct mtg. access
or Default digits for system

Indicates which meeting callers to this port will attend when DID/DDI digits = 0 and the default access type = "meeting."

Meeting ID or DID/DDI number of the meeting in which you want callers to be placed.

Default access type

Which access type is applicable to all ports in the group in the absence of dialed number information.

DID Meeting, Profile, or Combined

Your choice depends on the level of access you want users to have on these ports.

Language

The language in which prompts will play.

English (USA), English (UK), Japanese, French-Canadian, French (France), German, Portuguese (Brazil), Spanish (Americas), or No Language

When No Language, callers hear a language prompt when they dial in to the Cisco Unified MeetingPlace Audio Server system.

Human assistance?

When someone in a meeting needs help, Cisco Unified MeetingPlace uses another port to connect that person (via a call transfer) to a contact or attendant. The value in this field determines whether the ports in this group can be used for call transfer during a meeting.

Yes or No

Choose Yes, assuming that an individual who can provide assistance to users can be reached on this port group.

Flash transfer?

Whether these ports initiate a call transfer by using a hook flash.

Yes or No

Your telephony network provider can provide this answer.

Outdial?

Whether these ports can be used for outgoing calls.

Yes or No

For most applications, you should set ports to handle outdial.


Managing Port Scheduling with Guard Times

Guard times ensure that meetings do not overlap each other or that two meetings are not scheduled back-to-back with the same meeting ID.

Guard times become part of the scheduled meeting record. For example, if you schedule a meeting with the system start and end guard time parameters set at 0 minutes, then change the system start and end guard times to 60 minutes, your meeting will not take on the new guard time settings. To ensure the meeting in the example takes on the current system start and end guard time minutes, you must reschedule your meeting. Back-to-back reservationless meetings are permitted regardless of guard times. In effect, the guard time for reservationless meetings is equal to zero.

Cisco Unified MeetingPlace uses guard times to manage three resources, as shown in Table 5-2.

Table 5-2 Resources Managed by Guard Times

Resource  
Description

Conference ports

Every Cisco Unified MeetingPlace conference server has a finite number of ports available for users, as described earlier. The parameters described in this section determine how long before, during, and after a scheduled meeting the ports are reserved (and therefore when the ports become available to other users).

Meeting IDs

Every meeting has an ID number, which is how users identify the meeting they want to attend. During any given time, a meeting ID must be unique, so that the system knows which meeting to put a caller into.

Meeting guard time fields determine how long before and after a meeting the meeting ID is protected. This protection prevents another person from scheduling another meeting at the same time with that particular meeting ID number. The meeting ID guard time also defines the period before and after a meeting that the caller hears that the meeting has not yet started or has ended, rather than hearing that Cisco Unified MeetingPlace does not recognize the meeting.

Voice storage

Guard times reserve space for recording a meeting (if the organizers have elected to record the meetings at the time they scheduled the meetings).


Caution When using the Reservationless Meetings feature, profile numbers cannot match existing meeting IDs, because reservationless meetings use profile numbers as reservationless meeting IDs.

Figure 5-2 shows how guard time settings affect users.

Figure 5-2 How Guard Times Affect Users

Setting Guard Time Parameters

To specify the parameters for each of these "consumable" resources:


Step 1 In the MeetingTime Configure tab, select the Scheduling Parameters view.

Step 2 Set values for the parameters, as shown in Table 5-3.

Table 5-3 Guard Time Parameters

Parameter  
Description

Mtg. start guard time (min)

Number of minutes in advance of the requested meeting start time that ports are reserved for the meeting. Cisco Unified MeetingPlace automatically adds this advance time to the requested start time. This time guarantees ports for early arrivals to the voice component of a meeting.

Set this parameter to 0 minutes and use Mtg. ID Start Guard Time to ensure that Cisco Unified MeetingPlace acknowledges the meeting and users hear "The meeting has not started" when they try to enter the meeting.

Mtg. end guard time (min)

Number of minutes after the scheduled meeting end time that ports, or a "zero-port" meeting, remains reserved. The system adds this time to the reserved end time of the meeting. This time guarantees ports when a voice meeting overruns its scheduled end time.

Set this parameter to 0 minutes to be able to schedule back-to-back meetings. Set this parameter for a longer period if your users tend to have longer meetings and/or your system is less busy. When your guard time expires and no ports are available, you cannot extend the voice component of your meeting.

Although non-zero guard times guarantee ports before and after a meeting, most users simply schedule some "padding" into their meetings. For example, if a user wants an hour-long meeting and wants to pad it to allow callers time to enter the meeting, listen to the roll call and agenda, and greet one another, the user would simply schedule the meeting for 70 minutes. In this case, managing guard times can be an unnecessary complication.

Note In Release 5.3(0.31) and later, future meetings scheduled with a non-zero value for audio or video ports will no longer extend if there are less than two audio or video participants in the conference, regardless of the number of active Data Conference participants at extension time. To enable a future meeting of only Data Conference participants to extend, schedule the meeting with zero audio and video ports. Reservationless meeting extension behavior has not changed.

Mtg. ID start guard time (min)

Number of minutes before a meeting that the associated meeting ID or DID/DDI number is reserved. Both this parameter and Mtg. ID end guard time control when meeting IDs become available to be re-used. This is to ensure that two meetings do not have the same ID at the same time, and callers do not inadvertently enter the wrong meeting.

If users try to enter the meeting before the meeting ID start guard time begins, they are told, "This is not a recognized meeting ID number." Callers in the voice conference hear it as a voice prompt. Users logging into a web conference see it on their screen.

After the Mtg. start guard time begins, callers who try to enter the voice conference hear the message "The meeting has not started." The recommended value for this parameter is 15 minutes.

Mtg. ID end guard time (min)

Number of minutes after a meeting that the associated Meeting ID or DID/DDI number is reserved. If callers call into a voice conference during this period, they hear "The meeting has ended." Users logging into a web conference see it on their screen. After this period, users are informed, "This is not a recognized meeting ID number." The recommended value for this parameter is 15 minutes.


Remember the following information:

If two people are on a zero-port meeting and forget to log out, the meeting continues extending itself for up to 24 hours. The meeting expires if it encounters a meeting ID conflict.

Meeting guard time minutes and meeting ID guard times are added to the meeting start and end times. For example, if the start and end guard times are both 10 minutes, the meeting itself is scheduled for an hour, and the Start and End Meeting ID guard times are set to 10 minutes, the total time reserved for the meeting ID is one hour and forty minutes.

Managing Port Scheduling with Run Times

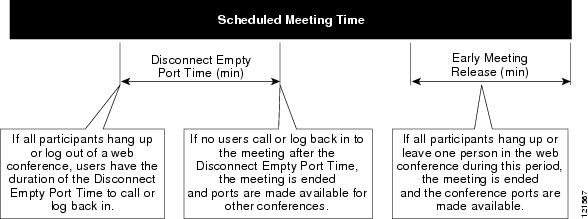
Run times determine how early someone can call into a meeting before its scheduled start time, how long a meeting can be extended, and when ports should be released.

Run-time parameters take effect at the start of each meeting. As each new meeting begins, the system looks to the current run-time settings to determine how to manage the meeting.

Table 5-4 describes the parameters used to manage port scheduling with run times.

Table 5-4 Managing Port Scheduling with Run Times

Parameter  
Description

End of mtg. warning (min)

Amount of time before meeting will end that users are first warned. (Recommended time is 10 minutes.) Users receive another warning two minutes before the meeting ends.

Extend meeting (min)

Amount of time a meeting is extended if the meeting continues past scheduled end time and ports are available (0 to 60 minutes). Callers receive warnings informing participants when the meeting will end. The system can extend the meeting time if ports are not reserved for other meetings. The recommended value for this parameter is 15 minutes.

End of meeting announcements and meeting extension announcements can be configured for individual meetings. However, the number of minutes set for each parameter is system wide.

Neither warning is supported during a zero-port meeting.

Early mtg. start (min)

Maximum amount of time before a meeting starts that early arrivals can enter the meeting. This time is added to the meeting start guard time, but must be less than the meeting ID start guard time. The recommended value for this parameter is 15 minutes.

For example, if the conference start time is 9:00, the Mtg. start guard time is 15 minutes, and the early meeting start minutes is 15 minutes (and ports are available), callers can enter the meeting at 8:30.

Disconnect empty port (min)

Amount of time that ports are held after everyone hangs up or one person remains on a web conference. This parameter accommodates longer meetings where people might want to take breaks and re-enter the meeting.

This parameter also determines how long to hold ports after the scheduled start time, if no one shows up for the meeting.

Early meeting release (min)

Amount of time before the scheduled end time of a meeting when ports are released if none are in use for that meeting.


The early meeting release feature takes effect in a zero-port meeting when only one person remains on the web conference.

Figure 5-3 illustrates the interaction of the release time parameters.

Figure 5-3 Interaction of Release Time Parameters

Setting Immediate Meeting Parameters

Immediate meetings (meetings that users start right away) also use ports. Immediate meetings do not use pre-meeting guard times; however, they do use resources while they are in progress and use Mtg End Guard Time, Mtg End ID guard time, Disconnect Empty Port, Early Mtg Release, Extend Meeting parameters, and the parameters for reserving space for recording meetings.

The system administrator sets the default port and meeting length, and the meeting scheduler can change the defaults.


Step 1 In the MeetingTime Configure tab, select the Scheduling Parameters view (under Company Specific Information).

Step 2 Scroll to the Immediate Meetings attributes, and set the following attributes:

# of Ports to Schedule  The default number of conference ports offered by the system when callers ask for immediate meetings. These ports are not reserved for general use by immediate meetings. A caller can only schedule an immediate meeting if ports are available.

Length of Meeting (Min)  The default meeting length offered by the system when callers ask for immediate meetings.

Step 3 Click Save Changes.


Remember the following information:

If you cannot schedule back-to-back meetings, make sure that the meeting start and end guard times are set 0 (zero). These values must be 0 to allow scheduling back-to-back meetings.

To ensure that users hear or see "The meeting has not yet started" rather than "That is not a valid meeting ID" if they call or log in too early, set the meeting ID start and end guard times to be large values, such as 60 minutes.

Reservationless meetings use immediate meeting parameters to determine the length and size of the meeting. When the Reservationless Meetings feature is enabled and you try to schedule an immediate meeting (or a scheduled meeting with the start time of now or earlier) and do not specify the meeting ID, the meeting becomes a reservationless meeting. (For more information about reservationless meetings, see the "About Reservationless Meetings" section on page 2-56.)

About Managing Capacity

To help you monitor and manage the use of your system, you can use the various Cisco Unified MeetingPlace capacity management tools. These tools generate charts that provide a graphical overview of system statistics.

By tracking usage on your Cisco Unified MeetingPlace system you can do the following:

Manage your daily operation by understanding individual meeting and port usage throughout each day.

Monitor your capacity utilization to determine whether your system is being used efficiently and effectively.

Measure the service levels you are providing to users. Efficient use of system resources can prevent scheduling failures, which will ensure quality of service and end user satisfaction.

The Cisco Unified MeetingPlace capacity management tools help you evaluate trends in meeting port usage. The reports are based on summary data and are appropriate for usage trending rather than precise usage reporting.

The effects of using summary data degrades the precision of the Capacity Management reports. The following factors affect the graphical calculations.

Flat attendance assumption. Flat attendance is a simplification that assumes all reported ports join at the very start of the meeting and remain to the very end of the meeting. Flat attendance does not accommodate for attendees joining late or leaving early.

Auto-extended port rescheduling. Auto-extended port rescheduling affects the graphical scheduled port usage on the Port Utilization graph. When a meeting runs long, the system automatically extends the meeting length and modifies the requested number of ports. At the time of extension, the system reschedules the port allocation based upon the current active number of ports, regardless of the original requested number of ports.

For example, a meeting organizer initially schedules a meeting for ten ports, but only eight people show up. When the meeting runs long, it is auto extended. The port reservation is reduced to eight ports instead of the original ten. Capacity management uses this last reported value for graphing the requested ports.

The combination of these two effects can produce significant deviations between the graphed Capacity Management charts and actual usage. For precise meeting statistics, we recommend that you generate a report (see Chapter 4, "Running Reports").

Using Capacity Management Tools

You can use the following two types of capacity management tools:

Daily Analysis tools, which generate information about individual meetings and port usage on a day-by-day basis, and peak usage across several days. (For more information, see the "About Daily Analysis Tools" section.)

Monthly Trending tools, which generate information about your system's total conferencing usage and scheduling conflicts on a monthly basis. (For more information, see the "About Monthly Trending Tools" section.)

To use a capacity management tool, use the following general steps. For details about each tool, see the "About Daily Analysis Tools" section and the "About Monthly Trending Tools" section.


Step 1 In MeetingTime, select Capacity Mgmt tab.

Step 2 For Capacity Management Tools, choose a daily analysis tool or monthly trending tool.

Step 3 For Tool Attributes, set attributes for the selected tool.

Step 4 Click Execute.

Cisco Unified MeetingPlace generates and displays a chart in the Capacity Management Tools window.

Step 5 You can then do the following:

Select other capacity management tools from the View menu or the tool bar. (Each tool is described in the next sections.)

To show different data and elements in the chart, configure the display parameters for each tool. To do so, choose View menu > Display Options. Choose options in the Display Options dialog box, and click Done.


Cisco Unified MeetingPlace provides the following capacity management tools.

Daily Analysis Tools

About Daily Analysis Tools

Meeting List Tool

Port Utilization Tool

Unattended Ports Tool

Summary Port Usage Tool

Monthly Trending Tools

Conferencing Minutes Tool

Uncaptured Conferencing Traffic Tool

Opportunity Cost Tool

Scheduling Failures Tool

About Daily Analysis Tools

The daily analysis tools display the meetings scheduled during a specified time, the total number of ports reserved for meetings, and actual number of ports used.

Meeting List Tool

The Meeting List tool displays the meetings scheduled for a specified number of days, and includes the scheduled length and scheduled number of ports for each meeting. If users cannot schedule meetings because of a lack of resources, you can use this tool to identify which meetings can be rescheduled to free up the needed ports.

The Meeting List tool is also useful to see a quick list of meetings for any day in the recent past, present, or near future.


Step 1 In the MeetingTime Capacity Mgmt tab, for Capacity Management Tools, select Meeting List. (Or choose View menu > Meeting List.)

Step 2 Click Execute.

Cisco Unified MeetingPlace generates and displays a Meeting List chart.

Step 3 To change the chart elements that are displayed in the chart, choose View menu > Display Options.

Step 4 In the Display Options dialog box, choose options, then click Done.

You can display the following information in the chart:

The scheduled meeting start and end times, and the actual start and end times

The number of ports scheduled for a meeting, and the actual number of participants that attended


Port Utilization Tool

The Port Utilization tool compares the number of ports scheduled to the number of ports actually used during a specified period of time, on a day-to-day basis. You can use this tool to determine the peak and off-peak times of your system and compare usage on your system with its available capacity.


Step 1 In the MeetingTime Capacity Mgmt tab, for Capacity Management Tools, select Port Utilization. (Or choose View menu > Port Utilization.)

Step 2 Click Execute.

Cisco Unified MeetingPlace generates and displays a Port Utilization chart.

Step 3 To change the chart elements that are displayed in the chart, choose View menu > Display Options.

Step 4 In the Display Options dialog box, choose options, then click Done.


Unattended Ports Tool

The Unattended Ports tool shows the total number of ports that were scheduled on your system but not actually used. These unused ports fall into two categories:

Scheduled ports that exceeded the actual number of meeting participants

Scheduled ports for a meeting that never took place

The Unattended Ports tool can help you determine the appropriate settings for your overbook and floater ports (described in the "About Managing Ports" section).


Step 1 In the MeetingTime Capacity Mgmt tab, for Capacity Management Tools, select Unattended Ports. (Or choose View menu > Unattended Ports.)

Step 2 Click Execute.

Cisco Unified MeetingPlace generates and displays an Unattended Ports chart.

Step 3 To change the chart elements that are displayed in the chart, choose View menu > Display Options.

Step 4 In the Display Options dialog box, choose options, then click Done.


A Cisco NCE can help you use the Unattended Ports tool to determine the appropriate settings for your overbook and floater ports. (See "Obtaining Technical Assistance" in the Guide to Cisco Conferencing Documentation and Support.)

Summary Port Usage Tool

System administrators can view scheduled and actual peak port usage that occurs across several days by using the Summary Port Utilization Tool. This tool generates a Summary Port Usage chart.

Each chart can show up to one month of peak port usage, including summary port utilization, and can optionally display the following information:

Average and distribution range for scheduled ports

Average and distribution range for actual ports used

The information displayed is a combination of data you request to include and available data that was retrieved from the server.


Step 1 In the MeetingTime Capacity Mgmt tab, for Capacity Management Tools, select Summary Port Utilization. (Or choose View menu > Summary Port Utilization)

Step 2 Click Execute.

Cisco Unified MeetingPlace generates and displays a Summary Port Utilization chart.

Peak scheduled and actual port usage is indicated by the solid, thin line above the shaded region.

The shaded region indicates the range of scheduled and actual port usage. The thick, dotted line indicates the average of scheduled and actual port usage. (The information included in each Summary Port Usage chart depends on the Display Options dialog box settings.)

The calendar legend in the lower right corner of the window indicates the way in which the raw data is evaluated, as described in the following table.

Element
Description

Summary Port Utilization has data for this day and uses it in calculating Average and Demand Range values

Although this day was selected (in the Display Options dialog box) for inclusion in the chart, the retrieved data lacks meeting information for this day

This day was not selected (in the Display Options dialog box) for inclusion in the chart


Step 3 To change the chart elements that are displayed in the chart, choose View menu > Display Options.

Step 4 In the Display Options dialog box, choose options (described in Table 5-5), then click Done.

Table 5-5 Display Options for Summary Port Usage Tool

To Specify  
Do this

A range of time for each day

Choose a Starting and Ending time.

The days to include in the chart

For Summarize Days in Week, do one of the following:

To include individual days, select the checkboxes for each day to include.

To include business days, click Monday-Friday. (To deselect this option, click the button again.)

To include all seven days of the week, click All Days. (To deselect this option, click the button again.)

Which information to display in the chart

For Summary Port Utilization Graph, select options.

Show Average of Scheduled Ports displays a solid line showing the average of all data from the selected days.

Show Demand Range of Scheduled Ports displays a shaded region above and below the average, representing 50% distribution of all port demand.

Show Average of Actual Port Usage displays a dotted line showing the average of actual port use on the selected days.

Show Demand Range of Actual Port Usage displays a shaded region above and below the average, representing 50% distribution of actual port demand.


Tip You can analyze peak usage from earlier Cisco Unified MeetingPlace Audio Server releases (such as Release 5.0). To do so, create a Daily Analysis chart in the earlier release and save it to a file (choose File menu > Save As). Then, open the file in Release 5.3, and create a Summary Port Utilization chart using the instructions above.


About Monthly Trending Tools

The monthly trending tools display information to help you review your system's conferencing growth and determine the right time to upgrade Cisco Unified MeetingPlace.

The data that MeetingTime uses to create the monthly trending charts is stored on the Cisco Unified MeetingPlace system and is purged after a specified amount of time. The amount of time Cisco Unified MeetingPlace stores this data is determined by the Days Until Mtg Stats Purged parameter, which is located in the Configure tab under Scheduling Parameters.

After you run a monthly trending tool for the first time, save the data for that month in an historical file in a central location before you exit the application. (You can copy and past the information, including any graphs, into other word processing programs.) Doing so ensures that the data is available after it has been purged from the system. After you create this file, update it monthly so you can archive information about your system. When you update the historical file, data for the current month(s) is appended to the existing data. You can analyze the information that is stored in the data file to determine system usage trends, even after the meeting data has been purged.

Creating an Historical File


Step 1 Run a monthly trending tool.

Step 2 In the Capacity Management window, choose File menu > Save, then specify a name and directory for this file.

The first time you update the historical data file, you must enter the file name specified above. From then on, MeetingTime remembers the file name entered into the MeetingTime attributes.


Updating an Historical File


Step 1 In the MeetingTime Capacity Management tab, select the monthly trending tool you want to use.

Step 2 For the Update History File parameter, choose Yes, and then enter the directory for this file.

Step 3 Click Execute.

The Capacity Management Tool window appears.

Step 4 Choose File menu > Save.


Conferencing Minutes Tool

The Conferencing Minutes tool displays the amount of monthly conferencing minutes that took place on your system on an aggregate and per-port basis. To help you manage your system's conferencing growth, this tool shows usage threshold lines that indicate when the use of your system has reached congested levels. (The usage threshold lines also indicate when more capacity was added to your system.)

To view the usage thresholds:


Step 1 Choose View menu > Display Options.

Step 2 In the Display Options dialog box, select Show usage thresholds.

You can also use the Display Options dialog box to view monthly conferencing minutes on a per-port basis.


Recommendations for Managing Capacity

To determine how efficiently your system is being used, run the Conferencing Use (minutes per port) capacity management tool at the end of each month. Table 5-6 shows how to interpret the usage threshold levels.

The figures in the table are suggested target points for your organization. Your results may vary depending on factors such as your peak conferencing business hours, international use, the size of your system, and specific conferencing applications. As you continue to track your Cisco Unified MeetingPlace use and service levels, you will be able to better define appropriate minutes per port conferencing levels for your organization.


Note These traffic level descriptions are for scheduled meetings and do not apply well to reservationless systems. Service quality degrades rapidly on a reservationless system when the traffic gets out of the "efficient usage" zone. Scheduled meetings can be rescheduled for a different time, but if ports are not available for a non-reserved meeting, users perceive a system failure. For reservationless systems, Cisco recommends that the peak traffic demand should never be allowed to exceed available capacity, implying that the average traffic should be kept well within the "efficient zone."


Table 5-6 Threshold Levels

Threshold Level  
Minutes Per Port (Monthly)
Description

Efficient Usage (below the yellow line)

Under 1,500

System is running efficiently. Capacity is available and meetings can extend and grow.

Busy Usage (between yellow and red lines)

1,500-2,000

Users can schedule and hold conferences, although some scheduling requests may not be satisfied because conferencing ports are unavailable. User satisfaction is beginning to decline.

System administrator should add more capacity to offset scheduling failures.

Constrained Usage (above the red line)

Over 2,000

Users are likely to experience several scheduling and attendance failures because ports are in high use. Overflow traffic is most likely going to service bureaus. During peak hours, meetings are not extending and growing.

System administrator needs to add more capacity.


Cisco Unified MeetingPlace provides default values for the usage thresholds based on general conferencing use, although these default values should be customized to reflect your company's unique conferencing environment.

Scheduling failures mean that users cannot join meetings or schedule meetings. You must check peak level usage. For assistance and advice, see "Obtaining Technical Assistance" in the Guide to Cisco Conferencing Documentation and Support.

To change the value of the usage thresholds:


Step 1 Make sure the usage thresholds are displayed in the chart.

Step 2 Choose View menu > Adjust Thresholds.

Step 3 Enter the desired value.

For help in adjusting the thresholds, see "Obtaining Technical Assistance" in the Guide to Cisco Conferencing Documentation and Support.


Uncaptured Conferencing Traffic Tool

The Uncaptured Conferencing Traffic tool displays how many minutes of monthly conferencing could not be conducted on Cisco Unified MeetingPlace because the system was busy. Upgrading your system can enable Cisco Unified MeetingPlace to fulfill this additional conferencing demand.

Opportunity Cost Tool

The Opportunity Cost tool calculates the cost spent on your uncaptured traffic, assuming the uncaptured traffic went to a service bureau instead of waiting for the system to become available.

To make sure Cisco Unified MeetingPlace correctly calculates the cost of your uncaptured traffic, you must enter the cents-per-minute rate of your service bureau. Enter this rate in the tool attributes area in the Capacity Management tab or in the Display Options dialog box.

Scheduling Failures Tool

The Scheduling Failures tool displays the percent of scheduling attempts that were not satisfied due to insufficient ports. This tool supplies a graphical indication of how often Cisco Unified MeetingPlace could not schedule meetings because the system was busy.

Determining System Service Levels

In addition to determining your minutes-per-port ratio on a monthly basis, also view the Scheduling Failures chart to determine the percentage of scheduling failures that occurred on your system.

If your scheduling failures rate is above 5 percent, run the Scheduling Failures Report (described in "Scheduling Failures Report" section on page 4-8) for detailed information about each failure. Usually, these scheduling failures come in two types:

Not enough ports are available.  To solve this problem, run the Port Utilization capacity management tool to determine the time of day the system is most busy, and then suggest to users that they schedule meetings at off-peak times.

The requested meeting ID is currently unavailable.  To solve this issue, have users assign personalized staff meeting IDs to the meetings they schedule instead of commonly used numeric IDs. Scheduling conflicts occur when two meetings are scheduled for the same time with the same meeting ID.

About Optimizing Disk Space Usage

To optimize disk space usage, you can begin by gathering disk usage statistics using the View Disk Usage option on the System tab as well as the Disk Usage Report.

Viewing Disk Usage Statistics

You can monitor the amount of disk space currently being used in the system. Unlike the Disk Usage Information report (described in the "Disk Usage Information Report" section on page 4-11), which shows usage statistics for each user, these disk usage statistics include values for the entire Cisco Unified MeetingPlace system, including:

Total voice storage space on disk (in minutes)

Meeting agenda minutes

Meeting guest name minutes

System profile name minutes

Custom prompt minutes

Meeting title minutes

Meeting recording minutes

Miscellaneous recording space minutes

Total voice storage space available on disk

To view the system disk usage statistics:


Step 1 In the MeetingTime System tab, select View Disk Usage Statistics.

Step 2 Click Execute.


Assigning System-Wide Parameters

Using the Scheduling Parameters topic and Server Configuration topic in the Configure tab, you can assign system-wide parameters, as described in Table 5-7.

Table 5-7 System-Wide Parameters

Topic  
Parameter
Description

Scheduling Parameters

Max mtg recdg length (min)

Limits the number of minutes any meeting can be recorded. Set this parameter when you need to manage disk space.

Scheduling Parameters

# of days to retain

Set according to your disk space constraints. Inform users of this setting, and advised if it will change. If the parameter is changed, the change affects only newly scheduled or rescheduled meetings.

Server Configuration

Max recdg space (min)

Ensures that, if there is enough disk space at the time the meeting is scheduled, enough space will be reserved for recording the entire meeting. You may find users reserving space for meetings that they do not in fact record.


Recording and Message Parameters

The following system-wide scheduling and recording parameters also affect the time available for a meeting and disk space usage:

Max agenda recdg (sec)

Max mtg name recdg (sec)

Max user name recdg (sec)

Max voice comment (sec)

Max mtg message length (sec)

You can also control disk space usage by the way you set up a profile user's individual recording parameters, as shown in Table 5-8.

Table 5-8 Recording and Message Parameters

Parameter  
Description
Choices

Able to record meetings?

This is set by the system administrator and cannot be changed by the user.

Yes, No

Record Meetings?

When Able to Record Meetings? is Yes, this parameter determines whether meetings are automatically recorded (unless the user manually turns recording off during the meeting).

Recommended: No

Yes, No


How Permanent Meetings Affect Disk Space Resources

When a meeting with recording is marked as non-purgeable (cannot be purged), the system manages this resource by doing the following:

Deletes the voice storage reservation associated with the meeting recording

Adds the meeting recording length to the running total of non-purgeable meeting recordings

Reduces the total available voice storage amount used up by the non-purgeable meeting

Marks the meeting as non-purgeable

When a non-purgeable meeting with recording is marked as purgeable, the system manages this resource by doing the following:

Subtracts the meeting recording length from the running total of non-purgeable meeting recordings

Makes a new voice storage reservation for the meeting recording until the specified purge date

Increases the total available voice storage

Marks the meeting as purgeable

Use the Disk Usage Information report and Permanent Meetings report in the Report tab to determine which users are using up disk space.

About Managing User Access

Scheduling parameters specify how much flexibility users have in scheduling meetings. Some of these settings also affect disk space. Table 5-9 shows the parameters that affect user access. (For a complete list of scheduling parameters, see the "Table of Scheduling Parameters" section.)

Table 5-9 User Access Parameters

Parameter  
Description

Max meeting length (min)

Can be set up to 1440 minutes (24 hours).

Max ports per meeting

Does not include contingency or floater ports.

Max advance days to schedule

Can be set up to 330 days.

Max agenda recdg (sec)

Maximum length of a prerecorded agenda.

Max mtg name recdg (sec)

Maximum length of a meeting name.

Max user name recdg (sec)

Maximum length of a user's name.

Max mtg message length (sec)

Maximum length of a single meeting message in seconds.

Days until mtg stats purged

Number of days historical meeting data is kept on the system.

All recordings related to the meeting are purged. The system administrator, the attendant, and the meeting's contact can purge individual meeting recordings as needed.


About Managing Notifications

Cisco Unified MeetingPlace can automatically send out e-mail notifications to all invited participants whenever users schedule, reschedule, or cancel meetings. This depends on the integration products purchased and a user's profile preference settings. Notifications are not distributed for reservationless meetings.

The Cisco Unified MeetingPlace Notification Option requires little monitoring or maintenance. However, situations may arise in which users need help determining the notification status of a particular meeting or request. This section describes how to review and diagnose any problems that may occur.

How Server Notifications are Sent

Specific events such as scheduling and rescheduling meetings, inviting or uninviting participants, and adding or replacing attachments trigger the notification process. Cisco Unified MeetingPlace automatically sends notifications to all meeting participants.

Viewing Server Notification Status

A Dispatch is a set of documents intended to be delivered by an integration application. Typical dispatches are notifications (and attachments if included) and reservationless meeting schedules. A notification-type dispatch may be initiated either by Cisco Unified MeetingPlace as the result of a scheduling event or a user-requested notification (called in by phone and requested meeting information).

To view the status of server notifications, such as the backlog of requests in the queue or the status of a particular event, use the following steps.


Step 1 In the MeetingTime System tab, select the Notification Queue Status action, then click Execute.

Step 2 In the status window, click the notification message whose status you want to view.

Step 3 In the Disposition area, view the notification status.

The following are common causes of notification failure.

Failure Status Message  
Description

Party has notif off

The intended recipient selected None for both primary and alternate notification methods.

E-mail is not selected by user

The recipient selected e-mail as the notification method, however, the recipient did not specify the type e-mail system.

User has no primary notif method

The recipient did not specify a primary notification method.


If you cannot determine the cause of the failure, see "Obtaining Technical Assistance" in the Guide to Cisco Conferencing Documentation and Support for assistance.

Step 4 To close the window, click Done.

To cancel notifications, see the "Canceling Server Notifications" section.


Viewing Meeting Notification Status

You may need further information to diagnose a particular problem. You can use the meeting ID, date and requester to locate a particular meeting, then view the status of specific meeting notifications in the Schedule, Attend, or Review tabs.


Step 1 In the Schedule, Attend, or Review tab, click the meeting record whose status you want to view.

Step 2 Click the Participants button.

Step 3 For the Notification area, click the Status button.

The Notification Status window opens. If a document is attached to the meeting, information about that document displays in the Attachment Information list. For information about an attachment, click the Details button.

Step 4 Click Done.


Canceling Server Notifications

After viewing the notification status information and diagnosing any problems, you can cancel one or all notifications. Reasons for canceling a notification can include:

A user determines they incorrectly invited participants to a meeting.

A user attached a non-renderable image to a meeting.


Step 1 In the Server Notification Status window, click the notification message you want to cancel.

Step 2 Click Cancel Notification (to cancel only the selected notification) or Cancel All (to cancel all notifications).

When the verification message appears, click Yes to cancel the selected notifications

Step 3 Click Done to exit.


Managing Workstation Connections

To help you manage the number of workstation connections available to users, Cisco Unified MeetingPlace offers the options described in Table 5-5.

Table 5-10 Workstation Connections Options

You Can  
Description

View current connections

The Current PC Connections topic in the System tab allows you to view MeetingTime connections and integration applications that are currently logged in.

The PC Connections dialog box displays a user ID, client type, and IP address for each active connection. Click the Update button to refresh the dialog box as needed.

Always allow system manager access

There may be times when all MeetingTime licenses are in use for scheduling, attending, or reviewing conferences.

When all MeetingTime licenses have been used up, the system allows one system administrator to enter the system.

Log off from idle connections

Using the Usage Parameters topic in the Configure tab, you can assign the Minutes Before Auto Logoff parameter to specify how long MeetingTime connections remain idle.

This parameter controls the number of minutes that a MeetingTime connection can be idle before the connection is severed. You may find that users are logged on to MeetingTime but not actively using the system.


About System Manager Agents

With system manager agents, system administrators can configure parameters as described in Table 5-11.

Table 5-11 System Manager Agents

Parameter  
Description

No-show recurring meeting

If a recurring meeting has no attendance for more than a predetermined number of periods, an e-mail notification is sent to the meeting organizer suggesting that the remainder of the recurring meeting chain be canceled.

If the meeting was scheduled from Cisco Unified MeetingPlace Web or MeetingTime, the notification includes a Click Here to Cancel Meetings link that leads users to a cancellation page on Cisco Unified MeetingPlace Web. If the meeting was scheduled from groupware (for example, Microsoft Outlook or IBM Lotus Notes), the notification suggests cancellation from the user's groupware.

Recurring meeting ending

In most cases, if a recurring meeting chain is within a specified number of periods before expiration, an e-mail notification is sent to the meeting organizer. The notification notes that the chain is set to expire and reminds the organizer to schedule another recurring meeting if the chain is to continue. The exception is when the value set for the Periods Before Recurring End parameter is equal to or greater than the number of meetings in the recurring meeting chain, no notification is sent.

If the meeting was scheduled from Cisco Unified MeetingPlace Web or MeetingTime, the notification includes a Click Here to Schedule Another Series link that leads users to the scheduling page where they can renew the meeting. If the meeting was scheduled from groupware (for example, Microsoft Outlook or IBM Lotus Notes), the notification suggests extending the chain from the user's groupware.

No other notifications are sent, as the recurring meeting continues toward its expiration.


Remember the following information:

This feature is not supported with Cisco Unified MeetingPlace SMTP E-Mail Integration Application, release 4.2.0 and earlier.

If the two recurring meeting triggers overlap, the no-show recurring meeting trigger overrides the recurring meeting ending trigger. The scheduler receives only the no-show notification.

Configuring System Manager Agents

System manager agents are system-wide parameters.


Step 1 Log in to MeetingTime, and click the Configure tab.

Step 2 Select the Scheduling Parameters view.

Step 3 For Attributes, scroll to the Scheduling Notifications section, and set the following attributes:

Click  
Then Click the Values area and Do This

After # no-show recurring mtgs

Choose a number to indicate the number of no-show recurring meetings allowed before the system triggers a notification.

For example, when this value is 2, the system sends a notification to the meeting scheduler after two consecutive no-show recurring meetings have occurred.

If you do not want no-show notifications, set this value to 0 (zero).

Note This feature depends on the number of consecutive no-shows. If a no-show meeting is followed by an attended meeting, the count of no-show meetings returns to 0.

Periods before recurring end

Choose a number to indicate which meeting, before the last recurring meeting, triggers the end-meeting notification.

For example, if this value is 1, then one meeting before the last recurring meeting, the system sends a notification to the meeting scheduler asking if they want to schedule another recurring meeting chain. (However, if you set a value equal to or greater than the number of meetings in the recurring meeting chain, no notification is sent.)

If you do not want end-meeting notifications, set this value to 0 (zero).


Step 4 Click Save Changes.


About Backing Up Information

Backing up the information stored on your system is essential for recovering from a hardware or software failure, from a user error, or in any other emergency.

If your system suffers a hardware or software failure, you will probably need to restore your system files from backup directories. (To restore backup files, see the Administrator Guide for Cisco Unified MeetingPlace Network Backup Release 5.3, or "Obtaining Technical Assistance" in the Guide to Cisco Conferencing Documentation and Support.)

Table 5-12 describes three backup methods.

Table 5-12 System Backup Methods

Method  
Description

Disk backup

As a redundancy feature, the Cisco Unified MeetingPlace server database is stored on two separate disk drives (Disk 1 and Disk 2). One is established as the primary drive, the other as a backup. Assuming the database on Disk 1 is the active one, the system periodically takes a "snapshot" of its contents and copies all database contents to the database on Disk 2.

The frequency of backups is determined by the amount of data (particularly user profiles, and future and past meeting records) on Disk 1. For example, a full database (typical of a 1000 port system) is backed up approximately once a day; however, a small database (typical of a 144 port system) is backed up several times per day. This process occurs in the background, while the system is in operation. It does not affect system performance.

If Disk 1 fails, the system can be restarted using Disk 2 with the latest copy of the database. If Disk 2 fails, the system continues to operate; however, voice files on Disk 2 are lost.

Note Make sure that you remove the failing drive and replace it as soon as possible. For troubleshooting, see the MeetingPlace Server Disk Failure Recovery technote. For more information about replacing a drive, see the Hard Disk Replacement Procedure for the Cisco Unified MeetingPlace 8106 or the Hard Disk Replacmenet Procedure for the Cisco Unified MeetingPlace 8112.

Shadow Server backup

The Shadow Server can replace the conference server in case of system or site failure. The switchover of the shadow server ensures that complete functionality (excluding voice and attachment data) can be returned with a minimum loss of time and disruption in service. For more information, see Chapter 3 in the Configuration Guide for Cisco Unified MeetingPlace Audio Server Release 5.3.

Network backup

As a second line of resort, you can schedule and run regular file transfers to a computer on your LAN. You can then back up the files according to your company's established procedures. A network backup copies only the configuration and scheduled meeting information in your Cisco Unified MeetingPlace database. No voice recordings, such as profile names and meeting recordings, are included in the backup.

The amount of load on your system determines how long a backup takes. In general, backing up a database takes one hour. Backup could take longer if your system is heavily loaded with meetings and scheduling activity at the time of the backup.

When and how often you schedule backups depend on the number of users, the frequency of configuration changes that occur in your system, and your corporate backup guidelines. For more information, see the Administrator Guide for Cisco Unified MeetingPlace Network Backup Release 5.3.


Performing a Network Backup

Before you can perform a network backup, Cisco Unified MeetingPlace Network Backup must be installed and configured. For more information, see the Administrator Guide for Cisco Unified MeetingPlace Network Backup Release 5.3.

Follow these guidelines when you perform a network backup:

Schedule regular daily backups.

Schedule backups at night.

Starting a Network Backup

You can schedule a backup during normal business hours, even when the system is being used. To ensure that changes made to the database during the day are included in the backup, however we recommend backing up your system at night.


Step 1 Make sure that Cisco Unified MeetingPlace Network Backup application is installed and configured.

Step 2 From your workstation, log in to MeetingTime.

Step 3 In the System tab, select the Database Backup action.

Step 4 For the Frequency attribute, choose how often and when to perform the backup.

To Perform  
Choose

A single backup immediately

Once, then click Execute.

A backup at a specified time

Recurring. Then, for the If Recurring, Hr. of Day attribute, enter the time to begin the backup. For the Recurring Every x Days attribute, enter the number of days between backups. (For example, to back up every other day, enter 2.) Then click Execute.


Viewing Network Backup Results

The system performs a full backup of all the information in the system and displays the outcome of the backup in the Results of Last Backup attribute.


Step 1 In MeetingTime System tab, select the Database Backup action.

Step 2 For the Results of Last Backup attribute, click in the Values area.

A window displays the results of the backup.

If a problem occurs during the backup, the system generates an alarm, and a description of the problem is logged in the results of last backup field.


Note To restore a backed up database, see the Administrator Guide for Cisco Unified MeetingPlace Network Backup Release 5.3, or "Obtaining Technical Assistance" in the Guide to Cisco Conferencing Documentation and Support, for assistance.


About Planning for Outages

There may be times when you need to shut down and restart your Cisco Unified MeetingPlace system. For example, there may be a problem in your switch room, or you know that you are about to lose power. This section provides information on preparing and planning for outages.


Note The system restarts itself if the number of functional Smart Blades falls below 25% of your original capacity. If you also have your system configured for IP, the system restarts if you experience a complete loss of IP function.


Before shutting down the system, it is very important to follow the procedures in this section to ensure a smooth shutdown.


Caution If the Cisco Unified MeetingPlace 8100 series is not shut down properly, it can take up to one hour to restart your system while the Cisco Unified MeetingPlace Audio Server system performs a full consistency check on its database.

Preparing for a System Shutdown

Before you shut down the system, let your users know the system will be unavailable. To tell users in advance about the system shutdown, you can do any of the following:

Join a conference in progress

Send a voice message in advance

Send an e-mail message in advance

Tell users when the shutdown will occur, how long it will last, and when the system will be restarted.


Tip Schedule all ports in advance so that they are all busy for the length of time you expect the system to be unavailable. That way, no one can schedule a meeting during the shutdown. (For more information, see the "About Reserve All Ports Meetings" section.)


Understanding System Shutdown Levels

The system allows for multiple levels of shutdown, depending on the status of your system and the nature of your requirements.

When the system is fully operational, users can access Cisco Unified MeetingPlace from a workstation or telephone to schedule and attend meetings or to change user profiles.

When you perform a telephony shutdown in the System Shutdown window, the system is still running, but other users cannot access Cisco Unified MeetingPlace from a telephone. This allows the system administrator to make system-level changes to the database without interference.

When you perform a full shutdown, the system conducts an orderly shutdown before power is turned off. During a full shutdown, users cannot access Cisco Unified MeetingPlace.

When you perform a system restart, the system begins a full shutdown and restart of the operating system. During a system restart, users cannot access Cisco Unified MeetingPlace.

Table 5-13 summarizes the levels of shutdown.

Table 5-13 Shutdown Levels

Level of Shutdown  
System Activity

Telephony shutdown

Prevents users from calling in so that you can make system-level changes to the database, such as changing scheduling parameters or making a trunk configuration change.

Full shutdown

Completes an orderly shutdown before turning off the power to the system.


Warning Invoke this option before the power is turned off; otherwise, the system can take longer to restart. Select this option only under the guidance of your customer support representative.

System restart

Completely shuts down and restarts the operating system.


Warning This procedure has serious consequences if not done properly. Do not attempt to reboot your system without direction from your customer support representative.

Initiating a Shutdown

The system must be powered down within 15 minutes of executing the shutdown button in MeetingTime. If the elapse time exceeds 15 minutes, the system restarts itself. For more information, see "Obtaining Technical Assistance" in the Guide to Cisco Conferencing Documentation and Support.


Step 1 In the MeetingTime System tab, select the System Shutdown action.

Step 2 Select the Type attribute.

Step 3 To shut down the Cisco Unified MeetingPlace 8106 or 8112, choose Full shutdown.

For standalone systems, the Server field is read-only.

Step 4 For the When attribute, choose when to perform the shutdown.

To Perform the Shutdown  
Do This

Immediately

Choose Immediate, then click Execute.

At a specified time

Choose Courtesy. Select the Delay attribute, and enter the number of minutes until the shutdown begins. Then click Execute.

If you have not notified users of the shutdown, use this period to do so. (For more information, see the "Preparing for a System Shutdown" section.) During this period, users are asked to hang up before the system shuts down.

Users cannot log in to MeetingTime during this period. When the delay period ends, all users are disconnected from the system.


Starting the Cisco Unified MeetingPlace 8106 Server


Warning If the system is shut down in a disorderly manner (for example during a power failure), the restart time may be longer, depending on the number of disks used by your system.


Caution Start the Cisco Unified MeetingPlace 8106 server only under the guidance of Cisco NCE (see "Obtaining Technical Assistance" in the Guide to Cisco Conferencing Documentation and Support for assistance).


Step 1 Move the server power switch in the back of the Cisco Unified MeetingPlace 8106 chassis to the ON, 1 position.

Step 2 Allow up to 10 minutes for the server to initialize.

Figure 5-4 Back of Cisco Unified MeetingPlace 8106 Server

1

Modem

3

CPU transition module

2

Blade slots (1-6)

4

Power switch


The system generates an alarm after the power failure. If the system runs normally, clear the alarm. If the system fails to recover or behaves inappropriately following a power failure, see "Obtaining Technical Assistance" in the Guide to Cisco Conferencing Documentation and Support. Do not try to reboot your Cisco Unified MeetingPlace 81o6 or Cisco MCS.


Starting the Cisco Unified MeetingPlace 8112 Server


Warning If the system is shut down in a disorderly manner (for example during a power failure), the restart time may be longer, depending on the number of disks used by your system.


Caution Start the Cisco Unified MeetingPlace 8112 server only under the guidance of Cisco NCE (see "Obtaining Technical Assistance" in the Guide to Cisco Conferencing Documentation and Support for assistance).


Step 1 Move the server power switch in the back of the Cisco Unified MeetingPlace 8112 chassis to the ON, 1 position.

Step 2 Allow up to 10 minutes for the server to initialize.

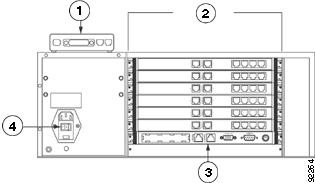
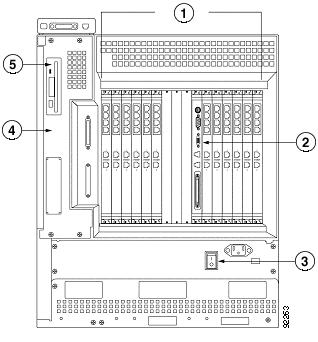
Figure 5-5 Back of Cisco Unified MeetingPlace 8112 Server

1

Blade slots (1-6, 11-16)

4

Floppy housing

2

CPU card transition module

5

Floppy drive

3

Power switch


The system generates an alarm after the power failure. If the system runs normally, clear the alarm. If the system fails to recover or behaves inappropriately following a power failure, see "Obtaining Technical Assistance" in the Guide to Cisco Conferencing Documentation and Support. Do not try to reboot your Cisco Unified MeetingPlace 8112 or Cisco MCS.


Monitoring Cisco Unified MeetingPlace 8112 Startup Progress

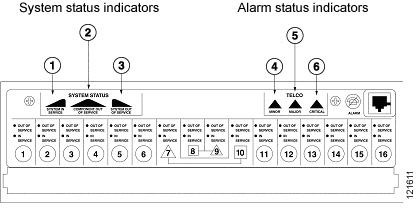
To monitor the progress of the Cisco Unified MeetingPlace 8112 after a system startup, watch the lights in the upper part of the front panel. Figure 5-6 describes the lights on the server.

For a detailed description of each light, see the "Interpreting Alarm LEDs on the Cisco Unified MeetingPlace 8112" section on page 6-5.

Figure 5-6 Out Of Service/In Service LEDs on Cisco Unified MeetingPlace 8112

1

Component Out Of Service indicator

4

Minor alarm

2

System In Service indicator (illuminates when the system is fully up)

5

Major alarm

3

System Out of Service indicator

6

Critical alarm


About Maintaining the Cisco Unified MeetingPlace Server

The Cisco Unified MeetingPlace 8106 or 8112 requires little hardware maintenance. However, for the Cisco Unified MeetingPlace 8112, you must replace the filter screens on each fan once each year.

This type of maintenance is included in your Full Care Support package. For more information about general hardware maintenance, see "Obtaining Technical Assistance" in the Guide to Cisco Conferencing Documentation and Support.

About Maintaining the User Database

When users leave your organization, disable their access to Cisco Unified MeetingPlace by either deactivating or removing them from your user database.

When you deactivate users, you disable their access but maintain historical information about them in the database.

When you remove users, you disable their access and remove their profile records from the Cisco Unified MeetingPlace database.

Deactivate users immediately (you can remove them later). When you run reports, you can continue to retrieve information about meetings scheduled by deactivated users. When other Cisco Unified MeetingPlace meetings no longer refer to that user, remove the user from the database.

You can use two methods for maintaining the user database:

Use Cisco Unified MeetingPlace Directory Services.  If you have Cisco Unified MeetingPlace Directory Services installed, it maintains the user database automatically. By using the corporate directory for profile information, Cisco Unified MeetingPlace Directory Services greatly simplifies profile management and guarantees a more accurate record of profiles stored on the Cisco Unified MeetingPlace server. It also adds a level of security by deleting profiles whenever a user is removed from the corporate directory. Properly managing profiles means former employees cannot continue accessing the system. (For more information, see the Administrator Guide for Cisco Unified MeetingPlace Directory Services.)

Maintain the database manually.  If Cisco Unified MeetingPlace Directory Services is not installed, you must maintain your system. This section describes how to manually maintain your user database. The following sections describe how to maintain the user database manually.

Deactivating Single User Profiles or Groups


Step 1 In MeetingTime, select the Configure tab.

Step 2 View the record for the user profile or group you want to deactivate. (For information about viewing, see the "Viewing User Group and User Profile Records" section on page 2-21.)

For profiles, in the User Active? field, choose No.

For groups, in the Group Active? field, choose No.

Step 3 Click Save Changes.

This action deactivates all user profiles for all users in the group whose User Active? fields are set to Group dflt.


Deactivating Multiple Profiles

If you have several users to deactivate, you can deactivate them all using the import process.


Step 1 Create an import file with three fields:

uid (user ID)

prfnum (profile number)

uactive (user active)

Step 2 Under these fields, for each profile you want to deactivate, enter the user ID and profile number, followed by a comma (,) and no, as in:

uid,prfnum,uactive
ABell,1234,no
JSmith,5678,no

Step 3 In MeetingTime, select the System tab.

Step 4 Click the Import User Profiles action.

Step 5 For the Action to Perform attribute, choose Add profiles to system.

Step 6 For the Data File to Use attribute, enter the location and name of the file to import in the text box. Then click OK.

You can also click Browse to locate the file. When browsing to import a file, Cisco Unified MeetingPlace specifies the file type as Import Files (*.imp). If your import file has a different extension, for List of File Type, choose either .csv or All Files.

Step 7 Set the Overwrite Duplicate Information attribute to Yes.

Step 8 Set the error threshold.

This value specifies the number of errors MeetingTime allows before aborting the import process. Do not set this number too high, because several errors can indicate a problem with the import file.

A status dialog box reports any error conditions that occur during importing.

Step 9 Click Execute.


Deactivating Groups by Importing

If you have several groups to deactivate, you can deactivate them by importing them.


Step 1 Create an import file with the following two fields:

Grpnme (group name)

IsActive (group active)

Step 2 Under these two fields, for each group you want to deactivate, enter the group name, followed by a comma (,) and no, as in:

Grpnme,IsActive
Corporate,no
Sales,no

Step 3 In the MeetingTime System tab, set the following attributes:

Click the Import Group Profiles action.

For the Action to Perform attribute, choose Add groups to system.

For the Data File to Use attribute, enter the location and name of the file to import in the text box. Then click OK.

You can also click Browse to locate the file. When browsing to import a file, Cisco Unified MeetingPlace specifies the file type as Import Files (*.imp). If your import file has a different extension, for List of File Type, choose either .csv or All Files.

Set the Overwrite Duplicate Information attribute to Yes.

For the Error Threshold attribute, enter the number of errors MeetingTime allows before aborting the import process.

Do not set this number too high, because large numbers of errors can indicate a problem with the import file. (A status dialog box reports any error conditions that occur during the import process.)

Step 4 Click Execute.


Deleting a Single Group or Profile

System administrators may decide to let their help desk staff or attendants delete user profiles. For more information, see the "About Help Desk Privileges for Attendants" section.


Step 1 In MeetingTime, select the Configure tab.

Step 2 Find the record you want to delete.

For information about finding records, see the "About Searching for Users, Groups, and Teams" section on page 2-23.

Step 3 Click the Delete button, then click Yes to confirm the deletion.


Deleting Multiple Profiles by Importing


Step 1 Create an import file with two fields:

uid (user ID)

prfnum (profile number)

Step 2 Under these two fields, for each profile you want to delete, enter the user ID and profile number separated by a comma (,), as in:

Uid,prfnum
ABell,1234
JSmith,5678

Step 3 In the MeetingTime System tab, set the following attributes:

Click the Import User Profiles action.

For the Action to Perform attribute, choose Delete profiles from system.

For the Data File to Use attribute, enter the location and name of the file to import. (Or click Browse to locate the file.) Then click OK.

Use the Send Log Info To attribute to set the destination for the error information.

If you are importing a large number of records, save the error information to a file. Use the Log file Name attribute to specify a name for this error file.

For the Error Threshold attribute, enter the number of errors MeetingTime allows before aborting the import process, then click OK.

Do not set this number too high, because several errors can indicate a problem with the import file.

Step 4 Click Execute.


Deleting Groups by Importing

To delete group profiles in a batch:


Step 1 Create an import file with two fields for grpnum (group number) and Grpnme (group name) with the list of groups you want to delete.

Grpnum,Grpnme
1837,Corporate
6272,Sales

Step 2 In the MeetingTime System tab, set the following attributes:

Select the Import Group Profiles action.

For the Action to Perform attribute, choose Delete groups from system.

For the Data File to Use attribute, enter the location and name of the file to import. (Or click Browse to locate the file.) Then click OK.

For the Send Log Info To attribute, set the destination for the error information.

If you are importing a large number of records, save the error information to a file. Use the Log File Name attribute to specify a name for this error file.

For the Error Threshold attribute, enter the number of errors MeetingTime allows before aborting the import process, then click OK.

Do not set this number too high, because several errors can indicate a problem with the import file.

Step 3 Click Execute.


Changing User Group Information Manually

You can change common attributes for a group of users. For example, if the contact person for a group of users changes, you can change the group information instead of changing multiple user profiles.


Step 1 In the MeetingTime Configure tab, select the User Groups view.

Step 2 Click the Find Records button (magnifying glass).

Step 3 Select the group whose attributes you want to change, then click OK.

For information about finding groups, see the "About Searching for Users, Groups, and Teams" section on page 2-23.

Step 4 Change the group attributes, then click Save Changes.


Changing User Profile Information Manually


Step 1 In the MeetingTime Configure tab, select the User Profiles view.

Step 2 Click the Find Records button (magnifying glass).

Step 3 Search for a user by user ID, profile number, or last name, then click OK.

For information about finding users, see the "About Searching for Users, Groups, and Teams" section on page 2-23.

Step 4 Change the attributes, then click Save Changes.


Changing User Profiles by Exporting and Importing Manually

You can change attributes for multiple user profiles by exporting the Raw Profile Information report into a spreadsheet or database.


Step 1 In the target spreadsheet or database, make the desired changes using the commands and features available in that application.

Step 2 Save the file as a comma delimited (.csv) file type.

Step 3 Import the file into Cisco Unified MeetingPlace with the Overwrite Duplicate attribute set to Yes.

For information about importing files, see the "Importing User Profile and Group Information" section on page 2-16.


Importing and Exporting Encrypted Passwords

You can export profiles containing a user's encrypted passwords by running a Raw Profile Information report. The profiles can then be imported into another conference server to replicate the database.

For example, if you have multiple standalone conference servers, export profiles from one conference server and import them into another, which preserves all passwords.

About Maintaining Configuration Records

When installation is complete, the worksheets in the Installation Planning Guide for Cisco Unified MeetingPlace Release 5.3 serve as complete documentation of your initial Cisco Unified MeetingPlace configuration. If you change the configuration of your system, you must create new documents that reflect these changes.

To Maintain  
Do This in MeetingTime

System configuration records, by creating an electronic file that lists your system's configuration settings.

In the Configure tab, select any topic, then click the Write to File button.

Cisco Unified MeetingPlace creates an electronic file of your system's settings for that topic.

Meeting records, by keeping a list of scheduled meetings for a specific time period or creating a record of meeting details. You can then save these records to file or print them.

In the Schedule tab, click the Print/Save button. Then choose an action from the drop-down menu.


About Loading Cisco Unified MeetingPlace License Keys

You can add or upgrade applicable Cisco Unified MeetingPlace feature license keys into your system, either all at one time or individually. You add or upgrade license keys through MeetingTime.

Files for license keys that you may add or upgrade are made available to you when you purchase a new Cisco Unified MeetingPlace system or upgrade to Release 5.3. These files are loaded into your Cisco Unified MeetingPlace 8106 or 8112 when it is purchased.

If you purchase new license keys, Cisco sends them to you as an e-mail attachment. Save the attachment on your local computer drive. Place it where you can browse to it easily in MeetingTime.

Loading All License Keys


Step 1 In the MeetingTime System tab, select the Import System Options action.

Step 2 For the Action to Perform Attribute, click the Values area. Choose Import system options to system, and click OK.

Step 3 For the Import File Name attribute, click the Values area.

Step 4 To enter the filename of the license keys file, accept the default filename or enter a different filename, and click OK. (Use the Browse key, if necessary.)

Step 5 Click Execute.

The licenses are exported to the Cisco Unified MeetingPlace 8106 or 8112 server and then added or updated.

Step 6 Restart the Cisco Unified MeetingPlace 8106 or 8112 server.

Step 7 To verify that the licenses have been loaded, run a License Information report in MeetingTime. (See the "License Information Report" section on page 4-6.)

Compare the license quantities and license keys with the information you entered into MeetingTime. If you see discrepancies, load missing licenses again. For help, see "Obtaining Technical Assistance" in the Guide to Cisco Conferencing Documentation and Support.


Loading License Keys Individually


Step 1 Locate the option key on the license document.

Step 2 In the MeetingTime Configure tab, select the System Options view.

Step 3 Click Query, then click the < or > button to locate the license key you want to add or upgrade.

Step 4 For the Number of Licenses attribute, click the Values area. Enter the number of licenses for your system, then click OK.

The number of licenses must match the number that corresponds to your Cisco Unified MeetingPlace option key.

Step 5 For the Option Key attribute, enter the option key number.

Step 6 Click Save Changes.

Step 7 To load additional licenses, repeat steps 3 through 6.

Step 8 Restart the Cisco Unified MeetingPlace 8106 or 8112 server.

Step 9 To verify that the licenses have been loaded, run a License Information report in MeetingTime. (See the "License Information Report" section on page 4-6.)

Compare the license quantities and license keys with the information you entered into MeetingTime. If you see discrepancies, load missing licenses again. For help, see "Obtaining Technical Assistance" in the Guide to Cisco Conferencing Documentation and Support.