-
Administrator Guide for Cisco Unified MeetingPlace Audio Server Release 5.3
-
Preface
-
Introducing Cisco Unified MeetingPlace Audio Server
-
Setting Up Cisco Unified MeetingPlace Audio Server
-
Scheduling and Attending Meetings
-
Running Reports
-
Managing and Maintaining Cisco Unified MeetingPlace Audio Server
-
Troubleshooting the Cisco Unified MeetingPlace Audio Server System
-
Installing MeetingTime
-
File Import Specifications
-
Raw Data Export Specifications
-
Cisco Unified MeetingPlace SNMP
-
Cisco Unified MeetingPlace DCTS Addin
-
Creating, Uploading, and Deleting Custom Voice Prompts
-
Custom Voice Prompts
-
 Feedback
Table Of Contents
Setting Up Cisco Unified MeetingPlace Audio Server
System Administrator Responsibilities
Maintaining the Cisco Unified MeetingPlace System
System Administrator's Schedule
Benefits of Assigning Profiles
Planning and Maintaining Profiles
Providing Profiles for Targeted Meeting Schedulers
When Find Me Settings Are Not Used
Letting Guests Join Meetings from the Web
Importing User Profile and Group Information
Importing Profiles for All Users
Importing with Cisco Unified MeetingPlace Directory Services
Importing with Manual File Import
Importing Files in the Cisco Unified MeetingPlace Database
Importing and Deleting Profiles in Windows Batch Mode
Viewing User Group and User Profile Records
About Searching for Users, Groups, and Teams
About Customizing Cisco Unified MeetingPlace Audio Server
Customizing Meeting Notifications
Listing Alternative Cisco Unified MeetingPlace Phone Numbers in Notifications
Designing a Flex Menu Application
Creating Custom Flex Menu Prompts
Saving a Flex Menu Application
Completing a Flex Menu Application
Loading a Flex Menu Application
Importing a Flex Menu Application
Exporting a Flex Menu Application
Deleting a Flex Menu Application
About Customizing Voice Prompts
Choosing Abbreviated and Unabbreviated Voice Prompts
Accessing the Voice Prompts Menu
Configuring Cisco Unified MeetingPlace Servers for Multiserver Meetings
Worksheet 2-1 Multiserver Meeting Scheduling Requirements
Worksheet 2-2 Recommendations for Multiserver Meetings
Providing Users with Profiles on the Other Cisco Unified MeetingPlace Servers
Allowing Users to Schedule Multiserver Meetings
Creating Server Information Records for Cisco Unified MeetingPlace Servers
Naming Cisco Unified MeetingPlace Servers
Procedure 1: Enter Information in the Server Configuration Record
Procedure 2: Update the Local Server Information Record
Recording a Voice Name for Other Cisco Unified MeetingPlace Servers
Recording the Breakout Session Warning Prompt
Using the Server-to-Server Connection Parameters
Monitoring Multiserver Meetings Using MeetingTime
Scheduling Multiserver Meetings
Scheduling Multiserver Meetings with Video Conferencing
Inviting Participants and Attaching Documents
Using MeetingTime to Schedule Multiserver Meetings
Procedure 1: Schedule a Meeting on the Secondary Cisco Unified MeetingPlace Server
Procedure 2: Schedule a Meeting on the Primary Server
Canceling or Changing Details of Multiserver Meetings
Using the Outdial Feature to Add Servers
Using Web Conferencing in Multiserver Meetings
Solving Common Problems of Multiserver Meetings
About Reservationless Meetings
Configuring Reservationless Meetings
Configuring System-Wide Reservationless Meetings Attributes
Configuring User Profiles and Groups for Reservationless Meetings
Configuring Reservationless and Scheduled Meetings
Requiring Passwords for Reservationless Meetings
Starting a Reservationless Meeting
Attending a Reservationless Meeting
Scheduling Reservationless Meetings with Video Conferencing
Viewing Reservationless Meeting Data Statistics
Recommended Settings for Reservationless Meetings
Worksheet 2-3 Default Values for Reservationless and Scheduled Meetings
Recommended Settings for Combined Reservationless and Scheduled Meetings
Recommended Settings for Reservationless Meetings Only
Managing Profile Numbers and Meeting IDs for Reservationless Meetings
Identifying Profile and Meeting ID Conflicts in Reservationless Meetings
Configuring a Cisco 3700 Series Router for RSNA Transfers
Procedure 1: Creating Other Cisco Unified MeetingPlace Servers Records
Procedure 2: Enabling the System for RSNA
Procedure 3: Configuring Users and Groups for RSNA
Resolving Recorded User Name Problems
Scheduling Reservationless Meetings with Web Conferencing
About Cisco Unified MeetingPlace Language System Option
Enabling the Cisco Unified MeetingPlace Language Option Key
Setting Meeting Language Prompts
Four-Language System, Port Not Configured
Two-Language System, Port Configured for Japanese
Setting Up Cisco Unified MeetingPlace Audio Server
Cisco Unified MeetingPlace offers several ways to organize, maintain, secure, and customize information about the system and the people who use the application. This chapter describes the following topics:
•
System Administrator Responsibilities
•
•
•
•
•
System Administrator Responsibilities
Cisco Unified MeetingPlace requires a minimal level of management. As system administrator, you perform the following tasks:
•
•
•
•
•
•
Maintaining Profiles
Each person in your user community needs a Cisco Unified MeetingPlace user profile defined in the Cisco Unified MeetingPlace database. User profiles contain information such as:
•
•
•
•
•
As the system administrator, you are responsible for maintaining a directory of users and their associated privileges (as is the case with many in-house communications systems, such as e-mail, groupware, and voice mail systems).
The amount of ongoing work for profile maintenance often depends on the level of up-front planning and coordination you perform. If you have Cisco Unified MeetingPlace Directory Services or can obtain database access to user lists from another source, such as an e-mail system directory or a human resources database, you can easily automate the process of synchronizing Cisco Unified MeetingPlace with that other source.
If you do not have a means of synchronizing Cisco Unified MeetingPlace with another source of users, you must set up a fulfillment process for new users who request Cisco Unified MeetingPlace profiles.
Planning Internal Support
As system administrator, you are responsible for planning and implementing the various levels of support in your organization. Some support considerations include:
•
•
•
When Cisco Unified MeetingPlace encounters more serious problems, such as T1 failure or a system failure, you can set up the system to notify you. A critical part of your internal support strategy is a set of procedures to follow for handling alarm conditions.
Tracking Resource Usage
Tracking resource usage on the system is important for several reasons:
•
•
•
•
To help track resource usage, Cisco Unified MeetingPlace offers a series of standard reports and capacity management tools. The system also enables you to export database tables in a raw format for analysis or reporting in other applications.
For more information on capacity management, see "Managing and Maintaining Cisco Unified MeetingPlace." For more information on reporting, see "Running Reports."
Maintaining the Cisco Unified MeetingPlace System
Cisco Unified MeetingPlace requires very little system maintenance. However, like any other system, you need to perform backups on a regular basis. You may also need to shut down and restart the system on occasion, such as when moving your offices to another location.
For information on system maintenance, see "Managing and Maintaining Cisco Unified MeetingPlace."
System Administrator's Schedule
Some of your tasks should be performed routinely on a weekly or monthly basis. Others require your response as needed. Table 2-1 summarizes typical system administrator tasks.
Note
Table 2-1 System Administrator's Schedule
About Profiles
Profiles offer different levels of service to different users, track use for billing purposes, maintain better security on your system, and provide effective ways for your users to conduct secure meetings.
You can define two types of profiles:
•
•
Define the user groups first, and then define the user profiles. User profiles within a group inherit many of the same group settings, which minimizes the work of duplicating those settings for each user in the group.
We recommend that you create a profile for every user in the system. Create a profile for each user who sets up meetings and attends meetings regularly.
Benefits of Assigning Profiles
Users who have profiles established for them can use the following important features:
•
•
•
•
•
•
•
•
•
Planning and Maintaining Profiles
You can define profiles for the following:
•
•
•
Cisco recommends defining profiles for your entire user community.
Providing Profiles for Targeted Meeting Schedulers
To minimize the number of profiles you maintain on your system, define profiles only for people who schedule conferences and create reservationless meetings. For example, these people might be departmental administrators, company operators, or specific "power users" within your organization. Everyone else is a guest. (For more information about guest users, see the "Profile Properties" section.)
Using this strategy, anyone can attend the conference as a guest user if the meeting scheduler allows guest participation. Providing guest access to meetings allows vendors, customers, and other partners to participate in conferences. However, you can have users who do not need to schedule conferences attend all meetings as guests.
Although this approach requires the least planning, it limits the features that users without profiles can use.
Providing Profiles on Request
You can provide profiles for only users who request them. This strategy may be similar to the process you already have in place for requesting other types of information systems or telecommunications resources.
If you provide profiles on request, define the process for creating them. For example, assign this task to the help desk staff so that you, the system administrator, have time for other responsibilities.
Profile Properties
A profile contains all the information about known users in the system. Table 2-2 shows the types of information that profiles contain.
Table 2-2 User Profile Information
Class of user
User ID and passwords
Address information, including phone and e-mail
Billing information
Class-of-service privileges
Outdialing privileges
Whether to allow guests to join meetings from the Web
Letting Guests Join Meetings from the Web and Creating Guest Profiles.
Departmental support contacts
Time zone
Meeting preferences
To define user groups, see the "About User Groups" section. To define user profiles, see the "About User Profiles" section.
User Class
You can control the level of access that each user has to Cisco Unified MeetingPlace by assigning each user to a class. Table 2-3 describes the four classes of users.
Table 2-3 User Classes
User ID and Password
Cisco Unified MeetingPlace identifies users based on their user ID. The user ID is a unique alphanumeric string of 3 to 17 characters. MeetingTime identifies users by their user IDs in all its screens and reports.
Users also need their user ID and a corresponding alphanumeric password to use MeetingTime and Cisco Unified MeetingPlace Web Conferencing over a Local Area Network (LAN) or Wide Area Network (WAN). Assign users Cisco Unified MeetingPlace user IDs that are the same as either their network or e-mail user names.
In addition to the user ID, Cisco Unified MeetingPlace profiles have a unique profile number. The profile number—3 to 17 digits—identifies users over the telephone. Typically, the profile number is the same as a user's telephone number, extension, or voice-mail box. Profile numbers have corresponding numeric passwords that are independent of the alphanumeric passwords associated with the user ID for LAN or WAN access.
Remember the following important information:
•
•
User Contact Information
Cisco Unified MeetingPlace maintains directory information for use with advanced features, such as automated outdialing (automatically dialing a participant at the time of the meeting) and paging.
For each user, the system tracks the following:
•
•
•
•
For telephone and pager numbers, the system uses its internal translation tables to map telephone numbers stored in Cisco Unified MeetingPlace profiles to actual dialing strings. Do not put in extra digits required for dialing strings (such as 9 to dial out from your PBX) in the profile entries.
To make the best use of Cisco Unified MeetingPlace capabilities, enter all the address information that applies to your system. This information might be available if you import profiles from a company directory or other source.
For e-mail addresses, enter the e-mail addresses used by your e-mail system. Table 2-4 shows the e-mail addresses to use.
Table 2-4 E-Mail Address Formats by E-Mail System
Remember the following information:
•
•
Billing Information
You can assign billing codes to profiles and meetings, which allows companies to choose billing schemes based on scheduling or meeting participation.
You assign a billing code to user profiles. Meeting schedulers can override their default billing code for each meeting. Typically, user profiles inherit their billing codes from their user group.
Class-of-Service Privileges
You can limit a user's resource usage based on what user group they are placed in and how that user group is configured. These permissions and rights extend to a user's or group's ability to schedule, outdial from, and record meetings.
Typically, user profiles inherit their class-of-service privileges from their user group. For more information on using class-of-service privileges to control resource use, see the "About Managing Ports" section. For more information on securing the system through class-of-service privileges, see the "About Establishing Security" section.
Outdialing Privileges
Outdialing allows users to quickly and easily join meetings and add other users to meetings they are attending. Using the Outdial feature, users can:
•
•
•
For Cisco Unified MeetingPlace to perform these functions, a user must have outdial privileges. To provide outdial privileges to users, set the Can Call Out from Mtgs attribute to Yes in their user profile.
Caution
Using the "Find Me" Feature
You can configure Cisco Unified MeetingPlace Audio Server to outdial to up to three numbers to reach a user (or user group members) to join meetings. This section describes the "Find Me" feature and shows examples of various configurations.
If a Find Me outdial is initiated and there is a First search method field value, the system uses that number as the initial outdial destination. If there is no such value, the Phone Number value (from the user profile) is used. (This is also the Main value that you can choose to configure various fields.)
If the system has not located the user after the initial outdial attempt, it proceeds based on the # of retry attempts field value (in the system Usage Parameters), according to the following rules.
•
•
The following restrictions apply to the Find Me settings:
•
•
•
•
Table 2-5 shows the allowable values in each search field.
Table 2-5 Allowable Values in Search Fields
The following example shows some invalid settings.
None
Primary
None
None
None
Pager
None
Alternate
Primary
Primary
Primary
Alternate
There must be a corresponding number for each value that is set. For example, if Pager is specified as a Find Me setting, there must be a pager number and type specified for the user in the profile.
Examples of Find Me Settings
The following examples show the sequence followed for a Find Me outdial with various combinations of settings, including None. The format is:
[FindMe settings: 1st, 2nd, 3rd], "# of retry attempts" Outdial Destination
The examples apply to the following actions in MeetingTime and voice user interface (VUI), as noted:
•
•
•
•
•
When Find Me Settings Are Not Used
The following example shows when Find Me settings are not used.
The examples apply to the following actions in MeetingTime:
•
•
•
[Alternate, None, None], 0
Main
[Alternate, None, None], 1
Main
Main[Alternate, Main, None], 0
Main
Departmental Support Contacts
To each Cisco Unified MeetingPlace profile, you assign a delegate (also called a contact)—a departmental support person or administrator who can represent the profile user. With each user profile, you must specify the Cisco Unified MeetingPlace user ID of the contact. Typically, user profiles inherit their contacts from their user group.
You can configure the system to let users get assistance before they enter a meeting if they do not enter a number at the first voice prompt or if they try to access an inactive profile. For more information on getting assistance, see the "About Assisting Users" section on page 6-19.
Time Zone
Each profile has a time zone setting. Set the time zone for the geographical location in which the user does business. For all meetings the user schedules or is invited to, the system accepts and reports start times in that user's time zone.
When participants in different time zones are invited to the same meeting, the times reported to each participant are converted to their time zones.
When you schedule a recurring meeting, all instances of that meeting are at the same time of day in the scheduler's time zone. So, for example, if someone in Arizona schedules a weekly meeting, callers from New York must adjust their schedules during daylight savings time.
Meeting Preferences
Each user profile has default meeting preferences. Whenever users schedule a new meeting, these default meeting preferences initially determine the behavior of the meeting, such as whether it will be recorded. Users can override their default meeting preferences for each meeting.
Because users set up different types of meetings, select default meeting preferences for a user group that make sense for their application.
About User Groups
After you choose your profile maintenance strategy, determine how to segment your user population into user groups. In Cisco Unified MeetingPlace, user groups are organized according to a shared set of attributes.
Before you begin, decide how to arrange users into groups, using the following information:
•
•
•
•
Each Cisco Unified MeetingPlace profile contains over 50 attributes that control users' class-of-service privileges (also called permissions) and their meeting preferences. By arranging users into groups, you can easily maintain profiles for similar users. When something about that group changes (such as the departmental contact), you can update all the users in that group at one time.
Groups also determine the sort order of records in Cisco Unified MeetingPlace standard reports. Information from users in the same group appears together.
Defining User Groups
Note
Step 1
Step 2
(Or choose Administration menu > Configure.)
The Register window opens with the Configure tab displayed.
Step 3
Step 4
Use the information from the "User Groups" worksheet in the Installation Planning Guide for Cisco Unified MeetingPlace Release 5.3.
Step 5
About User Profiles
After you define the user groups, create the user profiles. Before you create user profiles, be sure you have the following information about each user:
•
•
•
Defining User Profiles
Note
Step 1
Step 2
Step 3
Use the information from the "User Profiles" worksheet in the Installation Planning Guide for Cisco Unified MeetingPlace Release 5.3.
Step 4
Step 5
Step 6
By default, attendants cannot create End User, Delegate (Contact), or Attendant user profiles. However, you can grant them such privileges. For more information, see the "User Class" section.
Creating Guest Profiles
Cisco Unified MeetingPlace includes a user ID, called guest, with a user profile for guest users. You can modify the guest profile, but you cannot delete it.
Examples of parameters you might want to change for guests are:
•
•
•
While not recommended, you can also modify the class-of-service privileges for guest users. For example, you can allow guests to start meeting recordings or initiate outdials from within a meeting.]
The guest profile is also used as a template for future profiles created in MeetingTime. To speed up the process of creating profiles, make sure all guest profile settings are set to Group Dflt.
Letting Guests Join Meetings from the Web
By default, Cisco Unified MeetingPlace prevents outdialing to guests when they click the Join Voice Conference button from the Web. You can change this setting to allow users to schedule meetings that let guests be outdialed when they click the Join Voice Conference button. This is especially useful in meetings attended by guests outside your organization, such as customers, partners, and suppliers.
To allow users to schedule meetings that let guests attend over the Web:
Step 1
•
•
Step 2
For security reasons, we recommend that you set this attribute to No.
Users can change this attribute when they schedule individual meetings, to either allow or prevent guest attendance over the Web.
Remember the following information:
•
•
Importing User Profile and Group Information
If the information required for user profiles or user groups already exists in another database (such as an e-mail directory, a voice-mail directory, or a human resources database), you can import the profile information directly into the Cisco Unified MeetingPlace database. There are two ways of importing information:
•
•
Although creating a process for importing the initial database and keeping it current requires planning, doing so saves you time overall. Rather than worrying about accepting impromptu requests, you can manage the process by anticipating any circumstances that may occur.
For best results when doing any imports into Cisco Unified MeetingPlace Audio Server Release 5.3, remember the following information:
•
•
•
Importing Profiles for All Users
Cisco Unified MeetingPlace provides automated tools for synchronizing its list of profile users with other user lists in your company, such as e-mail directories, voice-mail directories, and human resources databases.
Although creating a process for importing the initial database and keeping it current requires planning, this approach saves you time. Rather than worrying about accepting impromptu requests, you can manage the process by anticipating any circumstances before they occur.
Alternatively, you can use Cisco Unified MeetingPlace Directory Services to automatically synchronize information in your corporate directory server with information in your Cisco Unified MeetingPlace server. For more information, see the "Importing with Cisco Unified MeetingPlace Directory Services" section.
Importing with Cisco Unified MeetingPlace Directory Services
Using a directory service, a company can store all its resources and personnel information in one place and allow other applications to access that information from a single source. Doin so decreases the cost of managing information, increases control and consistency of information, and unifies security across applications.
Cisco Unified MeetingPlace Directory Services (a Cisco Unified MeetingPlace software option) synchronizes information in your corporate directory server with information in your Cisco Unified MeetingPlace server. It interacts with common corporate directories such as Microsoft Active Directory and Netscape Directory Server through Lightweight Data Access Protocol (LDAP).
When new employees join the company, their information is entered into the corporate directory. Cisco Unified MeetingPlace Directory Services detects the addition and instantly creates a profile for each new employee.
As employees change departments and offices, their contact information changes. To ensure that the system has the most accurate information, changes to a person's information on the corporate directory are recognized and replicated on Cisco Unified MeetingPlace Directory Services. Automatic profile updates ease system use and limit help desk calls.
For more information about Cisco Unified MeetingPlace Directory Services, see the description in the Installation Planning Guide for Cisco Unified MeetingPlace Release 5.3. For more information about using this product, see the Administrator Guide for Cisco Unified MeetingPlace Directory Services.
Importing with Manual File Import
If you do not have Cisco Unified MeetingPlace Directory Services installed, you must complete a manual file import. To simplify this process, you can choose to import only fields that contain profile or group-specific information, such as user IDs, profile numbers, group names, group numbers, and contact information (e-mail addresses, phone numbers, and so on). Any fields you do not include in the import file derive their value from either the guest profile or the user group to which the user has been assigned.
If you are not assigning users to groups, review the settings in the guest profile to make sure they are appropriate for the users you are adding to the system. For example, if you want users to outdial from meetings but the guest profile has the Can Call Out from Mtgs attribute set to No, you must change this setting in the guest profile before importing your profiles. After the profiles are imported, you must change the settings in the guest profile back to their original values.
If you are assigning users to groups, be sure to include the Group Name or Group Number field in the import file.
The import file must include unique values for the profile number and user ID. If used, the group name and group number values must also be unique.
You can use any value as the user ID and profile number as long as it is unique. For example, if you are importing the data from your voice-mail system, you can use each person's telephone number as his or her profile number. If you are getting the information from an e-mail system database, you can use the person's e-mail user ID as the Cisco Unified MeetingPlace user ID.
For more information about file import, see "File Import Specifications."
Import File Requirements
The import file must be a comma-delimited ASCII file (an unformatted or flat file). The first line of the file is a group of keywords that acts as a header and identifies the order in which data appears in all subsequent lines.
For example, if each line of information starts with the first name of the user and then lists the person's first name, last name, user ID, profile number, phone number, contact user ID, group name, and time zone code, it would look like this:
fnm,lnm,uid,prfnum,phnum,ctcuid,grpnme,tzcodeAlex,Bell,Bell,206,5551234,Patton,system,87Lee,Smith,Smith,202,5556789,Patton,system,87Before you create an import file, remember the following information:
•
•
•
Importing Files in the Cisco Unified MeetingPlace Database
Caution
Step 1
•
•
Step 2
•
•
•
•
In general, performance is better when this attribute is set to No. Also, you avoid writing over any changes that users have made to their profiles. To reset the system back to a particular state, you can set this attribute to Yes.
•
If you are importing a large number of records, enter a filename to log the error to.
•
This value determines the number of errors that MeetingTime allows before aborting the import process. Do not set this number too high because a large number of errors indicates a problem with the import file.
Step 3
A status dialog box reports any error conditions that occur during importing.
Automating the Import Process
When importing is automated, you can publish the Cisco Unified MeetingPlace login schema through your intranet to greatly reduce your involvement in database management.
If Cisco Unified MeetingPlace Directory Services is not installed, you can simplify maintaining your Cisco Unified MeetingPlace database by writing a script that uses the Windows Batch Mode (see the "Importing and Deleting Profiles in Windows Batch Mode" section). Automating the import process deactivates employees who have left your company and adds new employees.
The following are general steps for writing a script to automate importing.
Step 1
Step 2
Step 3
Step 4
For more information, see the "Import File Requirements" section.
Step 5
Importing and Deleting Profiles in Windows Batch Mode
Importing or deleting profiles in batch mode lets you perform the process overnight and avoid tying up your machine (importing takes about one second per profile). You can perform all the import operations in batch mode using command line options.
Caution
To generate the import in batch mode:
Step 1
Make sure the import file contains the user's first name, last name, user ID, profile number, group name or number, and specific address information (phone number, Internet e-mail address, e-mail address, and pager number).
Step 2
Remember the following information:
•
•
C:\Program Files\Latitude\Mtgtime\mtgtime.exe[user ID] [user password] [hostname](For information on storing login settings, see the "Editing and Storing MeetingTime Settings" section.)
Table 2-6 Command Line Options
Step 3
If you plan to run the batch import process frequently, you can create a shortcut for quick access to the file without having to remember the import string each time.
Unlocking a Profile
Because more than one user may have tried unsuccessfully to log in, more than one user's profile might be locked. To review a list of locked profiles:
Step 1
In the Locked Profiles dialog box, you see the user ID, the active state of the profile, the group default value of the User Active? field, and the state that the profile will be set to.
Step 2
Step 3
Note
If the Lock/Unlock Profiles Help Desk privilege has been enabled, you can also view locked profiles by clicking on the View Locked Profiles button in the Preference tab. Attendants and users with higher privileges can see this button when this Help Desk privilege has been enabled.
Changing User Profile Records
You can also use the Import Profiles action to change a user's ID or profile number.
Step 1
These fields are used to find the existing user record.
Step 2
Step 3
Step 4
For example, importing the file displayed in the following example changes Pat Park's user ID to Bell_newID and changes the profile number to 20611. It also changes Chris Lee's user ID to Lee_Mgr but maintains the previous profile number. Alex Leeman's user ID and profile number remains the same.
fnm,lnm,uid,prfnum,newuid,newprfnumPat,Park,Park,206,Park_newID,20611Chris,Lee,Lee,202,Lee_Mgr,202Alex,Leeman,Leeman,204,Leeman,204For information about removing profiles from the system, see the "Changing User Profile Information Manually" section.
Viewing User Group and User Profile Records
You can quickly view a particular user group or user profile record. In the MeetingTime Configure tab, click the Find Records (magnifying glass) button.
About Teams
Authorized Cisco Unified MeetingPlace users can create and modify teams (lists of Cisco Unified MeetingPlace users), which all users can use when scheduling meetings or outdialing from a meeting. System administrators can limit the number of teams an authorized user can create.
Defining Teams
Step 1
Currently defined teams display in the Names list. Clicking a team in this list displays the properties of that team in the Team Information area.
Step 2
Add a team
Click the New button. Enter information about that team for Team Information, then click Save.
Note
Change a team
Click the team to change. Change settings for Team Information, then click Save.
Include or change details about the team
With the team information displayed, click Details. You can add or change the team description, the ID of the person who last modified the team, or the date and time the team was modified.
Delete a team
Click the team to delete, and click the Delete button.
Search for teams in the Release 5.3 database
Click the Find Teams button (the magnifying glass above the Names list), enter search information in the Directory window, then click OK.
The system searches for teams by name or number. If the Name or Number field is blank, all teams are found and displayed. Clicking the Add button also displays the Directory window.
For more information about searching, see the "About Searching for Users, Groups, and Teams" section.
For details about team attributes, see the "Properties of Teams" section.
Properties of Teams
Table 2-7 describes team properties.
Caution
Table 2-7 Properties of Teams
About Searching for Users, Groups, and Teams
You can search for and locate Cisco Unified MeetingPlace users in the users, groups, and teams databases. You search for information in the Directory window. This window displays when you:
•
•
•
Use Table 2-8 for searching user and group profiles and teams.
Table 2-8 Search Methods for Users, Groups, and Teams
Find a profile or team
For Search for Profiles, enter text or a number, then click the binoculars button. For details about each option, see the "Search Options" section.
Add a profile or team
Double-click the profile or team name in Found. (Or click the profile or team name and click Add.) The profile or team name moves to Selection. Then click OK.
Remove a profile or team
Click the profile or team name and click Remove. Then click OK.
Change the database you want to search
Click Options, then click the binoculars button. The search results are displayed in Found. (Each new search results clears the previous result in this list.)
Remember the following information:
•
•
•
Search Options
By default, profiles are searched according to the nature of the search string. So, for example, if the search string is a number, it searches for profiles where the criteria profile number matches the search number, as well as teams where the team number matches the search number. If the search string is text, it searches for profiles where the criteria user ID matches the text, as well as teams where name matches the search text.
Changing Search Options
Step 1
Table 2-9 describes each search option.
Table 2-9 Changing Search Options
About Establishing Security
The security of your Cisco Unified MeetingPlace system includes physical security, software security, and toll-fraud prevention. Your company may already have guidelines for protecting the security of its computer systems.
Securing the Location
Securing the location of your system prevents unauthorized access to the system technician console port.
Caution
Securing User Profiles
To prevent unauthorized users from accessing Cisco Unified MeetingPlace over the telephone or from a computer, use the security measures described in Table 2-10.
Table 2-10 Methods for Securing User Profiles
Use password protection
Cisco Unified MeetingPlace requires passwords for access from a telephone or computer. User passwords permit access from a computer, and profile passwords permit access over a telephone.
To ensure effective use of profile passwords, administer the minimum password length and password change parameters in the Configure tab to define password information, including the following:.
•
•
•
•
•
Note
Use hacker lockout
Cisco Unified MeetingPlace offers a "hacker lockout" feature, which deactivates any user profile after a number of consecutive unsuccessful login attempts. You define the number of attempts. To do so:
1.
2.
After users reach the maximum number of retries by telephone, the profile is locked. Further attempts to log in result in a "Profile is invalid" message, the caller is transferred to the attendant, and a minor alarm is generated.
To unlock a user's profile:
1.
2.
Users who exceed the limit of password attempts by computer in MeetingTime are exited from the application. Users can then double-click the MeetingTime icon and try again. (Security is less stringent from the computer than from the phone because outdialing is not an issue.)
Note
Keep the database current
You can also ensure user profile security by maintaining an up-to-date user database. For example, delete or deactivate user profiles of employees who leave the company. For details on removing profiles from the system, see the "About Maintaining the User Database" section.
Use Cisco MeetingPlace SNMP agent
The Cisco MeetingPlace Simple Network Management Protocol (SNMP) agent comes preconfigured with communities labeled MeetingPlace-public and MeetingPlace-private. To prevent unauthorized queries, Cisco recommends changing these community names to names chosen by the customer. For details on changing community names, see the "Setting Up Community Information" section.
The Cisco MeetingPlace SNMP agent is based on SNMPv1 code, which has security vulnerabilities known to hackers. Cisco recommends blocking the SNMP port using a firewall. If Release 5.3 is located on the network so that a firewall cannot protect the SNMP port, Cisco recommends disabling SNMP queries. This can be done without disabling trap generation. Before you shut down the SNMP agent, see "Obtaining Technical Assistance" in the Guide to Cisco Conferencing Documentation and Support for assistance.
Securing Meetings
All meetings are protected by meeting ID numbers. For each scheduled meeting, you can determine whether the meeting requires both a password and a meeting ID.
If you do not want end users to see listings for meetings to which they have not been invited, the Display Meeting to Everyone? attribute must be set to No when scheduling a meeting. If this attribute is set to Yes, any profile user can view information about this meeting from the Browse Meetings link in Cisco Unified MeetingPlace Web Conferencing and from the MeetingTime interface.
Table 2-11 describes ways to secure meetings.
Table 2-11 Methods for Securing Meetings
Use meeting passwords
Meeting passwords provide an additional level of security to the meeting. Using the Usage Parameters topic in the Configure tab, you can define the minimum length for a meeting password (Min meeting pwd length).
Restrict meeting attendance
The Who Can Attend attribute allows meeting schedulers to restrict meeting attendance to those users with Cisco Unified MeetingPlace profiles or to profile users who are explicitly invited to meetings. Restricting meeting attendance prevents guest users from joining the meeting.
Secure meetings in session
During a meeting, users can access the in-session meeting features and use the following admittance options to control who can enter the meeting:
•
•
•
•
Restrict access to meeting records
You can restrict users' ability to record meetings from the User Profile and User Groups topics in the Configure tab. When scheduling meetings you can determine whether access to recordings of certain meetings are restricted to specific users or require a password.
Restrict use of vanity meeting IDs
When users schedule meetings, by default they can assign vanity (custom or common) meeting IDs, such as 1234. Although vanity meeting IDs are easier for meeting participants to remember and identify, you may want to restrict their use. Doing so adds a level of security and prevents unauthorized users or hackers from easily guessing the ID and gaining access to the meeting.
To restrict vanity IDs:
1.
2.
When users are allowed to assign vanity IDs, you can add a level of security by restricting groups or individual users from assigning vanity IDs to meetings that are scheduled by phone. To do so:
3.
4.
Note
Preventing Toll Fraud
Although recent court decisions and Federal Communications Commission (FCC) regulations stipulate that toll fraud is the customer's responsibility and not the responsibility of the equipment vendors, Cisco Unified MeetingPlace provides several ways to prevent unauthorized use. Because Cisco Unified MeetingPlace is a powerful telecommunications system allowing calls in and out, it is important to take measures to prevent unauthorized access to your system, as shown in Table 2-12.
Table 2-12 Methods for Preventing Toll Fraud
Restrict outdialing privileges
The first level of protection against toll fraud is the user profile, which determines a user's outdial privileges and whether they can schedule meetings that allow guests to attend over the Web.
You can restrict outdialing privileges to specific user groups, such as sales and marketing, or to specific user profiles, such as Jones and Smith. In the most extreme case, you can choose to disable impromptu outdialing for all users, virtually eliminating the potential for toll fraud.
To ensure that only registered users can outdial from within meetings:
1.
2.
3.
4.
In addition, if you do not want the system to outdial to guests when they click the Join Voice Conference button from the Web, make sure the Can Allow Guest Outdial in Mtgs attribute is set to No in all user profiles. For more information on this attribute, see the "About User Profiles" section.
Note
Limit near-term meetings
You can limit the number of near-term meetings (meetings scheduled to occur within six hours of the scheduling time) by setting the near-term limit for the User Groups and User Profiles topics.
Define system-wide restrictions
The next level of security consists of the system outdialing translation tables. The translation tables define which phone numbers the Cisco Unified MeetingPlace system can call. You can configure the system with up to 16 different tables to provide unique capabilities for different user communities on the system. You can also define tables through a PBX.
Remember the following information:
•
•
•
•
About Customizing Cisco Unified MeetingPlace Audio Server
While the Audio Server system is completely functional as installed, you can customize the system to suit your special uses and applications. The following sections tell you how to:
•
•
•
•
Customizing Meeting Notifications
To assist users receiving notifications by e-mail, you can customize your company's e-mail messages with information on how to attend meetings on Cisco Unified MeetingPlace and listen to recorded meetings.
Step 1
This topic is located under the Company Specific Information heading in Views.
Step 2
Step 3
Table 2-13 show examples of messages to use for the custom notification fields.
Table 2-13 Meeting Notification Parameters
Listing Alternative Cisco Unified MeetingPlace Phone Numbers in Notifications
As a system administrator, you can identify up to three different phone numbers for gaining accessing to a Cisco Unified MeetingPlace conference server. For example, specify these phone numbers:
•
•
•
To enter alternative phone numbers for the Cisco Unified MeetingPlace 8106 or 8112:
Step 1
Step 2
Step 3
•
•
Step 4
Step 5
About Flex Fields
Using flex fields, you can customize profile or meeting fields with your business information. The information specified in flex fields is used for reports.
You can create seven profile and seven meeting flex fields on your system. As the system administrator, you specify the protection level of each field (editable, read-only, or invisible to users). For flex fields 4-7, you can also choose whether users must choose fields values from a list of possible entries (which you create), and whether a flex field requires a value.
Table 2-14 shows examples of profile and meeting flex fields you may want to use for your company.
Table 2-14 Flex Field Examples
Cost Center
Conference Room
Billing Exemption
Building Number
Hire Date
Instructor Name
Department Name
Project Name
When you define a flex field, you specify the field title and import title information. The required information for a flex field can be of several different types—text, number, date, or yes/no.
Remember the following information:
•
•
•
Defining Flex Fields
Step 1
Step 2
Use Table 2-15 when you assign attributes to a flex field. Your settings display as field attributes and values in the Configure tab.
Table 2-15 Flex Field Attributes
About Flex Menus
You can customize the top-level touchtone menu trees that callers use to access their meetings by using Flex Menu applications. Flex Menu applications provide quick access to do any of the following:
•
•
•
•
You can also incorporate standard Cisco Unified MeetingPlace menu trees into your Flex Menu applications, such as the standard attend, schedule, and MeetingNotes branches.
For example, you could define a Flex Menu application to play the following top-level prompts:
•
•
•
•
•
Note
Cisco Unified MeetingPlace can support multiple Flex Menu applications in a single system. You assign Flex Menu applications on a port group basis. As such, Cisco Unified MeetingPlace can play different menus to parties depending on the port group that users dial into.
Accessing Flex Menus
You access Flex Menu features from the System tab in MeetingTime. From this tab, you can do the following:
•
•
•
•
Creating Flex Menus
Creating Flex Menus consists of the following steps:
•
•
•
•
Designing a Flex Menu Application
To design a Flex Menu application, follow these steps:
Step 1
Step 2
Step 3
Step 4
Flex Menus requires three basic elements:
•
•
•
Creating Custom Flex Menu Prompts
Custom Flex Menu prompts are voice prompts not normally part of the Cisco Unified MeetingPlace system. In the previous example, the prompt "To attend today's brokerage call" would be a custom Flex Menu prompt played to the users.
You can create custom flex menu prompts while you are designing Flex Menus.
To define a custom Flex Menu prompt, follow these steps:
Step 1
Step 2
Step 3
Step 4
To record a custom Flex Menu prompt, do the following:
Step 1
Step 2
Step 3
Step 4
Step 5
Step 6
Flex Menu Macros
Each Flex Menu application consists of a set of states. Each state consists of an action to perform, parameters specifying what to perform that action on, and "go to" instructions indicating what the next state should be under both normal and error conditions.
The following table describes which actions or macro types are supported.
To use a Flex Menu macro, you must first enter it.
Step 1
Step 2
Step 3
Step 4
Finding Meetings
To access meetings to attend or review, you must first find the meetings. You can search for meetings based on their meeting ID or the meeting category.
Meeting Categories
The Find Meeting macro can find a specific meeting or generate a list of meetings based on the meeting ID or meeting category over a fixed range of time.
In the example, To Review Analyst Meetings, press 3, you would first define a meeting category titled "Analyst Meetings" and assign each relevant meeting to that category.
System managers can define meeting categories in the Configure tab.
Users assign a predefined meeting category to a meeting when they schedule meetings.
Presentation Styles
Cisco Unified MeetingPlace allows you to choose a single meeting or select from a set of meetings with the same meeting ID or meeting category. When Cisco Unified MeetingPlace generates a menu for the set of meetings, it can use one of several styles to present the list:
•
•
•
•
For example, if daily analyst meetings were held with a "by name" date presentation style, the menu might be:
•
•
•
•
Saving a Flex Menu Application
When you have finished designing a Flex Menu application, follow these steps to save it:
Step 1
Step 2
Step 3
Completing a Flex Menu Application
When you have saved a Flex Menu application, mark it as Complete in the Flex Menu Designer.
Loading a Flex Menu Application
Once a Flex Menu application has been marked as complete, load it into the Cisco Unified MeetingPlace system.
Note
To load a Flex Menu application in to Cisco Unified MeetingPlace, do the following:
Step 1
Step 2
Step 3
Step 4
Using a Flex Menu Application
To use a Flex Menu application, do the following:
Step 1
Step 2
Step 3
Step 4
Importing a Flex Menu Application
There are two reasons to import Flex Menu applications:
•
•
To import a Flex Menu application, do the following:
Step 1
Step 2
Step 3
Step 4
Exporting a Flex Menu Application
To use a Flex Menu application on another conference server, or to make a backup of a completed application, export the Flex Menu application to a text file by clicking Export.
Deleting a Flex Menu Application
To delete a Flex Menu application from MeetingPlace, do the following:
Step 1
Step 2
Step 3
Step 4
About Customizing Voice Prompts
To customize the voice prompts that users hear, you can do the following:
•
•
Choosing Abbreviated and Unabbreviated Voice Prompts
Users can choose between hearing longer introductory prompts or shorter versions of the prompts while using the system. The prompts they hear depend on their Abbreviated Prompts profile setting. When Abbreviated Prompts is set to Yes, users hear shorter versions of the prompts. (Some standard unabbreviated prompts do not have corresponding abbreviated prompts.)
Table 2-16 shows examples of how Cisco Unified MeetingPlace abbreviates prompts.
Table 2-16 Voice Prompts
To listen to the abbreviated and unabbreviated prompts, access the voice prompts menu and then choose the option for listening to these prompts (see the "Accessing the Voice Prompts Menu" section).
Customizing Prompts
The Cisco Unified MeetingPlace touch-tone telephone interface operates by playing a series of voice prompts and requesting touch-tone or spoken response from users. From a touch-tone phone, system administrators can customize all the prompts played. When you customize company identification and voice prompts, you must include the word "MeetingPlace" somewhere in the prompt.
Customize prompts for several reasons, including:
•
•
Accessing the Voice Prompts Menu
You customize voice prompts by choosing from the voice prompts menu. As system administrator, you have access to the voice prompts menu from a touch-tone phone. End users, contacts, and attendants do not have access to this menu.
Step 1
Step 2
After the standard functions, you hear the menu option: "For system manager options, press 9."
Step 3
Step 4
Step 5
For a partial list of voice prompts by number, see the table after the steps in the "Recording a New Prompt" section.
Step 6
Listen to the unabbreviated prompt
1
Listen to the abbreviated prompt
2
Listen to or record a custom prompt.
3
Listen to or record a custom prompt for use with a Flex Menu application
4
Recording a New Prompt
Step 1
Step 2
Step 3
Step 4
Keep the prompt
1
Record a new prompt
2
Delete the prompt and use the factory standard prompt
3
Prompts That Can Be Changed
Although you can change any voice prompt in the system, limit the voice prompts you change to those that greet callers or that provide specific telephony access instructions. Changing any prompt related to system features can confuse users.
The following table describes the prompts you can change, including suggested wording. Use Table 2-17 to decide whether to change prompts.
Table 2-17 Prompts that Can Be Changed
Remember the following information:
•
•
About Multiserver Meetings
The multiserver meeting feature provides a virtual link between different Cisco Unified MeetingPlace systems so that users on each server can communicate with each other as if they were in the same meeting.
When users schedule multiserver meetings, they designate one Cisco Unified MeetingPlace server as the primary server responsible for connecting to the other—secondary—servers. MeetingTime client software and Cisco Unified MeetingPlace Web Conferencing each provide an easy-to-use interface for scheduling multiserver meetings.
When a multiserver meeting is set to begin, the primary server places one call to each secondary server over standard phone lines. After the secondary servers receive the call, they add the primary server to their meeting, allowing all users to speak to each over the server they are connected to.
Multiserver meetings are ideal for:
•
•
For multiserver meeting system requirements, see the Installation Planning Guide for Cisco Unified MeetingPlace Release 5.3.
Outdial Behavior
Outdial behavior for multiserver meetings that are scheduled to start at the meeting's scheduled start time is determined by the Initiate parameter, which can be set to either "At scheduled start time" or "When 1st person enters". If the Initiate parameter is set to "When 1st person enters," the system does not initiate the outdial until the first person joins the meeting, even if the scheduled start time has passed.
In Cisco Unified MeetingPlace Audio Server Release 5.3.(0.32) and later, the amount of time in which the remote server connection to the other Cisco Unified MeetingPlace servers is established is as follows:
•
•
Note
Configuring Cisco Unified MeetingPlace Servers for Multiserver Meetings
Before users can set up multiserver meetings, the system administrator must do the following:
•
•
Worksheet 2-1 Multiserver Meeting Scheduling Requirements
The following worksheet shows the requirements for scheduling a multiserver meeting. These requirements are described in detail in the "Configuring Cisco Unified MeetingPlace Servers for Multiserver Meetings" section.
1.
2.
3.
4.
•
•
•
For more information about requirements, see the Administrator Guide for Cisco Unified MeetingPlace Web Conferencing Release 5.3.
5.
•
•
Worksheet 2-2 Recommendations for Multiserver Meetings
The following worksheet lists some recommendations to consider when you set up your Cisco Unified MeetingPlace 8106 or 8112 for multiserver meetings. You may need to work with the system administrators of the other Cisco Unified MeetingPlace servers to complete these recommendations.
1.
2.
3.
4.
5.
6.
Providing Users with Profiles on the Other Cisco Unified MeetingPlace Servers
To schedule a multiserver meeting, a user must have multiserver scheduling privileges and a profile on each Cisco Unified MeetingPlace server that is involved in the meeting. For example, if users need to schedule a multiserver meeting between New York City and London, you must make sure that user has a user profile with multiserver scheduling privileges on the New York City server and the London server.
There are two ways that you can provide users with profiles on other Cisco Unified MeetingPlace servers:
•
•
Allowing Users to Schedule Multiserver Meetings
Before users can schedule multiserver meetings, you must give their user profile multiserver scheduling privileges. You must have system manager privileges to modify a user's profile.
Step 1
Step 2
Step 3
This field is case-sensitive.
Step 4
This attribute is under the Outdial Meeting Defaults topic.
Step 5
Set the Time Zone parameter in a user's profile to the same zone on all Cisco Unified MeetingPlace servers. For example, if a user's local time zone is America/Los Angeles, their user profile on every server should be set to this time zone no matter where the server is located.
Step 6
Creating Server Information Records for Cisco Unified MeetingPlace Servers
Before two Cisco Unified MeetingPlace servers can connect, each server must have information about the other server entered into its database. Just as profiles identify Cisco Unified MeetingPlace users, each server must have a Server Information record to identify it to the other servers.
For example, in a multiserver meeting from New York City to London, the New York City server must have in its database a Server Information record for the London server, and vice versa.
Caution
Step 1
Step 2
Step 3
Table 2-18 Other MeetingPlace Servers Fields
Name
Server name that appears in MeetingTime and Cisco Unified MeetingPlace Web when users schedule a multiserver meeting. This name helps users identify the correct server to schedule.
ID number
Meeting participants use this numeric string (consisting of digits 0-9), when they outdial from within a conference to select the server to add to the meeting. We recommend that a server's ID number be the same on each server. Work with the other Cisco Unified MeetingPlace system administrators to determine the ID numbers for all the servers.
Phone number
Phone number of the Cisco Unified MeetingPlace server. This number is used by the system to dial out to the Cisco Unified MeetingPlace server to set up a multiserver meeting. This number is passed through a system translation table and is subject to the rules defined in the translation table.
To check that the correct phone number has been entered, schedule and attend a meeting on your local server and then outdial to this remote server. If the server answers the call, the phone number is correct.
VoIP gateway IP address 1
IP address of the remote server's VoIP gateway. (For more information, see the "About RSNA" section.)
(Optional) VoIP gateway IP address 2
IP address of a second remote server's VoIP gateway, if there is one. (For more information, see the "About RSNA" section.)
Will accept SNA transfers?
Whether this server accepts single number access transfers. (For more information, see the "About RSNA" section.)
Ethernet address
12-digit (with leading zeros) hex string that represents the Ethernet address of a Cisco Unified MeetingPlace 8100 series server. A Cisco Unified MeetingPlace 8100 series server's Ethernet address identifies itself to other Cisco Unified MeetingPlace 8100 series. This Ethernet address must match the Ethernet address that appears in the Server Configuration record (Configure tab) on the server this entry refers to.
Web Publisher location
IP address or the URL of Cisco Unified MeetingPlace Web Conferencing. For Cisco Unified MeetingPlace Web to function correctly, this field must contain the correct URL.
Data conference active?
If the server has the Cisco Unified MeetingPlace Web option installed and it is operational, set this field to Yes. If the server does not have this option installed, set the field to No.
Server number
As a standalone server, the Cisco Unified MeetingPlace 8106 or 8112 number is 0.
Step 4
Step 5
Step 6
Step 7
Step 8
Naming Cisco Unified MeetingPlace Servers
As a system administrator, you can provide descriptive names to the Cisco Unified MeetingPlace servers, which helps users identify which systems to schedule for a multiserver meeting.
As you name servers, remember the following information:
•
–
–
•
•
When you change a server's name, you must update every Cisco Unified MeetingPlace Audio Server system with the new name. For example, if your company has two Cisco Unified MeetingPlace Audio Server systems and you need to change the name of one, update both servers with the new name.
Table 2-19 shows which records on each server need to be updated.
Table 2-19 Records That Must be Updated on Each Server
•
•
•
Procedure 1: Enter Information in the Server Configuration Record
You must first enter a server's new name in the Server Configuration record.
Step 1
Step 2
Step 3
Step 4
For example, describe a conference server in California as CA-MeetingPlace.
Step 5
Procedure 2: Update the Local Server Information Record
Next, you need to update the local Server Information record as well as the Server Information record stored on the other Cisco Unified MeetingPlace servers.
Step 1
Step 2
Step 3
Step 4
Step 5
Step 6
If the system administrator of another Cisco Unified MeetingPlace system renamed one of their servers, you need to log in to your system and update the Server Information record that belongs to that server.
Recording a Voice Name for Other Cisco Unified MeetingPlace Servers
When another Cisco Unified MeetingPlace server joins a multiserver meeting, all participants hear the default prompt: "Now attending, another MeetingPlace server."
To help users better identify the server that is joining the meeting, it is strongly recommended that you change this prompt to include specific information like the server name and location. Make this voice name consistent with the name you gave the server in Procedure 1: Enter Information in the Server Configuration Record.
Anyone with system administrator privileges can record a new prompt through their telephone. To record a voice name for another Cisco Unified MeetingPlace server:
Step 1
Step 2
Step 3
Step 4
Step 5
Recording the Breakout Session Warning Prompt
Breakout sessions allow participants connected to the same server to form subgroups by breaking off from the main meeting. In multiserver meetings, this feature does not let participants on different Cisco Unified MeetingPlace servers go into the same breakout session.
Because some users do not know that they cannot meet participants on other servers in the same breakout session, you can record a warning prompt that plays whenever a multiserver meeting participant initiates a breakout session. This warning prompt can tell them about the limitations of this feature.
Note the following points about breakout session prompts:
•
•
To record a breakout session warning prompt through your touch-tone phone:
Step 1
Step 2
Step 3
Step 4
Step 5
Step 6
Step 7
Step 8
Suggested prompt: "In a multiserver meeting, you cannot go into the same breakout session with a user on another server."
Step 9
Using the Server-to-Server Connection Parameters
When you schedule a multiserver meeting using MeetingTime, you can determine when you want the primary server to initiate and terminate its connection to the other servers.
The default setting for initiating a connection is for the primary server to connect to the secondary servers at the scheduled start time of the meeting. However, you can also set the primary server to connect to the secondary servers when the first person enters the meeting, which may be before or after the scheduled start time.
Table 2-20 describes the different server-to-server connection parameters and the advantages of each.
Table 2-20 Server-to-Server Connection Parameters
You can set the server-to-server connection parameters per meeting in the Schedule tab in MeetingTime. You can also use the Scheduling Parameters topic in the Configure tab to change the parameter to a new default value. This new value becomes the default setting when users schedule a new multiserver meeting.
Monitoring Multiserver Meetings Using MeetingTime
Use the MeetingTime In Session tab to monitor a multiserver meeting that is taking place. You can view which servers are connected to the multiserver meeting and the participants attending the meeting on the server you are logged into.
To see which participants are attending the same multiserver meeting on other servers, open another MeetingTime window and log in to each of these servers separately. For example, if a meeting is taking place between a New York City server and a London server, use MeetingTime to log in to each server and keep each MeetingTime window open.
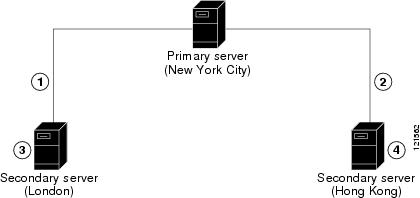
Scheduling Multiserver Meetings
When setting up a multiserver meeting, you need to schedule individual meetings on each Cisco Unified MeetingPlace server and specify which systems are responsible for connecting all the servers. The server responsible for this connection is the primary server.
At the start of the meeting, the primary server places a call to the secondary servers. The secondary servers then add the primary server to the meeting just as they would any participant who dialed into their system. The primary server communicates information to the secondary servers using DTMF signaling over the phone connection.
For example, to schedule a meeting between New York City, London, and Hong Kong, set up one meeting on each server. These three separate meetings then connect into one multiserver meeting as soon as the primary server establishes a connection with the other servers. If the New York City server is the primary server, the connections look like Figure 2-1.
Figure 2-1 Supported Setup for a Multiserver Meeting
Before scheduling a multiserver meeting, we recommend that you write down which servers are involved in the meeting and which server you want as the primary server.
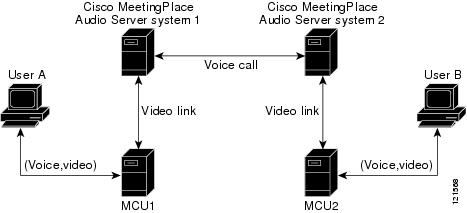
Scheduling Multiserver Meetings with Video Conferencing
Video participants can join a multiserver meeting and communicate with other participants using other Cisco Unified MeetingPlace 8106 or 8112 servers through the voice links. If both servers also have a Cisco IPVC Multipoint Control Unit attached and video participants join the same multiserver meeting from different Cisco IPVC MCU units, the participants from each Cisco IPVC MCU can hear each other through the video links. However, because there are two separate video conferences being hosted on each Cisco IPVC MCU, the video participants from both conferences cannot see each other.
(In this document, Cisco IPVC Multipoint Control Unit is referred to as Cisco IPVC MCU.)
For example, a multiserver meeting is in session between server 1 and server 2. Each server has MCU1 and MCU2. If User A joins the video conference on MCU1 and User B joins the video conference on MCU2, they can hear each other through video links. However, they cannot see each other from their video endpoints.
Figure 2-2 illustrates the communication path of the video participants in the multiserver meeting.
Figure 2-2
Multiserver Meeting with Video Conferencing
Inviting Participants and Attaching Documents
Because you schedule more than one Cisco Unified MeetingPlace server, special considerations need to be made when inviting participants and attaching documents.
When inviting participants to a multiserver meeting, each server is responsible for sending out its own notifications. In the previous example, the New York City server sends out notifications for participants that were invited to join the meeting on that server. Although the New York City server is the primary server, it is not responsible for sending out notifications for the Hong Kong and London servers.
When attaching documents to a multiserver meeting, remember to attach the same document to each server involved in the meeting. For example, if you attach a document to the London and New York City servers but forget to attach it to the Hong Kong server, the participants on the Hong Kong server cannot access the attachment.
Using MeetingTime to Schedule Multiserver Meetings
When scheduling a multiserver meeting using MeetingTime, do not assign more than one primary server to the meeting.
Before you begin, make sure the following are true:
•
•
Procedure 1: Schedule a Meeting on the Secondary Cisco Unified MeetingPlace Server
Step 1
Step 2
Make note of the meeting ID, because you will use this same number when you schedule the other servers.
Step 3
For example, if three people from different locations will call into this server, make this number 4.
Step 4
Step 5
For example, if you schedule a New York City to London meeting in which London is the secondary server, add only the participants who will call into the London server. Do not add the participants who will call into the New York City server.
Step 6
If you do not see this option, change your user profile to let you schedule multiserver meetings. To change your user profile, see the "Allowing Users to Schedule Multiserver Meetings" section.
Step 7
Step 8
Step 9
Procedure 2: Schedule a Meeting on the Primary Server
Step 1
Step 2
Be sure to use the same meeting ID, date, and start time used when scheduling the secondary servers, and add any attachments if necessary.
Step 3
For example, if three people from different locations will call into this primary server and you have scheduled two secondary servers, make this value 5.
Step 4
Step 5
Step 6
If you do not see this option, change your user profile to let you schedule multiserver meetings. To change your user profile, see the "Allowing Users to Schedule Multiserver Meetings" section.
Step 7
Step 8
If you scheduled more than one secondary server, be sure to add each one to the meeting.
Step 9
Canceling or Changing Details of Multiserver Meetings
To cancel or make changes to a multiserver meeting that has already been scheduled, you can use MeetingTime to reschedule or delete these meetings. However, the changes you make affect only the meeting on the server you are logged into. If you need to make changes that affect the entire multiserver meeting, you must reschedule or delete the meetings on the other Cisco Unified MeetingPlace servers.
Step 1
Step 2
If you do not see the meeting listed, use the Look for meeting ID field to search for the meeting.
Step 3
To cancel the entire multiserver meeting, click Cancel Meeting and then log in to the other servers to delete the other meetings.
Step 4
Only the meeting on the server you are logged into is updated. If you have rescheduled the time or date of the meeting, make sure you update the meetings on the other servers as well.
Step 5
Multiserver Meeting Features
The same Cisco Unified MeetingPlace features used in a single server meeting can be used in a multiserver environment. Some of these features, however, do not carry their function across all servers involved in the multiserver meeting.
Table 2-21 describes the features that participants can use when attending a multiserver meeting.
Table 2-21 Multiserver Meeting Features
Roll call
Announces the names of the participants connected on the same server. Roll call does not announce the names of participants connected to another Cisco Unified MeetingPlace server.
Record meeting
Records the entire multiserver meeting and stores the recording on the server that requested the recording. As soon as a participant activates the recording feature, a prompt informs all participants that the meeting is being recorded. If participants want the meeting recording to be stored on all servers involved in the meeting, someone from each server must initiate the recording.
Web conferencing
Allows a document to be shared and collaborated over the entire multiserver meeting as long as there are ports available on the primary server that initiated the web conference. For more information, see the "Using Web Conferencing in Multiserver Meetings" section.
Lock meeting
Allows participants to lock the meeting on the server they are connected to. This feature does not lock the entire multiserver meeting unless one person on each server performs this function.
Meeting message
Announces voice messages to all multiserver meeting participants.
Breakout session
Allows participants connected to the same server to form subgroups by breaking off from the main meeting. This feature does not support participants on different servers to go into the same breakout session.
Muting
Allows a participant to mute their phone line.
View attachments
Allows access to documents, recordings, and URLs if they are attached to the same server the participant is connected to.
Outdial
Allows any participant with outdial privileges to place a call to another person, team, or server and add them to the meeting. For instructions on how to use the outdial feature to add another server to a meeting, refer to page of this guide.
Announcement prompts
Announces the entry and departure of all meeting participants.
Automatic reconnect operation
When this feature is enabled, a primary server that has lost its connection to a secondary server automatically redials the secondary server to reestablish the meeting. If the connection between two servers becomes lost, users should wait for the connection to be re-established. This feature does not need to be enabled or configured by a system administrator.
Using the Outdial Feature to Add Servers
If you have outdial privileges, you can use your touch-tone phone to add another Cisco Unified MeetingPlace server to your meeting. To do so, you must know the other server's ID number and the meeting ID of the meeting you want to connect to.
Step 1
Step 2
Step 3
Step 4
Step 5
Step 6
If no password has been assigned, press # (the pound sign only).
Step 7
Using Web Conferencing in Multiserver Meetings
When a meeting begins, the Cisco Unified MeetingPlace server automatically informs the web conferencing server to set up a web conference for the same number of user licenses that were reserved for the system. For example, if a 25-user license meeting were about to start on Cisco Unified MeetingPlace, a 25-user license web conference would also be set up on the web conferencing server.
In a multiserver environment, the primary server hosts the web conference. Users on a secondary server are redirected to the web conferencing server for the primary server. Cisco Unified MeetingPlace automatically accommodates all web conference participants in the entire multiserver meeting.
For example, if a multiserver meeting is being conducted between New York City and London and a participant on the New York City server initiates a web conference, everyone on the London server who wants to participate in the web conference has their IP connection directed to the New York City server. These users still use their user licenses on the London server for the voice conference, but use user licenses on the New York City server for the web conference.
Solving Common Problems of Multiserver Meetings
Table 2-22 shows common questions that users may ask when setting up and attending multiserver meetings, and answers to these questions.
Table 2-22 Troubleshooting Multiserver Meetings
When I am scheduling a multiserver meeting using Cisco Unified MeetingPlace Web, what if I receive an error message that it cannot read the user profile?
This happens because the user probably does not have a user profile on the server they are trying to schedule. To solve this problem, create or import their user profile onto the server they are trying to schedule.
What if I want to schedule a meeting with Cisco Unified MeetingPlace Web, but I do not see the Schedule Multiserver link?
This happens because of either of these:
•
•
What if I am trying to schedule a meeting but I am unable to use the same meeting ID on each Cisco Unified MeetingPlace server?
This happens if the user is trying to schedule a meeting between two or more networked Cisco Unified MeetingPlace servers, or there is already another meeting scheduled at the same time on the same server with the same meeting ID. To solve this problem, have the user assign a different meeting ID to the meeting.
What if I am trying to schedule a meeting using Cisco Unified MeetingPlace Web, but when I select a primary or secondary server I receive an error message that the server could not be accessed?
Check that the server they are trying to access is connected to a Cisco Unified MeetingPlace Web server. If it is not connected, users cannot schedule a meeting through their web browser.
What if I am in a multiserver meeting and the participants on another server can access an attachment that I cannot?
This happens because the person who added the attachment to the other server did not add the attachment to the server the user is connected to.
What if I am in a meeting in which the time has been extended, and the other Cisco Unified MeetingPlace server gets dropped from the meeting?
This happens if that server ran out of available ports and its extend meeting parameter ran out of time. For all servers to stay connected for the same amount of time, they must each have the same extend meeting parameter. To modify the extend meeting parameter:
1.
2.
3.
4.
What if the servers are not connecting for the multiserver meeting?
This happens when a server has the wrong Ethernet address for another server in the meeting. To fix this problem, the system administrators for the Cisco Unified MeetingPlace servers must check the server profiles to see which server has the wrong address.
About Reservationless Meetings
With the Reservationless Meetings feature, profile users can create impromptu meetings through their touch-tone phones without having to schedule the meetings in advance. Using a unique meeting ID reserved for each user (the user's profile ID), participants can conduct meetings whenever system resources are available and use all available features during the meeting.
Reservationless meetings and standard scheduled meetings can reside on the same Cisco Unified MeetingPlace server. Setting reservationless meetings on or off at the system level determines the prompts that play and how participants attend meetings.
•
•
•
The Reservationless Meetings feature is enabled using the mtgmode CLI command, which must done only by a Cisco NCE representative. This command is executed once to configure the entire Cisco Unified MeetingPlace system for a particular type of meeting. After the mtgmode command is executed, the system does not need to be restarted for the feature to work. For assistance in enabling the Reservationless Meetings feature, see "Obtaining Technical Assistance" in the Guide to Cisco Conferencing Documentation and Support.
Note
Configuring Reservationless Meetings
When reservationless meetings are enabled, you can configure the use of reservationless meetings in three ways:
•
•
•
Step 1
You can enable scheduled meetings, reservationless meetings only, or combined reservationless and scheduled meetings.
Step 2
Step 3
Step 4
Step 5
Caution
Caution
Configuring System-Wide Reservationless Meetings Attributes
When you set system-wide field attributes for reservationless meetings, all users can or no users can use this feature.
To allow (or prevent) particular users or groups to use reservationless meetings, set the attributes described in the following table. Then see "Configuring User Profiles and Groups for Reservationless Meetings" section.
Step 1
Step 2
Enable reservationless
No
Allow or prevent reservationless meetings. This field is read-only. For assistance in changing this value, see "Obtaining Technical Assistance" in the Guide to Cisco Conferencing Documentation and Support.
Owner Initiate with 2 key?
No
When No, meeting owners must enter their profile and password. When Yes, meeting owners start their reservationless meeting by pressing 1 to attend the meeting and then 2 to start the meeting (after which they must enter their password).
Allow 3rd party initiate?
Yes
Whether profile users can initiate reservationless meetings before the meeting organizer arrives.
Bill 3rd party initiator?
Yes
Whether the reservationless meeting is billed to the meeting initiator (when a third party initiates the meeting) or the meeting organizer (no matter who initiates the meeting).
Step 3
Configuring User Profiles and Groups for Reservationless Meetings
For greater flexibility, system administrators may configure individual user profiles and user groups to use the Reservationless Meetings feature.
To enable users and groups to use reservationless meetings, the Enable Reservationless attribute (described in the "Configuring System-Wide Reservationless Meetings Attributes" section) must be set to Yes.
Step 1
Step 2
Step 3
Step 4
The default for user profiles is Group Dflt; the default for user groups is Yes.
Table 2-23 describes the dependencies that apply for various attribute settings.
Table 2-23 Combinations of Reservationless Meetings Settings
Remember the following information:
•
•
•
Configuring Reservationless and Scheduled Meetings
Configuring reservationless and scheduled meetings begins with the mtgmode CLI command. For assistance, contact Cisco NCE (see the "Obtaining Technical Assistance" in the Guide to Cisco Conferencing Documentation and Support).
Then, system administrators can configure meetings by setting parameters in MeetingTime. Table 2-24 shows the conditions in which reservationless and scheduled meetings (voice-only interface) can take place.
Table 2-24 Conditions for Reservationless and Scheduled Meetings
Requiring Passwords for Reservationless Meetings
You can ensure that all reservationless meetings are protected by passwords. Requiring a password applies only to participants in voice conferences. This feature does not apply to participants in web and video conferences.
Step 1
Step 2
Step 3
The reservationless meeting organizer (or the person who will start the meeting) should communicate the password to all attendees before the meeting begins, so that all attendees can join the meeting without delay. (For example, the meeting organizer can send an e-mail message to all attendees with the meeting phone number, ID, and password.)
For meetings that require meeting passwords, users are asked to enter the password before they are allowed to start or join the meeting.
Starting a Reservationless Meeting
Profile users can start a reservationless meeting through their touch-tone phone by calling the server and entering their profile number as the meeting ID. Their profile password confirms their identity and starts the reservationless meeting.
The meeting organizer is responsible for forwarding the meeting ID to all invited participants.
Users can start a reservationless meeting in any of the following ways:
•
•
•
•
•
Attending a Reservationless Meeting
Step 1
Step 2
•
•
•
Step 3
If the owner is late or absent, any profile user can activate the meeting by entering their profile number and password, and then bringing the meeting to order.
Step 4
Scheduling Reservationless Meetings with Video Conferencing
Users can join a video conference in a reservationless meeting as long as video conference slots and floater ports are available. However, reservationless meetings do not schedule video ports in advance.
If users try to join a reservationless meeting that has not started, they are given the following options:
1.
2.
Video participants, whether the meeting's owner or initiator, cannot initiate a reservationless meeting.
Viewing Reservationless Meeting Data Statistics
To see information about reservationless meetings, you can generate a Raw Meeting Details Information Report and view the following fields:
•
•
•
For more information about Raw Meeting Details Information reports, see the "Raw Meeting Details Information Data" section.
Recommended Settings for Reservationless Meetings
Use the information in this section for deployment settings for reservationless meetings, settings for combined reservationless and scheduled meetings, and profile number and meeting ID management.
For information about the system requirements for reservationless meetings, see the Installation Planning Guide for Cisco Unified MeetingPlace Release 5.3.
Table 2-25 shows the recommended deployment settings, which are based on settings for immediate meetings. You can change these settings in MeetingTime, depending on usage.
Table 2-25 Recommended Deployment Settings for Reservationless Meetings
Floater ports
See Table 2-26 and Table 2-27.
Number of ports reserved as floater ports for audio.
Overbook ports
Number of ports reserved to allow for scheduling beyond the number of conference ports readily available on the system.
Video floater ports
See the Administrator Guide for Cisco Unified MeetingPlace Video Integration Release 5.3 for recommended values.
Number of ports reserved as floater ports for video.
Video overbook ports
Number of ports reserved to allow for scheduling beyond the number of video conference ports readily available on the system.
# of ports to schedule
See Table 2-26 and Table 2-27.
Default for the number of participants (locations) for an immediate meeting.
Length of mtg (min)
30
Default length of an immediate meeting (in minutes).
Recommended value is 20 or higher. When only one caller is waiting in the waiting room, that caller is disconnected after this immediate meeting length expires.
Extend meeting (min)
15
Length of time (in minutes) a meeting is extended if time runs over an if ports are available.
Recommend 0 or above. When 0, meetings cannot be extended.
Worksheet 2-3 Default Values for Reservationless and Scheduled Meetings
Reservationless meetings are assigned predefined parameters to ensure a smooth conference experience. The parameters you set in MeetingTime apply only to standard scheduled meetings.
Display mtg to everyone
Yes
Yes/No/
Group DefaultWhether meetings scheduled by this user display to everyone from MeetingTime and Cisco Unified MeetingPlace Web.
End of mtg announcement?
No
Yes/No/
Group DefaultWhether the system announces the meeting ends in a set number of minutes.
Mtg extension announcements?
No
Yes/No/
Group DefaultWhether the system announces the meeting is extended by a set number of minutes.
Password required
No
Yes/No/
Group DefaultWhether meetings scheduled by this user require a password by default.
You can require all reservationless meetings organized by this user or group to have a password. For more information, see the "Requiring Passwords for Reservationless Meetings" section.
Note
Who can attend?
Anyone
Anyone/
MeetingPlace Users/
Invited Users/
Group DefaultWho can attend meetings scheduled by this group.
Enabled for this mtg?
No
Yes/No/
Group DefaultWhether this group sends notifications for meetings.
Default meeting type
All Speaker
All Speaker/ Lecture
Default for meeting type: All Speaker or Lecture.
Meeting start guard time (min)
Does not apply
Numeric—0 to 1440
Number of minutes before scheduled meeting start time that ports are reserved for meeting. Cisco Unified MeetingPlace adds this advance time to requested start time.
Mtg end guard time (min)
0
Numeric—0 to 1440
Number of minutes after scheduled meeting end time that ports remain reserved. The system adds this post meeting time to reserved end time of meeting.
Mtg ID start guard time (min)
Does not apply
Numeric—0 to 1440
Number of minutes before scheduled meeting start time that associated meeting ID or DID/DDI number is reserved.
Mtg ID end guard time (min)
0
Numeric—0 to 1440
Number of minutes after scheduled meeting end time that associated meeting ID or DID/DDI number is reserved.
Disconnect empty port (min)
0
Numeric—0 to 30
Number of minutes reserved ports are held after everyone hangs up, even when scheduled meeting end time has not arrived.
Recommended Settings for Combined Reservationless and Scheduled Meetings
Use the values in Table 2-26 to configure a system with both reservationless and scheduled meetings. These values maximize the port utilization and capacity of your system.
For the following table, remember the following information:
•
•
•
Table 2-26 Recommended Settings for Combined Reservationless and Scheduled Meetings, Audio
Immediate Meetings
3
Overbook ports
N x 30%
Floater ports
N x 30%
Immediate Meetings
0
Overbook ports
N x 15%
Floater ports
N x (R + 25%)
Remember the following information:
•
•
Recommended Settings for Reservationless Meetings Only
Use the values in Table 2-27 to configure a system with reservationless- only meetings. These values maximize the port utilization and capacity of your system.
For the following table, remember the following information:
•
•
Table 2-27 Recommended Settings for Reservationless-Only Meetings, Audio
Managing Profile Numbers and Meeting IDs for Reservationless Meetings
Because each person's profile number is their reservationless meeting ID, profile numbers cannot match existing meeting IDs when reservationless meetings is turned on.
•
•
When you migrate a system from standard scheduled meetings to combined scheduled and reservationless meetings, any scheduled meetings using a profile number as the meeting ID remain as scheduled meetings after the switchover.
Identifying Profile and Meeting ID Conflicts in Reservationless Meetings
Meeting conflicts can occur if you are converting your system from scheduled meeting mode to scheduled + reservationless mode (or reservationless-only mode), for example. These conflicts occur if future scheduled meetings have meeting ID numbers equal to the profile numbers of any reservationless users.
A utility, mtgconflicts, is available to help you identify profile ID and meeting ID conflicts. If a conflict is found, you see a list of conflicting meetings. To resolve the conflict, either keep the scheduled meetings or change the meeting IDs.
A Cisco NCE representative can assist you by running the mtgconflicts utility to check for these conflicts. For more information, see "Obtaining Technical Assistance" in the Guide to Cisco Conferencing Documentation and Support.
About RSNA
The Reservationless Single Number Access (RSNA) feature allows multiple Cisco Unified MeetingPlace 8100 series servers to appear as one server to the user community. All users who host (as a profile user) or attend (as a profile user or a guest) a reservationless meeting can access their meeting by dialing the phone number of the server that's local to that user, regardless of which server is hosting the meeting. They are then redirected to the server that is hosting the meeting.
In previous releases, remote users had to know and dial the number of the local Audio Server system, which can be different for each meeting. With RSNA, users always dial the number of their home server, which then transfers the call to the scheduler's (or host's) home server. Except for a short delay, users are not affected by this feature.
This feature works only with VoIP and SIP phones. For more information, see the "RSNA Requirements" section.
RSNA Requirements
RSNA requires that all voice communication with the Cisco Unified MeetingPlace server uses VoIP and SIP. Any PSTN or H.323 end points must go through a SIP integration to communicate with the system. This implementation depends on the use of the SIP "REFER method" call transfer mechanism, as specified in RFC 3515. All participating SIP end points, including a Cisco Unified MeetingPlace H.323/SIP IP server, any SIP integrations that communicate with Cisco Unified MeetingPlace, and any phones or other terminals that communicate directly with tthe system by using SIP. (For information about configuring a Cisco 3700 series router for RSNA, see the "Configuring a Cisco 3700 Series Router for RSNA Transfers" section.)
A SIP phone that does not support the REFER method does not transfer correctly and cannot attend meetings that require a transfer. In this situation, users are asked to dial the phone number of the hosting server, as if they entered an unrecognized meeting ID.
System administrators must ensure the following:
•
•
Use Cisco Unified MeetingPlace Directory Services to synchronize user databases across multiple Cisco Unified MeetingPlace systems. The following fields in each user profile on all servers must be set identically:
•
•
This configuration assumes that profile numbers are assigned across the system (for example, profile ID 1234 on servers A and B both refer to the same person). This configuration also assumes that either server can authenticate the user for both servers.
•
Configuring a Cisco 3700 Series Router for RSNA Transfers
Use the following steps to configure a Cisco 3700 series router for RSNA transfers. Before you begin, verify that the router is running one of the following IOS images. (They support the REFER method used by the RSNA feature.)
•
•
•
Step 1
Step 2
The current configuration of the Cisco 3700 series router displays.
Step 3
.
Step 4
Step 5
Step 6
Enabling RSNA
The steps for enabling single number access are described in the following sections:
•
•
•
Note
Procedure 1: Creating Other Cisco Unified MeetingPlace Servers Records
You must create an Other MeetingPlace Servers record for each remote server that will participate in RSNA.
Step 1
Step 2
Caution
Step 3
Step 4
Make sure that all ID Number values and Scheduling Home Server values are identical across participating servers.
Procedure 2: Enabling the System for RSNA
You must enable the system for RSNA, to turn on the RSNA transfer mechanism.
Step 1
Step 2
Step 3
Procedure 3: Configuring Users and Groups for RSNA
To enable remote users to use the RSNA feature, you must set attributes in the MeetingTime Configure tab.
Each user is assigned to a specific server identified by the Scheduling Home Server value in the user's profile. This value is used to look up an Other MeetingPlace Servers record (created in Procedure 1: Creating Other Cisco Unified MeetingPlace Servers Records).
Step 1
Step 2
This value must be the same as the ID Number value and must not be 0 (zero). The range should start at 101, and not 1. For example, 1 to 32767 should instead be 101 to 32767.
Caution
Step 3
Step 4
.
RSNA Enabled? (in the Configure tab, Usage Parameters view)
Yes
For more information, see Procedure 2: Enabling the System for RSNA.
Will Accept SNA Transfers? (in the Configure tab, Other MeetingPlace Servers view)
Yes
For more information, see Procedure 1: Creating Other Cisco Unified MeetingPlace Servers Records.
You can also configure a complementary "reservationless WebConnect" service for Cisco Unified MeetingPlace Web Conferencing. For more information see the Administrator Guide for Cisco Unified MeetingPlace Web Conferencing Release 5.3. However, because WebConnect and RSNA work independently, you must ensure that each is configured correctly to be synchronized.
Resolving Recorded User Name Problems
A user may have a different recorded name on each server. The first time that logged-in users attend a meeting hosted on each remote server, they are asked to record their name.
If users do not like their user name on some server, have them note the meeting with the undesirable recording, and tell their system administrator. The system administrator should then find that meeting, determine which server is the problem, and give users the phone number to call to access that server. Users can then enter their profile on that server and rerecord the user name.
Viewing Alarm Codes for RSNA
Table 2-28 describes minor alarms that may be generated by the RSNA feature. These descriptions may help system administrators to troubleshoot problems.
Table 2-28 RSNA Alarm Codes
Scheduling Reservationless Meetings with Web Conferencing
When reservationless meetings are used with Cisco Unified MeetingPlace Web Conferencing by using releases earlier than Release 3.0, web conferencing can be enabled after the voice conference has been activated. When used with Release 3.0 or later, reservationless meetings can be started either from the Web or the phone.
Exceptions to this behavior are with immediate meetings or scheduled meetings that begin now. If a meeting ID is not selected and a user clicks the Immediate Meeting button in the Cisco Unified MeetingPlace Web Conferencing home page (or schedules a meeting with a start time of now or earlier), the system creates a reservationless meeting with the user's profile number. On the second try, the user receives an error message because a reservationless meeting already exists. This also happens when scheduling from Cisco Unified MeetingPlace for Outlook and MeetingTime.
When reservationless meeting participants join the web conference, all participants—including those in the waiting room—may share. However, users in the waiting room cannot use the in-session features.
System Rules
As you work with reservationless meetings, remember the following system rules:
•
•
•
•
•
•
About Cisco Unified MeetingPlace Language System Option
The Cisco Unified MeetingPlace Language System Option offers support for up to four languages simultaneously. Users can hear prompts in an available configured languages. When no language has been selected, the system defaults to U.S. English.
Each system contains only the prompts for the languages installed and configured. For more information on installing additional languages, see "Obtaining Technical Assistance" in the Guide to Cisco Conferencing Documentation and Support.
Languages can be selected at the meeting, user profile, and port group level. These language selections determine the language that Cisco Unified MeetingPlace uses at any time. For example, prompts played to an entire meeting are played in the meeting language, while prompts played to individuals are played in the language specified by the user's profile or the language selected while in the system.
Enabling the Cisco Unified MeetingPlace Language Option Key
An option key is an alphanumeric string, similar to a serial number, that needs to be entered into the Cisco Unified MeetingPlace database to activate a system option.
Step 1
Step 2
Step 3
Step 4
The number of licenses must match the number of languages that correspond to your Cisco Unified MeetingPlace language option key.
Step 5
Step 6
Choosing Languages
This section describes the prompts a user hears when more than one language is installed and configured.
A hierarchy determines which language the system uses. When a language is selected at one of the following levels, users hear prompts in the selected language.
1.
2.
3.
4.
Language selections at a lower level override language selections at a higher level.
Multilingual System Rules
The following is a list of guidelines to keep in mind when you configure Cisco Unified MeetingPlace for additional languages:
•
•
•
•
•
•
•
•
For multiple language systems with ports configured to a language, prompts continue in the port language until users enter the meeting. For an example, see the tables in the "Setting Meeting Language Prompts" section.
Setting Meeting Language Prompts
The tables in the following sections show the prompts and language for various language configurations.
Remember the following information:
•
•
•
•
•
•
One-Language System
Table 2-29 shows the standard voice prompts for a one-language system.
Table 2-29 One-Language System Prompts
Four-Language System, Port Not Configured
Table 2-30 shows the voice prompts for a four-language system, with the port not configured (assuming that users press 5 to select Japanese when prompted).
Table 2-30 Four-Language System Prompts
Two-Language System, Port Configured for Japanese
Table 2-31 shows the voice prompts for a two-language system, with the port configured for Japanese.
Table 2-31 Two-Language System Prompts