Unpacking the Cisco R-Series Rack
Unpacking a Cisco R-Series Rack
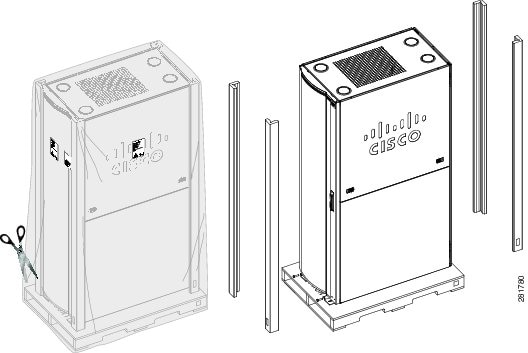
This section describes how to unpack and prepare a Cisco R-Series Rack to be moved to its installation site. The Cisco R-Series Rack ships on a wooden pallet with cardboard and plastic covering the rack.

Note![]() You will most likely need to perform this procedure in the loading dock of the building. A fork lift or chain hoist may be needed.
You will most likely need to perform this procedure in the loading dock of the building. A fork lift or chain hoist may be needed.
Remove the Packaging
To remove the protective packaging from the Cisco R-Series Rack, complete the following steps:
Step 1![]() Remove the nylon straps securing the cardboard sheathing.
Remove the nylon straps securing the cardboard sheathing.
Step 2![]() Remove the cardboard top piece.
Remove the cardboard top piece.
Step 3![]() Remove the plastic latches holding the cardboard sheathing together as shown in Figure 3-1.
Remove the plastic latches holding the cardboard sheathing together as shown in Figure 3-1.
Figure 3-1 Plastic Latches on Cardboard Sheathing

Step 4![]() Remove the clear plastic covering the rack and pallet as shown in Figure 3-2.
Remove the clear plastic covering the rack and pallet as shown in Figure 3-2.
Figure 3-2 Remove the Packing Materials
Step 5![]() Remove the four cardboard corner frames and other packaging material that covers the Cisco R-Series Rack.
Remove the four cardboard corner frames and other packaging material that covers the Cisco R-Series Rack.
Step 6![]() For pre installed systems, the packaging will include a two piece ramp. Set these pieces aside until they are needed,
For pre installed systems, the packaging will include a two piece ramp. Set these pieces aside until they are needed,
Remove the Cisco R-Series Rack from the Pallet
Before you move the Cisco R-Series Rack cabinet off the pallet and to its final location, read the following important safety guidelines.

Warning Stability hazard. The rack stabilizing mechanism must be in place, or the rack must be bolted to the floor before you slide the unit out for servicing. Failure to stabilize the rack can cause the rack to tip over. Statement 250
Warning If you are installing more than one chassis, install the slide assemblies so that the first chassis is installed in the lowest available position in the rack. Statement 252
Warning Make sure that your equipment rack is properly ventilated. Statement 220
Warning After installing system components in a rack, never pull more than one component out of the rack on its slide assemblies at one time. The weight of more than one extended component could cause the rack to tip over and injure someone. Statement 249
Warning Make sure that your rack is bolted to the floor. Statement 219
Warning Three people are required to lift the rack. Grasp the rack underneath the lower edge and lift with both hands. To prevent injury, keep your back straight and lift with your legs, not your back. Statement 334
Warning Never attempt to lift the rack with the handles on the power supplies or the modules. These handles are not designed to support the weight of the rack. Using them to lift or support the rack can result in severe damage to the equipment and serious bodily injury. Statement 333

Table 3-1 lists the contents of a Cisco R-Series Rack accessory kit.
|
|
|
|---|---|
To remove the Cisco R-Series Rack from the pallet, complete the following steps:
Step 1![]() Read the safety information before you move the Cisco R-Series Rack off the pallet.
Read the safety information before you move the Cisco R-Series Rack off the pallet.
Step 2![]() The weight of the empty or populated Cisco R-Series Rack cabinet is significant, be sure to have enough trained movers to move the cabinet off the pallet and to its installation site.
The weight of the empty or populated Cisco R-Series Rack cabinet is significant, be sure to have enough trained movers to move the cabinet off the pallet and to its installation site.
Step 3![]() Use a 3/8” or 1/2” flat headed screwdriver to raise the four leveling feet (one per corner) shown in Figure 3-3 to their highest position so that you can roll the rack on its casters.
Use a 3/8” or 1/2” flat headed screwdriver to raise the four leveling feet (one per corner) shown in Figure 3-3 to their highest position so that you can roll the rack on its casters.
Figure 3-3 Raising the Leveling Feet

Step 4![]() Open the doors and remove the bolts that hold the rack-retaining brackets to the pallet and the Cisco R-Series Rack. Save the brackets and the bolts. (See Figure 3-4.)
Open the doors and remove the bolts that hold the rack-retaining brackets to the pallet and the Cisco R-Series Rack. Save the brackets and the bolts. (See Figure 3-4.)
Figure 3-4 Removing the Brackets

Step 5![]() (Optional) To reduce the weight of the rack for easier handling, remove the side panels (if included). See Removing and Installing Side Panels (if included).
(Optional) To reduce the weight of the rack for easier handling, remove the side panels (if included). See Removing and Installing Side Panels (if included).
Step 6![]() (Optional) To reduce the weight of the rack for easier handling, remove the front door. See Removing and Installing a Front Door.
(Optional) To reduce the weight of the rack for easier handling, remove the front door. See Removing and Installing a Front Door.
Step 7![]() (Optional) To reduce the weight of the rack for easier handling, remove the rear doors. See Removing and Installing Rear Doors.
(Optional) To reduce the weight of the rack for easier handling, remove the rear doors. See Removing and Installing Rear Doors.
Step 8![]() For racks with pre installed equipment, use the four bolts from the front of the rack set aside in Step 4 to secure the two ramps to the pallet at the rear of the rack. Pre drilled holes and hardware are provided there. See Figure 3-5.
For racks with pre installed equipment, use the four bolts from the front of the rack set aside in Step 4 to secure the two ramps to the pallet at the rear of the rack. Pre drilled holes and hardware are provided there. See Figure 3-5.
Figure 3-5 Installing the Ramps

Step 9![]() Remove the rack from the pallet.
Remove the rack from the pallet.
For racks with pre installed equipment, roll the rack to the rear of the pallet and down the ramps.

For empty racks, carefully roll the Cisco R-Series Rack toward the front of the pallet; then, lift the rack enough to slide the pallet out from under it. We recommend lifting the Cisco R-Series Rack with a fork lift, a chain hoist, or professional movers. Empty racks are not shipped with ramps.
Step 10![]() Store the pallet and packaging material for future use if you have to ship the empty Cisco R-Series Rack cabinet.
Store the pallet and packaging material for future use if you have to ship the empty Cisco R-Series Rack cabinet.
Step 11![]() Make sure the installation location has the power you will need and meets the description detailed in Chapter2, “Site Preparation”
Make sure the installation location has the power you will need and meets the description detailed in Chapter2, “Site Preparation”
Step 12![]() Verify that the doors along the route to the installation location are wide and tall enough to accommodate the Cisco R-Series Rack on its wheels.
Verify that the doors along the route to the installation location are wide and tall enough to accommodate the Cisco R-Series Rack on its wheels.
Step 13![]() Verify that the flooring is ready. Refer to Figure 2-1.
Verify that the flooring is ready. Refer to Figure 2-1.
Step 14![]() Roll the Cisco R-Series Rack to the location where it will be installed.
Roll the Cisco R-Series Rack to the location where it will be installed.
 Feedback