- Information About the CLI Prompt
- Command Modes
- Special Characters
- Keystroke Shortcuts
- Abbreviating Commands
- Identifying Your Location in the Command Hierarchy
- Using the no Form of a Command
- Configuring CLI Variables
- Command Aliases
- Command Scripts
- Context-Sensitive Help
- Understanding Regular Expressions
- Searching and Filtering show Command Output
- Searching and Filtering from the --More-- Prompt
- BIOS Loader> Prompt
- Examples Using the CLI
- Additional References
Understanding the CLI
This chapter describes the Cisco NX-OS software CLI.
This chapter includes the following sections:
•![]() Information About the CLI Prompt
Information About the CLI Prompt
•![]() Identifying Your Location in the Command Hierarchy
Identifying Your Location in the Command Hierarchy
•![]() Using the no Form of a Command
Using the no Form of a Command
•![]() Understanding Regular Expressions
Understanding Regular Expressions
•![]() Searching and Filtering show Command Output
Searching and Filtering show Command Output
Information About the CLI Prompt
Once you have successfully accessed the device, the CLI prompt displays in the terminal window of your console port or remote workstation (see Example 3-1).
Example 3-1 Initial CLI Prompt
User Access Verification
login: admin
Password:<password>
Cisco Nexus Operating System (NX-OS) Software
TAC support: http://www.cisco.com/tac
Copyright (c) 2002-2008, Cisco Systems, Inc. All rights reserved.
The copyrights to certain works contained in this software are owned by other third
parties and used and distributed under license. Certain components of this software are
licensed under the GNU General Public License (GPL) version 2.0 or the GNU Lesser General
Public License (LGPL) Version 2.1. A copy of each such license is available at
http://www.opensource.org/licenses/gpl-2.0.php and
http://www.opensource.org/licenses/lgpl-2.1.php
switch#
You can change the default device hostname (see the "Changing the Device Hostname" section on page 5-5).
From the CLI prompt, you can do the following:
•![]() Use CLI commands for configuring features
Use CLI commands for configuring features
•![]() Access the command history
Access the command history
•![]() Use command parsing functions
Use command parsing functions
Command Modes
This section includes the following topics:
•![]() Global Configuration Command Mode
Global Configuration Command Mode
•![]() Interface Configuration Command Mode
Interface Configuration Command Mode
•![]() Subinterface Configuration Command Mode
Subinterface Configuration Command Mode
•![]() Exiting a Configuration Command Mode
Exiting a Configuration Command Mode
About Command Modes
The Cisco NX-OS CLI is divided into command modes, which define the actions available to the user. Command modes are "nested" and must be accessed in sequence. As you navigate from one command mode to another, an increasingly larger set of commands become available. All commands in a higher command mode are accessible from lower command modes. For example, the show commands are available from any configuration command mode. Figure 3-1 shows how command access builds from EXEC mode to global configuration mode.
Figure 3-1 Command Modes
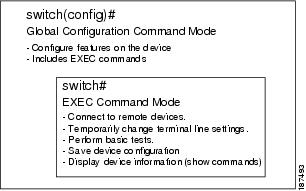
EXEC Command Mode
When you first log in, the Cisco NX-OS software places you in EXEC mode. The commands available in EXEC mode include the show commands that display device status and configuration information, the clear commands, and other commands that perform actions that you do not save in the device configuration.
Global Configuration Command Mode
Global configuration mode provides access to the broadest range of commands. The term "global" indicates characteristics or features that affect the device as a whole. You can enter commands in global configuration mode to configure your device globally, or to enter more specific configuration modes to configure specific elements such as interfaces or protocols.
To access the global configuration mode, follow this step:
Interface Configuration Command Mode
One example of a specific configuration mode that you enter from global configuration mode is interface configuration mode. To configure interfaces on your device, you must specify the interface and enter interface configuration mode.
You must enable many features on a per-interface basis. Interface configuration commands modify the operation of the interfaces on the device, such as Ethernet interfaces or management interfaces (mgmt 0).
For more information about configuring interfaces, see the Cisco Nexus 7000 Series NX-OS Interfaces Configuration Guide, Release 4.0.
For more information about interface commands, see the Cisco Nexus 7000 Series NX-OS Interfaces Command Reference, Release 4.0.
SUMMARY STEPS
1. ![]() configure terminal
configure terminal
2. ![]() interface type number
interface type number
DETAILED STEPS
Subinterface Configuration Command Mode
From global configuration mode, you can access a configuration submode for configuring VLAN interfaces called subinterfaces. In subinterface configuration mode, you can configure multiple virtual interfaces on a single physical interface. Subinterfaces appear to a protocol as distinct physical interfaces.
Subinterfaces also allow multiple encapsulations for a protocol on a single interface. For example, you can configure IEEE 802.1Q encapsulation to associate a subinterface with a VLAN.
For more information about configuring subinterfaces, see the Cisco Nexus 7000 Series NX-OS Interfaces Configuration Guide, Release 4.0.
For more information about subinterface commands, see the Cisco Nexus 7000 Series NX-OS Interfaces Command Reference, Release 4.0.
SUMMARY STEPS
1. ![]() configure terminal
configure terminal
2. ![]() interface type number.subint
interface type number.subint
DETAILED STEPS
Exiting a Configuration Command Mode
To exit from any configuration command mode, perform one of the following tasks:

Command Mode Summary
Table 3-1 summarizes information about the main command modes.
|
|
|
|
|
|---|---|---|---|
EXEC |
From the login prompt, enter your username and password. |
switch# |
To exit to the login prompt, use the exit command. |
Global configuration |
From EXEC mode, use the configure terminal command. |
switch(config)# |
To exit to EXEC mode, use the end or exit command or press Ctrl-Z. |
Interface configuration |
From global configuration mode, use an interface command and specify an interface with an interface command. |
switch(config-if)# |
To exit to global configuration mode, use the exit command. To exit to EXEC mode, use the end command or press Ctrl-Z. |
Subinterface configuration |
From global configuration mode, specify a subinterface with an interface command. |
switch(config-subif)# |
To exit to global configuration mode, use the exit command. To exit to EXEC mode, use the end command or press Ctrl-Z. |
VDC configuration |
From global configuration mode, use the vdc command and specify a VDC name. |
switch(config-vdc)# |
To exit to global configuration mode, use the exit command. To exit to EXEC mode, use the end command or press Ctrl-Z. |
VRF configuration |
From global configuration mode, use the vrf command and specify a routing protocol. |
switch(config-vrf)# |
To exit to global configuration mode, use the exit command. To exit to EXEC mode, use the end command or press Ctrl-Z. |
EXEC for a nondefault VDC |
From EXEC mode, use the switchto vdc command and specify a VDC. |
switch-vdc2# |
To exit to the default VDC, use the exit command or the switchback command. |
EXEC for a nondefault VRF |
From EXEC mode, use the routing-context vrf command and specify a VRF. |
switch%red# |
To exit to the default VRF, use the routing-context vrf default command. |
Special Characters
Table 3-2 lists the characters that have special meaning in Cisco NX-OS text strings and should be used only in regular expressions or other special contexts.
|
|
|
|---|---|
% |
Percent |
# |
Pound, hash, or number |
... |
Ellipsis |
| |
Vertical bar |
< > |
Less than or greater than |
[ ] |
Brackets |
{ } |
Braces |
Keystroke Shortcuts
Table 3-3 lists command key combinations that can be used in both EXEC and configuration modes:
|
|
|
|---|---|
Ctrl-A |
Moves the cursor to the beginning of the line. |
Ctrl-B |
Moves the cursor one character to the left. |
Ctrl-C |
Cancels the command and returns to the command prompt. |
Ctrl-D |
Deletes the character at the cursor. |
Ctrl-E |
Moves the cursor to the end of the line. |
Ctrl-F |
Moves the cursor one character to the right. |
Ctrl-G |
Exits to the previous command mode without removing the command string. |
Ctrl-K |
Deletes all characters from the cursor to the end of the command line. |
Ctrl-L |
Redisplays the current command line. |
Ctrl-N |
Displays the next command in the command history. |
Ctrl-O |
Clears the terminal screen. |
Ctrl-P |
Displays the previous command in the command history. |
Ctrl-R |
Redisplays the current command line. |
Ctrl-T |
Transposes the character to the left of the cursor with the character located to the right of the cursor. |
Ctrl-U |
Deletes all characters from the cursor to the beginning of the command line. |
Ctrl-V |
Removes any special meaning for the following keystroke. For example, press Ctrl-V before entering a question mark (?) in a regular expression. |
Ctrl-W |
Deletes the word to the left of the cursor. |
Ctrl-X, H |
Lists the history of commands you have entered. When using this key combination, press and release the Ctrl and X keys together before pressing H. |
Ctrl-Y |
Recalls the most recent entry in the buffer (press keys simultaneously). |
Ctrl-Z |
Ends a configuration session, and returns you to EXEC mode. When used at the end of a command line in which a valid command has been typed, the resulting configuration is first added to the running configuration file. |
|
Displays the previous command in the command history. |
|
Displays the next command in the command history. |
|
Moves your cursor through the command history, either forward or backwards, to locate a command string. |
? |
Displays a list of available commands. |
Tab |
Completes the word for you after entering the first characters of the word, and then pressing the Tab key. All options that match are presented. Use tabs to complete the following items: • • • • Example switch(config)# xm<Tab> switch(config)# xml <Tab> switch(config)# xml server |
Example switch(config)# c<Tab> callhome class-map clock cts cdp cli control-plane |
|
switch(config)# cl<Tab> class-map cli clock switch(config)# cla<Tab> switch(config)# class-map |
|
Example switch# cd bootflash:<Tab> bootflash: bootflash://sup-1/ bootflash://sup-remote/ bootflash:/// bootflash://sup-2/ bootflash://sup-standby/ bootflash://module-5/ bootflash://sup-active/ bootflash://module-6/ bootflash://sup-local/ |
|
Example switch# cd bootflash://mo<Tab> bootflash://module-5/ bootflash://module-6/ cvswitch# cd bootflash://module- |
Abbreviating Commands
You can abbreviate commands and keywords by entering the first few characters of a command. The abbreviation must include sufficient characters to make it unique from other commands or keywords. If you are having trouble entering a command, check the system prompt and enter the question mark (?) for a list of available commands. You might be in the wrong command mode or using incorrect syntax.
Table 3-4 lists examples of command abbreviations.
Identifying Your Location in the Command Hierarchy
Some features have configuration submode hierarchy nested more than one level. In these cases, you can display information about your present working context (PWC).
SUMMARY STEPS
1. ![]() where detail
where detail
DETAILED STEPS
Using the no Form of a Command
Almost every configuration command has a no form that can be used to disable a feature, revert to a default value, or remove a configuration. The Cisco NX-OS command reference publications describe the function of the no form of the command whenever a no form is available.
This example shows how to disable a feature:
switch# configure terminal
switch(config)# feature bgp
switch(config)# no feature bgp
This example shows how to revert to the default value for a feature:
switch# configure terminal
switch(config)# banner motd #Welcome to the switch#
switch(config)# show banner motd
Welcome to the switch
switch(config)# no banner motd
switch(config)# show banner motd
User Access Verification
This example shows how to remove the configuration for a feature:
switch# configure terminal
switch(config)# role feature-group name security
switch(config-role-featuregrp)# feature aaa
switch(config-role-featuregrp)# feature radius
switch(config-role-featuregrp)# feature tacacs
switch(config-role-featuregrp)# exit
switch(config)# show role feature-group
feature group: L3
feature: router-bgp
feature: router-eigrp
feature: router-isis
feature: router-ospf
feature: router-rip
feature group: security
feature: aaa
feature: radius
feature: tacacs
switch(config)# no role feature-group name security
switch(config)# show role feature-group
feature group: L3
feature: router-bgp
feature: router-eigrp
feature: router-isis
feature: router-ospf
feature: router-rip
This example shows how to use the no form of a command in EXEC mode:
switch# system standby manual-boot
system standby manual-boot option enabled
switch# system no standby manual-boot
system standby manual-boot option disabled
Configuring CLI Variables
This section includes the following topics:
About CLI Variables
The Cisco NX-OS software supports the definition and use of variables in CLI commands.
You can use CLI variables in the following ways: ï
•![]() Entered directly on the command line.
Entered directly on the command line.
•![]() Passed to a script initiated using the run-script command. The variables defined in the parent shell are available for use in the child run-script command process (see the "Running a Command Script" section).
Passed to a script initiated using the run-script command. The variables defined in the parent shell are available for use in the child run-script command process (see the "Running a Command Script" section).
CLI variables have the following characteristics: ï
•![]() Cannot have nested references through another variable
Cannot have nested references through another variable
•![]() Can exist only for the current session
Can exist only for the current session
Cisco NX-OS supports one predefined variable: TIMESTAMP. This variable refers to the time of execution of the command in the format YYYY-MM-DD-HH.MM.SS.

Note ![]() The TIMESTAMP variable name is case sensitive. All letters must be uppercase.
The TIMESTAMP variable name is case sensitive. All letters must be uppercase.
Configuring CLI Variables
You can define CLI session variables to persist only for the duration of your CLI session. These variables are useful for scripts that you execute periodically. You can reference the variable by enclosing the name in parentheses and preceding it with a dollar sign ($), for example $(variable-name).
SUMMARY STEPS
1. ![]() cli var name variable-name variable-text
cli var name variable-name variable-text
2. ![]() show cli variables
show cli variables
DETAILED STEPS
Command Aliases
You can define command aliases to replace frequently used commands. The command aliases can represent all or part of the command syntax.
Note ![]() The Cisco NX-OS software provides one default alias, alias, which displays all user-defined aliases.
The Cisco NX-OS software provides one default alias, alias, which displays all user-defined aliases.
This section includes the following topics:
About Command Aliases
Command alias support has the following characteristics:
•![]() Command aliases are global for all user sessions.
Command aliases are global for all user sessions.
•![]() Command aliases persist across reboots if you save them to the startup configuration.
Command aliases persist across reboots if you save them to the startup configuration.
•![]() Command alias translation always takes precedence over any keyword in any configuration mode or submode.
Command alias translation always takes precedence over any keyword in any configuration mode or submode.
•![]() Command alias configuration takes effect for other user sessions immediately.
Command alias configuration takes effect for other user sessions immediately.
•![]() You cannot delete or change the default command alias alias, which aliases the show cli alias command.
You cannot delete or change the default command alias alias, which aliases the show cli alias command.
•![]() You can nest aliases to a maximum depth of 1. One command alias can refer to another command alias that must refer to a valid command, not to another command alias.
You can nest aliases to a maximum depth of 1. One command alias can refer to another command alias that must refer to a valid command, not to another command alias.
•![]() A command alias always replaces the first command keyword on the command line.
A command alias always replaces the first command keyword on the command line.
•![]() You can define command aliases for commands in any command mode.
You can define command aliases for commands in any command mode.
•![]() If you reference a CLI variable in a command alias, the current value of the variable appears in the alias, not the variable reference.
If you reference a CLI variable in a command alias, the current value of the variable appears in the alias, not the variable reference.
Defining Command Aliases
You can define command aliases for commonly used commands.
SUMMARY STEPS
1. ![]() configure terminal
configure terminal
2. ![]() cli alias name alias-name alias-text
cli alias name alias-name alias-text
3. ![]() exit
exit
4. ![]() alias
alias
5. ![]() copy running-config startup-config
copy running-config startup-config
DETAILED STEPS
Command Scripts
You can create scripts of commands to perform multiple tasks.
This section includes the following topics:
•![]() Echoing Information to the Terminal
Echoing Information to the Terminal
•![]() Echoing Information to the Terminal
Echoing Information to the Terminal
Running a Command Script
You can create a list of command in a file and execute them from the CLI. You can use CLI variables in the command script (see the "Configuring CLI Variables" section).
Note ![]() You cannot create the script files at the CLI prompt. You can create the script file on a a remote device and copy it the Cisco NX-OS device. This section assumes that the script file resides in the bootflash:.
You cannot create the script files at the CLI prompt. You can create the script file on a a remote device and copy it the Cisco NX-OS device. This section assumes that the script file resides in the bootflash:.
SUMMARY STEPS
1. ![]() run-script filename
run-script filename
DETAILED STEPS
|
|
|
|
|---|---|---|
Step 1 |
run-script filename Example: switch# run-script testfile |
Executes the commands in the file. |
Echoing Information to the Terminal
You can echo information to the terminal, which is particularly useful from a command script. You can reference CLI variables and use formatting options in the echoed text. Table 3-5 lists the formatting options you can insert in the text.
SUMMARY STEPS
1. ![]() echo [-e] [text]
echo [-e] [text]
echo [backslash-interpret] [text]
DETAILED STEPS
|
|
|
|
|---|---|---|
Step 1 |
echo [-e] [text] Example: switch# echo This is a test. This is a test. |
Displays information on the terminal. In Cisco NX-OS Release 4.0(2) and earlier releases, the -e keyword indicates that the text string contains formatting options (see Table 3-5). The text argument is alphanumeric, case sensitive and can contain blanks. The maximum length is 200 characters. The default is a blank line. |
echo [backslash-interpret] [text] Example: switch# echo This is a test. This is a test. |
Displays information on the terminal. In Cisco NX-OS Release 4.0(3) and later releases, the backslash-interpret keyword indicates that the text string contains formatting options (see Table 3-5). The text argument is alphanumeric, case sensitive and can contain blanks. The maximum length is 200 characters. The default is a blank line. |
Delaying Command Action
You can delay a command action for a period of time, which is particularly useful with in a command script.
SUMMARY STEPS
1. ![]() sleep seconds
sleep seconds
DETAILED STEPS
|
|
|
|
|---|---|---|
Step 1 |
sleep seconds Example: switch# sleep 30 |
Cause a delay for a number of second. The range is from 0 to 2147483647. |
Context-Sensitive Help
The Cisco NX-OS software provides context-sensitive help in the CLI. You can use a question mark (?) at any point in a command to list the valid input options.
CLI uses the caret (^) symbol to isolate input errors. The ^ symbol appears at the point in the command string where you have entered an incorrect command, keyword, or argument.
Table 3-6 shows how to use error isolation and context-sensitive help when setting the clock.
Understanding Regular Expressions
The Cisco NX-OS software supports regular expressions for search and filtering in the commands, such as the show commands. Regular expressions are case sensitive and allow for complex matching requirements.
This section includes the following topics:
Special Characters
You can also use other keyboard characters (such as ! or ~) as single-character patterns, but certain keyboard characters have special meanings when used in regular expressions. Table 3-7 lists the keyboard characters that have special meanings.
To use these special characters as single-character patterns, remove the special meaning by preceding each character with a backslash (\). This example contains single-character patterns that match a dollar sign ($), an underscore (_), and a plus sign (+), respectively:
\$ \_ \+
Single-Character Patterns
The simplest regular expression is a single character that matches the same single character in the command output. You can use any letter (A-Z, a-z) or digit (0-9) as a single-character pattern. You can specify a range of single-character patterns to match against command output.
To specify a range of single-character patterns, enclose the single-character patterns in square brackets ([ ]). For example, you can create a regular expression that matches a string containing one of the following letters: a, e, i, o, or u. Only one of these characters must exist in the string for pattern matching to succeed. In this case, [aeiou] matches any one of the five vowels of the lowercase alphabet, while [abcdABCD] matches any one of the first four letters of the lowercase or uppercase alphabet. You can simplify ranges by entering only the endpoints of the range separated by a dash (-). Also, you can including a caret (^) at the start of the range to match strings that do not include the range of characters.
Table 3-8 shows examples of regular expressions with ranges of characters.
Multiple-Character Patterns
You can also specify a pattern containing multiple characters by joining letters, digits, or keyboard characters that do not have special meanings. For example, a4% is a multiple-character regular expression.
With multiple-character patterns, the order is important. The regular expression a4% matches the character a followed by a 4 followed by a percent sign (%). If the string does not have a4%, in that order, pattern matching fails. The multiple-character regular expression a. (the character a followed by a period) uses the special meaning of the period character to match the letter a followed by any single character. With this example, the strings ab, a!, or a2 are all valid matches for the regular expression.
You can remove the special meaning of a special character by inserting a backslash before it. For example, when the expression a\. is used in the command syntax, only the string a. will be matched.
Anchoring
You can match a regular expression pattern against the beginning or the end of the string by "anchoring" these regular expressions to a portion of the string using the special characters shown in Table 3-9.
|
|
|
|---|---|
^ |
Matches the beginning of the string. |
$ |
Matches the end of the string. |
For example, the regular expression ^con matches any string that starts with con, and $sole matches any string that ends with sole.
Note ![]() The ^ symbol can also be used to indicate the logical function "not" when used in a bracketed range. For example, the expression [^abcd] indicates a range that matches any single letter, as long as it is not the letters a, b, c, or d.
The ^ symbol can also be used to indicate the logical function "not" when used in a bracketed range. For example, the expression [^abcd] indicates a range that matches any single letter, as long as it is not the letters a, b, c, or d.
Searching and Filtering show Command Output
Often, the output from show commands can be lengthy and cumbersome. The Cisco NX-OS software provides the means to search and filter the output so that you can easily locate information. The searching and filtering options follow a pipe character (|) at the end of the show command. You can display the options using the using the CLI context-sensitive help facility:
switch# show running-config | ?
egrep Egrep
grep Grep
head Stream Editor
last Display last lines
less Stream Editor
no-more Turn-off pagination for command output
sed Stream Editor
wc Count words, lines, characters
begin Begin with the line that matches
count Count number of lines
exclude Exclude lines that match
include Include lines that match
Filtering and Searching Keywords
The Cisco NX-OS CLI provides a set of keywords that you can use with the show commands to search and filter the command output (see Table 3-10).
grep and egrep Utilities
You can use the Global Regular Expression Print (grep) and Extended grep (egrep) command-line utilities to filter the show command output as follows:
{grep | egrep} [-A lines] [-B lines] [-c] [-i] [-n] [-v] [-w] [-x] expression
Table 3-11 describes the grep and egrep parameters.
less Utility
You can use the less utility to display the contents of the show command output one screen at a time. You can enter less commands at the : prompt. To display all less commands you can use, enter h at the : prompt.
sed Utility
You can use the Stream Editor (sed) utility to filter and manipulate the show command output as follows:
sed command
The command argument contains sed utility commands.
Searching and Filtering from the --More-- Prompt
You can search and filter output from --More-- prompts. To search and filter the show command output from a --More-- prompt, use the commands described in Table 3-13.
BIOS Loader> Prompt
When the supervisor modules power up, a specialized BIOS image automatically loads and tries to locate a valid kickstart image for booting the system. If a valid kickstart image is not found, the following BIOS loader prompt displays:
loader>
For information on how to load the Cisco NX-OS software from the loader> prompt, see the
Cisco Nexus 7000 Series NX-OS Troubleshooting Guide, Release 4.0.
Examples Using the CLI
This section includes the following topics:
•![]() Using the System-Defined Timestamp Variable
Using the System-Defined Timestamp Variable
Defining Command Aliases
This example shows how to define command aliases:
cli alias name ethint interface ethernet
cli alias name shintbr show interface brief
cli alias name shintupbr shintbr | include up | include ethernet
This example shows how to use a command alias:
switch# configure terminal
switch(config)# ethint 2/3
switch(config-if)#
Using CLI Session Variables
You can reference a variable using the syntax $(variable-name).
This example shows how to reference a user-defined CLI session variable:
switch# show interface $(testinterface)
Ethernet2/1 is down (Administratively down)
Hardware is 10/100/1000 Ethernet, address is 0000.0000.0000 (bia 0019.076c.4da
c)
MTU 1500 bytes, BW 1000000 Kbit, DLY 10 usec,
reliability 255/255, txload 1/255, rxload 1/255
Encapsulation ARPA
auto-duplex, auto-speed
Beacon is turned off
Auto-Negotiation is turned on
Input flow-control is off, output flow-control is off
Auto-mdix is turned on
Switchport monitor is off
Last clearing of "show interface" counters never
5 minute input rate 0 bytes/sec, 0 packets/sec
5 minute output rate 0 bytes/sec, 0 packets/sec
L3 in Switched:
ucast: 0 pkts, 0 bytes - mcast: 0 pkts, 0 bytes
L3 out Switched:
ucast: 0 pkts, 0 bytes - mcast: 0 pkts, 0 bytes
Rx
0 input packets 0 unicast packets 0 multicast packets
0 broadcast packets 0 jumbo packets 0 storm suppression packets
0 bytes
Tx
0 output packets 0 multicast packets
0 broadcast packets 0 jumbo packets
0 bytes
0 input error 0 short frame 0 watchdog
0 no buffer 0 runt 0 CRC 0 ecc
0 overrun 0 underrun 0 ignored 0 bad etype drop
0 bad proto drop 0 if down drop 0 input with dribble
0 input discard
0 output error 0 collision 0 deferred
0 late collision 0 lost carrier 0 no carrier
0 babble
0 Rx pause 0 Tx pause 0 reset
Using the System-Defined Timestamp Variable
This example uses $(TIMESTAMP) when redirecting show command output to a file.
switch# show running-config > rcfg.$(TIMESTAMP)
Preparing to copy....done
switch# dir
12667 May 01 12:27:59 2008 rcfg.2008-05-01-12.27.59
Usage for bootflash://sup-local
8192 bytes used
20963328 bytes free
20971520 bytes total
Running a Command Script
This example displays the CLI commands specified in the script file:
switch# show file testfile
configure terminal
interface ethernet 2/1
no shutdown
end
show interface ethernet 2/1
This example displays the run-script command execution output:
switch# run-script testfile
`configure terminal`
`interface ethernet 2/1`
`no shutdown`
`end`
`show interface ethernet 2/1 `
Ethernet2/1 is down (Link not connected)
Hardware is 10/100/1000 Ethernet, address is 0019.076c.4dac (bia 0019.076c.4dac)
MTU 1500 bytes, BW 1000000 Kbit, DLY 10 usec,
reliability 255/255, txload 1/255, rxload 1/255
Encapsulation ARPA
Port mode is trunk
auto-duplex, auto-speed
Beacon is turned off
Auto-Negotiation is turned on
Input flow-control is off, output flow-control is off
Auto-mdix is turned on
Switchport monitor is off
Last clearing of "show interface" counters 1d26.2uh
5 minute input rate 0 bytes/sec, 0 packets/sec
5 minute output rate 0 bytes/sec, 0 packets/sec
Rx
0 input packets 0 unicast packets 0 multicast packets
0 broadcast packets 0 jumbo packets 0 storm suppression packets
0 bytes
Tx
0 output packets 0 multicast packets
0 broadcast packets 0 jumbo packets
0 bytes
0 input error 0 short frame 0 watchdog
0 no buffer 0 runt 0 CRC 0 ecc
0 overrun 0 underrun 0 ignored 0 bad etype drop
0 bad proto drop 0 if down drop 0 input with dribble
0 input discard
0 output error 0 collision 0 deferred
0 late collision 0 lost carrier 0 no carrier
0 babble
0 Rx pause 0 Tx pause 0 reset
Additional References
For additional information related to implementing Feature-1, see the following sections:
Related Documents
|
|
|
|---|---|
Licensing |
Cisco Nexus 7000 Series NX-OS Licensing Guide, Release 4.0 |
Command reference |
Cisco Nexus 7000 Series NX-OS Fundamentals Command Reference, Release 4.0 |
 Feedback