-
Cisco MDS 9000 Family Fabric Manager Quick Configuration Guide
-
Index
-
Preface
-
Overview
-
Initial Switch Configuration
-
Installing Fabric Manager
-
Fabric Manager Client
-
Configuring VSANs and Interfaces
-
Configuring Zones and Zone Sets
-
Launching Fabric Manager in Cisco SAN-OS Releases Prior to 3.2(1)
-
Quick Config Wizard
-
Configuring Static Domain IDs and Persistent FC IDs
-
Configuration Files
-
 Feedback
Table Of Contents
Configuring VSANs and Interfaces
Enabling or Disabling Interfaces
Configuring VSANs and Interfaces
Before configuring VSANs and interfaces, make sure that you have launched and logged into Fabric Manager from your workstation. See Chapter 3, "Installing Fabric Manager," for details.
You can achieve higher security and greater stability in Fibre Channel fabrics by using virtual storage area networks (VSANs). VSANs provide isolation among devices that are physically connected to the same fabric.
Interfaces are members of a VSAN. Interfaces enable communication between switches in a VSAN. Interfaces that are members of the same VSAN can communicate with each other; interfaces that are members of different VSANs cannot communicate with each other.
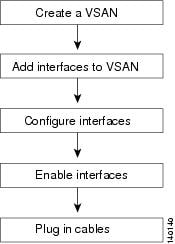
Figure 5-1 describes the steps involved in configuring VSANs and interfaces.
Figure 5-1 VSANs and Interfaces
This chapter includes the following sections:
Creating VSANs
VSANs help you create multiple logical SANs over a common physical infrastructure. Each VSAN can contain up to 239 switches and has an independent address space that allows identical Fibre Channel IDs (FC IDs) to be used simultaneously in different VSANs.
Default VSAN
VSAN 1, also known as the default VSAN, is typically used for communication, management, or testing purposes. We recommend that you do not use VSAN 1 as your production environment VSAN. There are several features that, when configured, disrupt traffic on VSAN 1. If you use VSAN 1 as your production environment VSAN, you risk disrupting traffic when these features are configured.
Note
VSAN 1 is enabled by default. We recommend that you use other available VSANs as your production environment VSAN.
To add and configure a VSAN, follow these steps.
Step 1
Figure 5-2 Create VSAN Icon
Note
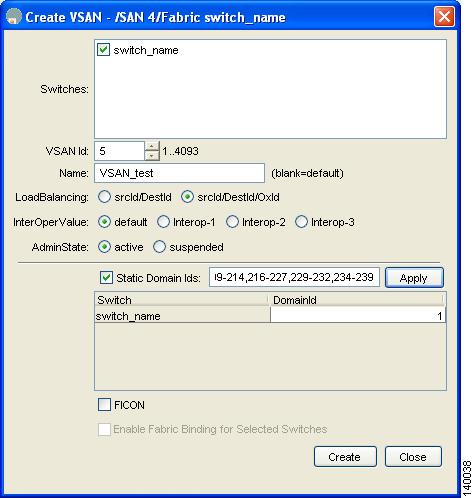
You see the Create VSAN dialog box. (See Figure 5-3.)
Figure 5-3 Create VSAN
Step 2
•
•
•
•
–
–
•
•
•
See Appendix C, "Configuring Static Domain IDs and Persistent FC IDs," for details.
Note
•
Step 3
Configuring Interfaces
The main function of a switch is to relay frames from one data link to another. To do that, the characteristics of the interfaces through which the frames are sent and received must be defined. The configured interfaces can be Fibre Channel interfaces, the management interface (mgmt0), or VSAN interfaces.
The following procedures are used to move the ports on a switch of a previously created VSAN, configure the interfaces, and add them to the VSAN.
Adding Interfaces to VSANs
To configure Fibre Channel interfaces, follow these steps:
Step 1
You see the interface configuration in the Information pane.
Step 2
Step 3
Step 4
Step 5
Enabling or Disabling Interfaces
Note
To enable an interface using Fabric Manager, follow these steps:
Step 1
Step 2
Step 3
Step 4
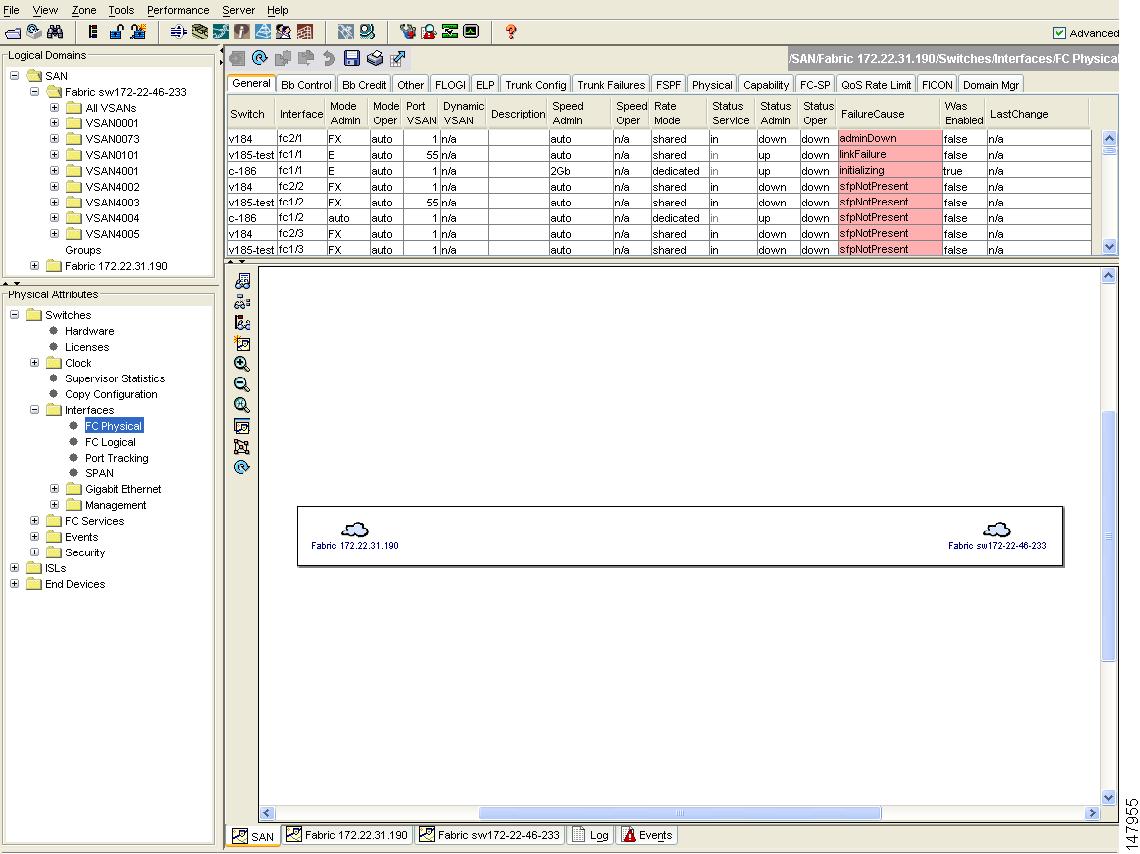
After enabling the interfaces, be sure to plug in the cables. If the cables are not plugged in, the hosts cannot communicate with the storage device. In the example below, the message linkFailure indicates that a cable may not be plugged in (see Figure 5-4).
Figure 5-4 Failed Switches