Feedback
Table Of Contents
Adding an Application Attribute Source
Adding Attribute Source Information
Downloading an Agent Configuration
Viewing or Setting the Log Level
Creating a User Attribute Source
Application Attribute Source of Database Type
Adding Attributes to the DB Attribute Source
Using DB Attribute in Advanced Policy Configuration
Using DB Attribute While Creating Typed Attributes
Application Attribute Source of LDAP Type
Adding Attributes to the LDAP attribute source
Application Attribute Source of Java Type
Adding Attributes to the Java Attribute Source
Application Attribute Source of Web Service Type
Adding Attributes to the Web Service Attribute Source
System Config
As a rule of thumb for implementing CEPM to protect the resources, there is a need to evolve a common resource hierarchy by identifying and prioritizing resources. In a wider sense, a resource can be an application group, an application, a resource under an application, or a child resource. The CEPM terminology limits the usage of resource to a "resource created under an application" only.
The System Config tab provides a platform for the authorized PAP user to create an application group, its applications, policy decision points (PDP), and external attribute sources, such as user attribute sources and application attribute sources. Any authorized user can administer the repository by configuring the CEPM agents (Policy Enforcement Points [PEPs]) and connect each of them to the specified PDPs.
System Config Selection
This section explains the various operations that you can perform on the System Config tab in the PAP administration console.
•
Application Groups—Create, update, and delete application groups. Add application attribute Sources and user attribute sources to application groups.
•
•
•
•
•
Application Groups
An application group is a suite of applications that perform different operations to achieve a common output. For example, a banking application has several applications put under one umbrella, such as retail banking, loans, and insurance. Each division is a separate application installed in a distributed environment across various geographical locations. The application group has a set of entities, such as users, roles, and groups that have a few other relational entities, such as SoD roles and Dynamic roles. Once created, these entities are the subjects for entitlement defined under the same application group across all applications and resources created within it. Contrary to this, if any such entities are created at the Global level (Global user, Global group, Global role, and so on), the utilities can be extended across all applications groups created within the repository.
In this way, an organization can have one or more application groups, which are again a part of repository, which covers the whole resource hierarchy under one umbrella. The list of application groups that constitute the selected repository is displayed in the home page of System Config. When you click the System Config tab, the Application Groups page is displayed, which contains a table listing all existing application groups owned by the logged in user along with the details. You can perform following operations from the application groups:
•
•
•
•
•
•
Adding an Application Group
To create a new application group, you must:
Step 1
The Create Application Group page.
Figure 7-1 Create Application Group
Step 2
Note
Step 3
The new application group is included in the list of application groups.
Deleting an Application Group
To delete an application group, click Delete next to that application group. You are prompted to confirm the deletion. Click Yes to delete the selected group, or click No to cancel the action.
Viewing Applications
The View Application button is used to view all the applications that constitute the selected application group.
Figure 7-2 View Application
This page is the same as the List of Applications page. The only difference you can observe is the contents of the List Applications table. In this table, only the applications that belong to the selected application group are listed. All the application-related functions are explained in this chapter.
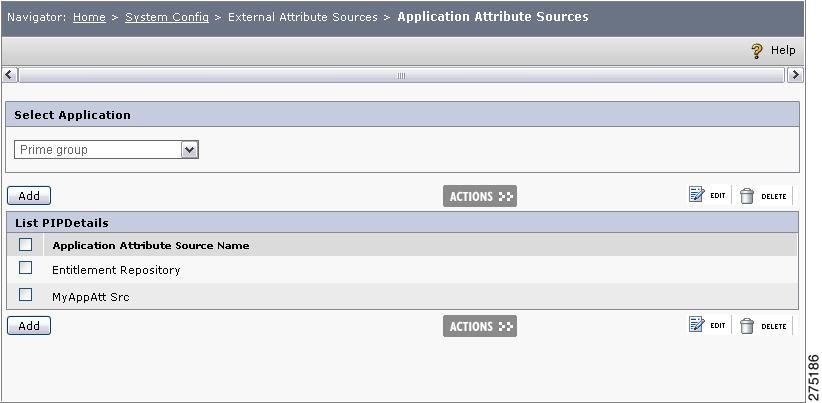
Adding an Application Attribute Source
An application attribute source is a collection of application metadata used by the PDP while evaluating policies for a specified application. For more details about application attribute sources, refer to Application Attribute Source.
In the Application Group page, after you select an application group you can view all the existing attribute sources. Here you can add an application attribute source created for that application group by clicking Add Application Attribute Source. The Attribute Source Information page is displayed.
Figure 7-3 Application Attribute Sources
This page lists all attribute sources or PIPs that belong to the selected application group. Entitlement Repository is a default attribute source created during PAP installation along with a set of predefined attributes. Other attribute sources shown on this page are created under the corresponding application group.
From this page, you can add new PIP to the application group by clicking the add attribute source button. The process of creating new application attribute sources has been explained in Application Attribute Source.
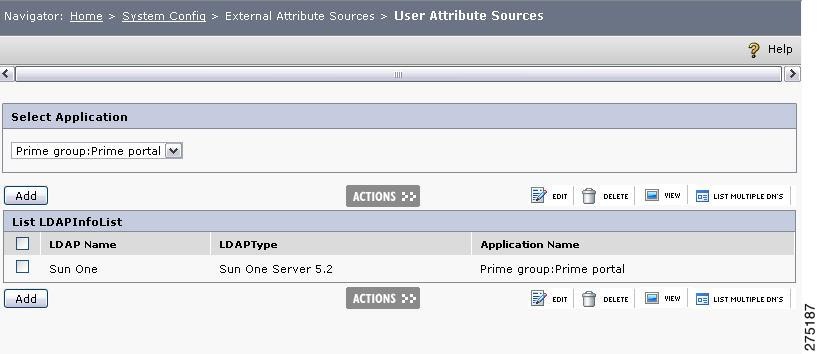
Add User Attribute Source
A user attribute source is a collection of user metadata stored in an external source, such as LDAP and AD. This information is tagged with a rule created on a policy and is used by the PDP while evaluating policies for the user created on the specified resource. For more details about user attribute sources, refer to User Attribute Sources.
In the Application Group page, after selecting an application group, you can view all the existing user attribute sources. You can add a new attribute source for that application group by clicking Add User attribute source.
Figure 7-4 Add User Attribute Source
This page lists all the user attribute sources that belong to the selected application group.
From this page, you can add new source to the application group by clicking Add. The process of creating a new user attribute sources has been explained in User Attribute Sources.
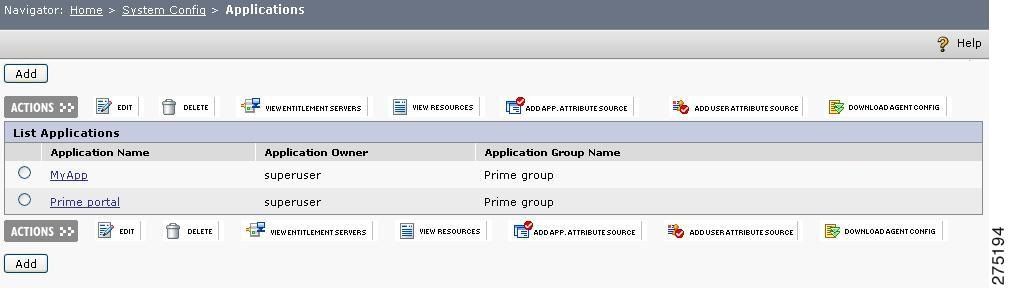
Applications
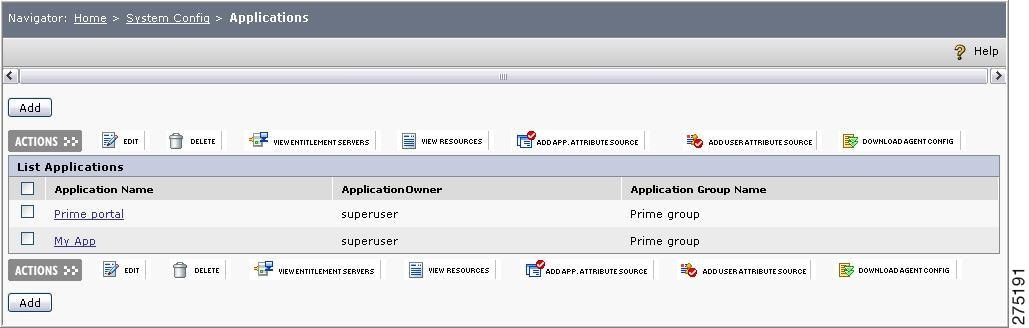
Applications are represented as a collection of named resources and actions. An application essentially consists of resources, child resources, and actions. In general the following details are provided in the List Applications table.
Figure 7-5 Applications Home Page
Application owner column displays the owner of the application, that is, the username of the user who created this application group. The Application Group Name column displays the name of the application group under which this application has been created. Other than this, a set of action buttons are added automatically to each applications to carry on different activities, such as:
•
•
•
•
•
•
•
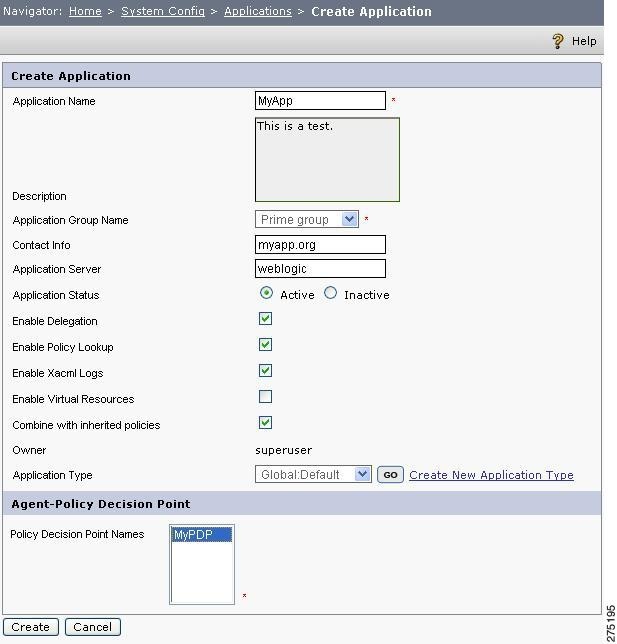
Adding a New Application
To add a new application, you must:
Step 1
The Create Application page is displayed.
Figure 7-6 Create Application
Step 2
•
Note
•
•
The drop-down list contains existing application groups. The new application must be included in any of the existing groups.
•
•
•
•
•
•
This check box relates to the setting of <xacml-log> in the pdp_config.xml file. The PDP config file has a parameter to enable logging the Xacml requests coming from the PEP and the Xacml responses sent to the PEP. The following table describes the xacml-log enable attribute where,
–
–
•
For example, an application called 'Prime Portal' (under 'Prime group') has a resource called 'View Reports'. If you have selected 'Enable virtual resources' for 'Prime portal', and if an access request for 'Prime group:Prime portal:View Report:Report7' (where there is no resource with the name Report7) hits the PDP, the PDP gives the decision on Report7 on the basis of the permission defined on 'View Reports' regardless of the fact that the resource called Report7 does not exist in the database.
In the above scenario, if `Enable Virtual Resources' is not selected for Prime portal, the decision for the above access request would be 'Not Applicable'.
•
–
–
–
For example, consider a resource called Res2 under resource Prime group:Prime portal:Res1. Resource Res1 is having Allow:Internal Dev policy and resource Res2 is having Allow: Internal Dev Tokyo policy and the application Prime portal is having Allow:Internal Dev London policy.
If the "Combine with inherited policies" field is enabled for the application and the request for Prime group:Prime portal:Res1:Res2 is sent, then it gets all the three policies: Internal Dev Tokyo (itself), Internal Dev (its parent), and Internal Dev London (application policy). The PDP gives the decision after applying the Policy Combining Algorithm.
•
•
In the Agent-PDP section, the PDP field contains all existing PDPs registered under the application. While creating a new application, select PDPs to be associated with it.
Step 3
The List of Applications page is displayed where you can view the new application in the table.
Editing an Application
Editing the application name is not allowed in CEPM. When you want to associate additional PDPs with your application along with the existing PDPs, you can do so by editing an application. When you add or delete the PDPs, you can also edit the application description. To edit the details, select the application from the list and click Edit. The Edit Application page is displayed.
Except for the Application Name and Application group selection fields, you can modify the other fields while editing a selected application. For example, if you want to associate an application with more PDPs than the existing ones, it can be done by editing the application. Similarly, if you want to disable Xacml Log field for a particular application that is otherwise currently enabled, you can uncheck the field by editing the concerned application.
Deleting an Application
To delete an application, select the application and click Delete. You are prompted to confirm the deletion. Click Yes to delete the selected application or click No to cancel the action.
Viewing PDPs
When you click the View PDPs icon, a pop-up window is displayed that lists the PDPs associated with the selected application. When a user tries to access any resource of a particular application, the application (PEP) sends a request for the authentication of the user authorization to its corresponding PDPs. The PDP in return verifies the request by dynamically checking each policy created under that application for that particular user-role. For multiple PDPs, if the first PDP fails to respond to the request, it is passed on to the next PDP. This process continues until the request is addressed by either of the PDPs associated with the application.
Figure 7-7 List of Entitlement Servers
The Resource Management page lists all the resources created under the selected application in a hierarchy showing application group name at the top. If the number of resources is large, the Search option provided in this page helps you search for the required resource without navigating the whole tree structure.
Viewing Resources
The View Resources button displays the resource tree for the selected application.
Adding Attribute Source Information
Attribute source provides information against which policy conditions are evaluated. Attributes are created to add additional information about a resource. Evaluation of policy requires access to information referenced by the policy. Often the information required is not available in the administration where the policy is retrieved. Attribute source, which is a policy information point, stores these additional conditions as attributes. Also different attribute sources can be created with regard to different database types. Depending on the datasource type, attribute source of type database, LDAP, or Java can be created. The process of creating an attribute source is explained later in this chapter.
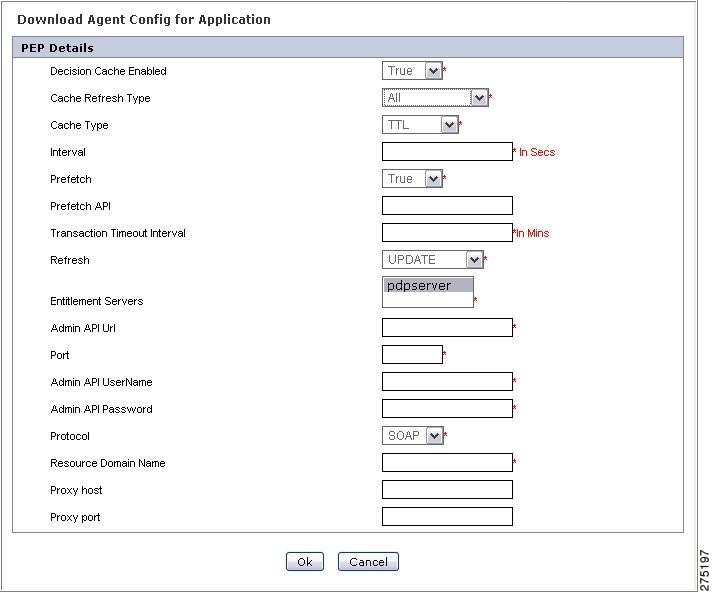
Downloading an Agent Configuration
The Agent Config button of any application provides you with the details of the agent configurations, such as PEP configuration and PDP details. You can also download the PEP configured for the selected application by using this button.
To download an agent configuration, you must:
Step 1
The Download Agent Config for Application page is displayed.
Figure 7-8 Download Agent Config for Application
Step 2
Step 3
Step 4
Step 5
Step 6
Step 7
Step 8
Step 9
Step 10
Step 11
Step 12
Step 13
Step 14
Step 15
Step 16
Policy Decision Points
The PDPs are services that run on different servers, but share a common database. The PDP evaluates application-specific distributed entitlement authority that evaluates authorization policies and is responsible for communicating with the PEP. The PDP is a unique, scalable, enterprise-ready solution for achieving fine-grained distributed entitlement. Existing solutions rely on re-purposing centralized Identity Management solutions to also act as a single, central entitlement authority. However, the existing model has largely failed to meet the scalable, application-specific, fine-grained authorization needs of enterprises and does not reflect the practical deployment considerations that require distributed decisions to be made closer to applications, rather than at a central authority.
Figure 7-9 Policy Decision Points Flow diagram
When a user tries to access a resource covered under CEPM, the agent (the PEP) embedded within the application sends a request to the concerned PDP in a defined format. The PDP evaluates the policy defined for that particular user by taking into consideration the requested data and communicates the decision to the PEP.
The PAP and PDP can be deployed either in a shared or distributed mode. If shared, these components have a common database. Otherwise, a different database is configured for the PAP and PDP giving sufficient scope for an effective synchronization of event taken place in PAP in the PDP database. Refer to CEPM Installation and Configuration Guide for more information on PAP-PDP DB Separation.
In CEPM, the user can create many PDPs and associate them with any application. These services run in different ports on different web servers. When any of the web servers go down, another PDP takes the request and continues the service.
If authorized by the superuser, the user can create many PDPs. These PDPs are then linked with one or more applications registered within the administration console. Other than this, the PDPs connect with existing information repositories, such as LDAP, AD, databases, and IdM, which are referred to as Policy Information Points (PIPs). As far as the PEPs are concerned, one or more PEPs can be connected to a single PDP and one or more PDP can be connected to a single PEP. To make the PDP authentication faster, more than one PDP can be associated with a single application. This helps keep the PDP-PEP communication very much alive even if one of the PDPs fails.
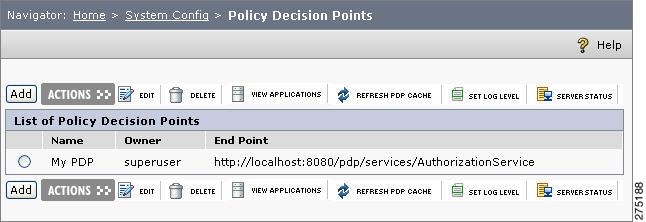
When you choose Home > System Config > Policy Decision Point, a list of PDPs is displayed.
Figure 7-10 Policy Decision Point
This page lists all the existing entitlement severs (PDPs) with their details, such as name, owner, and end points. You can add a new PDP by clicking Add PDP. Apart from this, a few actions can be carried out for each PDP by clicking the corresponding buttons, such as Edit, Delete, View Applications, Refresh PDP Cache, Set Log Level, and Server Status.
Adding PDPs
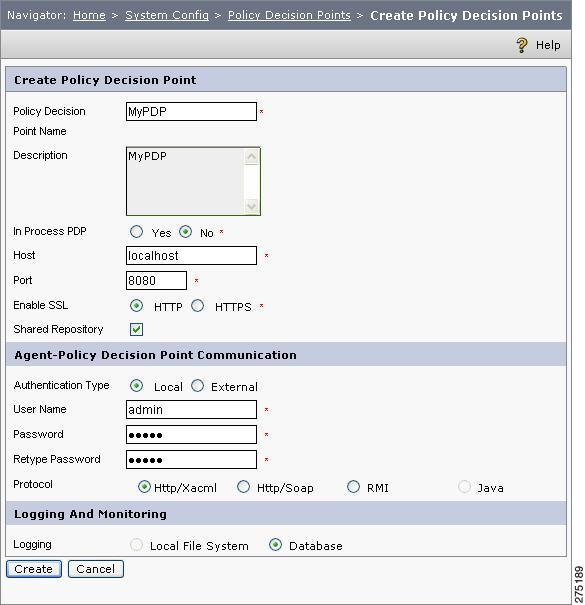
You can add new PDPs by clicking Add New PDPs. The Register PDPs page is displayed. Initially, this page is divided into three main areas (four if you select HTTPS). The first area deals with the PDP information, the second area deals with agent-PDP communication settings, and the third area basically carries the logging and monitoring settings. If HTTPS is selected as the protocol, this area is used to provide the HTTPS details.
To add a new PDP, you must:
Step 1
The Register PDP page is displayed.
Figure 7-11 Create Policy Decision Points
Step 2
•
Note
•
What is In-process PDP?
The in-process PDP is a special component replaced for the CEPM agent (PEP), which is embedded in the client-side application for sending, acknowledging, and implementing policy requests to and from the PDP. This component is very useful when the client-side application is a standalone (desktop) application. The in-process PDP is the merger of the PEP and PDP defined within the normal Cisco environment. For further details about in-process PDP, refer to the CEPM In-Process PDP Deployment Guide.
–
Note
–
Step 3
Step 4
•
•
Step 5
•
•
Creating a keystore?
The secured HTTP connection (https) system provides authentication and encrypted communication, which are widely used on the World Wide Web for security-sensitive communication. In order to enable secure HTTP connections, you must enable communication over the Secure Socket Layer (SSL), which ultimately ends up with the creation of a keystore. To enable SSL for Tomcat, you must do the following:
–
JAVA_HOME\bin\keytool -genkey -alias tomcat -keyalg RSAEnter keystore password changeitWhat is your first and last name? John DoeWhat is the name of your organizational unit? SoftwareWhat is the name of your organization? CiscoWhat is the name of your City or Locality? New YorkWhat is the name of your state province? NYWhat is the two-letter country code for this unit? USIs CN=John, OU=Software, O=Cisco, L=New York, ST=NY, C=US correct?[no]: yesThese instructions help you generate the keystore file (.keystore). This file is in the user profile folder. On Windows, for example, C:\Documents and Settings\<User>.
–
–
–
–
–
–
You can run the PEP with the JVM variable -Djavax.net.ssl.trustStore=<path-to-keystore-file>. You can use the same keystore on the client side too.
Step 6
•
•
Step 7
•
Step 8
This adds the new PDP to the list.
Editing PDPs
To edit the parameters of any of the PDP, select the PDP, and click Edit. The Edit PDP page is displayed.
You cannot change the PDP name as any changes made to this parameter affects the whole structure of the Delegate Administration due to the association of the PDP with one or more applications. Other references such as host, port, username, and password can be changed. When editing is done, click Update to save the changes.
Deleting a PDP
To delete a PDP, click Delete next to the PDP button. You are prompted to confirm the deletion. Click Yes to delete the selected group or click No to cancel the action.
Note
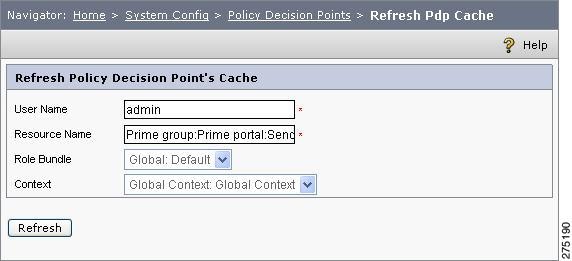
Refreshing the PDP Cache
The caching mechanism is widely used to enhance the performance of web-based applications. CEPM uses this mechanism for the PEP and PDP. It also supports prefetch of data when the server starts up. Caching is done on the basis of users who are the subject of the PEP request. The caching parameters are set in the <cache> tag of the pdp_config.xml. This sets the refresh time of the PDP cache for any or all users.Instead of doing this, you can refresh the PDP cache for any particular user under a selected role bundle and context.
To refresh the PDP cache for a specified user, you must:
Step 1
The Refresh PDP Cache page is displayed.
Figure 7-12 Refresh PDP Cache
Step 2
Step 3
Step 4
Step 5
Viewing Applications
The View Applications button enables you to list all the applications associated with the selected PDP. To view the application, click the corresponding View button. The Applications page is displayed.
Figure 7-13 View Application
This table contains information about the applications, their owners, and few additional functional buttons for every listed application. You can add a new application to the selected PDP from this page by clicking Add New Application. Detailed functionalities of these buttons are explained in Applications.
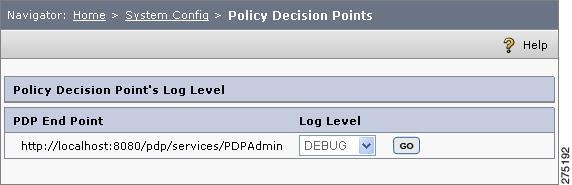
Viewing or Setting the Log Level
A server log is automatically created and maintained for all the activities performed by the concerned PDP. In CEPM, these logs are generated using the com.cisco.pdp package which is set as the default package in the logging.xml file. For any application only if the xacml log is enabled while creating that application. For example, when the PEP sends a request to the PDP, the PDP server maintains a history of that requests along with the response it returns.
To view or set the log level, you must:
Step 1
Figure 7-14 PDP Log Level
This table contains the URL of the selected PDP along with the existing log level.
Step 2
•
•
•
•
•
Select any of these levels based on your need.
Step 3
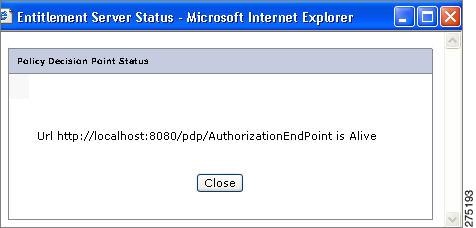
Server Status
At times, one or more PDPs are dead due to some connection failure or other technical reasons. This causes the PEP-PDP communication to go down unless the PEP is associated with other PDPs. After creating a PDP, you can check the status from the PDP table.
Click PDP Status for that PDP. A pop-up window is displayed that contains the message whether the selected PDP is alive or dead.
Figure 7-15 Server Status
Context
In CEPM, context represents a special scenario on which all policy mappings are tied. Context provides additional information about the environment, subject, object and / or action that may be used to make the access decision. By default, mappings are tied to the "Global Context". Mappings of group/role membership and authorization policies are all tied to a context. A different set of mappings can be created by creating a new context. For example, user Mary can be mapped to two different roles in two different contexts. So, an access decision to a resource for Mary differs depending upon the context passed in the request. Contexts are specific to an application group or an application and can be hierarchical. If a policy or a mapping is not available in a given context, the PDP searches for an applicable policy on its parent recursively.
The key requirement is centered on the ability to map users to roles, or roles to resources within a context. Context is hierarchical and could represent a customer, whereas subcontexts could represent divisions or other entities within a customer that may have different entitlements.
CEPM allows:
•
•
•
Context gains more importance while a mapping is done. For different contexts, you can create different mapping under the same application or application group. This culminates in setting the security parameters more accurately and minutely. For example, a user called Mary can have two different roles in two different contexts. When Mary is mapped with a role called Internal Dev, the newly created mapping can have different values of user attributes and role attributes in different contexts. The PDP while responding to a request from PEP, apart from other parameters, gives the decision on the basis of the context passed within the request. If no context is selected, the application shall consider Global as the default context.
You can create many contexts in the PAP in the shape of a hierarchy.
To create a new context, you must:
Step 1
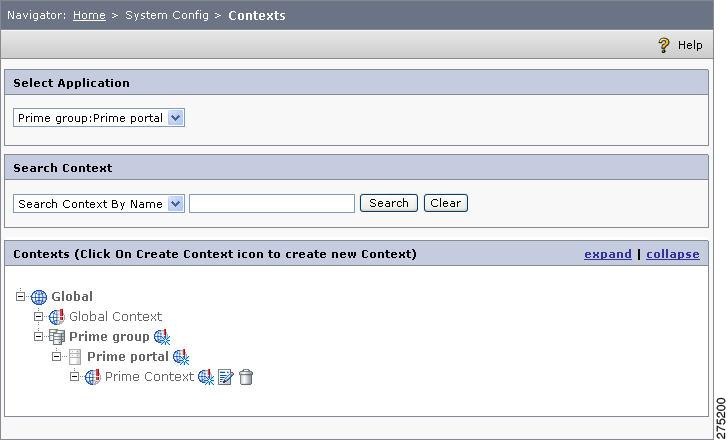
Step 2
Figure 7-16 Context Home Page
Step 3
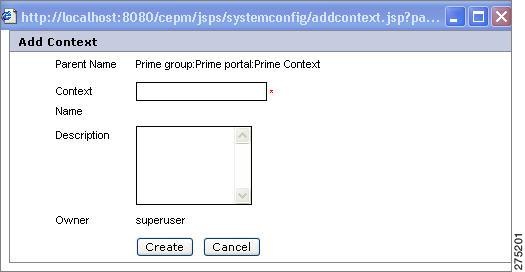
Figure 7-17 Add Context
This page displays the fully qualified name of the selected context.
Step 4
Note
Step 5
Note
•
•
•
•
•
For example, to re-register msscript.ocx, go to Start > Run. Enter the above command in the Run dialog box and click OK. A confirmation message window pops up. Click OK.
Apart from the Global context, wherever a context comes into use, the context hierarchy contains the contexts created under the application group and application. The user can select a required context from the hierarchy by clicking the context.
Figure 7-18 Manage Entitlement by Resources
When you select Global context, the CEPM takes all contexts created under the selected application dropdown.
Evaluation of policies in the context point of view:
When the PEP sends a request consisting of a context, the PDP searches for the policy under that context level. If no policy is found under that specified context, the PDP searches for its parent level. If the parent level has a policy on the said resource, it will sends the decision accordingly. If not, the PDP extends the search to one more level above the current level. In this way, the search is extended until it reaches the Global level and an appropriate decision is communicated.
Application Group Types
If you need to associate metadata with the application group, which might be required in the decision-making process or if the application requires it after getting the decision from the PDP, you can use these metadata. As the title suggests, an application group type is a special component used while creating application groups to provide additional security parameters to be considered during policy evaluation. The additional security parameter also provides a great deal of formality through evaluation of attributes for different application groups. This culminates the authentication of the PDP on the line of the application group types that constitute the specified application group.
To view and create application group types, you must:
Step 1
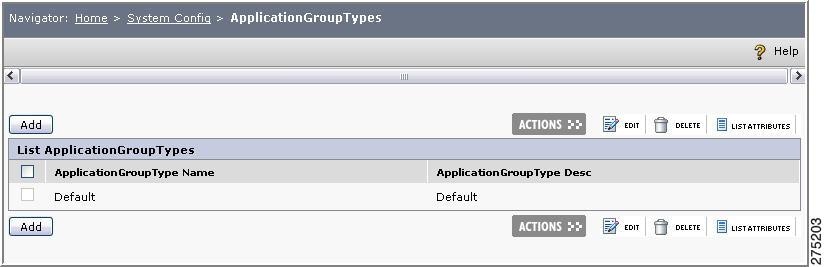
Figure 7-19 Application Group Types
The list contains a default application group type to be used while creating an application group without selecting any types. From this page, you can create, edit, or delete an application group type. Also you can view the attributes that constitute an existing application group type.
Step 2
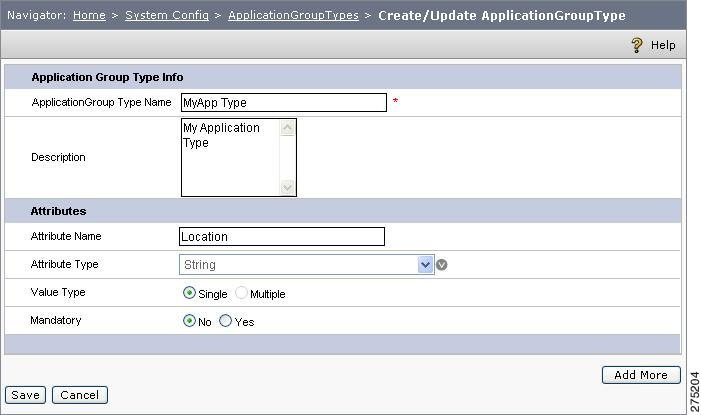
Figure 7-20 Create or Update Application Group Types
Step 3
Note
In the Attributes section, you can add any number of attributes to the new application group type. While creating an application group using this type, these attributes are evaluated as per the attribute types.
Step 4
Step 5
Step 6
Step 7
Step 8
Step 9
This creates the new application group type. You can also add more attributes to any of the existing application group types by editing the same.
Application Types
The Application Settings architecture provides many attributes that can be applied to the applications as its individual properties. These attributes are examined at run time by the PDPs in order to give decision in response to the concerned PEP request. Application types are metadata wrapped with the application that might be required in the decision making process.
While creating an application, you can have your own application type with a predefined set of attributes for making the PDP decision more stringent and particular. The additional security parameter also provides a great deal of formality through evaluation of attributes for different resources. This culminates the authentication of the PDP on the line of the application types that constitute the specified application. You can add any number of attributes to the application type. CEPM has a default application type, so it is not mandatory to create new application types before creating a resource.
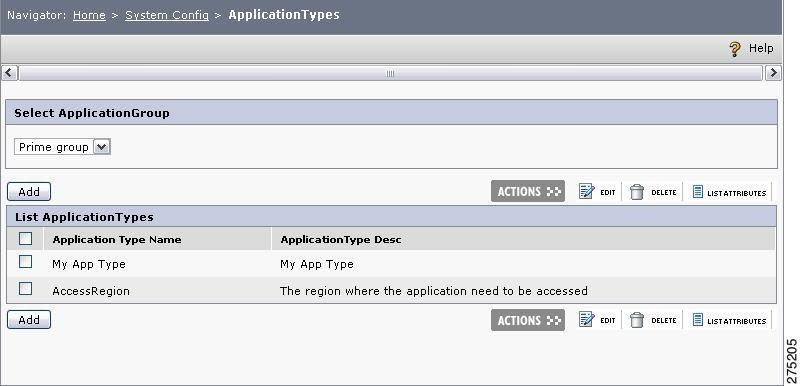
If you select an application group, all the application types created under the Global label and the application group level (under which the application is created) is shown in the table. Similarly, if you select an application, all the resource types created under the Global label, application group, and the selected application are listed in the table.
To view and create resource types, you must:
Step 1
Figure 7-21 Application Types Home Page
Step 2
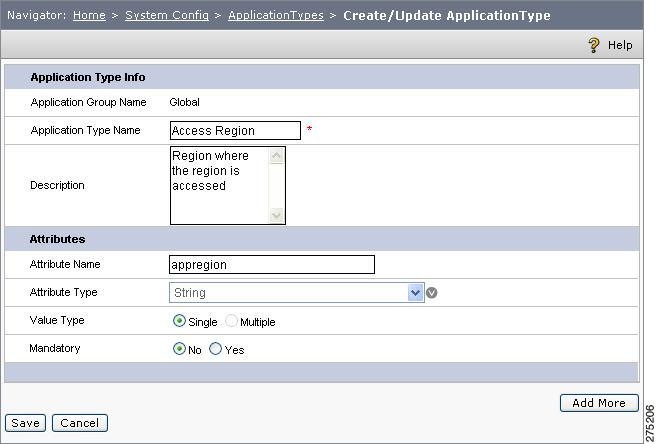
The Create/Update application type page is displayed where you can create a new application type and add the desired number of attributes to it.
Figure 7-22 Create or Update Application Type
Step 3
In the Attributes section, you can add any number of attributes to the new application type. While creating an application using this type, these attributes are evaluated as per the attribute types.
Step 4
Note
Step 5
Step 6
Step 7
Step 8
Step 9
This creates the new application group type. You can also add more attributes to any of the existing application group types by editing the same.
External Attribute Sources
The PDP evaluates application-specific and enterprise authorization policies. The PDP also connects with existing policy information repositories, such as LDAP and databases, that are referred to as Policy Information Points (PIPs).
All additional user information for a particular application can be directly imported from the external user attribute sources, such as LDAP and AD. Similarly, with an intention to minimize database space, additional application metadata can be called from external sources, such as database PIP.
CEPM provides two types of external attribute sources:
•
•
User Attribute Sources
CEPM allows you to import users and user groups from an LDAP directory service into the PAP. A user attribute source (also called a user store) is a virtual store of users and user groups created in the PAP and is configured to refer to the users and user groups in the LDAP directory.
This feature is useful when the application to be secured already contains a large number of users and user groups stored in an LDAP directory. Thus, rather than creating these users and user groups again in the PAP, you can import them from the existing LDAP directory.
CEPM supports the following LDAP directory services for importing external users and user groups into the PAP application:
•
•
•
In administration console, you can create, update, view, and delete the user stores for an application or for an application group.
User Synchronization
The import process can be done manually or can be automated. The process of automatically importing users from an LDAP directory to the PAP application is called synchronization. In this case, after an LDAP directory is configured for synchronization with the PAP application, for any new user that is created in the LDAP directory, the user gets automatically created in the PAP application.
For synchronization of LDAP directory users with the PAP users, the Base Distinguished Name (base DN) of the LDAP directory should be specified in the PAP application when a user store is created. Multiple Base DNs can also be specified for a single user store. If multiple base DNs are specified per user store, the users belonging to the multiple base DNs are merged together and then synchronized with the PAP application.
The top level of the LDAP directory tree is the base, referred to as the base DN. Assume that a person works for a U.S. E-commerce company called FooBar, Inc., which is on the Internet at foobar.com. The base DN for the LDAP directory service implemented for this company can be represented in one of three forms:
•
o="FooBar, Inc.", c=US
•
o=foobar.com
•
dc=foobar, dc=com
Creating a User Attribute Source
To create a user attribute source, you must:
Step 1
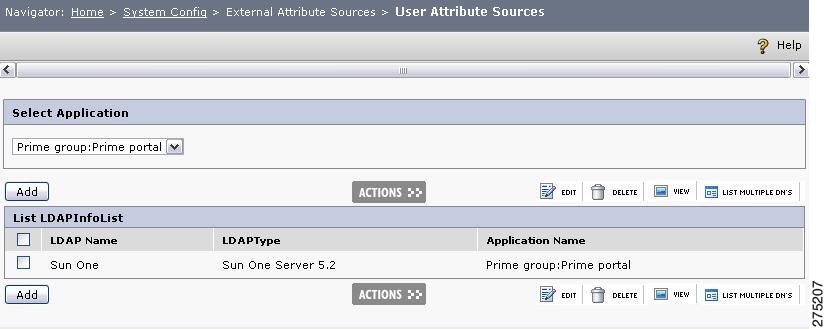
The List User Store page is displayed, which shows the existing user stores.
Figure 7-23 User Attribute Source
Step 2
Figure 7-24 Create User Store
Step 3
•
•
Note
•
•
•
•
•
•
Note
•
•
These parameters can be evaluated at any stage by using the Edit LDAP Info feature by selecting the concerned user attribute source.
•
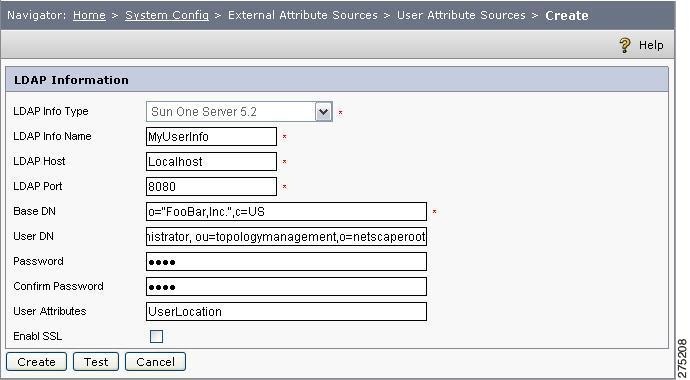
•
Figure 7-25 Create User Attribute Source
•
Enter the following parameters for this purpose:
–
–
•
–
–
Step 4
Step 5
Step 6
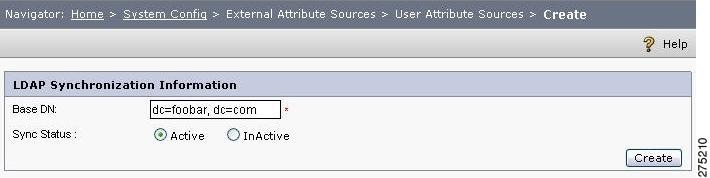
If you click Yes, the screen shown in LDAP Synchronization Information is displayed.
Figure 7-26 LDAP Synchronization Information
Step 7
Step 8
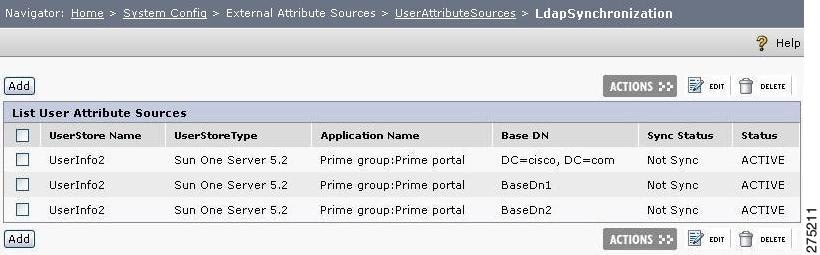
The page that contains the names of all the base DNs related to a Store Name configured for synchronization is displayed as follows:
Figure 7-27 LDAP Synchronization
You can edit or delete a particular Base DN from this list by clicking the Edit button or the Delete button respectively, under the Actions column. You can specify more Base DNs for synchronization for this store by clicking the Create button.
LDAP Synchronization
With the help of LDAP Sync option, the users created within the concerned LDAP are synchronized with the administrative console. As a result, the users are automatically listed in the Create/List Users page. This functionality enables the synchronization of users created within LDAP with the administrative console. As a matter of fact, when a user is created within the LDAP associated with the PAP, this event is synchronized with the database. So the same user is dynamically created in the Users List in the PAP. This option eases selection of users need to be imported for the purpose of mapping with groups and roles accordingly. The synchronization tool is integrated with the PAP, which enables the user to specify the branches that need to be synchronized with the database.
Note
The Sync tool is also used in user-group mapping only if the group is already imported into CEPM. As a result, any user-to-group mapping defined in the user store is also synchronously reflected in the PAP.
Update User Attribute Source
You can update an existing user attribute source by selecting the LDAP and clicking the Edit button. Other than the LDAP name, you are allowed to change the LDAP host, port, base DN, and password.
Note
Application Attribute Source
For instance, two users with the same name (say Mary) have a policy on a resource. While creating a rule on the policy, you need to set a condition "Country is equal to US". In case of a large number of users, it is practically not possible to feed all user related data into CEPM. To overcome this, CEPM has a provision to retrieve the attribute values from an external source called application attribute source, which can be a database, an LDAP, a web service, or a Java class. As a result, in this example, if the user data is in the LDAP attached to the application, you can create an application attribute source with this, and also create an attribute called Country.
Application attributes sources are external entities to be used to make the entitlement policy more stringent using rules where you define the condition using the attributes from these sources. Application attribute source is a collection of application attributes. Application attributes are not in the CEPM database, but are external data sources, also called Policy Information Points (PIPs). A PIP can be an external database, or LDAP directory service, a web service, or a Java class.
If the application attribute source is connected over SSL, you can configure one-way and two-way SSL. Currently, you can enable one-way and two-way SSL only for LDAP PIP. For web service PIP, you can only enable one-way SSL.
Note
CEPM has a default application attribute source called Entitlement Repository with a set of default attributes named RolesForUser, GroupsForUser, UsersForRole, UsersForGroup, GroupsForRole, RolesFor Group and UserAttributeValue.
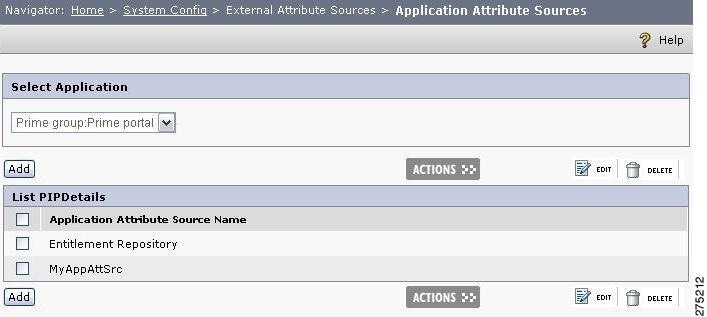
To create an application attribute, choose Home > System Configs > Administer > Application attribute sources. The Application attribute source Information page is displayed, which shows the existing attribute source names.
Figure 7-28 Application Attribute Sources
In this page, you can create a new application attribute source, edit an attribute source, and delete an attribute source.
CEPM supports four types of application attribute sources:
•
•
•
•
Application Attribute Source of Database Type
This is also called Database PIP. When a PIP is created under a particular application, all the attributes created under that PIP will automatically be listed in the attributes drop-down menu to formulate conditions for a policy rule.
To create a new attribute source, follow these steps:
Step 1
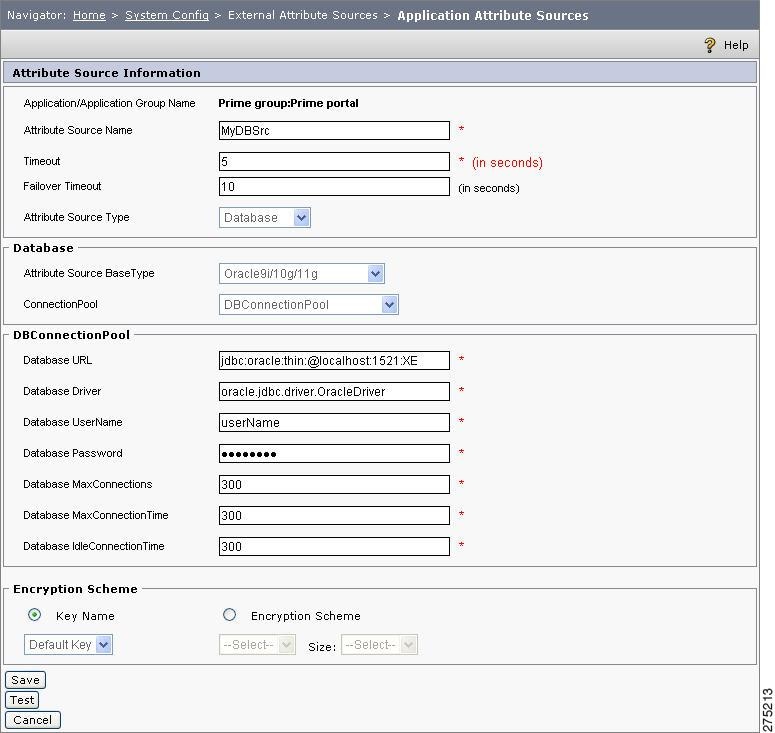
Figure 7-29 Application Attribute Source of Database Type
This page displays the selected application name.
Step 2
Note
Step 3
Step 4
Step 5
Step 6
Step 7
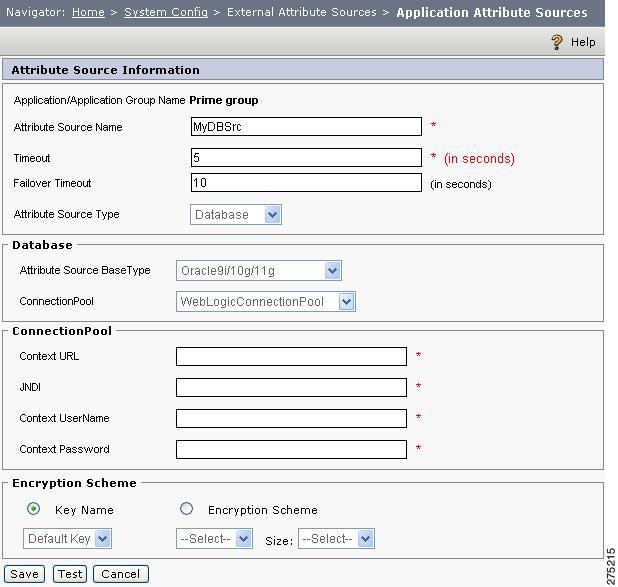
Step 8
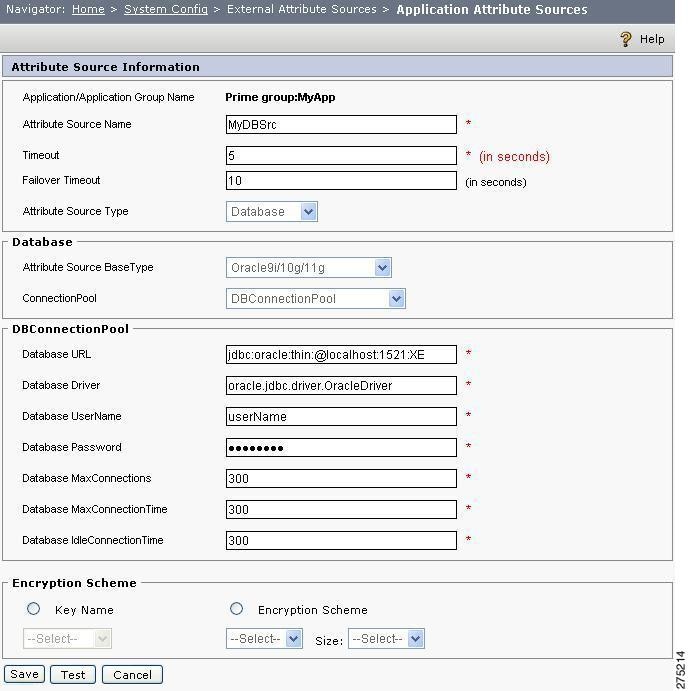
Figure 7-30 Application Attribute Sources Database details
Enter the information related to database connection in this section:
•
•
•
•
•
•
•
If WebLogic or WebSphere Connectionpool is selected, the following connection pool details must be entered:
Figure 7-31 Connection Pool
Enter the following connection pool details in this section:
•
•
•
•
Step 9
Step 10
Step 11
You can edit or delete any of the existing attribute sources from the list.
Step 12
Adding Attributes to the DB Attribute Source
To add an attribute to the new source, you must:
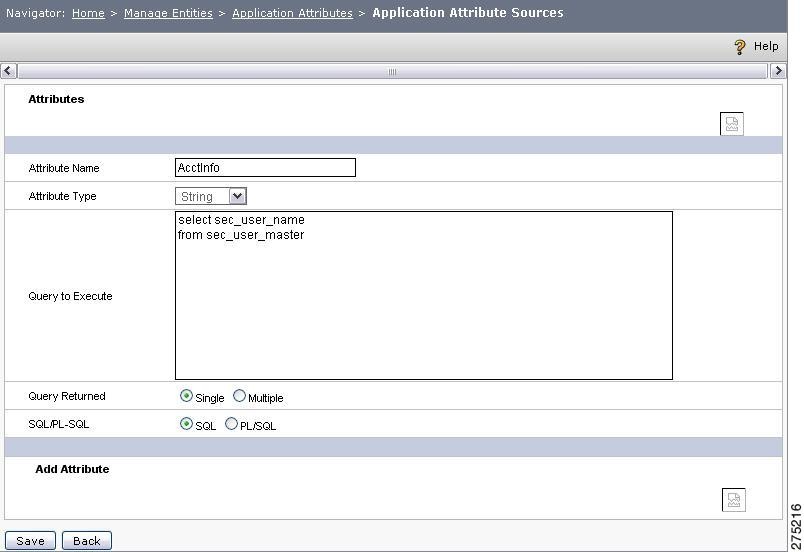
Step 1
Step 2
Figure 7-32 Add Application Attributes
Step 3
•
•
•
•
•
Step 4
In case of a rule created on a policy using this attribute, the PDP queries the external database as mentioned in the attribute source and not the database.
Using DB Attribute in Advanced Policy Configuration
Let's create an attribute source called AccountsDB and then define an attribute called GET_ACCOUNT_NAMES. The query to be executed for this attribute is:
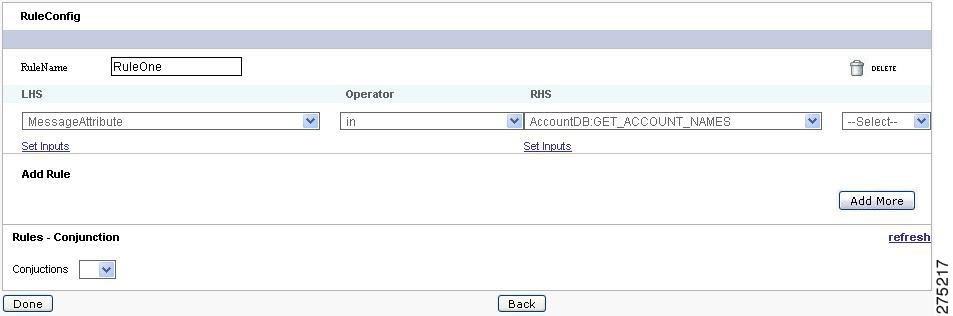
Select account_names from account_master where account_manager=?If John is the account manager and is managing accounts Acc1, Acc2, and Acc3, this would return three accounts during runtime. The rule can be configured on the policy as follows:
Figure 7-33 Rule Config
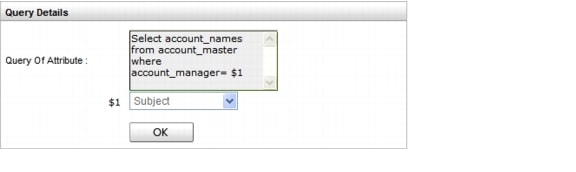
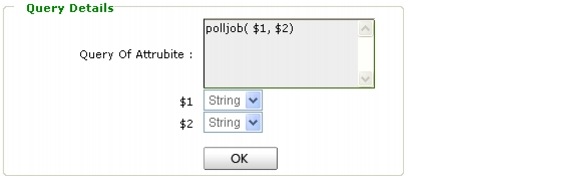
The input query details for the above rule is:
Figure 7-34 Query details
The above policy can be read as:
MessageAttribute[Account_Name] IN AccountsDB:GET_ACCOUNT_NAMESwhere the account name is being passed in as a message attribute, this is the account name on which the user is trying to transact and this is compared against a list of accounts for which the user is responsible. If the account name is in the list returned, the user is entitled to transact/view the account or else the user is not entitled.
Using DB Attribute While Creating Typed Attributes
Another way the application attribute sources can be used is to map them to the typed attributes of different entities, such as user, role, group, and resource. By doing this, the attribute values are constrained by the values returned by the attribute source.
Consider the preceding example, and see how the account names can be mapped to a user attribute. Assuming that there is a userType with an attribute called Account_Names defined and this attribute is mapped to the attribute source AccountsDB:GET_ACCOUNT_NAMES. When you create a user of this type, automatically the Account Names are populated for the user attribute and you can choose the right value for it. Further, the user attribute can be used in the policy rules.
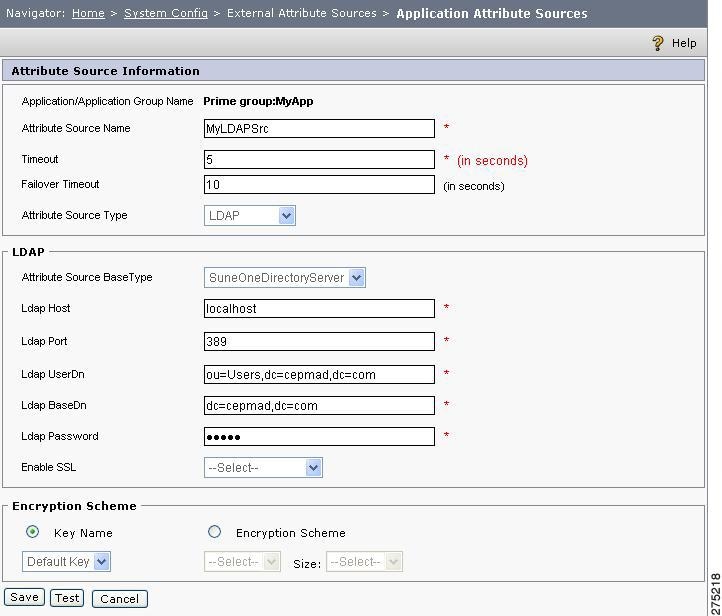
Application Attribute Source of LDAP Type
This is also called LDAP PIP. Application-specific attributes can be created within the LDAP PIP. For example, if the attribute is created as Contact No in a PIP, the same attribute is listed in the list of attributes to be selected for formulating a rule on a policy where the concerned user is a subject.
To create a new attribute source of type LDAP under an application, you must:
Step 1
Step 2
Step 3
Step 4
Step 5
The LDAP and Encryption scheme sections are added to the page.
Figure 7-35 Application Attribute Source-Encryption scheme
Step 6
•
•
•
For example, uid=john,ou=administrators,ou=topologymanagement,o=netscaperoot.
•
For example, dc=foobar,dc=co,dc=uk.
•
•
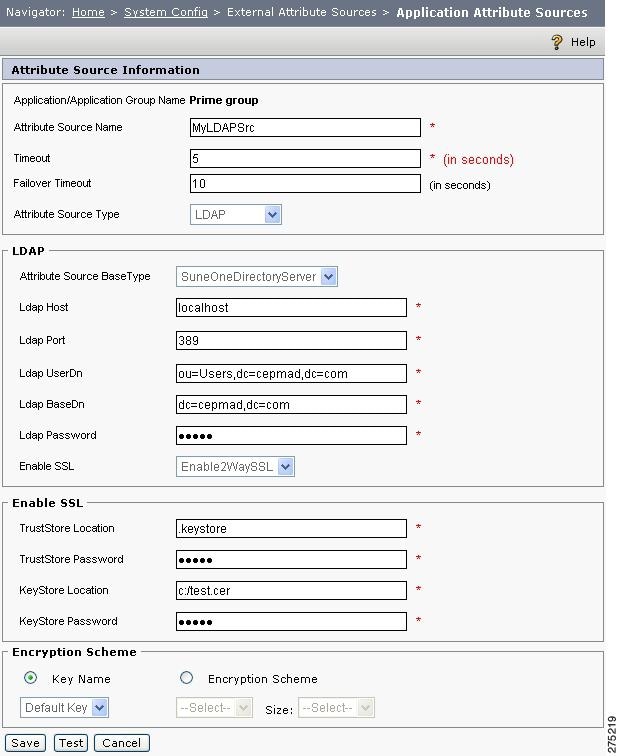
From the Enable SSL drop-down list, select either one-way or two-way SSL.
Figure 7-36 Application Attribute Source- Truststore
The Truststore Details section is available only if HTTPS is selected as the transport protocol. This section defaults to one-way SSL. For two-way SSL, you must check Enable two-way SSL. The Keystore Details section is available only if the Enable two-way SSL is selected.
The following details must be provided for enabling SSL:
–
–
–
–
–
–
Step 7
Step 8
Step 9
You can edit or delete any of the existing attribute sources from the list.
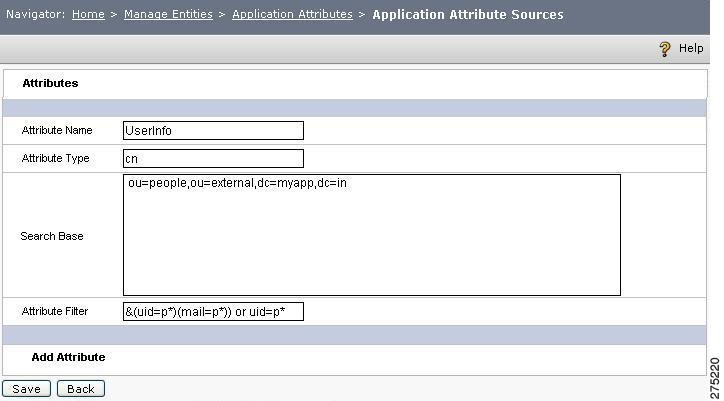
Adding Attributes to the LDAP attribute source
To add an attribute to the new source, you must:
Step 1
Step 2
The DataSource MetaData page is displayed.
Figure 7-37 Application Attributes
Step 3
•
•
•
•
Step 4
In case of a rule created on a policy using this attribute, the PDP queries the external LDAP as mentioned in the attribute source and not the database.
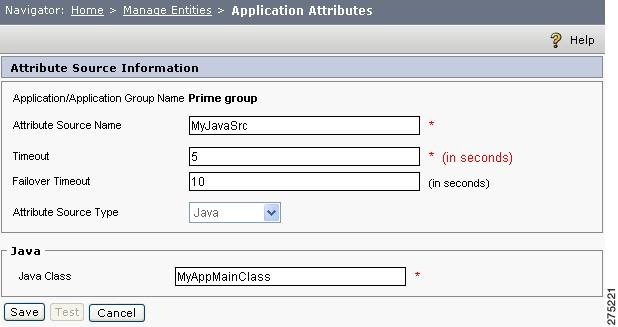
Application Attribute Source of Java Type
An application attribute source of Java type is also called a Java PIP. When a policy needs to be evaluated using an external Java API, it is done by using a Java PIP. Java PIP is a collection of one or more Java attribute methods with a defined set of attributes. The return types of these attributes are also defined while creating the Java PIP. Java PIP supports return types of primitive data types and java.lang.String.
To create an attribute source of type Java under an application, you must:
Step 1
Step 2
Step 3
Figure 7-38 Application Attribute Source of Java Type
Step 4
Step 5
Step 6
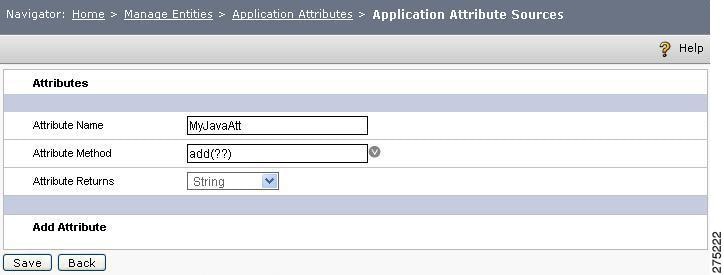
Adding Attributes to the Java Attribute Source
To add an attribute to the new source, you must:
Step 1
Step 2
Figure 7-39 Adding Attributes to the Java Attribute Source
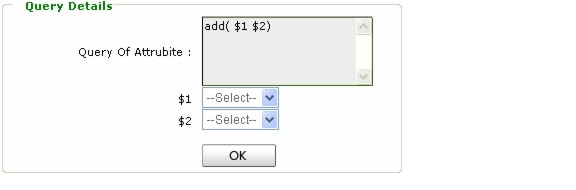
Step 3
•
•
•
Figure 7-40 Query Parameter type
•
•
Step 4
You can create multiple attributes for this attribute source by clicking Add Attributes.
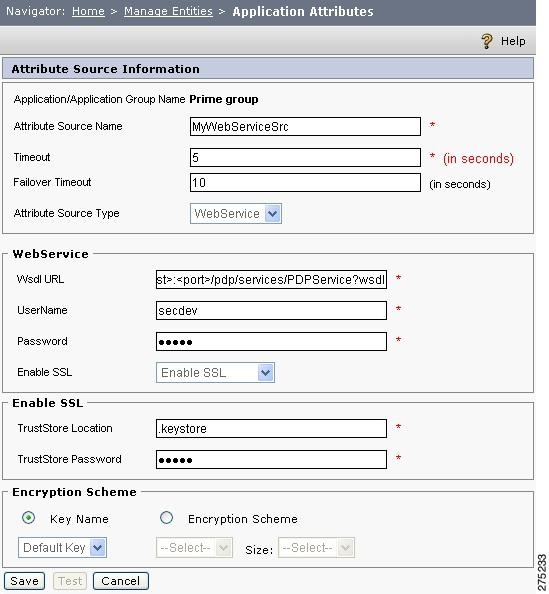
Application Attribute Source of Web Service Type
This is also called Webservice PIP. Using this feature you can use a web service as an external attribute source for database. This source contains all the Java methods that are exposed for a particular service. Further, these methods are used for creating attributes for the web service PIP. The PAP console allows you to create a web service PIP with or without enabling SSL. It supports only one-way SSL.
To create an attribute source of type web service under an application, you must:
Step 1
Step 2
Step 3
Step 4
Figure 7-41 Application Attribute Source of Web Service type
Step 5
Step 6
Step 7
Note
This will add truststore fields to the Create DataSource MetaData page.
•
•
Note
–
–
   JAVA_HOME\bin\keytool -import -trustcacerts -keystore .keystore -alias tomcat
   -file D:\test.cer
–
Enter keystore password: password–
–
Step 8
Step 9
Step 10
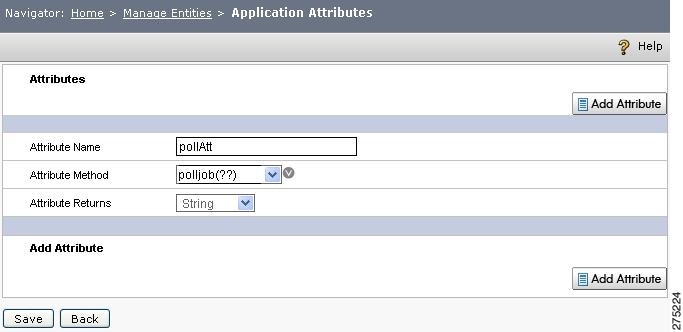
Adding Attributes to the Web Service Attribute Source
For the webservice PIP, you can create attributes only by using the operations available under that service. For example, if the webservice has an operation performed by an API called getDecisionByAttributeValue, you can use this API as an attribute for the webservice PIP.
To add an attribute to the new source, you must:
Step 1
Step 2
The DataSource MetaData page is displayed.
Figure 7-42 Adding Attributes to Web Service Attribute Source
Step 3
•
•
•
Figure 7-43 Query Parameter type
•
•
Step 4
You can create multiple attributes for this source by clicking Add Attributes.
List Repositories
CEPM supports entitlement management while using multiple concurrent entitlement repositories that can be geographically distributed. This provides deployment flexibility to meet enterprise and compliance needs. For example, geographically isolated entitlement repositories for EMEA and NA can be supported with central, delegated visibility using the PAP SOAP.
In CEPM, repositories are entitlement domains within which a PAP user can exercise roles and controls. CEPM supports creation of more than one entitlement domain and assigns those to one or more PAP users. These entitlement domains are defined by the use of a separate entitlement repository or database for that domain. Support for multiple entitlement domains is very useful when there is a need to store entitlement data separately for such things as different geographies and application groups. Administrators can choose the entitlement domain they would like to log in to by selecting the appropriate domain in the drop-down list on the login page. By default, users are logged in to the default domain. Administrators can register additional entitlement repositories / domains.
Repositories contain aggregates of application groups, their subsequent applications, resources, and child resources along with corresponding policies in each domain. Considering as a distinct project, while creating a repository, substantial provisions have been made for creating, mapping, and defining users, resources, policies, and rules independently in order to make each of these constituents available on selection of the same repository during login.
Authorized users can create their own repositories apart from the default repository. Any repository so created is automatically listed in the default pool and is available at the time of login to all users. Only the owner or any delegated user can access the repository from the default pool. Creating repository is a special function, and the user needs to be entitled to perform this operation only through the Admin Entitlement.
To create a new repository, you must:
Step 1
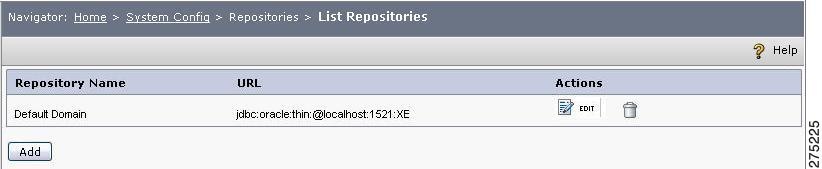
Figure 7-44 List Repository
This page lists the existing repositories created by the current user.
Step 2
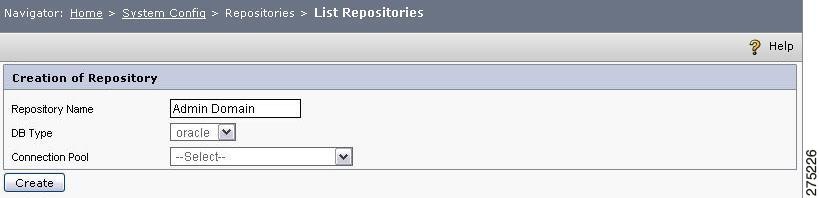
Figure 7-45 Create Repository Home Page
Step 3
Note
Step 4
Step 5
If you select the CepmConnectionPool, a new section is added to the page.
Figure 7-46 Create Repository
Step 6
•
•
•
•
•
•
•
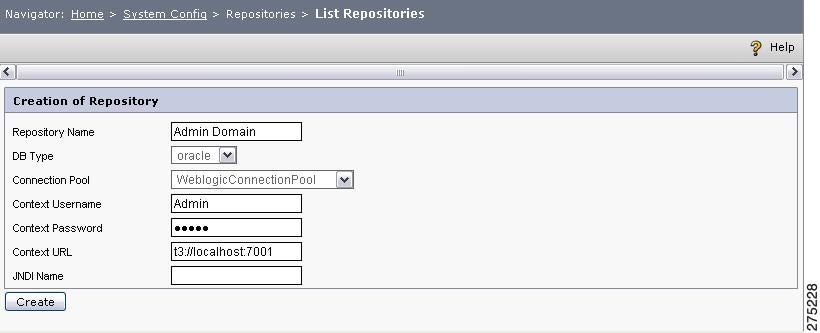
If you select the WeblogicConnectionPool, a new section is added to the page.
Figure 7-47 Repository with Database details
Step 7
•
•
•
•
For more information on how to configure a WebLogic connection pool, refer to the CEPM Installation and Configuration Guide.
Step 8
You are returned to the Create/List Repository page and the newly created repository is listed in the repository table. When you re-login to the CEPM environment, you find this new repository listed in the Entitlement Domain drop-down list.