Feedback
Table Of Contents
Integration of CEPM with MOSS Application
Configuring Membership and Role Providers
Synchronizing MOSS Resources with CEPM
Command Line-Based Synchronization
MOSS Application Navigation Links
Protecting MOSS Application Navigation Links Using CEPM
Protecting MOSS Application Web Parts Using CEPM
MOSS Application Document Libraries
Configuring Rules for SharePoint Document Library
Registering Custom Security Trimmer
Integration of CEPM with MOSS Application
This section explains how the Cisco Enterprise Policy Manager (EPM) SharePoint Agent is integrated with the Microsoft Office SharePoint Server (MOSS) application for securing its application components.
Update pep_config.xml file
Update the pep_config.xml file with the following information:
<CEPMMOSSAgent> Element
<CEPMMOSSAgent mode="Off"><Properties debug="false" trustHeader="false" headerName="REMOTE_USER"><RedirectURL defaultTarget="http://anil-lpt:10000/_layouts/AccessDenied.aspx" /><ApplicationPrefix appGroupName="Site AppGrp 10000" appName="Site App 10000" /><IgnorePage ignorePage="login,images,resourceweb,_vti_inf,_vti_bin,WebResource,styles,_layouts,viewlst s,Upload,EditForm,NewForm,DispForm,AccessDenied,OSSSearchResults" /></Properties><!--For Windows Principal<SubjectIdentity type="Principal" value="System.Security.Principal.WindowsPrincipal"/><SubjectIdentityAttribute value="Identity.Name"/><OverrideResourceFQN value="Description"/>--><!--For Custom Principal--><SubjectIdentity type="" value=""/><SubjectIdentityAttribute value=""/><!--For Custom Resource FQN for webparts--><OverrideResourceFQN value="CustomString"/><HTTPEnvironmentVariables>LOCAL_ADDR</HTTPEnvironmentVariables><AnonymousUser>off</AnonymousUser><OverrideMossPermissions>true</OverrideMossPermissions><shareResourceTypeForLibraries>true</shareResourceTypeForLibraries><syncusers>Site AppGrp 10000:Site App 10000</syncusers><syncgroups>Site AppGrp 10000:Site App 10000</syncgroups><syncroles>Site AppGrp 10000:Site App 10000</syncroles><!--ManagePermissions>MOSS</ManagePermissions--><moss-resource type="pages" mode="on"></moss-resource><moss-resource type="webparts" mode="on"></moss-resource><moss-resource type="documents" mode="on"><syncmetadata>true</syncmetadata><metadata>citizenship,Department</metadata></moss-resource><moss-resource type="items" mode="on"></moss-resource><syncinterval>400</syncinterval><syncperiodicaly value="false"/></CEPMMOSSAgent><dncache><cachepath>C:/DNCache.xml</cachepath><cachename>sampleCacheNoIdle</cachename></dncache><ncache><cachename>TestCache</cachename></ncache>•
<CEPMMOSSAgent> mode attribute—Set its value to On, to enable the authorization of MOSS application using SharePoint Agent. If set to Off, the SharePoint Agent will not be used for authorization of MOSS application.
•
–
–
–
–
•
•
•
Example for Configuring Windows Principal
<SubjectIdentity type="Principal" value="System.Security.Principal.WindowsPrincipal"/><SubjectIdentityAttribute value="Identity.Name"/>Example for Configuring Custom Principal
<SubjectIdentity type="Principal" value="namespace.classname"/><SubjectIdentityAttribute value="classname.propertyname"/>•
•
•
•
•
Note
•
•
•
•
•
If the resource type is page, the <moss-resource> tag should look like
<moss-resource type="pages" mode="off"></moss-resource>If the resource type is webpart, the <moss-resource> tag should look like<moss-resource type="webparts" mode="on"></moss-resource>If the resource type is document, you can synchronize document metadata values into CEPM PAP by setting the <syncmetadata> tag to true. You can pass the document metadata as environment variables in <metadata> tag. If the value is `all' then all the metadata of the document will be passed as an environment variables for the request. If the value is other than `all' then you can pass comma seperated Property Names for the metadata such as Department, Author, etc.
Caution
For example -<moss-resource type="documents" mode="off"><syncmetadata>true</syncmetadata><metadata>Department,Author</metadata></moss-resource>If the resource type is item, the <moss-resource> tag should look like
<moss-resource type="items" mode="off"></moss-resource>
Note
Configuring Membership and Role Providers
Membership Provider
MOSS model allows the use of forms-based authentication (FBA) to authenticate users as well as groups into the system. If you want your MOSS application to use CEPM as the source of users, enter the following text in the web.config file.
<membership defaultProvider="CEPMMembershipProvider"><providers><add name="CEPMMembershipProvider" type="Com.Cisco.agent.sharepoint.CEPMMembershipProvider, Com.Cisco.Agent.SharePoint, Version=3.3.0.0, Culture=neutral, PublicKeyToken=5e4be1f4e6ef363a" enablePasswordRetrieval="false" enablePasswordReset="true" requiresQuestionAndAnswer="true" applicationName="/" requiresUniqueEmail="false" passwordFormat="Hashed" maxInvalidPasswordAttempts="5" minRequiredPasswordLength="7" minRequiredNonalphanumericCharacters="1" passwordAttemptWindow="10" passwordStrengthRegularExpression="" /></providers></membership>Set the defaultProvider attribute value to CEPMMembershipProvider (its value should be the same as the one set for the name attribute).
Set the applicationNameFQN (that is, application group name:application name) attribute value to the name of the MOSS application that you want to protect. The application group name and application name must be same as entered in the pep_config.xml file.
Role Provider
As described earlier, MOSS Site model allows the use of forms-based authentication (FBA) to authenticate users as well as groups into the system. By riding on top of CEPM model, you can now support roles created within the PAP that have a role provider. If you want to create the roles into your MOSS application from the roles that are created in CEPM, enter the following text in the web.config file.
Note
<roleManager defaultProvider="CEPMRoleProvider" enabled="true"><providers><add name="CEPMRoleProvider" connectionStringName="" applicationName="/" type="Com.Cisco.Agent.Sharepoint.CEPMRoleProvider, Com.Cisco.Agent.SharePoint, Version=3.3.0.0, Culture=neutral, PublicKeyToken=5e4be1f4e6ef363a" /></providers></roleManager>Set the enabled attribute value to true. Set its value to false if you do not want to use CEPMRoleProvider. Set the defaultProvider value to CEPMRoleProvider (its value should be the same as the one set for the name attribute).
Set the applicationName attribute value to the name of the MOSS application that you want to protect (same as entered in the pep_config.xml file).
Refer to Appendix A, "Configuring Membership and Role Provider," for more step-by-step instructions on how to configure memebership provider and role provider.
Synchronizing MOSS Resources with CEPM
Resource synchronization between the MOSS application and the PAP can be done on one-to-one basis or many-to-one basis. By default, the one-to-one synchronization is enabled. If you mention a property name in the OverrideResourceFQN tag, the many-to-one synchronization is enabled.
UI-based Synchronization
When the PAP is integrated with the SharePoint application, various controls (such as, directories, files, Web Parts, and actions) from the SharePoint application get created as resources in the PAP.
This happens due to the execution of the SharePoint Agent component. The mechanism by which this integration happens is called the Resource Discovery Mechanism.
To enable UI-based resource synchronization, follow these steps:
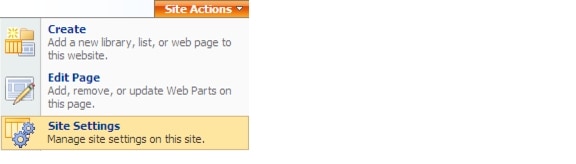
Step 1
Step 2
Figure 4-1 SIte Actions
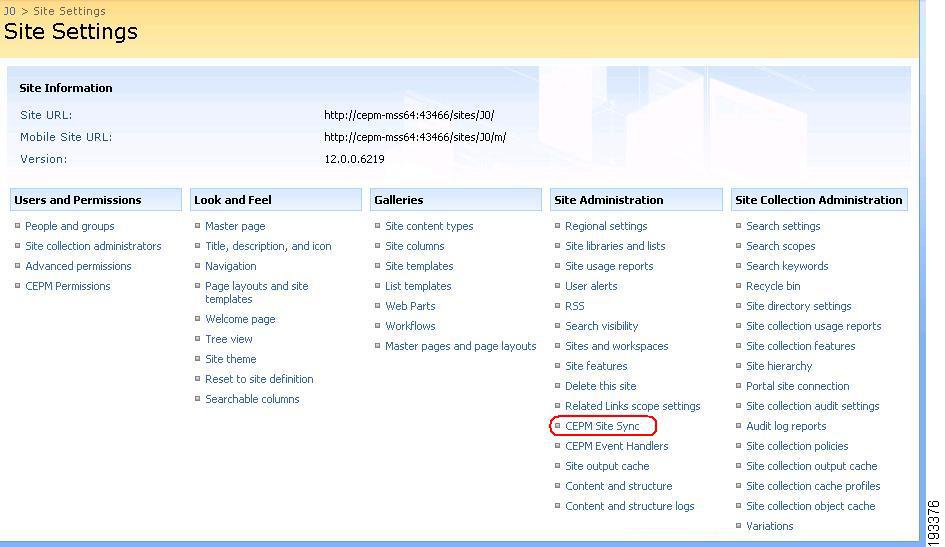
The Site Settings page is displayed.
Step 3
Figure 4-2 Site Settings
Create Resource Hierarchy page is displayed
Figure 4-3 Create Resource Hierarchy
Step 4
•
•
•
You can verify the resource synchronization by navigating Home > Manage Entities > Resources page.
Note
Figure 4-4 Internet Explorer error message
You can temporarily avoid this problem in the following ways:
•
OR
•
–
HKEY_CURRENT_USER\Software\Microsoft\InternetExplorer\StylesIf the Styles key is not present, create a new key called Styles.
–
This setting will temporarily resolve this problem. It may reoccur once the number of script statements exceeds the given value.
Command Line-Based Synchronization
CEPM also provides a tool that can be used to synchronize the resources in the MOSS application with the PAP in an asynchronous way. It is an executable file named SharePointResourceDiscovery.exe, which is included in the Cisco_EPM_SharePoint.zip file.
When you execute this file, the resources present in the MOSS application are created in the PAP.
Use this usage information to execute the SharePointResourceDiscovery.exe file at the command line.
SharePointResourceDiscovery [Site URL and port] [Path to pep_config.xml file]•
•
For example,
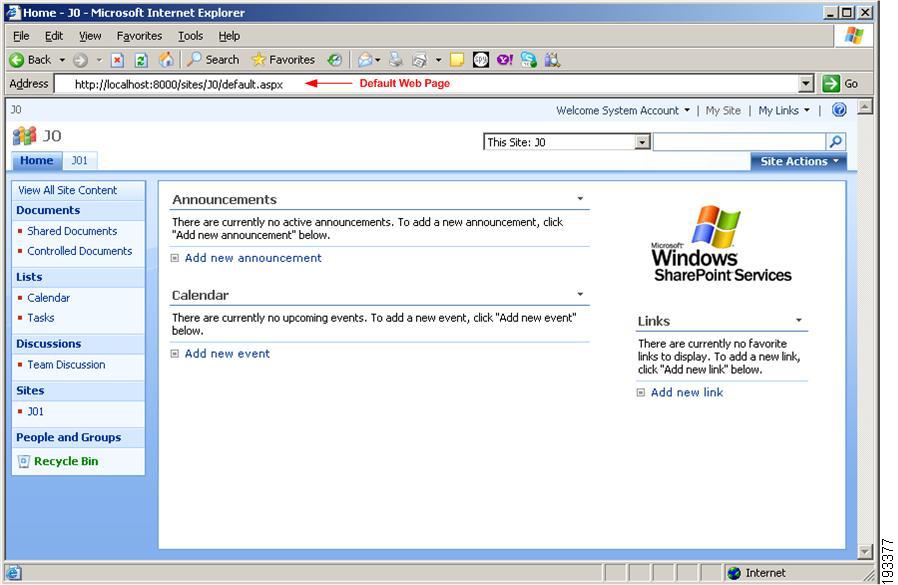
SharePointResourceDiscovery http://www.myMOSSSite.com:8080
c:\CEPM-V3.3.0.0\config\pep\pep_config.xml
MOSS Application Web Pages
The MOSS application is a web application and hence consists of numerous web pages. Following figure shows a sample web page called the default web page.
Figure 4-5 Sample site content
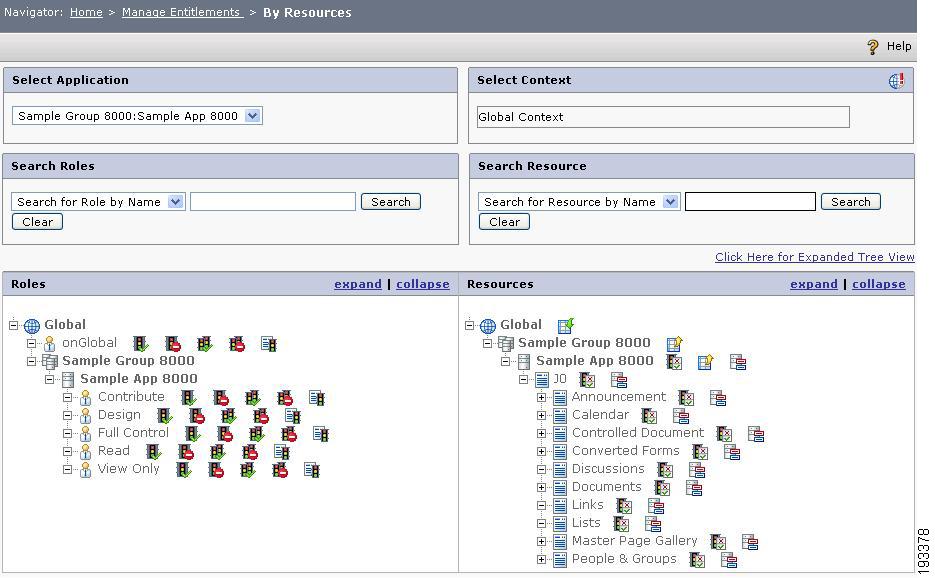
When the site sync is done, all the webparts will be created as individual resources in CEPM PAP console. You can create policies on these resources to provide the access permission to the users.
Figure 4-6 CEPM resource tree showing site content as resources
For example, a Deny policy is created for the web page resource called Calendar for the role called Design. When a SharePoint user belonging to the Design role tries to access the Calendar web page, the Access Denied page will be displayed. This Access Denied Pag is configured in the defaultTarget attribute of the <RedirectURL> tag in the pep_config.xml file.
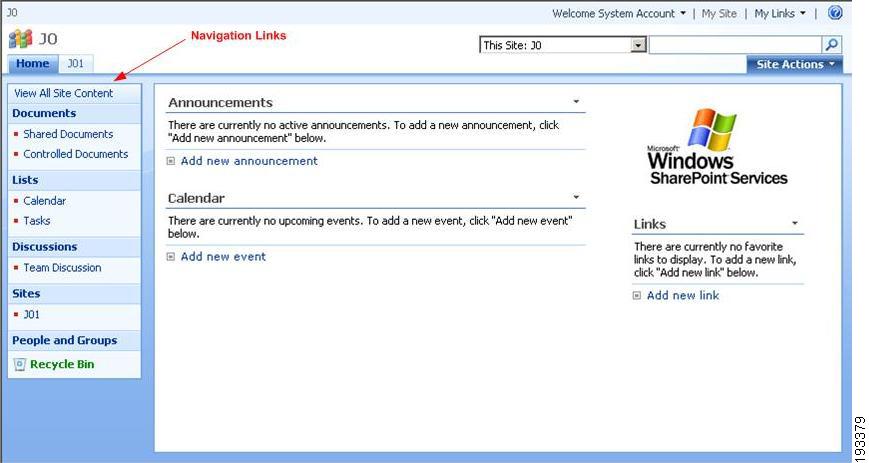
MOSS Application Navigation Links
MOSS provides the navigation menu on the left-side of the web pages to view items such as, Documents, Calendar, Tasks, and Discussions. Using CEPM, you can protect a particular navigation link by defining appropriate access control policies in CEPM.
Figure 4-7 Navigation links
Protecting MOSS Application Navigation Links Using CEPM
You can protect the MOSS Application Navigation Link by configuring the Deny Policy for those links in PAP Console as shown below.
Figure 4-8 Protecting site navigation links in CEPM
Here the Deny policy is created for the Documents navigation link resource for the Limited Access role. Thus when a SharePoint user belonging to the Limited Access role logs in to the MOSS application, the Documents navigation link will not be visible to that user.
Note
MOSS Application Web Parts
Every Web Part of your MOSS application is called as a control. The following Web Parts can be accommodated within your MOSS application:
•
•
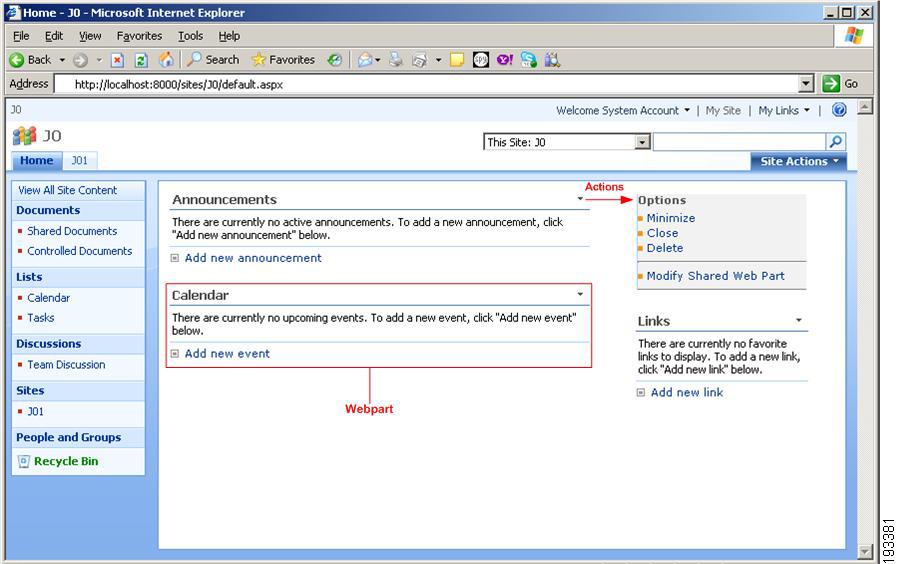
When you create a resource of type Web Part, few default actions get created for it in the MOSS application. Some such actions are minimize, maximize, and close.
A sample Web Part with actions is shown in the following figure.
Figure 4-9 Webparts
The PAP considers each Web Part as a resource. These resources should be of type webpart. So in the PAP resource hierarchy, when you create a resource of type webpart, it will also create the default actions under that Web Part as its child resources. Using CEPM, you can protect these resources and actions by defining appropriate access control policies.
Protecting MOSS Application Web Parts Using CEPM
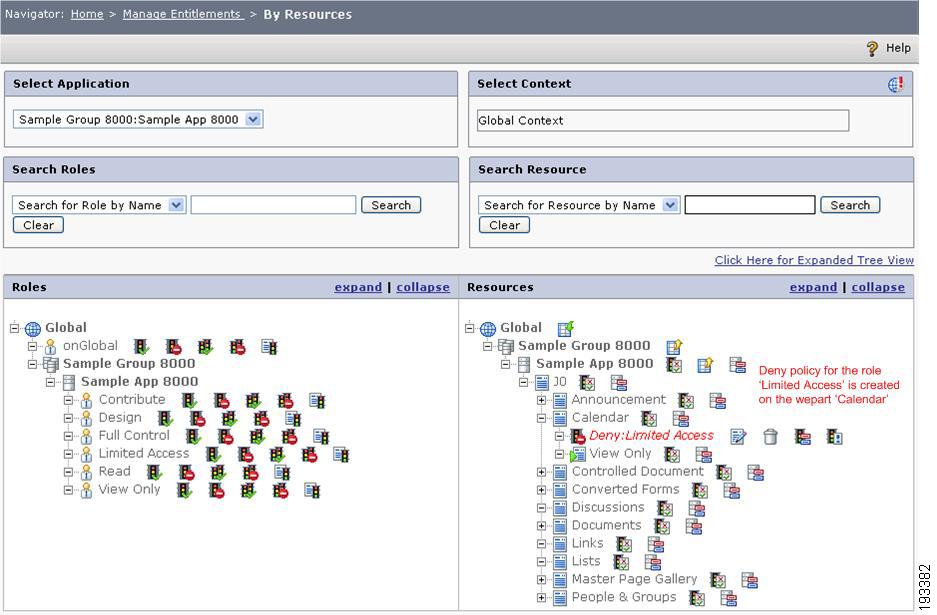
You can protect the MOSS application Web Part by configuring the Deny policy for the Web Part Resource in PAP Console as shown in the following figure.
Figure 4-10 Protecting webparts in CEPM
Here the Deny policy is created for the Calendar Web Part resource for the Limited Access role. Thus when a SharePoint user belonging to the Limited Access role logs in to the MOSS application, the Calendar Web Part will not be visible to that user.
MOSS Application Document Libraries
It is often a challenging task for the MOSS administrator to grant effective access control over SharePoint resources such as document libraries, folders, and documents. Rules provide fine-grained authorization while evaluating a policy.
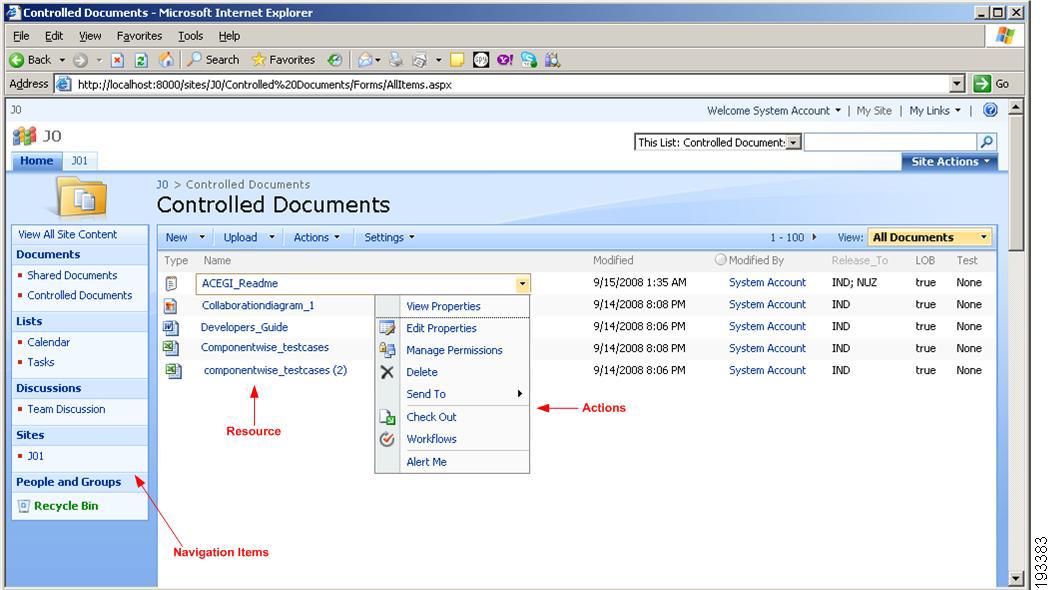
Configuring Rules for SharePoint Document Library
When a document is created in a SharePoint application, then SharePoint provides the user with various actions for that document, such as View/Edit Properties, Manage Permissions, and Delete document, as shown in the following figure.
Figure 4-11 SharePoint Document library
In CEPM, when a resource of type document is created, then some default actions are also created for that resource in the form of child resources. This enables the user to formulate the access control policies on the SharePoint documents and its actions.
CEPM allows the policy administrators to create simple rules and complex rules on a policy. Multiple simple rules can be joined together using "AND" and "OR" operators. Once the simple rules are configured, you can create multiple complex rules using the simple rules. Likewise, a Rule may contain one or more conditions which can be joined together using "AND" and "OR" operators. Each condition has a LHS value, an Operator and a RHS value.
As an example, if you wish to limit the view of users located in USA to documents which are released only to USA in a document library, you can do so by configuring a rule.
The following example describes how to configure simple as well as complex rules for an effective access control of the resources stored in the document library. A Site called J0 is created in the SharePoint Farm. This site has a document library entitled Controlled Documents.
Following the Site Sync using CEPM SharePoint Agent, SharePoint entities (Document Libraries, folders, documents) are created in CEPM PAP. At the same time, document metadata is created as the resource type attributes.
Following step must be taken for configuring a rule for the document library in CEPM PAP:
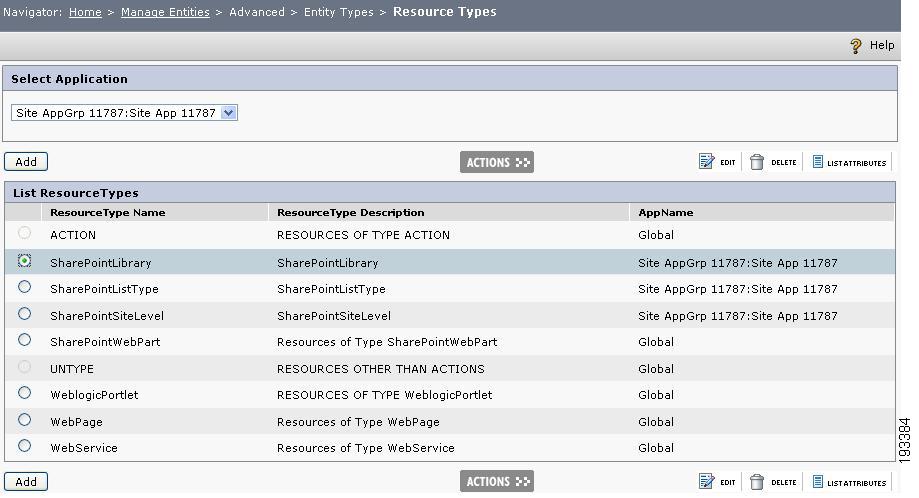
Step 1
Figure 4-12 Resource types
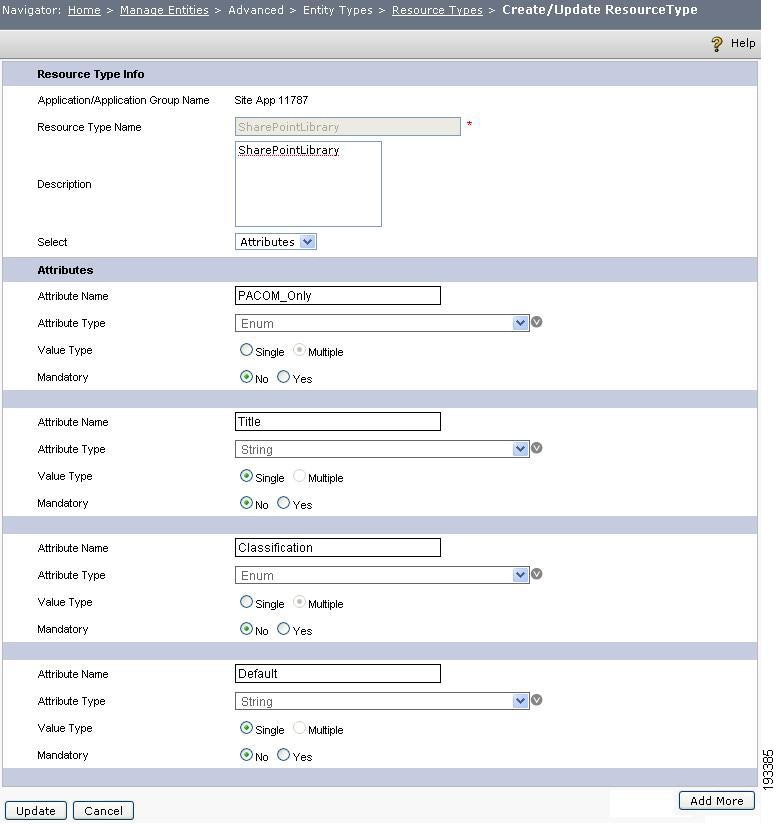
Step 2
Figure 4-13 Resource type attributes
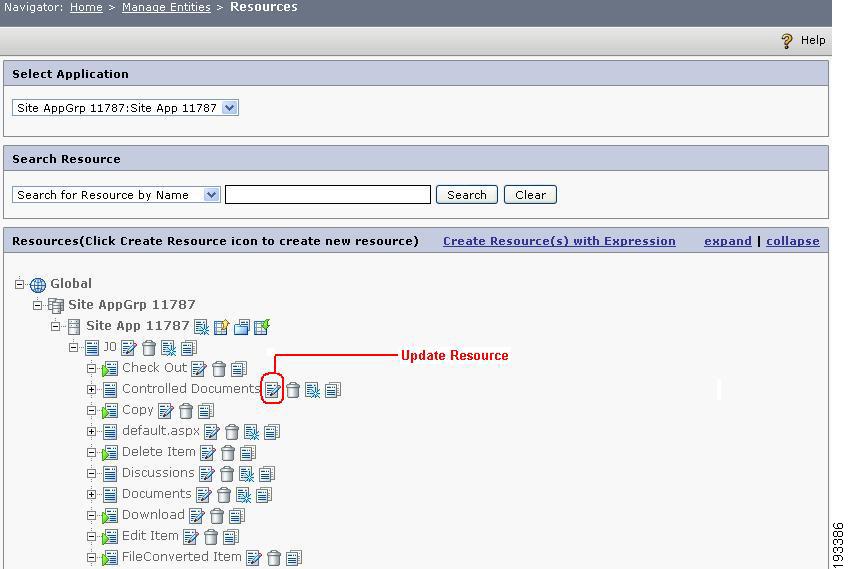
Step 3
Figure 4-14 Resource page
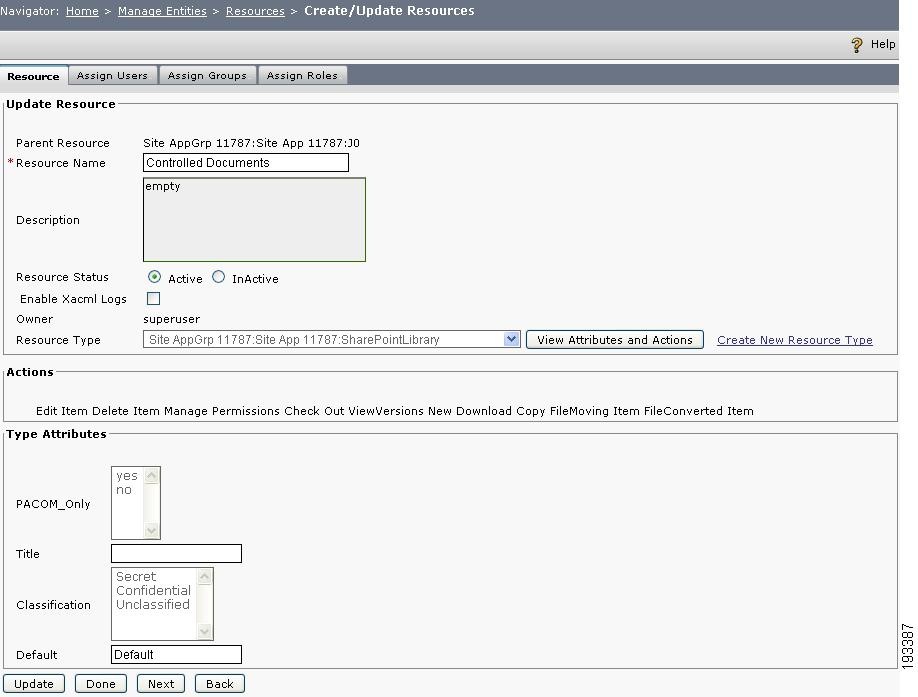
Step 4
Figure 4-15 Update resource
As shown in Figure 4-15, the resource named Controlled Documents has a Resource Type value of SharePointLibrary. This resource also has few other attributes such as Default, Title, Classification, etc. The classification attribute has three values Secret, Confidential and Unclassified. Likewise, you can verify any resource for its resource types and attributes.
Step 5
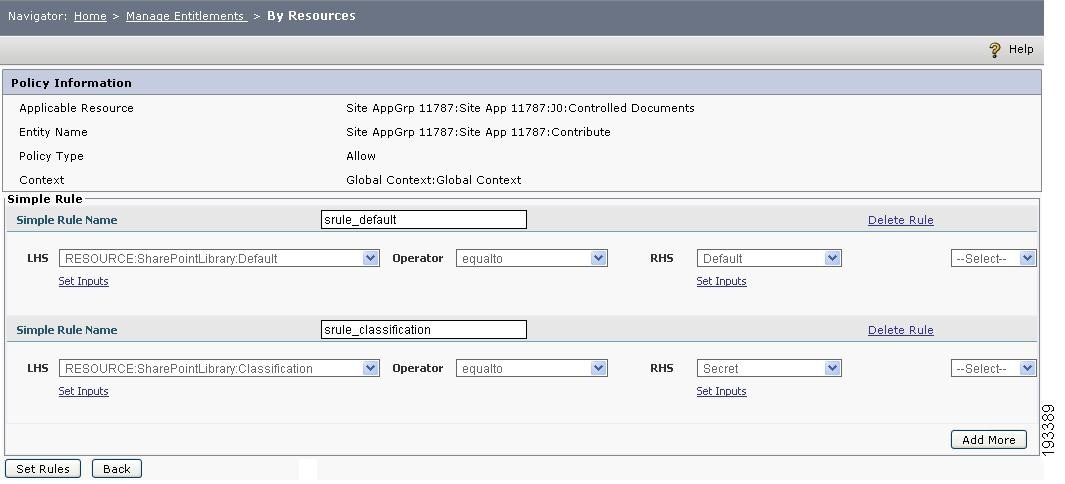
Figure 4-16 Create simple rules
In this page, the LHS and RHS dropdowns contain all the default attributes as well as other entity type attributes created under the chosen application.
Create a rule called SRule-Default, for which choose Resource:SharePointLibrary:Default as the LHS parameter, equal to as the operator and type Default in the RHS. This is a default rule that must be created to allow users to access the SharePoint folders.
Create another rule called SRule-Classification. For this rule, choose Resource:Shared Documents:Classification as the LHS parameter. choose equal to as the operator and choose Secret in the RHS.
Click Set Rules. This will get you back to the Rules Editor page.
Step 6
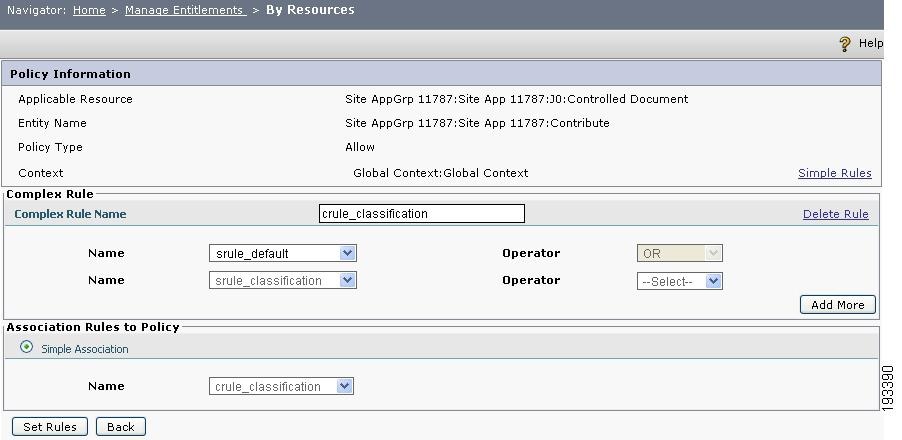
Figure 4-17 Create complex rules
Create a complex rule called crule-classification using the above created simple rules conjoined with OR operator such as "SRule-Default OR SRule-Classification".
In the Association Rule In policy section, choose crule-classification as the simple association. Click Set Rules.
So the rule can be read as—Resource:Controlled Documents:Classification equal to Secret. This implies pass the rule if the Classification attribute of the requested resource is Secret.
MOSS Search Security Trimmer
Enterprise Search in MOSS 2007 performs security trimming of search results at query time. The results are trimmed based on the identity of the user submitting the query, by using the security information obtained from the crawler. You might have certain scenarios, however, in which the built-in security trimming results are not sufficient for your requirements and you need to implement custom security trimming. Enterprise Search provides support for custom security trimming through the ISecurityTrimmer interface.
Note
This section provides information about the ISecurityTrimmer interface, and describes the following steps necessary to use a custom security trimmer for Enterprise Search:
•
Registering Custom Security Trimmer
This section describes how to deploy, and register a custom security trimmer for Enterprise Search in MOSS 2007. To make use of the custom security trimmer, follow these steps:
Step 1
•
•
•
•
•
•
•
Step 2
•
•
•
•
•
•
•
•
•
•
•
Step 3
Step 4
•
•
•
Step 5
•
•