Cisco Packaged Contact Center Enterprise レポート ユーザ ガイド リリース 10.0(1)
偏向のない言語
この製品のマニュアルセットは、偏向のない言語を使用するように配慮されています。このマニュアルセットでの偏向のない言語とは、年齢、障害、性別、人種的アイデンティティ、民族的アイデンティティ、性的指向、社会経済的地位、およびインターセクショナリティに基づく差別を意味しない言語として定義されています。製品ソフトウェアのユーザーインターフェイスにハードコードされている言語、RFP のドキュメントに基づいて使用されている言語、または参照されているサードパーティ製品で使用されている言語によりドキュメントに例外が存在する場合があります。シスコのインクルーシブランゲージに対する取り組みの詳細は、こちらをご覧ください。
翻訳について
このドキュメントは、米国シスコ発行ドキュメントの参考和訳です。リンク情報につきましては、日本語版掲載時点で、英語版にアップデートがあり、リンク先のページが移動/変更されている場合がありますことをご了承ください。あくまでも参考和訳となりますので、正式な内容については米国サイトのドキュメントを参照ください。
- Updated:
- 2017年6月23日
章のタイトル: レポートのスケジュール
目次
レポート スケジューラの概要
レポートのスケジュール設定、生成、および電子メール送信に [スケジューラ(Scheduler)] を使用します。
スケジュール設定されたレポートの表示、編集、実行に [スケジュール リスト(Schedule List)] を使用します。
次のいずれかの方法でレポートをスケジュール設定できます。
レポートのスケジュール作成
ダッシュボードにスケジュール設定されたレポートを作成するには、次の手順に従います。
 (注) |
レポートによっては、ダッシュボード内で自動的に実行されるようにスケジュール設定できます。 たとえば、間隔レポートを 30 分ごとに実行して以前の間隔までの今日のアクティビティをキャプチャできます。 |
(注) |
ライブ データではスケジューリングはサポートされません。 |
| ステップ 1 | スケジューラで、[作成(Create)] をクリックします。 | ||||
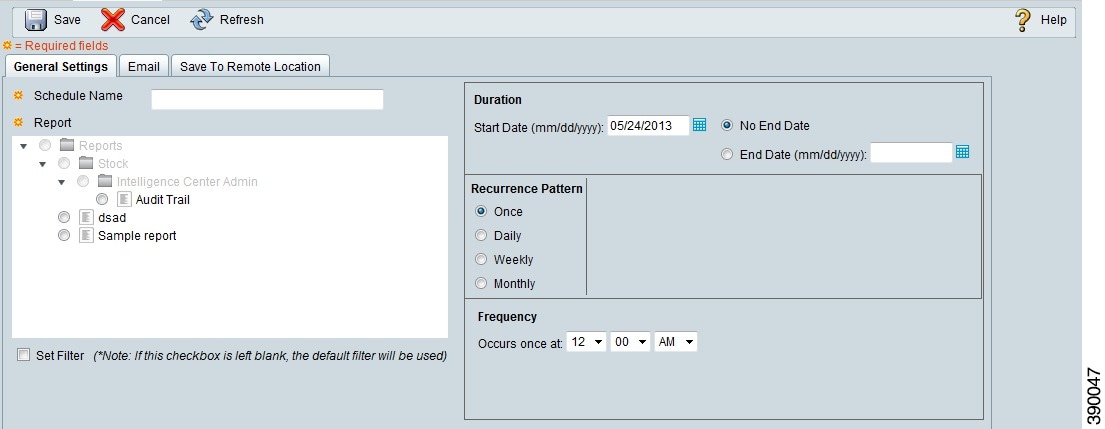
| ステップ 2 | [全般設定(General Settings)] タブで、スケジュール レポートの [スケジュール名(Schedule Name)] を入力します。 | ||||
| ステップ 3 | [レポート(Report)] ドロップダウン メニューを使用して、レポートを選択します。 | ||||
| ステップ 4 |
フィルタを設定するには、[フィルタの設定(Set Filter)] チェックボックスをオンにします。 デフォルト フィルタを使用するには、このチェックボックスをオフにしてください。 フィルタを持たないレポートをスケジュール設定することはできません。 |
||||
| ステップ 5 |
[フィルタ条件の設定(Set filtering criteria)] リンクをクリックし、フィルタ設定ページに移動します。
|
||||
| ステップ 6 | [期間(Duration)] セクションで、カレンダーのアイコンをクリックし、[開始日(Start Date)] を選択して [終了日なし(No End Date)] をオンにするか、[終了日(End Date)] にカレンダーのアイコンを使用します。 | ||||
| ステップ 7 |
[定例(Recurrence)] セクションで、スケジュール設定されたレポートの頻度を指定します。 次のいずれかのオプションを選択します。
[頻度(Frequency)] セクションで、スケジュール設定された日にレポートを実行する必要がある回数を指定します。
|
||||
| ステップ 8 | [保存(Save)] をクリックします。 |
スケジュール設定されたレポートの電子メールによる送信設定
スケジューラで [電子メール(Email)] タブをクリックし、スケジュール設定されたレポートを電子メールで送信するようにスケジュール設定します。
Administration Console の電子メール サーバを設定します。 不明な点については管理者に連絡するか、『Cisco Unified Intelligence Center Administration Guide』を参照してください。
リモート ロケーションに投稿するレポートの設定
スケジューラで、[リモート ロケーションに保存(Save to Remote Location)] をクリックしてレポートを投稿します。
| ステップ 1 | [プロトコル(Protocol)] ドロップダウン リストから [SFTP] を選択して、リモート ロケーションへのセキュアな接続を確立します。 | ||
| ステップ 2 | [レポート ビュー(Report View)] ドロップダウン リストから投稿するレポートのビューを選択します。 | ||
| ステップ 3 | [ホスト(Host)] フィールドに、リモート ロケーションの IP アドレスを入力します。 | ||
| ステップ 4 |
SFTP の [ポート番号(Port number)] を入力します。
|
||
| ステップ 5 | ホストの [ユーザ名(User name)] を入力します。 | ||
| ステップ 6 | ホストの [パスワード(Password)] 入力します。 | ||
| ステップ 7 | [ディレクトリ パス(Directory Path)] フィールドに、.csv ファイルを保存するホストの場所を入力します。 | ||
| ステップ 8 | [保存(Save)] をクリックします。 |
レポートのスケジュール作成
手順ダッシュボードにスケジュール設定されたレポートを作成するには、次の手順に従います。
(注)
レポートによっては、ダッシュボード内で自動的に実行されるようにスケジュール設定できます。 たとえば、間隔レポートを 30 分ごとに実行して以前の間隔までの今日のアクティビティをキャプチャできます。
(注)
ライブ データではスケジューリングはサポートされません。
ステップ 1 スケジューラで、[作成(Create)] をクリックします。 ステップ 2 [全般設定(General Settings)] タブで、スケジュール レポートの [スケジュール名(Schedule Name)] を入力します。 ステップ 3 [レポート(Report)] ドロップダウン メニューを使用して、レポートを選択します。 ステップ 4 フィルタを設定するには、[フィルタの設定(Set Filter)] チェックボックスをオンにします。 デフォルト フィルタを使用するには、このチェックボックスをオフにしてください。 フィルタを持たないレポートをスケジュール設定することはできません。
ステップ 5 [フィルタ条件の設定(Set filtering criteria)] リンクをクリックし、フィルタ設定ページに移動します。
(注) 詳細については、フィルタのタイプを参照してください。
ステップ 6 [期間(Duration)] セクションで、カレンダーのアイコンをクリックし、[開始日(Start Date)] を選択して [終了日なし(No End Date)] をオンにするか、[終了日(End Date)] にカレンダーのアイコンを使用します。 ステップ 7 [定例(Recurrence)] セクションで、スケジュール設定されたレポートの頻度を指定します。 次のいずれかのオプションを選択します。
- [1 回(Once)]:単一オカレンスの時刻を指定します。
- [毎日(Daily)]:日の反復数(たとえば 4 日ごと)を指定します。
- [毎週(Weekly)]:スケジュール設定されたレポートを実行する週数および曜日を指定します。
(注) 月の最後の日を指定するには、[最後(Last)] を使用します。 [頻度(Frequency)] セクションで、スケジュール設定された日にレポートを実行する必要がある回数を指定します。
(注) レポートをスケジュール設定できる最大頻度は 5 分に 1 回です。
ステップ 8 [保存(Save)] をクリックします。
スケジュール設定されたレポートの電子メールによる送信設定
はじめる前に手順Administration Console の電子メール サーバを設定します。 不明な点については管理者に連絡するか、『Cisco Unified Intelligence Center Administration Guide』を参照してください。
ステップ 1 [メールの配信(Email Distribution)] フィールドで [追加(Add)] をクリックし、受信者の電子メール アドレスを入力します。
ヒント ステップ 1 を繰り返して複数の受信者を追加します。
(注) [メールの配信(Email Distribution)] フィールドにメール ID が入力されると、メール ページの検証が行われます。 [メールの配信(Email Distribution)] フィールドにメール ID が入力されなければ、検証は行われません。
ステップ 2 [メール ビュー(Email View)] ドロップダウン メニューを使用して、電子メールを送信するレポートのビューを選択します。
(注) スケジュール設定できるのはグリッド ビューだけです。
ステップ 3 [メールの件名(Email Subject)] フィールドに、件名行のテキストを入力します。 ステップ 4 [ファイルの種類(File Types)] ドロップダウン メニューを使用して、ファイルの種類を選択します。 次のいずれかを実行します。
- [PDF]:PDF の添付ファイルとしてレポートを送信します。 PDF 添付ファイルには次の制限があります。
- 生成された PDF は、縦方向または横方向のいずれかになります。 横方向がデフォルト設定です。
- 生成された PDF は、標準サイズのフォントを使用します(横向きの場合は 10px、縦向きの場合は 8px)。 PDF を印刷しやすいよう、グリッド ビュー エディタで設定されたフォント サイズは無視されます。
(注) PDF では HTTP 形式の画像だけがサポートされます。
- 生成された PDF には、選択された向きのページ内に収まる行だけが表示されます。 ページ内に収まらない行は切り取られます。
- PDF の添付ファイルでは、1000 行までサポートされます。 電子メール メッセージは、スケジュール設定されたレポートが 1000 行を超えると送信されます。
- 生成された PDF は、カラムの右端での折り返しをサポートしません。 より大きなテキストの場合、重複を避けるためにグリッド エディタのカラムの幅をカスタマイズできます。 ただし、PDF に表示されるカラムの数が少なくなる可能性があることに注意してください。
ステップ 5 [保存(Save)] をクリックします。
リモート ロケーションに投稿するレポートの設定
手順
ステップ 1 [プロトコル(Protocol)] ドロップダウン リストから [SFTP] を選択して、リモート ロケーションへのセキュアな接続を確立します。 ステップ 2 [レポート ビュー(Report View)] ドロップダウン リストから投稿するレポートのビューを選択します。 ステップ 3 [ホスト(Host)] フィールドに、リモート ロケーションの IP アドレスを入力します。 ステップ 4 SFTP の [ポート番号(Port number)] を入力します。
(注) 使用するデフォルトのポート番号は 22 です。
ステップ 5 ホストの [ユーザ名(User name)] を入力します。 ステップ 6 ホストの [パスワード(Password)] 入力します。 ステップ 7 [ディレクトリ パス(Directory Path)] フィールドに、.csv ファイルを保存するホストの場所を入力します。 ステップ 8 [保存(Save)] をクリックします。
 フィードバック