Cisco Connected Mobile Experiences Configuration Guide, Release 10.1
Bias-Free Language
The documentation set for this product strives to use bias-free language. For the purposes of this documentation set, bias-free is defined as language that does not imply discrimination based on age, disability, gender, racial identity, ethnic identity, sexual orientation, socioeconomic status, and intersectionality. Exceptions may be present in the documentation due to language that is hardcoded in the user interfaces of the product software, language used based on RFP documentation, or language that is used by a referenced third-party product. Learn more about how Cisco is using Inclusive Language.
- Updated:
- May 12, 2015
Chapter: Managing Cisco CMX Configuration
Managing Cisco CMX Configuration
Overview of the Manage Service
The Cisco Connected Mobile Experiences (Cisco CMX) MANAGE service comprises the following tabs, which help you perform a variety of tasks to effectively manage the Cisco CMX configuration, including, but not restricted to those listed here:
- Locations —Enables you to manage and add location zones and tags.
- BLE Beacons —Enables you to manage and add Bluetooth low energy (BLE) beacons
- Notifications —Enables you to manage and add email and HTTP notifications
- Licenses —Enables you to manage and add licenses
- Users —Enables you to manage and add users

Note![]() All tasks can be performed by only users with corresponding user roles. For information on user roles, see the “User Roles” section.
All tasks can be performed by only users with corresponding user roles. For information on user roles, see the “User Roles” section.
Managing Licenses
To view the list of licenses that your Cisco Connected Mobile Experiences (Cisco CMX) system has, log in to Cisco CMX and choose MANAGE > Licenses. The list of licenses is displayed in the Licenses page.
For information about the licenses required to operate Cisco CMX, see the Cisco CMX 10.1 Ordering and Licensing Guide.
Note![]() Cisco CMX Release 10.1 comes with a 120-day full-functionality evaluation license. All the Access Points (APs) connected to Cisco CMX must be licensed.
Cisco CMX Release 10.1 comes with a 120-day full-functionality evaluation license. All the Access Points (APs) connected to Cisco CMX must be licensed.
Adding a License
Step 1![]() Log in to Cisco Mobile Connected Experiences (Cisco CMX).
Log in to Cisco Mobile Connected Experiences (Cisco CMX).
Step 2![]() Choose MANAGE > Licenses.
Choose MANAGE > Licenses.
Step 3![]() In the Licenses page, click See Installed Licenses to view the list of installed licenses.
In the Licenses page, click See Installed Licenses to view the list of installed licenses.
The UPLOAD LICENSE dialog box is displayed.
Step 5![]() Click Browse to select the corresponding license file, and then click Upload.
Click Browse to select the corresponding license file, and then click Upload.
Deleting a License
Step 1![]() Log in to Cisco Mobile Connected Experiences (Cisco CMX).
Log in to Cisco Mobile Connected Experiences (Cisco CMX).
Step 2![]() Choose MANAGE > Licenses.
Choose MANAGE > Licenses.
Step 3![]() In the Licenses page, click See Installed Licenses to view the list of installed licenses.
In the Licenses page, click See Installed Licenses to view the list of installed licenses.
Step 4![]() In the Action column adjacent the license you want to delete, click Delete.
In the Action column adjacent the license you want to delete, click Delete.
The DELETE LICENSE dialog box is displayed.
Step 5![]() Click Delete License to proceed with the deletion.
Click Delete License to proceed with the deletion.
Managing Users
Cisco Connected Mobile Experiences (Cisco CMX) is shipped with a default admin user account and password. An admin user can add, edit, and delete other users.
Adding a User
Step 1![]() Log in to Cisco Mobile Connected Experiences (Cisco CMX).
Log in to Cisco Mobile Connected Experiences (Cisco CMX).
The Users page, where all the current users are listed, is displayed.
Step 3![]() Click New User at the bottom of the table.
Click New User at the bottom of the table.
The ADD NEW USER dialog box is displayed.
Step 4![]() Enter the details and select one or more roles for the user from the Roles drop-down list.
Enter the details and select one or more roles for the user from the Roles drop-down list.
For information about the roles available for selection, see the “User Roles” section.
User Roles
Your Cisco Connected Mobile Experiences (Cisco CMX) system comes with the following services, depending on whether or not you have the license for that service:
- SYSTEM service (Included with Cisco CMX base license)
- MANAGE service (Included with Cisco CMX base license)
- DETECT & LOCATE service (Included with Cisco CMX base license)
- CONNECT & ENGAGE service (Included with Cisco CMX base license)
- ANALYTICS service (Provided only with Cisco CMX advanced license. Not included with Cisco CMX base license.)
When setting up users in Cisco CMX, you can select one or more roles for each user. Each role provides access privileges to one or more services, provided your license includes those services.
See Table 5-1 for a description of the access privileges associated with each role.
|
|
|
|---|---|
Note ●![]() A user may be allocated the System, Manage, Location, Analytics, and Connect roles. This allows the user to function like an admin user. Such non-admin users can be deleted by admin users, but not vice-versa.
A user may be allocated the System, Manage, Location, Analytics, and Connect roles. This allows the user to function like an admin user. Such non-admin users can be deleted by admin users, but not vice-versa.
Changing the Default Admin Password
Step 1![]() Log in to Cisco Mobile Connected Experiences (Cisco CMX).
Log in to Cisco Mobile Connected Experiences (Cisco CMX).
The Users page, where new users can be added and the roles of existing users modified, is displayed.
Step 3![]() Click Edit in the Actions column adjacent the admin user.
Click Edit in the Actions column adjacent the admin user.
This opens the EDIT USER dialog box for that admin user.
Step 4![]() Change the default factory-shipped admin password.
Change the default factory-shipped admin password.
Editing User Information
Step 1![]() Log in to Cisco Mobile Connected Experiences (Cisco CMX).
Log in to Cisco Mobile Connected Experiences (Cisco CMX).
The Users page, where all the current users are listed, is displayed.
Step 3![]() Click Edit in the Actions column adjacent the user whose details you want to edit.
Click Edit in the Actions column adjacent the user whose details you want to edit.
The EDIT USER dialog box is displayed.
Step 4![]() Edit the details of the user. Note that the username cannot be edited.
Edit the details of the user. Note that the username cannot be edited.
For information about user roles, see the “User Roles” section.
Deleting a User
Step 1![]() Log in to Cisco Mobile Connected Experiences (Cisco CMX).
Log in to Cisco Mobile Connected Experiences (Cisco CMX).
The Users page, where all the current users are listed, is displayed.
Step 3![]() Click Delete in the Actions column adjacent the user whose details you want to delete.
Click Delete in the Actions column adjacent the user whose details you want to delete.
The DELETE USER dialog box is displayed.
Step 4![]() To proceed with the deletion, click Delete User.
To proceed with the deletion, click Delete User.
Managing Perimeters and Zones on Location Maps
- Viewing Campus, Building, Floor, and Zone Details
- Creating a Perimeter
- Deleting a Perimeter
- Editing a Perimeter
- Creating a Zone
- Deleting a Zone
- Editing a Zone
Viewing Campus, Building, Floor, and Zone Details
Step 1![]() Log in to Cisco Mobile Connected Experiences (Cisco CMX).
Log in to Cisco Mobile Connected Experiences (Cisco CMX).
Step 2![]() Choose MANAGE > Locations.
Choose MANAGE > Locations.
Step 3![]() In the left pane of the page that is displayed, click Campus, Building, Floor, or Zone depending on the area you want to view.
In the left pane of the page that is displayed, click Campus, Building, Floor, or Zone depending on the area you want to view.
Items corresponding to the area selected are displayed as boxes.
Step 4![]() Click the curved arrow at the top-right corner of each item box to view details pertaining to that item.
Click the curved arrow at the top-right corner of each item box to view details pertaining to that item.
This opens the Zone Editor map view displaying a floor map.
Note![]() The curved arrow at the top-right corner of a floor box is called the Go to map view arrow. This arrow in available on the box of items at any level. For example, for a building, this opens the first floor. For a campus, this opens the first floor of the first building. You can then switch to other buildings and floors in that campus.
The curved arrow at the top-right corner of a floor box is called the Go to map view arrow. This arrow in available on the box of items at any level. For example, for a building, this opens the first floor. For a campus, this opens the first floor of the first building. You can then switch to other buildings and floors in that campus.
Creating a Perimeter
Step 1![]() Log in to Cisco Mobile Connected Experiences (Cisco CMX).
Log in to Cisco Mobile Connected Experiences (Cisco CMX).
Step 2![]() Choose MANAGE > Locations.
Choose MANAGE > Locations.
Step 3![]() In the left pane of the page that is displayed, click Zone.
In the left pane of the page that is displayed, click Zone.
The Zone Item boxes are displayed.
Step 4![]() Click the Subzone in the corresponding zone.
Click the Subzone in the corresponding zone.
Step 5![]() In the Zone Editor page, click the Create a Perimeter
In the Zone Editor page, click the Create a Perimeter  icon.
icon.
The cursor changes to a drawing tool.
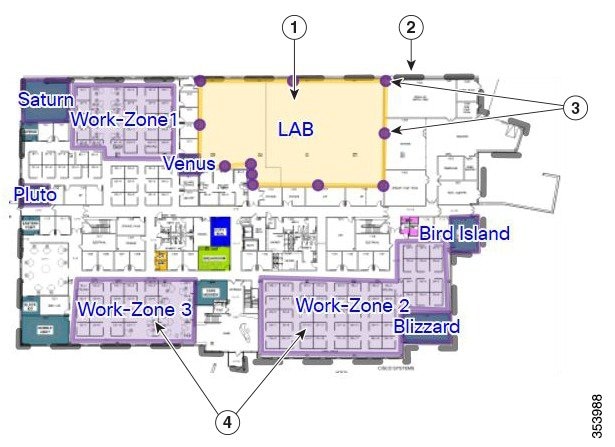
Step 6![]() Click each point that you want to designate as a vertex of the perimeter. Double-click the last vertex point to complete marking the vertices of the perimeter and closing the perimeter. See Figure 5-1.
Click each point that you want to designate as a vertex of the perimeter. Double-click the last vertex point to complete marking the vertices of the perimeter and closing the perimeter. See Figure 5-1.
When you double-click the last vertex point, the CREATE A PERIMETER dialog box opens.
Step 7![]() Click Add to add this perimeter to the floor.
Click Add to add this perimeter to the floor.
Figure 5-1 A Perimeter and its Vertices

|
|
Dark gray area indicating an area encircled by the perimeter. |
|
|
|
|
|
Deleting a Perimeter
Step 1![]() Log in to Cisco Mobile Connected Experiences (Cisco CMX).
Log in to Cisco Mobile Connected Experiences (Cisco CMX).
Step 2![]() Choose MANAGE > Locations.
Choose MANAGE > Locations.
Step 3![]() In the left pane of the page that is displayed, click Zone.
In the left pane of the page that is displayed, click Zone.
The Zone Item boxes are displayed.
Step 4![]() Click the Subzone in the corresponding zone.
Click the Subzone in the corresponding zone.
Step 5![]() In the Zone Editor page, click the Edit Perimeter icon.
In the Zone Editor page, click the Edit Perimeter icon.
Step 6![]() Click inside the perimeter to be deleted.
Click inside the perimeter to be deleted.
The perimeter will be highlighted in gray (Figure 5-1).
 icon.
icon. Step 8![]() In the DELETE PERIMETER dialog box, click Confirm to delete the perimeter.
In the DELETE PERIMETER dialog box, click Confirm to delete the perimeter.
Editing a Perimeter
Step 1![]() Log in to Cisco Mobile Connected Experiences (Cisco CMX).
Log in to Cisco Mobile Connected Experiences (Cisco CMX).
Step 2![]() Choose MANAGE > Locations.
Choose MANAGE > Locations.
Step 3![]() In the left pane of the page that is displayed, click Zone.
In the left pane of the page that is displayed, click Zone.
The Zone Item boxes are displayed.
Step 4![]() Click the Subzone in the corresponding zone.
Click the Subzone in the corresponding zone.
Step 5![]() In the Zone Editor page, click the Edit Perimeter icon.
In the Zone Editor page, click the Edit Perimeter icon.
Step 6![]() Click inside the perimeter to be edited.
Click inside the perimeter to be edited.
The perimeter will be highlighted in gray and the vertices in purple(Figure 5-1).
Step 7![]() Drag the purple vertices to modify the shape of the perimeter.
Drag the purple vertices to modify the shape of the perimeter.
Step 8![]() After you have the required shape, click outside the perimeter. This saves the new shape.
After you have the required shape, click outside the perimeter. This saves the new shape.
Creating a Zone
Step 1![]() Log in to Cisco Mobile Connected Experiences (Cisco CMX).
Log in to Cisco Mobile Connected Experiences (Cisco CMX).
Step 2![]() Choose MANAGE > Locations.
Choose MANAGE > Locations.
Step 3![]() In the left pane of the page that is displayed, click Zone.
In the left pane of the page that is displayed, click Zone.
The Zone Item boxes are displayed.
Step 4![]() Click the Subzone in the corresponding zone.
Click the Subzone in the corresponding zone.
Step 5![]() In the Zone Editor page, click the Draw Polygon Zone
In the Zone Editor page, click the Draw Polygon Zone  icon.
icon.
The cursor will change to a drawing tool.
Step 6![]() Click each point that you want to designate as a vertex of the perimeter. Double-click the last vertex point to complete marking the vertices of the perimeter and for closing the perimeter (Figure 5-2).
Click each point that you want to designate as a vertex of the perimeter. Double-click the last vertex point to complete marking the vertices of the perimeter and for closing the perimeter (Figure 5-2).
When you double-click the last vertex point, the CREATE A NEW ZONE dialog box is displayed.
Step 7![]() Click Add to add this zone to the corresponding floor.
Click Add to add this zone to the corresponding floor.
An Item panel pertaining to this zone is displayed on the right side of the page. You can add existing tags from the drop-down list, or add a new tag.
Note![]() Zones cannot be outside the floor map and they cannot overlap. Overlapping zones can be created using Cisco Prime Infrastructure.
Zones cannot be outside the floor map and they cannot overlap. Overlapping zones can be created using Cisco Prime Infrastructure.
Figure 5-2 A Zone and its Vertices
|
|
|
||
|
|
|
Deleting a Zone
Step 1![]() Log in to Cisco Mobile Connected Experiences (Cisco CMX).
Log in to Cisco Mobile Connected Experiences (Cisco CMX).
Step 2![]() Choose MANAGE > Locations.
Choose MANAGE > Locations.
Step 3![]() In the left pane of the page that is displayed, click Zone.
In the left pane of the page that is displayed, click Zone.
The Zone Item boxes are displayed.
Step 4![]() Click the Subzone in the corresponding zone.
Click the Subzone in the corresponding zone.
Step 5![]() In the Zone Editor page, click the zone to be deleted.
In the Zone Editor page, click the zone to be deleted.
The DELETE ZONE dialog box is displayed.
Editing a Zone
Step 1![]() Log in to Cisco Mobile Connected Experiences (Cisco CMX).
Log in to Cisco Mobile Connected Experiences (Cisco CMX).
Step 2![]() Choose MANAGE > Locations.
Choose MANAGE > Locations.
Step 3![]() In the left pane of the page that is displayed, click Zone.
In the left pane of the page that is displayed, click Zone.
The Zone Item boxes are displayed.
Step 4![]() Click the Subzone in the corresponding zone.
Click the Subzone in the corresponding zone.
Step 5![]() In the Zone Editor page, click the Gear
In the Zone Editor page, click the Gear  icon to view the zone editing options.
Step 6![]() To change the shape of the zone, use the Pencil
To change the shape of the zone, use the Pencil  icon to reshape the zone by moving the vertices.
Step 7![]() To move the zone, use the drag tool, denoted by the Hand
To move the zone, use the drag tool, denoted by the Hand  icon, to drag the zone around. Click the Hand icon, move the cursor to the center of the zone, where it will change to an Arrow icon. You can then drag the zone.
Step 8![]() Click outside the zone to save your changes.
Click outside the zone to save your changes.
Note![]() Zones cannot be outside the floor map and they cannot overlap. Overlapping zones can be created using Cisco Prime Infrastructure.
Zones cannot be outside the floor map and they cannot overlap. Overlapping zones can be created using Cisco Prime Infrastructure.
Managing BLE Beacons
Bluetooth low energy beacons (BLE beacons), are used to engage with Bluetooth-enabled mobile devices at close proximity.
Note![]() Cisco CMX has the capability to view the current location of beacons using Access Points (APs). Cisco CMX can determine if a beacon is missing or has been misplaced.
Cisco CMX has the capability to view the current location of beacons using Access Points (APs). Cisco CMX can determine if a beacon is missing or has been misplaced.
To use the BLE Beacons feature, choose MANAGE > BLE Beacons. This opens the Beacons Activity Map page, where you can:
- View the number of beacons, and the status and location of each beacon. The status of a beacon is indicated by the color of its icon, which is described in Table 5-2 .
- Keep track of the positions of all the BLE beacons on a particular floor.
- Position the BLE beacons on a floor map.


Adding a Beacon to a Map
Step 1![]() Log in to Cisco Mobile Connected Experiences (Cisco CMX).
Log in to Cisco Mobile Connected Experiences (Cisco CMX).
Step 2![]() Choose MANAGE > BLE Beacons.
Choose MANAGE > BLE Beacons.
Step 3![]() In the left panel, drill down to the floor level and click the floor in which you want to add a beacon.
In the left panel, drill down to the floor level and click the floor in which you want to add a beacon.
Step 4![]() In the Beacons Activity Map page that is displayed, click New Beacon.
In the Beacons Activity Map page that is displayed, click New Beacon.
Step 5![]() In the CREATE A NEW BEACON dialog box that is displayed, enter the beacon details and click Add.
In the CREATE A NEW BEACON dialog box that is displayed, enter the beacon details and click Add.
The new beacon will be positioned on the top left side of the map, ready to be placed.
Step 6![]() Drag the new beacon to the desired location on the map.
Drag the new beacon to the desired location on the map.
Deleting a Beacon
Step 1![]() Log in to Cisco Mobile Connected Experiences (Cisco CMX).
Log in to Cisco Mobile Connected Experiences (Cisco CMX).
Step 2![]() Choose MANAGE > BLE Beacons.
Choose MANAGE > BLE Beacons.
Step 3![]() In the left panel, drill down to the floor level and click the floor in which you want to add a beacon.
In the left panel, drill down to the floor level and click the floor in which you want to add a beacon.
Step 4![]() In the Beacons Activity Map page that is displayed, click the beacon you want to delete.
In the Beacons Activity Map page that is displayed, click the beacon you want to delete.
A slide-out panel containing the details of that beacon is displayed.
Step 5![]() Click the Trash icon in the slide-out panel to delete the beacon.
Click the Trash icon in the slide-out panel to delete the beacon.
Changing a Beacon Name
Step 1![]() Log in to Cisco Mobile Connected Experiences (Cisco CMX).
Log in to Cisco Mobile Connected Experiences (Cisco CMX).
Step 2![]() Choose MANAGE > BLE Beacons.
Choose MANAGE > BLE Beacons.
Step 3![]() In the left panel, drill down to the floor level and click the floor in which you want to add a beacon.
In the left panel, drill down to the floor level and click the floor in which you want to add a beacon.
Step 4![]() In the Beacons Activity Map page that is displayed, click the beacon you want to rename.
In the Beacons Activity Map page that is displayed, click the beacon you want to rename.
A slide-out panel containing the details of that beacon is displayed.
Step 5![]() Click the Edit icon adjacent the current name, and change the name.
Click the Edit icon adjacent the current name, and change the name.
Converting a Rogue Beacon to a Known Beacon
Note![]() All newly discovered beacons will be marked as Rogue.
All newly discovered beacons will be marked as Rogue.
Step 1![]() Log in to Cisco Mobile Connected Experiences (Cisco CMX).
Log in to Cisco Mobile Connected Experiences (Cisco CMX).
Step 2![]() Choose MANAGE > BLE Beacons.
Choose MANAGE > BLE Beacons.
Step 3![]() In the left panel, drill down to the floor level and click the floor in which you want to add a beacon.
In the left panel, drill down to the floor level and click the floor in which you want to add a beacon.
Step 4![]() In the Beacons Activity Map page that is displayed, click the rogue beacon that you want to convert.
In the Beacons Activity Map page that is displayed, click the rogue beacon that you want to convert.
A slide-out panel containing the details of that beacon is displayed.
Step 5![]() Click Convert to Known.
Click Convert to Known.
Managing Notifications from Applications
You can set up notifications for your own applications and for third-party applications.
The Notifications feature supports the following:
The following sections describe the notifications-related tasks that you can perform:
Creating a New Notification
Step 1![]() Log in to Cisco Mobile Connected Experiences (Cisco CMX).
Log in to Cisco Mobile Connected Experiences (Cisco CMX).
Step 2![]() Choose MANAGE > Notifications.
Choose MANAGE > Notifications.
The Notifications page is displayed.
Step 3![]() C lick New Notification.
C lick New Notification.
The CREATE NEW NOTIFICATION dialog box is displayed.
Step 4![]() Click New Notification.
Click New Notification.
Step 5![]() Enter a name for the notification and enter the details.
Enter a name for the notification and enter the details.
For a description of the available notification types, see Table 5-3 . When specifying the details, note that:
Making Changes to Notifications
Note![]() If you are a non-admin user, you can make changes to only those notifications that were created by you. A non-admin user cannot make changes to notifications created by other users.
If you are a non-admin user, you can make changes to only those notifications that were created by you. A non-admin user cannot make changes to notifications created by other users.
The following are the changes that you can make to notifications:
Enabling and Disabling a Notification
When a notification is created, it is enabled by default.
- To disable a notification, in the NOTIFICATIONS page, under the Status column adjacent the notification, click Enabled.
The label changes to Disabled and the notification is disabled.
- To enable a notification, in the NOTIFICATIONS page, under the Status column adjacent the notification, click Disabled.
The label changes to Enabled and the notification is enabled.
Editing a Notification
Step 1![]() To edit a notification, in the NOTIFICATIONS page, under the Actions column adjacent the notification, click Edit.
To edit a notification, in the NOTIFICATIONS page, under the Actions column adjacent the notification, click Edit.
The EDIT NOTIFICATION dialog box is displayed.
Step 2![]() Edit the details of the notification, as required. Note that you cannot edit the name of the notification.
Edit the details of the notification, as required. Note that you cannot edit the name of the notification.
Deleting a Notification

To delete a notification, in the NOTIFICATIONS page, in the Actions column adjacent the notification, click Delete. The notification is immediately deleted.
 Feedback