Integrate with Directory Sources
Set Up Directory Synchronization and Authentication
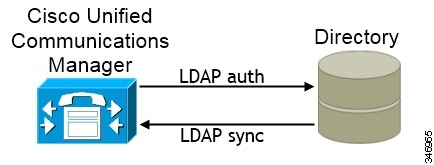
Synchronizing with the directory server replicates contact data from your directory to Cisco Unified Communications Manager.
Enabling authentication with the directory server lets Cisco Unified Communications Manager proxy authentication from the client to the directory server. In this way, users authenticate with the directory server, not with Cisco Unified Communications Manager or a presence server.
Synchronize with the Directory Server
Enable Synchronization
What to Do Next
Specify an LDAP attribute for the user ID.
Populate User ID and Directory URI
- User ID
-
You must specify a value for the user ID on Cisco Unified Communications Manager. This value is required for the default IM address scheme and for users to log in. The default value is sAMAccountName.
- Directory URI
-
You should specify a value for the directory URI if you plan to:
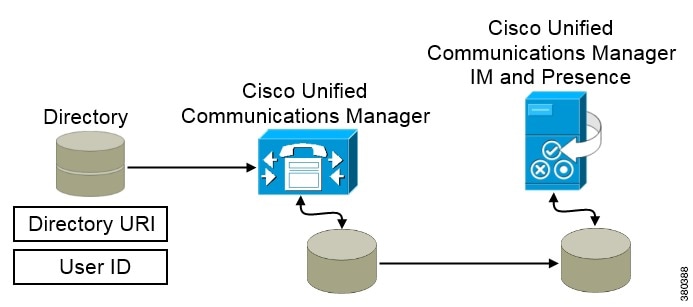
When Cisco Unified Communications Manager synchronizes with the directory source, it retrieves the values for the directory URI and user ID and populates them in the end user configuration table in the Cisco Unified Communications Manager database.
The Cisco Unified Communications Manager database then synchronizes with the Cisco Unified Communications Manager IM and Presence database. As a result, the values for the directory URI and user ID are populated in the end user configuration table in the Cisco Unified Communications Manager IM and Presence database.
Specify an LDAP Attribute for the User ID
When you synchronize from your directory source to Cisco Unified Communications Manager, you can populate the user ID from an attribute in the directory. The default attribute that holds the user ID is sAMAccountName.
Specify an LDAP Attribute for the Directory URI
On Cisco Unified Communications Manager version 9.0(1) and higher, you can populate the directory URI from an attribute in the directory. The default attribute is msRTCSIP-primaryuseraddress.
Perform Synchronization
This service keeps data synchronized between the presence server and Cisco Unified Communications Manager. When you perform the synchronization with your directory server, Cisco Unified Communications Manager then synchronizes the data with the presence server. However, the Cisco Sync Agent service must be activated and started.
User data from your directory server is synchronized to the Cisco Unified Communications Manager database. Cisco Unified Communications Manager then synchronizes the user data to the presence server database.
Authenticate with the Directory Server
| Step 1 | Open the Cisco Unified CM Administration interface. |
| Step 2 | Select . |
| Step 3 | Select Use LDAP Authentication for End Users. |
| Step 4 |
Specify LDAP credentials and a user search base as appropriate. See the Cisco Unified Communications Manager Administration Guide for information about the fields on the LDAP Authentication window. |
| Step 5 | Select Save. |
Contact Sources
In on-premises deployments, the client requires a contact source to resolve directory look ups for user information. You can use the following as a contact source:
- Basic Directory Integration
-
Basic Directory Integration (BDI) is an LDAP-based contact source.
Basic Directory Integration
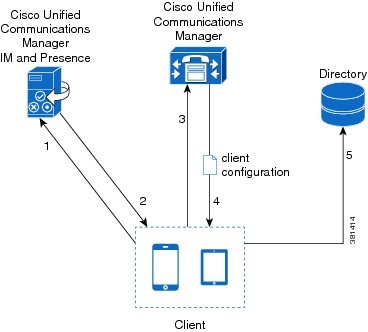
When using Basic Directory Integration (BDI), the client retrieves contact data from the directory service as follows.
- The client connects to the Cisco Unified Presence or Cisco Unified Communications Manager IM and Presence server.
- The client gets the LDAP profile configuration section in the service profile from the Cisco Unified Presence or Cisco Unified Communications Manager IM and Presence server. The service profile contains the location of Cisco Unified Communications Manager (TFTP) server. Depending on your configuration, the service profile can also contain the credentials to authenticate with the directory.
- The client connects to the Cisco Unified Communications Manager server.
- The client downloads the client configuration file from the Cisco Unified Communications Manager server. The client configuration file contains the location of the directory. Depending on your configuration, the client configuration file can also contain the credentials to authenticate with the directory.
- The client uses the directory location and the authentication credentials to connect to the directory.
Authentication with Contact Sources
- Specify credentials in Cisco Unified Presence or Cisco Unified Communications Manager
-
Specify credentials in a profile on the server. The client can then retrieve the credentials from the server to authenticate with the directory.
This method is the most secure option for storing and transmitting credentials.
- Set common credentials in the client configuration file
-
You specify a shared username and password in the client configuration file. The client can then authenticate with the directory server.
Important: The client transmits and stores these credentials as plain text.
You should use only a well-known or public set of credentials. The credentials should also be linked to an account that has read-only permissions.
- Use anonymous binds
-
Configure the client to connect to the directory source with anonymous binds.
- Specify LDAP Directory Configuration on Cisco Unified Presence
- Specify LDAP Directory Configuration on Cisco Unified Communications Manager
- Set Credentials in the Client Configuration
- Use Anonymous Binds
Specify LDAP Directory Configuration on Cisco Unified Presence
If your environment includes Cisco Unified Presence version 8.x, you can specify directory configuration in the LDAP profile. The client can then get the directory configuration from the server to authenticate with the directory source.
Complete the steps to create an LDAP profile that contains authentication credentials, and then assign that profile to users.
| Step 1 | Open the Cisco Unified Presence Administration interface. |
| Step 2 | Select . |
| Step 3 | Select Add New. |
| Step 4 | Specify a name and optional description for the profile in the following fields: |
| Step 5 | Specify a password that the client can use to authenticate with the LDAP server in the following fields: |
| Step 6 | Specify the IP address of your primary and backup LDAP servers in the following fields: |
| Step 7 | Select Add Users to Profile and add the appropriate users to the profile. |
| Step 8 | Select Save. |
Specify LDAP Directory Configuration on Cisco Unified Communications Manager
If your environment includes Cisco Unified Communications Manager version 9.x and higher, you can specify credentials when you add a directory service. The client can then get the configuration from the server to authenticate with the directory source.
Complete the steps to add a directory service, apply the directory service to the service profile, and specify the LDAP authentication configuration for the directory service.
| Step 1 | Open the Cisco Unified CM Administration interface. |
| Step 2 |
Add a directory service as follows:
|
| Step 3 |
Apply the directory service to your service profile as follows:
|
Set Credentials in the Client Configuration
The client transmits and stores these credentials as plain text.
You should use only a well-known or public set of credentials. The credentials should also be linked to an account that has read-only permissions.
The following is an example configuration:
<Directory>
  <BDIConnectionUsername>admin@example.com</BDIConnectionUsername>
  <BDIConnectionPassword>password</BDIConnectionPassword>
</Directory>
Use Anonymous Binds
To use anonymous binds, you set the following parameters in the client configuration file:
| Parameter | Value |
|---|---|
| DirectoryServerType | BDI |
| BDIPrimaryServerName | IP address FQDN |
| BDIEnableTLS | True |
| BDISearchBase1 | Searchable organizational unit (OU) in the directory tree |
| BDIBaseFilter | Object class that your directory service uses; for example, inetOrgPerson |
| BDIPredictiveSearchFilter | uid or other search filter A search filter is optional. |
The following is an example configuration:
<Directory> <BDIPrimaryServerName>11.22.33.456</BDIPrimaryServerName> <BDIEnableTLS>True</BDIEnableTLS> <BDISearchBase1>ou=people,dc=cisco,dc=com</BDISearchBase1> <BDIBaseFilter>(&(objectClass=inetOrgPerson)</BDIBaseFilter> <BDIPredictiveSearchFilter>uid</BDIPredictiveSearchFilter> </Directory>
Client Configuration for Directory Integration
Directory integration can be configured through Service Profiles using Cisco Unified Communications Manager 9 or higher or with the configuration file. Use this section to learn how to configure the client for directory integration.
 Note |
In instances where a Service Profile and the configuration file are present, settings in the Service Profile take priority. |
Note |
Cisco Unified Presence 8 profiles cannot be used for directory integration. |
- Configure Directory Integration in a Service Profile
- Summary of Directory Integration Configuration Parameters
- Attribute Mapping Parameters
- Directory Connection Parameters
- Directory Query Parameters
- Contact Photo Parameters
- Directory Server Configuration Examples
Configure Directory Integration in a Service Profile
With Cisco Unified Communications Manager version 9 and higher, you can provision users with service profiles and deploy the _cisco-uds SRV record on your internal domain name server.
The client can then automatically discover Cisco Unified Communications Manager and retrieve the service profile to get directory integration configuration.
To configure directory integration in a service profile, do the following:
| Step 1 | Open the Unified CM Administration interface. |
| Step 2 |
Add a directory service.
|
| Step 3 |
Apply the directory service to a service profile.
There is no need to check Use UDS for Contact Resolution and Use Logged On User Credential boxes. When both the directory profile and jabber-config.xml file are used at the same time, the configuration in the directory profile have the higher priority and will be used except manual sign-in and service discovery. When manually sign in, Username and Password from the directory profile will be used to connect to LDAP server for contact search. For service discovery, Username, Password, Search Base, and Primary server in the directory profile will be used to connect to LDAP server for contact search. To make it work consistently, it is highly recommended that Username and Password in both directory profile and jabber-config.xml are exactly the same. |
Directory Profile Parameters
The following table lists the configuration parameters you need to set in the directory profile:
| Directory Service Configuration | Description | ||
|---|---|---|---|
| Primary server | Specifies the address of the primary directory server. This parameter is required for manual connections where the client cannot automatically discover the directory server. |
||
| Username | Lets you manually specify a shared username that the client can use to authenticate with the directory server. You should use this parameter only in deployments where you cannot authenticate with the directory server using Microsoft Windows credentials. If you must use this parameter, you should use only a well-known or public set of credentials. The credentials should also be linked to an account that has read-only permissions. |
||
| Password | Lets you manually specify a shared password that the client can use to authenticate with the directory server. You should use this parameter only in deployments where you cannot authenticate with the directory server using Microsoft Windows credentials. If you must use this parameter, you should use only a well-known or public set of credentials. The credentials should also be linked to an account that has read-only permissions. |
||
| Search Base 1 | Specifies a location in the directory server from which searches begin. In other words, a search base is the root from which the client executes a search. By default, the client searches from the root of the directory tree. You can specify the value of up to three search bases in your OU to override the default behavior. Active Directory does not typically require a search base. You should specify search bases for Active Directory only for specific performance requirements. You must specify a search base for directory servers other than Active Directory to create bindings to specific locations in the directory.
|
Attribute Mappings
It is not possible to change the default attribute mappings in a service profile. If you plan to change any default attribute mappings, you must define the required mappings in a client configuration file.
Summary of Directory Integration Configuration Parameters
This topic lists all the parameters you can specify to configure directory integration.
| Attribute Mapping Parameters | |
|---|---|
| Directory Server Connection Parameters | |
|---|---|
| Contact Resolution and Directory Query Parameters | |
|---|---|
Attribute Mapping Parameters
| Parameter | Directory Attribute | Exists in Global Catalog by Default | Is Indexed by Default | Set for Ambiguous Name Resolution (ANR) by Default |
|---|---|---|---|---|
| BDICommonName | cn | Yes | Yes | No |
| BDIDisplayName | displayName | Yes | Yes | Yes |
| BDIFirstname | givenName | Yes | Yes | Yes |
| BDILastname | sn | Yes | Yes | Yes |
| BDIEmailAddress | Yes | Yes | Yes | |
| BDISipUri | msRTCSIP-PrimaryUserAddress | Yes | Yes | Yes |
| BDIPhotoSource | thumbnailPhoto | No | No | No |
| BDIBusinessPhone | telephoneNumber | Yes | No | No |
| BDIMobilePhone | mobile | Yes | No | No |
| BDIHomePhone | homePhone | Yes | No | No |
| BDIOtherPhone | otherTelephone | Yes | No | No |
| BDITitle | title | Yes | No | No |
| BDICompanyName | company | Yes | Yes | No |
| BDIUserAccountName | sAMAccountName | Yes | Yes | Yes |
| BDIDomainName | userPrincipalName | Yes | Yes | No |
| BDILocation | co | Yes | No | No |
| BDINickname | displayName | Yes | Yes | Yes |
| BDIPostalCode | postalCode | Yes | No | No |
| BDICity | l | Yes | Yes | No |
| BDIState | st | Yes | Yes | No |
| BDIStreetAddress | streetAddress | Yes | No | No |
Attributes on the Directory Server
You must index attributes on your directory server so that the client can resolve contacts.
Directory Connection Parameters
| Parameter | Value | Description |
|---|---|---|
| BDILDAPServerType | AD OpenLDAP |
|
| BDIPresenceDomain | Domain of the presence server |
Specifies the domain of the presence server. The client appends this domain to the user ID to create an IM address. For example, a user named Adam McKenzie has the following user ID: amckenzie. You specify example.com as the presence server domain. When the user logs in, the client constructs the following IM address for Adam McKenzie: amckenzie@example.com. |
| BDIPrimaryServerName | Specifies the address of the primary directory server. This parameter is required for manual connections where the client cannot automatically discover the directory server. |
|
| BDIServerPort1 | ||
| BDIConnectionUsername | Lets you manually specify a shared username that the client can use to authenticate with the directory server. The client transmits and stores this username as plain text. If you must use this parameter, you should use only a well-known or public set of credentials. The account that you use for integration should have read-only permissions to the directory. |
|
| BDIConnectionPassword | Lets you manually specify a shared password that the client can use to authenticate with the directory server. The client transmits and stores this password as plain text. If you must use this parameter, you should use only a well-known or public set of credentials. The account that you use for integration should have read-only permissions to the directory. |
|
| BDIEnableTLS | true false |
|
Directory Query Parameters
| Parameter | Value | Description | ||
|---|---|---|---|---|
| BDIBaseFilter | Specifies a base filter for Active Directory queries. Specify a directory subkey name only to retrieve objects other than user objects when you query the directory. The default value is (&(objectCategory=person)). Configuration files can contain only valid XML character entity references. Use & instead of & if you specify a custom base filter. |
|||
| BDIUseANR | true false |
You must configure your directory server to set attributes for ANR if you want the client to search for those attributes. |
||
| BDIPredictiveSearchFilter | Defines filters to apply to predictive search queries. You can define multiple, comma-separated values to filter search queries.
|
|||
| Specifies a location in the directory server from which searches begin. In other words, a search base is the root from which the client executes a search. By default, the client searches from the root of the directory tree. You can specify the value of up to five search bases in your OU to override the default behavior. Active Directory does not typically require a search base. You should specify search bases for Active Directory only for specific performance requirements. You must specify a search base for directory servers other than Active Directory to create bindings to specific locations in the directory.
|
Base Filter Examples
The following are example base filters you can use to look up specific locations or objects.
Find only specific groups:
(&(objectClass=user)(memberOf=cn=group-name,ou=Groups,dc=example,dc=com))
Find a nested group within a group:
(&(objectClass=user)(memberOf:search-oid:=cn=group-name,ou=Groups,dc=example,dc=com))
Find only enabled accounts and non-administrator accounts:
(&(objectCategory=person)(objectClass=user)(!(userAccountControl:search-oid:=2))
(!(sAMAccountName=*_dbo))(!(sAMAccountName=*-admin)))
Contact Photo Parameters
| Parameter | Value | Description |
|---|---|---|
| BDIPhotoUriSubstitutionEnabled |
|
|
| BDIPhotoUriSubstitutionToken | Specifies a directory attribute to insert in the photo URI; for example, sAMAccountName. |
|
| BDIPhotoUriWithToken | Specifies a photo URI with a directory attribute as a variable value; for example, http://staffphoto.example.com/sAMAccountName.jpg. To configure photo URI substitution, you set the directory attribute as the value of BDIPhotoUriSubstitutionToken. The client must be able to retrieve the photos from the web server without credentials. |
Contact Photo Retrieval with BDI
- URI substitution
-
Cisco Jabber dynamically builds a URL to contact photos with a directory attribute and a URL template.
To use this method, set the following values in your configuration file: - Specify true as the value of the BDIPhotoUriSubstitutionEnabled parameter.
-
Specify a directory attribute to use as a dynamic token as the value of the BDIPhotoUriSubstitutionToken parameter; for example,
<BDIPhotoUriSubstitutionToken>sAMAccountName</BDIPhotoUriSubstitutionToken>
-
Specify the URL and the dynamic token as the value of the BDIPhotoUriWithToken parameter; for example,
<BDIPhotoUriWithToken>http://staffphoto.example.com/sAMAccountName.jpg</BDIPhotoUriWithToken>
With the example values in the preceding steps, the sAMAccountName attribute might resolve to msmith in your directory. Cisco Jabber then takes this value and replaces the token to build the following URL: http://staffphoto.example.com/msmith.jpg.
- Binary objects
-
Cisco Jabber retrieves the binary data for the photo from your database.
To use this method to retrieve contact photos, specify the attribute that contains the binary data as the value of the BDIPhotoSource parameter in the configuration; for example, <BDIPhotoSource>thumbnailPhoto</BDIPhotoSource>
Contact Photo Formats and Dimensions
To achieve the best result with Cisco Jabber, your contact photos should have specific formats and dimensions. Review supported formats and optimal dimensions. Learn about adjustments the client makes to contact photos.
Contact Photo Formats
Cisco Jabber does not apply any modifications to enhance rendering for contact photos in GIF format. As a result, contact photos in GIF format might render incorrectly or with less than optimal quality. To obtain the best quality, you should use PNG format for your contact photos.
Contact Photo Dimensions
 Tip |
The optimum dimensions for contact photos are 128 pixels by 128 pixels with an aspect ratio of 1:1. |
| Location | Dimensions |
|---|---|
Audio call window |
128 pixels by 128 pixels |
|
|
64 pixels by 64 pixels |
|
|
32 pixels by 32 pixels |
Contact Photo Adjustments
- Resizing
-
If contact photos in your directory are smaller or larger than 128 pixels by 128 pixels, the client automatically resizes the photos. For example, contact photos in your directory are 64 pixels by 64 pixels. When Cisco Jabber retrieves the contact photos from your directory, it resizes the photos upwards to 128 pixels by 128 pixels.
Tip
Resizing contact photos can result in less than optimal resolution. For this reason, you should use contact photos that are 128 pixels by 128 pixels so that the client does not automatically resize them.
- Cropping
-
Cisco Jabber automatically crops non-square contact photos to a square aspect ratio, or an aspect ratio of 1:1 where the width is the same as the height.
- Portrait orientation
-
If contact photos in your directory have portrait orientation, the client crops 30 percent from the top and 70 percent from the bottom.
For example, if contact photos in your directory have a width of 100 pixels and a height of 200 pixels, Cisco Jabber needs to crop 100 pixels from the height to achieve an aspect ratio of 1:1. In this case, the client crops 30 pixels from the top of the photos and 70 pixels from the bottom of the photos.
- Landscape orientation
-
If contact photos in your directory have landscape orientation, the client crops 50 percent from each side.
For example, if contact photos in your directory have a width of 200 pixels and a height of 100 pixels, Cisco Jabber needs to crop 100 pixels from the width to achieve an aspect ratio of 1:1. In this case, the client crops 50 pixels from the right side of the photos and 50 pixels from the left side of the photos.
- Rounding
-
Cisco Jabber rounds the corners of contact photos after retrieving them from your directory.
Directory Server Configuration Examples
This section describes supported integration scenarios and provides example configurations.
Simple Authentication
Simple authentication lets you connect to a directory server using simple binds, as in the following example configuration:
<BDIEnableTLS>False</BDIEnableTLS>
<BDIConnectionUsername>username</BDIConnectionUsername>
<BDIConnectionPassword>password</BDIConnectionPassword>
Simple Authentication with SSL
<BDIEnableTLS>True</BDIEnableTLS>
<BDIConnectionUsername>username</BDIConnectionUsername>
<BDIConnectionPassword>password</BDIConnectionPassword>
OpenLDAP Integration
You can integrate with OpenLDAP using anonymous binds or authenticated binds.
Anonymous Binds
| Parameter | Value |
|---|---|
| BDILDAPServerType | OpenLDAP |
| BDIPrimaryServerName | IP address Hostname |
| BDIEnableTLS | True |
| BDISearchBase1 | Root of the directory service or the organizational unit (OU) |
| BDIUserAccountName | Unique identifier such as uid or cn |
| BDIBaseFilter | Object class that your directory service uses; for example, inetOrgPerson. |
| (Optional) BDIPredictiveSearchFilter | uid or other search filter |
<Directory> <BDILDAPServerType>OpenLDAP</BDILDAPServerType> <BDIPrimaryServerName>11.22.33.456</BDIPrimaryServerName> <BDIEnableTLS>True</BDIEnableTLS> <BDISearchBase1>ou=people,dc=cisco,dc=com</BDISearchBase1> <BDIUserAccountName>uid</BDIUserAccountName> <BDIBaseFilter>(&(objectClass=inetOrgPerson)</BDIBaseFilter> <BDIPredictiveSearchFilter>uid</BDIPredictiveSearchFilter> </Directory>
Authenticated Binds
| Parameter | Value |
|---|---|
| BDILDAPServerType | OpenLDAP |
| BDIPrimaryServerName | IP address Hostname |
| BDIEnableTLS | False |
| BDISearchBase1 | Root of the directory service or the organizational unit (OU) |
| BDIUserAccountName | Unique identifier such as uid or cn |
| BDIBaseFilter | Object class that your directory service uses; for example, inetOrgPerson. |
| (Optional) BDIPredictiveSearchFilter | uid or other search filter |
| BDIConnectionUsername | Username |
| BDIConnectionPassword | Password |
<Directory> <BDILDAPServerType>OpenLDAP</BDILDAPServerType> <BDIPrimaryServerName>11.22.33.456</BDIPrimaryServerName> <BDIEnableTLS>False</BDIEnableTLS> <BDISearchBase1>ou=people,dc=cisco,dc=com</BDISearchBase1> <BDIUserAccountName>uid</BDIUserAccountName> <BDIBaseFilter>(&(objectClass=inetOrgPerson)</BDIBaseFilter> <BDIPredictiveSearchFilter>uid</BDIPredictiveSearchFilter> <BDIConnectionUsername>cn=administrator,dc=cisco,dc=com</BDIConnectionUsername> <BDIConnectionPassword>password</BDIConnectionPassword> </Directory>
Federation
Federation lets Cisco Jabber users communicate with users who are provisioned on different systems and who are using client applications other than Cisco Jabber.
Interdomain Federation
Interdomain federation enables Cisco Jabber users in an enterprise domain to share availability and send instant messages with users in another domain.
You configure interdomain federation for Cisco Jabber on Cisco Unified Presence or Cisco Unified Communications Manager IM and Presence. See the appropriate server documentation for more information.
Intradomain Federation
Intradomain federation enables users within the same domain to share availability and send instant messages between Cisco Unified Presence and Microsoft Office Communications Server, Microsoft Live Communications Server, or other presence server.
- Cisco Unified Presence: Integration Guide for Configuring Partitioned Intradomain Federation for Cisco Unified Presence Release 8.6 and Microsoft LCS/OCS
- Cisco Unified Communications IM and Presence: Partitioned Intradomain Federation for IM and Presence Service on Cisco Unified Communications Manager
Configure Intradomain Federation
In addition to configuring intradomain federation on the presence server, you might need to specify some configuration settings in the Cisco Jabber configuration files.
To resolve contacts during contact search or retrieve contact information from your directory, Cisco Jabber requires the contact ID for each user. Cisco Unified Presence uses a specific format for resolving contact information that does not always match the format on other presence servers such as Microsoft Office Communications Server or Microsoft Live Communications Server.
| Step 1 | Set the value of the BDIUseSIPURIToResolveContacts parameter to true. |
| Step 2 | Specify an attribute that contains the contact ID that Cisco Jabber uses to retrieve contact information as the value of the BDISipUri parameter. The default value is msRTCSIP-PrimaryUserAddress. |
| Step 3 |
Specify any text that prefixes each contact ID as the value of the BDIUriPrefix parameter. The prefix is any text that exists before the username in the contact ID. For example, you specify msRTCSIP-PrimaryUserAddress as the value of BDISipUri. In your directory the value of msRTCSIP-PrimaryUserAddress for each user has the following format: sip:username@domain. |
<Directory>
  <BDIUseSIPURIToResolveContacts>true</BDIUseSIPURIToResolveContacts>
  <BDISipUri>non-default-attribute</BDISipUri>
  <BDIUriPrefix>sip:</BDIUriPrefix>
</Directory>
Intradomain Federation Example
This topic provides an example of intradomain federation contact resolution using the BDISipUri, BDIUseSIPURIToResolveContacts, and BDIUriPrefix parameters.
- The value of the BDISipUri parameter is msRTCSIP-PrimaryUserAddress.
- The value of the BDIUseSIPURIToResolveContacts parameter is true.
- The value of the BDIUriPrefix parameter is sip:.
- The directory contains sip:msmith@domain.com as the value of the msRTCSIP-PrimaryUserAddress attribute for a user named Mary Smith.
- Cisco Jabber connects to your directory to resolve contact information
-
- Cisco Jabber users search for Mary Smith
-
Cisco Jabber removes the prefix of sip: from sip:msmith@domain.com and gets the contact ID of msmith@domain.com.
 Feedback