- DMM User's Guide Preface
- DMM User's Guide Overview
- Understanding the Digital Media Manager
- Managing User Accounts
- Create Content Offering
- Creating Playlists
- Categorizing Content
- Customizing Video Portal
- Managing Deployments
- Config Settings
- Linking to the Video Portal
- Setting Up the DME 1000 and DME 2000 Encoders
- Setting Up Live Events Using a DME 1000 or DME 2000 Encoder
- Setting Up Live Events Using Third-Party Live Streams
- Archive and Delete
- Video Reports Metrics Overview
- DMM User's Guide Glossary
Cisco Digital Media Manager User Guide (version 3.5)
Bias-Free Language
The documentation set for this product strives to use bias-free language. For the purposes of this documentation set, bias-free is defined as language that does not imply discrimination based on age, disability, gender, racial identity, ethnic identity, sexual orientation, socioeconomic status, and intersectionality. Exceptions may be present in the documentation due to language that is hardcoded in the user interfaces of the product software, language used based on RFP documentation, or language that is used by a referenced third-party product. Learn more about how Cisco is using Inclusive Language.
- Updated:
- March 13, 2015
Chapter: Creating Playlists
Creating Playlists
The DMM can help feature different content offerings by displaying key videos in the Featured Playlist tab under the Playlists tab of the Video Portal
Playlists are managed in the Playlists page and are accessed using the playlists secondary navigation link under the VIDEO PORTAL tab of the primary navigation bar or using the Playlists link on the DMM home page.
Adding a New Playlist
To add a new playlist, follow these steps:
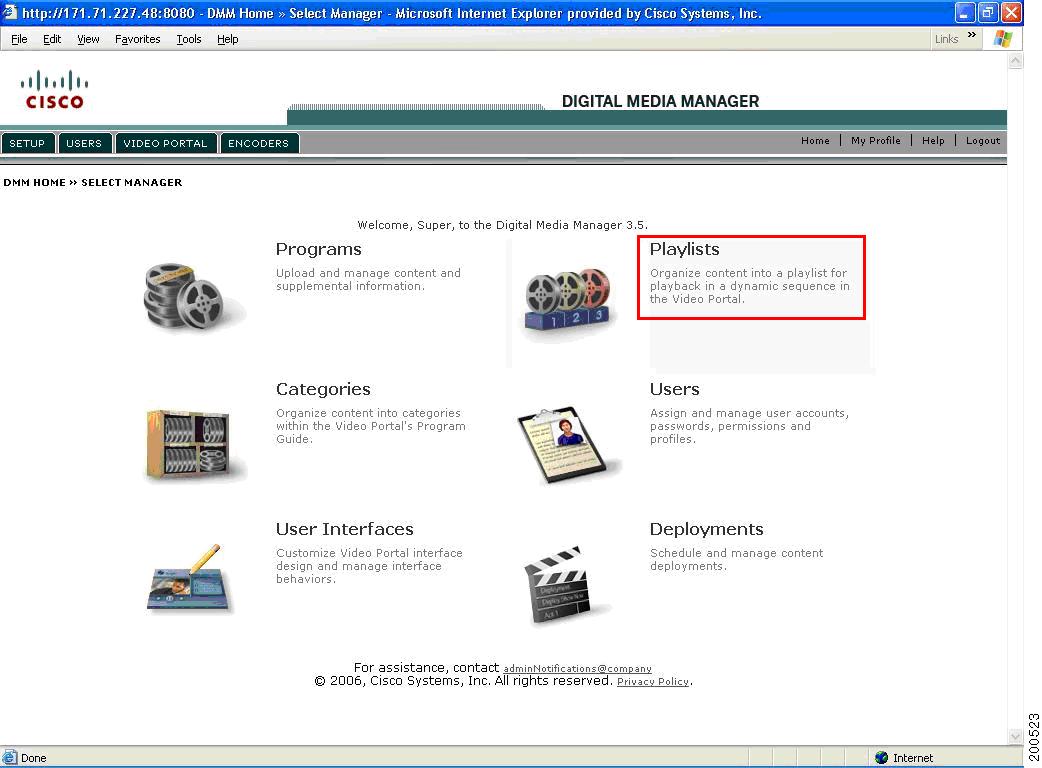
Step 1 ![]() Select the playlists secondary navigation link or the Playlists link on the DMM Home Page to access the PLAYLISTS page (see Figure 5-1).
Select the playlists secondary navigation link or the Playlists link on the DMM Home Page to access the PLAYLISTS page (see Figure 5-1).
Figure 5-1 Accessing the Playlists Page from the DMM Home Page
The Active Playlist window opens displaying all active playlists in the DMM, alphabetically by Name (see Figure 5-2).
Figure 5-2 Active Playlist Window

Table 5-1 describes the contents of this window:
Table 5-1 Field Descriptions for Active Playlist Window
Step 2 ![]() Select Add New Playlist from the upper right-hand corner of the Active Playlist contents (see Figure 5-3).
Select Add New Playlist from the upper right-hand corner of the Active Playlist contents (see Figure 5-3).
Figure 5-3 Add a New Playlist Window

Step 3 ![]() Enter the Playlist Name. This title appears in the SETUP module when selecting the Playlist to be deployed.
Enter the Playlist Name. This title appears in the SETUP module when selecting the Playlist to be deployed.
Step 4 ![]() Set the Playlist Status. The default value is Active. Setting it to Inactive stores the new Playlist in the Archived list of the Playlists page.
Set the Playlist Status. The default value is Active. Setting it to Inactive stores the new Playlist in the Archived list of the Playlists page.
Step 5 ![]() Enter the Playlist Description. This field is for your reference only.
Enter the Playlist Description. This field is for your reference only.
Step 6 ![]() Select whether or not this playlist should be the default choice during deployment.
Select whether or not this playlist should be the default choice during deployment.
Step 7 ![]() Set the Release Date for this playlist. This date is optional and is only for your reference.
Set the Release Date for this playlist. This date is optional and is only for your reference.
Step 8 ![]() Set the End of Life Date for this playlist. This date is optional and is only for your reference.
Set the End of Life Date for this playlist. This date is optional and is only for your reference.
Step 9 ![]() Click on Save to submit and save all the metadata.
Click on Save to submit and save all the metadata.
The new playlist you just added appears in the list of Active Playlists (if the Status was set to Active), or in the list of Archived Playlists (if the status was set to Inactive) in alphabetical order by Playlist Name.
Adding Video Parts to a Playlist
A playlist must have at least one Video Part associated with it to be displayed in the Featured Playlist of the Video Portal.
To add video parts to your playlist, follow these steps:
Step 1 ![]() To start, do one of the following:
To start, do one of the following:
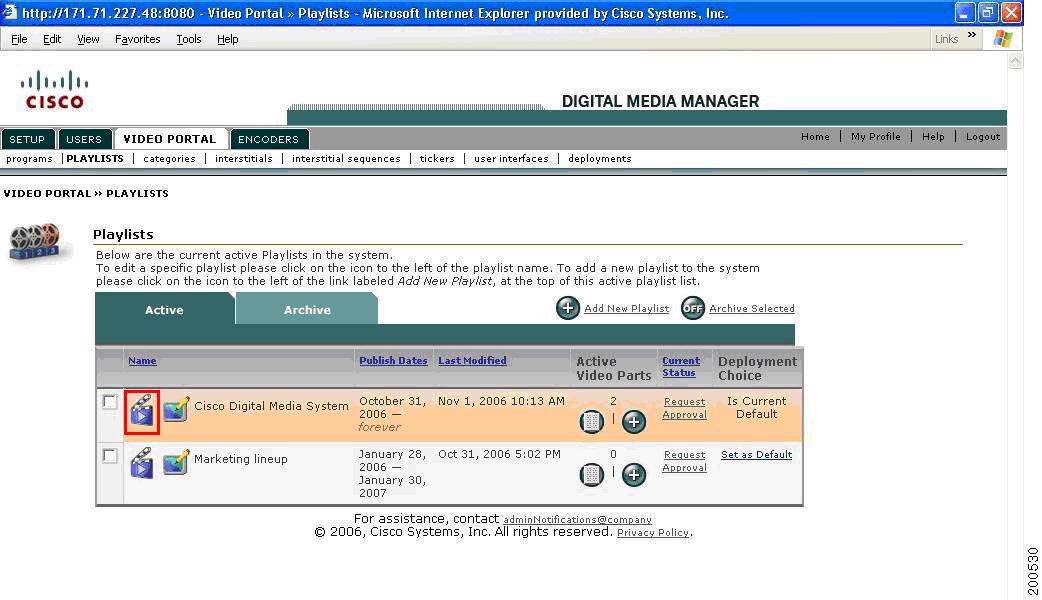
•![]() From the list of Active Playlists, find the row containing the Playlist for which you want to add a new Video Part and click on the Add New icon in the Active Video Parts column.(see Figure 5-4).
From the list of Active Playlists, find the row containing the Playlist for which you want to add a new Video Part and click on the Add New icon in the Active Video Parts column.(see Figure 5-4).
Figure 5-4 Adding a New Video Part to an Active Playlist
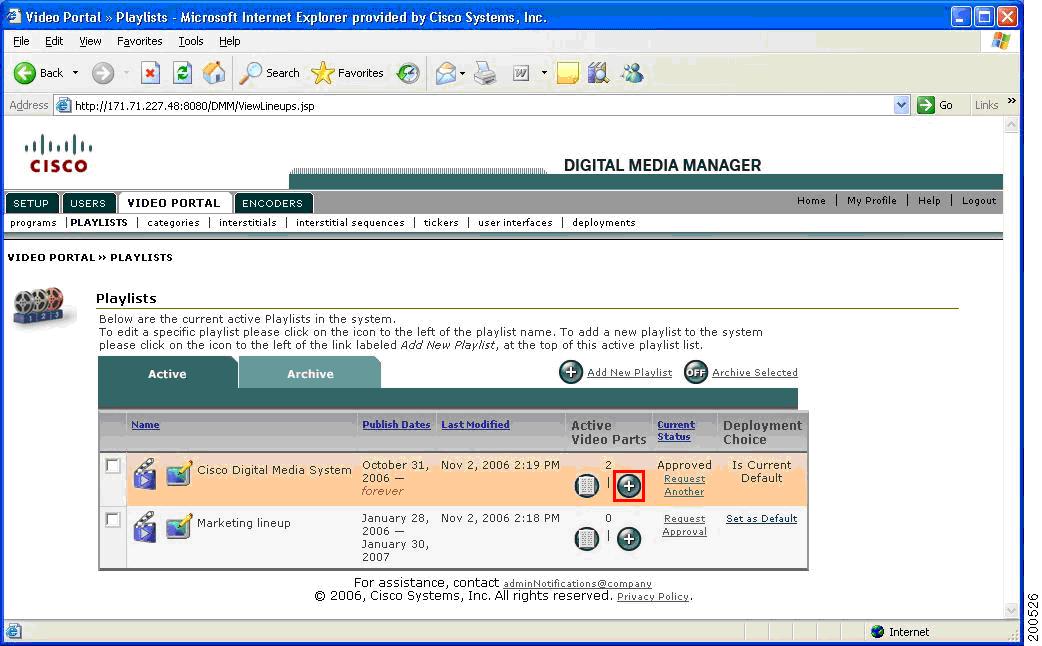
The number located in the Active Video Parts column above the List View and Add New icon indicates the current number of Active Video Parts belonging to the corresponding Playlist in each row.
OR
•![]() From the list of Active Playlist Items, click on the Add New Item to Playlist button located in the upper right-hand corner above the listing.
From the list of Active Playlist Items, click on the Add New Item to Playlist button located in the upper right-hand corner above the listing.
Figure 5-5 Adding a New Video Part from the list of Active Playlist Items
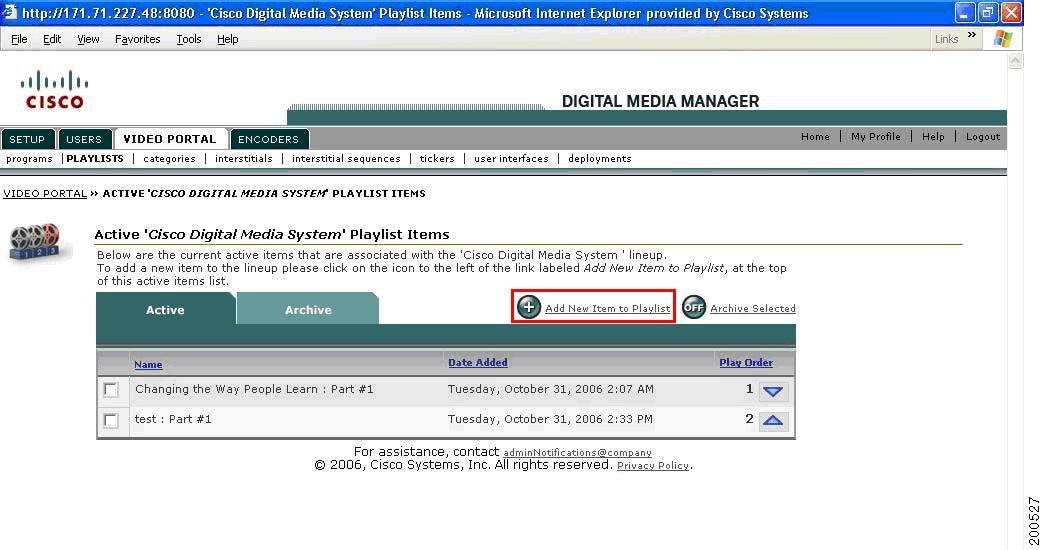
A newly added Playlist does not have any active Video Parts belonging to it. If a Playlist has any existing Video Parts belonging to it, the Video Parts appear in ascending, numerical Play Order.
Table 5-2 describes the buttons and icons in this window:
Table 5-2 Field Descriptions for Active Playlist Window
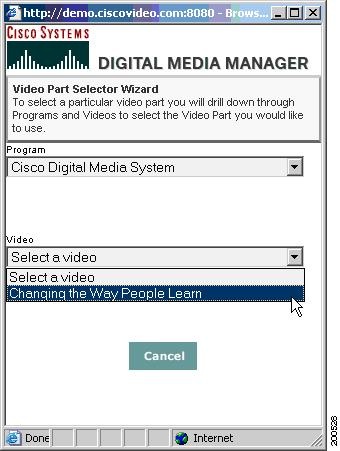
Step 2 ![]() In the Video Part Selector Wizard (see Figure 5-6), select the Video Part to add to the Playlist by navigating through the Category, Program, and Video Parts.
In the Video Part Selector Wizard (see Figure 5-6), select the Video Part to add to the Playlist by navigating through the Category, Program, and Video Parts.
Figure 5-6 Video Part Selector Wizard
Step 3 ![]() When the Video Part is selected, the popup window closes and the selected Video Part is listed in the Video Part Link of the New Playlist Item. To change the Video Part for this Playlist, click the Select a Video Part button and use the Video Part Selector Wizard to select a different Video Part for this Playlist.
When the Video Part is selected, the popup window closes and the selected Video Part is listed in the Video Part Link of the New Playlist Item. To change the Video Part for this Playlist, click the Select a Video Part button and use the Video Part Selector Wizard to select a different Video Part for this Playlist.
Figure 5-7 Adding a New Video Part to a Playlist
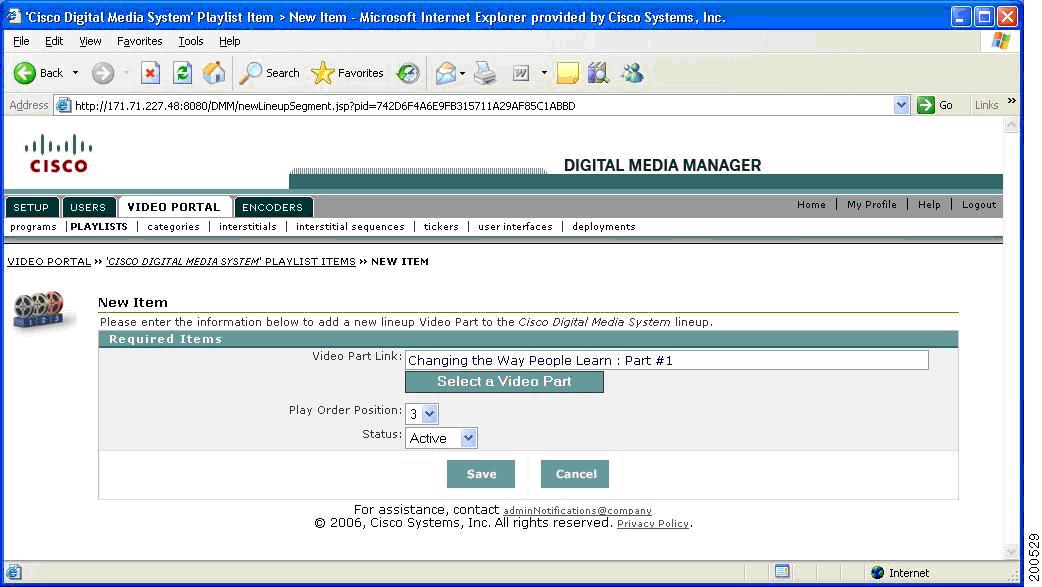
Step 4 ![]() Select the Play Order for this Video Part in the Playlist.
Select the Play Order for this Video Part in the Playlist.
Step 5 ![]() Set the Video Part Status. The default value is Active. Setting it to Inactive stores the new Video Part in the Playlist Archive List.
Set the Video Part Status. The default value is Active. Setting it to Inactive stores the new Video Part in the Playlist Archive List.
Step 6 ![]() Click on Save to submit and save all the metadata.
Click on Save to submit and save all the metadata.
The new Video Part you just added appears in the Active Playlist Items list (if the Video Part Status was set to Active) or in the Archived Playlist Item list (if the status was set to Inactive) in ascending Play Order.
Previewing a Playlist
After a Playlist has been created, you can preview the Featured Playlist in the Video Portal before deployment.
To preview your Playlists, follow these steps:
Step 1 ![]() From the list of Active Playlists find the row containing the Playlist you would like to preview. Click on the Preview Button icon to view this playlist as the Featured Playlist.
From the list of Active Playlists find the row containing the Playlist you would like to preview. Click on the Preview Button icon to view this playlist as the Featured Playlist.
Figure 5-8 Playlist Preview
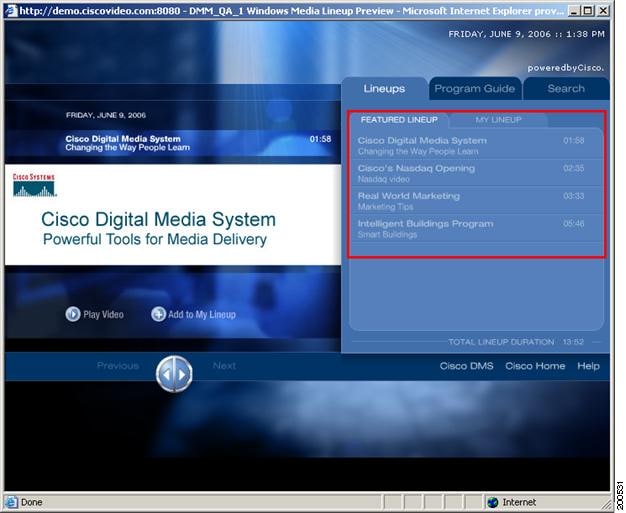
Step 2 ![]() The Playlist you selected to preview is displayed in the Video Portal's Featured Playlist tab under the Playlist tab.
The Playlist you selected to preview is displayed in the Video Portal's Featured Playlist tab under the Playlist tab.
Figure 5-9 Preview Featured Playlist in the Video Portal
Playlist Approvals
An approval process can be used to validate each Playlist. This process includes requesting an approval and either obtaining the approval or having the approval request denied.

Note ![]() An approver must be designated as someone with Approver permissions and can NOT be the same user as the requestor.
An approver must be designated as someone with Approver permissions and can NOT be the same user as the requestor.
Note ![]() Approvals are NOT required before a Playlist can be deployed.
Approvals are NOT required before a Playlist can be deployed.
Requesting a Playlist Approval
To request a playlist approval, follow these steps:
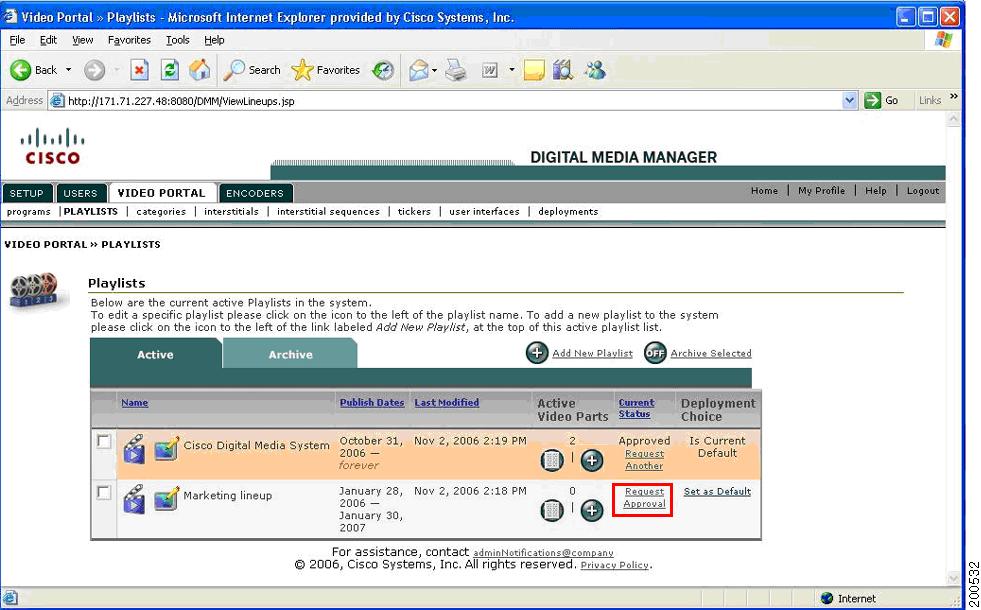
Step 1 ![]() From the list of Active Playlists, find the row containing the Playlist for which you want to request an Approval. Click on the Request Approval link under the Current Status column.
From the list of Active Playlists, find the row containing the Playlist for which you want to request an Approval. Click on the Request Approval link under the Current Status column.
Figure 5-10 Requesting an Approval for a Playlist
The Playlist Approval Request Popup window opens.
Figure 5-11 Playlist Approval Request Popup Window

Step 2 ![]() Select an Approver from the drop-down list of users with Approver permissions. Additional comments or instructions about this Playlist can also be added to the approval request.
Select an Approver from the drop-down list of users with Approver permissions. Additional comments or instructions about this Playlist can also be added to the approval request.
Step 3 ![]() Click the Request Approval button to send an email to the Approver requesting approval for the Playlist, or Cancel to abort the operation.
Click the Request Approval button to send an email to the Approver requesting approval for the Playlist, or Cancel to abort the operation.
After clicking the Request Approval button, a Playlist Approval Message window opens (see Figure 5-12) displaying the message that has been sent to the Approver.
Figure 5-12 Playlist Approval Message Window
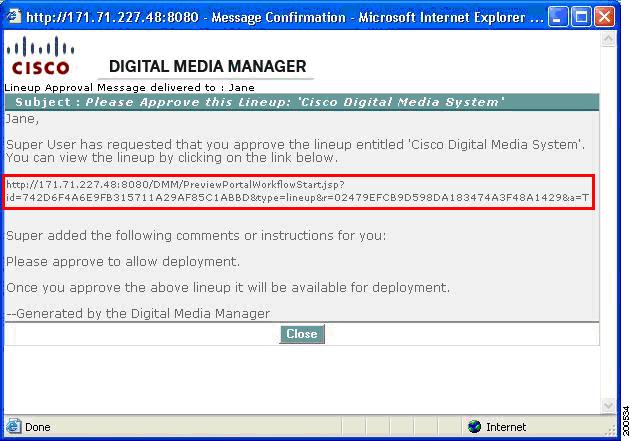
Click the Close button after reviewing the email sent to the Approver.
Approving or Not Approving a Playlist
After a Playlist Approval Request has been made, an email is sent to the Approver requesting the approval. The email contains a link to preview and approve or not approve the Playlist.
To approve or not approve a playlist, follow these steps:
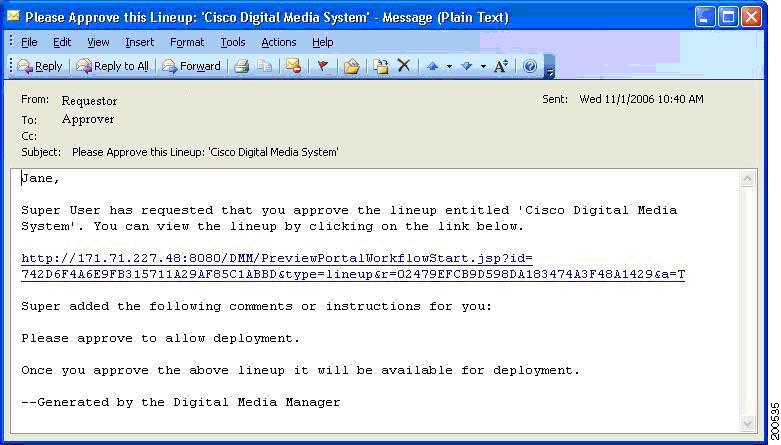
Step 1 ![]() In the email request for the Playlist approval, click on the link to preview the Playlist.
In the email request for the Playlist approval, click on the link to preview the Playlist.
Figure 5-13 Link to Preview the Playlist
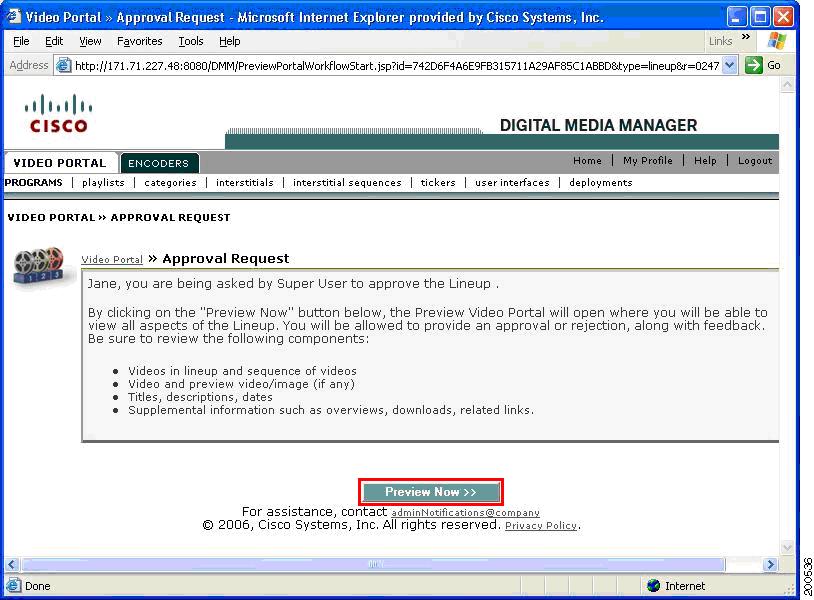
Step 2 ![]() In the Approval Request page that appears, click on the Preview Now button.
In the Approval Request page that appears, click on the Preview Now button.
Figure 5-14 Preview Playlist Approval
A preview Video Portal opens displaying the Playlist that has been requested for approval. After reviewing the Playlist, use the controls at the bottom of the window to approve or not approve the Playlist.
Figure 5-15 Playlist Preview

Step 3 ![]() Enter feedback in the text box for the Playlist. This feedback is optional. Click on the Approve Playlist button to approve the Playlist or click on the Not Approved button to deny the Playlist's approval.
Enter feedback in the text box for the Playlist. This feedback is optional. Click on the Approve Playlist button to approve the Playlist or click on the Not Approved button to deny the Playlist's approval.
Step 4 ![]() Click Close and Return in the Video Portal preview to return to the Digital Media Manager.
Click Close and Return in the Video Portal preview to return to the Digital Media Manager.
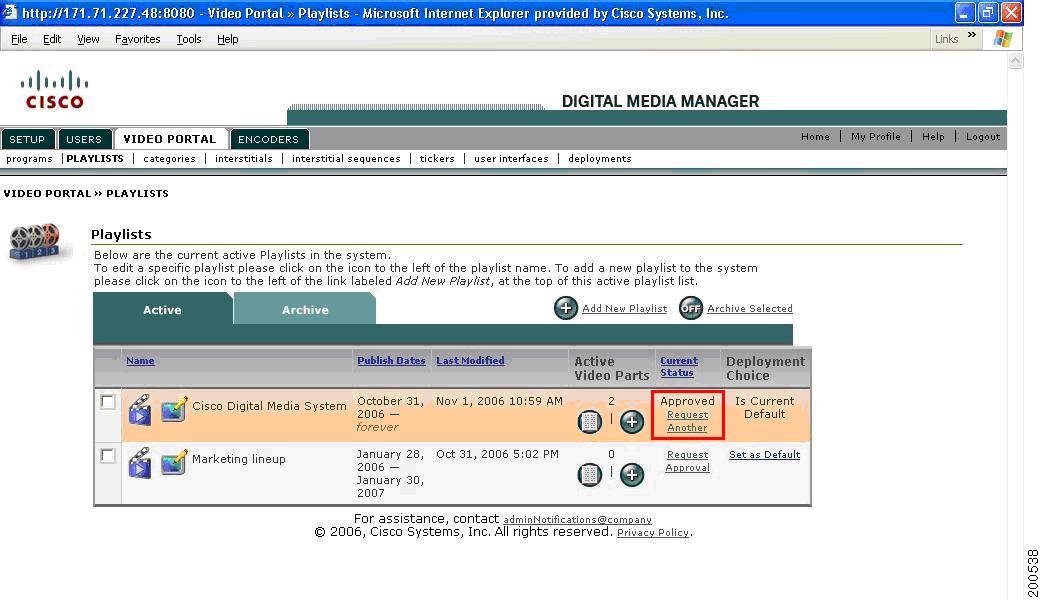
The action will be immediately reflected in the PLAYLISTS page under the list of Active Playlists. The requestor will also be notified via email of the Approver's response.
Figure 5-16 Playlist Approval Status Updated
 Feedback