- DMM User's Guide Preface
- DMM User's Guide Overview
- Understanding the Digital Media Manager
- Managing User Accounts
- Create Content Offering
- Creating Playlists
- Categorizing Content
- Customizing Video Portal
- Managing Deployments
- Config Settings
- Linking to the Video Portal
- Setting Up the DME 1000 and DME 2000 Encoders
- Setting Up Live Events Using a DME 1000 or DME 2000 Encoder
- Setting Up Live Events Using Third-Party Live Streams
- Archive and Delete
- Video Reports Metrics Overview
- DMM User's Guide Glossary
Cisco Digital Media Manager User Guide (version 3.5)
Bias-Free Language
The documentation set for this product strives to use bias-free language. For the purposes of this documentation set, bias-free is defined as language that does not imply discrimination based on age, disability, gender, racial identity, ethnic identity, sexual orientation, socioeconomic status, and intersectionality. Exceptions may be present in the documentation due to language that is hardcoded in the user interfaces of the product software, language used based on RFP documentation, or language that is used by a referenced third-party product. Learn more about how Cisco is using Inclusive Language.
- Updated:
- March 13, 2015
Chapter: Create Content Offering
Creating a Content Offering
Content offerings are managed in the Programs page. Content offerings can be live or on demand. Access the PROGRAMS page using the programs secondary navigation link under the VIDEO PORTAL tab on the primary navigation bar or using the Programs link on the DMM home page.
Adding a New Program
Each content offering must be structured according to the content taxonomy described in the Digital Media Taxonomy and Nomenclature section.
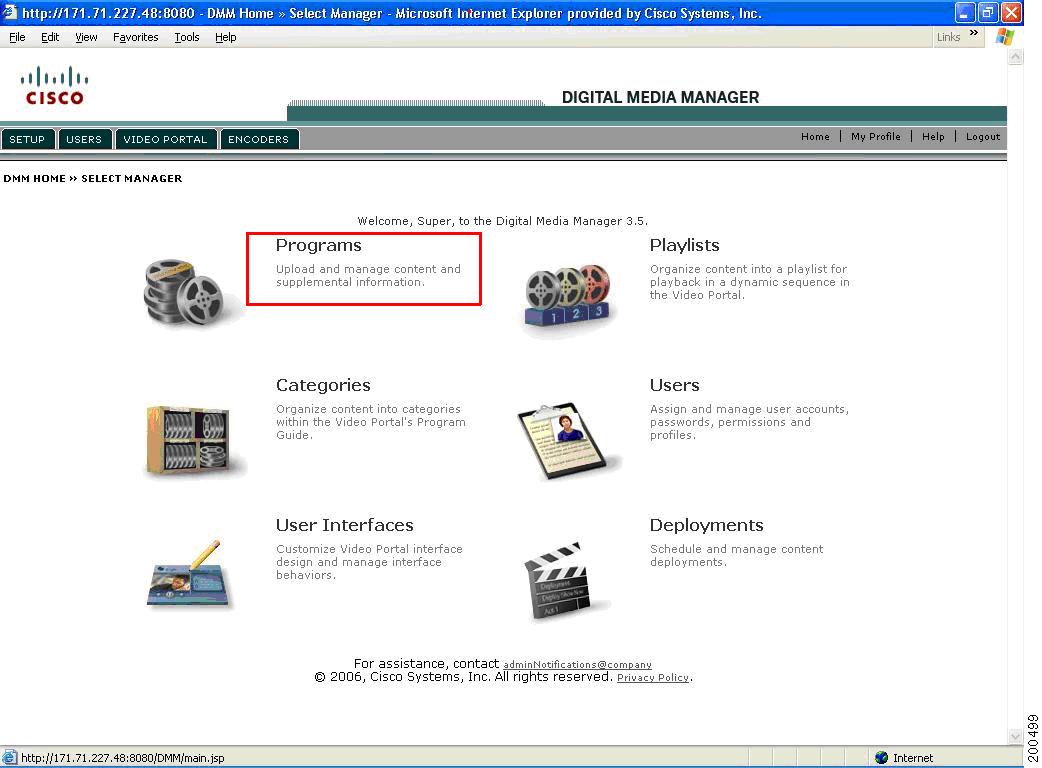
Step 1 ![]() Click on the programs secondary navigation link or the Programs link from the DMM Home Page to access the PROGRAMS page.
Click on the programs secondary navigation link or the Programs link from the DMM Home Page to access the PROGRAMS page.
Figure 4-1 Accessing the PROGRAMS Page from the DMM Home Page
The Active Program list window (see Figure 4-2) opens displaying all active programs in the DMM, alphabetically by title.
Figure 4-2 Active Program List
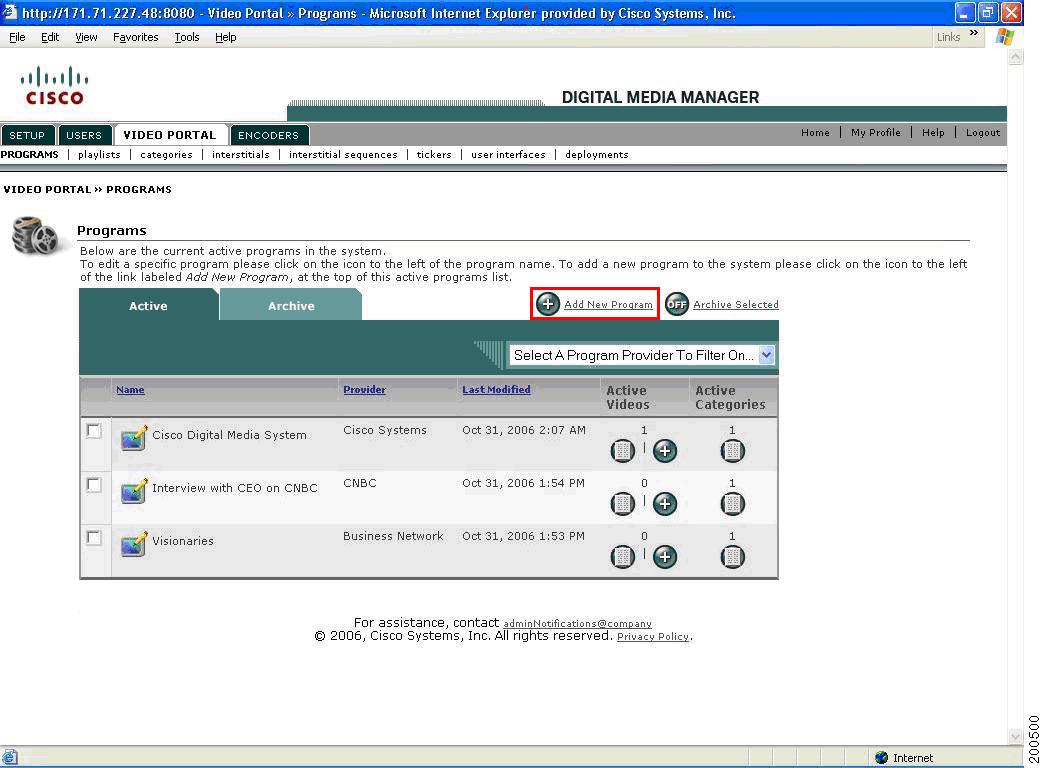
Table 4-1 describes the contents of the Active Program List window.
Table 4-1 Buttons and Icons on the Active Program List Window
Step 2 ![]() Select Add a New Program from the upper right-hand corner of the Active Program List (see Figure 4-3).
Select Add a New Program from the upper right-hand corner of the Active Program List (see Figure 4-3).
Figure 4-3 Add New Program Window
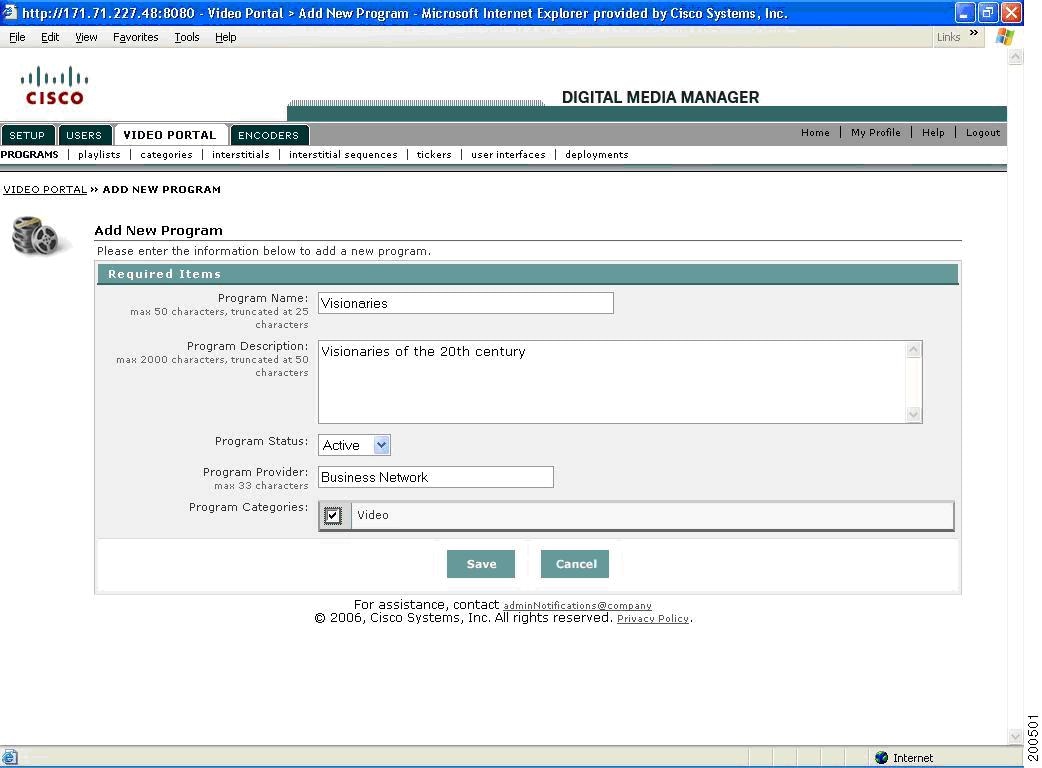
Step 3 ![]() Enter the Program Name. This title appears in the Video Portal when an end user uses the Program Guide tab.
Enter the Program Name. This title appears in the Video Portal when an end user uses the Program Guide tab.
Step 4 ![]() Enter the Program Description. This data appears in the Video Portal's Program Guide tab, next to the corresponding Program Name. It also appears in the More Info tab of every Video belonging to it.
Enter the Program Description. This data appears in the Video Portal's Program Guide tab, next to the corresponding Program Name. It also appears in the More Info tab of every Video belonging to it.
Step 5 ![]() Set the Program Status. The default value is Active. Setting it to Inactive stores the new Program in the Archived Program List of the Program Manager.
Set the Program Status. The default value is Active. Setting it to Inactive stores the new Program in the Archived Program List of the Program Manager.
Step 6 ![]() (Optional) Enter the Program Provider. This may be your company, organization or department name. This field is for your reference only. The default value is the Content Provider specified in the Configuration module of the DMM.
(Optional) Enter the Program Provider. This may be your company, organization or department name. This field is for your reference only. The default value is the Content Provider specified in the Configuration module of the DMM.
Step 7 ![]() Select all categories that the Program should be associated to. Click the check box next to each desired Category in the listing.
Select all categories that the Program should be associated to. Click the check box next to each desired Category in the listing.
If you select Program Categories, end users of the Video Portal will be able to locate this Program in the Program Guide and Search tabs.
Step 8 ![]() Click on Save to submit and save all the metadata.
Click on Save to submit and save all the metadata.
The new Program you just added appears in the Active Program list (if the Program Status was set to Active), or in the Archived Program list (if the status was set to Inactive) in alphabetical order by Program Name.
Adding a New Video
When a new Program has been added to the DMM, a Video entity must be created.
Each Video can only belong to one Program and a Program can have one or many Videos.
To add a new video, follow these steps:
Step 1 ![]() From the Active Program listing, find the row containing the Program for which you want to add a new Video entity and click on the Add New icon in the Active Videos column (see Figure 4-4).
From the Active Program listing, find the row containing the Program for which you want to add a new Video entity and click on the Add New icon in the Active Videos column (see Figure 4-4).
Figure 4-4 Adding a New Video to an Active Program in the Active Program List
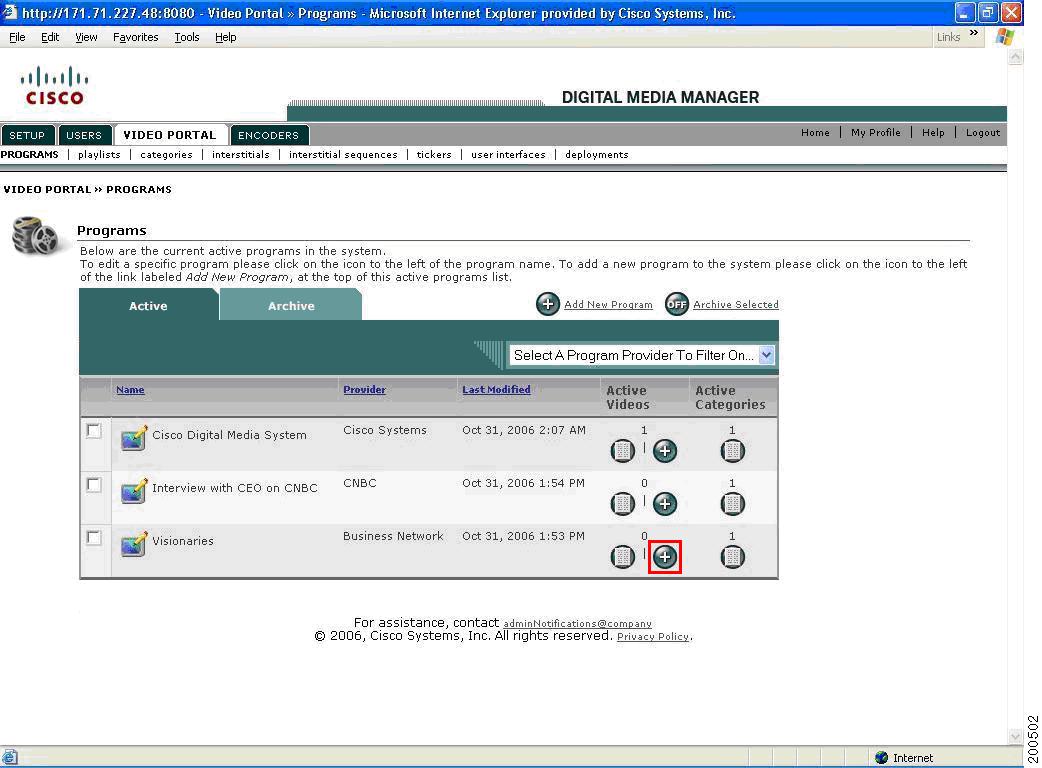
The number located in the Active Videos column above the List View and Add New icons indicates the current number of Active Videos belonging to the corresponding Program in each row.
OR
From the Active Video listing of a chosen Program, click on the Add New Video button located in the upper right-hand corner above the listing (see Figure 4-4).
Figure 4-5 Adding a New Video from the Active Video List
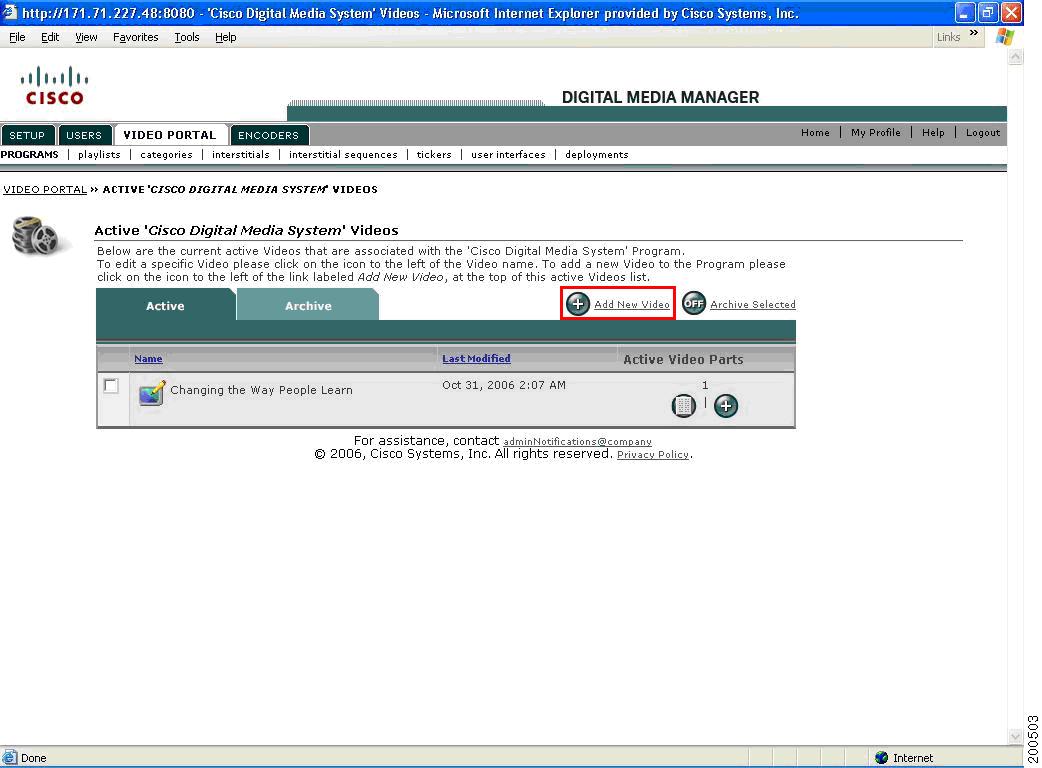
A newly added Program does not have any active Videos belonging to it. If a Program has any existing Videos belonging to it, the Videos appear in alphabetical order by Video Title.
Table 4-2 describes the contents of the Add New Video Window.
Table 4-2
Fields in the Add New Video Window
Figure 4-6 Adding a New Video
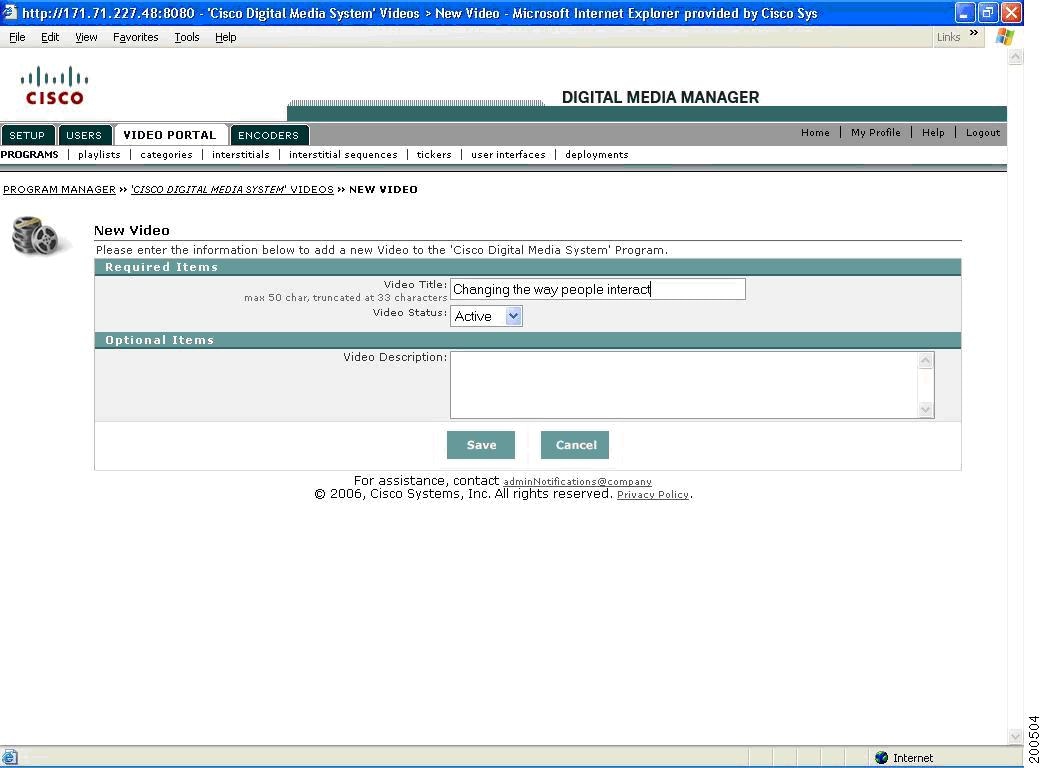
Step 2 ![]() Enter the Video Title. This title appears in the Video Portal's Video listing of the Playlists, Program Guide, and Search tabs.
Enter the Video Title. This title appears in the Video Portal's Video listing of the Playlists, Program Guide, and Search tabs.
Step 3 ![]() Set the Video Status. The default value is Active. Setting it to Inactive stores the new Video in the Program's Video Archive List.
Set the Video Status. The default value is Active. Setting it to Inactive stores the new Video in the Program's Video Archive List.
Step 4 ![]() (Optional) Enter the Video Description. This field is for your reference only.
(Optional) Enter the Video Description. This field is for your reference only.
Step 5 ![]() Click on Save to submit and save all the metadata.
Click on Save to submit and save all the metadata.
The new Video you just added appears in the Active Video list (if the Video Status was set to Active), or in the Archived Video list (if the status was set to Inactive) in alphabetical order by Video Title.
Adding a New Video Part
Each Video entity must have at least one Video Part. After a new Video entity has been created, you must create a Video Part
To add a new video part, follow these steps:
Step 1 ![]() From the Active Video listing of a chosen Program, find the row containing the Video for which you want to add a new Video Part and click on the Add New icon in the Active Video Parts column (see Figure 4-4).
From the Active Video listing of a chosen Program, find the row containing the Video for which you want to add a new Video Part and click on the Add New icon in the Active Video Parts column (see Figure 4-4).
Figure 4-7 Adding a New VIdeo Part to an Active Video in the Active Video List

The number located in the Active Video Parts column above the List View and Add New icons indicates the current number of Active Video Parts belonging to the corresponding Video in each row.
OR
Step 2 ![]() From the Active Video Parts listing of a chosen Video, click on the Add New Video Part button located in the upper right-hand corner above the listing (see Figure 4-8).
From the Active Video Parts listing of a chosen Video, click on the Add New Video Part button located in the upper right-hand corner above the listing (see Figure 4-8).
Figure 4-8 Adding a New Video Part from the Active Video Part List
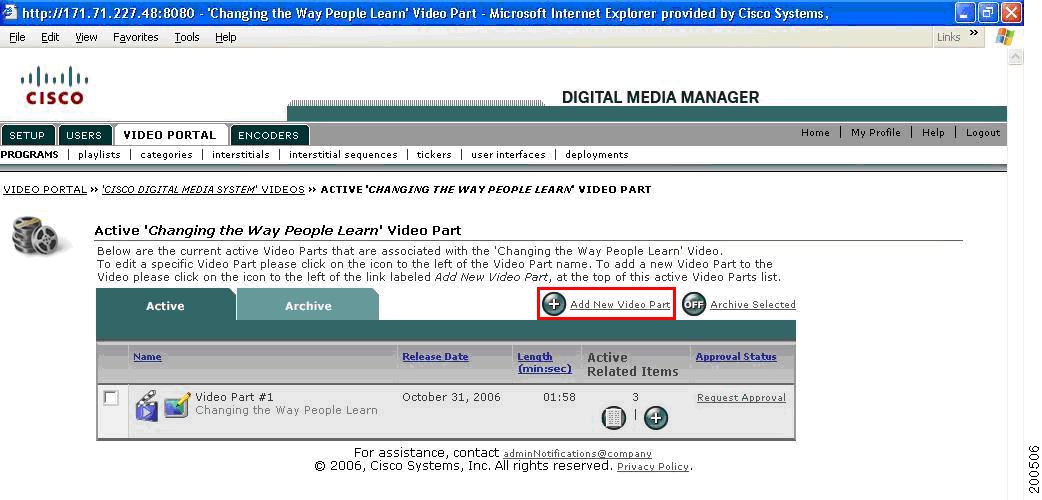
A newly added Video does not have any active Video Parts belonging to it. If a Video has any existing Video Parts belonging to it, the Video Parts appear in ascending, numerical order by Video Part number (see Figure 4-9).
Figure 4-9 Add A New Video Part Window
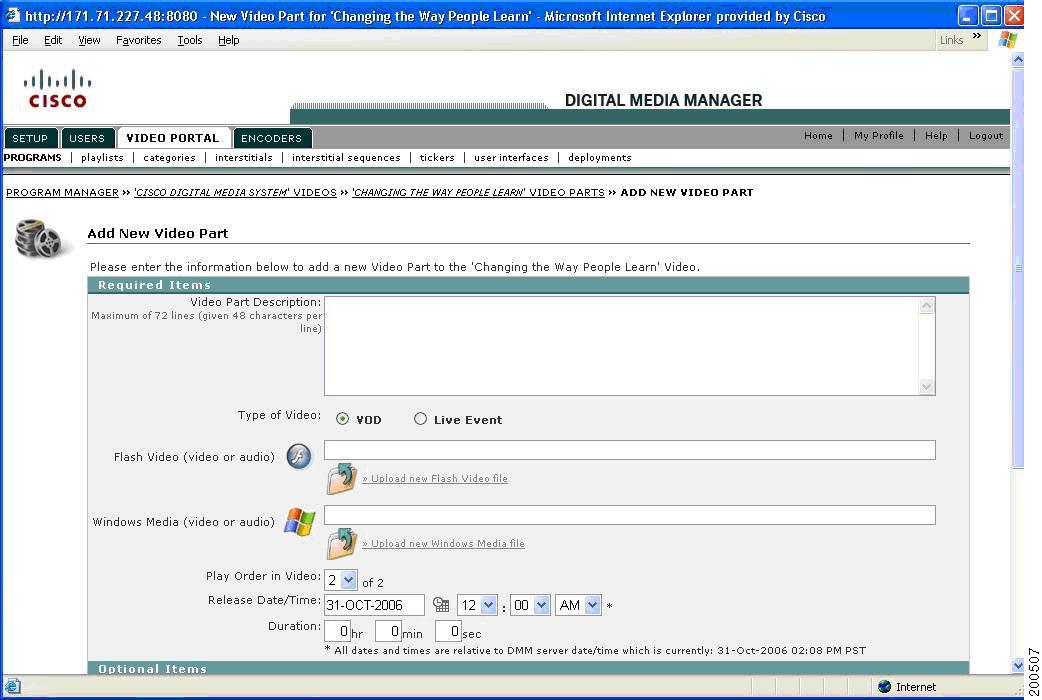
Table 4-3 describes the contents of this window:
Table 4-3
Field Descriptions for Add New Video Part Window
Step 3 ![]() Enter the Video Part Description. This data appears in the Video Portal's Preview Pane and in the More Info tab under the Overview tab for the corresponding Video Part.
Enter the Video Part Description. This data appears in the Video Portal's Preview Pane and in the More Info tab under the Overview tab for the corresponding Video Part.

Note ![]() The Video Part Description should be no more than 72 lines of text, given 48 characters per line, due to real estate limitations within the Video Portal.
The Video Part Description should be no more than 72 lines of text, given 48 characters per line, due to real estate limitations within the Video Portal.
Step 4 ![]() Enter the Duration of the Video Part in hh:mm:ss format. If you enter only seconds, the DMM will automatically convert it into hh:mm:ss format when you save your entry. The Duration appears in the Video Portal near the Video Part's corresponding Video Title.
Enter the Duration of the Video Part in hh:mm:ss format. If you enter only seconds, the DMM will automatically convert it into hh:mm:ss format when you save your entry. The Duration appears in the Video Portal near the Video Part's corresponding Video Title.
Note ![]() The Duration must be populated manually if a Flash (.flv) file is uploaded in Step 5 below. The Duration does not automatically populate for Windows media (.wmv), Real (.rm), or QuickTime (.mov) files.
The Duration must be populated manually if a Flash (.flv) file is uploaded in Step 5 below. The Duration does not automatically populate for Windows media (.wmv), Real (.rm), or QuickTime (.mov) files.
Note ![]() If the Video Part is a live stream, it is recommended that you enter the duration according to the length of the scheduled event. This duration is not enforced by the Video Portal; hence, if the live event exceeds the specified duration, the stream will still continue to play in the Video Portal until the stream is concluded or no longer accessible.
If the Video Part is a live stream, it is recommended that you enter the duration according to the length of the scheduled event. This duration is not enforced by the Video Portal; hence, if the live event exceeds the specified duration, the stream will still continue to play in the Video Portal until the stream is concluded or no longer accessible.
Step 5 ![]() Select the media file to upload to the DMM to deploy a media file and then deploy the file to the Deployment Location (as specified in the Configuration Manager module of the DMM). A media file is the actual viewable content in the Video Portal.
Select the media file to upload to the DMM to deploy a media file and then deploy the file to the Deployment Location (as specified in the Configuration Manager module of the DMM). A media file is the actual viewable content in the Video Portal.
•![]() Flash media files must be .flv or .swf.
Flash media files must be .flv or .swf.
•![]() Windows media files must be .wmv.
Windows media files must be .wmv.
•![]() Real media files must be .rm.
Real media files must be .rm.
•![]() QuickTime files must be .mov/.mp4/.m4v
QuickTime files must be .mov/.mp4/.m4v
Be sure that ALL supported media format fields (that is, Flash, Windows Media, Real, nd Quicktime where applicable) are populated with the image, audio, or video file to upload.
All media files will be expanded to a dimension of 400x300 for playback in the Video Portal.
Note ![]() It is highly recommended that videos be encoded at a 400x300 dimension.
It is highly recommended that videos be encoded at a 400x300 dimension.
OR
For a live stream or if the media file is already residing on the production server, enter the media file(s) URL reference for each available media format of this Video Part.
Note ![]() Be sure to specify the appropriate protocol per media format.
Be sure to specify the appropriate protocol per media format.
Table 4-4 Media Format Protocols and File Extensions
|
|
|
|
|---|---|---|
Flash Video |
http |
.flv |
Windows Media |
mms/rtsp |
.wmv, .wma, .asf |
Real |
rtsp |
.rm |
QuickTime |
http/rstp |
.mov, .mp4, .m4v |
An example of a URL reference for live Video Part is:
•![]() Windows Media: mms://yourserverdomain.com/directory/directory/ (or rtsp)
Windows Media: mms://yourserverdomain.com/directory/directory/ (or rtsp)
Note ![]() When referencing a live stream, a file name is not necessary. You generally reference a directory (e.g. location) on the streaming server(s) where the stream is being served from. Please check with your systems administrator for details on your particular configuration if you are unsure.
When referencing a live stream, a file name is not necessary. You generally reference a directory (e.g. location) on the streaming server(s) where the stream is being served from. Please check with your systems administrator for details on your particular configuration if you are unsure.
Example URL references for on-demand Video Part:
•![]() Flash (delivered via http)—http:// yourserverdomain.com/directory/directory/filename.flv
Flash (delivered via http)—http:// yourserverdomain.com/directory/directory/filename.flv
•![]() Windows Media—mms://yourserverdomain.com/directory/directory/filename.wmv (or rtsp)
Windows Media—mms://yourserverdomain.com/directory/directory/filename.wmv (or rtsp)
•![]() Real:—rtsp://yourserverdomain.com/directory/directory/filename.rm
Real:—rtsp://yourserverdomain.com/directory/directory/filename.rm
•![]() QuickTime—http://yourdomainserver.com/directory/filename.mov
QuickTime—http://yourdomainserver.com/directory/filename.mov
Step 6 ![]() Select the Play Order in Video to indicate which order the Video Part should play, relative to all other Video Parts belonging to the parent Video entity.
Select the Play Order in Video to indicate which order the Video Part should play, relative to all other Video Parts belonging to the parent Video entity.
Step 7 ![]() Select the Release Date for the Video Part. The Release Date appears in the Video Portal near the Video Part's corresponding Video Title.
Select the Release Date for the Video Part. The Release Date appears in the Video Portal near the Video Part's corresponding Video Title.
The default Release Date is seven days from the current date.
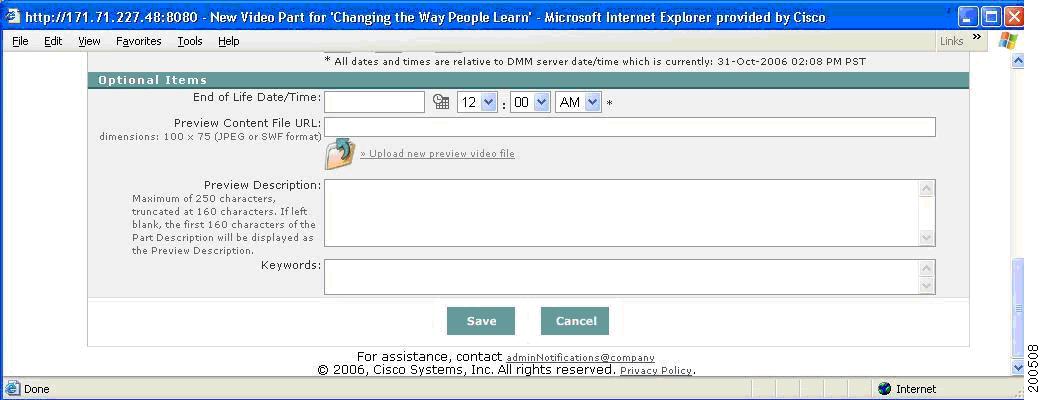
Step 8 ![]() Select the End of Life Date for the Video Part (see Figure 4-10). This date is optional and is only for your reference.
Select the End of Life Date for the Video Part (see Figure 4-10). This date is optional and is only for your reference.
Figure 4-10 Optional Items in the Add New Video Part Window
Note ![]() The Video Portal does not automatically archive Videos (that is, it does not enforce this date).
The Video Portal does not automatically archive Videos (that is, it does not enforce this date).
Step 9 ![]() Enter the Preview Content File URL (assuming the preview file is pre-positioned and the url is valid) or or choose to upload the file if you want the DMM to deploy the file out to the Deployment Location (as specified in the Configuration Manager module of the DMM). This is optional.
Enter the Preview Content File URL (assuming the preview file is pre-positioned and the url is valid) or or choose to upload the file if you want the DMM to deploy the file out to the Deployment Location (as specified in the Configuration Manager module of the DMM). This is optional.
The Preview File is displayed in the Video Portal Preview Pane. The Preview File (100 x 75 pixels) can be either an SWF animation (created using third-party tools) or a JPEG file. If no Program Icon is referenced or uploaded, the Video Portal displays a No Preview Available icon in the Preview Pane.
The Program Icon must be a 100x75 pixel, Flash animation (.swf) or a non-progressive JPG file. If it is a Flash animation, it is recommended that the .swf be programmed to pause on a static frame after 10 seconds rather than looping through infinitely.
Note ![]() All images must be in non-progressive JPG format in order to be viewable in the Video Portal.
All images must be in non-progressive JPG format in order to be viewable in the Video Portal.
Step 10 ![]() Enter the Audio Static File URL reference if the file is already residing on the production server or choose to upload the file if you want the DMM to deploy the file out to the Deployment Location (as specified in the Configuration Manager module of the DMM). This is optional.
Enter the Audio Static File URL reference if the file is already residing on the production server or choose to upload the file if you want the DMM to deploy the file out to the Deployment Location (as specified in the Configuration Manager module of the DMM). This is optional.
The Audio Static File is displayed in the Video Portal's playback window as a substitute for a Media File. If no Media File or Audio Static File is referenced or uploaded, the Video Portal will encounter an error when an end user tries to access this Video Part for playback.
The Audio Static File must be a 400x300 pixel, Flash animation (.swf) or a non-progressive JPG file.
Step 11 ![]() (Optional) Enter the Preview Description to describe the video in the Preview Pane. A maximum of 250 characters are allowed, truncated at 160 characters.
(Optional) Enter the Preview Description to describe the video in the Preview Pane. A maximum of 250 characters are allowed, truncated at 160 characters.
This field is optional. If you leave it blank, the first 160 characters of the Part Description will be displayed as the Preview Description.
Step 12 ![]() Enter the Keywords by which the Video Part will be searchable in the Video Portal's Search tab.
Enter the Keywords by which the Video Part will be searchable in the Video Portal's Search tab.
The Video Portal Search feature will parse through the Keyword field of all available Video Parts for string matches and return a list of all matching Video Titles. The Video Portal does not parse any other metadata.
Note ![]() You do not need to include commas, semicolons, or other word separators in the Keyword field. The Video Portal ignores these.
You do not need to include commas, semicolons, or other word separators in the Keyword field. The Video Portal ignores these.
Step 13 ![]() Click on Save to submit and save all the metadata.
Click on Save to submit and save all the metadata.
The new Video Part you just added appears in the Active Video Parts list (if the Video Part Status was set to Active), or in the Archived Video Parts list (if the status was set to Inactive) in numerical order by Part number.
All uploaded files (binaries) will be saved to the Staging Directory, as specified under the Setup module on the primary navigation bar of the DMM.
Video Part Approvals
An approval process can be used to validate each Video Part. This process includes requesting an approval and either obtaining the approval or having the approval request denied.
Note ![]() An approver must be designated as someone with Approver permissions and can NOT be the same user as the requestor.
An approver must be designated as someone with Approver permissions and can NOT be the same user as the requestor.
Note ![]() Approvals are NOT required before a Video Part can be deployed.
Approvals are NOT required before a Video Part can be deployed.
Requesting a Video Part Approval
To request a video part approval, follow these steps:
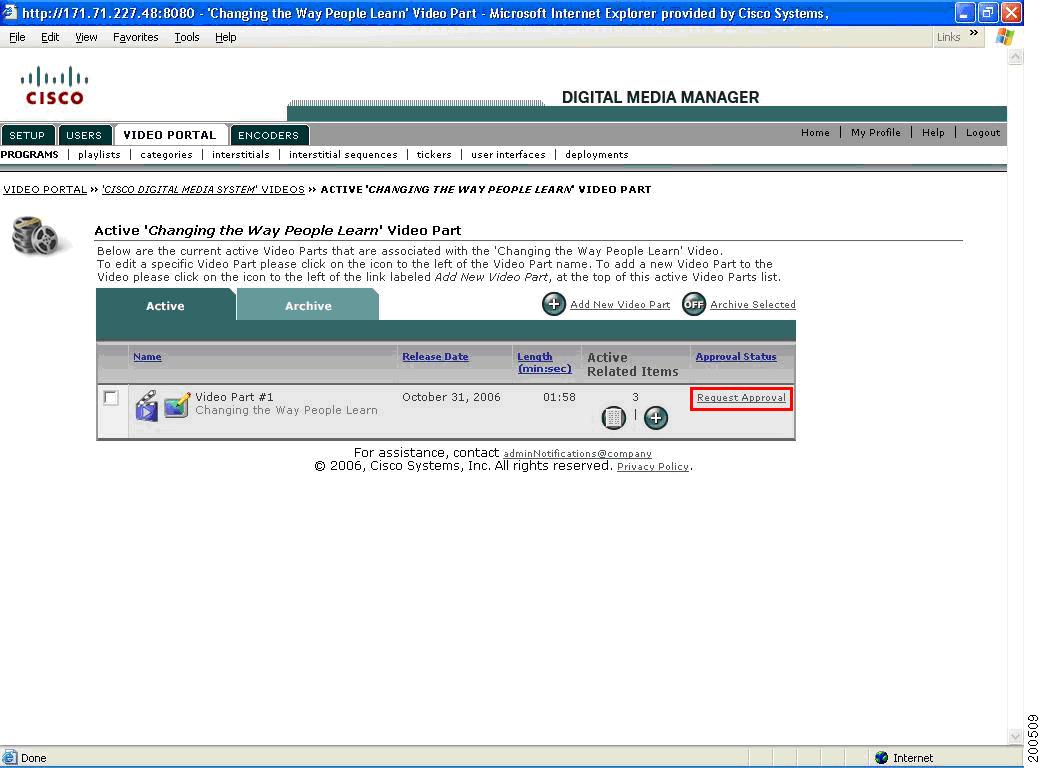
Step 1 ![]() From the Active Video Part listing of a chosen Video, find the row containing the Video Part for which you want to request an Approval. Click on the Request Approval link in the Approval Status column (see Figure 4-11).
From the Active Video Part listing of a chosen Video, find the row containing the Video Part for which you want to request an Approval. Click on the Request Approval link in the Approval Status column (see Figure 4-11).
Figure 4-11 Request an Approval for a Specific Video Part
The Video Part Approval Request Popup window opens.
Figure 4-12 Video Part Approval Request Pop-Up Window
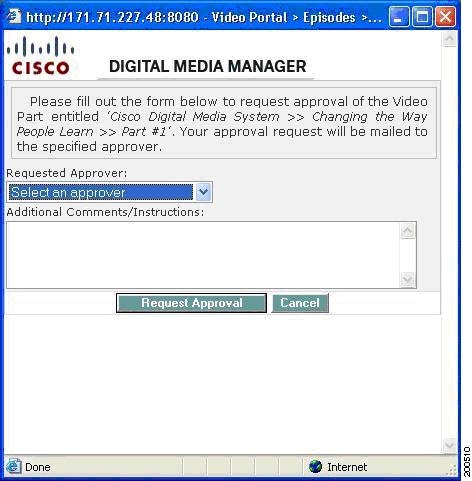
Step 1 ![]() Select an Approver from the drop-down list of users with Approver permissions. Additional comments or instructions about this Video Part can also be added to the approval request.
Select an Approver from the drop-down list of users with Approver permissions. Additional comments or instructions about this Video Part can also be added to the approval request.
Step 2 ![]() Click the Request Approval button to send an email to the Approver requesting approval for the Video Part, or Cancel to abort the operation.
Click the Request Approval button to send an email to the Approver requesting approval for the Video Part, or Cancel to abort the operation.
After clicking the Request Approval button, a Video Part Approval Message window opens displaying the message that has been sent to the Approver (see Figure 4-13).
Figure 4-13 Video Part Approval Message Window
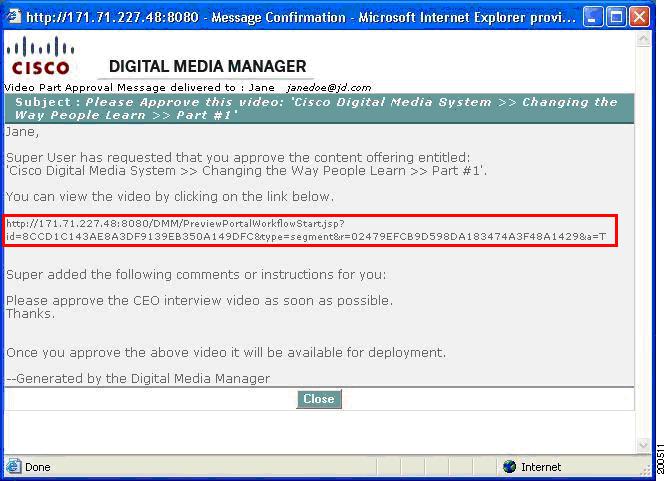
Step 3 ![]() Click the Close button after reviewing the email sent to the Approver.
Click the Close button after reviewing the email sent to the Approver.
Approving or Not Approving a Video Part
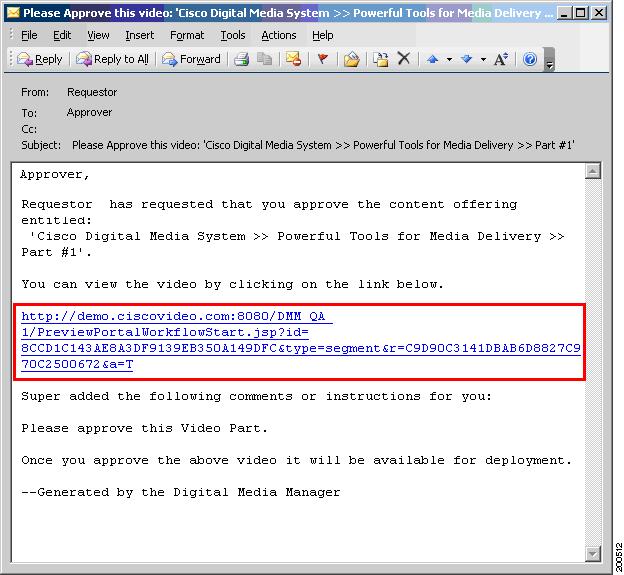
After a Video Part Approval Request has been made, an email is sent to the Approver requesting the Video Part approval (see Figure 4-14). The email contains a link to preview and approve or not approve the Video Part.
To approve or not approve a video part, follow these steps:
Step 1 ![]() In the email request for the Video Part approval, click on the link to preview the Video Part.
In the email request for the Video Part approval, click on the link to preview the Video Part.
Figure 4-14 Example of Email Requesting Approval
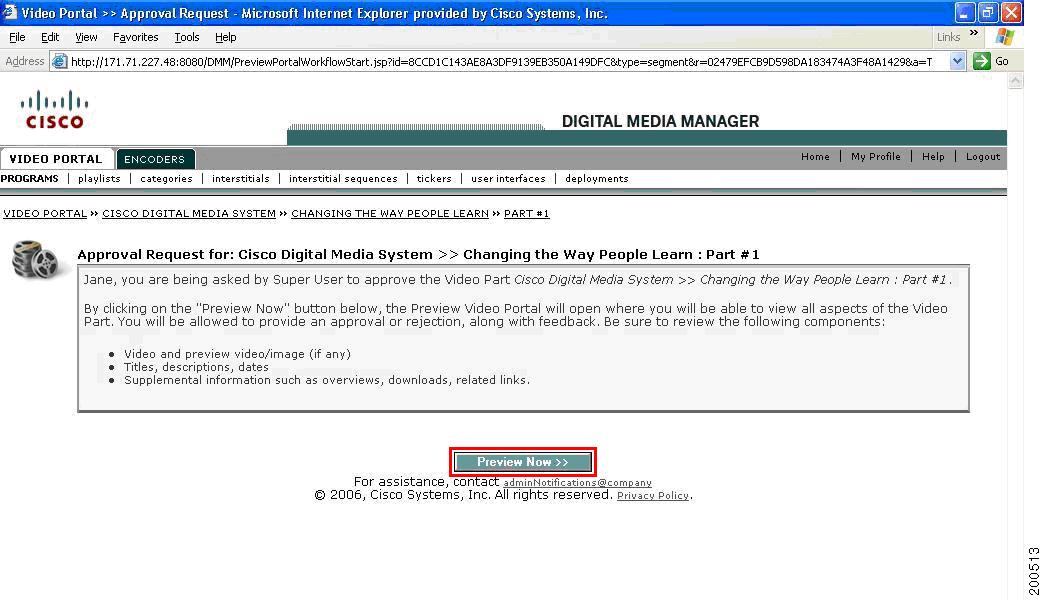
Step 2 ![]() In the Approval Request page that opens (see Figure 4-15), click on the Preview Now button.
In the Approval Request page that opens (see Figure 4-15), click on the Preview Now button.
Figure 4-15 Preview Video Part Approval
A preview Video Portal opens (see Figure 4-16) and plays the Video Part that has been requested for approval. After reviewing the Video Part, use the controls at the bottom of the window to approve or not approve the Video Part.
Figure 4-16 Video Part Preview
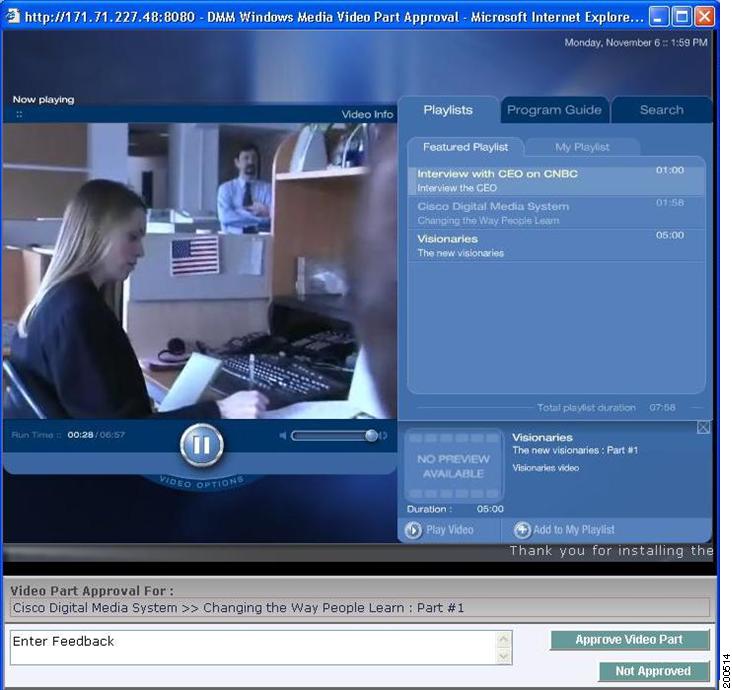
Step 3 ![]() (Optional) Enter feedback in the text box for the Video Part. Click on the Approve Video Part button to approve the video or click on the Not Approved button to deny the video's approval (see Figure 4-17).
(Optional) Enter feedback in the text box for the Video Part. Click on the Approve Video Part button to approve the video or click on the Not Approved button to deny the video's approval (see Figure 4-17).
Step 4 ![]() Click Close and Return in the Video Portal preview to return to the Digital Media Manager.
Click Close and Return in the Video Portal preview to return to the Digital Media Manager.
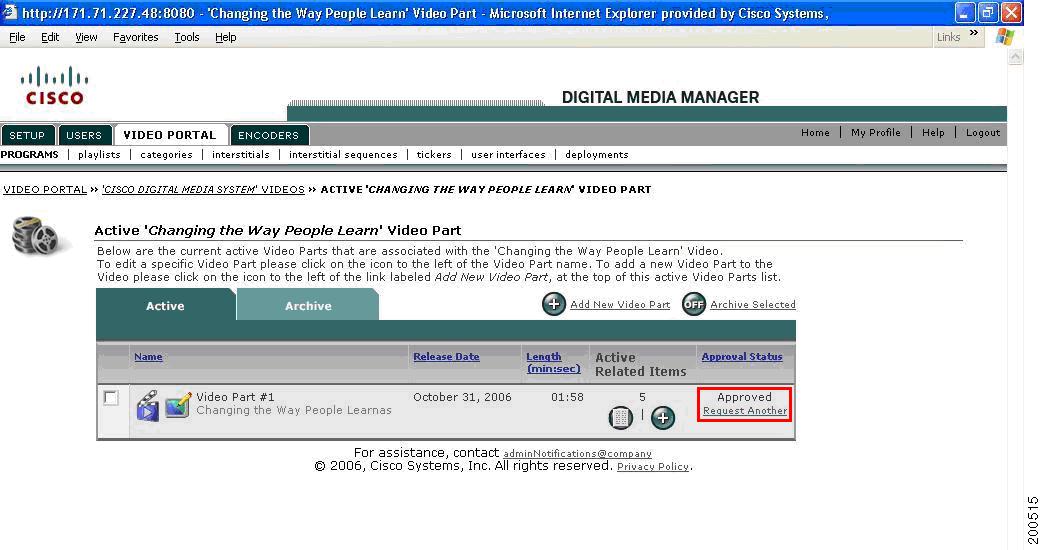
The action will be immediately reflected in the Program Manager under the Video Part listing. The requestor will also be notified via email of the Approver's response.
Figure 4-17 Video Part Approval Status Updated Window
Adding a New Related Item
Each Video Part can have additional content and information to supplement the content offering, referred to as related items.
Types of related items:
•![]() Web Links—Links to a related web site.
Web Links—Links to a related web site.
•![]() Related Video—Links to other Video Parts available within the Video Portal.
Related Video—Links to other Video Parts available within the Video Portal.
•![]() Downloads—Links to files that are downloaded via the browser for the Video Portal end users to save onto their system.
Downloads—Links to files that are downloaded via the browser for the Video Portal end users to save onto their system.
A Video Part's related items are accessible using the More Info button of the Video Portal during playback of the Video Part.
To add a new related item, follow these steps:
Step 1 ![]() From the Active Video Part listing of a chosen Video, find the row containing the video part for which you want to add a new related item and click on the Add New icon in the Active Related Items column (see Figure 4-18).
From the Active Video Part listing of a chosen Video, find the row containing the video part for which you want to add a new related item and click on the Add New icon in the Active Related Items column (see Figure 4-18).
Figure 4-18 Adding a New Related Item to an Active Video Part in the Active Video List
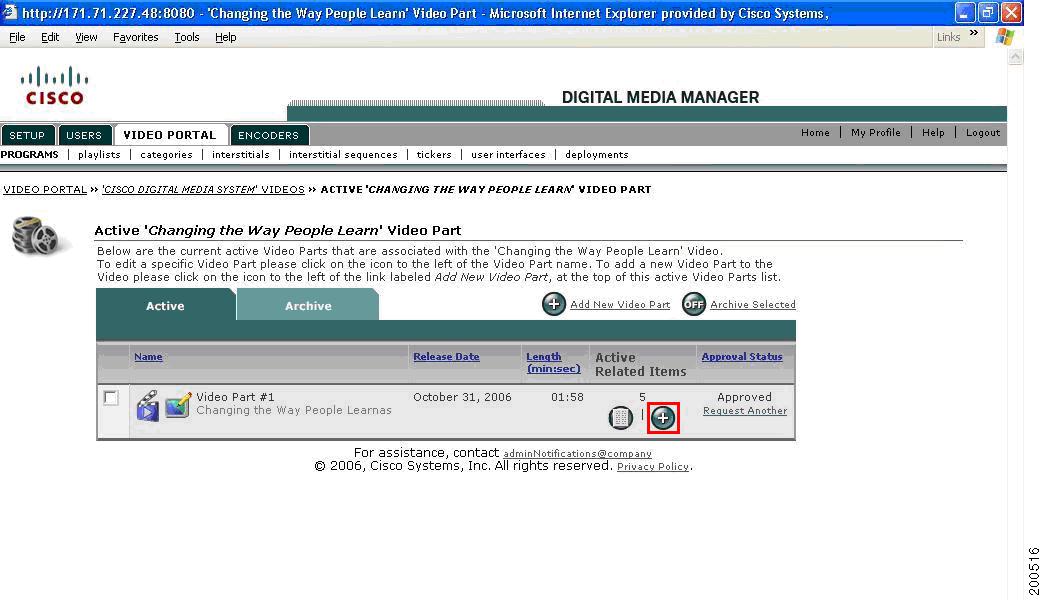
The number located in the Active Related Items column above the List View and Add New icon indicates the current number of Active Related Items belonging to the corresponding Video Part in each row.
OR
Click on the Add New Related Item button located in the upper right-hand corner above the listing (see Figure 4-19).
Figure 4-19 Adding a New Related Item from the Active Related Item List
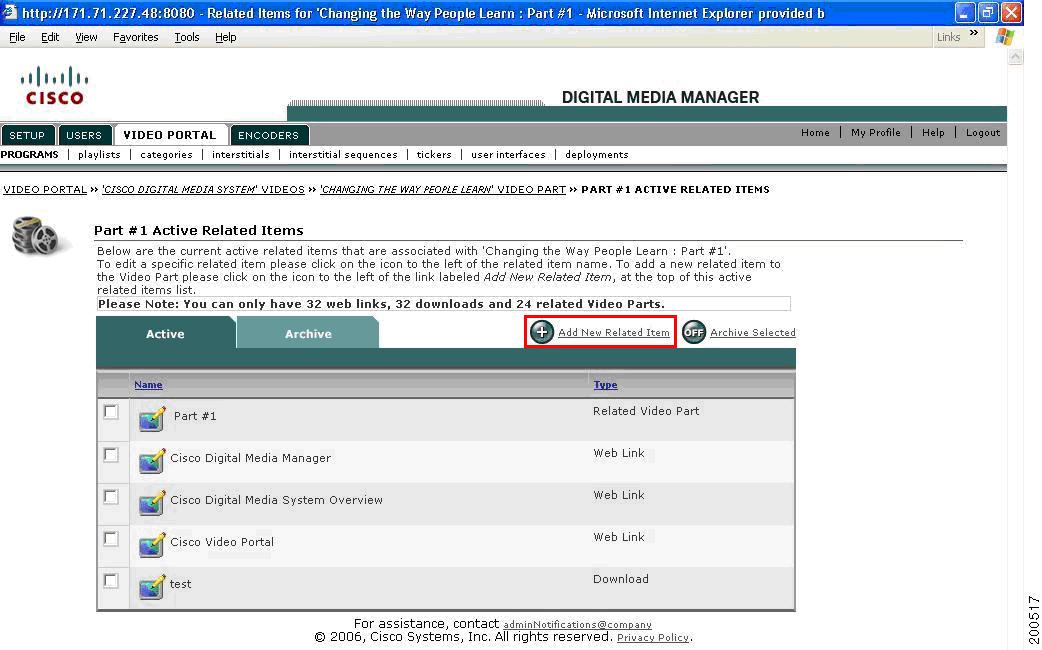
A newly added Video Part does not have any active Related Items belonging to it. If a Video Part has any existing Related Items belonging to it, the Related Items appear in alphabetical order by Related Item Name.
Table 4-5 describes the contents of this window:
Table 4-5
Adding New Related Item Field Descriptions
Step 2 ![]() Select the Related Item option from the pop-up window that opens (see Figure 4-20).
Select the Related Item option from the pop-up window that opens (see Figure 4-20).
Figure 4-20 Related Item Window
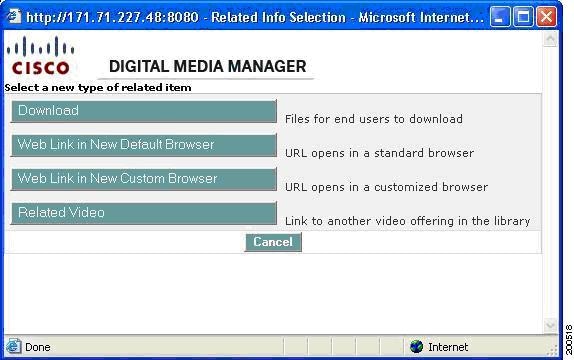
Table 4-6 describes the options in the Related Item window.
Table 4-6
Option Descriptions for Related Item Window
The following sections provide instructions for adding each of the options in Table 4-6.
Adding a New Download
To add a new download, follow these steps:
Step 1 ![]() From the Related Item window (see Step 2 of "Adding a New Related Item"), select the Download option.
From the Related Item window (see Step 2 of "Adding a New Related Item"), select the Download option.
Step 2 ![]() Enter the Item Title and Description as it will appear in the Downloads tab under the More Info tab in the Video Portal. The Item Title is the caption for the download.
Enter the Item Title and Description as it will appear in the Downloads tab under the More Info tab in the Video Portal. The Item Title is the caption for the download.
Follow these recommendations:
•![]() The Item Title should be no more than 44 characters (including spaces) because of real estate constraints in the Video Portal. After 44 characters, the Video Portal truncates the Item Title and appends an ellipses (...).
The Item Title should be no more than 44 characters (including spaces) because of real estate constraints in the Video Portal. After 44 characters, the Video Portal truncates the Item Title and appends an ellipses (...).
•![]() Specify the file type at the end of the Item Title in parentheses (for example: PDF, Doc, PPT).
Specify the file type at the end of the Item Title in parentheses (for example: PDF, Doc, PPT).
•![]() The Item Title has a character limit of 255 characters.
The Item Title has a character limit of 255 characters.
Step 3 ![]() Enter the File Location URL to which the Download Link will point. This field will take any path, but the path must be correctly accessible from the server hosting the Video Portal.
Enter the File Location URL to which the Download Link will point. This field will take any path, but the path must be correctly accessible from the server hosting the Video Portal.
Cisco recommends that you begin the URL with http://. You can also enter a relative path, but be sure that the Video Portal can access that path.
Note ![]() Make sure that the referenced file resides in the location you specify as the URL. The DMM does not currently have the ability to deploy a Download file. It can only reference a file that is already residing on the production server via URL or relative path.
Make sure that the referenced file resides in the location you specify as the URL. The DMM does not currently have the ability to deploy a Download file. It can only reference a file that is already residing on the production server via URL or relative path.
Step 4 ![]() Enter the Download Size in kilobytes. This indicates the size of the file in the Video Portal to allow the end user to gauge the duration of the file download.
Enter the Download Size in kilobytes. This indicates the size of the file in the Video Portal to allow the end user to gauge the duration of the file download.
Step 5 ![]() Set the Status. The default value is Active. Setting it to Inactive stores the new Download in the Archived Related Items list for the corresponding Video Part.
Set the Status. The default value is Active. Setting it to Inactive stores the new Download in the Archived Related Items list for the corresponding Video Part.
Step 6 ![]() Click on Save to submit and save all the metadata.
Click on Save to submit and save all the metadata.
The new Download you just added appears in the Related Items list (if the Status was set to Active), or in the Archived Related Items list (if the Status was set to Inactive) in alphabetical order by Item Title.
Adding a Web Link in a New Default Browser
To add a Web link in a new default browser, follow these steps:
Step 1 ![]() From the Related Item window (see Step 2 of "Adding a New Related Item"), select the Web Link in New Default Browser option.
From the Related Item window (see Step 2 of "Adding a New Related Item"), select the Web Link in New Default Browser option.
The New Related External Link page opens.
Figure 4-21 Adding a New Related External Link Window
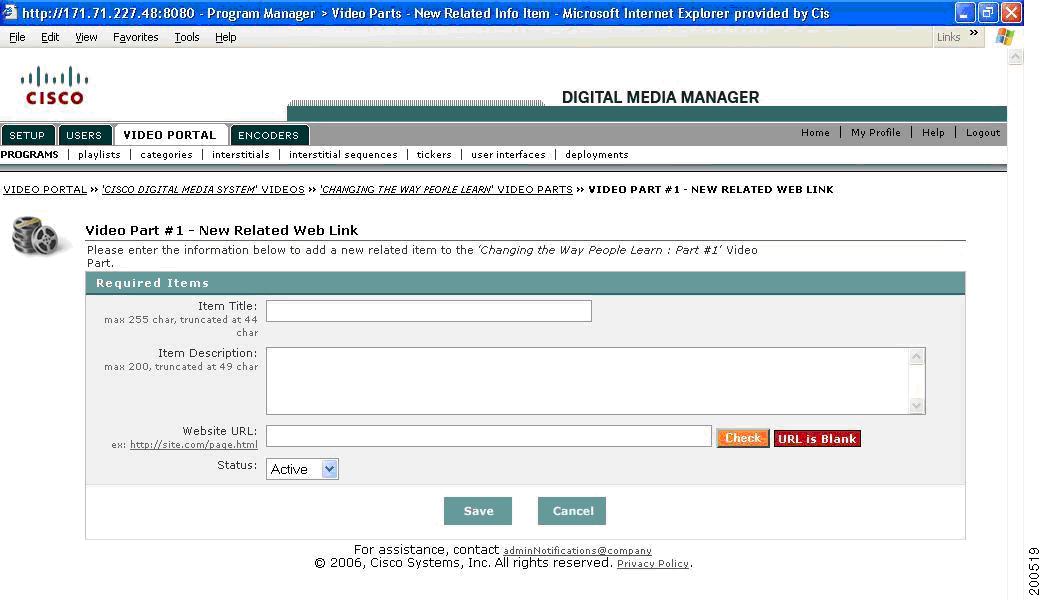
Step 2 ![]() Enter the Item Title and Description as they will appear in the Related Links tab under the More Info tab in the Video Portal. The Item Title is the caption for the link. The Item Description is the one line of text which is displayed underneath the Item Title, describing the download or link.
Enter the Item Title and Description as they will appear in the Related Links tab under the More Info tab in the Video Portal. The Item Title is the caption for the link. The Item Description is the one line of text which is displayed underneath the Item Title, describing the download or link.
Cisco recommends that the Item Title be no more than 48 characters (including spaces) because of real estate constraints in the Video Portal. After 48 characters, the Video Portal will truncate the Item Title and append an ellipsis (...).
•![]() Item Title character limit: 255
Item Title character limit: 255
•![]() Item Description character limit: 58
Item Description character limit: 58
Enter the Website URL to which the External Web Link will point. This field will take any path, but the path must be correctly accessible from the server hosting the Video Portal.
Cisco recommends that you start the URL with http://. You can also enter a relative path, but be sure that the Video Portal can access that path.
Step 3 ![]() Set the Status. The default value is Active. Setting it to Inactive stores the new Web Link in the Archived Related Items list for the corresponding Video Part.
Set the Status. The default value is Active. Setting it to Inactive stores the new Web Link in the Archived Related Items list for the corresponding Video Part.
Step 4 ![]() Click on Save to submit and save all the metadata.
Click on Save to submit and save all the metadata.
The new Web Link you just added appears in the Related Items list (if the Status was set to Active), or in the Archived Related Items list (if the Status was set to Inactive) in alphabetical order by Item Title.
Adding a Web Link in a New Custom Browser
To add a web link in a new custom browser, follow these steps:
Step 1 ![]() From the Related Link window (see Step 2 of "Adding a New Related Item"), select the Web Link in New Custom Browser option.
From the Related Link window (see Step 2 of "Adding a New Related Item"), select the Web Link in New Custom Browser option.
The New Related External Link page opens (see Figure 4-22).
Figure 4-22 New Related External Link Window
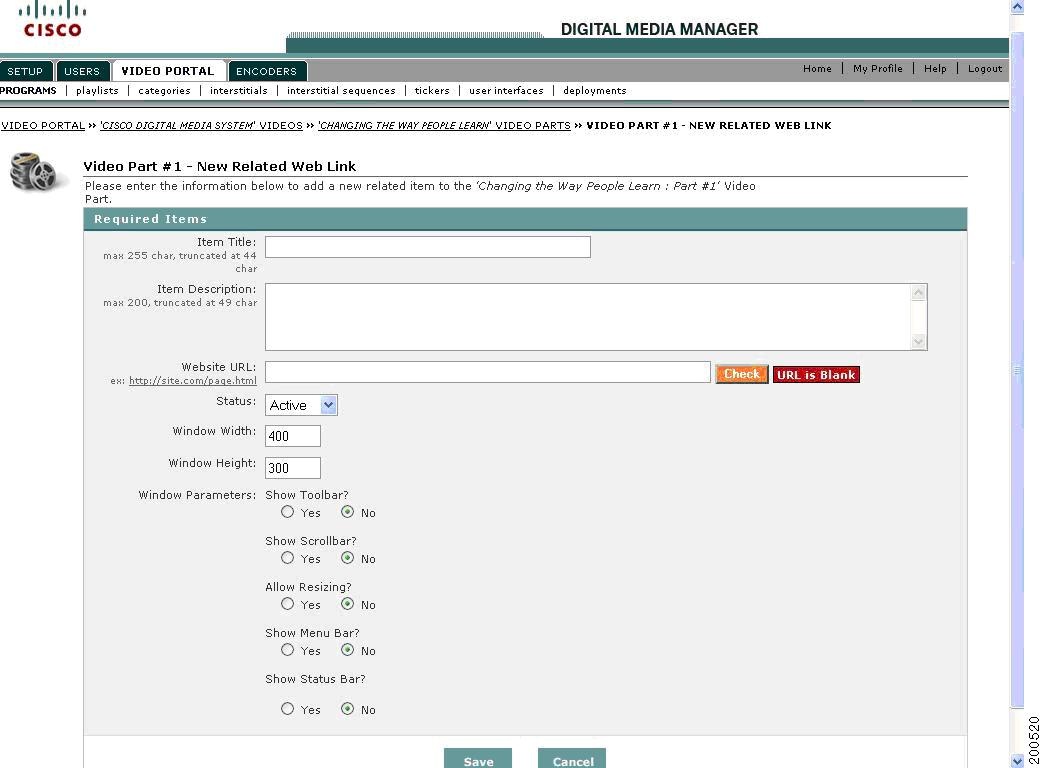
Step 2 ![]() Enter the Item Title and Description as they will appear in the Related Links tab under the More Info tab in the Video Portal. The Item Title is the caption for the link. The Item Description is the one line of text which is displayed underneath the Item Title, describing the download or link.
Enter the Item Title and Description as they will appear in the Related Links tab under the More Info tab in the Video Portal. The Item Title is the caption for the link. The Item Description is the one line of text which is displayed underneath the Item Title, describing the download or link.
Cisco recommended that the Item Title be no more than 44 characters (including spaces) because of real estate constraints in the Video Portal. After 44 characters, the Video Portal will truncate the Item Title and append an ellipsis (...).
Item Title character limit: 255
Item Description character limit: 200
Step 3 ![]() Enter the Website URL to which the External Web Link will point. This field will take any path, but the path must be correctly accessible from the server hosting the Video Portal.
Enter the Website URL to which the External Web Link will point. This field will take any path, but the path must be correctly accessible from the server hosting the Video Portal.
Cisco recommends that you begin the URL with http://. You can also enter a relative path, but be sure that the Video Portal can access that path.
Step 4 ![]() Click the Check button to verify the Website URL. If no URL is given, the status message displays "URL is blank". If the URL is invalid, the status message displays "URL is Incorrect". If the URL is valid, the status message displasy "URL exists".
Click the Check button to verify the Website URL. If no URL is given, the status message displays "URL is blank". If the URL is invalid, the status message displays "URL is Incorrect". If the URL is valid, the status message displasy "URL exists".
Step 5 ![]() Set the Status. The default value is Active. Setting it to Inactive stores the new Web Link in the Archived Related Items list for the corresponding Video Part.
Set the Status. The default value is Active. Setting it to Inactive stores the new Web Link in the Archived Related Items list for the corresponding Video Part.
The following additional Window Parameter options for the pop-up browser are also available:
•![]() Window Height: in pixels
Window Height: in pixels
•![]() Window Width: in pixels
Window Width: in pixels
•![]() Show Toolbar: Yes or No. The default is No.
Show Toolbar: Yes or No. The default is No.
•![]() Show Scrollbar: Yes or No. The default is No.
Show Scrollbar: Yes or No. The default is No.
•![]() Allow Resizing: Yes or No. The default is No.
Allow Resizing: Yes or No. The default is No.
•![]() Show Menu Bar: Yes or No. The default is No.
Show Menu Bar: Yes or No. The default is No.
•![]() Show Status Bar: Yes or No. The default is No.
Show Status Bar: Yes or No. The default is No.
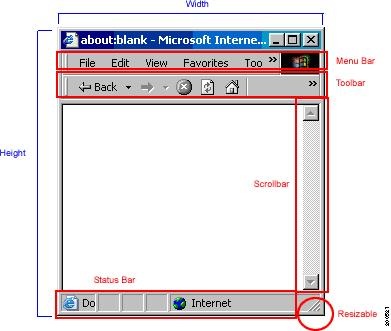
Figure 4-23 shows all the browser pop-up attributes that are configurable.
Figure 4-23 Configurable Browswer Pop-Up Attributes
Step 6 ![]() Click on Save to submit and save all the metadata.
Click on Save to submit and save all the metadata.
The new External Link you just added appears in the Related Items list (if the Status was set to Active), or in the Archived Related Items list (if the Status was set to Inactive) in alphabetical order by Item Title.
Adding a New Related Video Part
To add a new related video part, follow these steps:
Step 1 ![]() From the Related Link window (seeStep 2 of "Adding a New Related Item"), select the Related Video option.
From the Related Link window (seeStep 2 of "Adding a New Related Item"), select the Related Video option.
The Part Selector Wizard opens (see Figure 4-24).
Figure 4-24 Add New Related Video and Part Selector Wizard
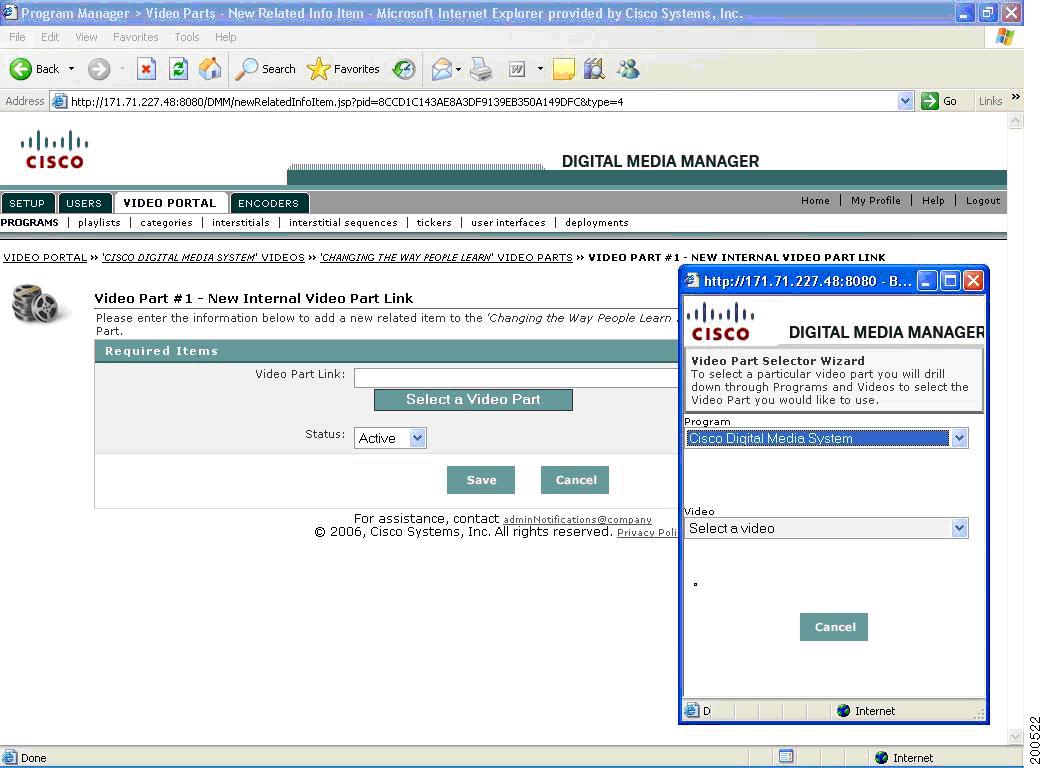
Step 2 ![]() In the Video Part Selector Wizard, select Program, then Video, then finally the Video Part for which you are creating the relationship. You must know this hierarchy for each Video Part that you wish to add as a Related Part.
In the Video Part Selector Wizard, select Program, then Video, then finally the Video Part for which you are creating the relationship. You must know this hierarchy for each Video Part that you wish to add as a Related Part.
Your selection will be saved to the Video Part Link field.
Step 3 ![]() Set the Status. The default value is Active. Setting it to Inactive stores the new Related Part in the Archived Related Items list for the corresponding Video Part.
Set the Status. The default value is Active. Setting it to Inactive stores the new Related Part in the Archived Related Items list for the corresponding Video Part.
Step 4 ![]() Click on Save to submit and save all the metadata.
Click on Save to submit and save all the metadata.
The new Related Video you just added appears in the Related Items list (if the Status was set to Active), or in the Archived Related Items list (if the Status was set to Inactive) in alphabetical order by Item Title.
 Feedback