- DMM User's Guide Preface
- DMM User's Guide Overview
- Understanding the Digital Media Manager
- Managing User Accounts
- Create Content Offering
- Creating Playlists
- Categorizing Content
- Customizing Video Portal
- Managing Deployments
- Config Settings
- Linking to the Video Portal
- Setting Up the DME 1000 and DME 2000 Encoders
- Setting Up Live Events Using a DME 1000 or DME 2000 Encoder
- Setting Up Live Events Using Third-Party Live Streams
- Archive and Delete
- Video Reports Metrics Overview
- DMM User's Guide Glossary
Cisco Digital Media Manager User Guide (version 3.5)
Bias-Free Language
The documentation set for this product strives to use bias-free language. For the purposes of this documentation set, bias-free is defined as language that does not imply discrimination based on age, disability, gender, racial identity, ethnic identity, sexual orientation, socioeconomic status, and intersectionality. Exceptions may be present in the documentation due to language that is hardcoded in the user interfaces of the product software, language used based on RFP documentation, or language that is used by a referenced third-party product. Learn more about how Cisco is using Inclusive Language.
- Updated:
- March 13, 2015
Chapter: Setting Up the DME 1000 and DME 2000 Encoders
Setting Up the DME 1000 and DME 2000 Encoders
This chapter describes how to add and manage DME 1000 and DME 2000 within the DMS.
Adding an Encoder into the DMM
To add an encoder into the DMM, follow these steps:
Step 1 ![]() Follow instructions included with the encoder for initial setup, and ensure it is connected to the network.
Follow instructions included with the encoder for initial setup, and ensure it is connected to the network.
Step 2 ![]() Optional: If you plan to publish live streams to your streaming server using "Push", proceed to the push configuration secondary navigation link and enter at least one push publishing point. See the next section, "Managing Push Configurations". (Be sure to add the Push Configuration that will be used most commonly with this encoder.)
Optional: If you plan to publish live streams to your streaming server using "Push", proceed to the push configuration secondary navigation link and enter at least one push publishing point. See the next section, "Managing Push Configurations". (Be sure to add the Push Configuration that will be used most commonly with this encoder.)
Step 3 ![]() Click on the ENCODERS tab on the primary navigation bar of the DMM, then click on the Encoders and Pull Configurations secondary navigation link.
Click on the ENCODERS tab on the primary navigation bar of the DMM, then click on the Encoders and Pull Configurations secondary navigation link.
Step 4 ![]() Find the encoder's IP Address. On the encoder front panel, click menu > setup system > Network > 100 Mbit (or 1,000 Mbit, depending on the port being used) > View Settings > IP Address(s).
Find the encoder's IP Address. On the encoder front panel, click menu > setup system > Network > 100 Mbit (or 1,000 Mbit, depending on the port being used) > View Settings > IP Address(s).
Step 5 ![]() Enter the IP Address obtained in Step 4 into the Encoder IP Address/Hostname field. (Optionally, enter the hostname of the encoder if you have DNS configured.)
Enter the IP Address obtained in Step 4 into the Encoder IP Address/Hostname field. (Optionally, enter the hostname of the encoder if you have DNS configured.)
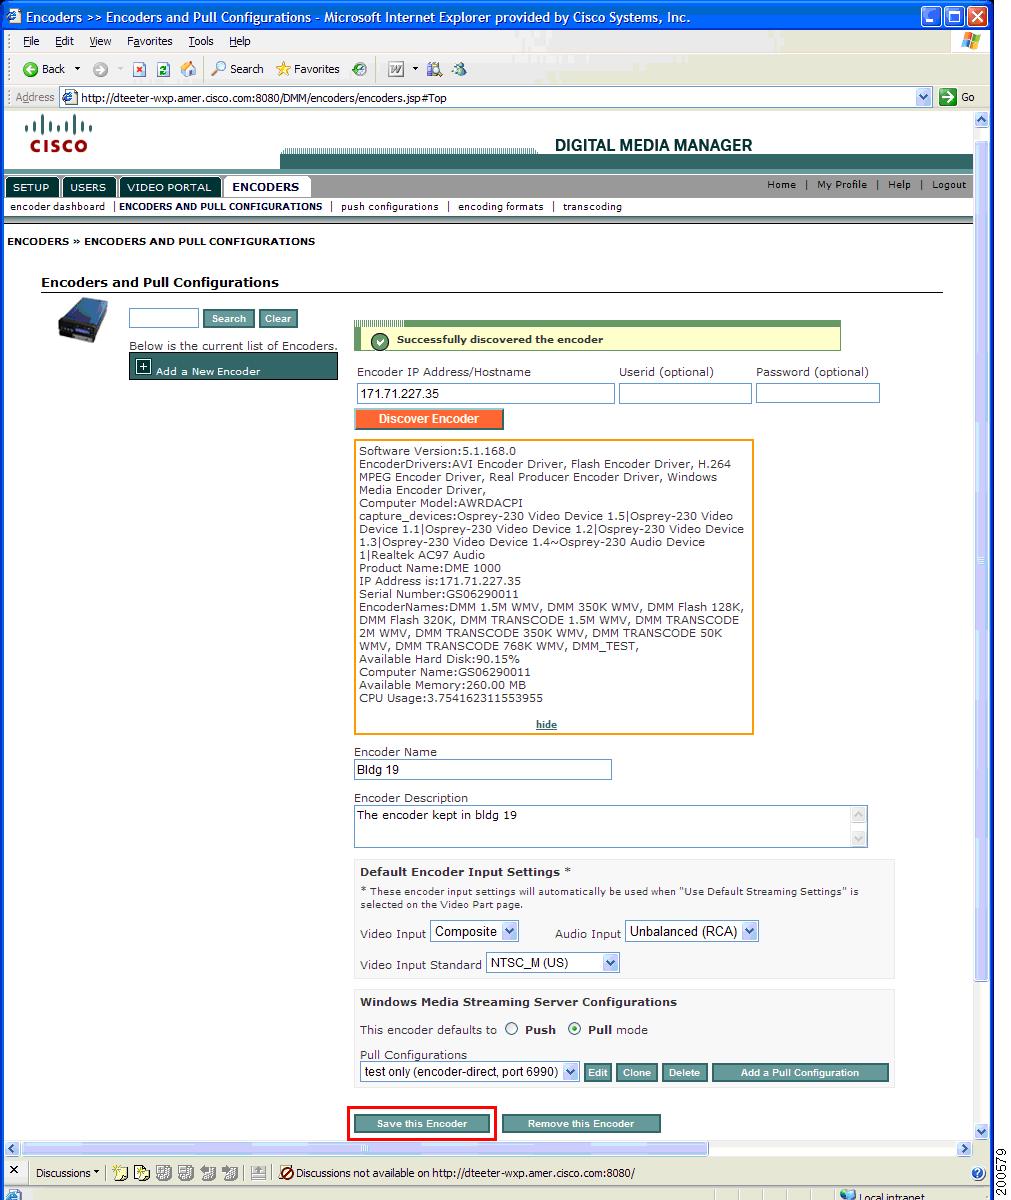
Step 6 ![]() Click on the Discover Encoder button. The button changes color and animates until the discovery process is complete.
Click on the Discover Encoder button. The button changes color and animates until the discovery process is complete.
Step 7 ![]() Enter the Encoder Name and Encoder Description. These fields may be used to describe the encoder owner, encoder location, encoder purpose, or a label placed on the product.
Enter the Encoder Name and Encoder Description. These fields may be used to describe the encoder owner, encoder location, encoder purpose, or a label placed on the product.
Step 8 ![]() Choose the Default Encoder Input Settings. Choose your most commonly used Video Input, Audio Input, and Video Input Standard. Later, when setting up live events, you may choose Use Default Settings rather than re-choosing these fields for each live event.
Choose the Default Encoder Input Settings. Choose your most commonly used Video Input, Audio Input, and Video Input Standard. Later, when setting up live events, you may choose Use Default Settings rather than re-choosing these fields for each live event.
Step 9 ![]() Choose the most common means of publishing your live events, either Push or Pull.
Choose the most common means of publishing your live events, either Push or Pull.

Note ![]() If you chose Pull, you will notice that one pull configuration called "test only (encoder-direct, port 6990)" is pre-created. This pull configuration enables you to test streams originating directly from the encoder rather than through a streaming server.
If you chose Pull, you will notice that one pull configuration called "test only (encoder-direct, port 6990)" is pre-created. This pull configuration enables you to test streams originating directly from the encoder rather than through a streaming server.
Step 10 ![]() If you chose Push: Choose the default Push configuration for this encoder. Later, when setting up live events, you may choose Use Default Settings rather than re-choosing the Push Configuration for each live event.
If you chose Push: Choose the default Push configuration for this encoder. Later, when setting up live events, you may choose Use Default Settings rather than re-choosing the Push Configuration for each live event.
If you chose Pull: Click the Add a Pull Configuration button to add the streaming server pull configurations that apply to this encoder.
Figure 11-1 Adding a Pull Configuration
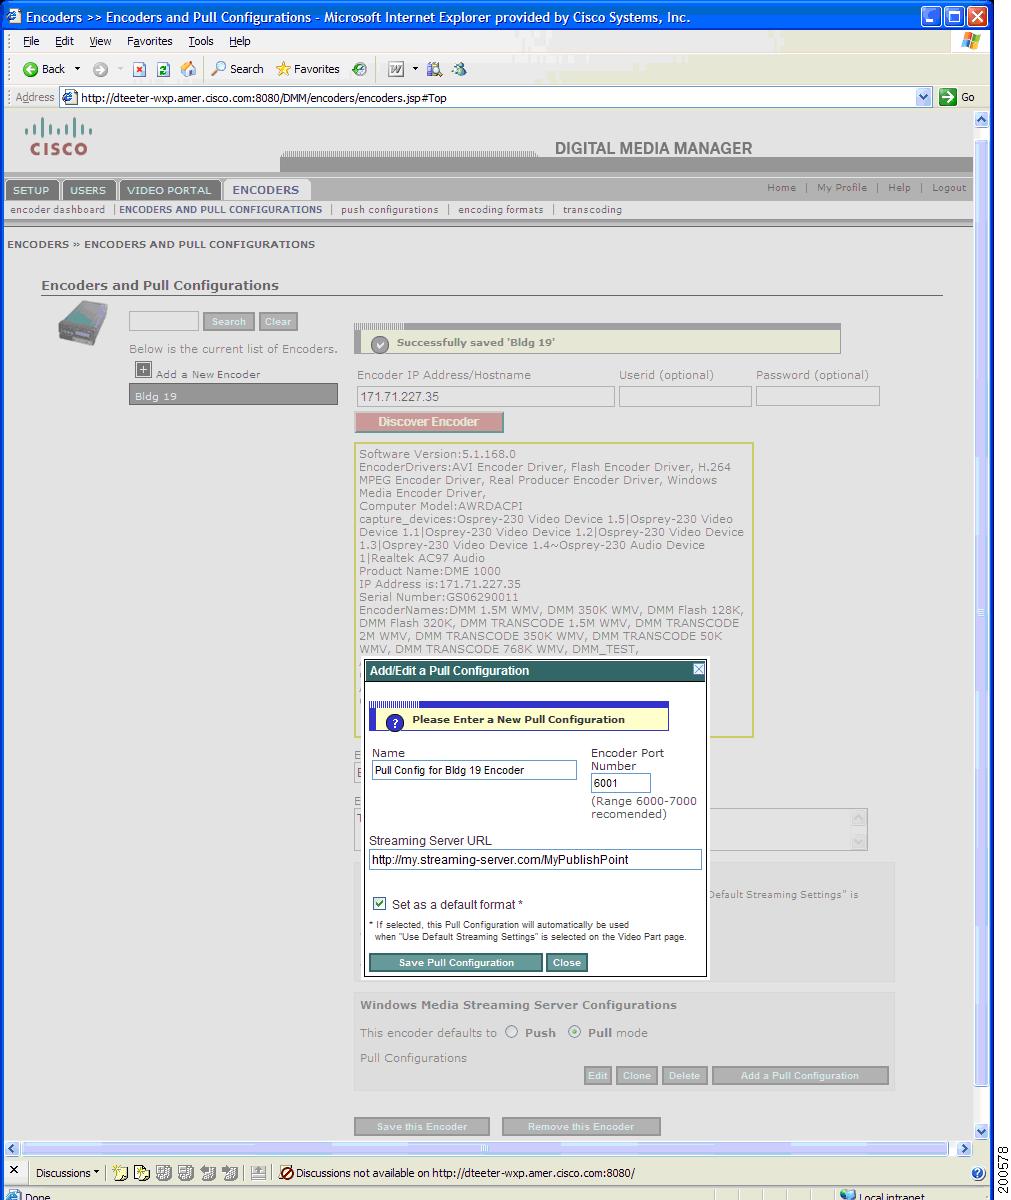
Step 11 ![]() Click the Save this Encoder button to save your new encoder and pull configurations. After saving, you should see a green box at the top of the page with the message "Successfully saved '{Encoder Name}'".
Click the Save this Encoder button to save your new encoder and pull configurations. After saving, you should see a green box at the top of the page with the message "Successfully saved '{Encoder Name}'".
Figure 11-2 Discovering an Encoder
Testing Stream-Publishing Functionality
To test stream-publishing functionality, follow these steps
Step 1 ![]() Click on the ENCODERS tab in the primary navigation bar in the DMM. The ENCODER DASHBOARD page opens.
Click on the ENCODERS tab in the primary navigation bar in the DMM. The ENCODER DASHBOARD page opens.
Step 2 ![]() Click the Encoder Setup button.
Click the Encoder Setup button.
Figure 11-3 Preparing to Start an Encoder
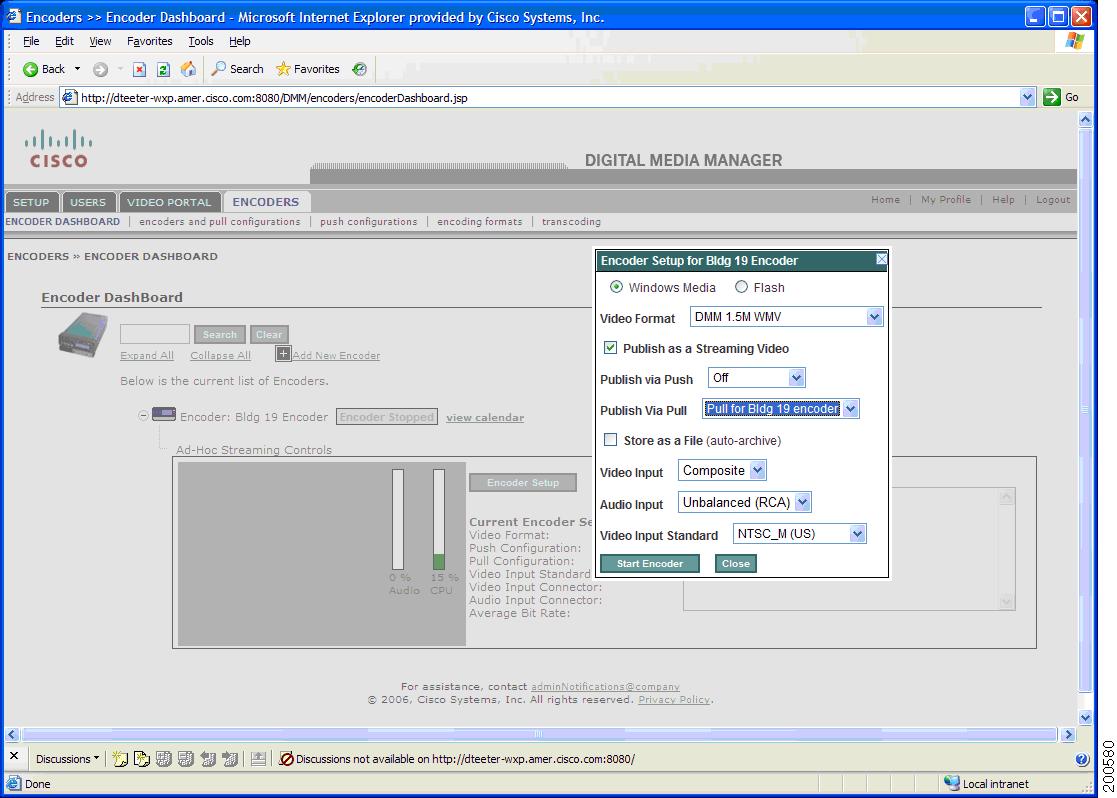
Step 3 ![]() Choose a Video Format according to the bit rate you will test
Choose a Video Format according to the bit rate you will test
Step 4 ![]() Click the Publish as a Streaming Video check box and choose either a Push or Pull publishing configuration. To test a stream directly from the encoder, choose the Pull Configuration called test only (encoder-direct, port 6990).
Click the Publish as a Streaming Video check box and choose either a Push or Pull publishing configuration. To test a stream directly from the encoder, choose the Pull Configuration called test only (encoder-direct, port 6990).
Step 5 ![]() Make sure you have a live video source connected to your encoder. Choose the Video Input, Audio Input, and Video Input Standard that match your video source.
Make sure you have a live video source connected to your encoder. Choose the Video Input, Audio Input, and Video Input Standard that match your video source.
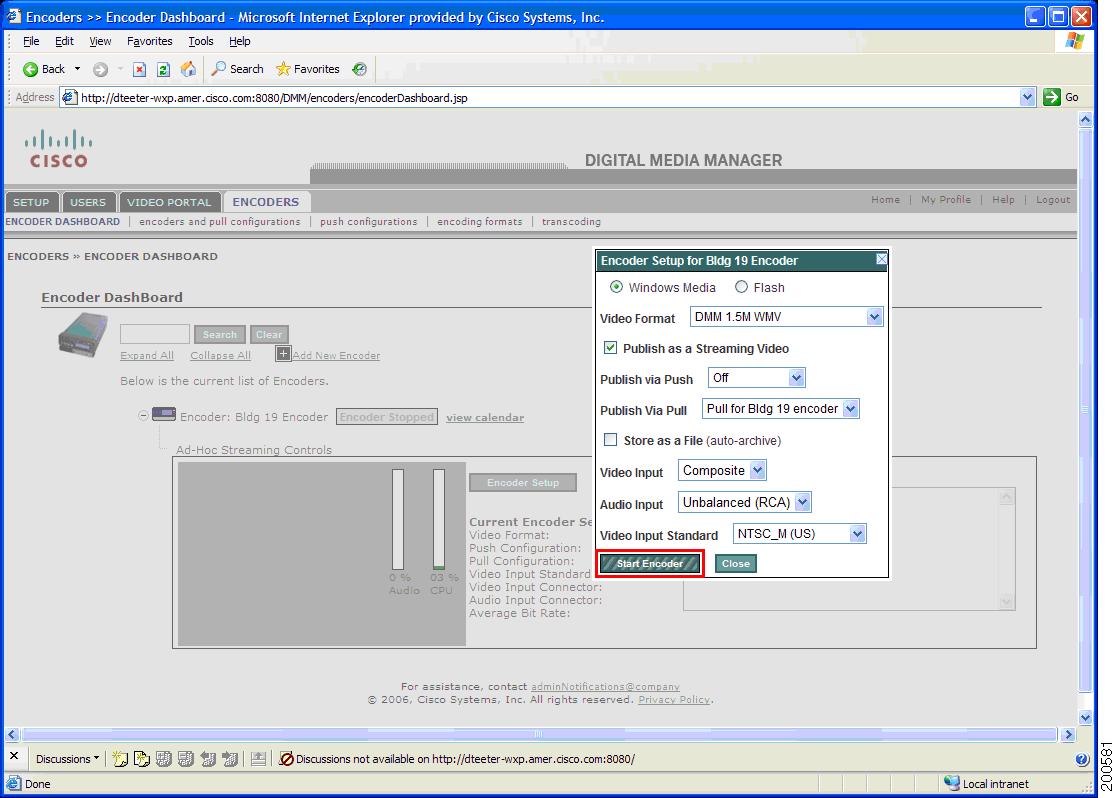
Step 6 ![]() Click the Start Encoder button. The button animates until the encoding process is started (requires 10-25 seconds).
Click the Start Encoder button. The button animates until the encoding process is started (requires 10-25 seconds).
Figure 11-4 Button Animating While Starting
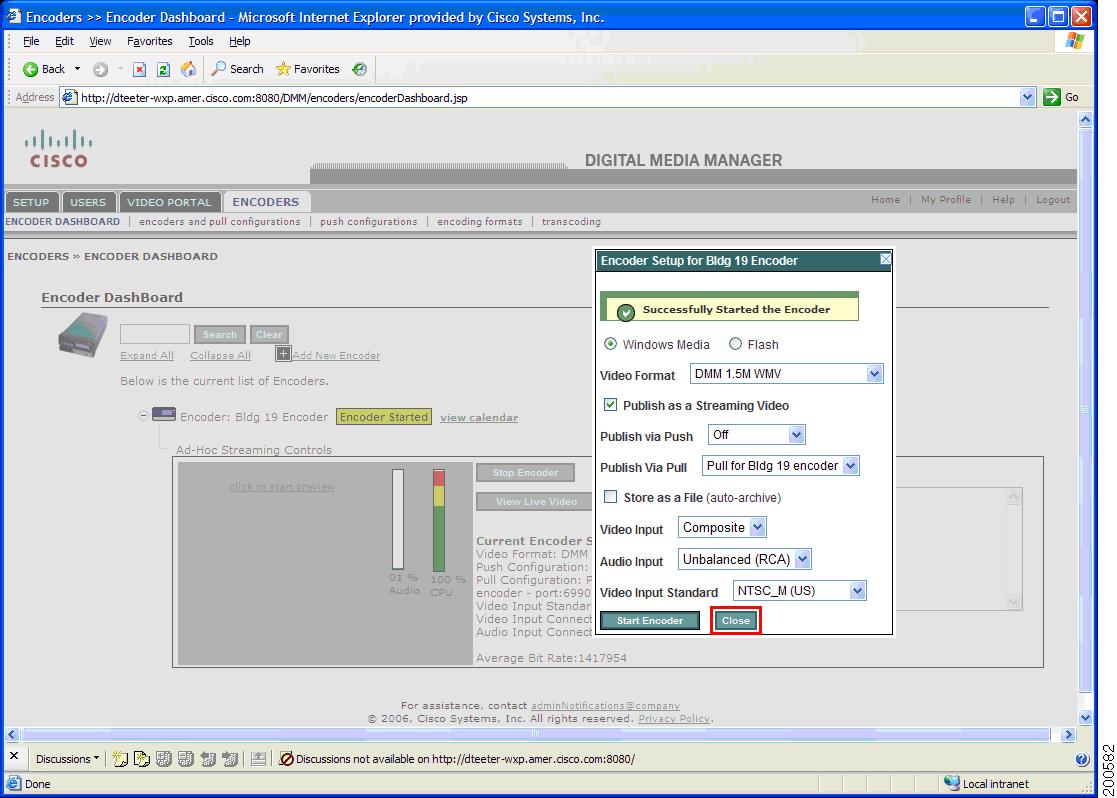
Step 7 ![]() When the encoder process is started, you can click the Close button on the Encoder Setup window.
When the encoder process is started, you can click the Close button on the Encoder Setup window.
Figure 11-5 Encoder Successfully Started
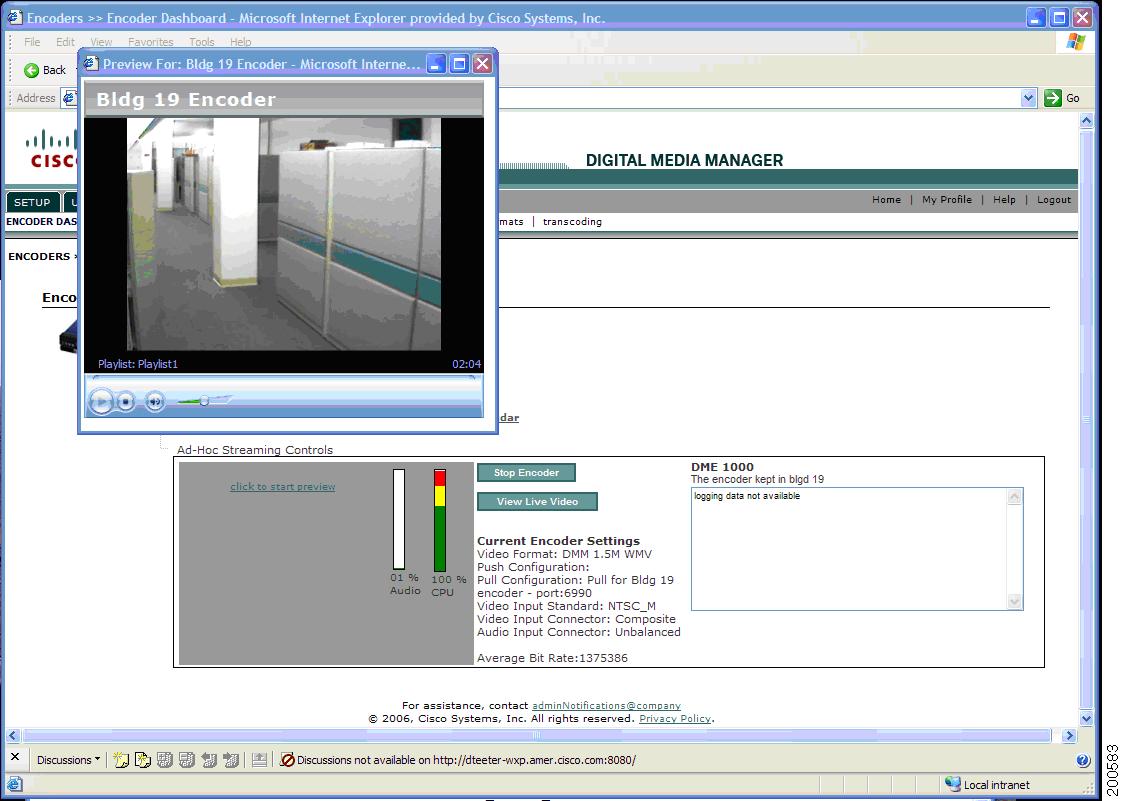
Step 8 ![]() To test your video stream, click the View Live Video button. A pop-up window opens displaying your current live stream.
To test your video stream, click the View Live Video button. A pop-up window opens displaying your current live stream.
Figure 11-6 View Live Video Popup Window
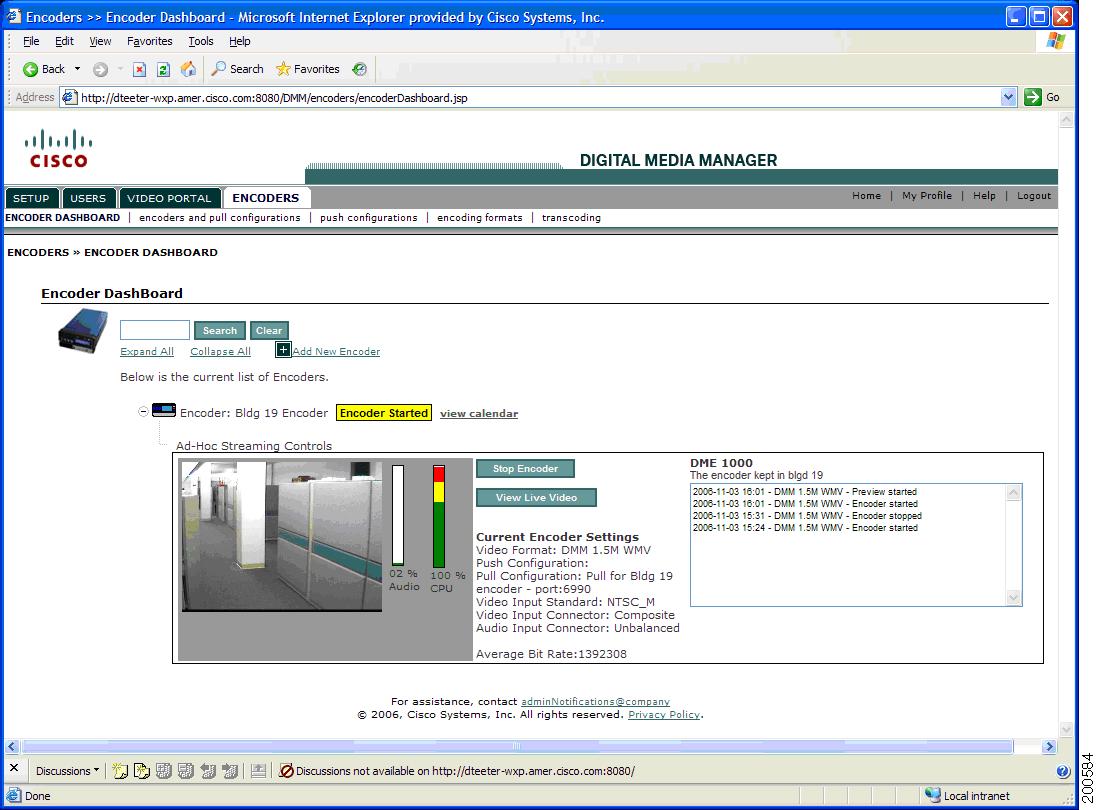
Step 9 ![]() To preview the video as a periodically updated image, click the Click to start preview link. The preview image is served directly from the encoder and it works independently from your streaming-server infrastructure.
To preview the video as a periodically updated image, click the Click to start preview link. The preview image is served directly from the encoder and it works independently from your streaming-server infrastructure.
Figure 11-7 Video Preview Image (5 second update)
Step 10 ![]() Click the Stop Encoder button to complete your test.
Click the Stop Encoder button to complete your test.
Using the DME 1000 or DME 2000 Encoder to "Save to a File" and Publish to a VOD
To use the DME 1000 or DME 2000 Encoder to "save to a file" and publish to a VOD, follow these steps:
Step 1 ![]() Click on the ENCODERS tab in the primary navigation bar in the DMM. The ENCODER DASHBOARD page opens.
Click on the ENCODERS tab in the primary navigation bar in the DMM. The ENCODER DASHBOARD page opens.
Step 2 ![]() Expand the encoder section of the encoder being used for your event by clicking its adjacent + icon.
Expand the encoder section of the encoder being used for your event by clicking its adjacent + icon.
Step 3 ![]() Click the Encoder Setup button.
Click the Encoder Setup button.
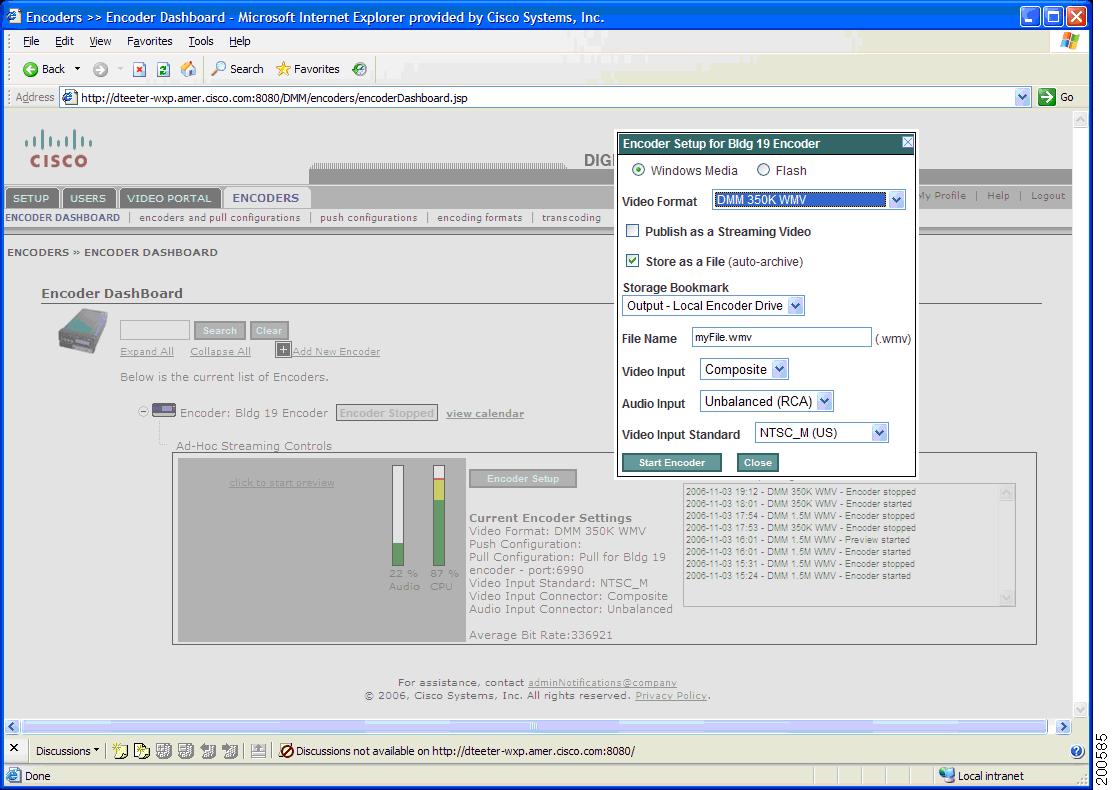
Step 4 ![]() Click the Store as File check box and enter the name of the file you are saving.
Click the Store as File check box and enter the name of the file you are saving.
Figure 11-8 Starting an Encoder with "Save to a File"
Step 5 ![]() After confirming that your video source is live and connected to the encoder, click the Start Encoder button. After the encoder is started (may require 10-25 seconds) click the Close button.
After confirming that your video source is live and connected to the encoder, click the Start Encoder button. After the encoder is started (may require 10-25 seconds) click the Close button.
Step 6 ![]() When you are ready to stop storing your video to a file, click the Stop Encoder button.
When you are ready to stop storing your video to a file, click the Stop Encoder button.
Step 7 ![]() Retrieve output files from the encoder using the following technique:
Retrieve output files from the encoder using the following technique:
Using a web browser, enter the URL ftp://{encoder ip address}/AVFiles/Out. A directory listing is displayed from which you can download the saved file.
Step 8 ![]() After downloading the saved file, you may upload it directly to a VOD Video Part. (See instructions in the "Adding a New Video Part" section in "Creating a Content Offering.") Alternatively, you may edit the video file using your favorite video editing tool before you publish it.
After downloading the saved file, you may upload it directly to a VOD Video Part. (See instructions in the "Adding a New Video Part" section in "Creating a Content Offering.") Alternatively, you may edit the video file using your favorite video editing tool before you publish it.
Managing Push Configurations
To manage push configurations, follow these steps:
Step 1 ![]() Click on the ENCODERS tab in the primary navigation bar in the DMM, then click on the Push Configurations secondary navigation link.
Click on the ENCODERS tab in the primary navigation bar in the DMM, then click on the Push Configurations secondary navigation link.
Step 2 ![]() Enter your push Configuration Name and Configuration Description. The configuration name will appear in a drop-down field that you may choose before starting your encoder.
Enter your push Configuration Name and Configuration Description. The configuration name will appear in a drop-down field that you may choose before starting your encoder.
Note ![]() Push Configurations apply only to Windows Media streams.
Push Configurations apply only to Windows Media streams.
Step 3 ![]() Enter your streaming server base URL including the port, for example:
Enter your streaming server base URL including the port, for example:
http://my.streaming-server.com/ for port 80,
http://my.streaming-server.com:7000/ for port 7000
Step 4 ![]() Enter the name of your Publishing Point.
Enter the name of your Publishing Point.
Step 5 ![]() Check the URL that appears under Full Stream URL to ensure that it represents a valid URL to your streaming server's publish point.
Check the URL that appears under Full Stream URL to ensure that it represents a valid URL to your streaming server's publish point.
Step 6 ![]() Optional: Enter the userid (user name) and password (if required) to publish a stream to your streaming server via push.
Optional: Enter the userid (user name) and password (if required) to publish a stream to your streaming server via push.
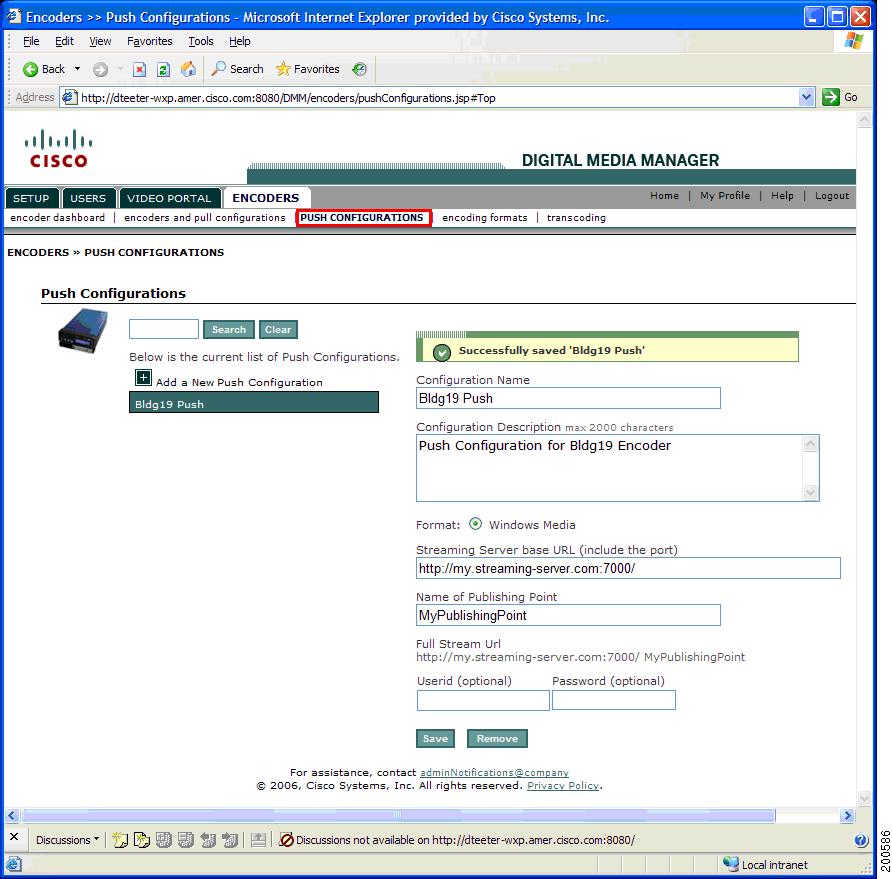
Step 7 ![]() Click the Save button to save your new push configuration.
Click the Save button to save your new push configuration.
Figure 11-9 Saved Push Configuration
Managing Encoding Formats
An Encoding Format is a group of settings that specifies a particular media type, video dimensions, video bandwidth consumption, and video quality. The DMM includes pre-built encoder formats designed for use with the Video Portal. The encoding formats marked with * default are preferred formats for use with the video portal. Only one Default encoding format is allowed for each media type (that is, one default for Windows Media and one default for Flash Video).
Adding or Editing a Windows Media Encoding Format
To add or edit a Windows Media encoding format, follow these steps:
Step 1 ![]() To Add: Click Add a new Encoding Format.
To Add: Click Add a new Encoding Format.
To Edit: On the left side of the page, click the name of the encoding format you will edit.
Step 2 ![]() Enter or edit a descriptive Encoding Format Name and Profile Description.
Enter or edit a descriptive Encoding Format Name and Profile Description.
Step 3 ![]() Click the radio button next to Windows Media.
Click the radio button next to Windows Media.
Step 4 ![]() Choose a video dimension from the list or CUSTOM if your video dimension is not listed.
Choose a video dimension from the list or CUSTOM if your video dimension is not listed.
Step 5 ![]() Choose the Pixel Proportion. Standard (square pixel) is the correct choice for most applications.
Choose the Pixel Proportion. Standard (square pixel) is the correct choice for most applications.
Step 6 ![]() Choose a Windows Media Capture Profile based on your desired bandwidth usage.
Choose a Windows Media Capture Profile based on your desired bandwidth usage.
Step 7 ![]() Choose Audio Capture On or Off to enable or disable audio capture.
Choose Audio Capture On or Off to enable or disable audio capture.
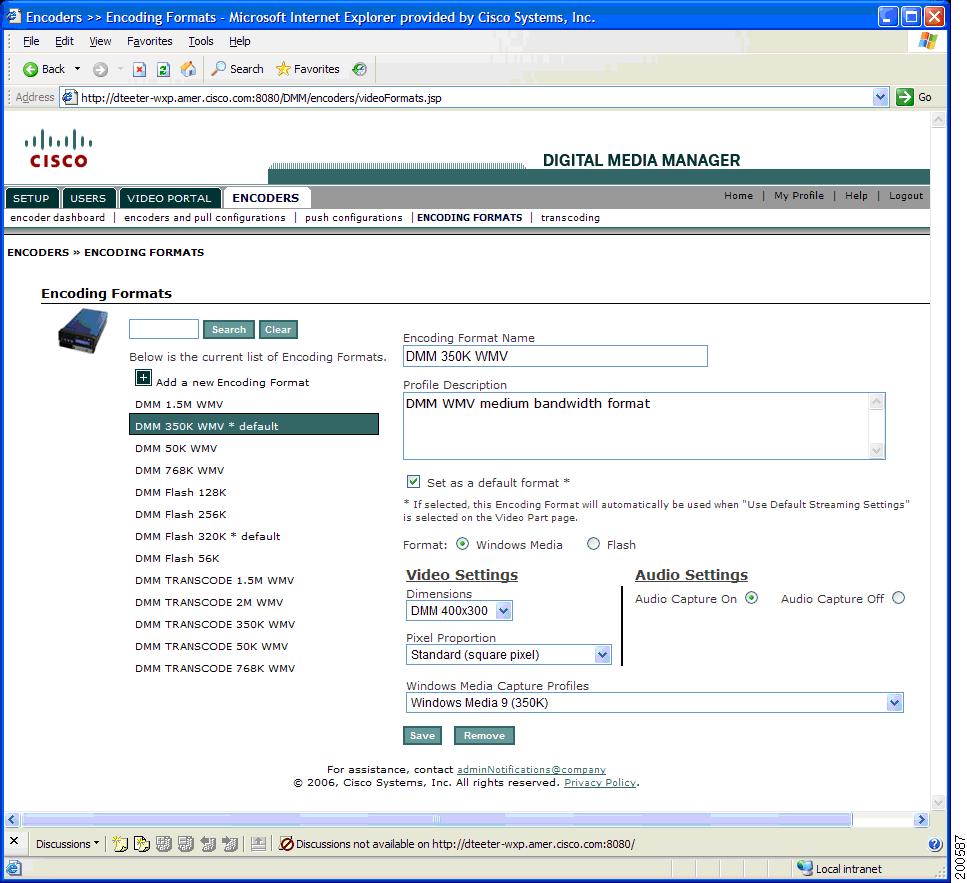
Step 8 ![]() Click the Save button to save your encoding format.
Click the Save button to save your encoding format.
Figure 11-10 Editing an Encoding Format
Transcoding
The Transcoding page manages the conversion of either AVI or MPEG2 format files into Windows Media format. Transcoding tasks should be scheduled such that they do not compete with any other encoder tasks (such as live events, save to a file, and so forth). You should expect that transcoding a video file will require time equivalent to at least the duration of the video and potentially longer, depending on the encoder format being used.
Adding a New Transcoding Task
To add a new transcoding task, follow these steps:
Step 1 ![]() Add the file that you wish to transcode onto the hard drive of your encoder, as follows:
Add the file that you wish to transcode onto the hard drive of your encoder, as follows:
a. ![]() Plug a keyboard, mouse, and monitor into your encoder.
Plug a keyboard, mouse, and monitor into your encoder.
b. ![]() Add the file(s) to a USB 2.0 hard drive or flash drive.
Add the file(s) to a USB 2.0 hard drive or flash drive.
c. ![]() Using Windows Explorer, copy the file(s) to be transcoded from the USB drive to D:\AVFiles\In on the encoder's hard drive.
Using Windows Explorer, copy the file(s) to be transcoded from the USB drive to D:\AVFiles\In on the encoder's hard drive.
Step 2 ![]() Click Add a New Transcoding Task.
Click Add a New Transcoding Task.
Step 3 ![]() Enter a descriptive Transcoding Task Name.
Enter a descriptive Transcoding Task Name.
Step 4 ![]() Choose the name of the encoder that will perform this task.
Choose the name of the encoder that will perform this task.
Step 5 ![]() Choose the date and time when the encoding task should start.
Choose the date and time when the encoding task should start.
Step 6 ![]() Choose the input video format (AVI or MPEG2).
Choose the input video format (AVI or MPEG2).
Step 7 ![]() Choose the input directory path Input - Local Encoder Drive.
Choose the input directory path Input - Local Encoder Drive.
Step 8 ![]() Enter the Input File Name. Use only the file name, and do not include a path.
Enter the Input File Name. Use only the file name, and do not include a path.
Step 9 ![]() Choose the Output Video Format. Use only Video Formats that include the word TRANSCODE in their title.
Choose the Output Video Format. Use only Video Formats that include the word TRANSCODE in their title.
Step 10 ![]() Choose the output file name. Use only the file name, and do not include a path.
Choose the output file name. Use only the file name, and do not include a path.
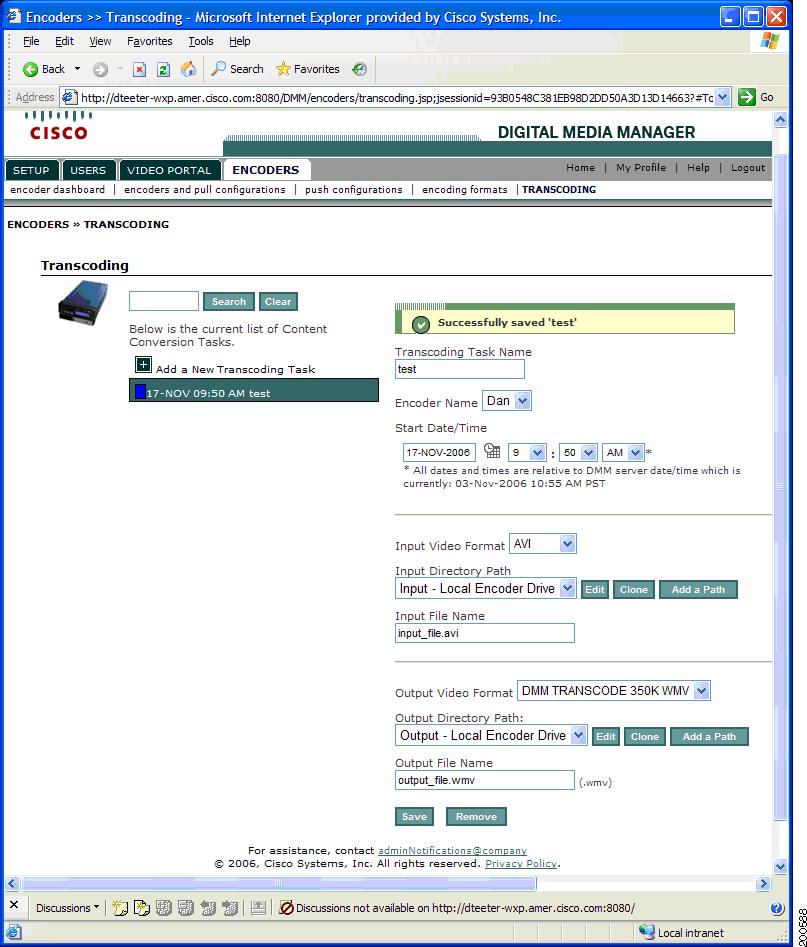
Step 11 ![]() Click the Save button.
Click the Save button.
Figure 11-11 Saving a Transcoding Task
Step 12 ![]() Choose the output file name. Use only the file name, and do not include a path.
Choose the output file name. Use only the file name, and do not include a path.
Step 13 ![]() Track the status of your transcoding task. An icon next to your transcoding task starts out as blue (Scheduled status) and proceed to animated green (In Progress status), and finally solid green (Completed status). Other possible status includes red (Error) and blue (Postponed). You can learn more status details by momentarily holding your mouse pointer over any colored status icon.
Track the status of your transcoding task. An icon next to your transcoding task starts out as blue (Scheduled status) and proceed to animated green (In Progress status), and finally solid green (Completed status). Other possible status includes red (Error) and blue (Postponed). You can learn more status details by momentarily holding your mouse pointer over any colored status icon.
Step 14 ![]() Retrieve output files from the encoder using one of these two alternatives:
Retrieve output files from the encoder using one of these two alternatives:
•![]() Using Windows Explorer, copy the completed file(s) from D:\AVFiles\Out on the encoder's hard drive to your USB drive.
Using Windows Explorer, copy the completed file(s) from D:\AVFiles\Out on the encoder's hard drive to your USB drive.
•![]() Using a web browser enter the URL ftp://{encoder ip address}/AVFiles/Out. A directory listing opens from which you can download the transcoding output files as needed.
Using a web browser enter the URL ftp://{encoder ip address}/AVFiles/Out. A directory listing opens from which you can download the transcoding output files as needed.
 Feedback