Contents
- Configuring VLANs
- Information About VLANs
- VLANs Overview
- VLAN Ranges
- Creating, Deleting, and Modifying VLANs
- High Availability for VLANs
- Virtualization Support for VLANs
- Licensing Requirements for VLANs
- Prerequisites for Configuring VLANs
- Guidelines and Limitations for Configuring VLANs
- Default Settings for VLANs
- Configuring a VLAN
- Creating and Deleting a VLAN - CLI Version
- Entering the VLAN Configuration Submode
- Configuring a VLAN
- Changing the Range of Reserved VLANs
- Configuring a VLAN Before Creating the VLAN
- Verifying the VLAN Configuration
- Displaying and Clearing VLAN Statistics
- Configuration Example for VLANs
- Additional References for VLANs -- CLI Version
- Feature History for Configuring VLANs -- CLI Version
Configuring VLANs
This chapter describes how to configure virtual LANs (VLANs) on Cisco NX-OS devices.
This chapter includes the following sections:
- Information About VLANs
- Licensing Requirements for VLANs
- Prerequisites for Configuring VLANs
- Guidelines and Limitations for Configuring VLANs
- Default Settings for VLANs
- Configuring a VLAN
- Verifying the VLAN Configuration
- Displaying and Clearing VLAN Statistics
- Configuration Example for VLANs
- Additional References for VLANs -- CLI Version
- Feature History for Configuring VLANs -- CLI Version
Information About VLANs
Note
Beginning with Cisco Release 5.2(1) for Cisco Nexus 7000 Series devices, you can create Fibre Channel over Ethernet (FCoE) VLANs. For more information, see the Cisco NX-OS FCoE Configuration Guide for Cisco Nexus 7000 and Cisco MDS 9500.
You can use VLANs to divide the network into separate logical areas at the Layer 2 level. VLANs can also be considered as broadcast domains.
Any switch port can belong to a VLAN, and unicast broadcast and multicast packets are forwarded and flooded only to end stations in that VLAN. Each VLAN is considered a logical network, and packets destined for stations that do not belong to the VLAN must be forwarded through a router.
- VLANs Overview
- VLAN Ranges
- Creating, Deleting, and Modifying VLANs
- High Availability for VLANs
- Virtualization Support for VLANs
VLANs Overview
A VLAN is a group of end stations in a switched network that is logically segmented by function or application, without regard to the physical locations of the users. VLANs have the same attributes as physical LANs, but you can group end stations even if they are not physically located on the same LAN segment.
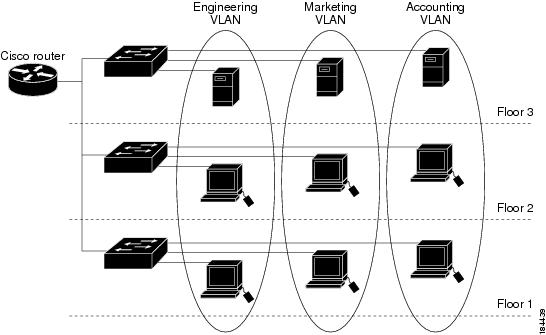
Any switch port can belong to a VLAN, and unicast, broadcast, and multicast packets are forwarded and flooded only to end stations in that VLAN. Each VLAN is considered as a logical network, and packets destined for stations that do not belong to the VLAN must be forwarded through a router. The following figure shows VLANs as logical networks. The stations in the engineering department are assigned to one VLAN, the stations in the marketing department are assigned to another VLAN, and the stations in the accounting department are assigned to another VLAN.
VLANs are usually associated with IP subnetworks. For example, all the end stations in a particular IP subnet belong to the same VLAN. To communicate between VLANs, you must route the traffic.
By default, a newly created VLAN is operational; that is, the newly created VLAN is in the no shutdown condition. Additionally, you can configure VLANs to be in the active state, which is passing traffic, or the suspended state, in which the VLANs are not passing packets. By default, the VLANs are in the active state and pass traffic.
A VLAN interface, or switched virtual interface (SVI), is a Layer 3 interface that is created to provide communication between VLANs. In order to route traffic between VLANs, you must create and configure a VLAN interface for each VLAN. Each VLAN requires only one VLAN interface.
Note
See the Cisco Nexus 7000 Series NX-OS Interfaces Configuration Guide, Release 5.x for complete information on configuring VLAN interfaces, and subinterfaces, as well as assigning IP addresses. This feature must be enabled before you can configure VLAN interfaces.
VLAN Ranges
Note
The extended system ID is always automatically enabled in Cisco NX-OS devices.
The device supports up to 4094 VLANs in accordance with the IEEE 802.1Q standard in each VDC. The software organizes these VLANs into ranges, and you use each range slightly differently.
The software allocates a group of VLAN numbers for features like multicast and diagnostics, that need to use internal VLANs for their operation. You cannot use, modify, or delete any of the VLANs in the reserved group. You can display the VLANs that are allocated internally and their associated use.
Beginning with Cisco NX-OS Release 5.2(1), the system allocates a block of 128 reserved VLANs (3968 to 4094) for these internal uses. You can change the block of 128 reserved VLANs to occupy another range of 128 adjacent VLANs. For example, you can change the reserved block of VLANs to be 400 to 528. You cannot assign a previously created VLAN as part of the 128 range of reserved VLANs. Anytime you change the reserved block of VLANs for the device, you must do the following:
To return to the default block of reserved VLANs (3968 to 4094), you must enter the no system reserve vlan command. The write-erase procedure does not restore the default reserved VLAN range to 3968 to 4094.
Note
When you change the range of reserved VLANs, the existing configurations for the new range of VLANs get deleted. A warning note is displayed as in the following example:
switch(config)# system vlan 2000 reserve This will delete all configs on vlans 2000-2127. Continue anyway? (y/n) [no] y Note: After switch reload, VLANs 2000-2127 will be reserved for internal use. This requires copy running-config to startup-config before switch reload. Creating VLANs within this range is not allowed. switch(config)#Creating, Deleting, and Modifying VLANs
Beginning with Cisco NX-OS Release 5.1(1) , you can configure a VLAN without actually creating the VLAN. This procedure is used for IGMP snooping, VTP, and other configurations.
Note
By default, all Cisco NX-OS ports are Layer 3 ports.
VLANs are numbered from 1 to 4094 for each VDC. All ports that you have configured as switch ports belong to the default VLAN when you first bring up the switch as a Layer 2 device. The default VLAN (VLAN1) uses only default values, and you cannot create, delete, or suspend activity in the default VLAN.
You create a VLAN by assigning a number to it; you can delete VLANs and move them from the active operational state to the suspended operational state. If you attempt to create a VLAN with an existing VLAN ID, the device goes into the VLAN submode but does not create the same VLAN again.
Newly created VLANs remain unused until Layer 2 ports are assigned to the specific VLAN. All the ports are assigned to VLAN1 by default.
Depending on the range of the VLAN, you can configure the following parameters for VLANs (except the default VLAN):
Note
See the Cisco Nexus 7000 Series NX-OS Interfaces Configuration Guide, Release 5.x for information on configuring ports as VLAN access or trunk ports and assigning ports to VLANs.
When you delete a specified VLAN, the ports associated to that VLAN become inactive and no traffic flows. When you delete a specified VLAN from a trunk port, only that VLAN is shut down and traffic continues to flow on all the other VLANs through the trunk port.
However, the system retains all the VLAN-to-port mapping for that VLAN, and when you reenable or re-create, that specified VLAN, the system automatically reinstates all the original ports to that VLAN. The static MAC addresses and aging time for that VLAN are not restored when the VLAN is reenabled.
Note
Commands entered in the VLAN configuration submode are immediately executed. Beginning with Cisco release 5.1 for Nexus 7000 series devices, you must exit the VLAN configuration submode for configuration changes to take effect.
High Availability for VLANs
The software supports high availability for both stateful and stateless restarts, as during a cold reboot, for VLANs. For the stateful restarts, the software supports a maximum of three retries. If you try more than 3 times within 10 seconds of a restart, the software reloads the supervisor module.
You can upgrade or downgrade the software seamlessly when you use VLANs.
Note
See the Cisco Nexus 7000 Series NX-OS High Availability and Redundancy Guide, Release 5.x, for complete information on high availability features.
Virtualization Support for VLANs
The software supports virtual device contexts (VDCs), and VLAN configuration and operation are local to the VDC.
Note
See the Cisco Nexus 7000 Series NX-OS Virtual Device Context Configuration Guide, Release 5.x, for complete information on VDCs and assigning resources.
Each VLAN must have all of its ports in the same VDC. If you do not have enough resources allocated to the VDC, the software returns an error message.
When you create a new VDC, the device automatically creates a new default VLAN, VLAN1, and internally reserves VLANs for device use.
You can re-use the same numbers for VLANs in different VDCs.
One or more VLANs can be associated with a role to either allow or disallow the user to configure it. When a VLAN is associated with a role, the corresponding interfaces will also be subjected to the same check. For instance, if a role is allowed to access VLAN1, then that role also has access to the interfaces that have that VLAN. If an interface does not have the VLAN associated with a role, that interface is not accessible to that role.
Licensing Requirements for VLANs
The following table shows the licensing requirements for this feature.
Product
License Requirement
Cisco NX-OS
VLANs require no license. Any feature not included in a license package is bundled with the Cisco NX-OS system images and is provided at no extra charge to you. For a complete explanation of the Cisco NX-OS licensing scheme, see the Cisco NX-OS Licensing Guide.
However, using VDCs requires an Advanced Services license.
Prerequisites for Configuring VLANs
VLANs have the following prerequisites:
You must be logged onto the device.
If necessary, install the Advanced Services license and enter the desired VDC. Ensure that you have allocated enough resources for that VDC. See the Cisco Nexus 7000 Series NX-OS Virtual Device Context Configuration Guide, Release 5.x, for information on creating VDCs and allocating resources.
You must create the VLAN before you can do any modification of that VLAN.
Guidelines and Limitations for Configuring VLANs
VLANs have the following configuration guidelines and limitations:
The maximum number of VLANs per VDC is 4094.
You can reuse VLAN ID numbers in different VDCs. For example, you can have VLAN10 in the default VDC and a completely separate VLAN10 in a newly created VDC, such as VDC 2 .
You can configure a single VLAN or a range of VLANs.
You cannot create, modify, or delete any VLANs that are within the group of VLANs reserved for internal use.
VLAN1 is the default VLAN. You cannot create, modify, or delete this VLAN.
VLANs 1006 to 4094 are always in the active state and are always enabled. You cannot suspend the state or shut down these VLANs.
Default Settings for VLANs
Configuring a VLAN
Note
See the Cisco Nexus 7000 Series NX-OS Interfaces Configuration Guide, Release 5.x, for information on assigning Layer 2 interfaces to VLANs (access or trunk ports). All interfaces are in VLAN1 by default.
Note
If you are familiar with the Cisco IOS CLI, be aware that the Cisco NX-OS commands for this feature might differ from the Cisco IOS commands that you would use.
- Creating and Deleting a VLAN - CLI Version
- Entering the VLAN Configuration Submode
- Configuring a VLAN
- Changing the Range of Reserved VLANs
- Configuring a VLAN Before Creating the VLAN
Creating and Deleting a VLAN - CLI Version
You can create or delete all VLANs except the default VLAN and those VLANs that are internally allocated for use by the device.
Once a VLAN is created, it is automatically in the active state.
Note
When you delete a VLAN, ports associated to that VLAN become inactive. Therefore, no traffic flows and the packets are dropped. On trunk ports, the port remains open and the traffic from all other VLANs except the deleted VLAN continues to flow.
If you create a range of VLANs and some of these VLANs cannot be created, the software returns a message listing the failed VLANs, and all the other VLANs in the specified range are created.
Note
You can also create and delete VLANs in the VLAN configuration submode.
Before You BeginSUMMARY STEPSEnsure that you are in the correct VDC (or enter the switchto vdc command). You can repeat VLAN names and IDs in different VDCs, so you must confirm that you are working in the correct VDC.
2. vlan {vlan-id | vlan-range}
5. (Optional) copy running-config startup-config
DETAILED STEPS
Command or Action Purpose Step 1 config t
Example:switch# config t switch(config)#Enters configuration mode.
Step 2 vlan {vlan-id | vlan-range}
Example:switch(config)# vlan 5 switch(config-vlan)#Creates a VLAN or a range or VLANs. If you enter a number that is already assigned to a VLAN, the device puts you into the VLAN configuration submode for that VLAN. If you enter a number that is assigned to an internally allocated VLAN, the system returns an error message. However, if you enter a range of VLANs and one or more of the specified VLANs is outside the range of internally allocated VLANs, the command takes effect on only those VLANs outside the range. The range is from 2 to 4094; VLAN1 is the default VLAN and cannot be created or deleted. You cannot create or delete those VLANs that are reserved for internal use.
Step 3 exit
Example:switch(config-vlan)# exit switch(config)#Exits the VLAN mode.
Step 4 show vlan
Example:switch# show vlan(Optional) Displays information and status of VLANs.
Step 5 copy running-config startup-config
Example:switch(config)# copy running-config startup-config(Optional) Copies the running configuration to the startup configuration.
Entering the VLAN Configuration Submode
To configure or modify the VLAN for the following parameters, you must be in the VLAN configuration submode:
Before You BeginSUMMARY STEPSEnsure that you are in the correct VDC (or enter the switchto vdc command). You can repeat VLAN names and IDs in different VDCs, so you must confirm that you are working in the correct VDC.
2. vlan {vlan-id | vlan-range}
5. (Optional) copy running-config startup-config
DETAILED STEPS
Command or Action Purpose Step 1 config t
Example:switch# config t switch(config)#Enters configuration mode.
Step 2 vlan {vlan-id | vlan-range}
Example:switch(config)# vlan 5 switch(config-vlan)#Places you into the VLAN configuration submode. This submode allows you to name, set the state, disable, and shut down the VLAN or range of VLANs.
You cannot change any of these values for VLAN1 or the internally allocated VLANs.
Step 3 exit
Example:switch(config-vlan)# exit switch(config)#Exits the VLAN configuration mode.
Step 4 show vlan
Example:switch# show vlan(Optional) Displays information and status of VLANs.
Step 5 copy running-config startup-config
Example:switch(config)# copy running-config startup-config(Optional) Copies the running configuration to the startup configuration.
Configuring a VLAN
To configure or modify a VLAN for the following parameters, you must be in the VLAN configuration submode:
Note
You cannot create, delete, or modify the default VLAN or the internally allocated VLANs. Additionally, some of these parameters cannot be modified on some VLANs.
Before You BeginSUMMARY STEPSEnsure that you are in the correct VDC (or enter the switchto vdc command). VLAN names and IDs can be repeated in different VDCs, so you must confirm which VDC that you are working in.
2. vlan {vlan-id | vlan-range}
9. (Optional) copy running-config startup-config
DETAILED STEPS
Command or Action Purpose Step 1 config t
Example:switch# config t switch(config)#Enters configuration mode.
Step 2 vlan {vlan-id | vlan-range}
Example:switch(config)# vlan 5 switch(config-vlan)#Places you into the VLAN configuration submode. If the VLAN does not exist, the system creates the specified VLAN and then enters the VLAN configuration submode.
Step 3 name vlan-name
Example:switch(config-vlan)# name accountingNames the VLAN. You can enter up to 32 alphanumeric characters to name the VLAN. You cannot change the name of VLAN1 or the internally allocated VLANs. The default value is VLANxxxx where xxxx represent four numeric digits (including leading zeroes) equal to the VLAN ID number.
Step 4 state {active | suspend}
Example:switch(config-vlan)# state activeSets the state of the VLAN to active or suspend. While the VLAN state is suspended, the ports associated with this VLAN become inactive, and that VLAN does not pass any traffic. The default state is active. You cannot suspend the state for the default VLAN or VLANs 1006 to 4094.
Step 5 no shutdown
Example:switch(config-vlan)# no shutdownEnables the VLAN. The default value is no shutdown (or enabled). You cannot shut down the default VLAN, VLAN1, or VLANs 1006 to 4094.
Step 6 exit
Example:switch(config-vlan)# exit switch(config)#Exits the VLAN configuration submode.
Step 7 show vlan
Example:switch# show vlan(Optional) Displays information and status of VLANs.
Step 8 show vtp status
Example:switch# show vtp status(Optional) Displays information and status of VLAN Trunking Protocols (VTPs).
Step 9 copy running-config startup-config
Example:switch(config)# copy running-config startup-config(Optional) Copies the running configuration to the startup configuration.
Note Commands entered in the VLAN configuration submode are immediately executed. Beginning with Cisco release 5.1 for Nexus 7000 series devices, you must exit the VLAN configuration submode for configuration changes to take effect.
Changing the Range of Reserved VLANs
SUMMARY STEPS2. system vlan {start-vlan} reserve
3. copy running-config startup-config
5. (Optional) show system vlan reserved
DETAILED STEPS
Command or Action Purpose Step 1 config t
Example:switch# config t switch(config)#Enters configuration mode.
Step 2 system vlan {start-vlan} reserve
Example:switch(config)# system vlan 2000 reserve This will delete all configs on vlans 2000-2127. Continue anyway? (y/n) [no] y Note: After switch reload, VLANs 2000-2127 will be reserved for internal use. This requires copy running-config to startup-config before switch reload. Creating VLANs within this range is not allowed. switch(config)#Allows you to change the reserved VLAN range by specifying the starting VLAN ID for your desired range.
You can change the reserved VLANs to any other 128 contiguous VLAN range. When you reserve such a range, it frees up the range of VLANs that were allocated for internal use by default, and all of those VLANs are available for user configuration except for VLAN 4094. All VDCs inherit the new reserved range of VLANs.
Note To return to the default range of reserved VLANs (3968-4094), you must enter the no system vlan reserve command.
For more details and instructions, see VLAN Ranges.
Step 3 copy running-config startup-config
Example:switch(config)# copy running-config startup-config switch(config)#Copies the running configuration to the startup configuration.
Note You must enter this command if you change the reserved block.
Step 4 reload
Example:switch(config)# reloadReloads the software, and modifications to VLAN ranges become effective.
For more details about this command, see the Cisco Nexus 7000 Series NX-OS Fundamentals Configuration Guide, Release 5.x
Step 5 show system vlan reserved
Example:switch(config)# show system vlan reserved(Optional) Displays the configured changes to the VLAN range.
Configuring a VLAN Before Creating the VLAN
SUMMARY STEPSBeginning with Cisco NX-OS Release 5.1(1), you can configure a VLAN before you create the VLAN. This procedure is used for IGMP snooping, VTP, and other configurations.
Note
The show vlan command does not display these VLANs unless you create it using the vlan command.
2. vlan configuration {vlan-id}
DETAILED STEPS
Command or Action Purpose Step 1 config t
Example:switch# config t switch(config)#Enters configuration mode.
Step 2 vlan configuration {vlan-id}
Example:switch(config)# vlan configuration 20 switch(config-vlan-config)#Allows you to configure VLANs without actually creating them.
Verifying the VLAN Configuration
To display VLAN configuration information, perform one of the following tasks:
Command
Purpose
show running-config vlan vlan-id Displays VLAN information.
show vlan [all-ports | brief | id vlan-id | name name | dot1q tag native] Displays VLAN information.
show vlan summary
Displays a summary of VLAN information.
show vtp status
Displays VTP information.
show system vlan reserved
Displays system reserved VLAN range.
For information on the output of these commads, see the Cisco Nexus 7000 Series NX-OS Layer 2 Switching Command Reference.
Configuration Example for VLANs
The following example shows how to create and name a VLAN as well as how to make the state active and administratively up:
switch# configure terminal
switch(config)# vlan 10
switch(config-vlan)# name test
switch(config-vlan)# state active
switch(config-vlan)# no shutdown
switch(config-vlan)# exit
switch(config)#
Additional References for VLANs -- CLI Version
Related Documents
Related Topic
Document Title
Command reference
Cisco Nexus 7000 Series NX-OS Layer 2 Switching Command Reference
NX-OS Layer 2 switching configuration
Cisco Nexus 7000 Series NX-OS Layer 2 Switching Configuration Guide, Release 5.x
Interfaces, VLAN interfaces, IP addressing, and port channels
Cisco Nexus 7000 Series NX-OS Interfaces Configuration Guide, Release 5.x
Multicast routing
Cisco Nexus 7000 Series NX-OS Multicast Routing Configuration Guide, Release 5.x
NX-OS fundamentals
Cisco Nexus 7000 Series NX-OS Fundamentals Configuration Guide, Release 5.x
High availability
Cisco Nexus 7000 Series NX-OS High Availability and Redundancy Guide, Release 5.x
System management
Cisco Nexus 7000 Series NX-OS System Management Configuration Guide, Release 5.x
VDCs
Cisco Nexus 7000 Series NX-OS Virtual Device Context Configuration Guide, Release 5.x
Licensing
Cisco NX-OS Licensing Guide
Release notes
Release notes
Cisco Nexus 7000 Series NX-OS Release Notes, Release 5.x
MIBs
MIBs
MIBs Link
To locate and download MIBs, go to the following URL: http://www.cisco.com/public/sw-center/netmgmt/cmtk/mibs.shtml
Feature History for Configuring VLANs -- CLI Version
This table lists the release history for this feature.
Table 3 Feature History for Configuring VLANsFeature Name
Releases
Feature Information
Dynamic system reserved VLAN range
5.2(1)
You can change the range of the system reserve VLANs.
Configure VLAN before creating the VLAN
5.1(1)
You can configure a VLAN before creating the VLAN.
VLAN Trunking Protocol
4.1(2)
The device now runs VTP in transparent mode.
No change
4.2(1)
--