Cisco SD-WAN: Application-Aware Routing Deployment Guide
Available Languages
Bias-Free Language
The documentation set for this product strives to use bias-free language. For the purposes of this documentation set, bias-free is defined as language that does not imply discrimination based on age, disability, gender, racial identity, ethnic identity, sexual orientation, socioeconomic status, and intersectionality. Exceptions may be present in the documentation due to language that is hardcoded in the user interfaces of the product software, language used based on RFP documentation, or language that is used by a referenced third-party product. Learn more about how Cisco is using Inclusive Language.
- US/Canada 800-553-2447
- Worldwide Support Phone Numbers
- All Tools
 Feedback
 Feedback
This guide is intended to provide design and deployment guidance to deploy Application-Aware Routing on the Cisco SD-WAN solution providing Service Level Agreement (SLA) based routing for business-critical applications to optimize application performance. The guide focuses on the step-by-step procedures for defining the network characteristics requirements for an application and leveraging the calculated path liveness and quality measurement to influence the traffic path dynamically, providing the best experience for the applications at all times.
The ability to consider the path characteristic in path selection offers a number of advantages to the Cisco SD-WAN solution:
● In normal network operation, the path taken by application traffic through the network can be optimized by directing it to WAN links that support the required levels of packet loss, latency, and jitter defined in an application’s SLA.
● In the face of network brownouts or soft failures, performance degradation can be minimized. The tracking of network and path conditions by application-aware routing in real time can quickly reveal performance issues, and it automatically activates strategies that redirect business critical data traffic to the best available paths that meets the SLA. As the network recovers from the brownout or soft failure conditions, application-aware routing automatically readjusts the data traffic paths.
● Network costs can be reduced because data traffic can be more efficiently load-balanced.
● Application performance can be increased without the need for WAN upgrades.
This prescriptive deployment guide focuses on design considerations and deployment best practices for Application Aware Routing within the Cisco SD-WAN solution. In this guide, SD-WAN controllers are deployed in the cloud and WAN Edge routers are deployed either at remote sites or at the datacenter and are connected to two WAN transports, Internet and MPLS.
Although this deployment guide is about Application Aware Routing. It is presumed that
● Cisco SD-WAN Controllers (vManage, vBond, and vSmart) are already deployed with valid certificates.
● Cisco WAN Edge device is onboarded and have established control connections to Cisco SD-WAN controllers and data tunnels to other WAN Edge devices across all available transports.
● Cisco SD-WAN WAN Edge and vSmart controller have configuration – feature templates defined, and device template associated and are in vManage mode.
For more information on SD-WAN controller design and deployment, please refer to the Cisco SD-WAN Design guide, Cisco SD-WAN End-to-End Deployment guide and the Cisco WAN Edge Onboarding Prescriptive Deployment guide.
This document contains four major sections:
The Define section provides a high-level overview of the SD-WAN architecture and components and Application-Aware Routing components.
The Design section provides detailed discussion on the design considerations and prerequisites needed to deploy Application-Aware Routing.
The Deploy section discusses step-by-step procedures to configure Application-Aware Routing policies in the Cisco SD-WAN network. It walks through the best practices and gotchas to consider during the process.
The Operate section briefly discusses how to monitor and troubleshoot the common issues.
Refer to Appendix A for details on the platform and software versions used to build this document.
The intended audience for this document includes network design engineers and network operations personnel who have deployed the Cisco SD-WAN components and are looking for the best viable option to provide service level quality for applications running on the Cisco SD-WAN infrastructure.
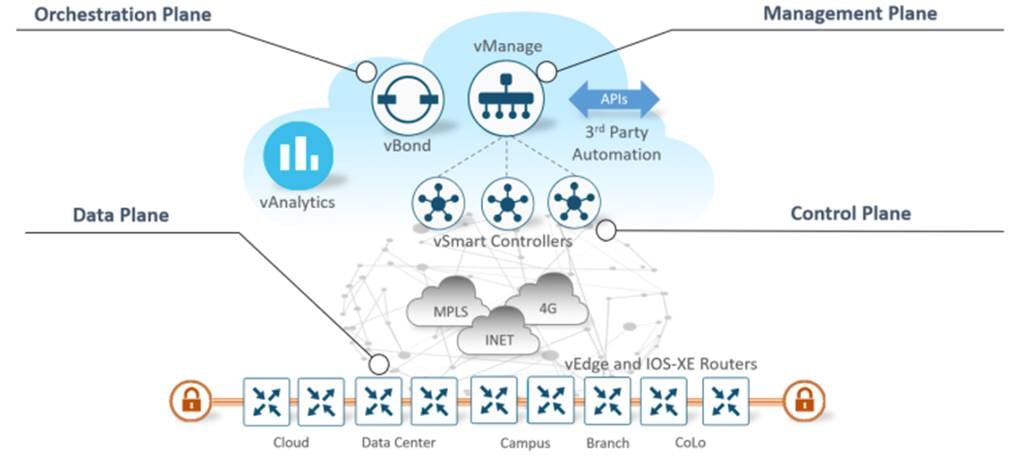
The Cisco SD-WAN solution is an enterprise-grade SD-WAN architecture overlay that enables digital and cloud transformation for enterprise. The solution fully integrates routing, security, centralized policy and orchestration into large-scale networks and addresses the problems and challenges of common WAN deployments.
The Cisco SD-WAN solution is comprised of separate orchestration, management, control and data plane.
● Orchestration plane assists in securely onboarding the SD-WAN WAN Edge routers into the SD-WAN overlay. The vBond controller, or orchestrator, authenticates and authorizes the SD-WAN components onto the network. The vBond orchestrator takes an added responsibility to distribute the list of vSmart and vManage controller information to the WAN Edge routers.
● Management plane is responsible for central configuration and monitoring. The vManage controller is the centralized network management system that provides a single pane of glass GUI interface to easily deploy, configure, monitor and troubleshoot all Cisco SD-WAN components in the network.
● Control plane builds and maintains the network topology and make decisions on the traffic flows. The vSmart controller disseminates control plane information between WAN Edge devices, implements control plane policies and distributes data plane policies to network devices for enforcement.
● Data plane is responsible for forwarding packets based on decisions from the control plane. WAN Edge physical or virtual devices provide secure data-plane connectivity between the sites in the same SD-WAN overlay network. WAN Edge devices are responsible for establishing secure connections for traffic forwarding, for security, encryption, Quality of Service (QoS) enforcement and more.
In this prescriptive deployment guide, we focus on ensuring real-time dynamic path selection for business-critical application based on the end-to-end WAN network traffic conditions.
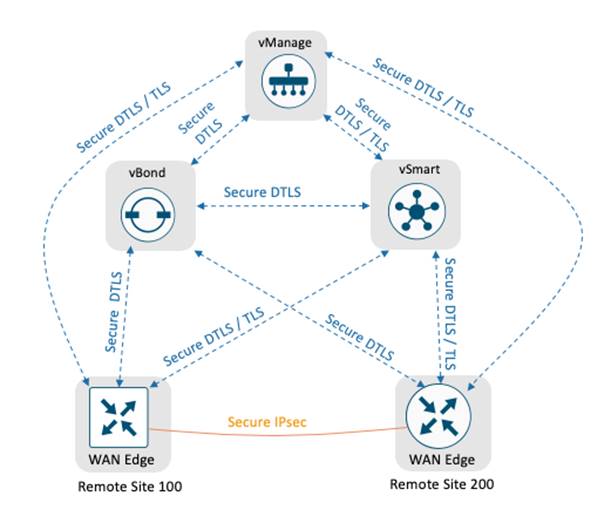
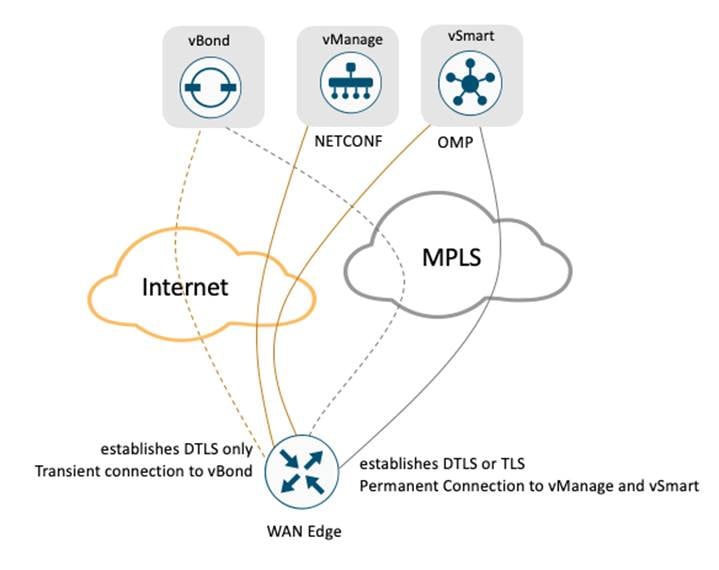
Upon securely onboarding the WAN Edge device in the Cisco SD-WAN overlay network, the WAN Edge device establishes secure control connections with all the controllers (vBond, vManage, vSmart) where it receives configuration, policies and routing information. The WAN Edge device would then establish secure IPsec tunnels with other WAN Edges, which is part of the same SD-WAN overlay network, to forward data-traffic.
The Cisco SD-WAN solution leverages NETCONF to provision the WAN Edge devices with the associated template configuration in the vManage and Overlay Management Protocol (OMP) to convey the control-plane information such as route-prefixes, next-hop routes, crypto keys and policy information between the vSmart controllers and the WAN Edge devices. By default, with no policies defined, the SD-WAN overlay network would form full-mesh topology, allowing each WAN Edge device to establish a secure IPsec connection to other WAN Edge device.
It is important to note that the WAN Edge device establishes a permanent persistent connection to the vSmart controller over each available WAN transport and a single permanent persistence connection to the vManage over only one WAN transport.
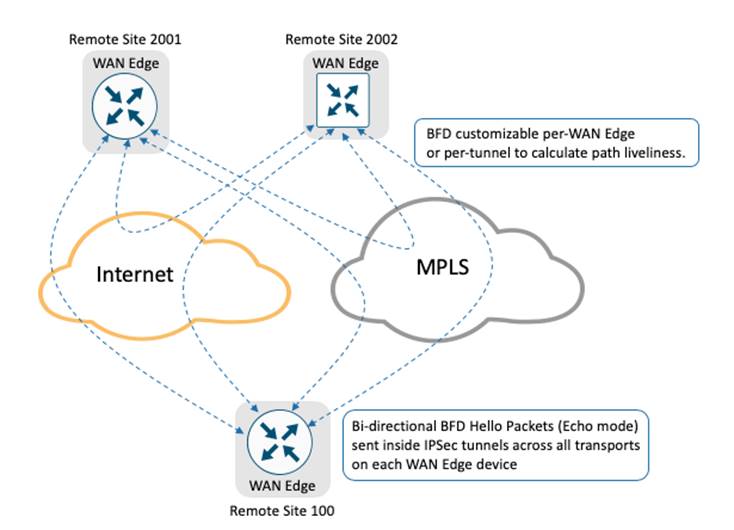
Bi-directional Forward Detection (BFD)
Upon establishing secure IPsec data-plane tunnels between the WAN Edge devices, BFD session are initiated on each of the tunnel established between the WAN Edge devices. The BFD probes monitors the network characteristics – loss, latency and jitter on the tunnels. By default, the BFD Hello packet is sent every 1 second and this value can be changed on a per tunnel basis.
The BFD operates in echo mode where BFD messages generated by the WAN Edge device are reflected (echoed) back by the remote WAN Edge device. Each BFD packet is time-stamped by the originating WAN Edge device to determine the round-trip latency and jitter. Path loss or tunnel liveness is determined based on the lost BFD packets.
The WAN Edge device collects the packet loss, latency and jitter for every BFD probe (default BFD Hello packets are sent 1 sec on every WAN transport) and is preserved for every poll interval (the default poll interval value is 10 minutes). The network path liveliness, by default, is calculated for a period of 6 poll intervals for better accuracy and to dampen any intermittent reclassification (flapping) of the tunnel. At the seventh poll interval, the earliest polling data is discarded to accommodate the latest information.
BFD packets being forwarded at regular intervals enables the SD-WAN overlay network to not only detect any blackout situations but also detect path characteristics such loss, latency, jitter, path-MTU that can then be leveraged by other SD-WAN protocols to make dynamic decision and provide the best quality of experience for business-critical applications.
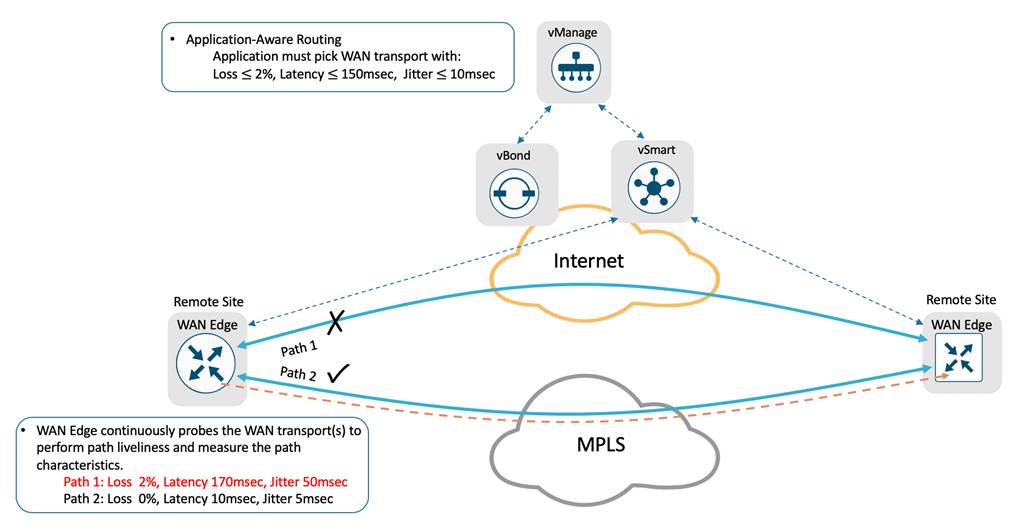
Cisco SD-WAN solution provides the network administrator procedure to define the desired SLA for the business-critical traffic. The SLA characteristics defines the desired loss, latency and jitter for the specified classified traffic.
The WAN Edge devices determines the WAN transports path characteristics - loss, latency and jitter from the previously discussed BFD probes sent across each tunnel between the WAN Edge devices.
● Packet loss is calculated on the WAN Edge device on a per tunnel basis and is measured as percentage 0 through 100 percent.
● Jitter is calculated on the WAN Edge device on a per tunnel basis and is a measurement of millisecond, 0 through 1000 milliseconds.
● Latency is calculated on the WAN Edge device on a per tunnel basic and is a measurement of millisecond, 0 through 1000 milliseconds.
Note: Calculated Packet Loss, Jitter and Latency are average values for the poll intervals and are round-trip measurements on each tunnel interface on the WAN Edge device.
Application-Aware Routing leverages the calculated network path characteristics values as a measurement and compares with the desired SLA for the application, to dynamically optimize the data path selection for the traffic on the WAN Edge device.
Policies
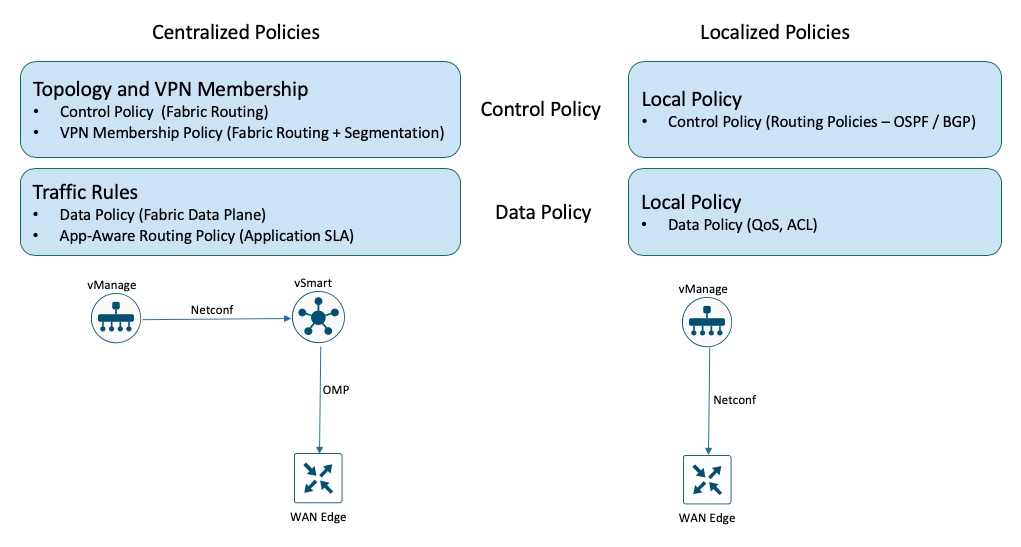
The Cisco SD-WAN solution separates the control plane functionality managed by vSmart controller with the data plane functionality operated by the WAN Edge devices. Similarly, the Cisco SD-WAN policy architecture separates the control policies that influence the routing information shared between vSmart controllers and the WAN Edge devices, with the data policies that influences the data traffic between the WAN Edge devices.
Policies, either control or data, are configured in vManage, provisioned and enforced either at vSmart controller influencing network-wide or locally on the WAN Edge influencing a specific parameter for the device.

By default, with no policy associated to the any SD-WAN components in the solution. In this scenario:
● WAN Edge devices advertise routes to vSmart controllers through the OMP protocol.
● The vSmart controller advertises the full routing information that is learnt from all WAN Edge devices to all other WAN Edge devices through the OMP protocol.
● SD-WAN WAN Edge devices establish data plane connections to all other WAN Edge devices forming a full-mesh topology.
Centralized policy, either control policy or data policy, is configured in vManage.
● The centralized control policy is applied to the routing information that is stored in the vSmart controller and enforced before the routes are advertised to the WAN Edge devices allowing for customizing routing decisions and determining the routing paths through the overlay network.
The centralized control policy configuration remains on the vSmart controller and is never pushed to the WAN Edge devices.
● The centralized data policy is applied to the data traffic flow for the specified VPNs in the overlay network. These policies permit or restrict access based on 6-tuples (source-ip, destination-ip, source-port, destination-port, protocol, dscp values) or based on VPN memberships allowing for customizing routing decision and determining routing paths at a local site.
Depending on the policies, the policy is provisioned on vSmart, pushed (via OMP protocol) and enforced on the WAN Edge devices.
Localized policy, either control policy or data policy, is configured in vManage.
● Localized control policy is applied to the routing information that is stored on the WAN Edge device influencing the routing behavior on the device at local site level.
● Localized data policy is applied on the interface of the WAN Edge device. The data policy is leveraged to match traffic and defines QoS, policing, mirroring at the interface level of the WAN Edge device.
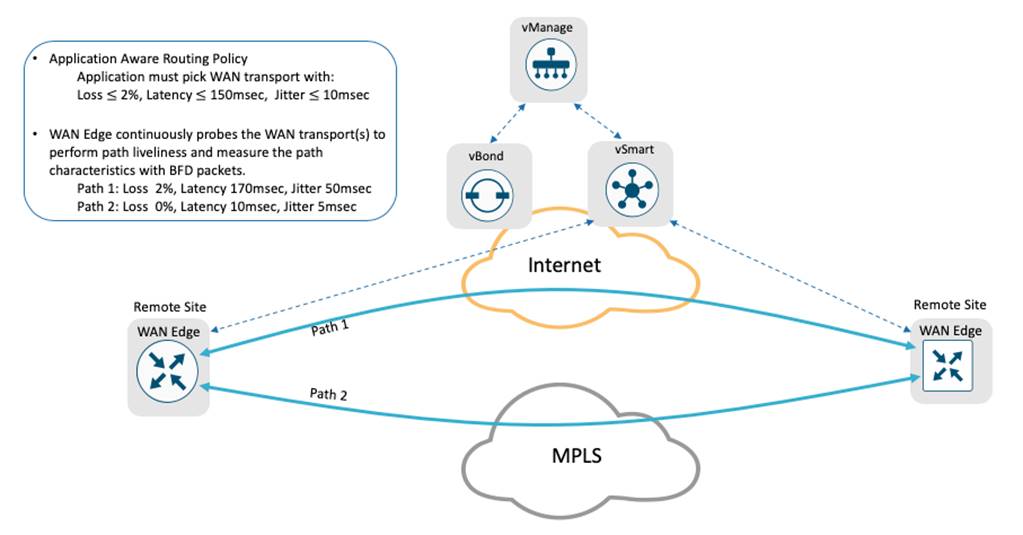
Advanced features set such as Application-Aware Routing provide network administrators the necessary flexibility to pin certain business-critical application to a specific WAN transport on the device. Actively probe the network and path characteristics and dynamically re-route the application traffic, in real-time, on the WAN transport links that meets the specified application SLA requirements.
Cisco SD-WAN WAN Edge device supports up to 8 TLOCs, allowing a single device to be connected to 8 different WAN transports. Each WAN Edge device in the SD-WAN environment advertises its local routes to the vSmart controller using OMP protocol. The vSmart controller computes the best path selection algorithm for the entire SD-WAN environment and applies any configured centralized control policy before advertises the route-selection to the WAN Edge devices.
The WAN Edge device installs the received OMP route in its forwarding table. For destination prefixes with multiple best paths, the device natively performs Layer-3 ECMP (Equal Cost Multiple Path) load-balancing across 4 reachable next-hop TLOCs. The number of paths installed on the WAN Edge device can be increased to 16 as long as the next-hop is reachable.
SLAs for each of the transport tunnels are calculated periodically using BFD probes by the WAN Edge device and is made available for advanced features like Application-Aware Routing to leverage and provide deterministic experience for business-critical applications.
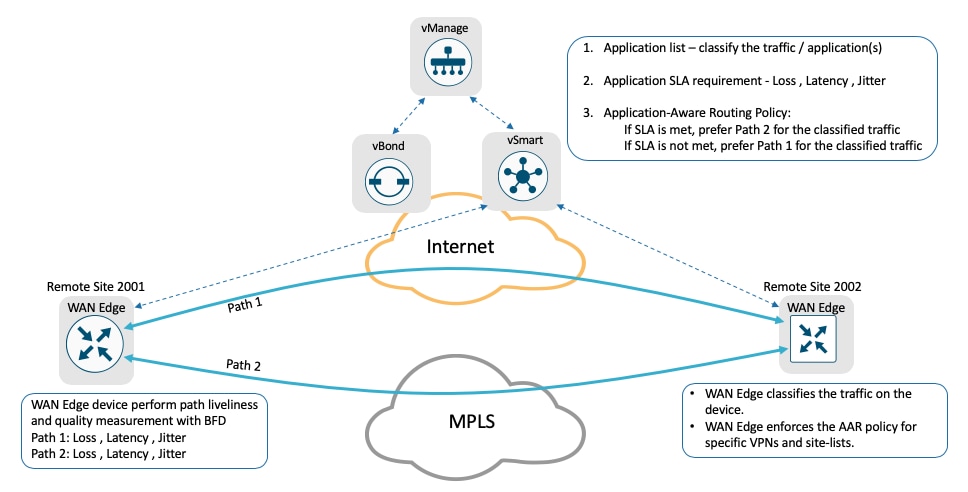
Application-Aware Routing allows the network administrator to evaluate the network path characteristics for the selected business critical applications and set a preferred path as long as the SLAs are satisfied and a backup preferred path. The backup preferred path is chosen when no available WAN transport(s) meets the specified SLA.
Application-Aware Routing policy is configured in vManage as a centralized data policy that maps the service-side application(s) to specific SLA requirements. The centralized policies provisioned in vSmart controller is pushed to relevant WAN Edge devices for enforcement. The defined policy consists of match-action pairs, where the match statement defines the application-list or the type of traffic to match, and the action statement defines the SLA action the WAN Edge devices must enforce for the specified traffic.
Application-Aware Routing Components
Cisco SD-WAN Application-Aware Routing consists of three components:
● Identification – Classify the traffic / Application group of interest.
● Application SLA Requirement – Defining the application SLA requirements.
● Application-Aware Routing Policy – Policy maps the classified traffic to the transport tunnel based on the defined SLA requirement.
Identification – Classify the traffic / Application group of interest
First step in defining the Application-Aware Routing (AAR) is to choose the traffic or application group of interest that requires preferred treatment or Service Level Agreement (SLA) to be met. The vManage centralized policy wizard provides the network administrator options to match and define groups of interest as shown below:
| List Type |
Groups of Interest |
| Application List |
Application – specify the application or application list Application Family – specify the application family list(s) |
| Prefix |
Network prefix that can be matched for source or destination addresses |
In addition to above, network administrator can also match traffic based on:
| List Type |
Groups of Interest |
| Cloud SaaS Application List |
Leverage the pre-defined Cloud-SaaS Application list |
| DNS Application List |
DNS application list is mainly used when the network deployment needs split DNS lookup for certain application or application-lists. |
| DNS |
DNS lookup (DNS request / response) packets can be matched. |
| DSCP |
Pre-configured traffic with DSCP values, through QoS policy on the service-side traffic, can be leveraged. |
| PLP |
Pre-configured traffic part of the Packet Loss Priority (PLP) queue, configured part of QoS policy, can be matched. |
| Protocol |
Traffic with certain protocol number. |
| Source Data Prefix |
Pre-defined custom data-prefix of the traffic. |
| Source Port |
Data traffic with defined port number. |
| Destination Data Prefix |
Pre-defined custom data-prefix of the traffic. |
| Destination Port |
Data traffic with defined port number. |
Deep Packet Inspection
Cisco WAN Edge device have integrated Deep packet Inspection (DPI) engine to identify and classify applications including voice and video, email, file sharing, gaming, peer-to-peer (P2P), and cloud-based applications. Viptela WAN Edge devices leverages Qosmos DPI to classify the traffic and Cisco IOS-XE SD-WAN devices uses NBAR2 to identify a wide variety of applications from the network traffic flows using L3 to L7 data.
Cisco IOS-XE SD-WAN devices can incorporate SD-AVC along with the NBAR2 DPI engine providing the capability to inspect and classify the flows on the first packet. Once the applications are classified, policies can leverage this information to match on the application and/or application-list and influence the traffic.
Service Level Agreement
Next step in defining the Application-Aware Routing (AAR) Policy is to set Service Level Agreement (SLA). The Service Level Agreement specifics the network path characteristics (loss, latency and jitter) that the application can handle for optimized performance.
The vManage centralized policy wizard provides network administrator options to define custom Service Level Agreement (SLA) or leverage the pre-defined SLA’s as shown below:
| Name |
Loss (%) |
Latency (msec) |
Jitter (msec) |
| Transactional-Data |
5 |
50 |
100 |
| Bulk-Data |
10 |
300 |
100 |
| Voice-And-Video |
2 |
45 |
100 |
| Default |
25 |
300 |
100 |
The pre-defined SLA values (Loss, Latency and Jitter) are specific to the WAN transport characteristics and are round-trip measurement. The pre-defined SLA class values, shown in the above table, may or may not fit the deployment needs. vManage provides administrates the flexibility to define custom SLA class instead of leveraging the pre-defined SLA class.
| Tech tip |
| Before defining custom SLA values, monitor the current WAN transport SLA statistics across the SD-WAN environment by navigating to vManage > Main Dashboard > Application-Aware Routing widget. By default, the Loss, Latency and Jitter values are calculated for every WAN transport available on the WAN Edge device and are made available for a period of up to 7 days. This historical data can be used as a baseline to evaluate and define custom SLA values to better fit the environment and the application requirements. |
Careful consideration must to taken when choosing the SLA values. Choosing a more aggressive values might cause undesired result with too many SLA violations, while choosing a more relaxed values might not yield the desired result for the enterprise.
Administrators can define any number of custom SLA’s but can associate only 4 SLA’s to the Application-Aware Routing policy. Please check the Release Notes for the corresponding software version on the number of SLA supported for the release.
Application-Aware Routing Policy – Policy maps the classified traffic to the WAN transport based on the defined SLA requirement.
The Application-Aware Routing policy defined in vManage binds the selected application/traffic list with the SLA. For all matched data-traffic traversing from LAN/Service side to remote site through the device WAN transports, the AAR policy defines the
● Preferred Color – the selected data traffic is pinned to the chosen WAN transport(s) as long as the transport(s) meets the specified SLA.
Note that when multiple WAN transports are selected and transports satisfying the SLA requirements, the WAN Edge performs ECMP load balancing across the tunnels for the selected data traffic.
● Strict – if enabled, the selected data traffic would be dropped if all the WAN transport(s) do not meet the specified SLA. If there is at least one path meeting the SLA, traffic is forwarded on that path.
● Backup SLA Preferred Color – the selected data traffic is pinned to the chosen WAN transport(s) only when no transport(s) meets the specified SLA and Strict option is not enabled.
● Log – if enabled, a syslog message is generated first time a packet flow is logged and every 5 minutes thereafter, as long as the flow is active.
For all other data traffic that doesn’t match the selected application/traffic list, the traffic would be load-balanced across all the available WAN transport links available on the WAN Edge device.
Along with defining the preferred dynamic path selection, AAR policy provides the network administrators with flexibility of defining Site-list’s and VPN-list’s where the policy needs to be enforced across the SD-WAN overlay network.
Monitoring and Measuring WAN transport path characteristics
The network path characteristics is measured by running Bi-directional Forward Detection (BFD’s) probes periodically on device’s each WAN transport tunnel interfaces. The BFD probe measures the transport’s loss, latency, jitter every polling intervals.
Following the WAN Edge onboarding – authenticating and joining the overlay network, the device would establish secure data-tunnel to other WAN Edge devices part of the same SD-WAN overlay network. Upon establishing the data-tunnel, the WAN Edge device would:
● probe each WAN transport tunnel with BFD Hello packets at every 1 second interval. Below table lists the BFD default values.
| List |
Description |
Default Values |
| Hello interval |
Interval at which BFD Hello Interval are send across the WAN transport |
1000 msec (configurable) |
| BFD Multiplier |
Value defines number of BFD Hello Packet Intervals the device waits before declaring that tunnel has failed. |
7 (configurable) |
Note: The BFD Hello Interval and BFD Multiplier can be changed per tunnel or across all the WAN transports on the WAN Edge device.
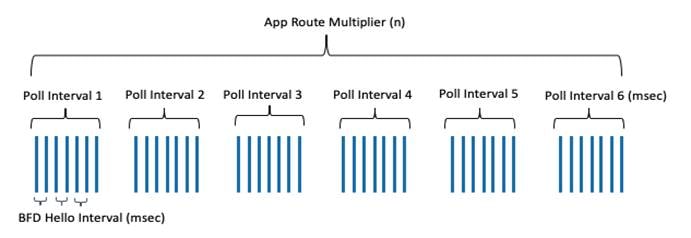
● collect and preserve the packet loss, latency and jitter for every BFD poll and calculate the network path characteristics at each poll interval. The default poll interval value is 10 minutes, implies 600 BFD hello packets are considered for each poll interval calculation.
Poll Interval = poll-interval in secs * BFD Hello packet interval
● collect 6 poll intervals and average these values to calculate network path liveliness for better accuracy and to dampen any intermittent reclassification (flapping) of the tunnel. At the seventh poll interval, the earliest polling data is discarded to accommodate the latest information.
Below table lists the default values for the Application Aware Routing polling data:
| List |
Description |
Default Values |
| Poll Interval |
Interval at which WAN Edge calculates the average loss, latency and jitter for each WAN transport. |
10 minutes (configurable) |
| Multiplier |
Value defines number of poll interval(s) to be considered to calculate the tunnel statistics for the AAR. |
6 (configurable) |
Note: The Poll Interval and Multiplier values can be modified on the WAN Edge device effecting all the tunnel/WAN transport(s) associated with the device.
Careful consideration must be taken before changing the default values as the BFD packets gets high priority treatment on the WAN Edge device. The BFD packets are marked with high priority DSCP 48 marking. By default, the control traffic and the BFD packets are mapped to Queue 0 on the device and is configured for low-latency queuing, strict-priority traffic queue for control and delay-sensitive traffic. Packets in this queue is transmitted before any other packets in other queues and for congestion avoidance tail-drop is implemented on Queue 0.
Being aggressive by lowering the BFD values would impact the WAN Edge device performance and being conservative by increasing the BFD values would delay the calculations of the network path resulting in undesired dynamic path selection for the business-critical applications.
| Tech tip |
| For optimal device performance, Cisco recommends not to change the default BFD values as this might impact WAN Edge performance. |
In situation where the default values need to be modified to meet the business requirements, such as to meet the SLA requirements for highly susceptible applications or to reduce bandwidth consumption on the tunnel or to reduce the WAN charges at the remote site. Additional caution and tests must be done before deploying in production environment.
It is always recommended to have a consistent BFD values configured across WAN Edge devices in the same site for the same WAN transport type.
Below table shows examples on the modified values and how quickly the path characteristics are calculated:
|
|
Example 3 (Recommended) |
Example 1 (Aggressive) |
Example 2 (Moderate) |
| BFD Hello Interval |
1000 msec (Default) |
1000 msec (Default) |
1000 msec (Default) |
| Poll Interval |
120 sec |
30 sec |
120 sec |
| App-route Multiplier |
6 intervals (Default) |
2 intervals |
5 intervals |
| Path characteristics calculated every |
120 sec intervals using last 12 minutes poll data |
30 sec intervals using last 1minute poll data |
120 sec intervals using 10 minutes poll data |
Policies are an important part of the Cisco SD-WAN solution and are used to influence the overlay topology and to influence the flow of data traffic across the WAN Edge devices in the overlay network. Policies are applied either at control plane or data plane level, configured in the vManage and enforced either on vSmart controllers or on the WAN Edge devices.
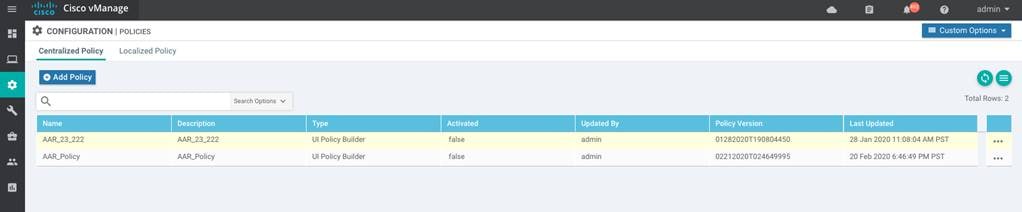
It is to be noted that only one centralized policy can be activated at any time on the vSmart controller. The activated policy can contain several different policy definitions that make up the centralized policy, such as Topology, VPN Membership, Application-Aware Routing policy, Traffic Data (QoS, Service Chaining, Traffic Engineering etc.) and Cflowd policy.
Application Aware Routing policy is part of the centralized policy associated to the vSmart controller. The vSmart controller would distribute the policy through the OMP protocol to the appropriate WAN Edge devices in the overlay network that are part of the selected Site Lists, VPN lists and enforced on the WAN Edge devices for the selected traffic traversing from service-side (LAN network) to the WAN-transport (WAN network).
The WAN Edge device can also be associated with other localized policy. Similar to the centralized policy, only one localized policy can be applied to WAN Edge device. The localized policy can contain several different policies such as prefix-lists, access control list policy, route policy, community-lists, QoS etc.
With multiple policies being configured and enforced on the WAN Edge device, it is important to understand the order of precedence when the packet is moving from service-side to WAN transport-side.
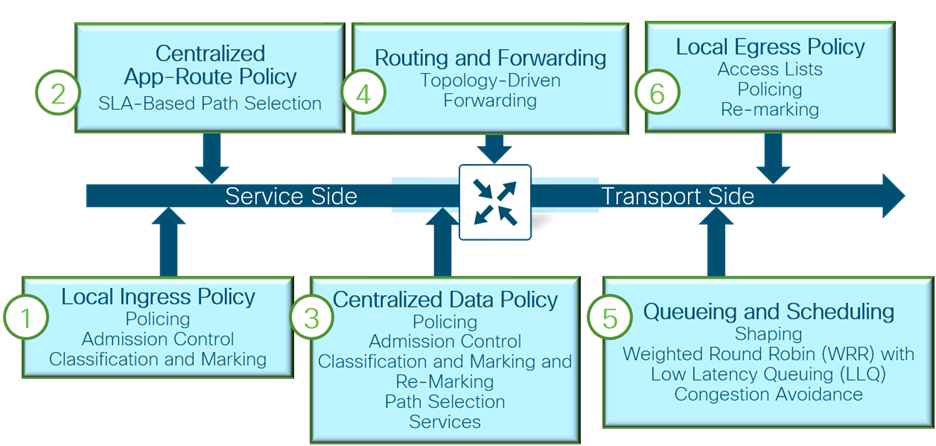
● Local policy/configuration – includes QoS classification, policer and marking
● Centralized application – application aware routing policy
● Centralized data policy – includes QoS classification, policies, marking and path selection
● Routing/Forwarding
● Scheduling and queuing
● Local policy shaping and ACL – includes shaping, re-marking and policer
It is possible for a centralized data policy to overwrite the actions of a centralized application-aware routing policy. Careful consideration must be kept in mind when defining multiple policies for the network as mutually exclusive policies can influence the traffic traversing the WAN Edge device.
This section covers needed steps to
● Verify the prerequisites required before proceeding to deploy Application-Aware routing.
● Procedures involved in deploying centralized policy with Application-Aware routing
● Procedures to append Application-Aware Routing policy to the existing centralized policy.
Process: Prerequisites for Application-Aware Routing
The below procedure lists the prerequisites that are needed before configuring the Application Aware Routing policies.
Procedure 1. Verify the WAN Edge device is successfully onboarded in the SD-WAN overlay network.
Step 1. In vManage, navigate to Dashboard > Main Dashboard, make sure WAN Edge devices are successfully onboarded.

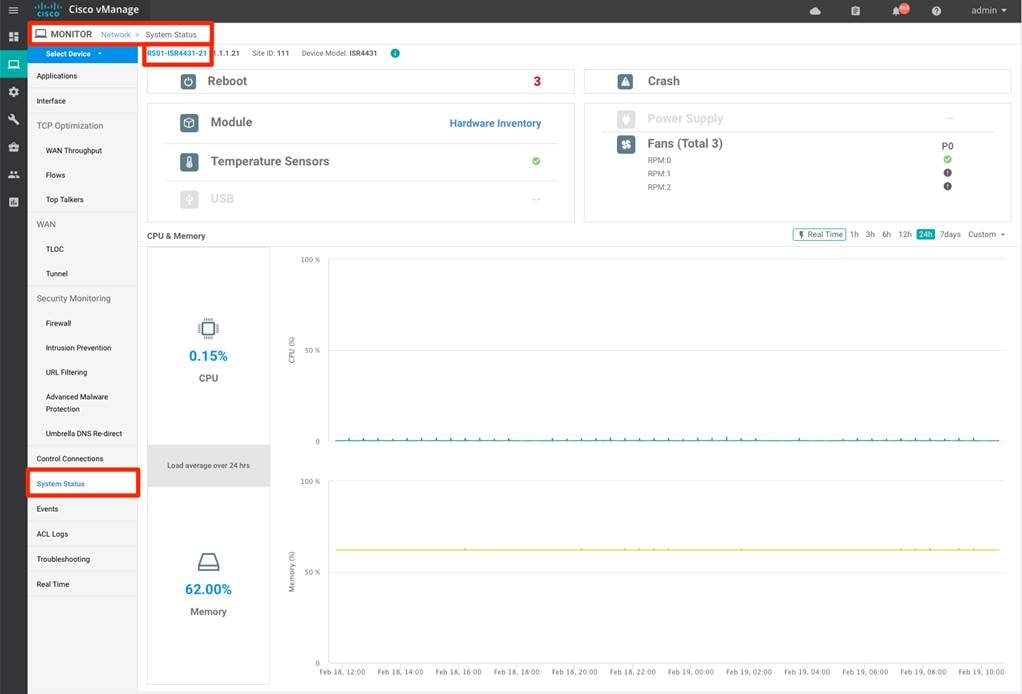
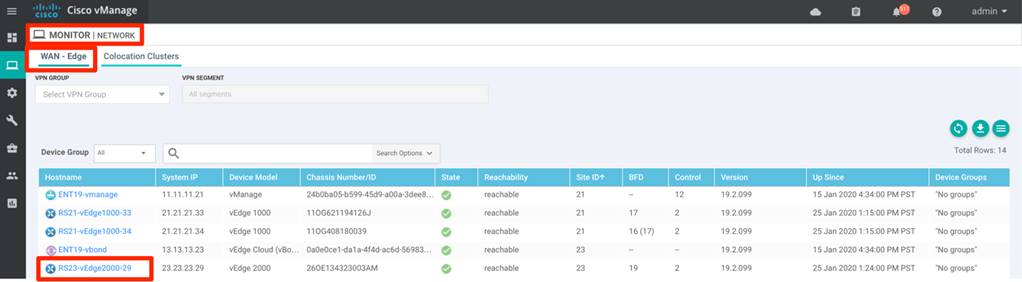
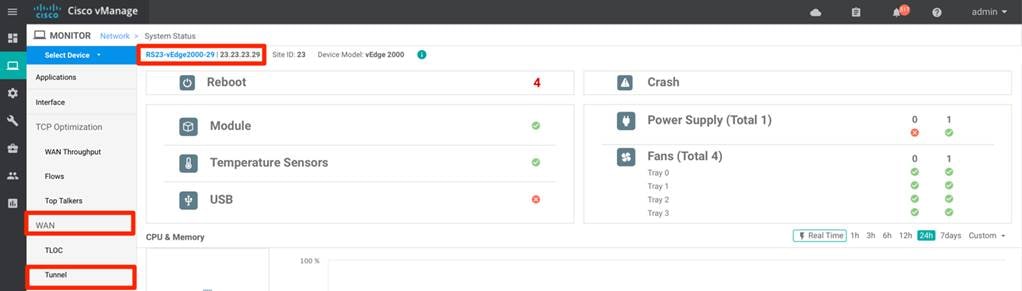
Step 2. In vManage, navigate to Monitor > Network, select the device from the WAN-Edge list.
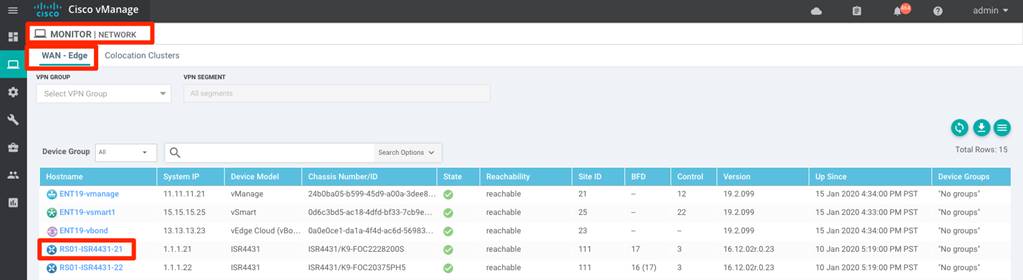
select System Status from the left panel to view the device status.
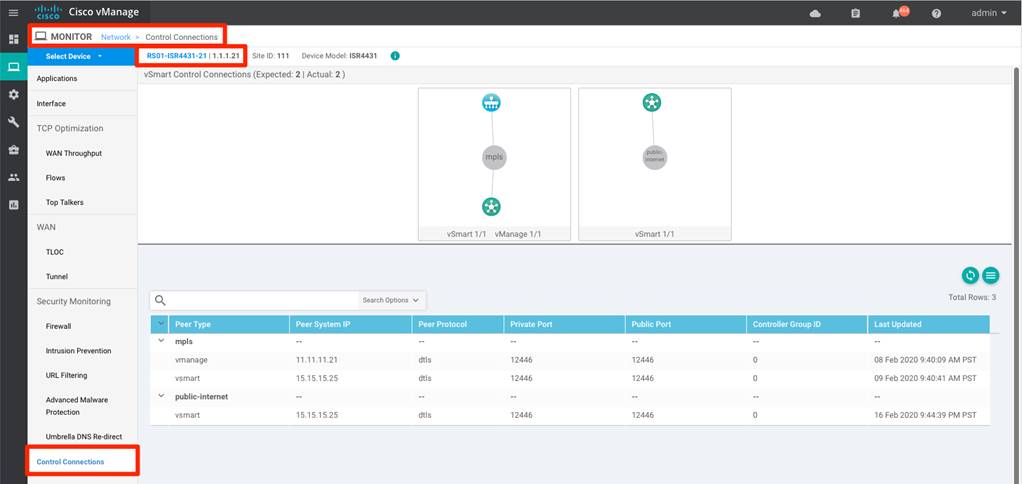
Procedure 2. Verify the WAN Edge device control connections to all the SD-WAN controllers.
Step 1. In vManage, navigate to Monitor > Network, select the device from the WAN-Edge list and select Control Connections option from the left panel.
Procedure 3. Verify the WAN Edge device IPSec connections to other WAN Edge devices.
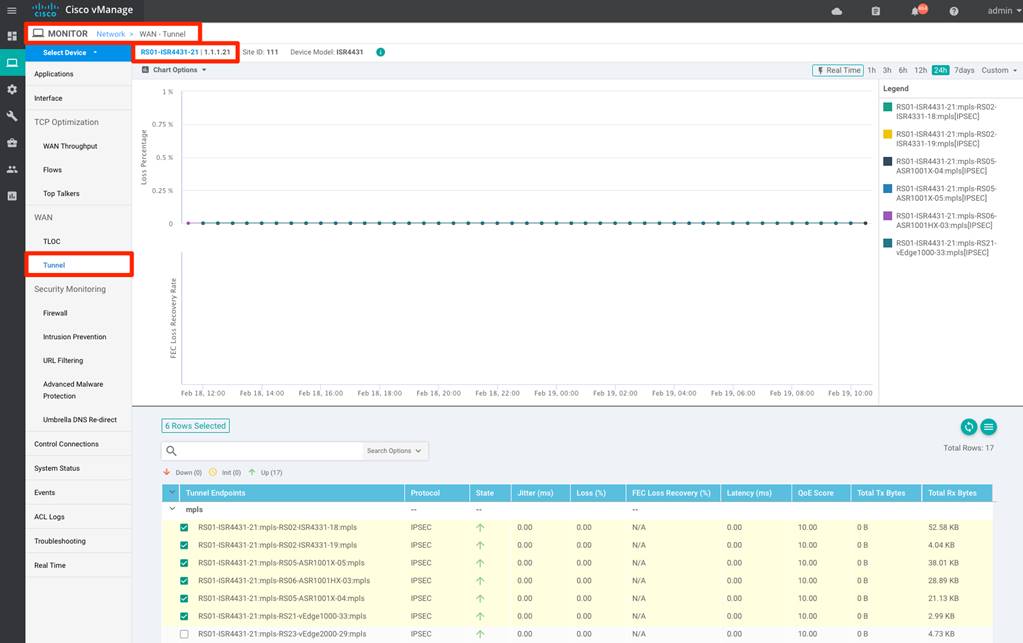
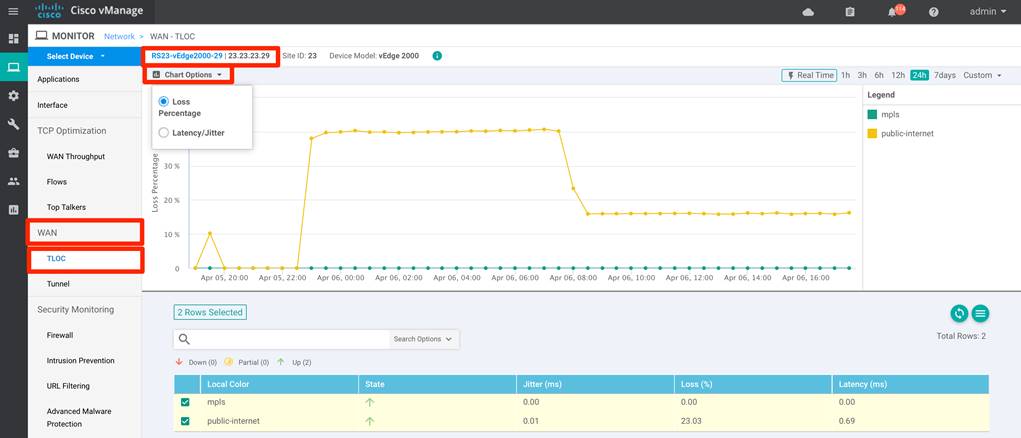
Step 1. In vManage, navigate to Monitor > Network, select the device from the WAN-Edge list and select WAN > Tunnel option from the left panel.
Procedure 4. Verify the BFD sessions are established between WAN Edge devices.
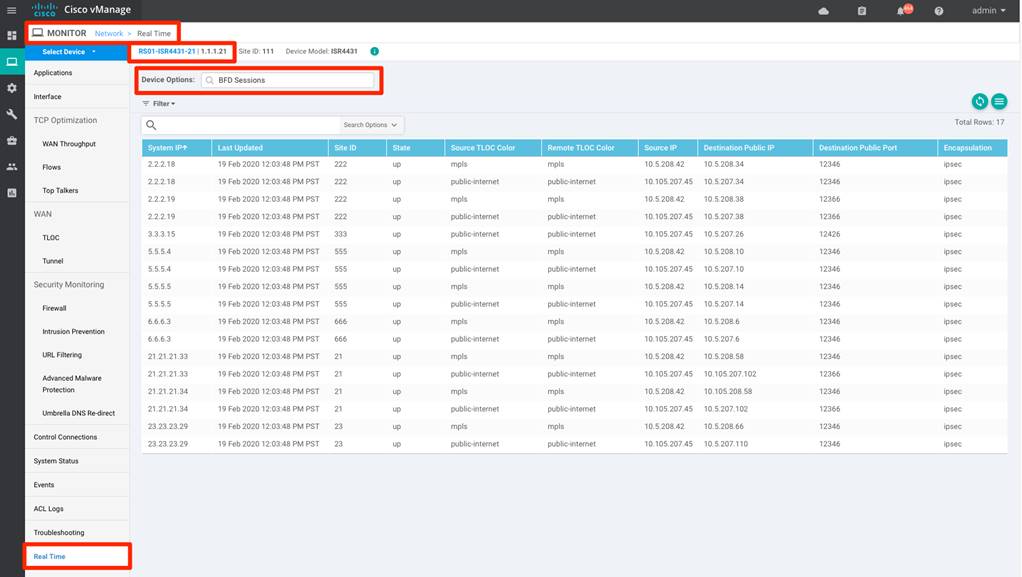
Step 1. In vManage, navigate to Monitor > Network, select the device from the WAN-Edge list and select Real Time option from the left panel. Search for BFD sessions option in the Device Options search bar.
Procedure 5. Verify the SD-WAN vSmart controller is in vManage mode.
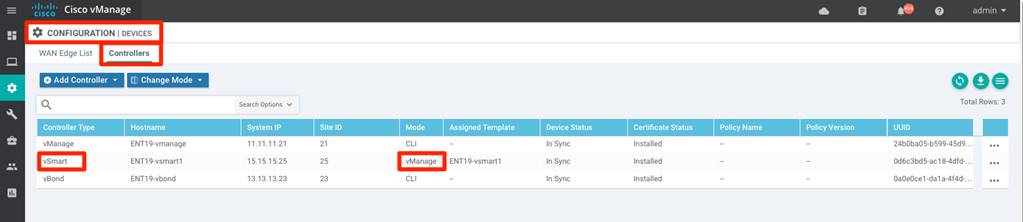
Step 1. In vManage, navigate to Configuration > Devices, select the Controllers options to verify the vSmart mode.
Process: (Optional) Configuring custom BFD template
This process walks through procedure and steps needed to configure custom BFD template for the SD-WAN environment.
Procedure 1. (optional) Create custom BFD Template
Following the WAN Edge onboarding, the device establishes secure IPSec data tunnels with other WAN Edge devices and periodically probes the secure tunnels, with BFD Hello packets, to measure the transport tunnel liveliness and path characteristics.
Below table lists the default values for the BFD polling data defined globally for all tunnel on the WAN Edge device:
| List |
Description |
Default Values |
| Hello interval |
Interval at which BFD Hello Interval are send across the WAN transport |
1000 msec (configurable) |
| BFD Multiplier |
Value defines number of BFD Hello Packet Intervals the device waits before declaring that tunnel has failed. |
7 (configurable) |
and the default values used to calculate the network path characteristics:
| List |
Description |
Default Values |
| Poll Interval |
Interval at which WAN Edge calculates the average loss, latency and jitter for each WAN transport. |
10 minutes (configurable) |
| Multiplier |
Value defines number of poll interval(s) to be considered to calculate the tunnel statistics for the AAR. |
6 (configurable) |
The above default value can be changed either effecting all the tunnels on the WAN Edge device or on each tunnel basis on the WAN Edge device. Careful consideration must be taken when changing the BFD values as this may cause adverse effect on the performance of the WAN Edge device.
Below procedure walks through steps on the procedure to change the default BFD values.
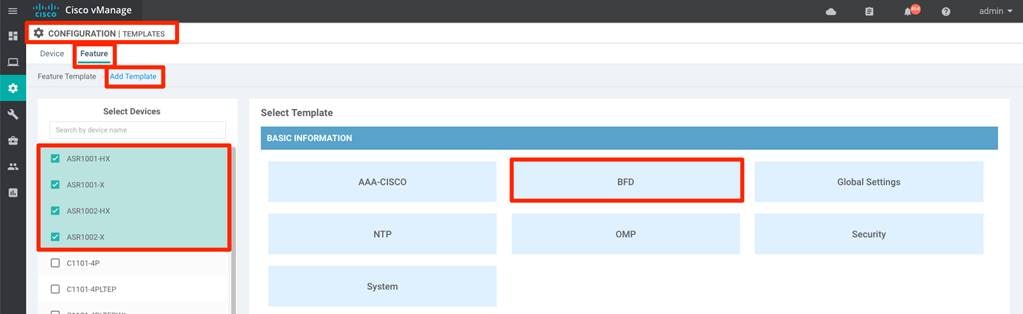
Step 1. Create BFD template for the WAN Edge device(s) in the SD-WAN network.
In vManage, navigate to Configuration > Templates > Feature and click Add Template. Select all the appropriate devices deployed in the SD-WAN network from the Select Devices list and choose BFD template from the Basic Information category.
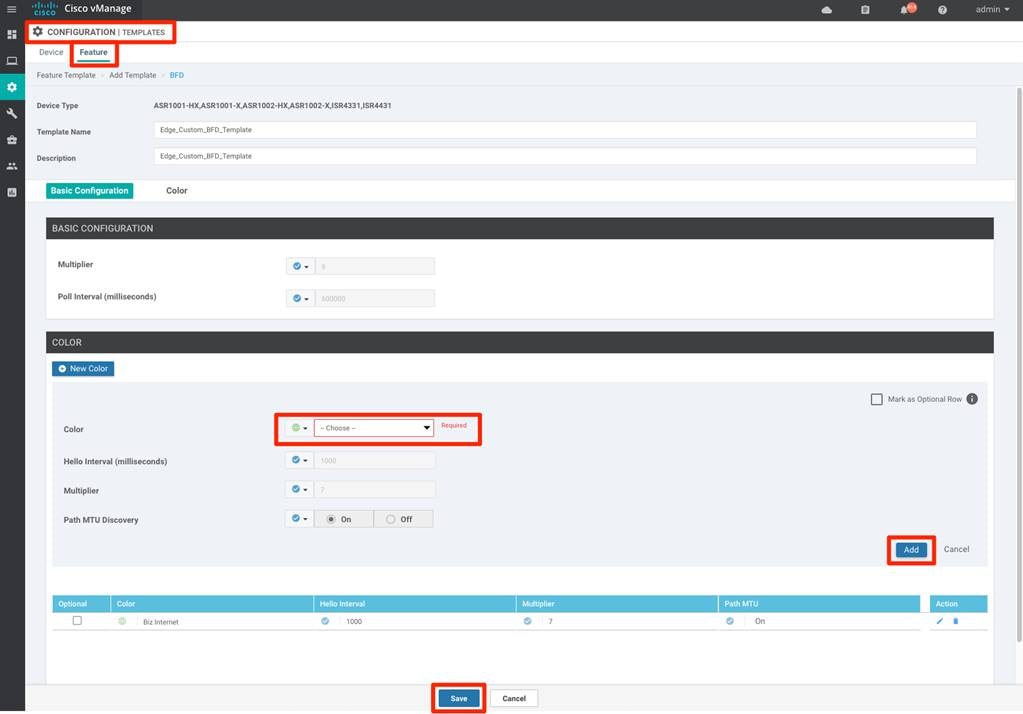
Step 2. Create custom BFD template for the SD-WAN network.
Input the Template Name and Description for the template and modify the Multiplier and Poll Interval under Basic configuration section. The modified values in the section would influence all the associated tunnels on the WAN Edge device.
Alternatively, to influence values on the tunnel/color basis, select the New Color from the Color section, choose the appropriate Color from the drop-down menu option and modify the Hello Interval and Multiplier values. Click Add in the Color section and Save at the bottom of the page to save the BFD feature template.
Step 3. Associate the custom BFD template to the WAN Edge device(s).
In vManage, navigate to vManage > Configuration > Templates > Device, select the devices from the device list and click the three dots (…), located at the end of each table row and choose the Edit option from the drop-down options
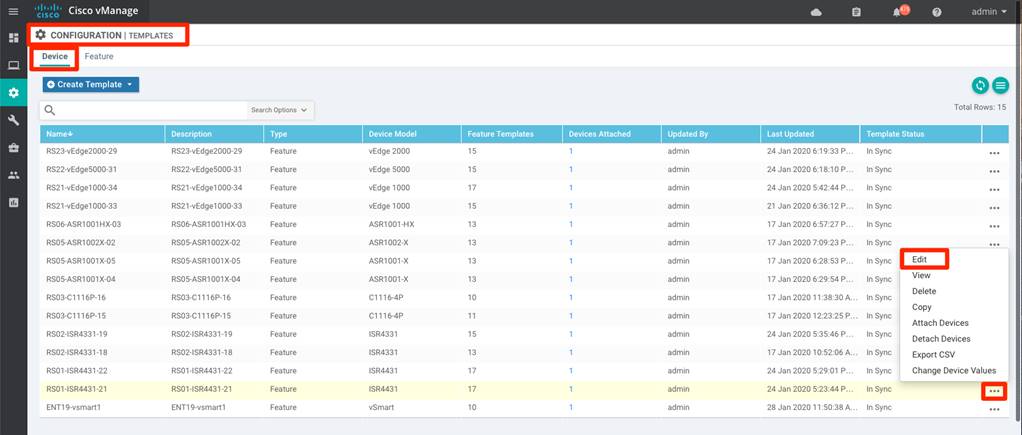
navigate to the Basic Information > BFD section and choose the previously created custom BFD template and click Update.

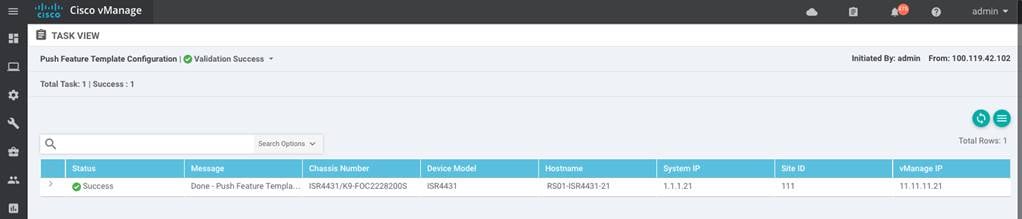
Step 4. Click Next, Configure Devices to configure the WAN Edge(s) with custom BFD template.

Process: Configuring Application-Aware Routing policy
Creating Application Aware Routing policies consists of defining the three core components:
● Identification – Classify the traffic / Application group of interest.
● Application SLA Requirement – Defining the application SLA requirements.
● Application-Aware Routing Policy – Policy maps the classified traffic to the transport tunnel based on the defined SLA requirement.
On creating the policy, associate and activate the centralized policy to appropriate Site list(s) and VPN list(s).
Procedure 1. Identification – Classify the traffic / Application group of interest.
Below steps walks through steps for classifying the traffic class of interest for the preferred treatment in the SD-WAN environment.
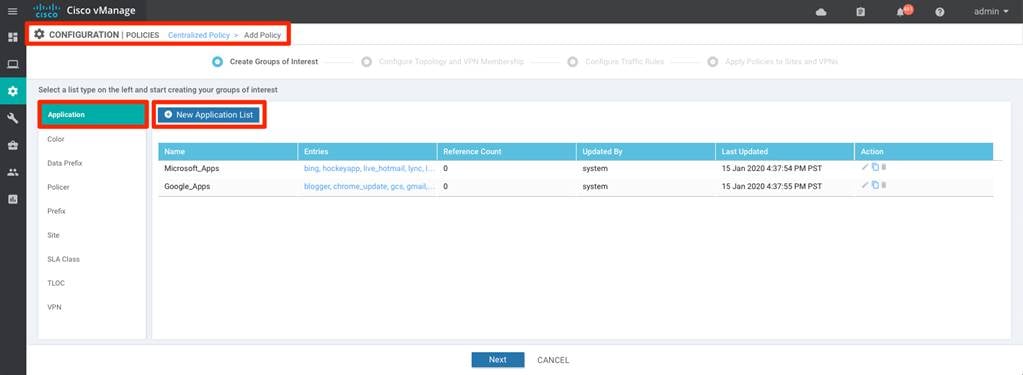
Step 1. In vManage, navigate to Configuration > Policies > Centralized Policy and select Add Policy.

Step 2. Select Application from the left panel and click New Application List
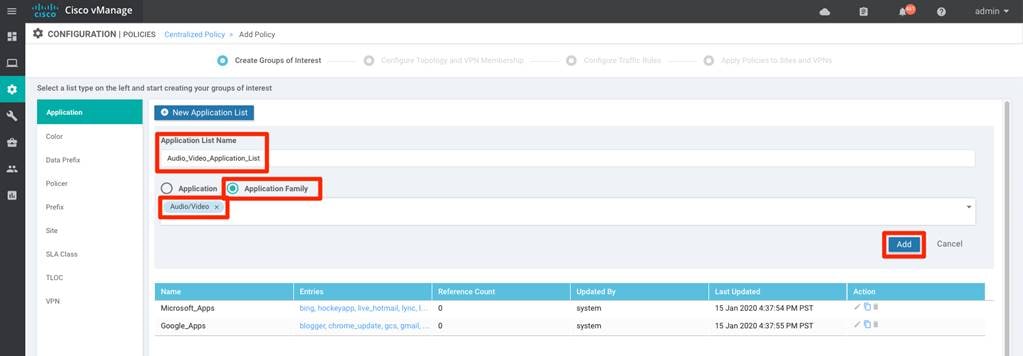
name the custom application list and select either Application or Application Family option.
Choose appropriate application family category option from the drop-down option and Click Add.
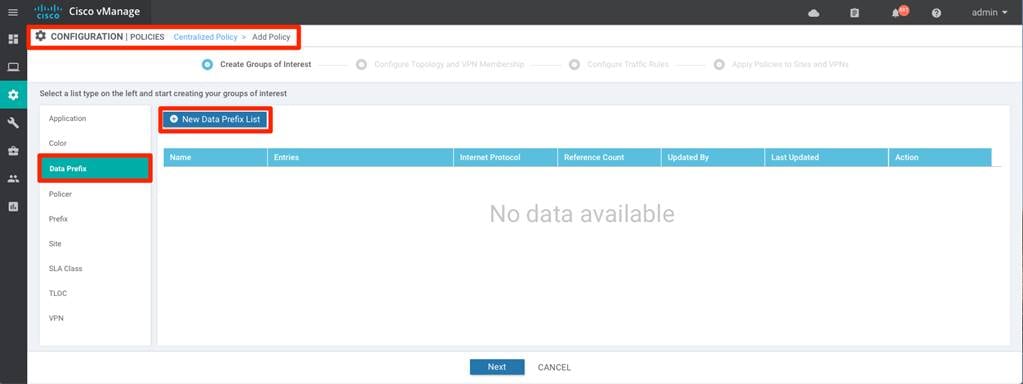
Step 3. Alternatively, to previous Step 2, network administrators can match on Data Prefix to identify traffic based of the network traffic.
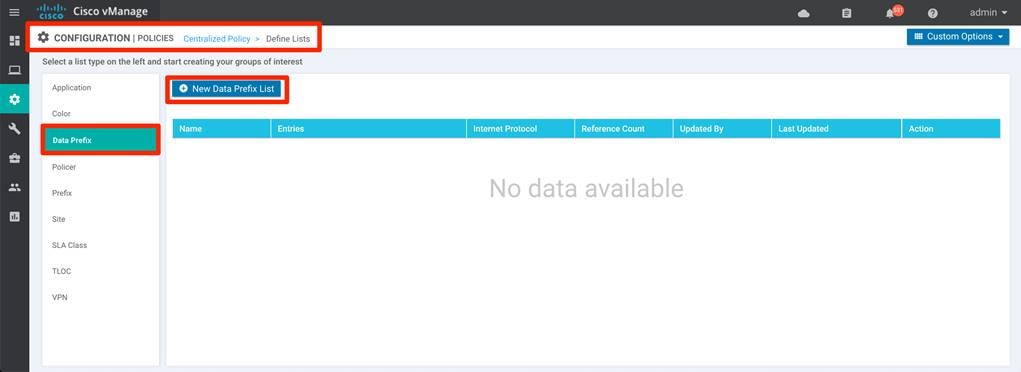
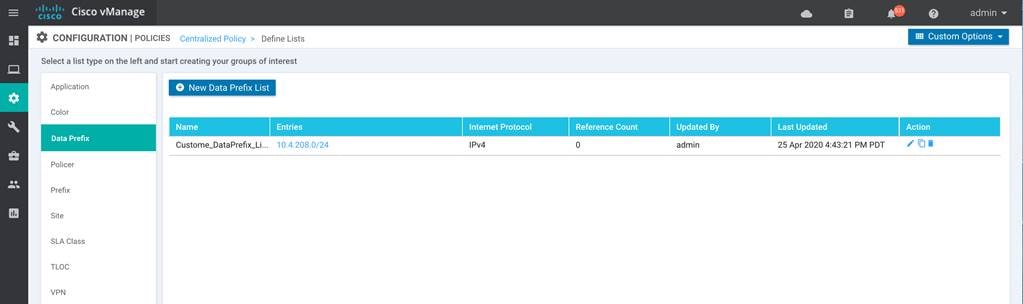
To define the data prefix, select the Data Prefix option from the list type on the left side panel and click New Data Prefix List
Input the Data Prefix List Name and select either IPv4 / IPv6 from the Internet Protocol option and add the network prefix that needs to be matched and select Add
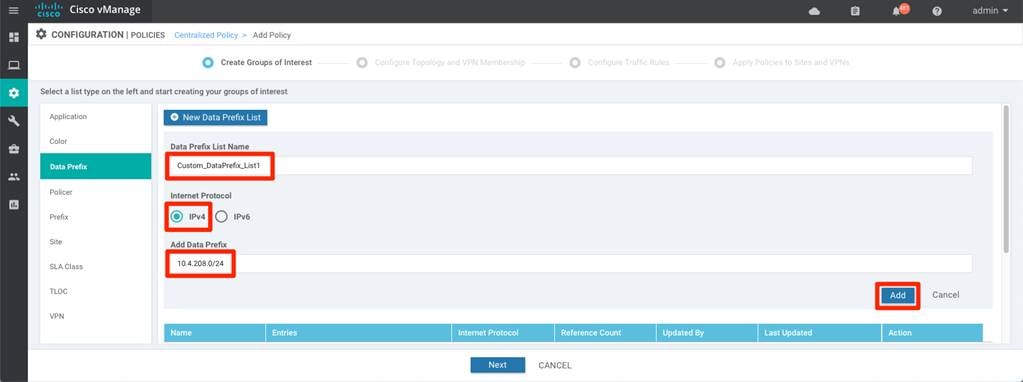

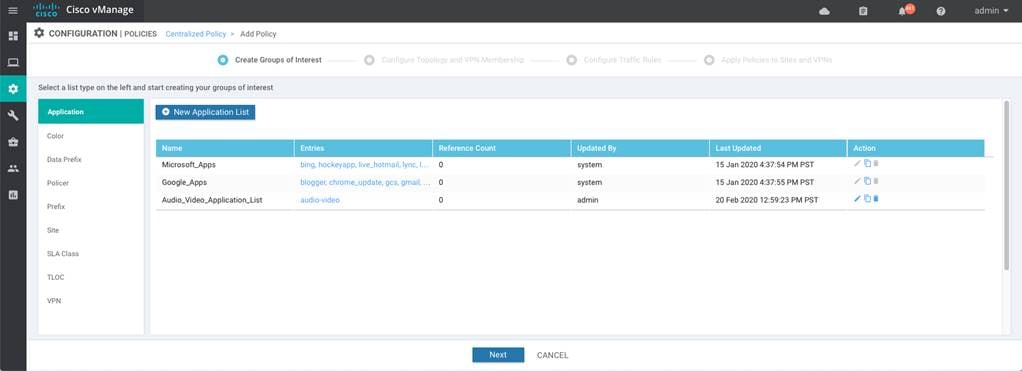
Step 4. Repeat the above steps to add any additional Application List and/or Data Traffic for the SD-WAN deployment.
Procedure 2. Define Application Service Level requirements.
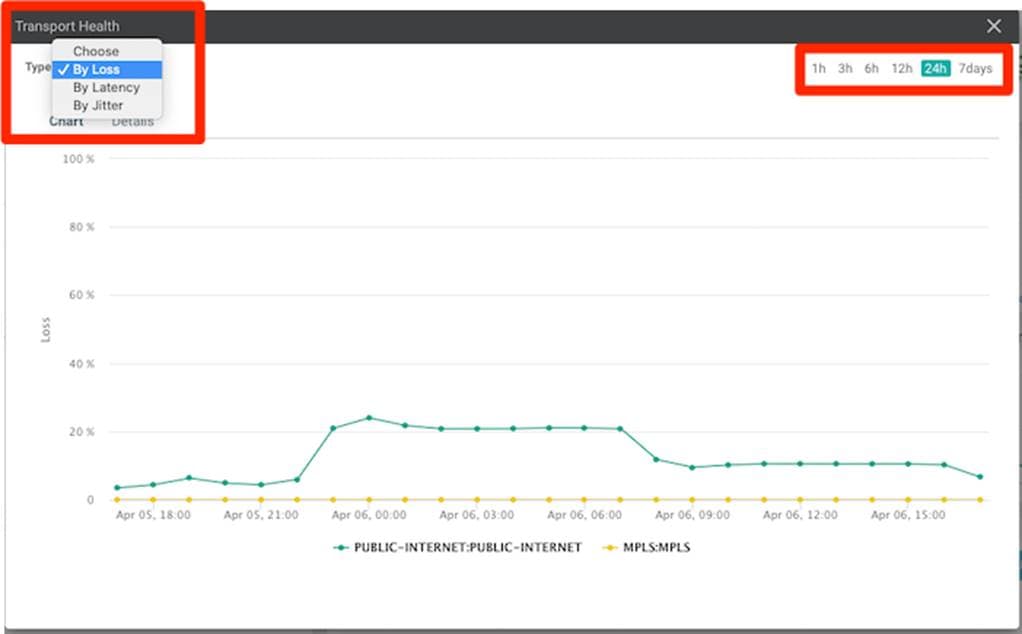
Below steps walks through steps on defying custom SLA class. But, before defining the custom SLA, it is important to understand the current historical WAN Transport health characteristics.
Step 1. Monitor transports health characteristics across the SD-WAN environment.
To view the tunnel characteristics across the SD-WAN infrastructure. Navigate to vManage > Dashboard > Main Dashboard > Transport Health widget.

Step 2. Expand the widget by clicking the square icon in the top right corner of the Transport Health widget and select the Type option to view the chart By Loss, By Latency or by Jitter values and view the transport health over the maximum of past 7 days.
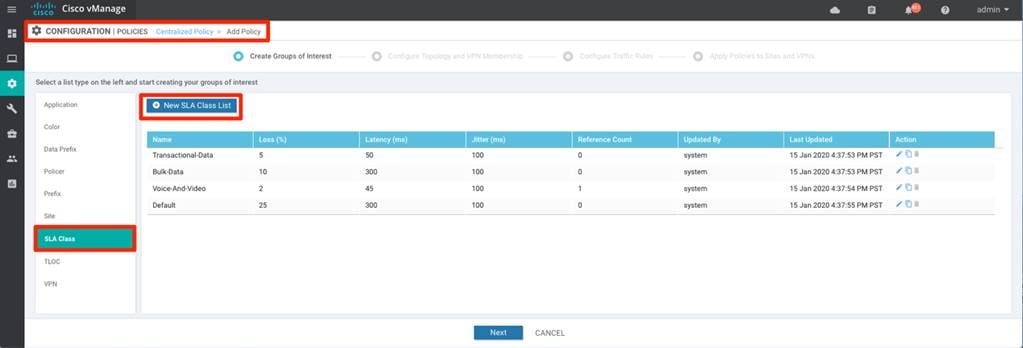
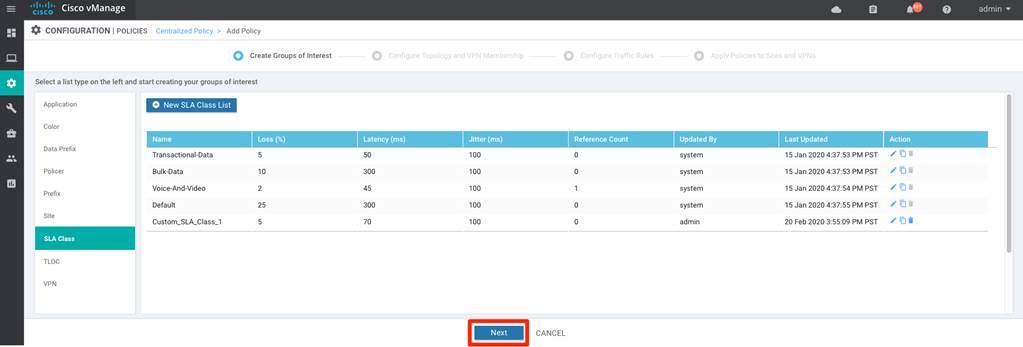
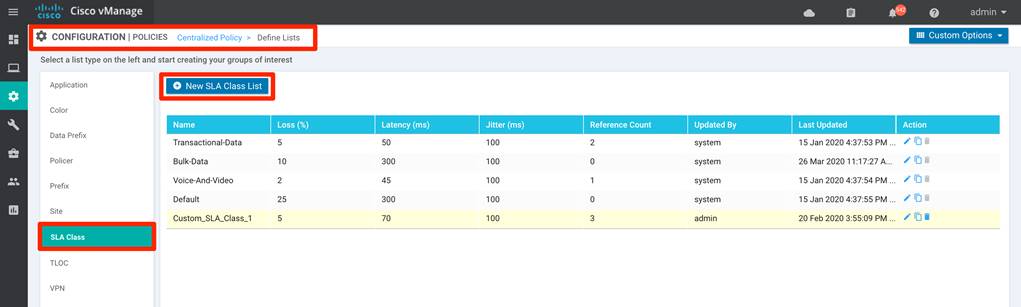
Step 3. Select SLA Class from the left panel, in the Configuration > Policies > Centralized Policy page, to create additional SLA Class list. By default, vManage has 4 pre-defined SLA class (Transactional-Data, Bulk-Data, Voice-And-Video and Default).
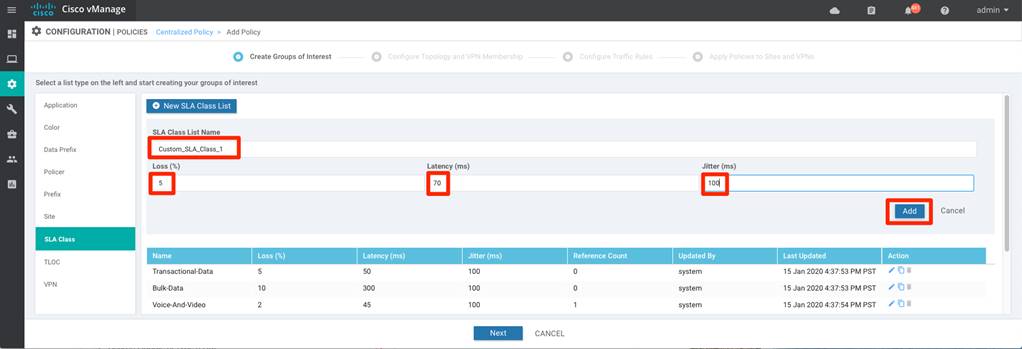
In case the pre-defined SLA class does not fit the deployment requirements, Click New SLA Class List to add additional list
Input the SLA Class List Name and Loss, Latency, Jitter value requirement for the application family and click Add.
Step 4. Repeat the previous step to create any additional SLA Class needed
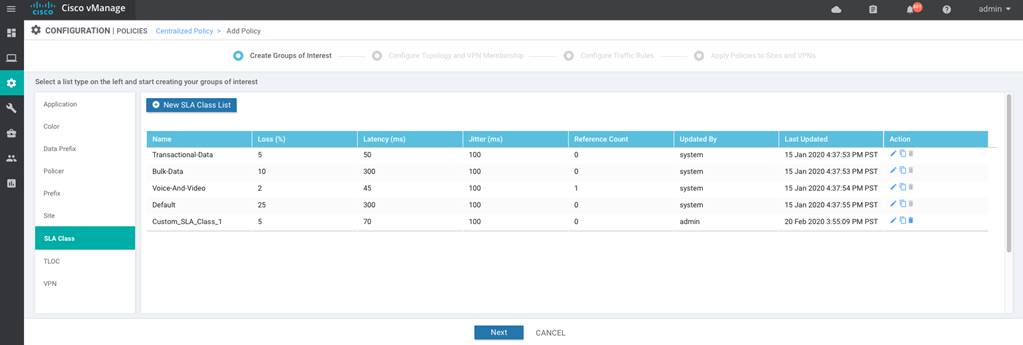
| Note that any number of SLA Class can be created, but only 4 SLA class can be associated to the Application Aware Routing policy. Please refer to the Software Release Notes for the latest supported number of SLAs for the version in use. |
Procedure 3. Create Site List
The Site list defines all the sites in the SD-WAN environment. This site-list would be used in the Application-Aware Routing policy to enforce the policy, influencing WAN Edge devices part of the selected site(s).
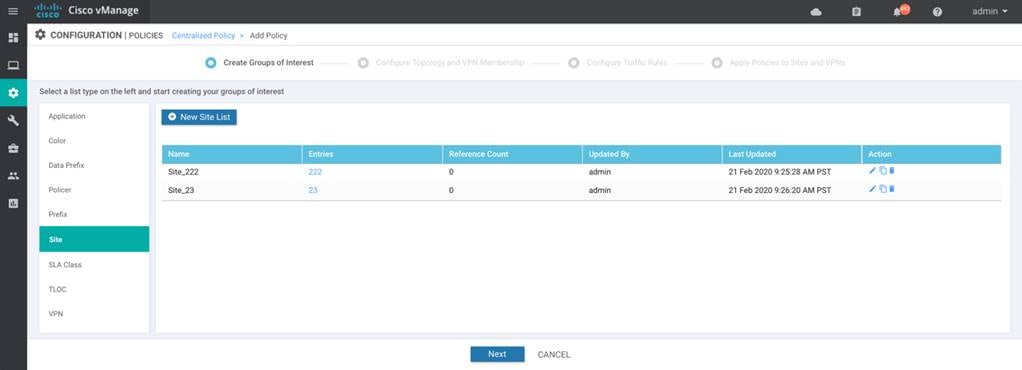
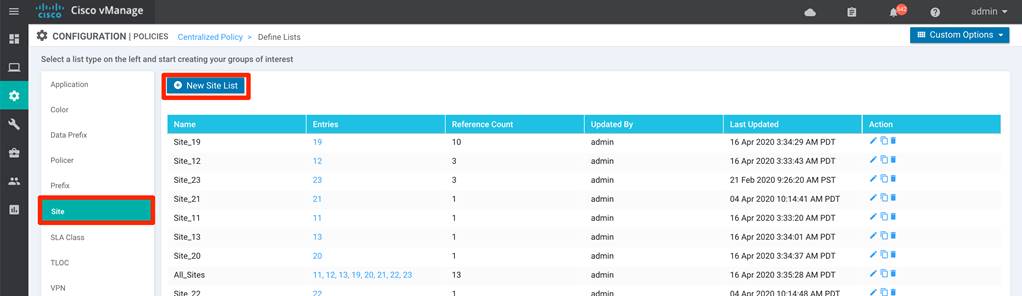
Step 1. To create Site List, select Site from the left panel and create Site list by clicking New Site List
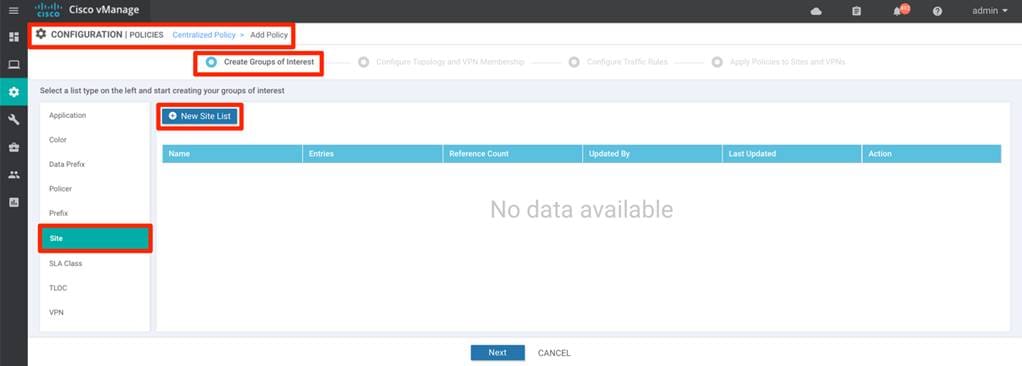
Input the Site List Name and Add Site. click Add.
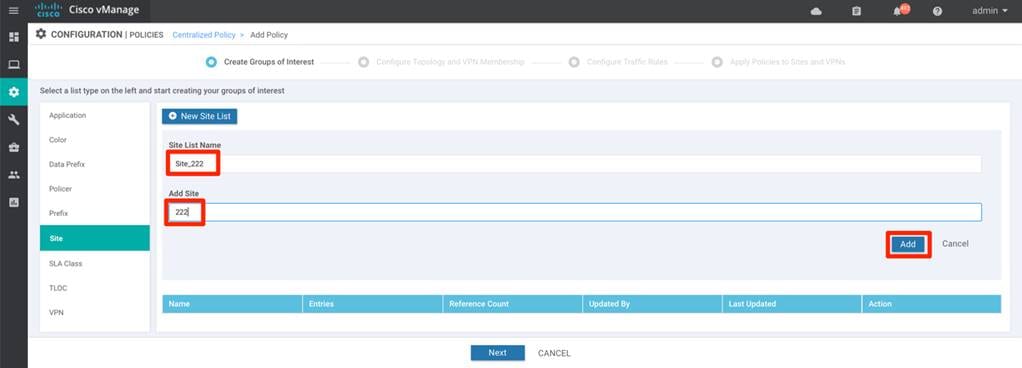
Step 2. Repeat above step to add additional sites
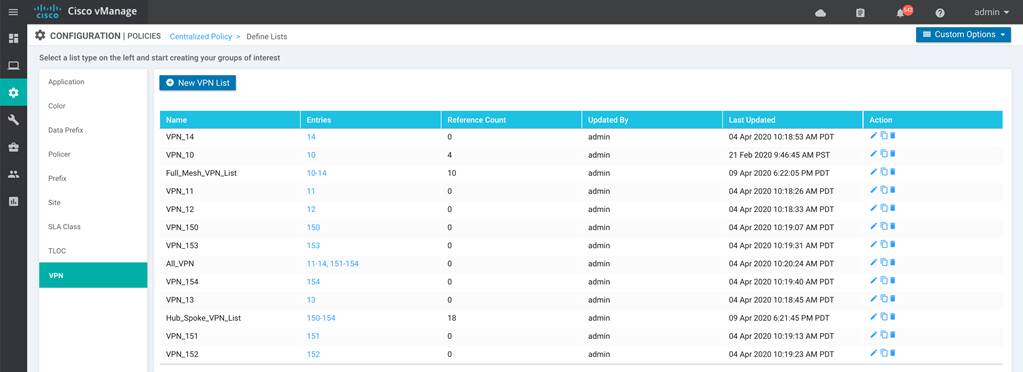
Procedure 4. Create VPN List
The VPN list defines the service VPN deployed in the SD-WAN environment. This VPN-list would be used in the Application-Aware Routing policy to enforce the policy, influencing WAN Edge devices that are associated with the selected VPN.
Step 1. To create VPN List, select VPN from the left panel and click New VPN List
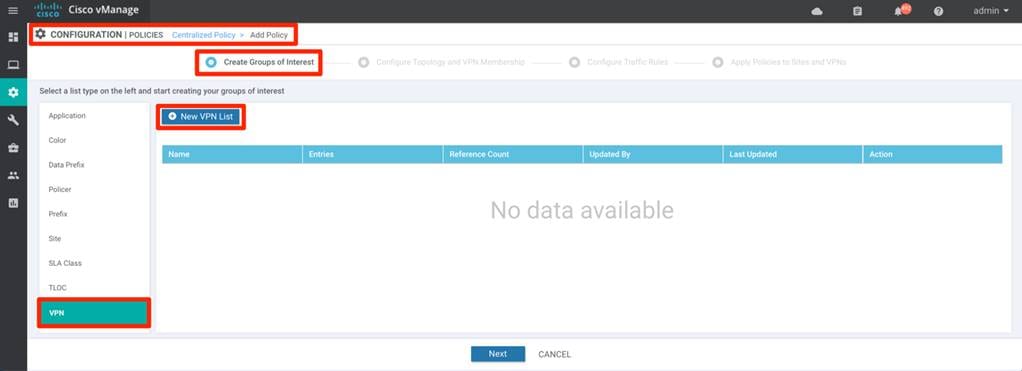
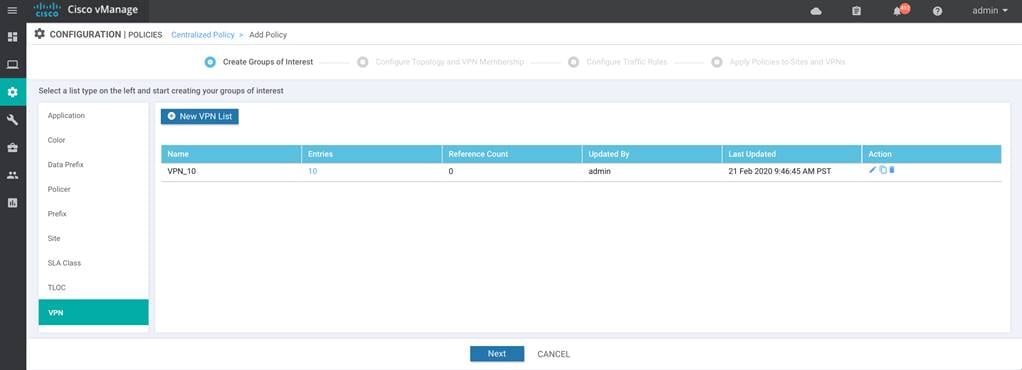
Input the VPN List Name and Add VPN. click Add.
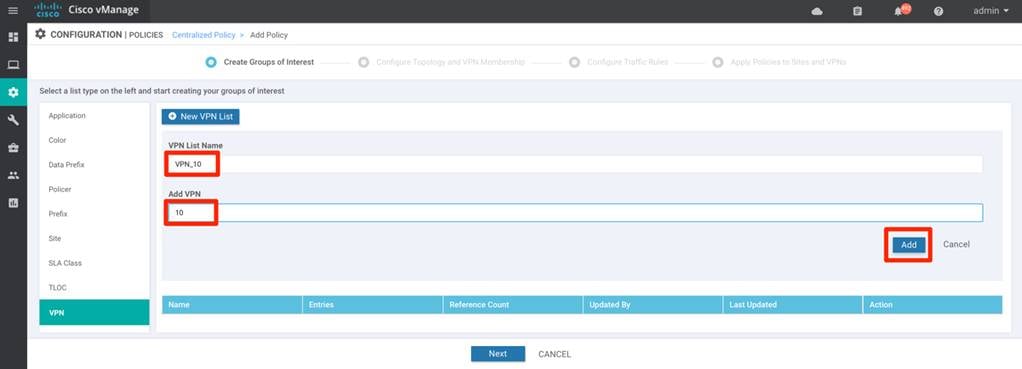
Step 2. Repeat previous step to add additional VPNs
Procedure 5. Configuring Application-Aware Routing policy
This procedure walks through steps to create Application-Aware Routing policy.
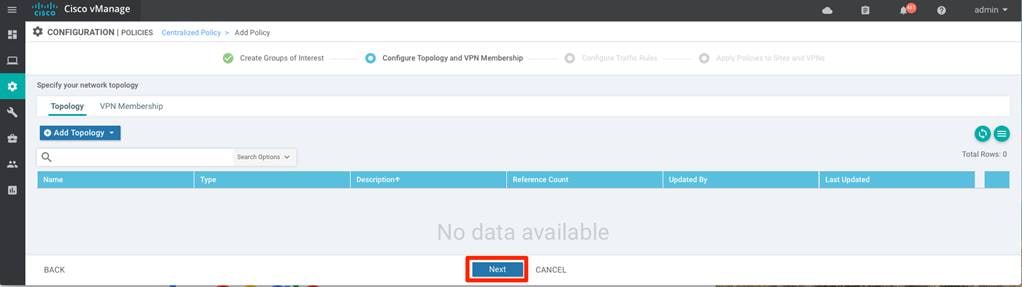
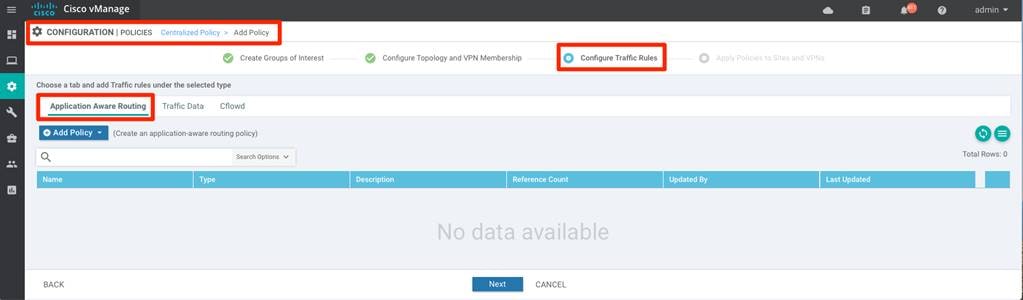
Step 1. Click Next twice to navigate the Centralized Policy wizard to Configure Traffic Rules and select the Application Aware Routing tab.
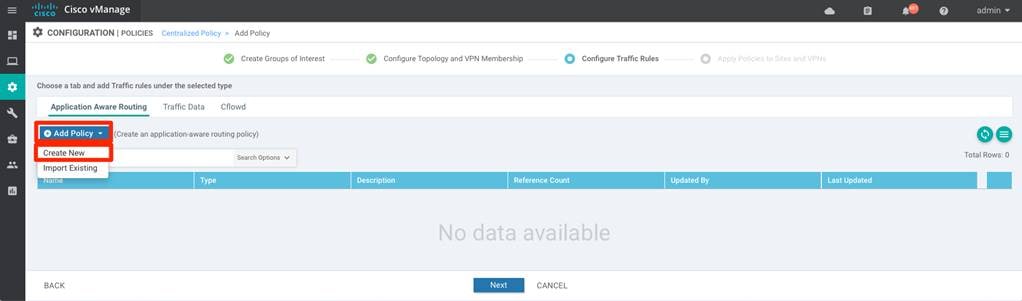
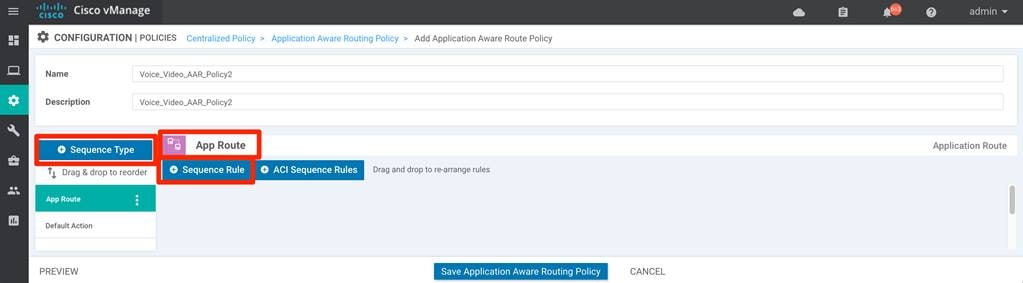
Step 2. Click Add Policy > Create New to create a new Application Aware Routing Policy.
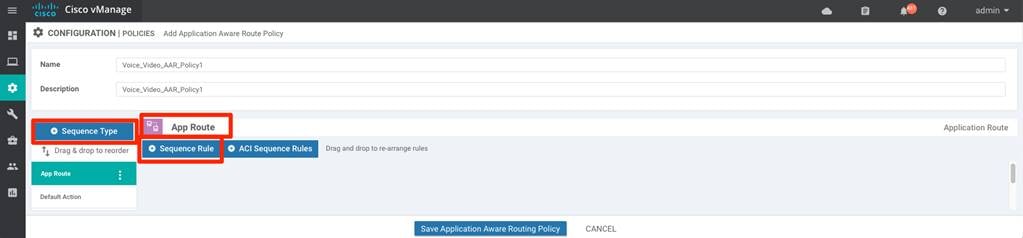
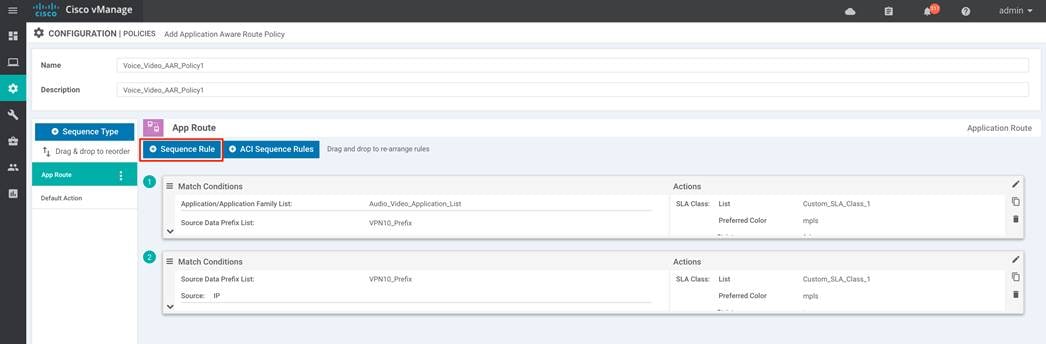
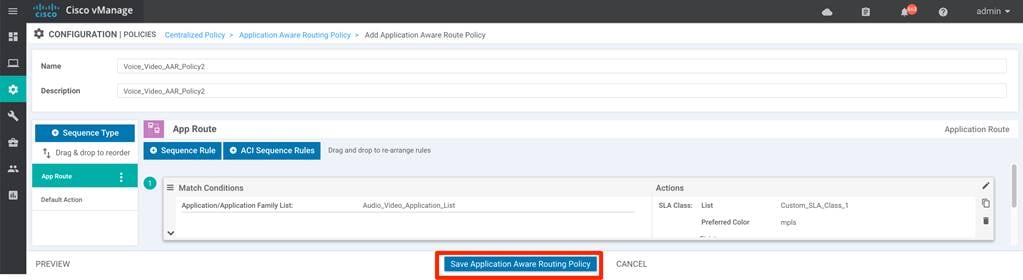
Input the Name and Description for the policy. To add the policy, click Sequence Type and under App Route tab select Sequence Rule option
Step 3. select the traffic by matching on the options available in the Match tab.
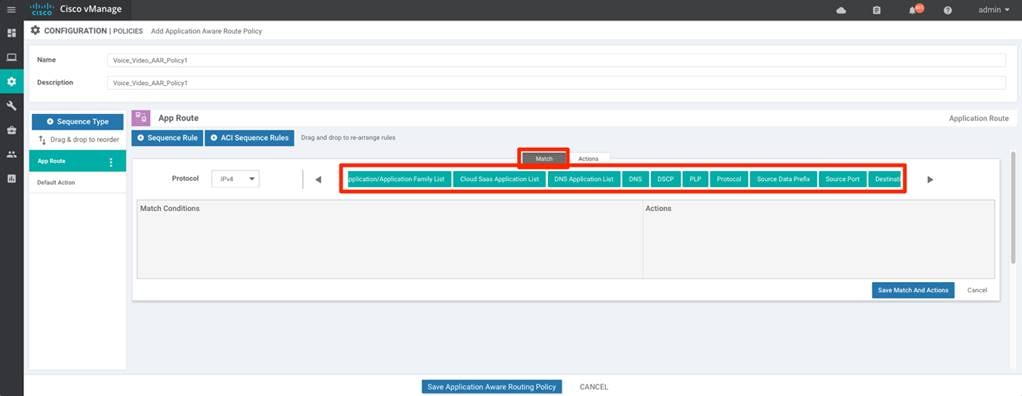
The match criteria matches the data traffic originating from the service side. Below table lists the different options available to match on:
| Possible Match options |
|
Description |
| Application / Application Family List |
Pre-defined / custom-defined list |
Leverage the pre-defined Application/Applications-list or create custom application-list to match (defined in the guide steps 1 -5). |
| Cloud SaaS Application List |
Pre-defined list |
Leverage the pre-defined Cloud-Saas Application list |
| DNS Application List |
Pre-defined / custom-defined list |
DNS application list is used to split DNS lookup per the selected application-lists. |
| DNS |
DNS request / response option |
DNS packets. |
| DSCP |
0-63 |
Pre-configured traffic with DSCP values through QoS policy on the service-side traffic can be used to match the traffic. |
| PLP |
High / Low options |
Pre-configured traffic part of the Packet Loss Priority (PLP) queue, configured part of Policer QoS section policy, can be matched. By default, packets have a PLP value of low. To set the PLP value to high, apply a policer that includes the exceed remark option. |
| Protocol |
Protocol number |
Traffic with defined protocol number can be matched |
| Source Data Prefix |
custom-defined data prefix |
Pre-defined custom data-prefix of the traffic can be matched on |
| Source Port |
Port number |
Data traffic with defined port number can be matched. |
| Destination Data Prefix |
custom-defined data prefix |
Pre-defined custom data-prefix of the traffic can be matched on |
| Destination Port |
Port number |
Data traffic with defined port number can be matched. |
For this guide, lets pick the previously created custom Application Family list.
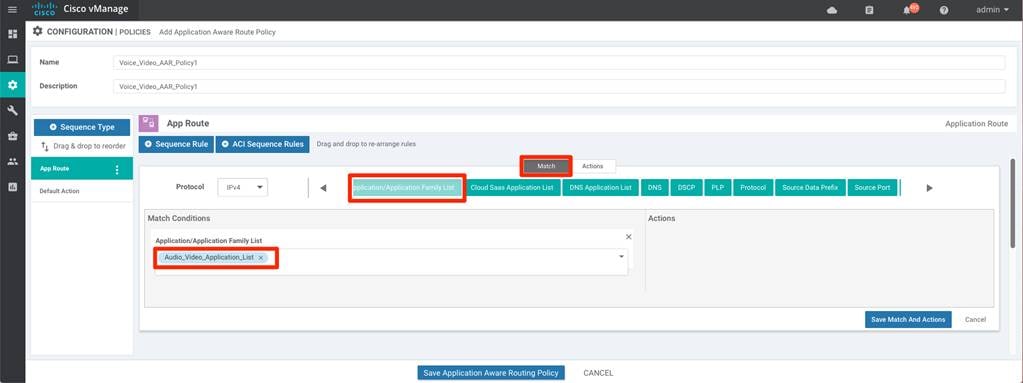
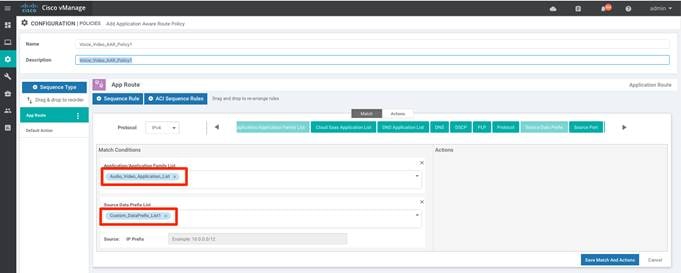
Note that multiple match statements can be configured within the same sequence to select more specific traffic, as shown below
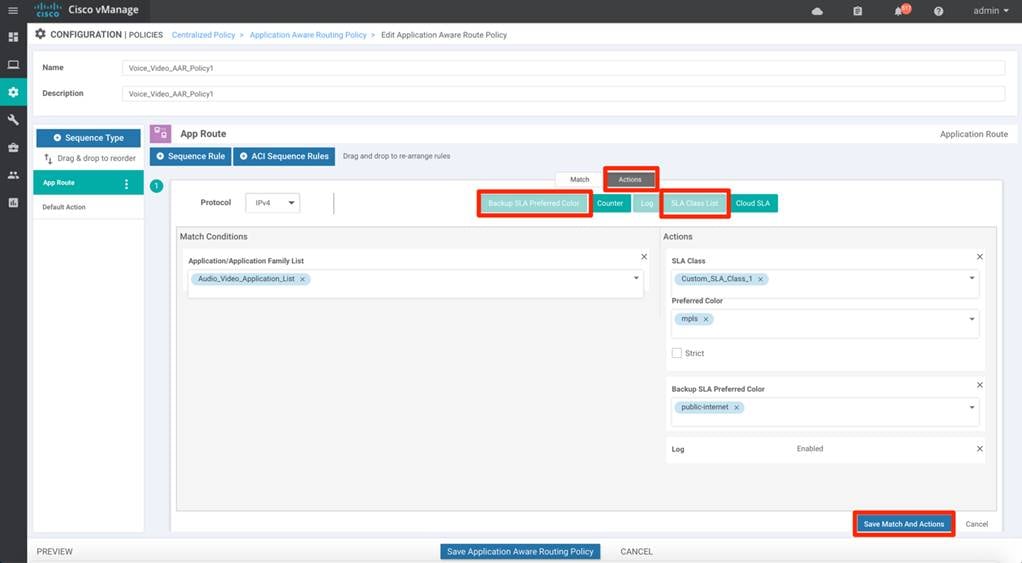
Step 4. Select the preferred Actions to be performed for the matched traffic.
| Possible Action options |
|
| Backup SLA Preferred Color |
choose predefined color(s) that traffic is forwarded if the SLA is not met |
| Counter |
Specify name to store the count for matching packets |
| Log |
If enabled, syslog message is generated first time a packet flow is logged and every 5 minutes thereafter, as long as the flow is active. ‘show log’ can be leveraged to view the log. |
| SLA Class List |
Select the custom/pre-defined SLA Class List and choose preferred color(s) that traffic gets forwarded as long as the specified SLA is satisfied. |
| Cloud SLA |
Enabled (if selected) |
App Route policy actions statement allows us to define Preferred Color list as long as the SLA class is satisfied and action if SLA is breached, either to use the Backup SLA Preferred Color or drop the traffic by enabling the Strict option.

App Route policy actions statement allows us to define Preferred Color list as long as the SLA class is satisfied and action if SLA is breached, either to use the Backup SLA Preferred Color or drop the traffic by enabling the Strict option.
Select SLA class List, Backup SLA Preferred Color option from the Actions. Select the previously created SLA Class, Preferred Color and Backup SLA Preferred Color from the drop-down menu.
Click Save Match and Actions option.
Step 5. Multiple App-Route rule can be defined part of the same policy, each rule is recognized by different sequence number, each rule containing a match-action pair defining the preferred treatment for the classified traffic. The data-traffic matching a sequence rule (executed from low to high sequence number), executes the appropriate action and exists the policy.
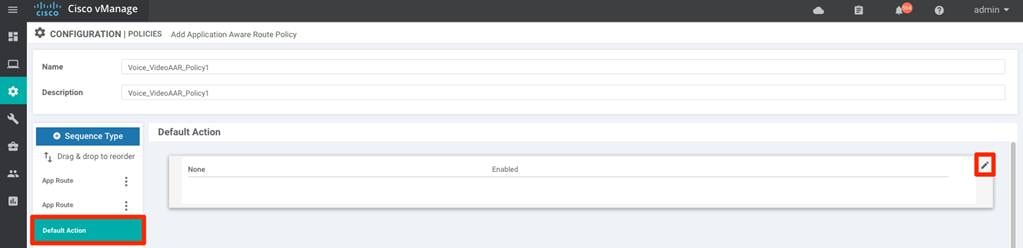
If no policy matches the traffic, Default Action rule is applied for the traffic. The WAN Edge behavior for Default Action is to perform load-balance the traffic across all available WAN transports
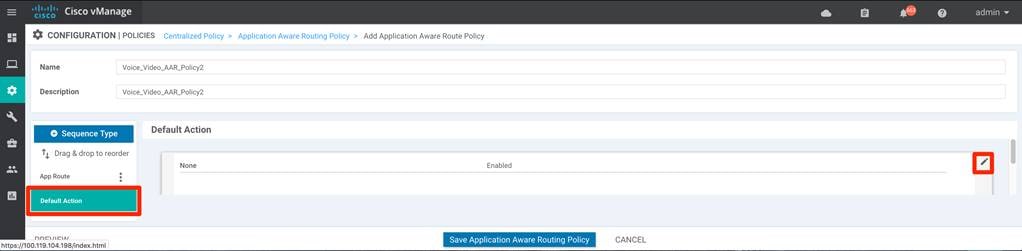
Step 6. (optional) Changing the Default Action behavior.
Modify the default behavior to redirect the data traffic to a preferred WAN transport that meets the specified SLA class list.
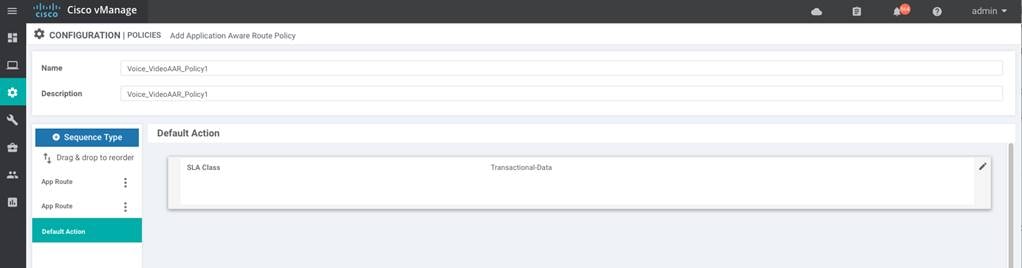
Click the Default Action and click Edit option.
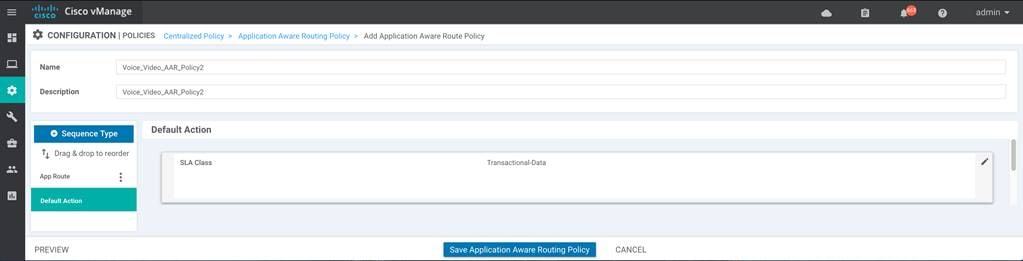
select the SLA Class List and select the appropriate SLA Class from the drop-down menu. Click Save Match and Actions option.
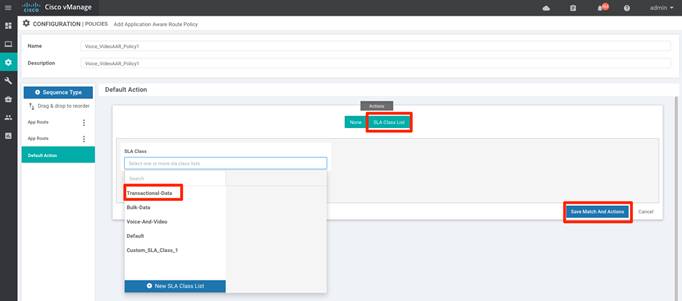
| Tech tip |
| If no WAN transports satisfies the selected SLA class in the default action, the WAN Edge device will load-balance the data traffic across all the available links. |
Step 7. Click Save Application Aware Routing Policy and then Next.

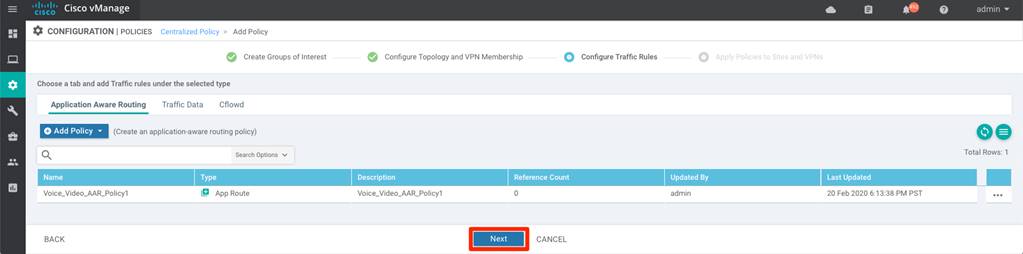
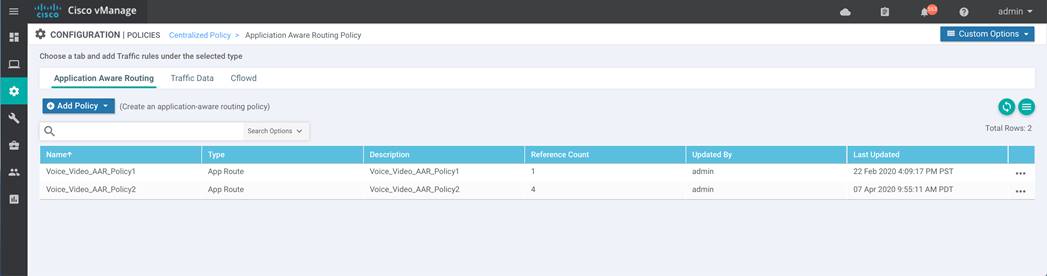
Step 8. Create any additional Application-Aware Routing policies as shown in previous steps if necessary.
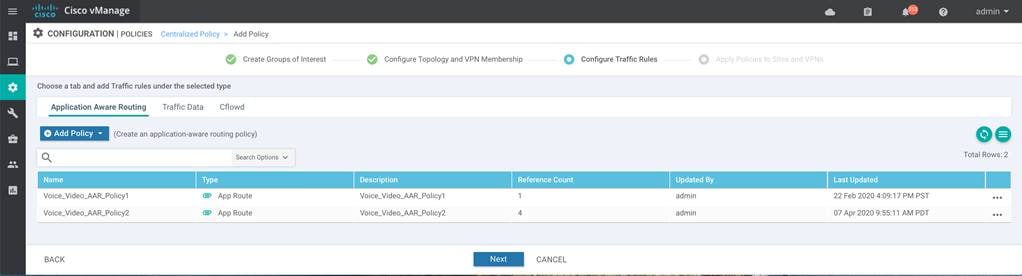
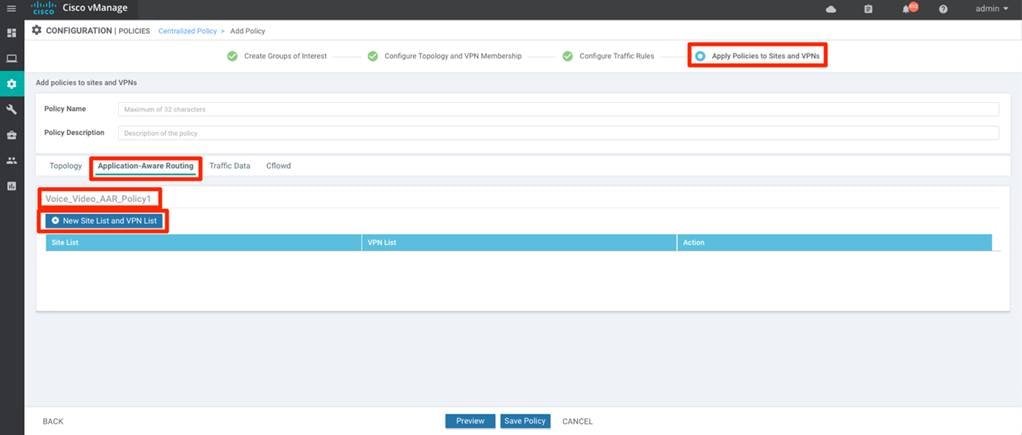
Step 9. Final step in configuring the Application Aware Routing Policy is to choose the Site List and VPN list for the policy to be associated with
In the Centralized Policy wizard, select Next to navigate to Apply Policies to Sites and VPNS and select Application-Aware Routing tab.
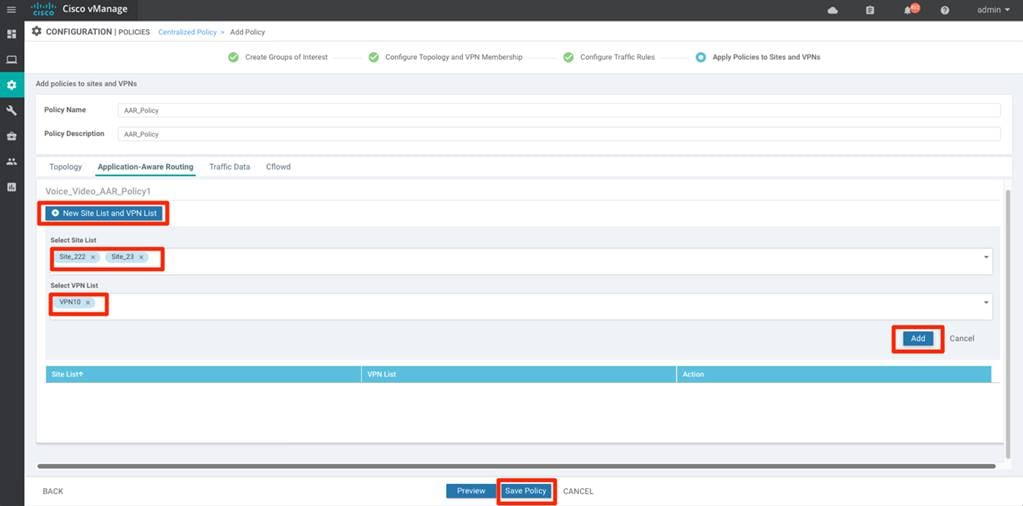
Input Policy Name and Policy Description and under the previously created App-Aware policy section, click the New Site List and VPN List option.
Select the previously defined Site List and VPN List. Click Add and click Save Policy.
Step 10. Activate the policy
Configuring the Application Aware Routing policy does not push the policy to vSmart controller. Final step is to configure the vSmart controller and enforce the policy by activating the policy.
In vManage, navigate to Configuration > Policies > Centralized Policy. Choose the configured Application Aware Routing Policy, on the far right-side select the three dots (…) to the right of each table row and select Activate option from the menu.
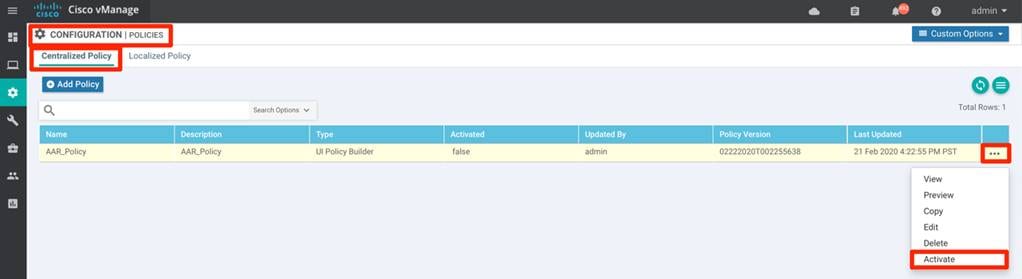
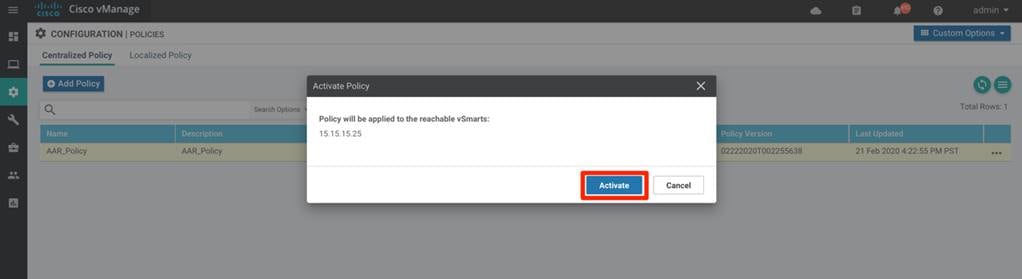
Pop-up window will ask for confirmation to push the configuration to all vSmart controllers for enforcement. Click Activate

Process: Appending Application-Aware Routing policy
It is important to note that only one Centralized Policy can be associated and activated in the SD-WAN environment. The centralized policy can have multiple policies embedded within the same policy.
Deployments with an existing active centralized policy can add the Application-Aware Routing policy to the existing policy. This process walks through procedure needed to append the Application-Aware routing policy
Creating Application Aware Routing policies consists of defining the three core components:
● Identification – Classify the traffic / Application group of interest.
● Application SLA Requirement – Defining the application SLA requirements.
● Application-Aware Routing Policy – Policy maps the classified traffic to the transport tunnel based on the defined SLA requirement.
On creating the policy, associate and activate the centralized policy to appropriate Site list(s) and VPN list(s).
Procedure 1. Identification – Classify the traffic / Application group of interest.
The below procedure walks through steps needed to classify the traffic.
Step 1. In vManage, navigate to Configuration > Policies > Centralized Policy. Click Custom Options from the top right menu options and select Lists from the Centralized Policy section.

Step 2. Select Application from the left panel and click New Application List
Select the Application or Application Family and choose appropriate option from the drop-down option. Provide an Application List Name and Click Add.
Step 3. Alternatively, to previous step, network administrator can match on Data Prefix to identify the traffic.
To define the data prefix. In vManage, navigate to Configuration > Policies > Centralized Policy. Click Custom Options from the top right menu options and select Lists from the Centralized Policy section.

select the Data Prefix option from the List type on the left side panel, and click New Data Prefix List
Input the Data Prefix List Name and select either IPv4 / IPv6 from the Internet Protocol option and add the prefix that needs to be matched and select Add

Procedure 2. Define Application Service Level requirements.
This procedure walks through steps needed to define custom SLA class.
Step 1. In vManage, navigate to Configuration > Policies > Centralized Policy. Click Custom Options from the top right menu options and select Lists from the Centralized Policy section.

Step 2. select the SLA Class option from the List type on the left side panel, and click New SLA Class List
Input the SLA Class List Name and Loss, Latency, Jitter value requirement for the application and click Add.

Step 3. Create additional SLA Class as shown in the previous step, if needed.

| Tech tip |
| Any number of SLA Class can be created, but only 4 SLA class can be associated to the Application Aware Policy. Please refer to the corresponding version Release Notes for the latest supports number of SLAs. |
Procedure 3. Create Site List
The Site list defines the sites in the SD-WAN environment. This site list can be used to enforce the Application-Aware Routing to influence WAN Edge devices in the specified site(s).
Step 1. In vManage, navigate to Configuration > Policies > Centralized Policy. Click Custom Options from the top right menu options and select Lists from the Centralized Policy section.
Step 2. Select Site from the left panel and create Site list by clicking New Site List
Input the Site List Name and Add Site. click Add

Step 3. Add additional sites by clicking the New Site List.

Procedure 4. Create VPN List
The VPN list defines the VPN defined in the SD-WAN environment. This VPN list can be used to enforce the Application-Aware Routing to influence traffic in the specified VPN.
Step 1. In vManage, navigate to Configuration > Policies > Centralized Policy. Click Custom Options from the top right menu options and select Lists from the Centralized Policy section.
Step 2. Select VPN from the left panel and create VPN list by clicking New VPN List

Input the VPN List Name and Add VPN. click Add.
Step 3. Add any additional VPN by clicking the New VPN List.
Procedure 5. Configuring Application-Aware Routing policy
This procedure walks through the steps needed to create Application-Aware Routing policy. The policy binds the previously created traffic class to the specified WAN Edge device transport tunnel that satisfies the selected SLA class requirements.
Step 1. In vManage, navigate to Configuration > Policies > Centralized Policy. Click Custom Options and select Traffic Policy from the Centralized Policy section.
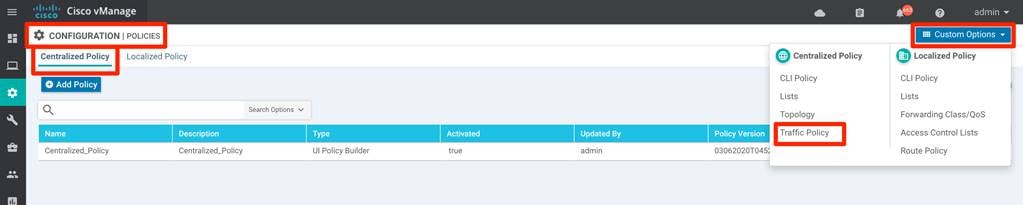
Step 2. Select the Application Aware Routing tab and select Add Policy > Create New

Step 3. Input the Name and Description for the policy and click Sequence Type and under App Route tab select Sequence Rule option.
Step 4. Select the match statement options to match the application/traffic set by clicking on the options available.
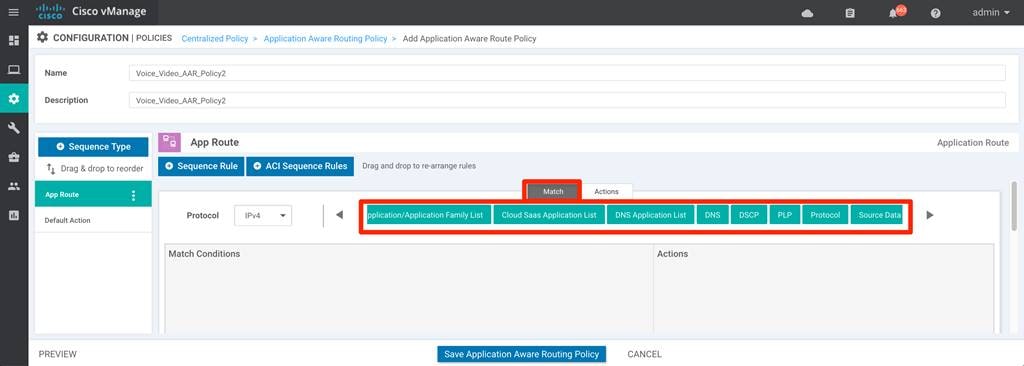
Data traffic originating from the service side can be classified and matched. Below table points on to different possible options to match on:
| Possible Match options |
|
Description |
| Application / Application Family List |
Pre-defined / custom-defined list |
Leverage the pre-defined Application/Applications-list or create custom application-list to match (defined in the guide steps 1 -5). |
| Cloud SaaS Application List |
Pre-defined list |
Leverage the pre-defined Cloud-Saas Application list |
| DNS Application List |
Pre-defined / custom-defined list |
DNS application list is used to split DNS lookup per the selected application-lists. |
| DNS |
DNS request / response option |
DNS packets. |
| DSCP |
0-63 |
Pre-configured traffic with DSCP values through QoS policy on the service-side traffic can be used to match the traffic. |
| PLP |
High / Low options |
Pre-configured traffic part of the Packet Loss Priority (PLP) queue, configured part of Policer QoS section policy, can be matched. By default, packets have a PLP value of low. To set the PLP value to high, apply a policer that includes the exceed remark option. |
| Protocol |
Protocol number |
Traffic with defined protocol number can be matched |
| Source Data Prefix |
custom-defined data prefix |
Pre-defined custom data-prefix of the traffic can be matched on |
| Source Port |
Port number |
Data traffic with defined port number can be matched. |
| Destination Data Prefix |
custom-defined data prefix |
Pre-defined custom data-prefix of the traffic can be matched on |
| Destination Port |
Port number |
Data traffic with defined port number can be matched. |
In this guide, we would pick the previously created custom Application Family list.
Multiple match statements can be configured within the same sequence to select more specific traffic, as shown below:
Step 5. Select the Actions to be performed for the above matched traffic.
| Possible Action options |
|
| Backup SLA Preferred Color |
choose predefined color(s) that traffic is forwarded if the SLA is not met |
| Counter |
Specify name to store the count for matching packets |
| Log |
If enabled, syslog message is generated first time a packet flow is logged and every 5 minutes thereafter, as long as the flow is active. ‘show log’ can be leveraged to view the log. |
| SLA Class List |
Select the custom/pre-defined SLA Class List and choose preferred color(s) that traffic gets forwarded as long as the specified SLA is satisfied. |
| Cloud SLA |
Enabled (if selected) |
Application Aware Routing actions statement allows us to define Preferred Color list as long as the SLA class is satisfied and action to be performed in case the SLA is not met, either to use the Backup SLA Preferred Color or drop the traffic by enabling the Strict option.
Select SLA class List, Backup SLA Preferred Color option from the Actions. Select the previously created SLA Class, Preferred Color and Backup SLA Preferred Color from the drop-down menu.
Click Save Match and Actions option
Multiple App-Route rule can be defined part of the same policy, each rule recognized by sequence number, each rule containing a match-action pair defining the preferred treatment for the classified traffic. When the data-traffic matches a rule (executed from low to high sequence number), the appropriate action is applied for the classified traffic. If no policy matches the traffic, Default Action rule is applied for the traffic.
WAN Edge behavior for Default Action is to perform load-balance the traffic across all available WAN transports.
Step 6. (optional) Changing the Default Action behavior.
Modify the default behavior to redirect data traffic to the WAN transports that meets the selected SLA Class List in the Actions tab as shown below.
Click the Default Action from the Sequence Type section and click Edit option.
Select the SLA Class List and select the appropriate SLA Class from the drop-down menu. Click Save Match and Actions option.

| Tech tip |
| If none of the WAN transports satisfies the selected SLA class in the default action, the WAN Edge device will load-balance the data traffic across all the available links. |
Step 7. Click Save Application Aware Routing Policy.
Step 8. Create any additional Application Aware Routing policies if necessary.
Procedure 6. Associate and activate the Application-Aware Routing policy
To apply the App-Aware routing policy to the already existing centralized policy, create a copy of the existing activated policy and edit the copied policy. Making a copy of the existing policy allows administrators to keep the existing configured policy active, while making the new changes to the copied policy.
Step 1. In vManage, navigate to Configuration > Policies > Centralized Policy. Select the policy and click the three dots (…) and select Copy.
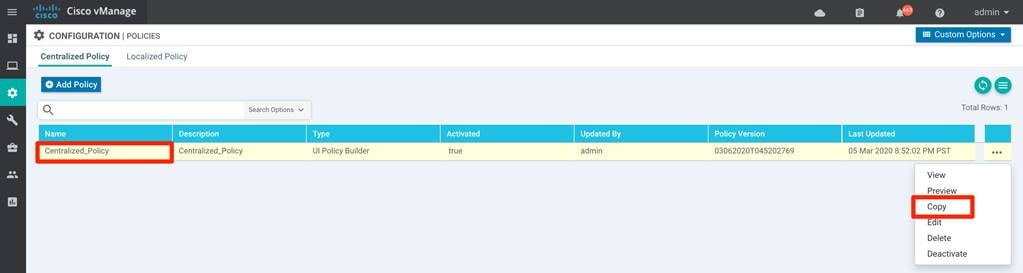
Step 2. Input the Policy Name and Description for the new policy and click Copy

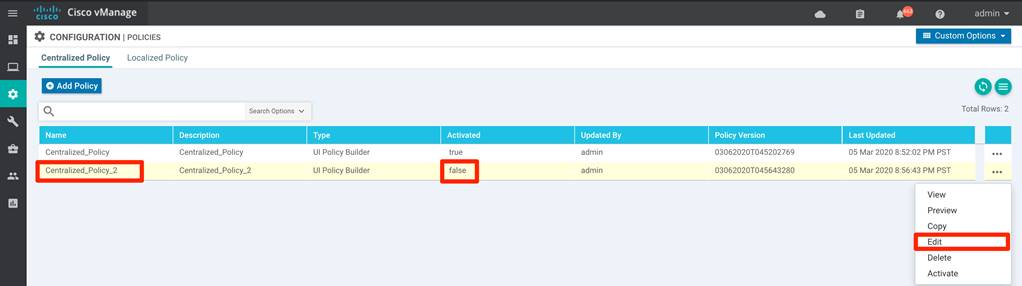
Step 3. Confirm that the newly created Policy is inactive (column Activated: false status) and then select the three dots (...) against the policy and choose Edit to add App-Aware routing policy.
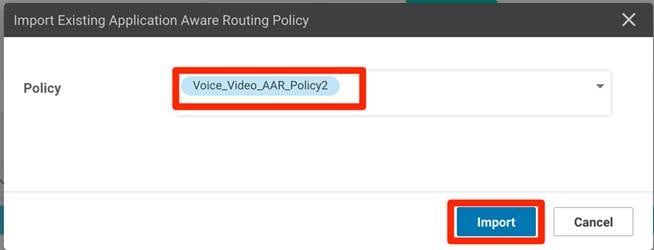
Step 4. Click Traffic Rules tab and choose Application Aware Routing and click Add Policy, select Import Existing option from the drop-down menu.

Select the policy created from the drop-down menu and click Import.
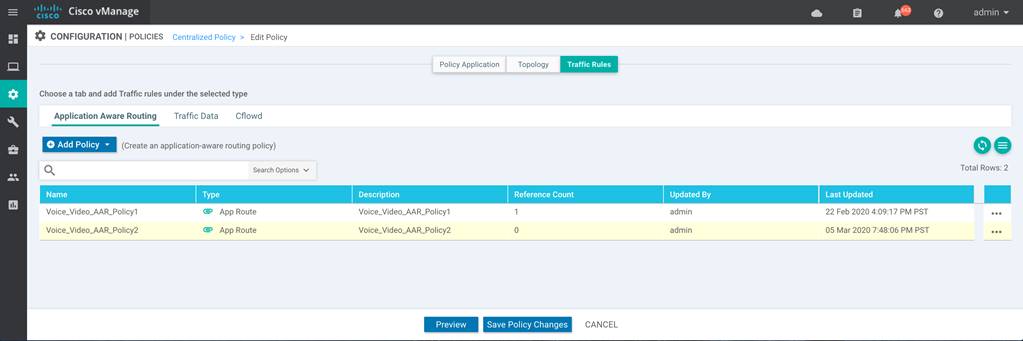
Step 5. Import any additional Application Aware Routing policies if necessary.
Step 6. Select the Policy Application and select the Application-Aware Routing tab.
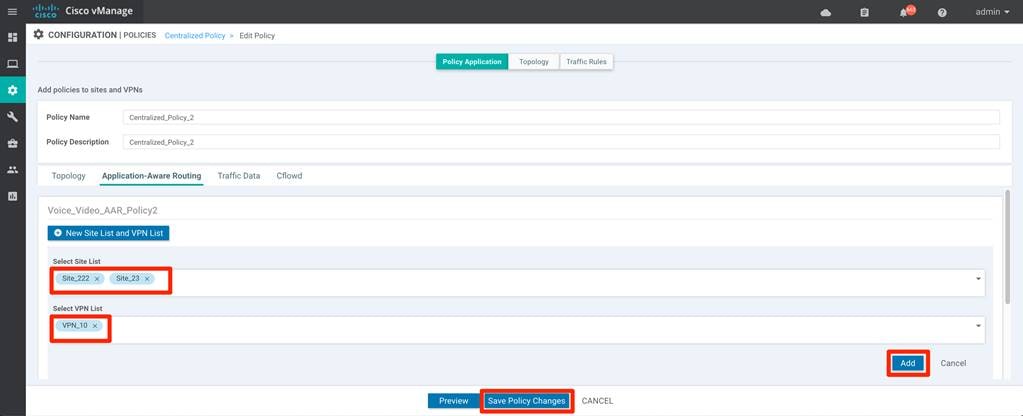
Under the imported App-Aware routing policy, click the New Site List and VPN List and select the appropriate Site List and the VPN List from the drop-down menu
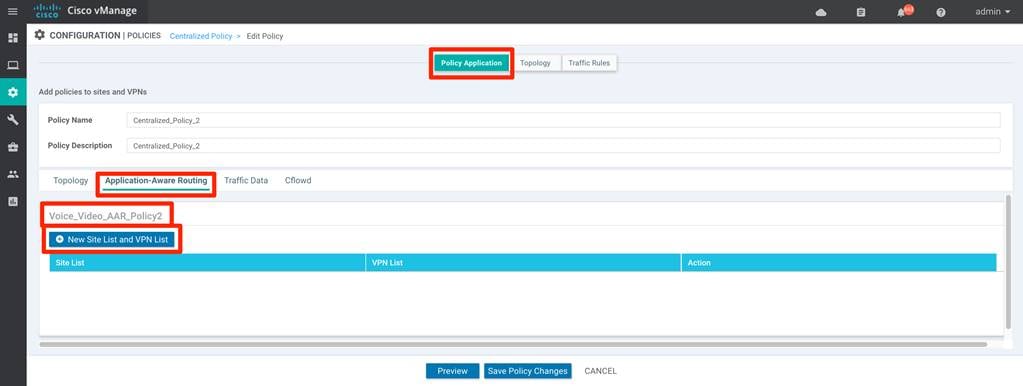
click Add and click Save Policy Changes.
Step 7. Activate the modified Centralized Policy.
Configuring and associating the Application Aware Routing policy does not push the policy to vSmart controller or enforce the policy in the SD-WAN environment. Final step is to activate the policy, which provisions the vSmart controller and enforces the policy.
In vManage, navigate to Configuration > Policies > Centralized Policy. Choose the newly configured centralized policy from the list, on the far right-side select the three dots (…) and select Activate option from the menu.
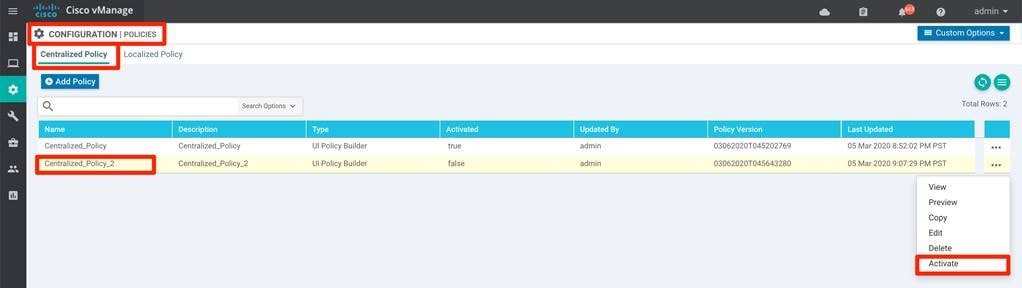
Pop-up window would ask for confirmation to push the configuration to all vSmart controllers for enforcement. Click Activate.
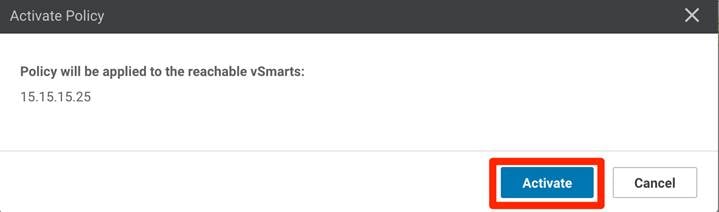
the new policy configuration is pushed to vSmart and the configuration is activated for enforcement.

With Application-Aware routing deployed and activated, this section covers steps to manage, monitor and troubleshoot the various component in the SD-WAN environment using vManage GUI.
Process: Monitor the Application-Aware Routing policy
Procedure 1. View the Application-Aware routing policy configuration
Step 1. View the activated centralized policy
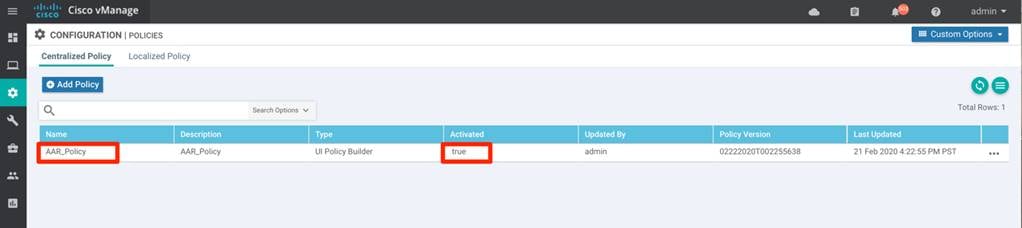
To confirm the centralized policy that contains Application-Aware Routing policy is activated, navigate to vManage > Configuration > Policies > Centralized Policy and the Activated section should be true.
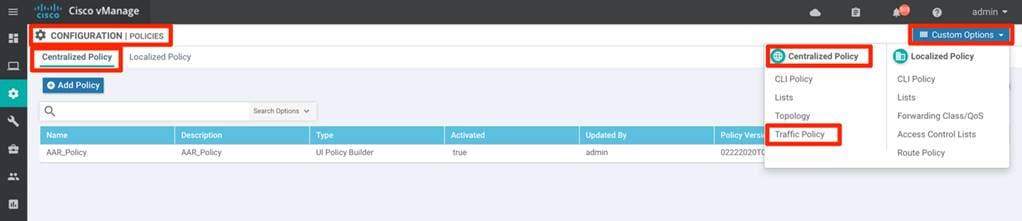
Step 2. View the Application-Aware routing policy from the vManage User Interface.
To view the Application-Aware Routing Policy, navigate to vManage > Configuration > Policies. Click the Custom Options on the top right corner and select the Centralized Policy > Traffic Policy.
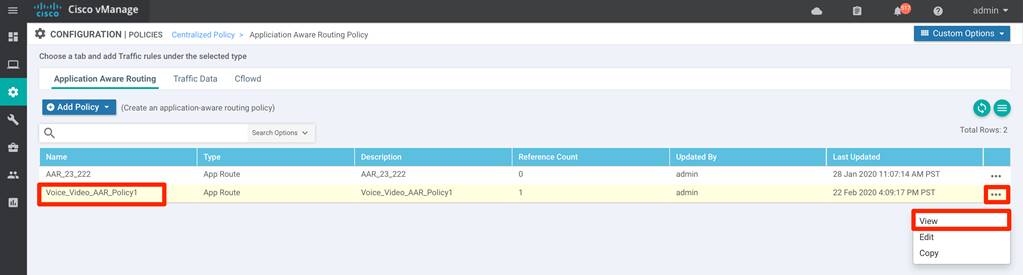
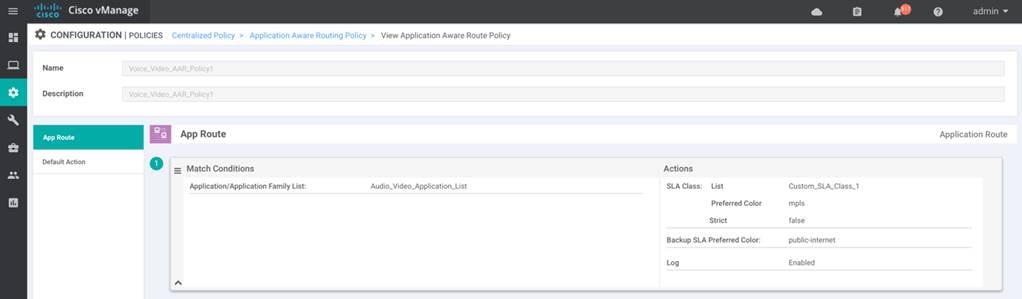
Click the three dots (…) to the right of each table row against the policy and select View from the options
Step 3. To verify the Application-Aware routing policy configuration on the vSmart controller
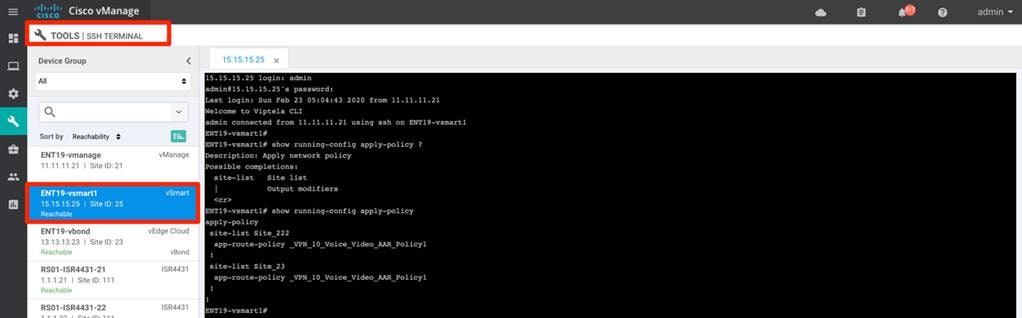
To view the Application-Aware Routing Policy, navigate to vManage, Tools > SSH Terminal. Select the vSmart controller and issue show running-config policy.

and show running-config apply-policy
Step 4. View the Application-Aware routing policy configured on the WAN Edge device.
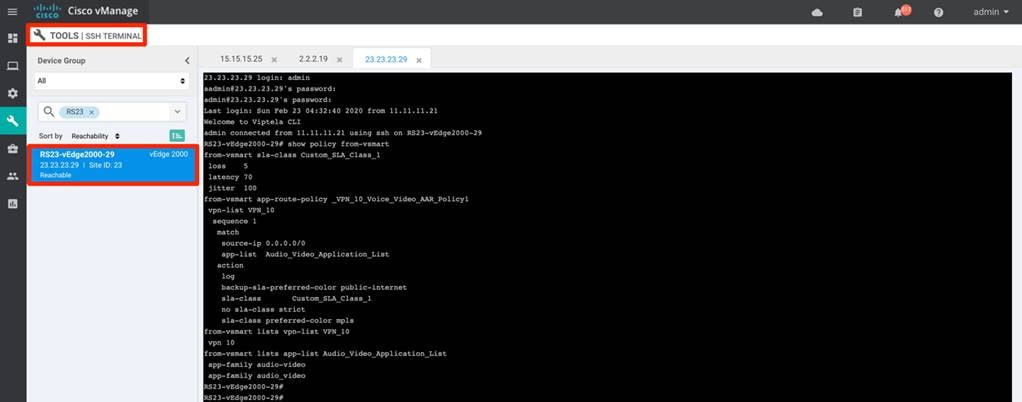
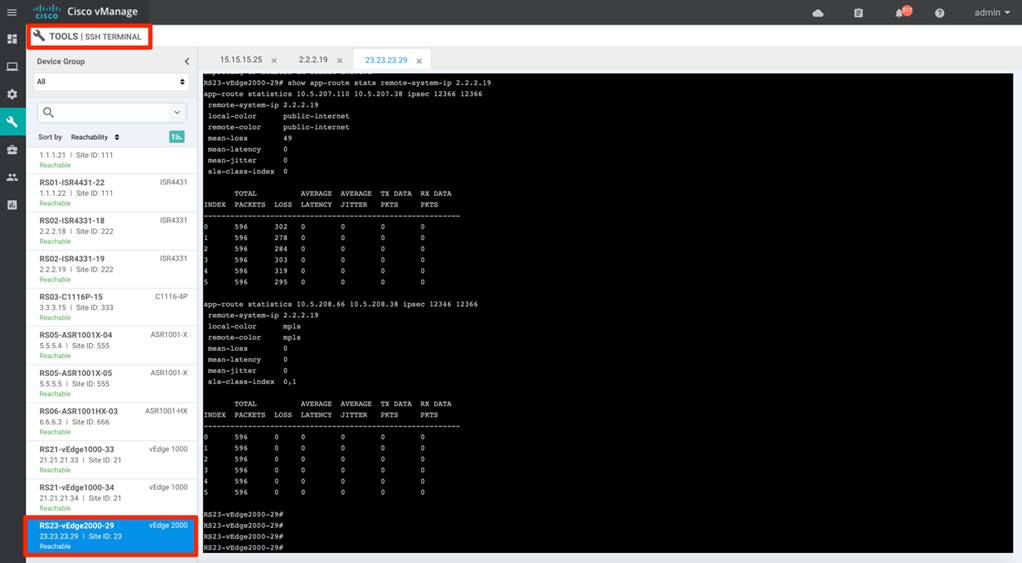
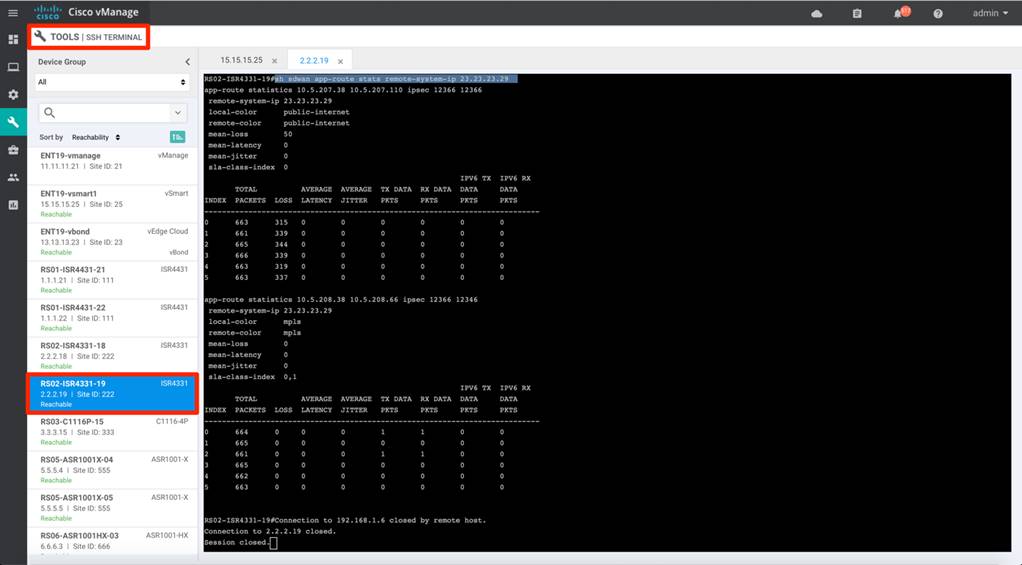
To view the Application-Aware Routing Policy configured on the WAN Edge device, navigate to vManage > Tools > SSH Terminal. Select the WAN Edge device and issue show sdwan policy from-vsmart on IOS-XE SD-WAN platform
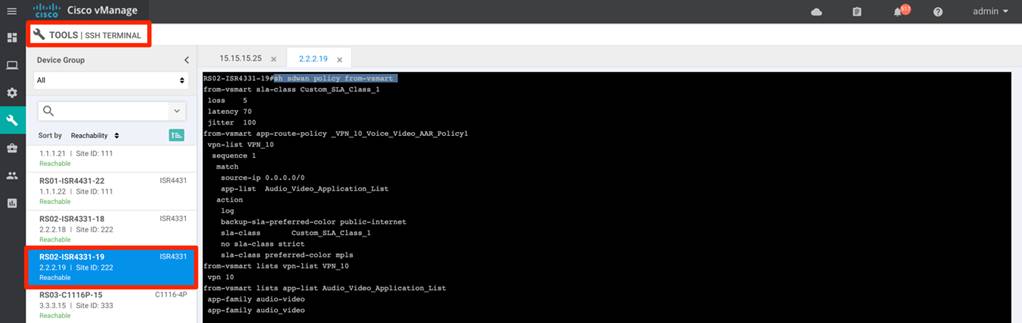
and show policy from-vsmart on Viptela platform.
Procedure 2. View the SLA configuration on the WAN Edge device
Step 1. View the SLA configured on the WAN Edge device.
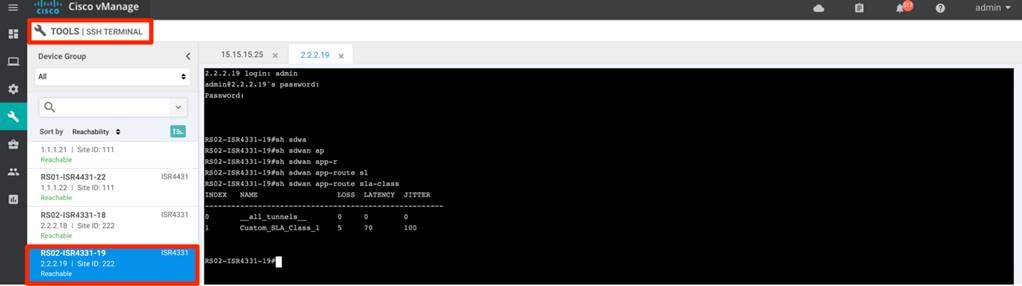
To view the SLA configured, navigate to vManage, Tools > SSH Terminal. Select the WAN Edge device and issue sh sdwan app-route sla-class on IOS-XE SD-WAN platform sh app-route sla-class on vipteal platform.
Process: Monitor the WAN transport path characteristics
Procedure 1. View the WAN transport path characteristics across the SD-WAN environment
SD-WAN transport tunnel characteristics across the SD-WAN environment or specific to the WAN Edge can be monitored from the vManage.
Step 2. Monitor transports health characteristics across the SD-WAN environment.
To view the tunnel characteristics across the SD-WAN infrastructure. Navigate to vManage > Dashboard > Main Dashboard > Transport Health widget.
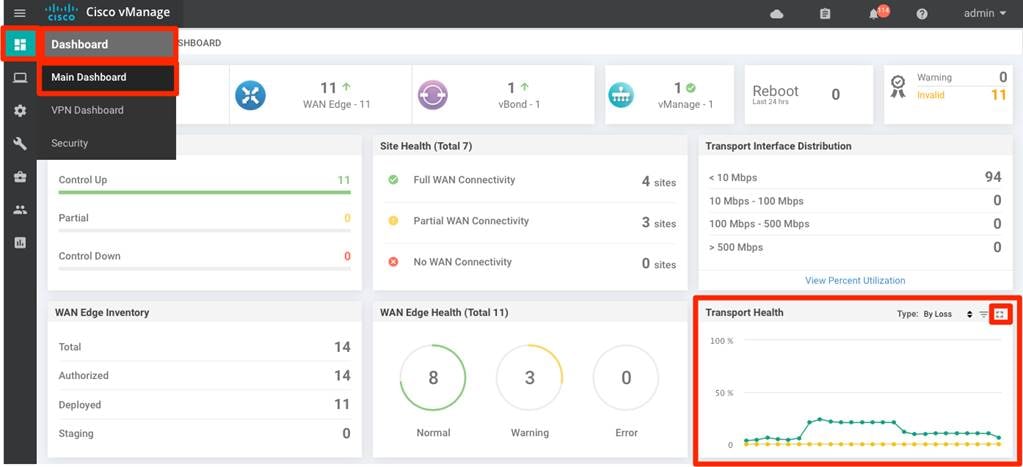
Step 3. Expand the widget by clicking the square icon in the top right corner of the Transport Health widget and select the Type option to view the chart By Loss, By Latency or by Jitter values and view the transport health over the maximum of past 7 days.

Procedure 2. View the path characteristics for the WAN Edge device
Step 1. Monitor WAN transport TLOC path characteristics for the WAN Edge device.
To view the tunnel characteristics on the WAN Edge device, navigate to vManage, Monitor > Network > WAN - Edge. select the WAN Edge device.

Step 2. click WAN > TLOC from the left panel options for the device.
Select the Chart options and choose Loss percentage or Latency/Jitter option. By default, the value is shown for 24hours, but can be changed.
Procedure 3. View the WAN transport tunnel characteristics for the WAN Edge device
Step 1. Monitor WAN transport Tunnel characteristics for the WAN Edge device
To view the tunnel characteristics on the WAN Edge device, navigate to vManage, Monitor > Network > WAN - Edge. click on the WAN Edge device.
Step 2. click WAN > Tunnel from the left panel options for the device.
Select the Tunnel Endpoints from the list and view the path characteristics – Jitter, Loss, Latency for all transports (mpls, public-internet).
By default, the value is shown for 24hours, but can be changed.
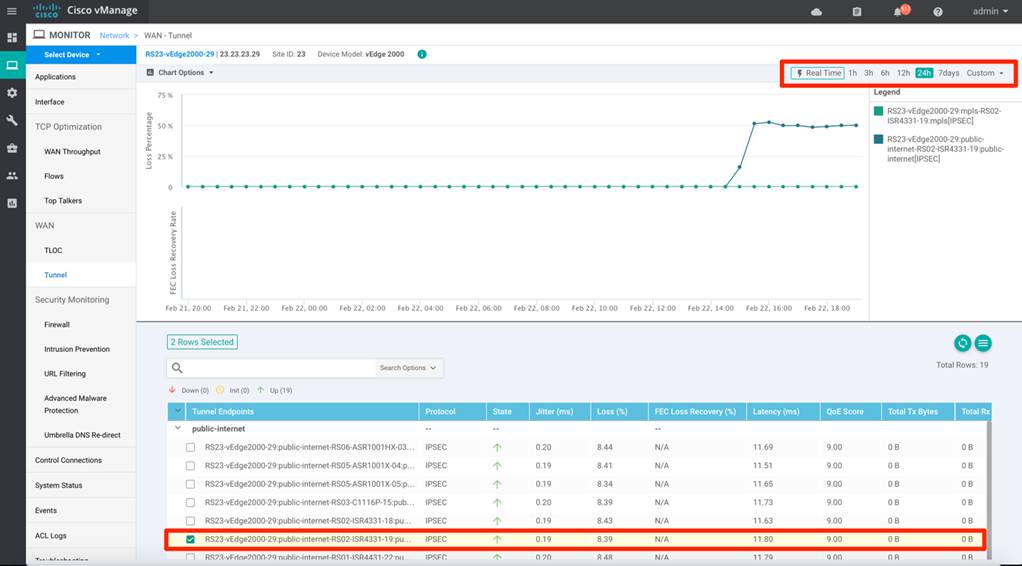
The chart can be changed to view the Latency/Jitter path characteristics by selecting the appropriate option form the Chart Options option as shown below.


Process: Monitor the Application-Aware Routing Statistics
Procedure 1. View the Application-Aware routing statistics across the SD-WAN environment
Application Aware statistics can be monitored for each WAN transport in the SD-WAN environment from vManage GUI.
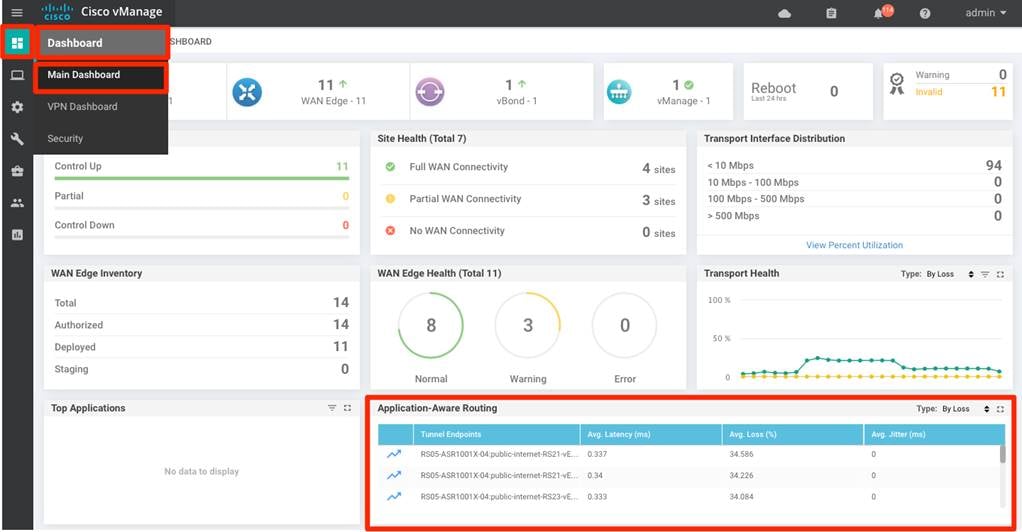
Step 1. Monitor the Application-Aware Routing across the SD-WAN environment.
To view the tunnel characteristics across the SD-WAN infrastructure, navigate to vManage >Dashboard > Main Dashboard > Application-Aware Routing widget.
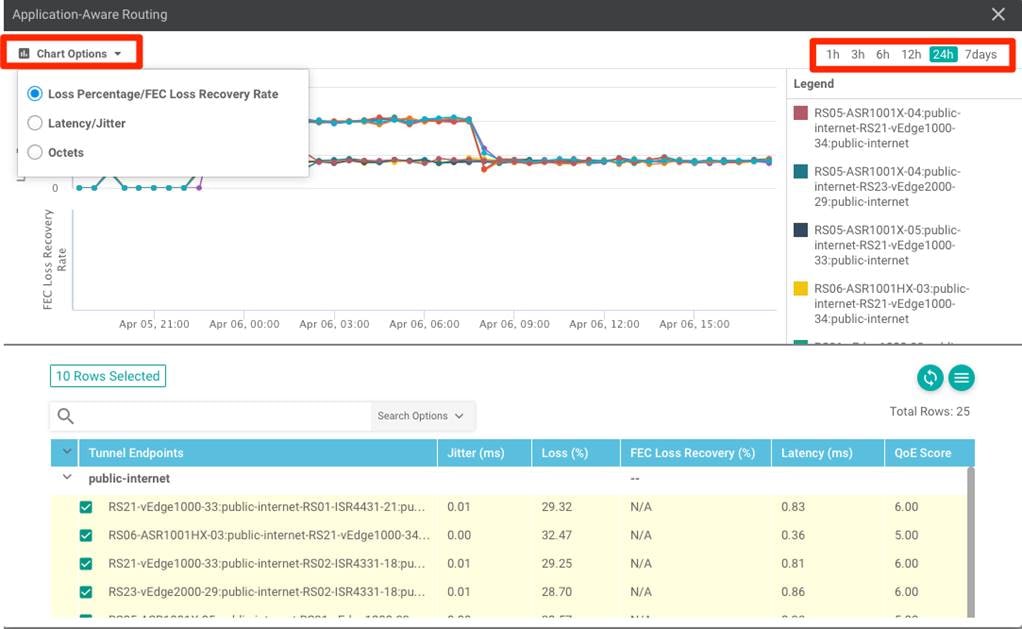
Step 2. expand the widget by clicking the square icon in the top right corner of the Application-Aware Routing widget and select the Chart options to view the Loss Percentage, Latency, Jitter as far as past 7 days on the WAN transports.
Procedure 2. View the Application-Aware routing statistics for the WAN Edge device
Step 1. Monitor the Application-Aware Routing statistics specific for the WAN Edge health.
To view the tunnel characteristics across the SD-WAN infrastructure, navigate to vManage > Dashboard > Main Dashboard > Application-Aware Routing widget.
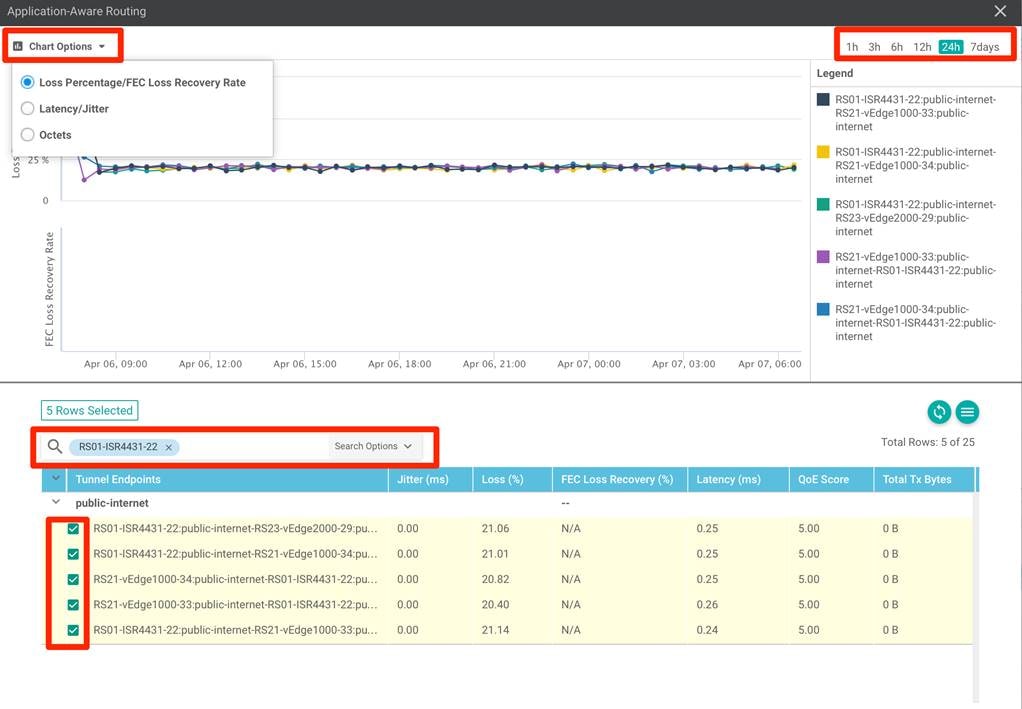
Expand the widget by clicking the square icon in the top right corner of the Application-Aware Routing widget and select the Chart options to view the Loss Percentage, Latency, Jitter. Search the WAN Edge device in the search options and select the transports to view in the chart
Step 2. View the App-route statistics on the WAN Edge device.
To view the App-route statistics, navigate to vManage > Tools > SSH Terminal. Select the WAN Edge device and issue show sdwan app-route stats on IOS-XE SD-WAN platform and show app-route stats on vipteal platform.
Process: Monitor Events – SLA, BFD, App-route changes
Procedure 1. View the Events – SLA, BFD, App-Route
Application-Aware routing specific events related to SLA changes, BFD events, and App-route events can be monitored across the SD-WAN environment from vManage GUI.
Step 1. To view the events on the WAN Edge device, navigate to vManage > Monitor > Network > WAN - Edge. click on the specific WAN Edge device.

Step 2. click Events from the left panel options for the device.
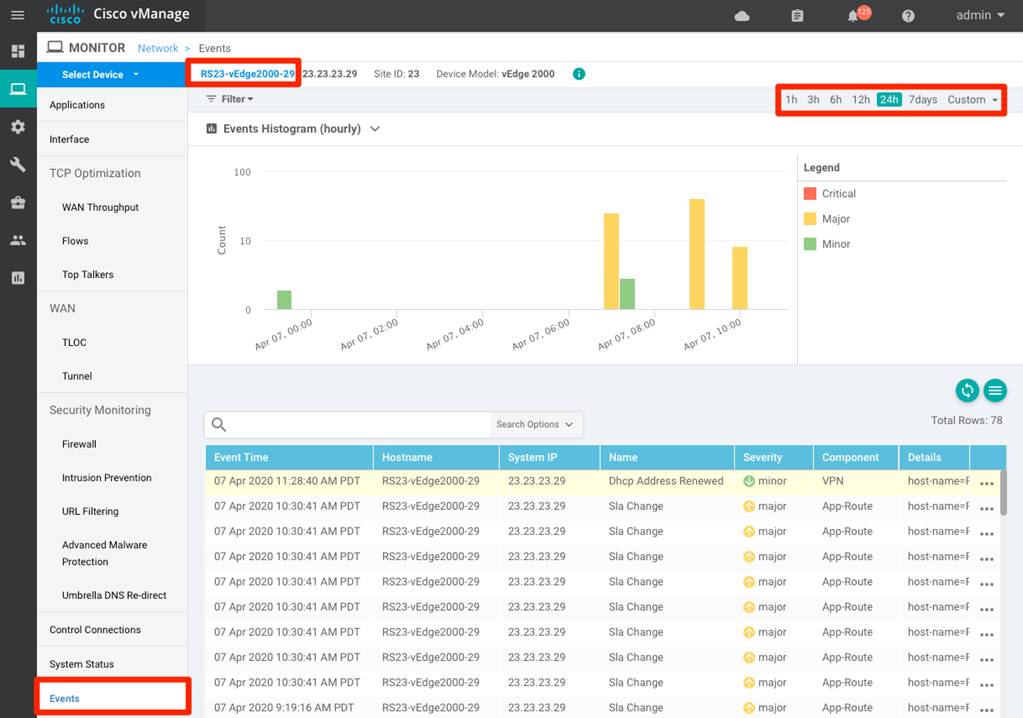
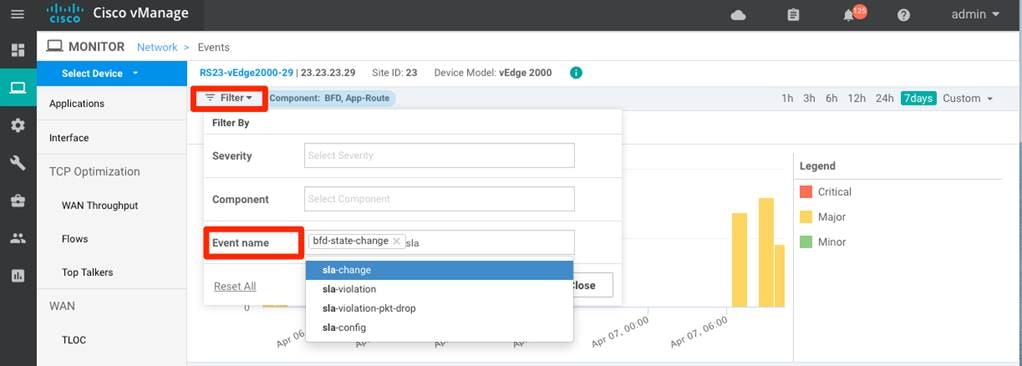
Step 3. Click Filter > Filter By > Component. choose BFD, App-route from the drop-down options and click Search.

Alternatively, you can also filter on Event Name as shown below
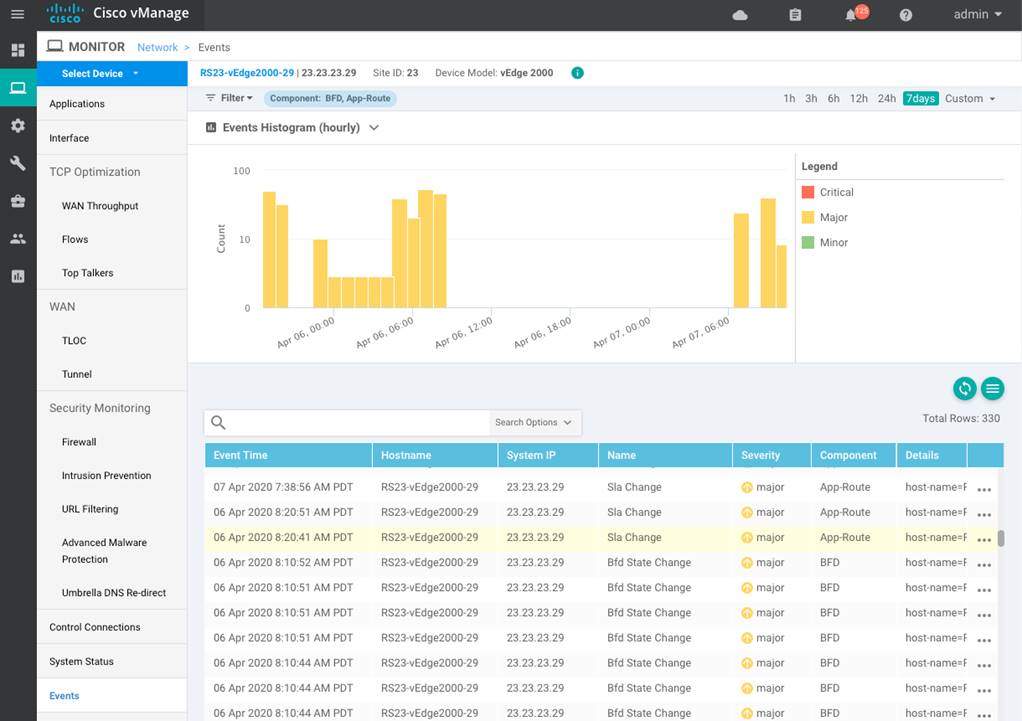
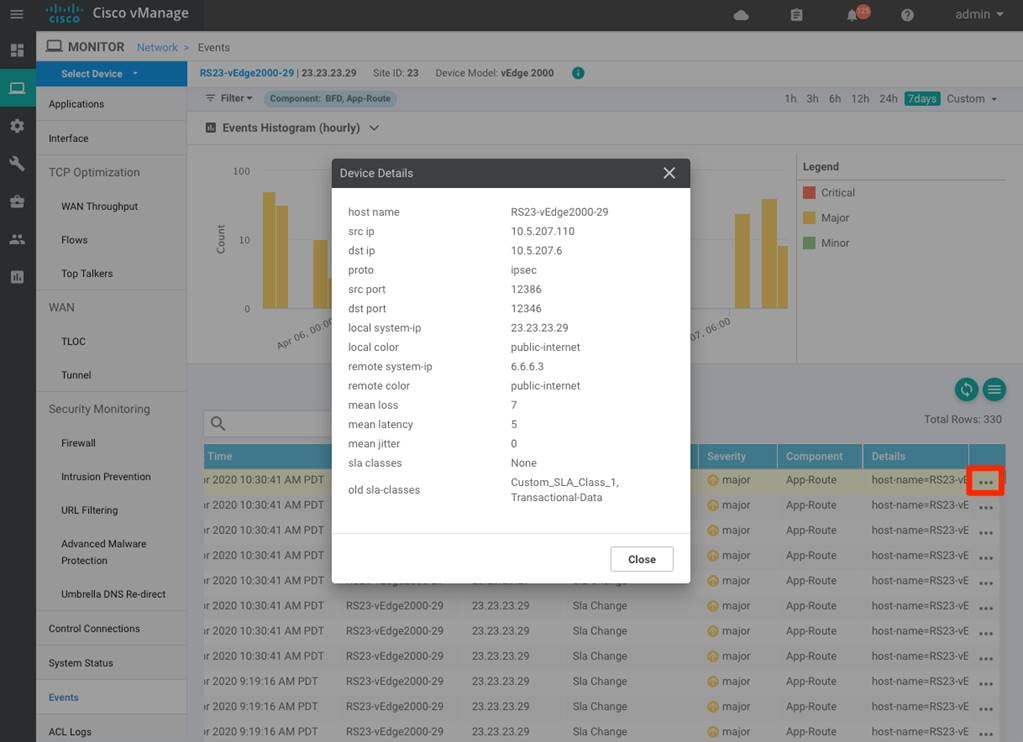
Step 4. Click the three dots on the right hands side of the event to view more details of the event
Process: Visualize traffic path selection on the WAN Edge
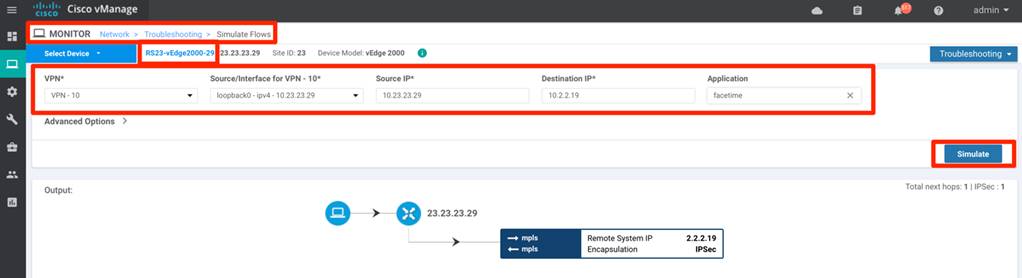
Procedure 1. Visualize real-time Application-Aware routing enforcement in vManage
vManage has a very useful tool for network administrators to simulate traffic on the Service side on the Viptela platform and view the traffic path taken on the WAN Edge to confirm the desired policy enforcement.
Step 1. Simulate the traffic flow from service side to remote branch service site with App-Aware routing enabled.
In vManage, navigate to Monitor > Network. Select the WAN Edge device and click the Troubleshooting option from the left-side panel. Click Traffic section > Simulate Flows
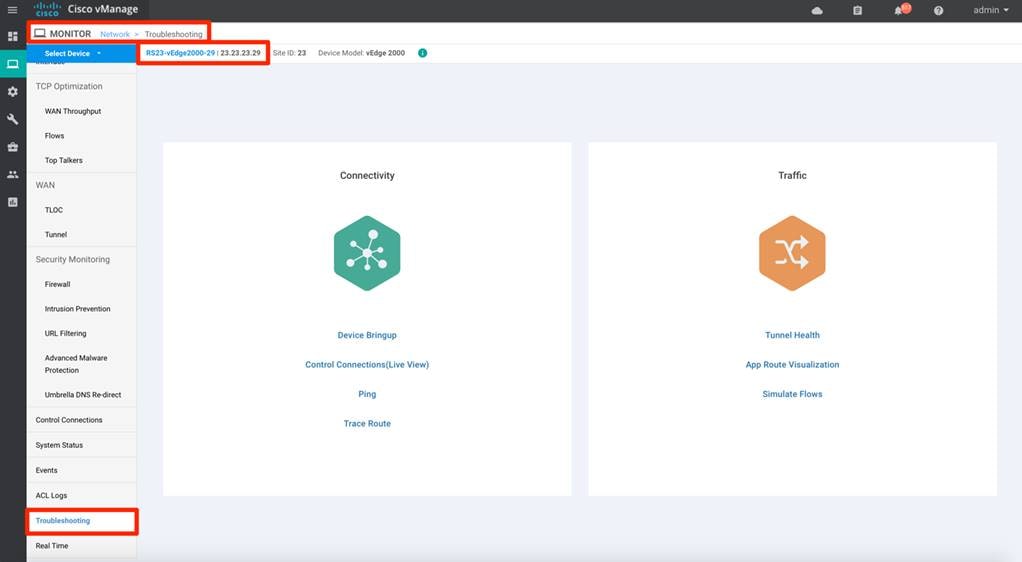
Step 2. View the Tunnel health by navigating to vManage, Monitor > Network, select the WAN Edge device and click the Troubleshooting option from the left-side panel. Click Traffic section > Tunnel Health to view the tunnel health (Loss percentage, Latency, Jitter) between the WAN Edge device and the selected Remote WAN Edge device.
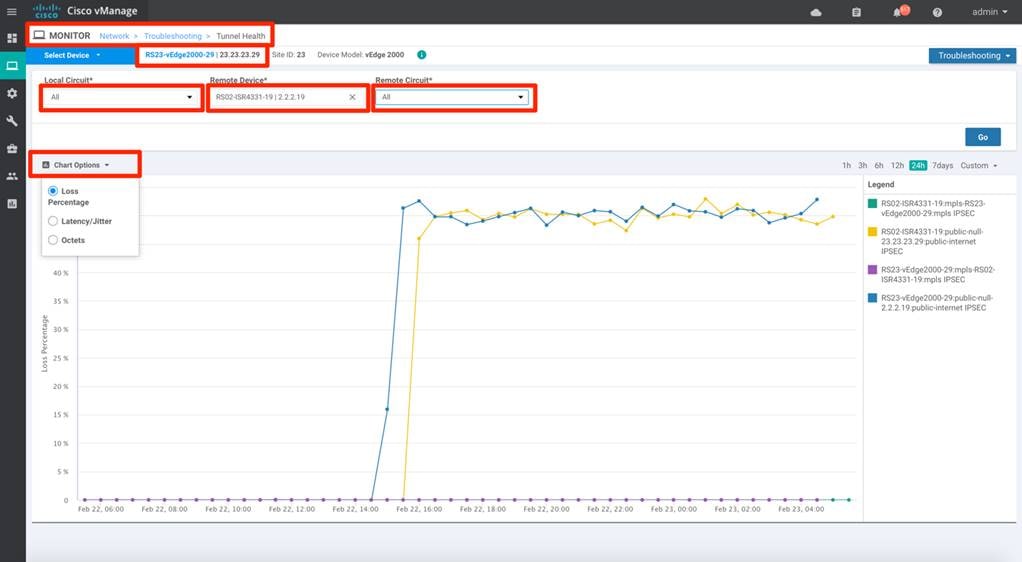
With Application-Aware Routing policy enabled, the WAN Edge device considers the tunnel health to forward the traffic. In the above example, the public-internet WAN transport has significant loss, Latency and doesn’t meet the SLA defined. The WAN Edge is preferring the MPLS transport to forward the service-side traffic as defined in the policy.
The following products and software versions are included as part of validation in this deployment guide. This validated set is not inclusive of all possibilities.
Table 1. Cisco SD-WAN Solution
| Functional area |
Product |
Software version |
| Cisco SD-WAN controllers |
Cisco vManage, Cisco vSmart, and Cisco vBond controllers |
19.2.099 |
| Cisco IOS-XE SD-WAN Device |
ISR4K, ASR1K |
16.12.02r |
| Cisco vEdge Device |
vEdge, vEdge 1000 |
19.2.099 |
| Server |
Hypervisor/vSphere client |
VMware ESXi, 6.7.0, 10302608/version 6.7.0.20000 |
For comments and suggestions about this guide and related guides, join the discussion on Cisco Community at https://cs.co/en-cvds.