- Overview
- Getting Started
- Monitoring and Analyzing Traffic
- Capturing and Decoding Packets
- Performing User and System Administration
- Understanding NAM Deployment
- Customizing Cisco Prime NAM
- Understanding Prime NAM Traffic Sources
- Configuring NAM Security
- Understanding Prime NAM Behavior Reference
- GUI Field Descriptions
- Troubleshooting Network and NAM Issues
Cisco Prime Network Analysis Module User Guide, 6.4(1)
Bias-Free Language
The documentation set for this product strives to use bias-free language. For the purposes of this documentation set, bias-free is defined as language that does not imply discrimination based on age, disability, gender, racial identity, ethnic identity, sexual orientation, socioeconomic status, and intersectionality. Exceptions may be present in the documentation due to language that is hardcoded in the user interfaces of the product software, language used based on RFP documentation, or language that is used by a referenced third-party product. Learn more about how Cisco is using Inclusive Language.
- Updated:
- February 2, 2015
Chapter: Performing User and System Administration
- Performing System Administration
- Monitoring Prime NAM Health and Traffic Statistics
- Setting Network Parameters
- Setting the SNMP Agent
- Synchronizing Your System Time
- Setting Up E-Mail Notifications for Alarms
- Sharing NAM Data by Enabling Web Data Publication
- Setting Remote Servers to Receive Syslog Messages
- Configuring Hosts to Receive SNMP Traps from Prime NAM
- Licensing
- Customizing System Preferences
- Importing/Exporting Configuration Details
- Upgrade or Patch Details
- Troubleshooting Using Diagnostics Tools
- Controlling User Access
- Managing System Data
Performing User and System Administration
This chapter provides information about what user and system administration tasks are required or optional, how to generate diagnostic information when requesting technical assistance, and provide user access.
Performing System Administration
You can perform the following system administration tasks:
- Monitoring Prime NAM Health and Traffic Statistics
- Setting Network Parameters
- Setting the SNMP Agent
- Synchronizing Your System Time
- Sharing NAM Data by Enabling Web Data Publication
- Setting Remote Servers to Receive Syslog Messages
- Configuring Hosts to Receive SNMP Traps from Prime NAM
- Licensing
- Customizing System Preferences
- Importing/Exporting Configuration Details
For at-a-glance details on why you may want to perform these system administration tasks, see Table 5-1 .
Monitoring Prime NAM Health and Traffic Statistics
Ensuring that your Cisco NAM processes your traffic efficiently and effectively without becoming overloaded is a critical task.
To view the network traffic coming into the Cisco NAM as well as data about its health (such as server network details and CPU, memory, and data usage) use Administration > System > Overview to check how much traffic is sent to Cisco NAM. If you can't see any traffic coming in on this page, check the traffic source and cable connections.
Use the data provided in the Inputs and Resources tabs to determine scalability issues and to assist with troubleshooting.
Table D-68 describes the types of information of the System Overview window.
Setting Network Parameters
If you want to use IP hostname resolution in Prime NAM, you must configure the nameservers first. Prime NAM supports three DNS servers. If this task is not complete, you will be unable to perform DNS lookup. You can also set

Tip Ensure your name server addresses are correct, otherwise some of your Monitor dashboards and Capture Decode windows may seem slow to load.
To view and set your name servers:
Step 1 Choose Administration > System > Network Parameters .
The Network Parameters window displays.
Step 2 Enter or change the IPv4 or IPv6 information.
Step 3 To validate the accuracy of the nameservers, click Validate Nameservers.
Step 4 Do one of the following:
Step 5 Ensure you have turned on IP hostname resolution using Administration > System > Preferences . See Customizing System Preferences .
Setting the SNMP Agent
An SNMP Agent is a network management software module that resides in a managed device. It has local knowledge of management information and translates that information into a form compatible with SNMP.
You can manage devices with SNMPv3 in addition to SNMPv2 and SNMPv1. The NAM polls the managed device to get its basic health and interface statistics. For NAM blades, the managed device is the switch in which the NAM is inserted, and the NAM software negotiates with the switch to use SNMP and a community string to do the polling. This community string is only valid for use with the NAM. For security purposes, the switch associates the community string with the NAM's IP address only, and no other SNMP application can use this community string to communicate with the switch. For more information about community strings, see Working with NAM Community Strings .
Also, to further alleviate any security concerns, the SNMP exchanges between NAM blades and the switch take place on an internal backplane bus. These SNMP packets are not visible on any network, nor any interface outside of the switch. It is a completely secure out-of-band channel inside the switch.
For other platforms, such as Cisco NAM appliances, you can type in any IP address and use it as the managed device. In setting managed devices, virtual NAM platforms managed devices function just like the NAM appliances. On all platforms, NAM can only monitor and display data for one managed device at a time.
In this case, the managed device may only want to use SNMPv3 since it is more secure.

Note NAM blades use SNMPv2 to manage the locally managed device.
For RISE appliances, if the managed device is a Nexus switch/VDC, RISE service is configured on the Nexus switch SUP. When RISE service is configured, Nexus device and NAM will automatically sync up the VDC and interfaces information. NAM in this environment is used to manage more than one VDC's interface statistics, without moving physical data port connections between NAM and switch.
To view and set the NAM SNMP agent, follow these steps:
Step 1 Choose Administration > System > SNMP Agent .
Step 2 Enter or change the information in the NAM SNMP window. The fields are detailed in Table D-69 .
Step 3 To create community strings, see Creating NAM Community Strings .
Step 4 To delete community strings, select the entry and click Delete .
Step 5 To save the changes, click Submit .
Working with NAM Community Strings
You use community strings so that other applications can send SNMP get and set requests to the NAM, set up collections, poll data, and so on.
Creating NAM Community Strings
To create the NAM community strings:
Step 1 Choose Administration > System > SNMP Agent .
Step 2 Click Create under NAM Community Strings.
The System SNMP Agent Dialog Box displays.
Step 3 Enter the community string (use a meaningful name).
Step 4 Enter the community string again in the Verify Community field.
Step 5 Assign read-only or read-write permissions using the following criteria:
Step 6 To make the changes, click Submit .
Deleting NAM Community Strings
To delete the NAM community strings:
Step 1 Choose Administration > System > SNMP Agent .
Step 2 Select an entry, then click Delete .

Caution Deleting the NAM community strings blocks SNMP requests to the NAM from outside SNMP agents.
Testing the Router Community Strings
Before the router can send information to the NAM using SNMP, the router community strings set in the NAM must match the community strings set on the actual router. The Router Parameters dialog box displays the router name, hardware, Supervisor engine software version, system uptime, location, and contact information.
The local router IP address and the SNMP community string must be configured so that the NAM can communicate with the local router.
To set the community strings on the router, use the router CLI. For information on using the CLI, see the documentation that accompanied your device.
Caution The router community string you enter must match the read-write community strings on the router. Otherwise you cannot communicate with the router.
To test router community strings:
Step 1 Choose Setup > Managed Device > Device Information .
The Device Information dialog box displays.
Step 2 Enter the Device's Community String.
Step 3 Click Test Connectivity .
Step 4 Wait for a while for NAM to communicate with the Device. If it comes back OK, then click on Submit .
Synchronizing Your System Time
Ensure that the NAM system time is configured correctly. If the system time is incorrect, NAM data presentation may be inaccurate due to time ranges, hence providing incorrect interpretations of NAM data.
Some platforms are synchronized automatically, but you must also synchronize the standard time source outside the NAM in addition to the NAM and the router, switch, or in order for the data to be accurate. We recommend you perform the time synchronization for your platform, especially if you see the following message on the dashboard interface:
Client or NAM time is incorrect
.
You can configure the NAM system time by using one of the following methods:
This is valid for all platforms and is the recommended option.
This option is valid only for NAM-3 and NAM-NX1.
This option is valid for Cisco NAM appliances and virtual NAMs.
Configuring the NAM System Time with an NTP Server
To configure the NAM system time with an NTP server:
Step 1 Choose Administration > System > System Time .
Step 2 Choose the NTP Server radio button.
Step 3 Enter one or two NTP server names or IP address in the NTP server name/IP Address text boxes.
Step 4 Select the Region and local time zone from the lists.
Step 5 To save the changes, click Submit .
Synchronizing the NAM System Time with the Switch or Router
Note This section is valid only for NAM-3 and NAM-NX1. For additional platform options, see Synchronizing Your System Time.
To configure the NAM system time from the switch or router:
Step 1 Choose Administration > System > System Time .
Step 3 Select the Region and local time zone from the lists. This should be the region in which your NAM is located.
Synchronizing the NAM System Time Locally
Note This section is valid for Cisco NAM appliances and virtual NAMs. For additional platform options, see Synchronizing Your System Time.
To configure the NAM system time locally using the NAM command line:
Step 1 Log into the NAM command line interface.
Step 2 Set the clock using the CLI clock set command.
clock set <hh:mm:ss:> <mm/dd/yyyy>
Step 3 On the Prime NAM GUI, choose Administration > System > System Time .
Step 4 Click the Local radio button.
Step 5 Select the Region and local time zone from the lists.
Step 6 Click Submit to save the changes.
Configuring System Time for NAM-3/NAM-NX1 with Precision Time Protocol (IEEE 1588)
To use Precision Time Protocol (PTP), you will need to have a PTP-aware or multicast-enabled switch connected to the sync port on the front of the NAM-3 or NAM-NX1, as well as a PTP master connected to the switch.
Note This section is applicable to the NAM-3 and NAM-NX1. For details on any hardware setup requirements related to this feature, see your specific NAM installation guide. For additional platform options, see Synchronizing Your System Time.
To configure the NAM system time using PTP:
Step 1 On the NAM, choose Administration > System > System Time .
Step 2 Choose the PTP radio button.
Step 3 Enter the IP address of the PTP interface in the PTP Interface IP Address field.
Tip Set the PTP interface IP address so that it is not in the same subnet as the management interface. If they are in the same subnet, there may be routing issues for outbound management traffic (http, for example).
Step 4 Enter the subnet mask in the PTP Interface Subnet Mask field.
Step 5 For NAM Local Time Zone, select the Region and the Zone from the drop-down lists.
Step 6 Click Submit to save the changes.
Configuring System Time for other NAM Platforms with Precision Time Protocol (IEEE 1588)
PTP time is supported through the Napatech NIC cards on the NAM 2420, NAM 2440, NAM 2520 and NAM 2540 platforms. To connect the PTP server to the NIC card, you will need Napatech part TSA-PTP-RJ45/SMA (part number 802-0072-01-03). See http://link.arrow.com/napatech for ordering details.
To configure the Packet Analyzer system time with a PTP server:
Step 1 Choose Administration > System > System Time.
Step 2 Choose the PTP radio button.
Step 3 Select the Region and local time zone from the lists.
Step 4 Click Submit to save the changes.
Understanding NAM System Time
Ensure that the Prime NAM software application's Linux system time is synchronized with the packet timestamp and the standard time source outside of the NAMplatform. Packet timing analysis uses system time to support application response time measurements, voice and video quality metrics, packet decode data, reporting, and many other network statistics.
The NAM gets the UTC (GMT) time from several sources, depending on its NAM platform type. All NAMs can be set up to get their time from an external NTP server. Other NAM platforms may prefer to use an IEEE 1588 Precision Time Protocol (PTP)-based time master due to its high accuracy and precision.
You should also configure any PTP switches that are between the NAM and the master clock to use Edge-to Edge (E2E) mode. E2E is preferred because it reduces PTP messaging bandwidth and eliminates delay accumulation when daisy chaining many nodes. If the master clock and/or PTP switches are not configured correctly, all of the clocks on the NAM will be synced with each other, but to the wrong time.
Caution Both the client computer and the NAM server must have the time set accurately for their respective time zones. If either the client or the server time is incorrect, then the data shown in the GUI is incorrect.
After the NAM acquires the time, you can set the local time zone using the NAM System Time configuration window.
For details on how to configure the NAM system time for your specific hardware platform, see Synchronizing Your System Time.
Setting Up E-Mail Notifications for Alarms
You can configure Prime NAM to provide e-mail notification of alarms and to e-mail reports.
To set up e-mail notifications:
Step 1 Choose Administration > System > E-Mail Setting .
Step 2 Check the Enable Mail check box and enter the required or optional field information.
Table D-70 describes the Mail Configuration Options.
Step 3 Check the optional Advanced Settings check box and enter the details in the fields provided.
Step 4 Click Submit to save your modifications, or click Reset to clear the dialog of any characters you entered or restore the previous settings.
Sharing NAM Data by Enabling Web Data Publication
Web Data Publication allows general web users and websites to access (or link to) selected NAM monitor and report windows without a login session.
Web Data Publication can be open or restricted using Access Control List (ACL) and/or publication code. The publication code, if required, must be present in the URL address or cookie to enable access to published data.
To enable Web Data Publishing:
Step 1 Choose Administration > System > Web Data Publication .
Step 2 Check the Enable Web Data Publication check box.
Step 3 Enter a Publication Code (Optional). This is the pass code required in a URL’s cookie to access the published page. For example, a publication code set to abc123 would be able to access the following published window:
http://<nam-hostname>/application-analysis/index?publicationcode=abc123
Step 4 Enter an ACL Permit IP Address/Subnets to permit only those IP addresses or subnets access to web publications. No entry provides open access to all.
Step 5 Click Submit to enable web publishing, or click Reset to clear the dialog of any characters you entered.
Setting Remote Servers to Receive Syslog Messages
NAM syslogs are created for alarm threshold events, voice threshold events, or system alerts. You can specify whether syslog messages should be logged locally on the NAM, on a remote host, or both. You can use the NAM to view the local NAM syslogs.
If logging on a remote host, in most Unix-based systems, the syslog collector that handles the incoming syslog messages uses the facility field to determine what file to write the message to, and it will use a facility called local7 . Check the syslog collector configuration to ensure that local7 is handled properly.
Step 1 Choose Administration > System > Syslog Setting .
The NAM Syslog Setting window displays.
Step 2 In the Remote Server Names field, enter the IP address or DNS name of up to five remote systems where syslog messages are logged. Each address you enter receives syslog messages from all three alarms (Alarm Thresholds, Voice Signaling Thresholds, and System).
Step 3 Click Submit to save your changes, or click Reset to cancel.
Configuring Hosts to Receive SNMP Traps from Prime NAM
Traps are used to store alarms triggered by threshold crossing events. When an alarm is triggered, you can trap the event and send it to a separate host. Trap-directed notifications can result in substantial savings of network and agent resources by eliminating the need for frivolous SNMP requests.
To configure, edit, or delete a host destination to which Prime NAM will send traps:
Step 1 Choose Administration > System > SNMP Trap Setting .
The SNMP Trap Setting window displays.
Step 3 In the Community field, enter the community string set in the NAM Thresholds.
Step 4 In the IP Address field, enter the IP address to which the trap is sent if the alarm and trap community strings match.
Step 5 In the UDP Port field, enter the UDP port number.
Step 6 Click Submit to save your changes, or click Reset to cancel and leave the configuration unchanged.
Licensing
Certain software-only NAM platforms require software licenses to run. You can see your NAM platform installation guide for details.
To obtain a NAM license, go to the following URL:
http://www.cisco.com/go/license
Follow the instructions on this page to obtain a NAM license file. You will need your NAM platform’s PID and SN to obtain the license file.
Tip Use the Prime NAM show inventory command to obtain the PID and SN for licensing.
After you enter the PID and SN or the Product Authorization Key, a license file will be sent by e-mail. Store the license file on an available FTP server. Use the license install command to install the license after the NAM software installation completes.
Several Cisco Prime Network Analysis Module platform requires you to install a product license in the form of a text file.
Note See your release notes as platform support changes with each release.
An evaluation license allows you to use the software for up to 60 days. The NAM login window indicates how many days remain before the evaluation license expires. After that time, you will be unable to log into the NAM GUI.
For details on licensing install and management CLI commands, see the Cisco Prime Network Analysis Module Command Reference Guide .
There is no license required for the protocol pack usage in Prime NAM.
There are two types of license:
When you purchase a SMART license you will be provided with a URL that points you to the Cisco Smart Software Manager portal where you can manage your licenses and monitor their usage. For more details on the portal, see Cisco Smart Software Manager User Guide .
CSL or Node-locked Licensing
Only specific NAM platforms such as vNAM, and NAM on Nexus VB N1K-1110-X(), support node-locked licensing or CSL.
SMART Licensing
SMART licensing only applies to the vNAM and includes both the KVM based vNAM and ESX hypervisor based vNAM.
SMART licensing uses the Smart Software Manager, which enables you to manage all of your SMART licenses from one centralized website, and to organize and view your licenses in groups, which are called virtual accounts.
Registering a SMART license the for vNAM will extend the 90 day evaluation period into a permanent license. It also allows you to increase the traffic rate that can be monitored from 100 Mbps to either 150Mbps or 1 Gbps, depending upon your license tag (vx10 or vx20, respectively).
To enable SMART licensing, you will need a registration token, which can be generated from your company’s SMART licensing portal.
To use SMART licensing, vNAM must be able to access the internet in one of the following ways:
- Direct access - vNAM accesses the internet directly.
- Proxy Server - vNAM accesses a proxy server on your intranet, which has direct access the internet.
- Smart Software Manager Satellite - vNAM accesses a smart software manager satellite, which is a transport gateway component running in the customer’s DMZ, and has direct access to the internet.
Setting SMART License
To register with a Smart Licensing token using GUI:
Step 1 Choose Administration > System > SMART License .
The SMART License Settings page appears.
Step 2 Retrieve a registration token from your company’s SMART licensing portal and enter it in the Registration Token entry box.
Click Register Token to register vNAM.
Step 3 Click Request Tag to request a tag based on different rate limits, and enter the returned tag in the Tag entry box. Currently, vNAM supports tags vx10, for 150 Mbps traffic and vx20 for 1 Gbps traffic.
To register with a Smart Licensing token using the CLI:
Step 1 Ensure that SMART licensing is enabled by issuing the following command:
If the status is DISABLED, then run the following command:
Note This may take about one minute before SMART licensing is enabled.
Step 2 SMART Licensing depends on network access, so ensure that the IP nameserver and domain settings are correct by inspecting those settings in the output from the CLI command “show config”.
If the settings are not correct, enter the following commands to set these fields:
Step 3 This is an optional step, and is only necessary if there is no direct access to the internet, but rather the connection is through a proxy server or through the Smart Software Manager Satellite. This step is necessary to set the URL so that a connection can be made to either the proxy server or Smart Software Manager Satellite, respectively.
Enter the command CLI command “callhome” to enter the callhome submenu and follow the steps below.
a. If the internet connection is through a proxy server, enter the following command:
b. If the internet connecting is through the Smart Software Manager Satellite, enter the following command:
Note The default setting for the transport http gateway URL is https://tools.cisco.com/its/service/oddce/services/DDCEService. This setting should be restored if internet access is changed back to be either direct or through a proxy.
After the appropriate URL has been entered, type exit to exit the callhome submenu.
Step 4 Retrieve a registration token from your company’s SMART licensing portal and enter it as the token in the following command:
The “force” option can be used at the end of the register command to force the registration if you encounter an error that the product has already been registered.
Step 5 Enter the command below to set the request tag, which is used to specify the monitored traffic rate:
It may take several minutes for the tag status to become AUTHORIZED. Use the following command to monitor the tag status:
Use the following command to verify your monitored traffic rate:
Note If you run out of licenses in your virtual account or your license expires, you will get an Out of Compliance (OOC) message from the Cisco Smart Software Manager. You can remedy this problem by adding more licenses to your virtual account and then run the command below, which will renew your licenses:
Use the CLI commands “show smart-license” and “license smart” for debugging and additional smart license commands.
Permanent License Reservation (PLR)
PLR is for customers who need to deploy their devices on an isolated network, such as government agencies or highly secure environments. PLR is a way to lock a specific UDI to a PLR license on the portal. It is one model of smart license.
Once you apply a PLR license to a device, you can enable any entitlement available and that entitlement is permanent. You can request, install, or return a PLR license using the CLI command.
Portal Reservation GUI Installation Steps
Step 1 Click on the License Reservation Tab and enter the code from the CLI.


Step 2 Click Next to confirm the details.

Step 3 Click Generate Authorization Code to paste the code into the CLI.

Step 4 Click Copy to Clipboard to copy the authorization code.
Returning a Current Reservation
At this point the reservation has been cancelled. The vNAM is still in reservation mode, but there is no reservation installed. Hence, the device will revert back to eval mode.
Step 6 To return the license back to the pool on the portal, enter the code in the portal.
Step 7 In the portal, find the Product Instance using the UDI of vNAM, as shown below:
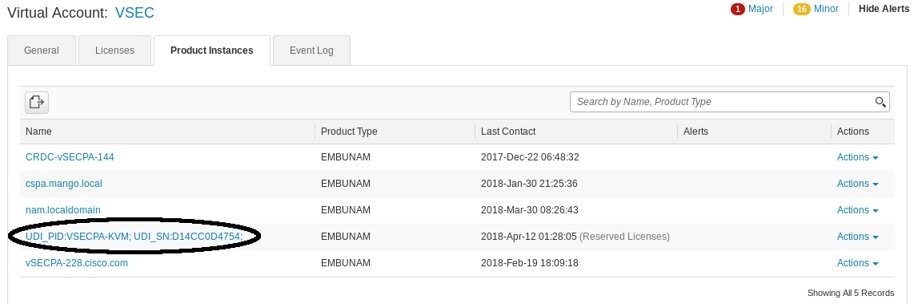
Step 8 Click on the Action drop-down and choose Remove.

Paste the code you got from the license smart reservation return cli in the Reservation return Code area.
Step 9 Click Remove Product Instance.
The dialog box will announce success and the PLR license will be removed from the pool.
Returning an Uninstalled Reservation
Step 1 To return a reservation that has been requested and entered on the portal but not installed, you will need to cancel the reservation first. Then use the 'license smart reservation return auth' command and the authorization code from the portal.
If you have lost the auth code from the portal, you can find it by clicking on the Product instance in the portal and downloading it from the link provided.
root@vsecpa-plr.localdomain# license smart reservation return auth CAACC9-C6pkaq-ppCjVB-qe66QV-UBmMBc-4wcf
Step 2 Using the same procedure paste the code in the 'Remove Product Instance' dialog on the portal and click Remove Product Instance.
Remove reservation mode.
Note • Setting PLR from the GUI will not be supported. When the system is in reservation mode, whether or not the reservation code is installed, the GUI will display a message and will not accept any input. All reservation (PLR) operations can only be set/unset from the CLI command.
- PLR NBI is not supported for 6.4.1 release.
- Reformat install, should do the return action for PLR license. Otherwise the license is occupied and you cannot register with new license.
- vNAM -KVM/UCS should enable smart license first by CLI.
- The vNAM will revert to smart licensing and should never show disabled from the GUI. If you are in reservation mode and disable smartlicensing from the cli, it should come right back up in reservation mode.
Upgrading Your License
You can upgrade your license from smart license to smart license including the PLR License. For CSL node-locking license, it is only supported before 6.3(1) release. You can upgrade your license from previous version like 6.0/6.1/6.2 to the latest version with the same CSL node-locking.
Customizing System Preferences
To change the Prime NAM display or logging characteristics, choose Administration > System > Preferences . Table D-71 describes the fields of the Preferences window and why you may want to change the defaults.
Importing/Exporting Configuration Details
To import/export the configuration details:
Step 1 Choose Administration > System > Import/Export Configuration .
Step 2 Click Import or Export at the top of the window.
Step 3 Choose either FTP , SFTP or SCP from the protocol drop-down list.
Step 4 Enter the IP address of the host.
Step 5 Enter the username and password of the host. This is optional if you select FTP as the protocol.
Step 6 Enter the configuration filename of the application which you want to import or export.
Step 7 Enter the location where you want to import or export the application details.
Step 8 Enter the configuration filename of the DSCP which you want to import or export.
Step 9 Enter the location where you want to import or export the DSCP details.
Step 10 Enter the configuration filename of the Site which you want to import or export.
Step 11 Enter the location where you want to import or export the Site details.
Step 12 Click Import or Export .
While importing, it will replace the existing configuration details with the new details.
Upgrade or Patch Details
This feature allows the administrator to upgrade or patch the system using a file located on their local file system.
To perform an upgrade or patch:
Step 1 Download an installable Prime NAM image from cisco.com.
Step 2 Choose Administration > System > Upgrade or Patch.
Step 3 Click Choose File and select the installable image file.
Step 4 To upgrade images, choose whether or not to reformat the system.
Note Reformatting deletes all monitoring and captured data. Upgrades and some patches will require a system reboot.
Note In order to see the system output during the upgrade or patch, you will need to connect to the system console before clicking ‘Submit’. Depending on your system platform, please connect to the system console using CIMC or KVM or switch/router.
Troubleshooting Using Diagnostics Tools
The Diagnostics option of the Administration menu provides tools to aid in troubleshooting. You can use these tools when you have a problem that might require assistance from the Cisco Technical Assistance Center (TAC). There are options for:
System Alerts
You can view any failures or problems that the NAM has detected during normal operations. To view System Alerts, choose Administration > Diagnostics > System Alerts .
Each alert includes a date, the time the alert occurred, and a message describing the alert. The NAM displays up to one thousand (1,000) of the most-recent alerts. If more than 1,000 alerts have occurred, you need to use the NAM CLI command show tech-support to see all of the alerts.
If you notice an alert condition and troubleshoot and attempt to solve the condition causing the alert, you might want to click Clear to remove the list of alerts to see if additional alerts occur.
Audit Trail
The Audit Trail option displays a listing of recent critical activities that have been recorded in an internal syslog log file. Syslog messages can also be sent to an external log using Administration > System > Syslog Setting .
The following user activities are logged in the audit trail:
- All CLI commands
- User logins (including failed attempts)
- Unauthorized access attempts
- SPAN changes
- NetFlow data source changes
- Enabling and disabling data collections
- Starting and stopping captures
- Adding and deleting users
Each log entry will contain the following:
In Cisco NAM 6.2 release, there are two additional logs, Samba (SMB) and SSH/SFTP which are logged events from the File Sharing feature. These events get logged when the file operations are performed either on a network device through SMB or from SSH/SFTP connections.
To access the audit trail window, choose Administration > Diagnostics > Audit Trail . The Audit Trail window appears and provides a way to view the user access log and filter entries based on time, user, (IP address) from or activity. The internal log files are rotated after reaching certain size limits.
Tech Support
The NAM syslog records NAM system alerts that contain event descriptions and date and timestamps, indicating unexpected or potentially noteworthy conditions. This feature generates a potentially extensive display of the results of various internal system troubleshooting commands and system logs. For a list of user activities logged in the audit trail window, see Audit Trail .
This information is unlikely to be meaningful to the average user. It is intended to be used by your technical support team for debugging purposes. You are not expected to understand this information; instead, you should save the information and attach it to an e-mail message to your support team or, if applicable, Cisco TAC.
Before you can view the Tech Support page, you must enable the System Config user privilege on the Administration > Users > Local Database page. For more information on editing user privileges, see Establishing TACACS+ Authentication and Authorization .
Note You can also view this information from the NAM CLI. For information on using the NAM CLI, see Cisco Network Analysis Module Command Reference.
To view the tech support information:
Step 1 Choose Administration > Diagnostics > Tech Support .
After a few minutes, extensive diagnostic information generates and displays in the window.
Step 2 To save the information, click Download log files . Save the files to your local disk. You can analyze the files locally or, if requested forward on to your technical support team for review.
To download core files from the Tech Support page, click Download log files and follow the instructions.
Controlling User Access
In order to make your Cisco NAM solution more secure, you can take several steps including:
- Enable Secure Sockets Layer (SSL) on the Cisco NAM for secure, encrypted HTTP sessions. See your installation guide for details.
- Enable Secure Shell (SSH) protocol for secure Telnet to the Cisco NAM.
- Enable TACACS+ for authentication and authorization. Cisco NAMs provide support for multiple TACACS+ servers.
This section covers how to control your user’s access using the Administration options:
- Local Database
- Establishing TACACS+ Authentication and Authorization
- Configuring a TACACS+ Server to Support NAM Authentication and Authorization
- Current User Sessions
Local Database
When you first install the NAM, use the NAM command-line interface (CLI) to enable the HTTP server and establish a username and password to access the NAM for the first time.
After setting up the initial user accounts (root, admin, and webuser), you can create additional accounts, enabling or disabling different levels of access independently for each user.
Table D-73 provides information about User Privileges and describes each privilege.
For additional information about creating and editing users, see Creating a New User and Establishing TACACS+ Authentication and Authorization .
If you have forgotten your password, use the helper utility to reset your root or user passwords (see Resetting Passwords).
Resetting Passwords
There are several methods you can use to reset your NAM passwords. Use the options documented in Table 5-2 based on your needs.
Restart your NAM and choose option 5 or enter reboot -helper at the NAM CLI. |
||
The easiest way to reset NAM passwords. This command resets both the root and guest user passwords to the factory default state. You must have appropriate privileges to reset passwords. |
||
See your platform installation guide . |
||
Delete the user for whom you have forgotten the password; then create a new one. |
||
Use if no other local users are configured other than the user for whom you have forgotten the password. Then enable http or https to prompt for the creation of a NAM user. |
Changing Predefined NAM User Accounts on the Switch or Router
The predefined root and guest NAM user accounts (accessible through either a switch or router session command or a Telnet login to the NAM CLI) are static and independent of the NAM. You cannot change these static accounts nor can you add other CLI-based users with the NAM.
Creating a New User
Step 1 Choose Administration > Users > Local Database .
The GUI displays the users in the local database. Checks indicate the privileges each user has for the functions listed.
The GUI displays the New User Dialog Box.
Step 3 Enter the information required to create new user and select each privilege to grant to the user. See Table D-73 for an explanation of user privileges. Table D-71 describes the fields in the New User Dialog Box.
Note If you delete user accounts while users are logged in, they remain logged in and retain their privileges. The session remains in effect until they log out. Deleting an account or changing permissions in mid-session affects only future sessions. To force off a user who is logged in, restart the NAM.
Step 4 Select a single or multiple check box to set user privileges. Table D-73 provides information about each privilege.
Step 5 Click Submit to create the user or Reset to clear the dialog of any characters you entered.
Invalid User Name and Password Characters
For usernames, do not use the following:
- Exclamation point !
- At sign @
- Pound sign #
- Dollar sign $
- Percent %
- Carot ^
- Ampersand &
- Asterisk *
- Left or right parentheses ( )
- Greater than <
- Less than >
- Comma ,
- Period .
- Double quote "
- Single quote '
- Forward slash /
- Backward slash \
For web user passwords, do not use the following:
For root or guest user passwords, only the single quote is not allowed.
Establishing TACACS+ Authentication and Authorization
Terminal Access Controller Access Control System (TACACS) is an authentication protocol that provides remote access authentication, authorization, and related services such as event logging. With TACACS, user passwords and privileges are administered in a central database instead of an individual switch or router to provide scalability.
TACACS+ is a Cisco Systems enhancement that provides additional support for authentication and authorization.
When a user logs into the NAM, TACACS+ determines if the username and password are valid and what the access privileges are.
To establish TACACS+ authentication and authorization:
Step 1 Choose Administration > Users > TACACS+ . The TACACS+ Authentication and Authorization Dialog Box displays.
Step 2 Enter or select the appropriate information in Table D-74, TACACS+ Authentication and Authorization Dialog Box .
Step 3 Do one of the following:
Tip If you cannot log into the NAM with TACACS+ configured, verify that you entered the correct TACACS+ server name and secret key.
Configuring a TACACS+ Server to Support NAM Authentication and Authorization
In addition to enabling the TACACS+ option, you must configure your TACACS+ server so that it can authenticate and authorize NAM users. NAM supports ACS versions 5.2, 5.1 (including Patch 1), and 4.2.
Note Configuration methods vary depending on the type of TACACS+ server you use. When configuring NAM within ACS 5.x, uncheck the check box for the Single Connect Device option under the TACACS+ settings.
Continue to the section specific to your particular version:
Configuring a Cisco ACS Server, Version 4.2
To configure a version 4.2 Cisco ACS server, you must perform two tasks:
- Configure the NAM hostname and IP address on the ACS server. See Configuring NAM on ACS for Windows NT and 2000 Systems for Version 4.2 .
- Add a NAM user or user group. See Adding a NAM User or User Group for Version 4.2.
Configuring NAM on ACS for Windows NT and 2000 Systems for Version 4.2
To configure a Cisco ACS TACACS+ server (version 4.2):
Step 1 Log into the ACS server.
Step 2 Click Network Configuration .
Step 4 For the Network Access Server, enter the NAM hostname and IP address.
Note The secret key must be the same as the one configured on the NAM.
Step 6 In the Authenticate Using field, select TACACS+ .
Step 8 Continue to Adding a NAM User or User Group for Version 4.2 to complete the next configuration task.
Adding a NAM User or User Group for Version 4.2
To add a NAM user or user group:
Step 2 Enter the user login name.
Step 6 If necessary, assign a user group.
Step 7 In the TACACS+ settings:
f. In the Arguments field, enter:
Step 8 In Unlisted Arguments, select Deny .
Configuring a Cisco ACS Server, Version 5.x
To configure a version 5.1 (Patch 1) or 5.2 Cisco ACS server, you must perform these tasks. There is an additional configuration task that enables you to set up policy rules for your users or groups.
Use the following sections to configure your Cisco ACS server:
- Configure the NAM hostname and IP address on the ACS server. See Configuring NAM on ACS For Windows NT and 2000 Systems for Version 5.x.
- Add a NAM user or user group. See Adding a NAM User or User Group for Version 5.x.
- Set up your policy rules. See Configuring Access Policies for ACS and NAM for Version 5.x.
Configuring NAM on ACS For Windows NT and 2000 Systems for Version 5.x
To configure a Cisco ACS TACACS+ server (version 5.1(P1) or 5.2):
Step 1 Log into the ACS server.
Step 2 To set up an optional device type for NAM, click Network Resources > Network Device Groups > Device Type and create a device type. For example, you may choose to name your device type NAM_Module .
Step 3 Click Network Resources > Network Devices and AAA Clients to add NAM devices.
Step 4 For the Network Access Server, enter the NAM hostname and IP address.
Step 5 Under Authentication Options field, select TACACS+ .
Step 6 Enter the secret key and deselect the check box for the Single Connect Device option under the TACACS+ settings.
Note The secret key must be the same as the one configured on the NAM.
Step 8 Continue to Adding a NAM User or User Group for Version 5.x to complete the next configuration task.
Adding a NAM User or User Group for Version 5.x
To add a NAM user or user group:
Step 1 Click Users and Identity Stores > Internal Identity Stores > Users.
Step 3 Enter the user login name.
Step 5 If necessary, assign a user group.
Step 6 Enter the password information.
Configuring Access Policies for ACS and NAM for Version 5.x
In versions 5.1(P1), 5.2, and 5.3 you must set up access policies to complete your ACS and NAM configuration.
Step 1 On the ACS server, click Policy Elements > Authorization and Permissions > Device Administration > Command Sets and click Create to create NAM command sets.
For example, if you want to provide full access to the NAM, create a command set called NAMfullAccess and check the check box Permit any command that is not in the table below .
Step 2 Click Submit when you have completed entering the NAM command sets. Ensure you include all of the following commands:
Step 3 Click Access Policies > Access Services > Create to create a new Service (for example, name = namAdmin ; Service Type = Device Administration.)
Step 4 Go to Access Policies > Access Services > namAdmin > Authorization > Customize to set up customized conditions which are needed in later step. For example, you may choose: NDG: Device Type, Device IP Address, and so on). Replace namAdmin with the service you created in this step.
Step 5 Go to Access Policies > Access Services > namAdmin > Authorization > Create to set up the condition to qualify all login requests. NAM devices use these conditions and follow the command set (created in Step 1). For example, your condition may be == NDG: Device Type is All Device Types: NAM device which you set up in Step 2.
Step 6 Click Access Policies > Service Selection Rules to choose a service (for example, the service you created in Step 3).
Step 7 Log into the NAM and click NAM > Administration > Users > TACACS+ to set up the ACS server IP and secret key.
Configuring a Generic TACACS+ Server
To configure a generic TACACS+ server:
Step 1 Specify the NAM IP address as a Remote Access Server.
Step 2 Configure a secret key for the TACACS+ server to communicate with the NAM.
Note The secret key must be the same as the one configured on the NAM.
Step 3 For each user or group to be allowed access to the NAM, configure the following TACACS+ parameters:
Current User Sessions
The Current User Sessions table is a record of the users who are logged into the application. The user session times out after 30 minutes of inactivity. After a user session times out, that row is removed from the table.
To view the current user sessions table:
Step 1 Choose Administration > Users > Current Users .
The Current User Sessions table ( Table D-75 ) displays.
Managing System Data
One of the roles of an administrator is to manage Prime NAM’s network data collection and retention so that it:
- Scales to fit the real needs of the system’s users.
- Minimizes the burden on monitored devices, applications, and network bandwidth.
- Survives hardware failures.
The following sections explain how to achieve these goals, and how to perform other data management tasks.
Handling Backups
It is critical to have your system backed up so that you can restore your configuration and data if required. Ensure you have sufficient data backups scheduled. Use the config upload command to back up your current configuration. For detailed instructions see your installation guide on Cisco.com .
Shrinking Storage Requirements
Network administrators are consistently looking for ways to shrink their network storage requirements and improve bandwidth efficiency on tasks like backup and recovery.
By configuring Prime NAM packet deduplication on supported platforms, packets whose inspected segments match another packet within the specific time window are marked as duplicates and not forwarded.
For configuration guidelines and instructions, see Configuring Hardware Deduplication.
You can also move capture files to an external storage location to save on local disk space. See About Capturing to Data Storage.
 Feedback