-
Cisco Unity Documentation Addendum, Release 4.1
-
Preface
-
Cisco Unity Bridge Networking Guide
-
Cisco Unity Failover Configuration and Administration Guide
-
Cisco Unity Installation Guide
-
Cisco Unity Maintenance Guide
-
Cisco Unity Reconfiguration and Upgrade Guide
-
Cisco Unity System Administration Guide
-
Cisco Unity Troubleshooting Guide
-
Cisco Unity User Guide
-
Networking in Cisco Unity Guide
-
 Feedback
Table Of Contents
Cisco Unity Bridge Networking Guide
Pushing Mailbox Information from the Avaya Interchange to Cisco Unity
Upgrading from Cisco Unity 4.0(5) with Bridge 3.x (Cisco Unity with IBM Lotus Domino Only)
Upgrading the Cisco Unity Bridgehead Server
Redesignating the Bridgehead Server
Upgrading Non-Bridgehead Cisco Unity Servers
Upgrading Cisco Unity Bridge 3.x to a Newer Version (Optional)
Installing the Cisco Unity Bridge Analog Network And Node Analyzer (BANANA)
Configuring the Interop Gateway (Cisco Unity with IBM Lotus Domino Only)
Cisco Unity Bridge Networking Guide
This chapter should be used in conjunction with the Cisco Unity Bridge Networking Guide, Release 3.0. New features are described in individual sections. Information that has changed in the Cisco Unity Bridge Networking Guide, Release 3.0—either because Cisco Unity or Cisco Unity Bridge functionality changed, or because the information is incorrect—is described in the "Errors" section at the end of the chapter.
This chapter contains the following sections:
•
Pushing Mailbox Information from the Avaya Interchange to Cisco Unity
•
Private List Considerations
Consider notifying subscribers in the event that the following members are inadvertently removed from their lists:
•
•
Pushing Mailbox Information from the Avaya Interchange to Cisco Unity
When the Cisco Unity Bridge represents more than one node on the Octel analog network—in other words, the Interchange has multiple location profiles with different serial numbers configured for the same Cisco Unity network—the configuration of the directory view for update pushes of mailbox information should be performed for only one of the Cisco Unity location profiles. Otherwise, the Bridge will receive redundant pushes when changes occur.
Depending on how many location profiles are set up for Cisco Unity on the Interchange and how many changes are occurring, sending duplicate pushes could generate unnecessary use of Bridge ports for administrative calls. It could also generate unnecessary processing of duplicate modifications by Cisco Unity and other servers, such as a Microsoft Exchange server hosting the Voice Connector, or an IBM Lotus Domino server involved in routing the push messages.
Upgrading from Cisco Unity 4.0(5) with Bridge 3.x (Cisco Unity with IBM Lotus Domino Only)
If you currently have Cisco Unity 4.0(5) servers configured for networking with a Bridge 3.x server (or servers), use the task list and procedures in this section to upgrade Cisco Unity. Networking with the Octel servers is not disrupted after upgrading Cisco Unity. Therefore, in installations with multiple Cisco Unity servers, you can upgrade the Cisco Unity servers as your schedule permits.
Upgrade the Cisco Unity Bridgehead Server
1.
2.
Upgrade Non-Bridgehead Cisco Unity Servers
3.
Optionally, Upgrade the Bridge Server(s)
If a newer version of the Bridge 3.x software is available, we recommend that you upgrade the Bridge software to the latest version.
4.
5.
Enable Optional Features
6.
Upgrading the Cisco Unity Bridgehead Server
Upgrade the Cisco Unity bridgehead server. For systems using failover, upgrade the secondary server as well. Refer to the "Upgrading Cisco Unity 4.x Software to the Shipping Version" chapter of the Cisco Unity Reconfiguration and Upgrade Guide (With IBM Lotus Domino) at http://www.cisco.com/univercd/cc/td/doc/product/voice/c_unity/rug/dom/index.htm.
Redesignating the Bridgehead Server
Run the ConfigMgr.exe utility with the Create Bridge Account option to redesignate the server as the bridgehead. (The CsBridgeConnector service will not start, and the Cisco Unity Administrator will not display Bridge-related pages until ConfigMgr.exe has been run.)
To Designate the Bridgehead Server
Step 1
Step 2
Step 3
Step 4
Step 5
Upgrading Non-Bridgehead Cisco Unity Servers
Upgrade all non-bridgehead Cisco Unity servers in the network. For systems using failover, upgrade the secondary servers as well. Networking with the Octel servers is not disrupted after upgrading Cisco Unity. Therefore, in installations with multiple Cisco Unity servers, you can upgrade the Cisco Unity servers as your schedule permits. Refer to the "Upgrading Cisco Unity 4.x Software to the Shipping Version" chapter of the Cisco Unity Reconfiguration and Upgrade Guide (With IBM Lotus Domino) at http://www.cisco.com/univercd/cc/td/doc/product/voice/c_unity/rug/dom/index.htm.
Upgrading Cisco Unity Bridge 3.x to a Newer Version (Optional)
Optionally, upgrade the Bridge server (or servers) to the latest 3.x version.
We recommend that you upgrade when Bridge message traffic is light. To upgrade to the latest Bridge version from Bridge 3.0(x):
1.
2.
3.
To Disable and Stop Virus-Scanning and Cisco Security Agent Services
Step 1
Step 2
Step 3
a.
b.
c.
d.
Step 4
To Upgrade Cisco Unity Bridge 3.x to a Newer Version
Step 1
Step 2
a.
b.
Caution
Step 3
•
•
The Bridge services will complete the shutdown process when the last in-process message transmission or reception, rather than call, is complete. No additional message transmissions will begin on the in-process calls—either outbound or inbound—after shutdown has been initiated.
Step 4
If you are using the Cisco Unity Bridge CD, insert the disc in the CD-ROM drive, and browse to the Install directory.
Step 5
Step 6
Step 7
Step 8
Step 9
Step 10
Step 11
Step 12
To Re-Enable and Start Virus Scanning and Cisco Security Agent Services
Step 1
Step 2
Step 3
a.
b.
c.
d.
Step 4
Installing the Cisco Unity Bridge Analog Network And Node Analyzer (BANANA)
BANANA is a stand-alone application that runs on the Bridge server. It is designed to assist with monitoring and troubleshooting analog communication between the Bridge and the Octel nodes in the analog network. It also provides detail and summary information of call activity.
The drive on which BANANA will be installed requires at least 1 GB of free disk space.
The following procedures provide details for installing and initiating test calls. Refer to the BANANA Help file for information about other functionality provided by BANANA.
To Install BANANA
Step 1
Step 2
Step 3
Step 4
Step 5
Step 6
Step 7
Step 8
Step 9
Step 10
Step 11
Note
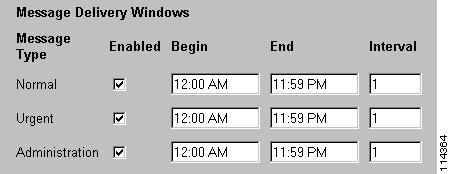
To Adjust the Message Delivery Window Settings
Step 1
Step 2
Step 3
Note that BANANA makes only administrative calls when testing the Octel analog network. However, if you adjust the normal and urgent schedules as shown, you do not have to remember to adjust the schedule if you also send test messages from Cisco Unity subscribers to Octel subscribers.
Step 4
Step 5
To Initiate Test Calls to the Octel Nodes
Step 1
Step 2
Step 3
Step 4
Step 5
Refer to the BANANA Help for details.
Errors
Configuring the Interop Gateway (Cisco Unity with IBM Lotus Domino Only)
In the Cisco Unity Bridge Networking Guide, Release 3.0 (With IBM Lotus Domino), the procedures for setting up Cisco Unity and the Bridge for networking omit an additional step for configuring permissions for the interop gateway that is required when Cisco Unity is integrated with IBM Lotus Domino release 7.0. The step must be done prior to performing the procedure to configure the interop gateway.
In Domino release 7.0, the default permissions set for the -Default- account on the access control list of the mailbox.ntf template do not include permission to replicate or copy documents. This permission is required when setting up the interop gateway. It can be granted either by adding the permission for the -Default- account, or by adding the UnityServers group that was created during Cisco Unity installation to the access control list, and granting permission to replicate or copy documents to the group. Refer to the applicable IBM Lotus documentation for information on adding this permission.