-
Cisco Unity System Administration Guide (With Microsoft Exchange), Release 4.0(3)
-
Index
-
Preface
-
Introduction
-
Accessing the Cisco Unity Administrator
-
Using the Cisco Unity Administrator
-
Maintaining a Cisco Unity System
-
Manually Setting Up Cisco Unity to Use SSL
-
Default Accounts and Message Handling
-
Cisco Unity Conversation
-
Setting Up Client Applications
-
Subscriber, Operator, and Support Desk Orientation
-
Enhanced Phone Security
-
Languages
-
Integrating a Fax Server with Cisco Unity
-
Subscriber Template Settings
-
Class of Service Settings
-
Creating Subscriber Accounts
-
Deleting Subscriber Accounts
-
Subscriber Settings
-
Hospitality and Property Management System Integration
-
Public Distribution List Settings
-
Account Policy Settings
-
Call Management
-
Call Handler Settings
-
Directory Handler Settings
-
Interview Handler Settings
-
Call Routing
-
Restriction Tables
-
Reports
-
Network Settings
-
System Settings
-
Appendix: Exiting and Starting the Cisco Unity Software and Server
-
Glossary
-
 Feedback
Table Of Contents
Overview: Cisco Unity Call Management
Creating a Call Management Plan
Routing Callers by Using One-Key Dialing
Creating a Call Management Map
Implementing a Call Management Plan
Call Management
Overview: Cisco Unity Call Management
Cisco Unity provides the following tools for managing incoming and outgoing calls:
Call Handlers
Call handlers answer calls and can take messages; provide menus of options (for example, "For customer service press 1, for sales press 2..."); route calls to subscribers and to other call handlers; and play audiotext (prerecorded information). See the "Overview: Call Handler Settings" section on page 22-1 for more information.
Directory Handler
Directory handlers provide directory assistance by playing an audio list that subscribers and unidentified callers use to reach subscribers and to leave messages. See the "Overview: Directory Handler Settings" section on page 23-1 for more information.
Interview Handlers
Interview handlers collect information from callers by playing a series of questions and then recording the answers. See the "Overview: Interview Handler Settings" section on page 24-1 for more information.
Call Routing Tables
Call routing tables allow you to define how calls are initially routed, based on criteria such as the phone number of the caller and the schedule. Once you have set up call handlers, interview handlers, and the directory handler, as well as extensions for subscribers, you can route calls to the applicable person or handler by modifying the call routing tables. See the "Overview: Call Routing Tables" section on page 25-1 for more information.
Restriction Tables
Restriction tables control outgoing calls by allowing you to specify the numbers that Cisco Unity can dial for transferring calls, for notifying subscribers of messages, and for delivering faxes. See the "Overview: Restriction Tables" section on page 26-1 for information on how to set up and use restriction tables.
Creating a Call Management Plan
Careful planning for your system components—call handlers, interview handlers, directory handlers, and call routing tables—is key to setting them up efficiently. Creating a call management map is a way to document your plan.
Routing Callers by Using One-Key Dialing
With one-key dialing, you can offer callers a menu of choices. One-key dialing enables you to designate a single digit to represent a subscriber extension, call handler, interview handler, or directory handler. Instead of entering the full extension, the caller presses a single key.
Callers can bypass one-key dialing. You set the system to pause a certain number of seconds for additional key presses before routing the call according to the way you have set up a one-key dialing menu. These pauses allow callers to press full extension IDs to bypass one-key dialing menus, even during the handler greeting.
You can also lock certain keys to take the caller directly to the action programmed for that key without waiting for an additional key press.
Use the handler greeting to tell callers about the one-key options they have, and whether they are allowed to enter an extension during the greeting.
Creating a Call Management Map
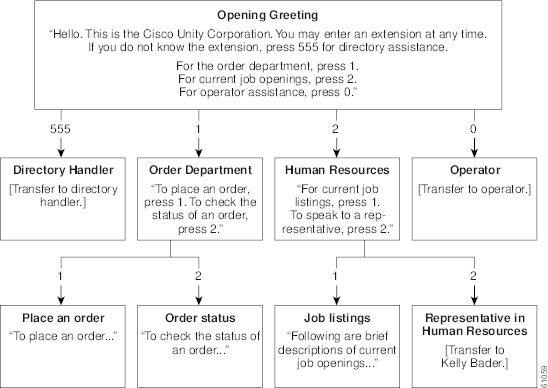
Once you have considered how your call management plan ought to work, you can create a sketch that shows specifically how the handlers connect to one another. Include a menu of one-key dialing options and all possible navigation choices (such as reaching a call handler by dialing an extension or via a routing rule). You can also include the predefined Cisco Unity call handlers in your plan. See Figure 21-1 for a sample call management map that makes use of the automated attendant.
Figure 21-1 Sample Automated Attendant Call Management Map
Implementing a Call Management Plan
After you have mapped your plan, write detailed scripts for the greeting of each call handler to use during the recording session.
When you are ready to set up your system of call handlers, start from the bottom up. First create the call handlers to which calls are routed. You will select these "destination" call handlers when you create the call handlers that route calls to them. You also need to create Cisco Unity accounts for the subscribers to which call handlers will transfer before creating those call handlers.
Using Figure 21-1 as an example, you first create a subscriber account for Kelly Bader, and the handlers for Place an Order, Order Status, and Job Listings. Then you create the handlers for the Order Department and Human Resources.
In addition to mapping call handlers, you also need to plan call routing tables. In Figure 21-1, for example, all new call handlers are reached through the Opening Greeting. Another alternative is to assign extensions to some of your call handlers and to route incoming calls to those extensions by using a call routing table. See the "Overview: Call Routing Tables" section on page 25-1 for more information.