-
Administration Guide for Cisco Unified MeetingPlace Directory Services Release 5.4
-
Index
-
Preface
-
Introducing Cisco Unified MeetingPlace Directory Services
-
Installing Cisco Unified MeetingPlace Directory Services
-
Upgrading Cisco Unified MeetingPlace Directory Services
-
Configuring Cisco Unified MeetingPlace Directory Services
-
Maintaining Cisco Unified MeetingPlace Directory Services
-
Troubleshooting Cisco Unified MeetingPlace Directory Services
-
Appendix: Cisco Unified MeetingPlace Directory Services Plug-In Functions
-
Appendix: Cisco Unified MeetingPlace Attributes
-
Appendix: Cisco Unified MeetingPlace Directory Services Extended ASCII Character Support
-
Appendix: Cisco Unified MeetingPlace Directory Services Implementation Steps and Checklist
-
 Feedback
Table Of Contents
Configuring Cisco Unified MeetingPlace Directory Services
Restrictions for Configuring Cisco Unified MeetingPlace Directory Services
About Configuring Cisco Unified MeetingPlace Directory Services
Default MetaLink Configuration File
Modifying the Corporate LDAP Directory MetaLink Agreement
Deleting the One-Way Export MetaLink Agreement
Enabling Changelogs on the Slave Server
Creating a MetaLink Agreement with Cisco Unified CallManager
Configuring Cisco Unified MeetingPlace Directory Services
This chapter describes how to create the MetaLink agreements needed to synchronize Cisco Unified MeetingPlace Directory Services with your Cisco Unified MeetingPlace Audio Server and corporate directory server, in both basic single-server and multiserver (master-slave or dual-master) systems.
See the following sections:
•
Restrictions for Configuring Cisco Unified MeetingPlace Directory Services
•
Restrictions for Configuring Cisco Unified MeetingPlace Directory Services
Cisco Unified MeetingPlace Directory Services does not support the use of load-balancing software for directory access and synchronization. You must create synchronization agreements by using the actual hostname or IP address of the corporate directory server.
About Configuring Cisco Unified MeetingPlace Directory Services
Before you configure Directory Services, you should understand the following concepts:
•
MetaLink Agreements
Directory Services provides default MetaLink agreement and configuration files that you modify as needed to configure Directory Services. Each MetaLink agreement usually requires the following two files:
•
•
For more concept information about MetaLink agreements, see the "Meta-Directory and the MetaLink Agreement" section.
Default MetaLink Configuration File
Directory Services provides default configuration files for the MetaLink agreement that synchronizes Directory Services with your corporate directory server.
Before starting the synchronization, you will need to customize the attribute mappings, filters, and other parameters that are contained in the configuration file to meet the needs of your specific business rules.
See the following sections for information about configuration file sections and examples:
•
•
•
•
•
•
•
LDAP Filters
The LDAP Filters section of the configuration file lists the directory entries that you want to import. By default, Directory Services imports all entries whose objectClass attribute has a value of person, as described in the LDAPFilters section:
[LDAPFilters]Abs_Person = &attrHasValue(*objectClass, "person")You can modify the default LDAPFilters section to include additional conditions that will be applied when Directory Services synchronizes with the corporate LDAP directory.
Example
This entry checks whether a directory entry meets all the following requirements:
•
•
•
•
Abs_Person = &AND(&attrHasValue(*persontype, "employee"), employeenumber,&FilterBuiltin(&Trim(termflag), "T"), &FilterBuiltin(&Trim(termflag), "Pendinghire"))Example
This entry checks whether an Active Directory entry meets all the following requirements:
•
•
•
Abs_Person = &AND(&attrHasValue(&BitMask(userAccountControl,"2"), "0"),&attrHasValue(*objectClass, "user"), employeeNumber)
Note
Directory Services can also use plug-in functions within the LDAP filter to execute logical expressions; for example, the logical AND function (&AND), or the check attribute value existing function (&attrHasValue). For a complete list of plug-in functions, see the "Cisco Unified MeetingPlace Directory Services Plug-In Functions" appendix.
Note
DCDPersonMapping
The DCDPersonMapping section allows you to register standard and BootStrap attribute mappings and correlation rules. You must register mappings and rules before you can use them.
Example
StandardMapping = ImportPersonMapImportCorrelation
The ImportCorrelation section of the configuration file contains correlation rules, which determine how directory entries are mapped to each other. You can modify the default correlation rule to include additional attribute mappings or add new correlation rules.
Normally, a unique identifier in the corporate directory, such as samaccountname in Active Directory or uid in the corporate LDAP directory, is correlated with the Cisco Unified MeetingPlace username, which is unique for the Cisco Unified MeetingPlace profile.
•
•
Example
To synchronize a Cisco Unified MeetingPlace username with an Active Directory user login name, include the following correlation rule:
if FullDistName = SAMAccountNameExample
The following mapping correlates fullDistName (meetingplace username) with lowercase samaccountname in the Active Directory:
[ImportCorrelation]fullDistName ="/o=comp.com/ou=people/nm=""" + &Caselow(SAMAccountName) +""""Example
The following attribute correlates Vuname (Cisco Unified MeetingPlace profile number) with the right four digits of the corporate directory attribute Telephone-Office1, and correlates FaxNum with five digits from the corporate directory attribute Telephone-Fax, starting at the third number from the left:
[ImportCorrelation]Vuname = &StringRightN(Telephone-Office1, "4")FaxNum = &midString(Telephone-Fax, "3", "5")ConversionFunctions
Plug-in functions give you flexibility when correlating directory data during a MetaLink synchronization. Before you can use a plug-in function, you must register it by entering the function and its corresponding .dll in the Conversion Functions section of the configuration file. Once a function is registered, you can use it in any mapping in the configuration file.
There are approximately 30 plug-in functions available for manipulating data. For example, you can use plug-in functions to filter out unwanted entries or to extract the first three digits of a phone number to create a profile number. For a full list of plug-in functions, see the "Cisco Unified MeetingPlace Directory Services Plug-In Functions" appendix. For the correct syntax for declaring a specific function, see the "Plug-In Guidelines" section on page A-1.
Example
This entry shows the registration of the functions AND and attrHasValue:
[Conversion Functions]AND = dcmlkcnv.dll,mlkAMapANDattrHasValue = dcmlkcnv.dll,mlkAMapAttrHasValueLDAPObjectClass
LDAPObjectClass section contains the list of classes that will be mapped.
Example
LDAPPerson = top,person,inetOrgPerson,organizationPerson,yourcompanyOrgPersonBootStrapPersonMap
The BootStrapPersonMap section of the configuration file contains attribute mappings between the corporate directory and the Cisco Unified MeetingPlace directory that are made when a new profile is created in Cisco Unified MeetingPlace. By default, Cisco Unified MeetingPlace users take values from the guest profile when the attributes that are specified in the configuration file have "NOVALUE", such as
GroupName = """NOVALUE"""To ensure that the MetaLink agreement meets the needs of your organizational directory information, you can add, modify, and delete BootStrap attribute mappings, as shown in the following examples:
Example
To import Cisco Unified MeetingPlace users with different values than those of the guest profile, you can create a group in the Cisco Unified MeetingPlace system and specify the attribute value in the mapping section, for example after creating a group called "MeetingPlace user":
GroupName = "MeetingPlace user"Example
If a particular Cisco Unified MeetingPlace attribute has no corresponding attribute in the corporate directory, you can substitute the default value from the Guest user profile in the Cisco Unified MeetingPlace system by specifying """NOVALUE""" in the attribute mapping line, for example:
BillCode = """NOVALUE"""OutdialPhone = """NOVALUE"""Example
In the following example, the mapping directs that the Lastname field in Cisco Unified MeetingPlace will use the value of the sn attribute in the Corporate LDAP Directory:
LastName = snExample
In the following example, the mapping populates the Cisco Unified MeetingPlace attribute Emailadd1 with the mail attribute in the corporate director y and the Groupname attribute with an employee type attribute pulled in from a flat file:
Emailadd1 = mailGroupname = &mapString(employeetype,"E:\Cisco Systems\MeetingPlace Directory Services\config\group.txt")
Note
ImportPersonMap
Standard attribute mappings are placed in the ImportPersonMap section of the configuration file and apply to entries that correlate between the two directories. These mappings indicate which attributes in existing Cisco Unified MeetingPlace entries will be updated with which attributes in the corporate directory.
You can specify that an attribute must have a value for the attribute to be propagated to the Cisco Unified MeetingPlace system. A percent (%) sign preceding an attribute specifies that a value is mandatory.
Example
You can map %LastName = sn so that the last name attribute on the source server is mapped to the sn attribute on the destination server.
The % sign guarantees that the last name attribute must have a value to be propagated to the Cisco Unified MeetingPlace system. If the attribute does not have a value, an error is written to the suspense file, and the MetaLink agreement proceeds to the next entry in the directory.
Example
In the following example, the mapping uses the plug-in functions BitMask and Caselow, plus a flat file, to populate the Cisco Unified MeetingPlace attributes IsActive and FlexField1:
IsActive = &mapString(&BitMask(userAccountControl, "2"),"d:\Cisco Systems\MeetingPlaceDirectory Services\config\active.txt")FlexField1 = &Caselow(&Trim(location))
Tip
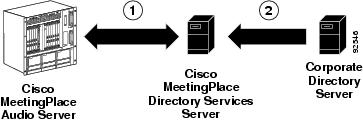
Synchronizing a Single-Server Cisco Unified MeetingPlace Directory Services System with a Corporate Directory Server
Figure 4-1 shows the MetaLink agreements that are needed for a basic single-server Directory Services system synchronization.
Figure 4-1 Single-Server Synchronization with One-Way and Two-Way MetaLink Agreements
To synchronize a single-server Directory Services system with a corporate directory server, do the following procedures:
1.
2.
3.
4.
5.
6.
7.
8.
9.
10.
11.
12.
13.
14.
15.
•
•
To Enable the Changelog Feature for Netscape/SunOne/iPlanet LDAP Directory
Netscape/SunOne/iPlanet directory servers support a changelog feature that Directory Services uses to synchronize data. When the changelog feature is enabled, these directory products automatically maintain a log of modifications to the system. During the synchronization process, the changelog is examined to determine which entries have changed on the system.
The changelog records changes in the order that the changes occur; each change is assigned an index number. Directory Services tracks these index numbers to determine the state of the corporate directory server each time a MetaLink agreement is run, ensuring that the latest version of the corporate directory is synchronized with your Cisco Unified MeetingPlace system user profiles.
Step 1
Step 2
Step 3
Step 4
Step 5
The Netscape Directory Server window for that selected server appears.
Step 6
Step 7
a.
b.
c.
Step 8
a.
b.
c.
Step 9
To Configure Cisco Unified MeetingPlace Directory Services Changelog Access Control
For Directory Services to access the changelog, you must create an account with the required permissions.
Step 1
Step 2
Note
Step 3
Note
Figure 4-2 Editing the Access Control Rule
Step 4
Preparing Microsoft Active Directory for Synchronization with Cisco Unified MeetingPlace Directory Services
To connect to Microsoft Active Directory, Directory Services requires an Active Directory user account. You must create a user account in Active Directory and assign this user account rights that allow Directory Services to monitor the directory for new, deleted, or modified user entries. Assigning rights enables Directory Services to search the Active Directory domain but does not enable the user or application to write information to Active Directory.
Note
The user account that you create for synchronization with Active Directory is different than the service user account that you use to install and run Directory Services. This user account is used to synchronize with Active Directory, and the service user account is used to run the application service on the Directory Services server.
Restrictions
•
•
Synchronization Process
Directory Services sets up a synchronization link with the Active Directory change log on the dedicated domain controller by using the following process:
1.
2.
3.
4.
For subsequent synchronizations, the synchronization link provides the data element cookie to Active Directory, which provides reads only the incremental changes from the change logs.
Note
To Prepare Active Directory for Synchronization with Directory Services
Step 1
Step 2
Step 3
Step 4
Step 5
Step 6
Step 7
Creating a MetaLink Agreement Between the Cisco Unified MeetingPlace Audio Server and the Directory Services Server
This MetaLink agreement synchronizes Cisco Unified MeetingPlace system user profiles between the Cisco Unified MeetingPlace Audio Server system and the Directory Services server and requires the mp-sync.mmu agreement file and the mp-sync.cfg configuration file.
The mp-sync.cfg configuration file is preconfigured and does not typically require modification. You will need to modify the mp-sync.mmu file.
Prerequisites
•
•
To Create a MetaLink Agreement Between the Audio Server and the Directory Services Server
Step 1
C:\Program Files\Cisco Systems\MeetingPlace Directory Services\config.The file contains the following entries:
Module MPMLAction AddAgrName MeetingPlace-LiveSync-AgreementTimeInterval OnChangeAgreementScope /o=comp.com/ou=peopleConfigRecord @C:\Program Files\Cisco Systems\MeetingPlaceDirectory Services\config\mp-sync.cfgSuspensePath C:\mpdslogs\mp_sync\SuspenseLimit 100000Step 2
Step 3
Step 4
Note
Step 5
Step 6
Step 7
C:\Program Files\Cisco Systems\MeetingPlace Directory Services\config.Step 8
To Monitor the MetaLink Agreement
Monitor the progress and outcome of the MetaLink agreement by using one of the following methods:
•
•
•
Note
•
–
–
By using Notepad, open the logs to display import and export activity.
To Verify That Entries Have Been Propagated to Cisco Unified MeetingPlace Directory Services
After synchronization is complete, you can verify how many profiles have been propagated from the Cisco Unified MeetingPlace Audio Server system to Directory Services.
Step 1
Step 2
Step 3
Step 4
Troubleshooting Tips
If you find that certain profiles have not been imported into Cisco Unified MeetingPlace Directory Services, check for synchronization errors by following the instructions in the "Monitoring Cisco Unified MeetingPlace Directory Services" section.
Creating a MetaLink Agreement Between the Cisco Unified MeetingPlace Directory Services Server and a Corporate Directory Server
After synchronizing profiles between the Cisco Unified MeetingPlace Audio Server and the Directory Services server, create the MetaLink agreement between the Directory Services server and your corporate directory server.
Note
To create a MetaLink agreement between the Directory Services server and your corporate directory server, do the following tasks:
1.
2.
3.
4.
5.
To Modify the MetaLink Agreement File
Step 1
or
For Microsoft Active Directory, locate the ad-import.mmu agreement file in the C:\Program Files\Cisco Systems\MeetingPlace Directory Services\config directory.
Step 2
Step 3
Table 4-1 Agreement File Keywords
Module
LDAP
LDAP
Yes
Action
Add, Modify, Delete
Add
Yes
AgrName
Agreement name
LDAP-Sync-to-MS-Active-Directory (AD)1
LDAP-Sync-to-Netscape (NS)2Yes
TimeInterval
Frequency in seconds that the MetaLink agreement tracks changes in the corporate directory
TimeInterval Automatic
TimeInterval 3600No
AgreementScope
Cisco Unified MeetingPlace Directory Services subtree used to synchronize user data
/o=comp.com/ou=people
Yes
ConfigRecord
Path to the configuration file for this MetaLink. Must be preceded by an "@" and should include the complete path
@C:\ProgramFiles\Cisco Systems\MeetingPlace Directory Services\config\ad-import.cfg (AD)
@C:\ProgramFiles\Cisco Systems\ MeetingPlace Directory Services\config\ldap-import.cfg (NS)Yes
ADHostName (AD)
NSHostName (NS)Hostname or IP address of your corporate directory server
ad-server.cisco.com (AD)
ns-directory.cisco.com (NS)
Yes
UserName
Login username for your corporate directory
ad\mpds (AD)
cn=latsync,cn=users,dc=cisco,dc=com (AD)ns-user (NS)
uid=latsync,ou=people,o=acme.com (NS)No
Password3
Password for username
cisco
No
DomainPartition
DN of the domain level entry in the Active Directory server
dc=cisco, dc=com
Yes
LDAPSubtree
LDAP server subtree below which all entries will be synchronized
ou=myorg,dc=cisco,dc=com
Yes
UIDManaged (NS)
True or False, depending on whether the UID is managed by the MetaLink
See the UID attribute.
False
Yes
UIDAttr4 (NS)
UID attribute name
uid
employeenumberYes
SuspensePath
Path to folder storing suspense files. Create a folder matching this parameter in the C:\mpdslogs directory.
C:\mpdslogs\ad-import (AD)
Yes
SuspenseLimit
Maximum amount of disk space the MetaLink can use for suspense files for this synchronization agreement
0 (no disk limit)
No
LDAPSizeLimit
Maximum number of entries returnable in one search from the Netscape Server. Use 0 for unlimited searching.
LDAPSizeLimit 800
No
LDAPTimeOut
Maximum time in seconds that the MetaLink waits for an LDAP search to finish
0 (unlimited search time, unless your LDAP directory has a specific setting)
No
PortNumber
LDAP port number
389 (default)
No
1 AD denotes a keyword or example that is specific to the MetaLink agreement file for Microsoft Active Directory (ad-import.mmu).
2 NS denotes a keyword or example that is specific to the MetaLink agreement file for Netscape Directory (ldap-import.mmu).
3 Although you enter the password here, you can delete the agreement file after you create the MetaLink to prevent the password being exposed.
4 An Active Directory MetaLink uses ObjectGUID in the Active Directory as the default UIDAttr.
Step 4
To Modify the MetaLink Configuration File
Note
Step 1
C:\Program Files\Cisco Systems\MeetingPlace Directory Services\config directory.or
For Microsoft Active Directory, locate the ad-import.cfg configuration file in the C:\Program Files\Cisco Systems\MeetingPlace Directory Services\config directory.
Step 2
Step 3
•
MeetingPlace attribute = LDAP attribute•
;FaxNum=&midString(Telephone-Fax, "3", "5");Active Directory MetaLink Configuration for <companyname>•
See the "Cisco Unified MeetingPlace Directory Services Plug-In Functions" appendix for more information.
See the "Default MetaLink Configuration File" section for mapping examples.
Step 4
To Modify the MetaLink Configuration File for Cisco Unified MeetingPlace for Outlook Authentication
If your organization has Cisco Unified MeetingPlace for Outlook and you want to authenticate its users via Cisco Unified MeetingPlace Directory Services, do the following procedure.
Note
Step 1
Step 2
NetworkCredentials = "<your domain>\5C"+SAMAccountName
Replace <your domain> with your actual domain.
Step 3
Step 4
To Run the MetaLink Agreement File
After modifying the agreement file and corresponding configuration file for your corporate directory MetaLink agreement, run the agreement file to initiate the synchronization between the Directory Services server and your corporate directory server.
Note
Step 1
Step 2
Step 3
Step 4
To Monitor the Corporate Directory MetaLink Agreement
Monitor the progress and outcome of the corporate directory MetaLink agreement by using one of the following methods:
•
•
Note
•
•
Modifying the Corporate LDAP Directory MetaLink Agreement
After creating the initial corporate directory MetaLink agreement, you can modify it by making changes to the mappings in the MetaLink configuration file.
Once you have updated the configuration file, you can modify the existing MetaLink agreement by using either of the following methods:
•
•
To Upload a New Configuration File by Using the Cisco Unified MeetingPlace Directory Services GUI
Step 1
Step 2
Step 3
Step 4
Step 5
Step 6
Step 7
Step 8
Step 9
Step 10
This MetaLink will now use the new configuration to update the profiles in the Cisco Unified MeetingPlace system.
Note
To Modify the Current MetaLink Agreement File by Using the Command-Line Interface
You can modify the current MetaLink by editing the .mmu agreement file. You can add an instruction to the file to update the MetaLink, which will activate the new configuration file.
Step 1
Step 2
Step 3
Step 4
Module LDAPAction AddAgrName LDAP-Sync-to-NetscapeTimeInterval AutomaticAgreementScope /o=comp.com/ou=peopleConfigRecord @C:\Program Files\Cisco Systems\MeetingPlace DirectoryServices\config\ldap-import.cfgNSHostName its4.companyname.comUserName uid=meetingplace,ou=applications,o=companyname.comPassword mp147syLDAPSubtree ou=People,o=companyname.comSuspensePath C:\mpdslog\suspense_LDAP\SuspenseLimit 100000SuspenseDaily FALSEUIDManaged FALSEUIDAttr uidStep 5
Step 6
Step 7
Step 8
Step 9
Step 10
Step 11
Step 12
An output text file, called ldap_modify.mmu.out, is generated. Open this file with Notepad to verify whether the modification was successful or to see any errors that may have occurred.
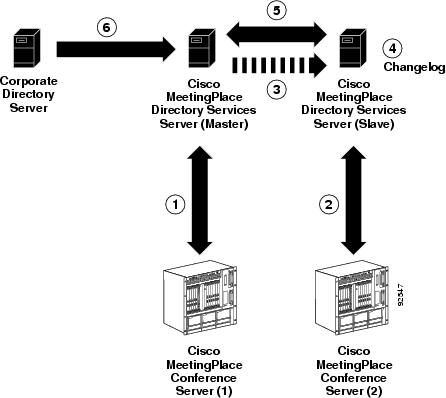
Synchronizing a Multi-Server Cisco Unified MeetingPlace Directory Services System with a Corporate Directory Server
Figure 4-1 shows the MetaLink agreements that are needed to synchronize a multi-server system, consisting of two Cisco Unified MeetingPlace Audio Servers, two Directory Services servers, and a corporate directory.
In this type of system, one Directory Services server and one Cisco Unified MeetingPlace Audio Server are called the master servers, and the second Directory Services server and Audio Server are called the slave servers. We recommend that you designate the Directory Services server with the most recent data as the master server.
Figure 4-3 Synchronizing a Multiple Cisco Unified MeetingPlace Directory Services Server System
To configure a multi-server Cisco Unified MeetingPlace Directory Services system to synchronize with a corporate directory server, do the following tasks:
1.
2.
3.
Note
4.
5.
Or,
Create an export (one-way) MetaLink agreement from the master Directory Services server to the slave Directory Services server by completing the "Creating an Export MetaLink Agreement from the Cisco Unified MeetingPlace Directory Services Master Server to the Slave Server" procedure.
6.
7.
8.
9.
Creating an Export MetaLink Agreement from the Cisco Unified MeetingPlace Directory Services Master Server to the Slave Server
Note
A one-way export MetaLink from a master Cisco Unified MeetingPlace Directory Services server to a slave Directory Services server synchronizes profiles from the master system to the slave system.
Prerequisites
•
•
•
Caution
Note
To Create a One-Way Export MetaLink Agreement
Step 1
Module LDAPAction AddAgrName LDAP-Sync-to-DC-DirectoryTimeInterval AutomaticLDAPTimeOut 0AgreementScope /o=comp.com/ou=peopleConfigRecord @C:Program Files\Cisco Systems\MeetingPlaceDirectory Services\config\mpds-export.cfgDCDHostName mpds.cisco.comportnumber 389UserName cn=Admin,o=comp.comPassword CiscoLDAPSubtree /o=comp.com/ou=peopleSuspensePath D:\mpdslog\mpds-exportSuspenseLimit 100000UIDManaged TRUEUIDAttr Custom5Step 2
Note
Step 3
Step 4
Step 5
Step 6
Step 7
Step 8
Step 9
Step 10
Deleting the One-Way Export MetaLink Agreement
After the synchronization process is complete between the master and slave Directory Services servers, delete the one-way export MetaLink agreement before creating the two-way synchronization MetaLink agreement.
To Delete the One-Way Export MetaLink Agreement
Step 1
Step 2
Step 3
Step 4
Step 5
Step 6
Step 7
Step 8
Step 9
Enabling Changelogs on the Slave Server
The changelog on a Directory Services server records changes to server data, allowing other Directory Services servers to synchronize the changes.
To enable the changelog on the slave Cisco Unified MeetingPlace Directory Services server, do the following procedures:
•
•
To Create a Changelog Object on the Slave Cisco Unified MeetingPlace Directory Services Server
Step 1
Step 2
Step 3
Step 4
Step 5
In the Ambiguous Object Class dialog box, a default object class appears for the changelog.
Step 6
At the main administration console, a new Changelog folder appears under the Directory folder in the left panel.
To Create a Changelog Agreement on the Slave Cisco Unified MeetingPlace Directory Services Server
Step 1
The file contains these entries:
Module CHNGLGAction AddAgrName ChangeLog-Export-AgreementTimeInterval OnChangeAgreementScope /o=comp.com/ou=peopleMaxChanges 60000Step 2
Note
Step 3
Step 4
Step 5
Step 6
Step 7
A changelog agreement on the slave Directory Services server is created.
Creating a Two-Way MetaLink Agreement on the Master Cisco Unified MeetingPlace Directory Services Server
After you create the changelog on the slave Directory Services server, create a MetaLink agreement on the master Directory Services server to synchronize profiles in both directions between the servers.
Note
Prerequisites
•
•
•
Note
To Create a Two-Way MetaLink Agreement on the Master Directory Services Server
Step 1
The file contains the following entries:
Module LDAPAction AddAgrName LDAP-Sync-to-DC-DirectoryTimeInterval AutomaticLDAPTimeOut 0AgreementScope /o=comp.com/ou=peopleConfigRecord @C:\Program Files\Cisco Systems\MeetingPlaceDirectory Services\config\mpds-repl.cfgDCDHostName mpds.cisco.comportnumber 389UserName cn=Admin,o=comp.comPassword CiscoLDAPSubtree /o=comp.com/ou=peopleSuspensePath C:\mpdslog\mpds-replSuspenseLimit 100000SuspenseDaily FALSEUIDManaged TRUEUIDAttr Custom5Step 2
Note
Step 3
Step 4
Step 5
Step 6
Step 7
Step 8
Step 9
Step 10
A two-way synchronization MetaLink agreement between the paired Directory Services servers is created.
Synchronizing Cisco Unified MeetingPlace Directory Services with the Cisco Unified CallManager Database
Note
Cisco Unified CallManager is the software-based call-processing component of the Cisco IP telephony solution. If you have an IP telephony environment that includes Cisco Unified CallManager, you can use Directory Services to synchronize the user information that is stored in the Cisco Unified CallManager database with your Cisco Unified MeetingPlace user information.
For information about which releases of Cisco Unified CallManager are supported by Cisco Unified MeetingPlace Directory Services, see the System Requirements for Cisco Unified MeetingPlace, at http://www.cisco.com/en/US/products/sw/ps5664/ps5669/prod_installation_guides_list.html.
Creating a MetaLink Agreement with Cisco Unified CallManager
Synchronizing user data with the Cisco Unified CallManager server is similar to synchronizing data with an external LDAP directory except that synchronization requires an export MetaLink agreement on the Cisco Unified CallManager server rather than an import agreement on the Directory Services server. The export MetaLink agreement exports user data as it is added, modified, or deleted from the Cisco Unified CallManager database.
Note
Directory Services provides default MetaLink agreement and configuration files specifically designed for synchronization with Cisco Unified CallManager. These files are located in the config directory, which is in the location where you installed Directory Services.
Prerequisites
•
•
•
To Create a MetaLink Agreement with Cisco Unified CallManager
Step 1
Step 2
Step 3
•
•
•
Step 4
Step 5
Step 6
Step 7
Step 8
A text output file named ccm-export.mmu.out is created.
Step 9
Step 10
To Stop the Synchronization Process Between Cisco Unified CallManager and Directory Services
Step 1