Cisco Unified CallManager Serviceability Administration Guide, Release 4.2(1)
CDR Search Configuration

Table Of Contents

CDR Search Configuration

Configuring CDR Search by User Extension

Configuring CDR Search by Gateway

Configuring CDR Search by Cause for Call Termination

Viewing Call Termination Details

Configuring CDR Search By Call Precedence Levels

Configuring CDR Search for Malicious Calls


CDR Search Configuration


CAR provides reporting capabilities for three levels of users: Administrators, managers, and individual users. Only CAR administrators can use CDR Search.

This chapter contains the following topics:

Configuring CDR Search by User Extension

Configuring CDR Search by Gateway

Configuring CDR Search by Cause for Call Termination

Viewing Call Termination Details

Configuring CDR Search By Call Precedence Levels

Configuring CDR Search for Malicious Calls

Before You Begin

Make sure that you set the Cisco CallManager service parameters CDR Enabled Flag and Call Diagnostics Enabled to true (enabled), so that the system can generate CDR/CMR data. By default, the system disables these service parameters. For more information about these service parameters, refer to the Cisco CallManager Administration Guide.

All CAR reports use CDR data. Be sure to have the most current CDR data from which your reports are built. By default, CDR data loads daily from midnight to 5 a.m. However, you can set the loading time, interval, and duration as needed. See System Scheduler Configuration, for more information.

Configuring CDR Search by User Extension

Only CAR administrators use the CDR search by user extension feature.

This section describes how to show the details of CDR data based on a user or extension.


Caution Use CAR only during off-peak hours. Otherwise, data collection and report generation could cause performance degradation on the Cisco CallManager system.

Procedure


Step 1 Choose CDR > Search > By User/Extension.

The CDR Search by User Extension window displays.


Note You can enter a wildcard pattern like "!" or "X" to search on extensions. The "!" represents any n digit having 0-9 as each of its digits, and the "X" represents a single digit in the range 0-9.


Step 2 Perform one of the following tasks:

To search CDRs based on extensions, enter the extension number in the Extension field and click the Add Extension button.

To search CDRs based on user, click the Search Extension(s) based on User(s) link, enter the first few letters of the first and/or last name in the First Name and/or Last Name fields, and click the Search button. When the results display, click the Select link next to the result that you want to include. Click the Close button.

The extension displays in the Selected Extension(s) box.


Note To delete an item from the Report Criteria box, click the Remove Extension(s) button. You can delete all items from the Report Criteria box by clicking the Remove All Extensions button.


Step 3 Choose the date range of the period for which you want to see CDR data for the specified user or extension.

Step 4 Click the OK button.

The CDR-CMR Results window displays. If the search returns more than 100 records, a message indicates that the result will be truncated.

Step 5 To view the CMR data, Others button; to view both the CDR and CMR data fields, click the View button.

Step 6 To mail the report to e-mail recipient(s), follow the steps in "Mailing a Report" section.


Related Topics

Understanding the Results for CDR Search

Media Information

CDR and CMR Dump Tables

Configuring CDR Search by Gateway

Configuring CDR Search by Cause for Call Termination

Viewing Call Termination Details

Configuring CDR Search By Call Precedence Levels

Configuring CDR Search for Malicious Calls

Configuring CDR Search by Gateway

Only CAR administrators use the CDR search by gateway feature.

This section describes how to search CDR data based on a specific gateway type or on those gateways that use a chosen route pattern.


Caution Use CAR only during off-peak hours. Otherwise, data collection and report generation could cause performance degradation on the Cisco CallManager system.

Procedure


Step 1 Choose CDR > Search > By Gateway.

The CDR Search by Gateway window displays.

Step 2 Perform one of the following tasks:

To choose the type of gateway that you want to include in the report, click Gateway Types in the column on the left side of the window.

The tree structure expands, and a list of gateway types displays.

To specify only those gateways that use a particular route pattern/hunt list, rather than a gateway type, click Route Patterns/Hunt Pilots in the column on the left side of the window.

The tree structure expands, and a list of route patterns/hunt pilots displays.


Note You can also search for specific route patterns/hunt lists by entering part of the name of the route pattern(s)/hunt pilot(s) in the Route Patterns/Hunt Pilots box in the column on the left side of the window. CAR searches for the route pattern(s)/hunt list(s) that matches the search string.


Step 3 Choose a gateway type from the list.

The gateway name displays in the List of Gateways box.


Note The List of Gateways box will display up to 200 gateways that are configured for the chosen gateway type.


Step 4 In the List of Gateways box, choose the gateways that you want to include in the report.


Note You can generate a report for up to 15 gateways at a time.


Step 5 Click the down arrow icon to move the chosen gateway to the list of Selected Gateways box.

The gateway that you chose displays in the Selected Gateways box.

Step 6 Choose the date and time range of the period when you want to search CDR data.

Step 7 Click the OK button.

The CDR-CMR Results window displays. If the search returns more than 100 records, a message indicates that the result will be truncated.

Step 8 To view the CMR data, Others button; to view both the CDR and CMR data fields, click the View button.

Step 9 To mail the report to e-mail recipient(s), follow the steps in "Mailing a Report" section.


Related Topics

Understanding the Results for CDR Search

Media Information

CDR and CMR Dump Tables

Configuring CDR Search by User Extension

Configuring CDR Search by Cause for Call Termination

Viewing Call Termination Details

Configuring CDR Search By Call Precedence Levels

Configuring CDR Search for Malicious Calls

Configuring CDR Search by Cause for Call Termination

Only CAR administrators use the CDR Search by Cause for Call Termination feature.

This section describes how to search for information about the cause for termination of a call.

Procedure


Step 1 Choose CDR > Search > By Cause for Call Termination.

The Cause for Call Termination window displays.

Step 2 To search for the cause(s) of the termination of a call, highlight the cause(s) in the list of call termination causes.


Tip You can select more than one cause by clicking the causes that you want while holding down the Ctrl key on your keyboard. You can also select all causes in the list by holding down the Shift key while clicking all causes.


Step 3 With the desired cause(s) highlighted, click the down arrow icon above the Selected Call Termination Causes box.

The cause(s) that you chose displays in the Selected Call Termination Causes list box.

Step 4 Choose the date and time range of the period when you want to search CDR data.

The current time in Greenwich Mean Time and Local Time displays.

Step 5 Click OK.

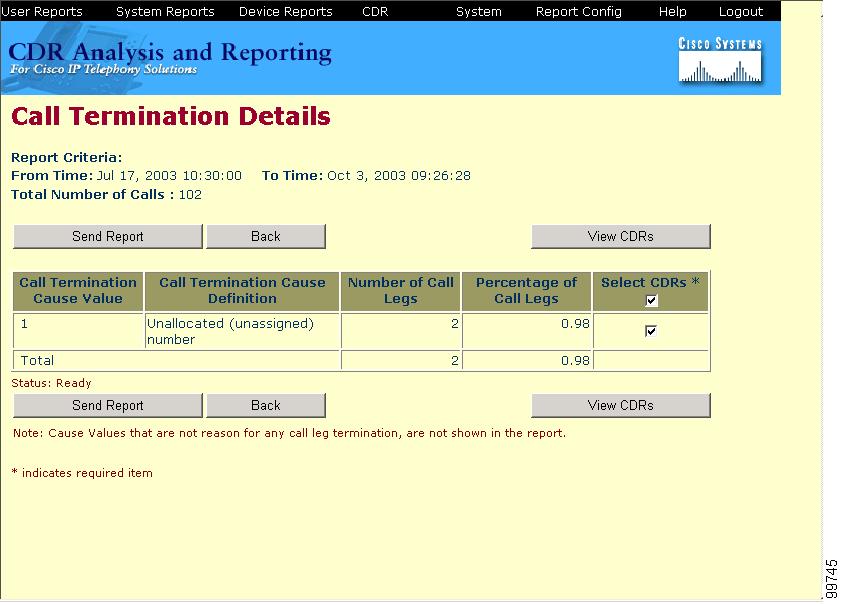
The Call Termination Details window displays the report criteria for which the report has been generated, along with the total number of calls that have been placed during the given time range as well as how many call legs and the percentage of call legs for each cause code selected.

Step 6 To view CDRs, see the "Viewing Call Termination Details" section.


Related Topics

Understanding the Results for CDR Search

Media Information

CDR and CMR Dump Tables

Configuring CDR Search by User Extension

Configuring CDR Search by Gateway

Mailing a Report

Viewing Call Termination Details

Configuring CDR Search By Call Precedence Levels

Configuring CDR Search for Malicious Calls

Viewing Call Termination Details

This section describes how to view the call termination details.

Before You Begin

Follow the steps in the "Configuring CDR Search by Cause for Call Termination" section. This brings you to the Call Termination Details window, that lists the report criteria for which the report has been generated, along with the total number of calls that were placed during the given time range.

Procedure


Step 1 In the Select CDRs field, check the check box beside the individual CDRs that you want to view, or, if you want to view all CDRs in the list, check the Select CDRs check box. See Figure 21-1.

Figure 21-1 Call Termination Details Window

Step 2 After you have chosen the CDRs that you want to view, click View CDRs.

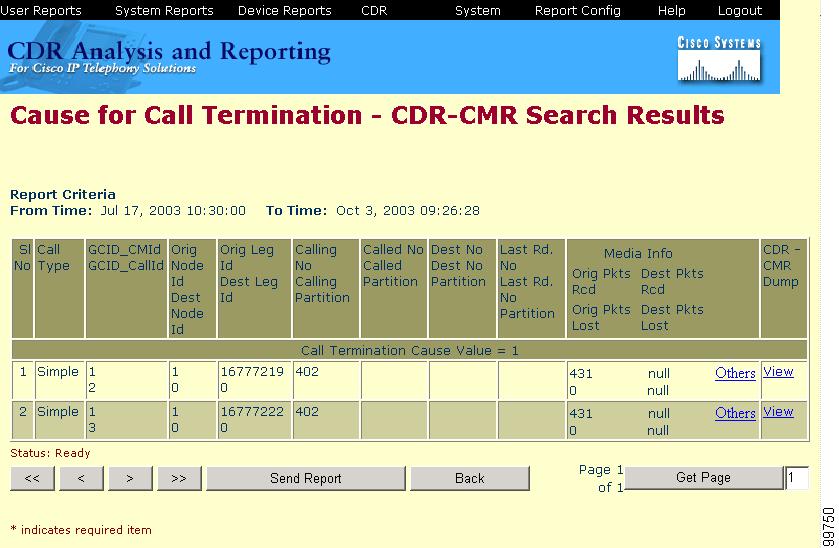
The CDR-CMR Search Results window displays. See Figure 21-2.

Figure 21-2 CDR-CMR Search Results

From this window, you can view the media information and the CDR-CMR dump records by clicking the Others and View links. Refer to the "Understanding the CDR Search Results" section for information on how to read CDR search results reports.

Step 3 To mail the report in an e-mail, click Send Report and follow the procedure described in the "Mailing a Report" section.


Related Topics

Media Information

CDR and CMR Dump Tables

Configuring CDR Search by User Extension

Configuring CDR Search by Gateway

Mailing a Report

Configuring CDR Search by Cause for Call Termination

Configuring CDR Search By Call Precedence Levels

Configuring CDR Search for Malicious Calls

Configuring CDR Search By Call Precedence Levels

Only CAR administrators use the CDR Search by Call Precedence Levels feature.

This section describes how to search for calls according to call precedence.

Procedure


Step 1 Choose CDR > Search > By Call Precedence Level.

The CDR Search by Precedence Levels window displays.

Step 2 In Select Precedence Levels, check the check box(es) for the call precedence level(s) on which you want to search. See Table 21-1 for information about precedence levels.


Note To check the check boxes of every precedence level, click Select All. To clear the check boxes, click Clear All.


Step 3 In the From Date field, choose the date and time from which you want CDRs searched.

Step 4 In the To Date field, choose the date and time to which you want CDRs searched.

Step 5 Click OK.

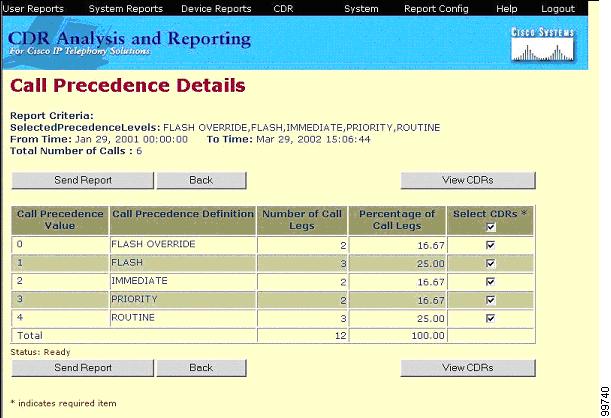
The Call Precedence Details window displays and shows the call precedence levels and values, number of call legs, and percentage of call legs. See Figure 21-3.

Figure 21-3 Call Precedence Details

Step 6 In the Select CDRs column, check the check box(es) of the CDR(s) at which you want to look.

Step 7 Click the View CDRs button.

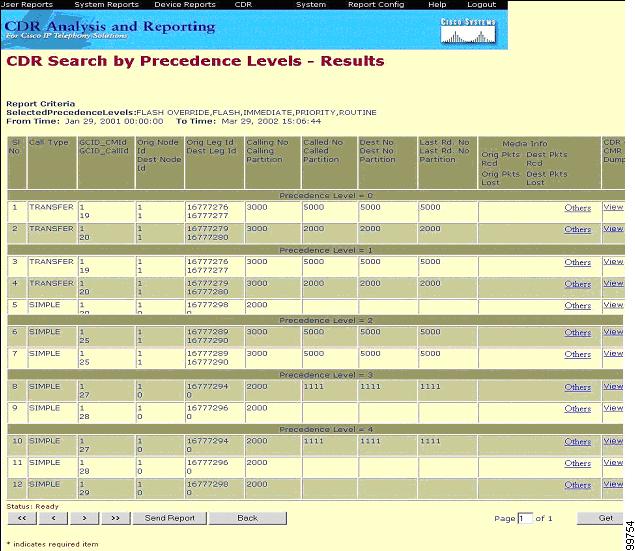
The CDR Search by Precedence Levels - Results window displays. See Figure 21-4.

If the search returns more than 100 records, a message indicates that the result will be truncated.

Figure 21-4 CDR Search by Precedence Levels - Results

Step 8 To view the CMR data, Others button; to view both the CDR and CMR data fields, click the View button.

Table 21-1 Call Precedence Levels

Precedence Level
Priority
Description

Flash Override

0


Flash

1


Immediate

2


Priority

3


Routine

4


Step 9 To mail the report to e-mail recipient(s), click Send Report and follow the steps in "Mailing a Report" section.


Related Topics

Understanding the Results for CDR Search

Media Information

CDR and CMR Dump Tables

Mailing a Report

Configuring CDR Search by User Extension

Configuring CDR Search by Gateway

Configuring CDR Search by Cause for Call Termination

Viewing Call Termination Details

Configuring CDR Search for Malicious Calls

Configuring CDR Search for Malicious Calls

Only CAR administrators use the CDR Search for Malicious Calls feature.

This section describes how to search for malicious calls.

Procedure


Step 1 Choose CDR > Search > For Malicious Calls.

The CDR Search for Malicious calls window displays.

Step 2 Perform one of the following tasks:

In the Select Extension(s) box, enter an extension in the Extension field and click Add Extension.

The user's extension displays in the Selected Extension(s) box.

To search for a user extension, click the Search Extension(s) based on User(s) link, enter the first few letters of the first and/or last name in the First Name and/or Last Name fields, and click the Search button. When the results display, click the Select link next to the result that you want to include. The extension number associated with the user to appears in the Selected Extension(s) box. Click the Close button.


Note To remove an extension, highlight the extension(s) that you want removed and click Remove Extension(s). To remove all extensions, click Remove All Extensions.


Step 3 Choose the date and time range of the period when you want to search CDR data.

Step 4 Click OK.

The CDR-CMR Results window displays. If the search returns more than 100 records, a message indicates that the result will be truncated.

Step 5 To view the CMR data, Others button; to view both the CDR and CMR data fields, click the View button.

Step 6 To mail the report to e-mail recipient(s), follow the steps in "Mailing a Report" section.


Related Topics

Understanding the Results for CDR Search

Media Information

CDR and CMR Dump Tables

Mailing a Report

Configuring CDR Search by User Extension

Configuring CDR Search by Gateway

Configuring CDR Search by Cause for Call Termination

Viewing Call Termination Details

Configuring CDR Search By Call Precedence Levels