-
Cisco MDS 9000 Family Storage Media Encryption Configuration Guide
-
Index
-
New and Changed Information
-
Preface
-
Cisco SME Overview
-
Cisco SME Getting Started
-
Cisco SME Cluster Management
-
Cisco SME Interface Configuration
-
Cisco SME Tape Management
-
Cisco SME Key Management
-
Using the CLI to Configure Cisco SME
-
Cisco SME Best Practices
-
Cisco SME Troubleshooting
-
Cisco SME CLI Commands
-
Offline Data Restore Tool
-
Creating Self-sign certificates
-
Database Backup and Restore
-
Planning for Cisco SME Installation
-
 Feedback
Table Of Contents
Enabling Clustering Using Fabric Manager
Enabling Clustering Using Device Manager
Enabling Cisco SME Using Fabric Manager
Enabling Cisco SME Using Device Manager
Enabling SSH Using Device Manager
Enabling SSH Using Fabric Manager
sme.useIP for IP Address or Name Selection
IP Access Lists for the Management Interface
Creating and Assigning Cisco SME Roles and Cisco SME Users
Creating and Assigning Cisco SME Roles Using Fabric Manager
Creating and Assigning Cisco SME Roles Using the CLI
Installing Fabric Manager, Fabric Manager Client, and Enabling HTTPS
Adding a Fabric and Changing the Fabric Name
Obtaining and Installing Licenses
Java Cryptography Extension Requirement
Cisco SME Configuration Overview
Initial Cisco SME Configuration
Saving Cisco SME Cluster Configurations
Cisco SME Configuration Restrictions
Cisco SME Configuration Limits
Getting Started
This chapter includes information about Cisco SME installation and the preliminary tasks that you must complete before configuring Cisco SME. It includes the following:
•
Cisco SME Configuration Restrictions
Note
http://www.cisco.com/en/US/products/ps5989/prod_release_notes_list.html
Cisco SME Installation
Cisco SME has the following installation requirements:
•
To determine if the release supports SME, refer to the Cisco MDS 9000 Family Release Notes and the Cisco Data Center Interoperability Matrix.
•
Note
•
Cisco Fabric Manager is installed using the Fabric Manager Installation CD-ROM included with your switch, or you can download Fabric Manager. For information on installing Fabric Manager, see the Cisco MDS 9000 Family Fabric Manager Configuration Guide. For information on installing Cisco MDS SAN-OS Release 3.2(2), see the Cisco MDS 9000 Family CLI Configuration Guide.
You can use one of two configuration management tools to configure Cisco Storage Media Encryption.
•
Cisco MDS 9000 Fabric Manager
The Cisco Fabric Manager is a set of network management tools that supports Secure Simple Network Management Protocol version 3 (SNMPv3). It provides a graphical user interface (GUI) that displays real-time views of your network fabrics, and lets you manage the configuration of Cisco MDS 9000 Family devices and third-party switches. The Cisco Fabric Manager applications are:
•
Note
•
•
–
–
Note
The Cisco Fabric Manager applications are an alternative to the CLI for most switch configuration commands.
For more information on configuring the Cisco MDS switch using the Cisco MDS 9000 Family Fabric Manager.
Command Line Interface
With the CLI, you can type commands at the switch prompt, and the commands are executed when you press the Enter key. The CLI parser provides command help, command completion, and keyboard sequences that allow you to access previously executed commands from the buffer history.
For more information on configuring the Cisco MDS switch using the CLI, refer to the Cisco MDS 9000 CLI Configuration Guide.
Before You Begin
This section describes the required tasks that must be completed before you configure Cisco SME. It includes the following:
•
•
•
•
•
•
Before configuring Cisco SME, you must explicitly enable clustering, Cisco SME, SSH, and DNS on the MDS switch with an installed MSM-18/4 module or on the MDS 9222i switch. By default, these are disabled. The configuration and verification operations for Cisco SME are only available when these are enabled on a switch.
Enabling Clustering
You can enable clustering on the Cisco MDS 9000 switch with an installed MSM-18/4 module using Fabric Manager and Device Manager 3.2(2).
Note
This section includes the following topics:
•
•
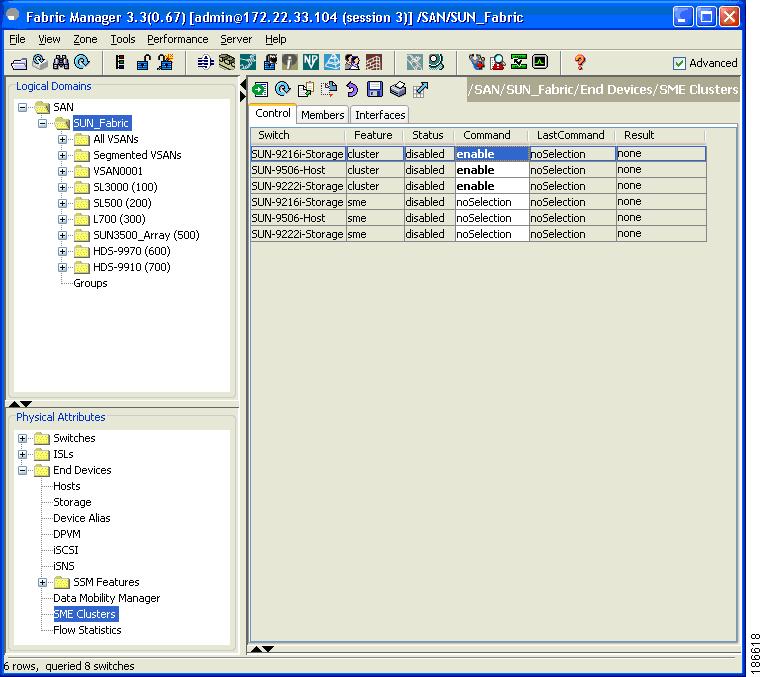
Enabling Clustering Using Fabric Manager
To enable clustering using Fabric Manager, follow these steps:
Step 1
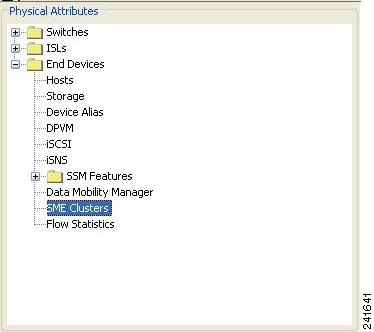
Figure 2-1 Physical Attributes Pane
Step 2
Step 3
Note
Figure 2-2 Information Pane
Step 4
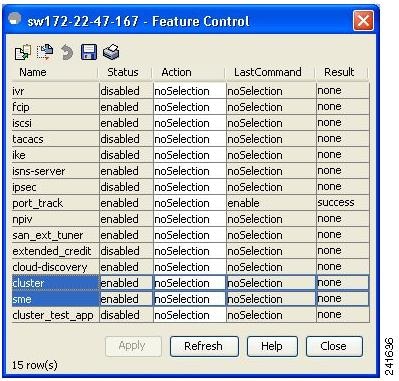
Enabling Clustering Using Device Manager
To enable clustering using Device Manager, do the following for a specific switch:
Step 1
Step 2
Step 3
Figure 2-3 Device Manager Feature Control Window
Step 4
Enabling Cisco SME
You can enable Cisco SME using Fabric Manager or Device Manager.
Note
This section includes the following topics:
•
•
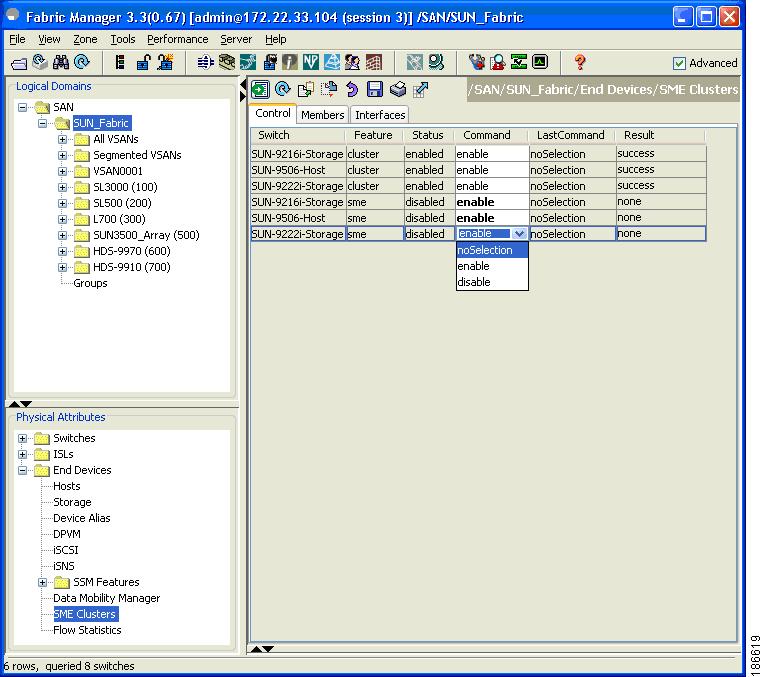
Enabling Cisco SME Using Fabric Manager
To enable Cisco SME using Fabric Manager, follow these steps:
Step 1
Figure 2-4 Physical Attributes Pane
Step 2
Step 3
Note
Figure 2-5 Information Pane
Step 4
Enabling Cisco SME Using Device Manager
To enable Cisco SME using Device Manager, do the following for a specific device:
Step 1
Step 2
Step 3
Figure 2-6 Device Manager Feature Control Window
Step 4
Enabling SSH
Before using Cisco SME, you need to generate an SSH server key-pair SSH on the MDS switch with the MSM-18/4 modules installed. By default, the SSH service is disabled.
This section includes the following:
•
•
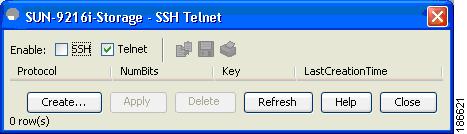
Enabling SSH Using Device Manager
Before using Cisco SME, you need to generate an SSH server key-pair SSH on the MDS switch with the MSM-18/4 modules installed.By default, the SSH service is disabled.
To enable SSH using Device Manager, follow these steps:
Step 1
Step 2
Figure 2-7 Device Manager SSH Telnet Window
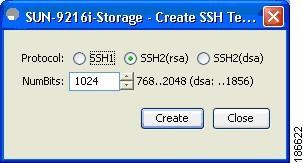
Step 3
Figure 2-8 Device Manager Create SSH Window
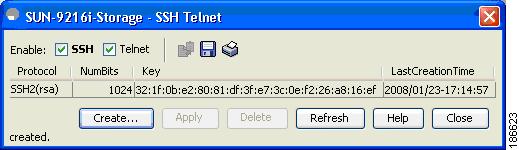
Step 4
Figure 2-9 Device Manager Final Window
Step 5
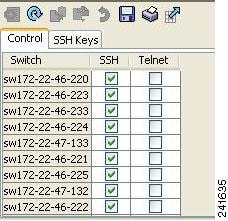
Figure 2-10 Enabling SSH on Cisco SME configured switches
Enabling SSH Using the CLI
Before using Cisco SME, you need to generate an SSH server key-pair SSH on the MDS switch with the MSM-18/4 modules installed.
Be sure to have an SSH server key-pair with the appropriate version before enabling the SSH service. Generate the SSH server key-pair according to the SSH client version used. The number of bits specified for each key-pair ranges from 768 to 2048.
Note
Generating the SSH Server Key-Pair
The SSH service accepts three types of key-pairs for use by SSH versions 1 and 2.
•
•
Note
If you delete all of the SSH keys, you cannot start a new SSH session.
To generate the SSH server key-pair, follow these steps:
To enable or disable the SSH service using the CLI, follow these steps
:
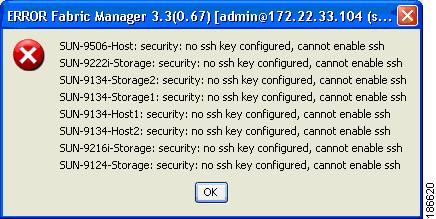
Enabling SSH Using Fabric Manager
You must first generate the SSH keys using either the Device Manager or the CLI. If you try to enable SSH in the Fabric Manager Web Client before generating the SSH keys, you will get an error message. See Figure 2-11.
Figure 2-11 Error Message in Fabric Manager
After generating the keys, enable SSH in Fabric Manager as follows:
Step 1
Step 2
Figure 2-12 Physical Attributes Pane
Step 3
Figure 2-13 Information Pane
Step 4
Enabling DNS
DNS offers services to map a host name to an IP address in the network through a DNS server. When you configure DNS on the switch, you can substitute the host name for the IP address with all IP commands, such as ping, telnet, upload, and download.
You must decide to use DNS completely or to use IP addresses fully in your fabric. A combination of these will not work with the Cisco SME feature.
If you chose to use DNS, the following requirements apply:
•
•
•
If you choose to use IP addresses, the DNS server should not be configured on any switch in the fabric and the use_ip flag in the smeserver.properties must be set to TRUE.
For information on configuring DNS, refer to the Configuring IP Services chapter in the Cisco MDS 9000 Family CLI Configuration Guide.
To verify that DNS is enabled everywhere in the cluster, ping between the Fabric Manager server and the MDS switches and also between the MDS switches with DNS names.
sme.useIP for IP Address or Name Selection
If you do not have DNS configured on all switches in the cluster, you can use sme.useIP. For information about sme.useIP, see Chapter 9, "Cisco SME Troubleshooting".
IP Access Lists for the Management Interface
Cluster communication requires the user of the Management interface. IP ACL configurations must allow UDP and TCP traffic on ports 9333, 9334, 9335, and 9336.
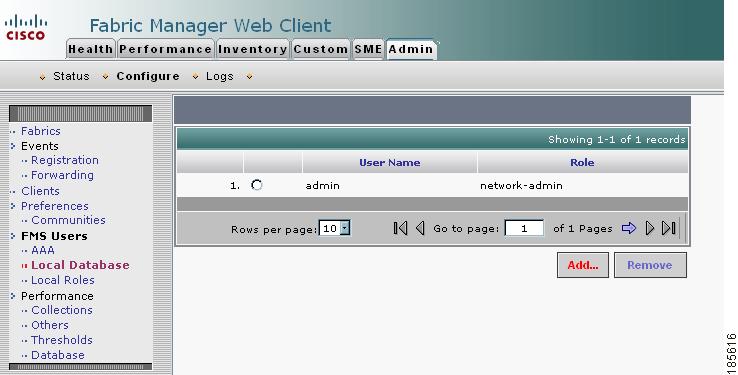
Creating and Assigning Cisco SME Roles and Cisco SME Users
The Cisco SME feature provides two primary roles: Cisco SME Administrator and the Cisco SME Recovery Officer. Be default, Cisco SME assigns both the Cisco SME Administrator and the Cisco SME Recovery Officer to the same user. This assignment works well for small scale deployments of Cisco SME.
Note
Table 2-1 shows a description of the Cisco SME roles and the number of users that should be considered for each role.
Configuring the AAA Roles
For information on configuring the AAA roles for the Cisco SME Administrator and the Cisco SME Recovery Officer, refer to the Cisco MDS 9000 Family CLI Configuration Guide.
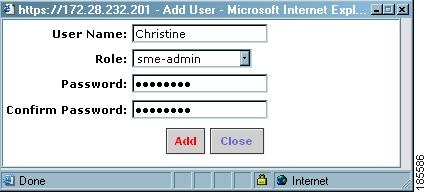
Creating and Assigning Cisco SME Roles Using Fabric Manager
For detailed information on creating and assigning roles, refer to the Cisco MDS 9000 Family Fabric Manager Configuration Guide.
Note
You need to create a Cisco SME role and then assign users to the Cisco SME role. To create a Cisco SME role, follow these steps:
Step 1
Step 2
Figure 2-14 Creating and Assigning Cisco SME Roles
Step 3
Step 4
Step 5
Creating and Assigning Cisco SME Roles Using the CLI
For detailed information on creating and assigning roles, refer to the Cisco MDS 9000 Family CLI Configuration Guide.
To create a Cisco SME role or to modify the profile for an existing Cisco SME role, follow these steps:
Note
Note
Installing Fabric Manager, Fabric Manager Client, and Enabling HTTPS
To be able to manage Cisco SME, you need to install Fabric Manager Server Enterprise edition. For information on installing Cisco Fabric Manager, refer to the installation chapters of the .
Note
Note
Cisco SME requires the HTTPS protocol on the Cisco MDS 9000 switch with an MSM-18/4 module installed. You must enable HTTPS during the Fabric Manager installation. To enable HTTPS, refer to the installation information in the Cisco MDS 9000 Family Fabric Manager Configuration Guide.
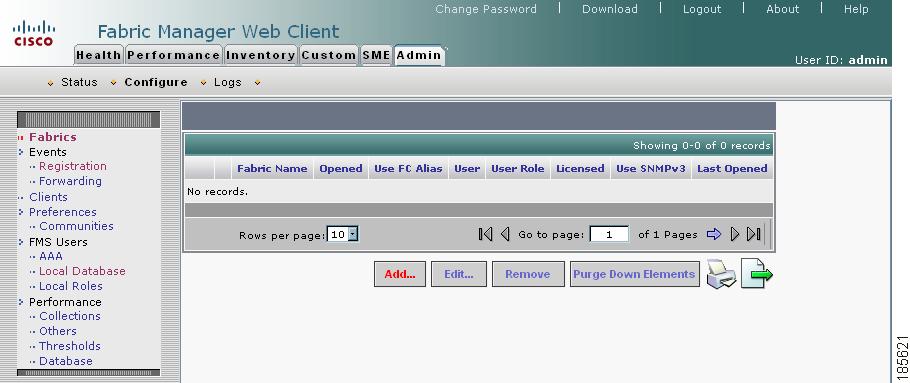
Adding a Fabric and Changing the Fabric Name
You need to add the fabric that includes the Cisco MDS switch with the MSM-18/4 module installed. Or you also can add a fabric that includes an MDS 9222i switch.
Note
To add a fabric using Fabric Manager Web Server, follow these steps:
Step 1
Step 2
Step 3
Step 4
Figure 2-15 Fabric Manager Admin Screen
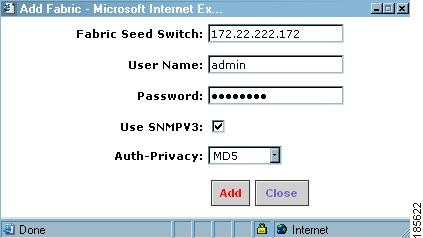
The Add Fabric seed switch screen displays fields to log in to the fabric seed switch.
Step 5
Step 6
Figure 2-16 Fabric Seed Switch Login
Note
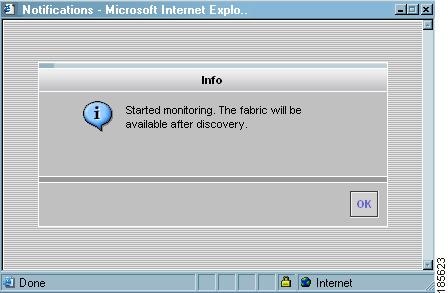
A notification window indicates that monitoring has started and that the fabric will be available after discover is complete.
Figure 2-17 Monitoring Notification
Step 7
Note
Figure 2-18 New Fabric Added
Step 8
Step 9
Step 10
Note
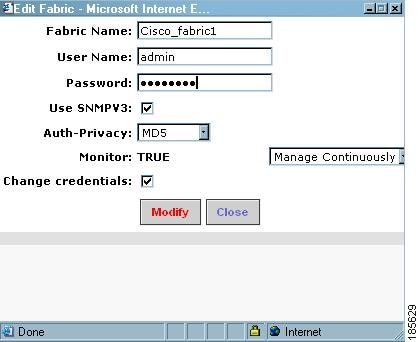
Figure 2-19 Enter a Unique Fabric Name
Step 11
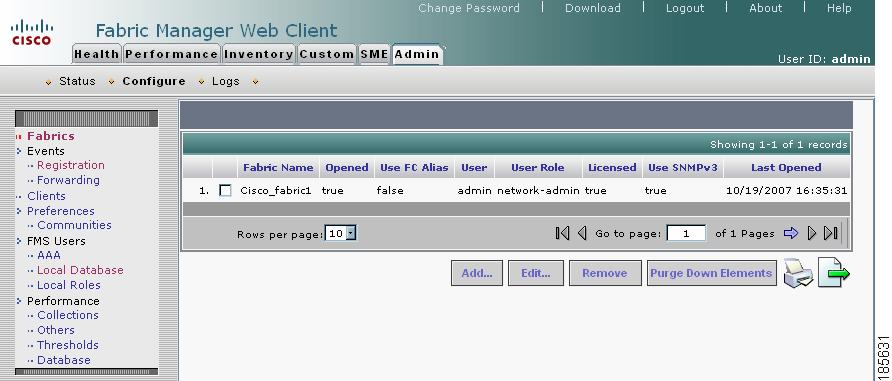
Figure 2-20 Viewing the New Fabric Name
Installing Smart Card Drivers
The smart card reader must be connected to a management workstation that is used to configure Cisco SME. The smart card driver and the smart card drivers library file must be installed in the workstation. These are found on the Fabric Manager Installation CD.
When connecting a new smart card reader after the installation of smart card drivers, you may be required to restart the computer. If the card reader is not recognized on your workstation, you may need to install the latest smart card drivers. You can find the Download link on the Fabric Manager Web Client.
Note
Obtaining and Installing Licenses
To use the Cisco SME feature, you need the appropriate Cisco SME license; however, enabling Cisco SME without a license key starts a counter on the grace period. You then have 120 days to install the appropriate license keys or disable the use of Cisco SME. If at the end of the 120-day grace period the switch does not have a valid license key for Cisco SME, it will be automatically disabled.
To identify if the Cisco SME feature is active, use the show license usage license-name command.
Note
The following three Cisco SME licenses are available:
To obtain and install Cisco SME licenses, refer to the licensing chapter in the Cisco MDS 9000 Family CLI Configuration Guide.
Cisco SME Requirements
This section describes the following requirements:
•
Java Cryptography Extension Requirement
Cisco SME requires Java Cryptography Extension (JCE) Unlimited Strength Jurisdiction Policy Files 5C0 (for JRE 1.5). You will need to extract and copy the local_policy.jar and the US_export_policy.jar files to the $JAVA_HOME\jre\lib\security\ directory. You can obtain these files from the Fabric Manager Installation CD.
Zoning Requirement
Zoning requirements include the following:
•
For information on zoning, refer to the Cisco MDS 9000 Family CLI Configuration Guide.
FC-Redirect Requirements
FC-Redirect requirements include the following:
•
•
•
•
•
•
Cisco SME Configuration Overview
Before configuring Cisco SME on your switch, it is important to become familiar with the Cisco SME configuration process. This section provides an overview of the Cisco SME configuration process and includes the following topics:
•
•
Initial Cisco SME Configuration
Note
Cisco SME configuration tasks listed below provide an overview of the basic Cisco SME configuration process. Complete the Cisco SME configuration tasks on the switch with an installed MSM-18/4 module or on a Cisco MDS 9222i switch.
Cisco SME basic configuration tasks include the following:
•
•
•
•
For details about configuration procedures using the CLI, see Chapter 7, "Using the Command Line Interface to Configure SME."
Saving Cisco SME Cluster Configurations
Caution
You must save configuration changes whenever switches or interfaces are added or deleted from a cluster.
Cisco SME Configuration Restrictions
This section includes information on Cisco SME configuration limitations and restrictions. It contains the following:
•
FICON Restriction
Cisco SME is not supported on FICON devices and Cisco SME cluster devices can not be part of a FICON VSAN.
iSCSI Restriction
You can not configure Cisco SME and iSCSI on the same Cisco MDS MSM-18/4 module as SME uses the iSCSI port indices.
FC-Redirect Restrictions
FC-Rredirect is not supported on the following switches:
•
•
•
Cisco SME Configuration Limits
Table lists the Cisco SME configurations and the corresponding limits.