-
Cisco MDS 9000 Family Storage Media Encryption Configuration Guide
-
Index
-
New and Changed Information
-
Preface
-
Cisco SME Overview
-
Cisco SME Getting Started
-
Cisco SME Cluster Management
-
Cisco SME Interface Configuration
-
Cisco SME Tape Management
-
Cisco SME Key Management
-
Using the CLI to Configure Cisco SME
-
Cisco SME Best Practices
-
Cisco SME Troubleshooting
-
Cisco SME CLI Commands
-
Offline Data Restore Tool
-
Creating Self-sign certificates
-
Database Backup and Restore
-
Planning for Cisco SME Installation
-
 Feedback
Table Of Contents
Provisioning Self-Sign Certificates
Creating Certificate Authority (CA) Certificates
Generating Key Manager Center (KMC) Certificate
Editing SSL Settings in Cisco Fabric Manager Web Client
Setting Up the RSA Key Manager to Work with Cisco SME
Installing the RSA Key Manager Application
Creating JKS Files Using the Java Keytool
Adding the Cisco SME User to RKM
Provisioning Self-Sign Certificates
The Secure Socket Layer (SSL) protocol secures the network communication and allows data to be encrypted before transmission and provides security. Many application servers and Web servers support the use of keystores for SSL configuration.
This appendix also includes information on how to select the RSA Key Manager.
This appendix includes the following sections:
•
Configuring SSL for Cisco SME, page C-1
•
•
Configuring SSL for Cisco SME
A certificate is an electronic document that you use to identify a server, a company, or some other entity and to associate that identity with a public key.
Certificate authority (CA) are entities that validate identities and issue certificates. The certificate that the CA issues binds a particular public key to the name of the entity that the certificate identifies (such as the name of a server or device). Only the public key that the certificate certifies works with the corresponding private key that is possessed by the entity that the certificate identifies. Certificates help prevent the use of fake public keys for impersonation.
You must install a third-party tool such as the OpenSSL application to generate a certificate request. In Windows, by default, openssl.exe is located at c:\openssl\bin.
Before configuring the SSL, consider the following:
•
•
•
This section describes the following topics:
•
•
Creating Certificate Authority (CA) Certificates
To generate the CA certificates follow these steps:
Step 1
OpenSSL> req -x509 -days 365 -newkey rsa -out cacert.pem -outform PEM
This creates a cacert.pem file in the directory with OpenSSL.exe.
Step 2
switch# config tEnter configuration commands, one per line. End with CNTL/Z.Step 3
switch(config)#crypto ca trustpoint my_caStep 4
switch(config-trustpoint)# rsakeypair my_ca_keyStep 5
switch(config-trustpoint)# exitStep 6
switch(config)# crypto ca authenticate my_cainput (cut & paste) CA certificate (chain) in PEM format;end the input with a line containing only END OF INPUT :----BEGIN CERTIFICATE----MIIDnjCCAwegAwIBAgIBADANBgkqhkiG9w0BAQQFADCBlzELMAkGA1UEBhMCVVMxEzARBgNVBAgTCkNhbGlmb3JuaWExETAPBgNVBAcTCFNhbiBKb3NlMRowGAYDVQQKExFDaXNjbyBTeXN0ZW1zIEluYzEOMAwGA1UECxMFRGV2ZWwxETAPBgNVBAMTCG1hbWFzc2V5MSEwHwYJKoZIhvcNAQkBFhJtYW1hc3NleUBjaXNjby5jb20wHhcNMDcxMTIyMDgzNDM1WhcNMDgxMTIxMDgzNDM1WjCBlzELMAkGA1UEBhMCVVMxEzARBgNVBAgTCkNhbGlmb3JuaWExETAPBgNVBAcTCFNhbiBKb3NlMRowGAYDVQQKExFDaXNjbyBTeXN0ZW1zIEluYzEOMAwGA1UECxMFRGV2ZWwxETAPBgNVBAMTCG1hbWFzc2V5MSEwHwYJKoZIhvcNAQkBFhJtYW1hc3NleUBjaXNjby5jb20wgZ8wDQYJKoZIhvcNAQEBBQADgY0AMIGJAoGBAMbZAv0+Ka/FS3/jwdaqItc8Ow3alpw9gyqEzA3uFLjNtXSfHRu9OsrP5tliHHlJP+fezeAUuVfmMTPrOIxURcF2c7Yq1Ux5s4Ua3cMGf9BGYBRbhO8Filt2mGDqY5u0mJY+eViR69MZk8Ouj+gRxQq83fB8MqJG39f1BedRcZLBAgMBAAGjgfcwgfQwHQYDVR0OBBYEFGXsBg7f7FJcL/741j+M2dgI7rIyMIHEBgNVHSMEgbwwgbmAFGXsBg7f7FJcL/741j+M2dgI7rIyoYGdpIGaMIGXMQswCQYDVQQGEwJVUzETMBEGA1UECBMKQ2FsaWZvcm5pYTERMA8GA1UEBxMIU2FuIEpvc2UxGjAYBgNVBAoTEUNpc2NvIFN5c3RlbXMgSW5jMQ4wDAYDVQQLEwVEZXZlbDERMA8GA1UEAxMIbWFtYXNzZXkxITAfBgkqhkiG9w0BCQEWEm1hbWFzc2V5QGNpc2NvLmNvbYIBADAMBgNVHRMEBTADAQH/MA0GCSqGSIb3DQEBBAUAA4GBAFmDucZlBZFJk09IihEm5wd4oouxHsKPQroyG/CYShv1XXAyEGytxuCAITDzMq2IJiFbZt0kIiyuP9YRQLNRz47G4IRJGp5J2HnOc2cdF8Mc0DDApdgndUiIX/lv7vuQfyxqX45oSncwQct3y38/FPEbcRgZgnOgwcrqBzKV0Y3+----END CERTIFICATE----END OF INPUTFingerprint(s): MD5 Fingerprint=1E:18:10:69:7B:C1:CC:EA:82:08:67:FB:90:7D:58:EBDo you accept this certificate? [yes/no]:yesStep 7
switch(config)# crypto ca enroll my_caCreate a challenge password. You will need to verbally provide thispassword to the CA Administrator in order to revoke your certificate.For security reasons your password will not be saved in the configuration.Please make a note of it.Password:nbv123The subject name in the certificate will be: ips-vegas8.cisco.comInclude the switch serial number in the subject name? [yes/no]:noInclude an IP address in the subject name [yes/no]:noThe certificate request will be displayed...----BEGIN CERTIFICATE REQUEST----MIIBJTCB0AIBADAfMR0wGwYDVQQDExRpcHMtdmVnYXM4LmNpc2NvLmNvbTBcMA0GCSqGSIb3DQEBAQUAA0sAMEgCQQCeAzv5w9d32YpPfYdNYoFjOW0yRVbYEe+mNHi8b2VPOVZ6UOFdhIS1Im0/Xv1Bpcuy4TRktu7whNyyvvu3niVdAgMBAAGgTDAVBgkqhkiG9w0BCQcxCBMGbmJ2MTIzMDMGCSqGSIb3DQEJDjEmMCQwIgYDVR0RAQH/BBgwFoIUaXBzLXZlZ2FzOC5jaXNjby5jb20wDQYJKoZIhvcNAQEEBQADQQBzPcKE3EjeTjODnPXNkz1WsU3oUdsuxOT/m1OSBZvhBfHICQZZpfS2ILqaQP16LiZCZydHWViNQ+9LmHUZ4BDG----END CERTIFICATE REQUEST----switch(config)#Step 8
Ensure that you include the BEGIN CERTIFICATE REQUEST and END CERTIFICATE REQUEST lines in the file content.
Step 9
OpenSSL> x509 -req -days 365 -in switch.csr -CA cacert.pem -CAkey privkey.pem -set_serial 01 -out switch.pem
Step 10
switch(config)# crypto ca import my_ca certificateinput (cut & paste) certificate in PEM format:----BEGIN CERTIFICATE----MIIB4jCCAUsCAQEwDQYJKoZIhvcNAQEEBQAwgZcxCzAJBgNVBAYTAlVTMRMwEQYDVQQIEwpDYWxpZm9ybmlhMREwDwYDVQQHEwhTYW4gSm9zZTEaMBgGA1UEChMRQ2lzY28gU3lzdGVtcyBJbmMxDjAMBgNVBAsTBURldmVsMREwDwYDVQQDEwhtYW1hc3NleTEhMB8GCSqGSIb3DQEJARYSbWFtYXNzZXlAY2lzY28uY29tMB4XDTA3MTIxNDAyMzIzOVoXDTA4MTIxMzAyMzIzOVowHzEdMBsGA1UEAxMUaXBzLXZlZ2FzOC5jaXNjby5jb20wXDANBgkqhkiG9w0BAQEFAANLADBIAkEAngM7+cPXd9mKT32HTWKBYzltMkVW2BHvpjR4vG9lTzlWelDhXYSEtSJtP179QaXLsuE0ZLbu8ITcsr77t54lXQIDAQABMA0GCSqGSIb3DQEBBAUAA4GBAKR3WAAF/9zMb2u9A42I2cB2G5lucSzndc4P+O4sYZF5pBt7UpyAs1GKAqivGXVq2FJ2JetX78Fqy7jYCzanWm0tck0/G1dSfr/XlCFXUuVed9de02yqxARSEx8mX4ifqzYHErHdbi+vDAaMzkUEvHWthOuUZ7fvpoNH+xhRAuBo----END CERTIFICATE----Step 11
Generating Key Manager Center (KMC) Certificate
To generate the KMC server certificate, follow these steps:
Step 1
OpenSSL> genrsa -out sme_kmc_server.key 1024
OpenSSL> req -new -key sme_kmc_server.key -out sme_kmc_server.csr
OpenSSL> x509 -req -days 365 -in sme_kmc_server.csr -CA cacert.pem -CAkey privkey.pem -CAcreateserial -out sme_kmc_server.cert
OpenSSL> pkcs12 -export -in sme_kmc_server.cert -inkey sme_kmc_server.key -out sme_kmc_server.p12
Step 2
"C:\Program Files\Java\jre1.6.0_02\bin\keytool.exe" -importkeystore -srckeystore sme_kmc_server.p12 -srcstoretype PKCS12 -destkeystore sme_kmc_server.jks -deststoretype JKS
Note
Step 3
"C:\Program Files\Java\jre1.6.0_02\bin\keytool.exe" -importcert -file cacert.pem -keystore sme_kmc_trust.jks -storetype JKS
Step 4
Step 5
Step 6
Note
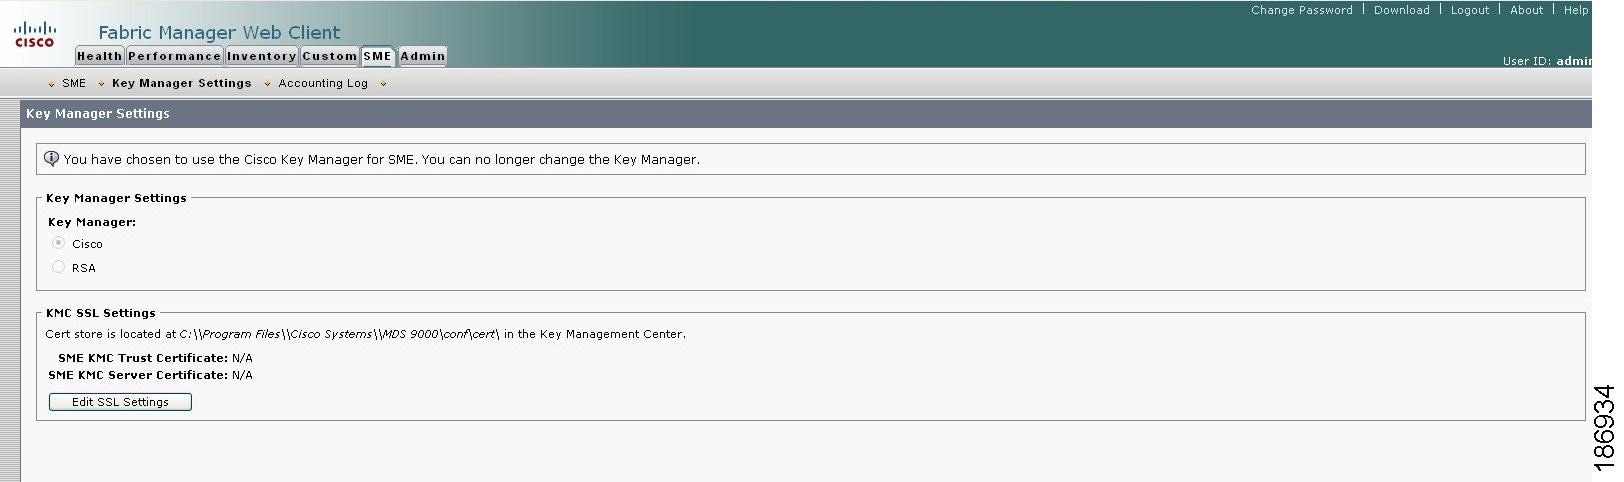
Editing SSL Settings in Cisco Fabric Manager Web Client
You can edit the SSL settings if you chose the Cisco Key Manager.
To edit the SSL settings in the Cisco SME wizard, do the following:
Step 1
Step 2
Figure C-1 Selecting KMC SSL Settings
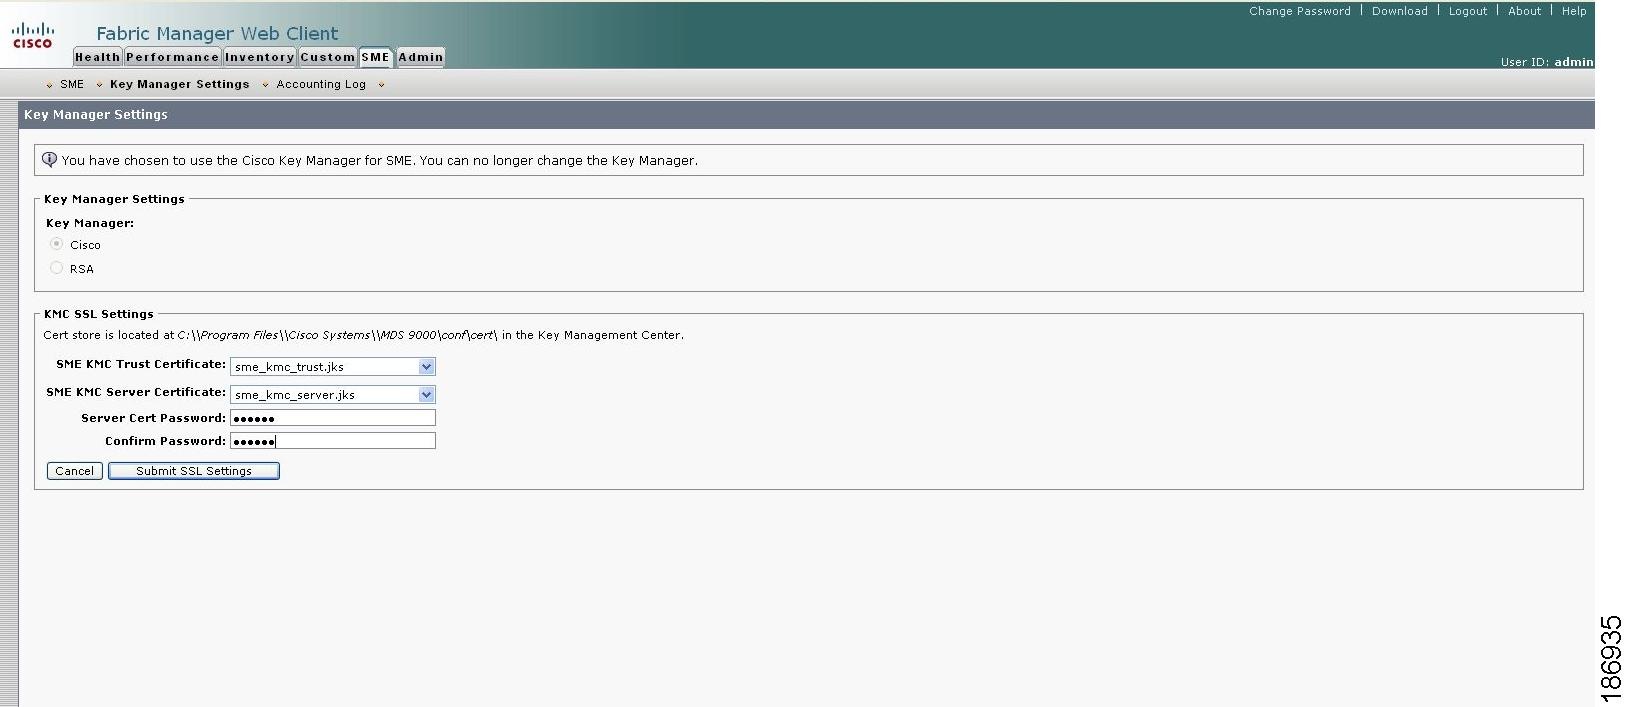
Step 3
Figure C-2 Selecting KMC SSL Settings
Step 4
Note
Step 5
The keystore files that are stored in the KMC directory are listed in the drop-down menu.
Step 6
Step 7
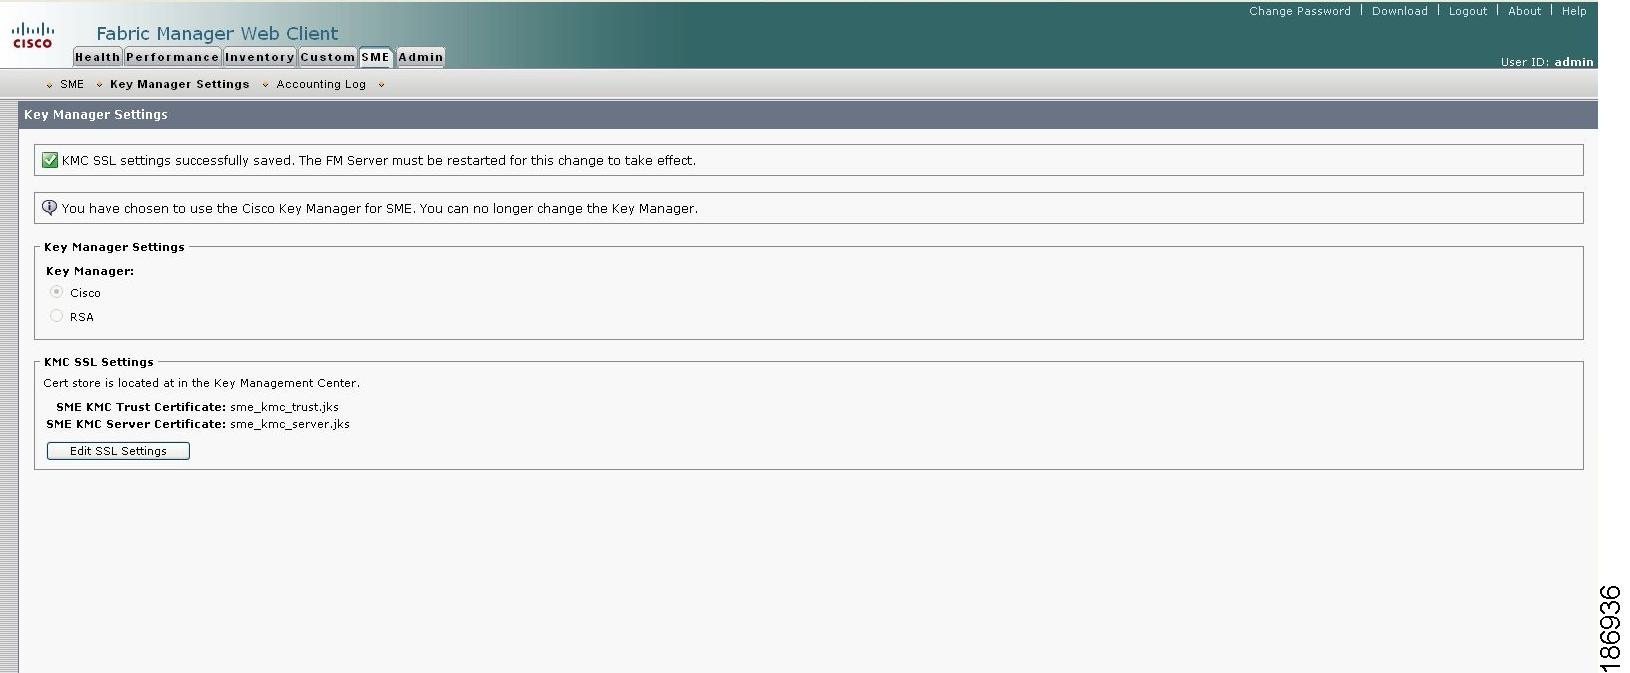
Figure C-3 Saving the KMC SSL Settings
To change the SSL settings again, click Edit SSL Settings.
Note
Note
•
•
For more information, refer to Selecting Transport Settings, page 3-10.
Setting Up the RSA Key Manager to Work with Cisco SME
In order to implement a complete working security solution between the KMC and the RSA RKM, you will need to install and setup the RSA Key Manager application.
The following applications are required:
•
•
•
•
The process of setting up the RSA Key Manager to work with Cisco SME, involves the following:
•
•
•
•
After completing these tasks, you will be able to select RSA as the key manager for Cisco SME and then create a cluster.
Installing the RSA Key Manager Application
To install the RSA Key Manager application, follow the instructions provided in the RSA Install Guide.
Generating CA Certificates
Generating CA certificates requires access to an OpenSSL system. You can obtain a Windows version at http://gnuwin32.sourceforge.net/packages/openssl.htm.
The OpenSSL program stores the files that are created during this process in the /bin directory of the OpenSSL program.
To generate CA certificates, do the following:
Step 1
Step 2
OpenSSL> genrsa -out rt.key 1024Loading 'screen' into random state - doneGenerating RSA private key, 1024 bit long modulus.++++++.......++++++e is 65537 (0x10001)Step 3
Note
OpenSSL> req -new -key rt.key -x509 -days 365 -out rt.certYou are about to be asked to enter information that will be incorporated into your certificate request.What you are about to enter is what is called a Distinguished Name or a DN.There are quite a few fields but you can leave some blankFor some fields there will be a default value,If you enter '.', the field will be left blank.-----Country Name (2 letter code) [AU]:State or Province Name (full name) [Some-State]:Locality Name (eg, city) []:Organization Name (eg, company) [Internet Widgits Pty Ltd]:Organizational Unit Name (eg, section) []:Common Name (eg, YOUR name) []:homeEmail Address []:Step 4
OpenSSL> pkcs12 -export -in rt.cert -inkey rt.key -out rt.p12Loading 'screen' into random state - doneEnter Export Password:Verifying - Enter Export Password:Step 5
OpenSSL> genrsa -out client.key 1024Loading 'screen' into random state - doneGenerating RSA private key, 1024 bit long modulus..................++++++....++++++e is 65537 (0x10001)Step 6
OpenSSL> req -new -key client.key -out client.csrYou are about to be asked to enter information that will be incorporated into your certificate request.What you are about to enter is what is called a Distinguished Name or a DN.There are quite a few fields but you can leave some blankFor some fields there will be a default value,If you enter '.', the field will be left blank.-----Country Name (2 letter code) [AU]:State or Province Name (full name) [Some-State]:Locality Name (eg, city) []:Organization Name (eg, company) [Internet Widgits Pty Ltd]:Organizational Unit Name (eg, section) []:caeCommon Name (eg, YOUR name) []:Email Address []:Please enter the following 'extra' attributesto be sent with your certificate requestA challenge password []:An optional company name []:Step 7
OpenSSL> x509 -req -days 365 -in client.csr -CA rt.cert -CAkey rt.key -CAcreateserial -out
client.cert
Loading 'screen' into random state - doneSignature oksubject=/C=AU/ST=wi/L=hudson/O=cisco/OU=cae/CN=mikef/emailAddress=mikef@cisco.comGetting CA Private KeyStep 8
OpenSSL> pkcs12 -export -in client.cert -inkey client.key -out client.p12Loading 'screen' into random state - doneEnter Export Password:Verifying - Enter Export Password:OpenSSL> genrsa -out server.key 1024Loading 'screen' into random state - doneGenerating RSA private key, 1024 bit long modulus..++++++..................++++++e is 65537 (0x10001)Step 9
OpenSSL> req -new -key server.key -out server.csrYou are about to be asked to enter information that will be incorporatedinto your certificate request.What you are about to enter is what is called a Distinguished Name or a DN.There are quite a few fields but you can leave some blankFor some fields there will be a default value,If you enter '.', the field will be left blank.--Country Name (2 letter code) [AU]:State or Province Name (full name) [Some-State]:Locality Name (eg, city) []:Organization Name (eg, company) [Internet Widgits Pty Ltd]:Organizational Unit Name (eg, section) []:Common Name (eg, YOUR name) []:Email Address []:Please enter the following 'extra' attributesto be sent with your certificate requestA challenge password []:An optional company name []:Step 10
OpenSSL> x509 -req -days 365 -in server.csr -CA rt.cert -CAkey rt.key -CAcreateserial -out
server.cert
Loading 'screen' into random state - doneSignature oksubject=/C=AU/ST=wi/L=town/O=cisco/OU=tac/CN=bill/emailAddress=bill@cisco.comGetting CA Private KeyStep 11
OpenSSL> pkcs12 -export -in server.cert -inkey server.key -nokeys -out serverpub.p12Loading 'screen' into random state - doneEnter Export Password:Verifying - Enter Export Password:Step 12
OpenSSL> pkcs12 -export -in server.cert -inkey server.key -out server.p12Loading 'screen' into random state - doneEnter Export Password:Verifying - Enter Export Password:OpenSSL>Creating JKS Files Using the Java Keytool
To create the JKS files needed by the Fabric Manager server using the JAVA Keytool, do the following:
Step 1
Step 2
Import client PKCS12 keystore to JKSkeytool -importkeystore -srckeystore client.p12 -srcstoretype PKCS12 -destkeystore sme_rkm_client.jks -deststoretype JKSImport server PKCS12 keystore to JKSkeytool -importkeystore -srckeystore serverpub.p12 -srcstoretype PKCS12 -destkeystore sme_rkm_trust.jks -deststoretype JKSStep 3
Placing Certificates in RKM
To place certificates in the RKM, do the following:
Step 1
Step 2
Step 3
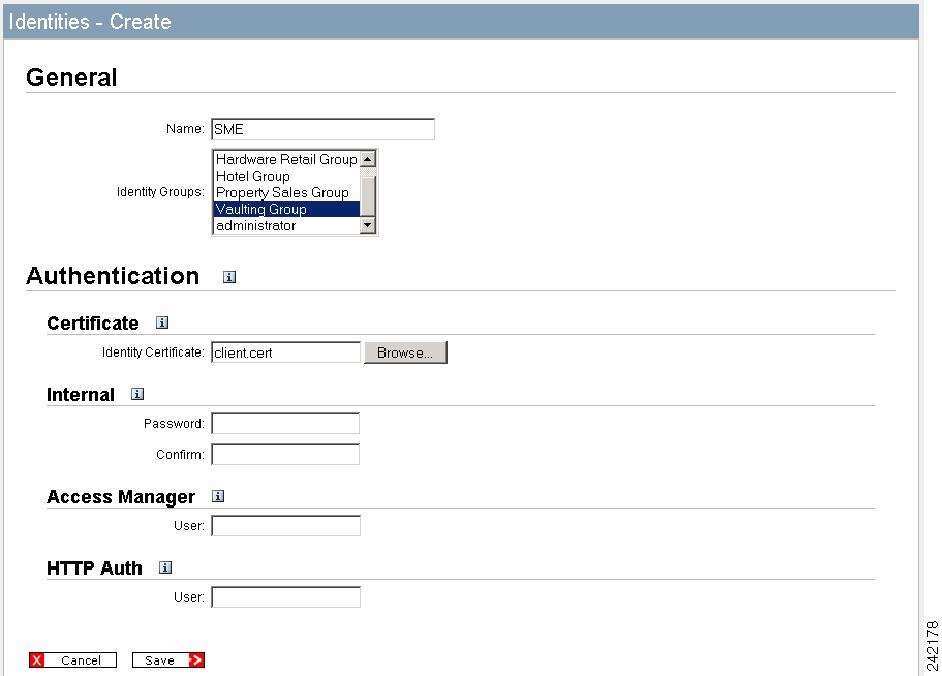
Adding the Cisco SME User to RKM
To add a Cisco SME user to the RKM, do the following:
Step 1
Step 2
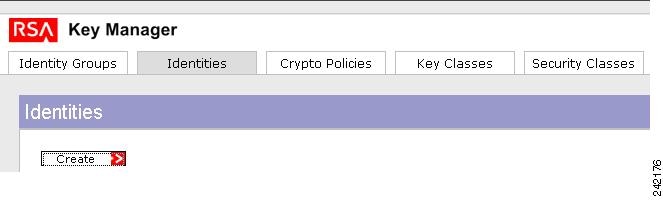
Figure C-4 RKM Main Window
Figure C-5 Identities - Create screen is displayed.
Step 3
Step 4
Step 5
Step 6
Note
Selecting the RSA Key Manager
Selecting the Key Manager can only be done when a Cisco SME cluster is created, and, it cannot be changed unless PostgreSQL is reinstalled. The default is the Cisco Key Manager, so if you wish to change the Key Manager to RSA, you must do so when the cluster is created.
Figure C-6
Key Manager Default Settings
To change the Key Manager setting to RSA, do the following:
Step 1
Figure C-7
Selecting the RSA Key Manager Setting
Step 2
Step 3
Step 4
Step 5
Figure C-8
RSA Key Manager Setting - Warning Message
Figure C-9
RSA Key Manager Settings Confirmation
The confirmation window displays the RSA Key Manager server IP address and the RSA Key Manager port number (38443).