Feedback
Table Of Contents
Using the DMM GUI for Data Migration
Server-Based Data Migration Overview
Storage-Based Data Migration Overview
Guidelines for Using the DMM GUI
Selecting Ports for Server-Based Jobs
Configuring a Server-Based Migration Job
Creating a Server-Based Migration Job
Selecting SSMs for the Migration (Server-Based)
Configuring Migration Sessions
Configuring a Storage-Based Migration Job
Creating a Job and Selecting Storage Enclosures (Storage-Based Migration)
Selecting SSMs for the Migration (Storage-Based Migration)
Configuring the Virtual Initiators in the Storage Arrays (Storage-Based Migration)
Verifying the New Zone (Storage-Based Migration)
Configuring Migration Sessions
Selecting Paths to Existing and New Storage
Correlating LUN Maps (Existing Storage)
Correlating LUN Maps (New Storage)
Displaying the Data Migration Status
Using the Data Migration Status
Job Status Display DMM Commands
Using the DMM GUI for Data Migration
This chapter describes how to use the DMM GUI to configure and monitor data migrations. This chapter includes the following sections:
•
Guidelines for Using the DMM GUI
•
•
•
•
About Cisco MDS DMM
Cisco MDS Data Mobility Manger (DMM) is an intelligent software application for achieving data migrations. DMM runs on the Storage Services Module (SSM) of an MDS switch and operates across the SAN fabric.
Cisco MDS DMM offers capabilities and features that simplify data migration and minimize disruptions and reconfigurations. For example, the SSM can be located anywhere in the fabric. No reconfiguration is required for the server, the existing storage, or the SAN fabric. Cisco MDS DMM uses resources on the SSM card to perform the migration, so it adds no processing overhead on the application servers
Cisco MDS DMM supports online migration, allowing applications to continue to access the existing storage devices. The SSM coordinates all server access to the storage and runs the data migration. However, this activity is transparent to the server, which continues to have full access to the data.
Cisco MDS DMM supports data migration at the server or storage device level of granularity. Server level migration involves migrating the storage data used by the specified server. Storage device level migration involves migrating all storage data from the specified storage device.
About the DMM GUI
The DMM GUI is integrated into the Fabric Manager and provides wizards to configure server-based and storage-based data migrations. The DMM GUI also provides a status window to monitor and control data migration jobs and sessions.
The following sections provide additional information about the DMM GUI:
DMM Data Migration Wizards
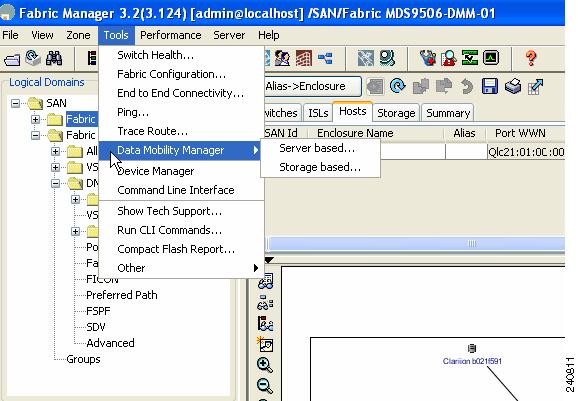
DMM GUI provides wizards to configure and perform data migration jobs. You can launch the DMM wizards from the Fabric Manager, by choosing the Data Mobility Manager option from the Tools menu (see Figure 4-1). There are separate options to launch server-based data migration jobs and storage-based data migration jobs.
You can also launch the DMM wizards from the job status display. On the Data Migration Status toolbar, the Config Server-based Mode tool launches the wizard for a server-based job and the Config Storage-based Mode launches the wizard for a storage-based job (see Figure 4-18).
Figure 4-1 Launching the Wizard
The DMM wizard guides users through the configuration steps. At the end of each step, the wizard communicates with the SSMs as required (to create the job, to obtain configuration information, or to create the sessions).
The DMM GUI uses the configuration information from the SSM to automate parts of the data migration configuration. For example, when you choose a server enclosure, the GUI displays the storage devices (and a list of storage device ports) that are exposed to the server enclosure (based on VSAN and zone information).
The DMM feature performs LUN discovery to select the LUNs available for migration and automates the session creation by matching the LUNs in the existing and new storage. The wizard allows you to adjust the session configuration prior to sending it to the SSM.
Server-Based Data Migration Overview
The major steps in a server-based data migration are as follows:
•
•
•
•
•
•
Storage-Based Data Migration Overview
The major steps in a storage-based data migration are as follows:
•
•
•
•
•
•
•
•
DMM Job Migration Status
In the Fabric Manager window, the Data Migration Status area displays a list of jobs and information about each job. The Data Migration Status area also contains a toolbar of commands that operate on the selected job or jobs. The commands are context sensitive: depending on the status of the selected job or jobs, only certain commands are activated.
The information displayed in the Data Migration Status area is updated periodically, based on polling the SSMs. Set the polling interval using the Poll Interval drop-down list.
You can view the sessions associated with a job by clicking the maximize button (+) next to a job. The display expands to show information about all the sessions associated with the job (see Figure 4-18).
Guidelines for Using the DMM GUI
When using the DMM GUI, note the following guidelines:
•
•
•
For the DMM GUI to operate correctly, fabrics must be opened in Fabric Manager using SNMPv3. SSMs on fabrics opened with SNMPv2 are not available for data migration.
Selecting Ports for Server-Based Jobs
When creating a server-based migration job, you must include all active paths from the host to the LUNs being migrated. This is because all writes to a migrated LUN need to be mirrored or logged until the job is destroyed, so that no data writes are lost.
For additional information about selecting ports for server-based jobs, refer to the "Ports to Include in a Server-Based Job" section on page 6-4.
Configuring a Server-Based Migration Job
The DMM GUI wizard guides users through the steps required for configuring a server-based job. The wizard uses information from the SSM to preconfigure much of the required information.
This section assumes a dual-fabric topology with multipath ports defined in the server and in the storage devices.
The wizard creates and configures the job in three steps, which are described in the following sections:
•
•
•
Creating a Server-Based Migration Job
To create a server-based data migration job, launch Fabric Manager and perform this task:
Step 1
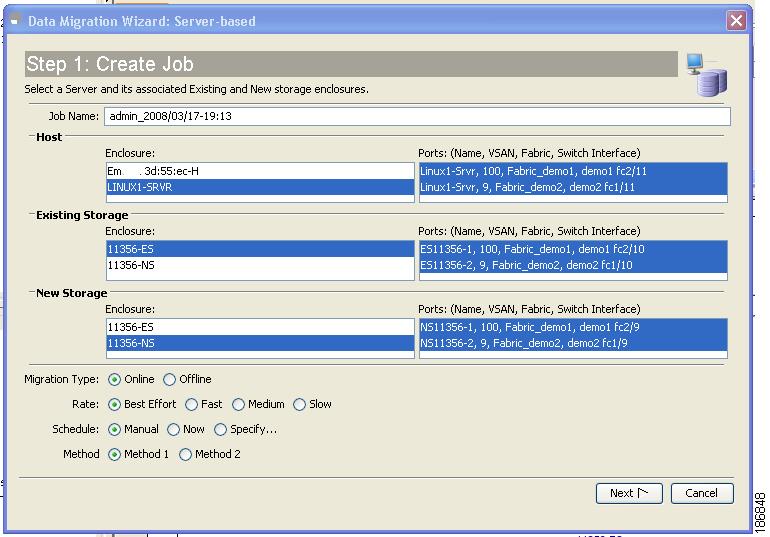
You see the Create Job window, as shown in Figure 4-2.
Figure 4-2 Create Job Window
The Create Job window displays the server and storage enclosures available for data migration.
When you select a host enclosure, the wizard lists all existing storage that the selected host port can access (based on Zone and VSAN information). For the new storage, DMM includes zoned and unzoned devices (because the new device may not be zoned yet).
Step 2
When you select a server enclosure, you see the available ports in the Ports field of the Host pane.
Step 3
Step 4
When you select an existing storage enclosure, you see the available ports in the Ports field.
Step 5
Step 6
When you choose a new storage enclosure, you see the available ports in the Ports field.
Step 7
Step 8
Step 9
Step 10
Step 11
•
•
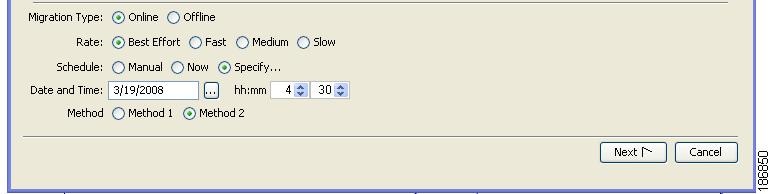
Figure 4-3 Scheduling the Job
Note
Step 12
Method 1
For the section of existing storage LUN whose data is already migrated to new storage LUN, any new SCSI Write I/Os from the server is written to both the existing and new storage LUN before sending a response back to the server. Method 1 is typically used in local data migration.
Method 2
SCSI Write I/Os from the server to any section of existing storage LUN are written only to the existing storage LUN. The Write I/O changes to the existing storage LUN are marked in the Modified Region Log [MRL] before sending a response back to the server. These changes are then migrated to the new storage LUN on subsequent iterations. Method 2 is used in remote data centre migration.
Step 13
If the job configuration is OK, you see the Select SSM window. See Figure 4-4 for more details.
If the job configuration contains errors, you see a pop-up window with one of the following error messages:
•
•
•
•
•
•
•
Selecting SSMs for the Migration (Server-Based)
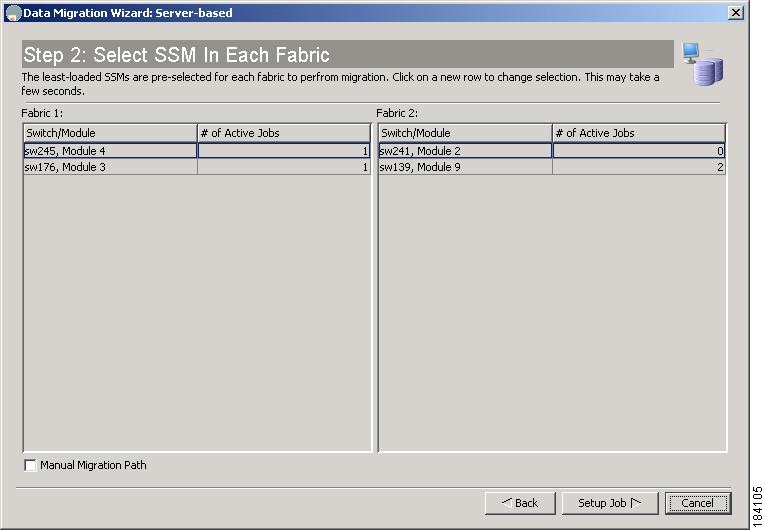
Figure 4-4 shows the Select SSM window, which displays the DMM-enabled SSMs available to run the migration job.
Figure 4-4 Select SSM Window
The wizard preselects the least-loaded SSM in each fabric and automatically selects the path for each source/destination port pair.
If the selections are acceptable, you can click Setup Job to proceed to the next configuration task. The wizard sends the job configuration information to both SSMs and the SSMs create the data migration job. The SSMs return information (such as LUN maps) that is required to configure sessions. You see the Create Session window. See Figure 4-6.
To manually select SSMs or migration paths for the data migration, perform this task:
Step 1
Step 2
Step 3
If you had checked the Manual Migration Path check box, you see the Choose Existing and New Path window, as shown in Figure 4-5.
Figure 4-5 Choose Migration Path
Step 4
Step 5
The wizard sends the job configuration information to both SSMs and the SSMs create the data migration job. The SSMs return information (such as LUN maps) that is required to configure sessions.
If the job configuration is OK, you see the Create Session window. See Figure 4-6.
If the job configuration contains errors, you see a pop-up window with the following error message:
•
If the number of LUNs on the existing and new storage does not match, the wizard generates an error message and stops. You need to correct the LUN configurations on the storage devices.
Configuring Migration Sessions
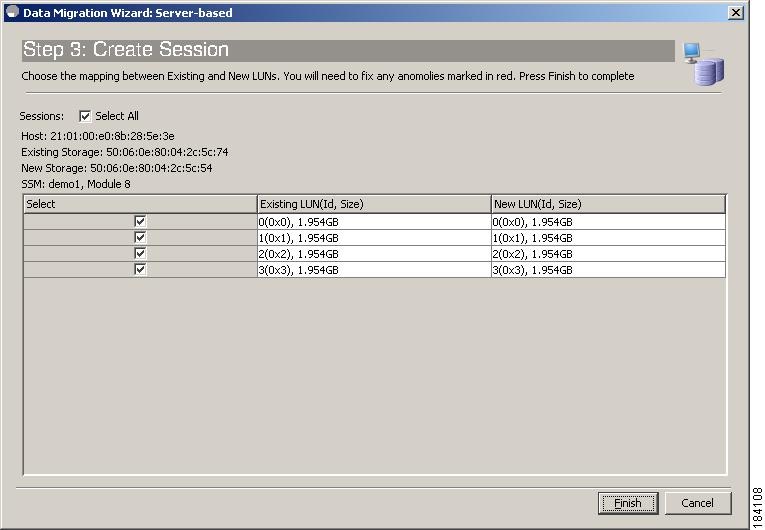
Figure 4-6 shows theThe Create Session window, which displays the sessions available for migration.
Figure 4-6 Create Session Window
The wizard preconfigures the sessions by matching existing and new LUN pairs, based on information provided by the SSM. Click Finish to accept the sessions as configured.
To manually configure sessions for the data migration, perform this task:
Step 1
Step 2
Step 3
The session configuration is sent to the SSMs.
DMM refreshes the Data Migration Status area to display the new data migration job.
Note
Correcting Session Anomalies
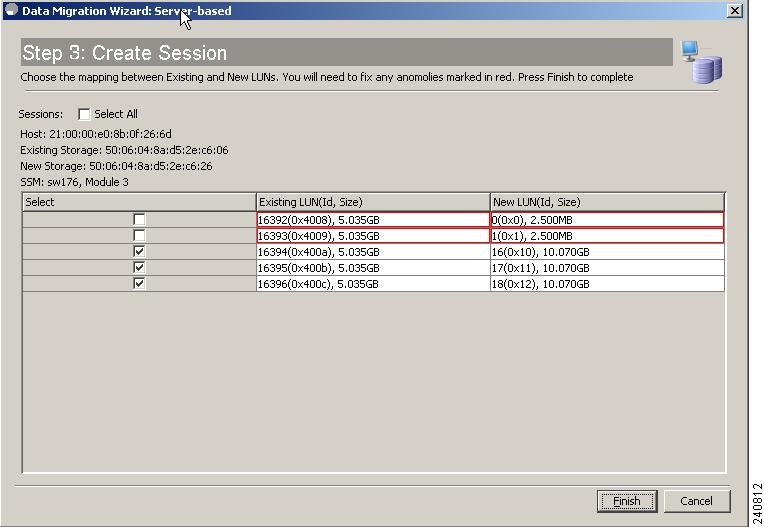
If the GUI detects a problem with a session, the GUI highlights the LUN fields in red. Figure 4-7 shows an example in which LUN 0 in the new storage is smaller than the matching LUN in the existing storage.
Figure 4-7 LUN Size Mismatch
To manually override the preselected LUN match, click the Existing LUN/Size or New LUN/Size field. The field expands to show the available LUN choices (see Figure 4-8). Select the existing and new LUNs that you want to match up.
Figure 4-8 Selecting a LUN
Note
Configuring a Storage-Based Migration Job
The DMM GUI wizard guides the user through the steps required to configure a storage-based job. The topology for this example is dual-fabric with multipath ports defined in the server and in the storage devices.
The wizard creates and configures the job in five steps, which are described in the following sections:
•
•
•
•
•
Creating a Job and Selecting Storage Enclosures (Storage-Based Migration)
To create a storage-based data migration job, launch Fabric Manager and perform this task:
Step 1
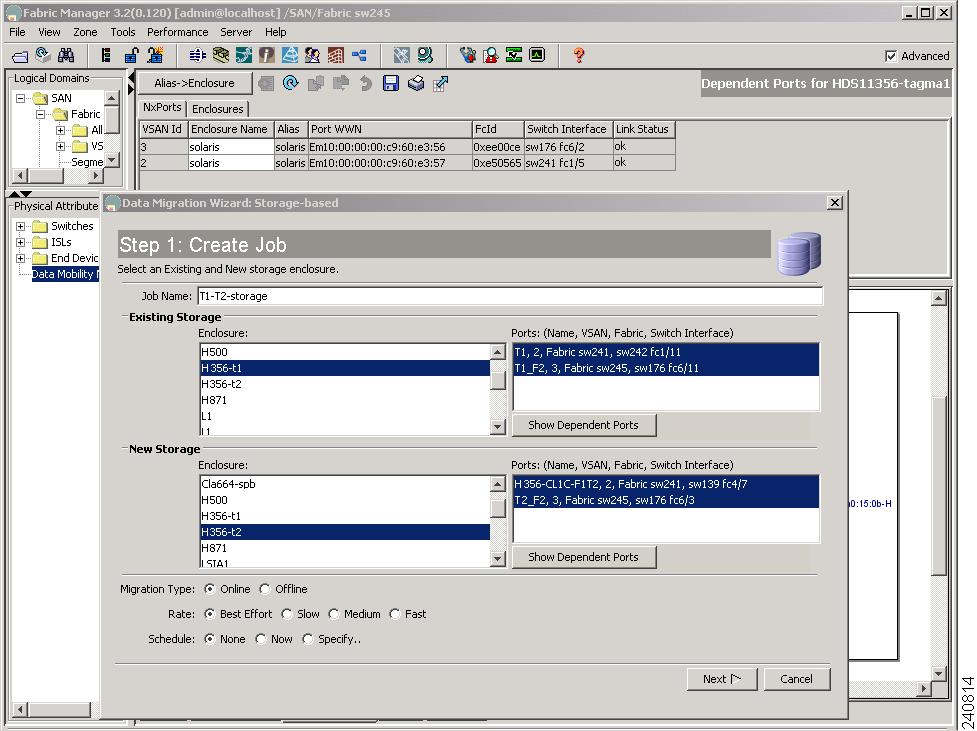
You see the Create Job window, as shown in Figure 4-9.
Figure 4-9 Create Job Window (Storage-Based)
Step 2
Step 3
Step 4
Step 5
Step 6
Figure 4-10 Dependent Ports for a Storage-Based Migration
Step 7
You see the Select SSM window. See Figure 4-11.
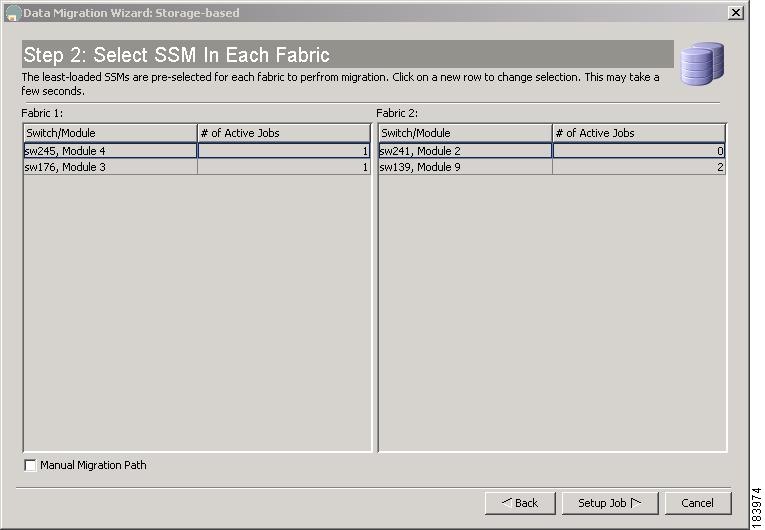
Selecting SSMs for the Migration (Storage-Based Migration)
Figure 4-11 shows the Select SSM window, which displays the available SSMs to run the migration job.
Figure 4-11 Select SSMs for Storage-Based Job
The wizard preselects the least-loaded SSM in each fabric and automatically selects the path for each source/destination port pair.
If the selections are acceptable, you can click Setup Job to proceed to the next configuration task. The wizard sends the job configuration information to both SSMs and the SSMs create the data migration job. The SSMs return information (such as LUN maps) that is required to configure sessions. You see the DPP VI Selection window. See Figure 4-12.
To manually select SSMs or migration paths for the data migration, perform this task:
Step 1
Step 2
Step 3
If you had checked the Manual Migration Path check box, you see Choose Existing and New Path window. See Figure 4-5.
Step 4
Step 5
The wizard sends the job configuration information to both SSMs and the SSMs create the data migration job. The SSMs return information (such as LUN maps) that is required to configure sessions.
If the job configuration is OK, you see the DPP VI Selection window, as shown in Figure 4-12.
If the job configuration contains errors, you see a pop-up window with the following error message:
•
If the number of LUNs on the existing and new storage do not match, the wizard generates an error message and stops. You need to correct the LUN configurations on the storage devices.
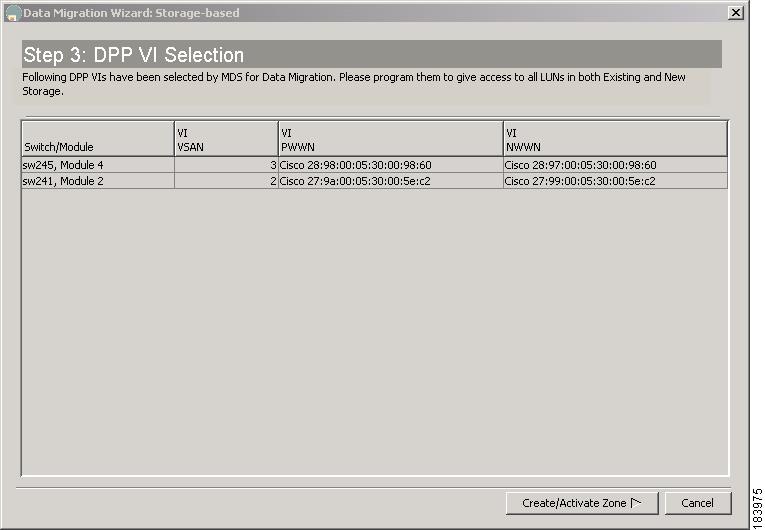
Configuring the Virtual Initiators in the Storage Arrays (Storage-Based Migration)
In a storage-based job, the DMM feature creates a virtual initiator (VI) for each SSM that was selected for the current job. The VI is created in the same VSAN as the storage ports (existing and new). If the job contains multiple storage ports, DMM creates the VI in one of the VSANs.
For the data migration to work correctly, you must configure the storage arrays (existing and new) to allow the VIs access to all LUNs that are being migrated. The VI information is displayed in the DPP VI Selection window, as shown in Figure 4-12.
Figure 4-12 DPP VI Selection
To configure the VIs, perform this task:
Step 1
Step 2
Step 3
Note
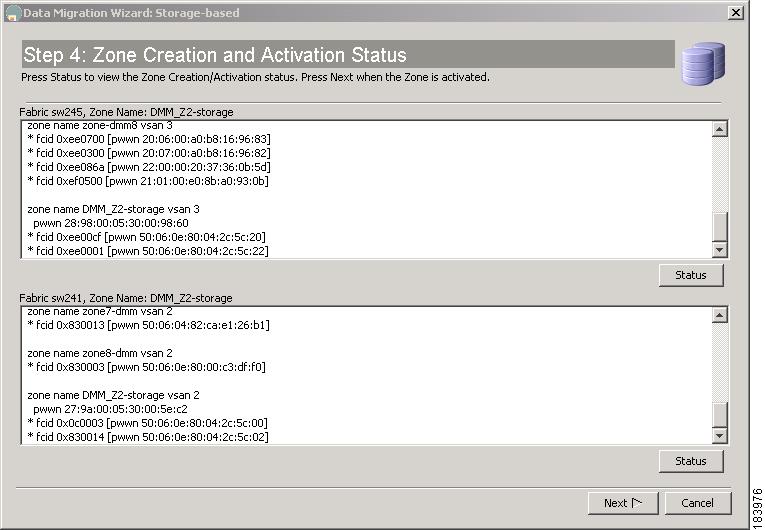
Verifying the New Zone (Storage-Based Migration)
In a storage-based job, the DMM feature creates a new zone using the job name as the zone name. As shown in Figure 4-13, the Zone Creation and Activation Status window displays information about all zones in each of the two fabrics.
Figure 4-13 Zone Creation Window
To verify the new zones, perform this task:
Step 1
Step 2
You see the Create Session window, as shown in Figure 4-14.
Note
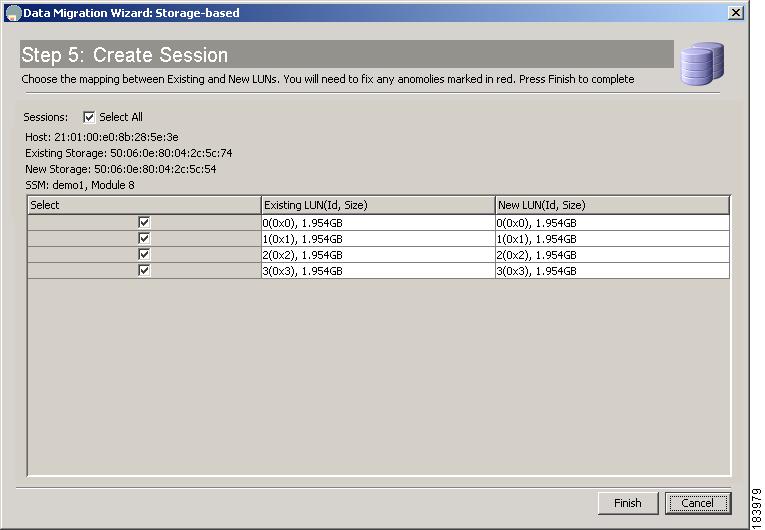
Configuring Migration Sessions
The Create Session window displays the LUNs available for migration, as shown in Figure 4-14.
Figure 4-14 Create Sessions Window
To create sessions for the data migration job, perform this task:
Step 1
Step 2
Step 3
Step 4
Step 5
This sends the data migration session configurations to the SSMs. DMM updates the Data Migration Status area in the Fabric Manager window to display the new data migration job.
Note
Optional Configuration Steps
The DMM GUI wizard provides two optional configuration steps that apply to both types of data migration jobs (server-based and storage-based).
If the DMM feature cannot automatically correlate the LUN maps across multiple paths for the existing storage or the new storage, the wizard displays the configuration steps to manually correlate the LUNs.
The following sections provide a description of the additional configuration steps:
•
•
•
Selecting Paths to Existing and New Storage
The data migration wizard automatically selects a path through the SAN for each source/destination port pair. To manually select the source/destination path,
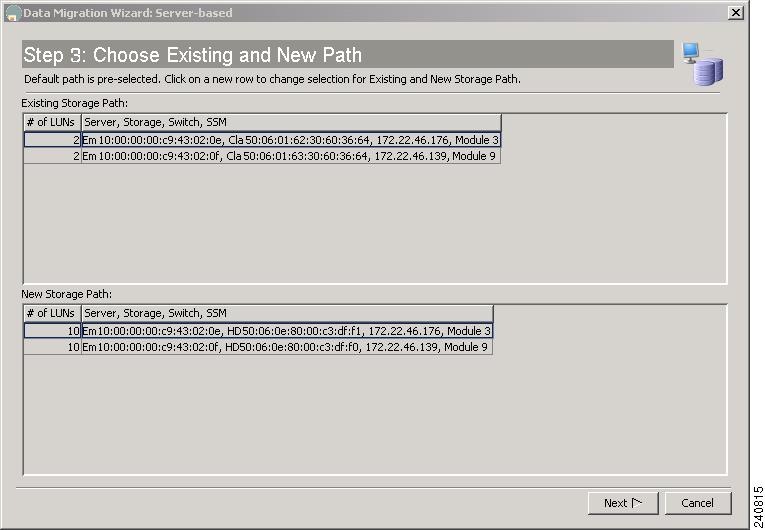
If you checked the Manual Migration Path check box in the Select SSM window, you see the Choose Existing and New Path window, as shown in Figure 4-15. This window shows all the available paths, with the selected paths highlighted.
Figure 4-15 Select Paths
To select a migration path, perform this task:
Step 1
Step 2
Note
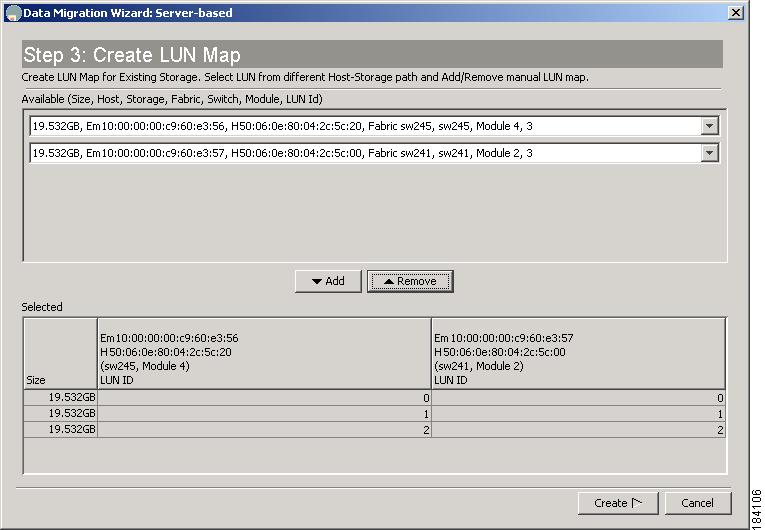
Correlating LUN Maps (Existing Storage)
After you click Setup Job in the Select SSM window, DMM automatically correlates the LUN maps. If DMM is unable to correlate the LUN maps for paths to the existing storage, you see the Create LUN Map window, as shown in Figure 4-16.
Figure 4-16 Correlate LUN Map (Existing Storage)
To correlate the LUN maps for the existing storage, perform this task:
Step 1
Step 2
Step 3
Step 4
This opens the Create LUN Map window (for the new storage).
Note
Note
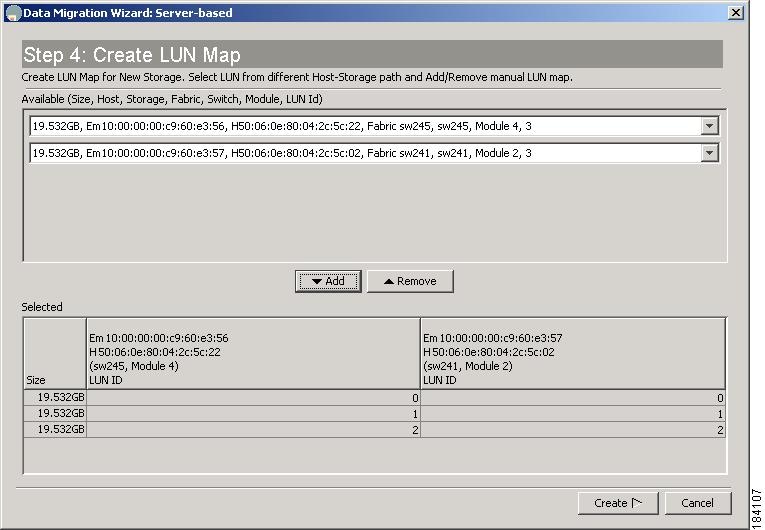
Correlating LUN Maps (New Storage)
After you click Setup Job in the Select SSM window, DMM automatically correlates the LUN maps. If DMM is unable to correlate the LUN maps for paths to the new storage, you see the Create LUN Map window, as shown in Figure 4-17.
Figure 4-17 Correlate LUN Map (New Storage)
To manually correlate the LUNs for the new storage, perform this task:
Step 1
Step 2
Step 3
Step 4
This opens the Configure Session window, which displays the available migration sessions.
Note
Displaying the Data Migration Status
To display the Data Migration Status, perform this task:
Step 1
The Job Status area appears in the upper right quarter of the display. The area is labeled "Data Migration Status".
Using the Data Migration Status
To display Data Migration Status in the Information pane, expand End Devices and then select Data Mobility Manager in Physical Attributes.
The Data Migration Status displays the status of data migration jobs and their sessions (see Figure 4-18). The Data Migration Status also provides a toolbar containing tools to create new jobs and perform operations on existing jobs.
Figure 4-18 Data Migration Status
Note
Job Status Display Fields
The job status display is arranged as a table. Each row of the table displays information about one job. You can expand the job to display a table row for each session in the job. If the DMM job consists of more than 10 sessions at any given instance, a maximum of 10 sessions are executed simulataneously. Table 4-1 describes the information that is displayed in the fields for jobs and sessions.
Table 4-1 Field Definitions in the Job Status Display
Name
The name of the job.
This field is blank.
Id
System-assigned unique identifier for the job.
The session number within the job.
Mode
Server mode or storage mode.
This field is blank.
Existing Storage
Alias name of the port on the existing storage.
LUN number on the existing storage.
New Storage
Alias name of the port on the new storage.
LUN number on the new storage.
Status
Status of the job: a created or scheduled job has not yet started. An in-progress job is currently performing the migration. A completed or verified job has finished successfully. A stopped, failed or reset job has finished unsuccessfully.
Status of the session.
Est.TOC
An estimation of time to complete the migration for the entire job.
An estimation of time to complete the migration for the given session of a job.
SSM1
Switch number and slot of the SSM executing the migration job.
Displays On SSM 1 if the session is executing on SSM 1.
SSM2
Switch number and slot of the SSM executing the migration job.
Displays On SSM 2 if the session is executing on SSM 2.
Type
Online or offline migration.
This field is blank.
Rate
Best effort, slow, medium, or fast. You set the rate when you configure the migration job. See the "Creating a Server-Based Migration Job" section.
This field is blank.
Method
The method chosen for the Data Migration Job.
The method chosen for the Data Migration Job.
Table 4-2 shows the job status values and provides their descriptions.
Table 4-3 shows the session status values and provides their descriptions.
Table 4-3 Session Status Values
Created
The session has been created, but the data migration has not started running.
InProgress 1
The data migration for this session is in progress.
VerifyInProgress
The verification of the session is in progress.
VerifyComplete
The verification of the session is complete.
Complete
The session has completed successfully.
Failed
The session has failed because of an internal problem.
Suspended
The user has suspended execution of the session.
I/O Failure
The session has failed because of an I/O problem.
Internal Failure
The session has failed because of internal processing errors.
1 1-%Synched specifies the percentage migrated.
Job Status Display DMM Commands
You can invoke commands on DMM jobs by clicking on the command buttons displayed above the list of jobs. The command buttons are context sensitive. Commands are valid or not valid depending on the job status of the selected job or jobs. Command buttons are grayed out for commands that are not valid for any of the selected jobs. For example, the Stop button is available only when one or more data migration session is in progress.
Table 4-4 shows the data migration commands and provides their descriptions.
The following sections contain additional information about the commands:
Verifying Jobs
When a job is in completed state, the Verify button is activated in the DMM session status display.
Note
The SSM reads each migration region from the existing and new storage, and then performs a comparison of the data.
You can verify multiple jobs simultaneously. However, the verification uses shared hardware resources in the SSM. If you try to verify a job for which the resource is already in use (verifying another job), the command fails.
To verify a job, perform this task:
Step 1
Step 2
You see a confirmation pop-up window.
Step 3
Deleting Jobs
Click the Delete button to permanently delete the selected job (or jobs). You are prompted to confirm the delete operation.
When you delete a job, DMM retrieves the job execution log from the SSM to a location on the FM server. You can find the job activity log in the following directory: C:\Documents and Settings\<user>\.cisco_mds9000\tftp\dmm for more details.
You can select multiple jobs for deletion at the same time. This capability is useful when migrating active-passive arrays, which require at least two simultaneous jobs to perform the migration.
Starting and Stopping Jobs
Click the Stop button to stop a job that is in progress. Restart the job by clicking the Start button.
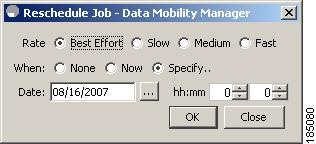
Modifying Jobs
You can change the schedule by performing the following task;
Step 1
Step 2
You see the Reschedule Job pop-up window, as shown in Figure 4-19.
Figure 4-19 Modify Schedule
Step 3
Step 4
Finishing Jobs
For a Method 2 Data Migration Job, the finish operation needs to be performed. Until the finish operation is performed, the job continues to remain in the InProgress state. On clicking finish, server access to the existing storage LUNs are blocked. Cisco MDS DMM then performs the process of migrating the final list of changed blocks from the existing storage LUNs to new storage LUNs for the last time. A Method 2 DMM job can be deleted only in the completed state.
Displaying Job Logs
Click the Log button to display the Job Log for the selected job.
The job log from both SSMs for dual fabric job includes the following information:
•
•
•
•
•
•
•
•
•
•
Post-Migration Activities
After the data migration job has completed successfully, you need to reconfigure the server to use the new storage. The exact post-migration configuration steps vary depending on the operating system of the server.
Reconfiguration may include the following steps:
•
•
•
•
For Method 2- Use the DMM GUI to finish the data migration job. When the job moves to Completed state, delete the data migration job. See Finishing Jobs for more details.
•
•
•
•
•
–
–